
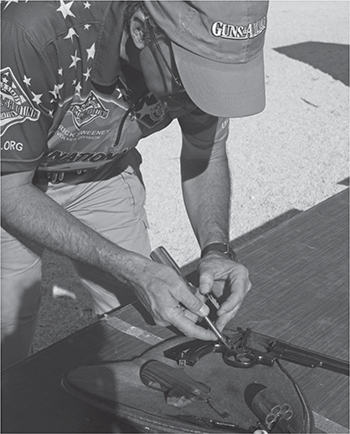
Don’t let anyone tell you revolvers never malfunction. Here I am, at the World Shoot in Greece, trying to find out why my revolver won’t work.
In the early days of practical competition shooting, the jockeying between pistol and revolver shooters was interesting. The big advantage revolvers supposedly had over pistols was reliability. And for the most part, in those days, it was not just a theoretical advantage. As long as the revolver shooter stayed with factory ammo, he could count on reliable function. Though the reliability of pistols has increased exponentially, wheelguns are still a lot of fun and in the hands of a good shooter, competitive at many clubs.
Don’t let anyone tell you revolvers never malfunction. Here I am, at the World Shoot in Greece, trying to find out why my revolver won’t work.
What is a malfunction? Defined broadly, a malfunction is what happens when you were expecting something else instead. You could call a miss a malfunction, though it’s more a malfunction of your personal mechanism than of the revolver. And calling your miss “a malfunction of the optical/mechanical sighting system” will not help your standing at the gun club or down that deer bounding away.
Most mechanical malfunctions are caused by lack of maintenance. If you keep your revolver clean, you won’t have many problems. When you have a problem, though, you will be in one of two situations. The first is the calm, collected and unstressed atmosphere of the shooting range or gun club. There is no need to hurry. Your target won’t escape, or worse yet, turn and attack you. At the range, you have plenty of time to figure out exactly what went wrong, and how, and what corrective measures to take.
The second situation is a highly stressed one. You may be in the middle of a bigger-than-local match, with time ticking away and have to figure out how to correct the problem. Or, you are deer hunting and all of a sudden the handgun just doesn’t want to work. You may not get another chance this season. In the worst situation, you have attempted to use your handgun in defense of yourself or another, and it won’t work. In all of these instances, you have nearly no time to take corrective measures.
The second situation is actually the simpler, but under stress even the simple becomes difficult. Open the revolver, dump out the rounds that won’t work, load fresh ones as quickly as possible, and continue. If new ammunition doesn’t solve the problem, drop the revolver and draw your backup.
No backup? Now, you are in trouble. You will need to ferret out the exact cause of the problem, and may not have enough time.
In the first situation, you can take all the time you need to diagnose the problem.
When your car fails to start and you call your mechanic, the first thing he’ll do is ask you a barrage of questions: When you turn the key, what noises does it make? Clicking? Whirring? Cranking but not catching? The answers give him clues to likely solutions. The simple statement “the car won’t start” provides only the roughest idea of what may be wrong. With your revolver, you are the mechanic. You ask yourself the questions and supply the answers.
When a round fails to chamber, it does not seat completely. Ask yourself why a round would fail to chamber.
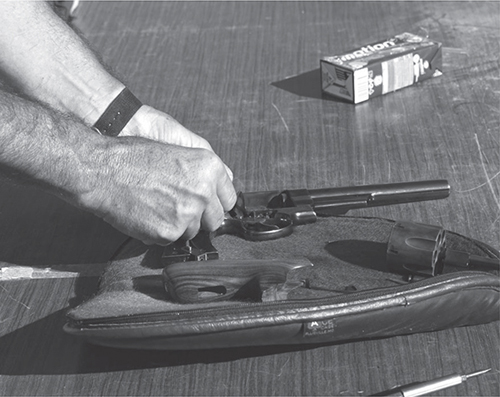
With a parts kit, tools, and time, I figure, no problem, I’ll do a little range-surgery.
First, did you load the correct ammunition? At first glance, the rounds may be so similar that you mistakenly picked up the wrong one. A single .357 Magnum in a box of loose .38 Specials will go unnoticed until you try to chamber it. Then it will stop, sticking .10 inches out of the cylinder. Likewise with .44 Magnum ammunition and a .44 Special revolver.
Wait a minute, what’s this?
Second, are you using reloads? If so, were they correctly re-sized? The sizing ring of a re-sizing die cannot reach all the way down to the rim of the cartridge, so if you use stray brass picked up at the range you may run into a chambering problem. The previous owner of the brass could have had a larger chamber or a larger sizing die. He might have fired much hotter loads than the brass could stand, bulging the bottom of the case where your sizing die can’t reach. The result will be an incompletely chambered round. The long-term solution to this problem is to use the Case-Pro 100 to iron the case down to size all the way down to the rim. For now, you will have to set the round aside. It cannot be used. Competition shooters chamber-check every round before a match to prevent this problem.

Game’s up, it is catastrophically broken, short of going back to the factory, and I need to borrow a gun to finish the match. Lucky me, my teammates have spares.
Third, is the chamber clean? Dirt in the chamber will keep the rounds from going all the way home. If you haven’t cleaned your revolver lately, or have fired many rounds since the last cleaning, the chamber may be so gunked up with powder residue that the rounds can’t drop in. A temporary fix is to push the stuck round in place with your thumb, but the real solution is more frequent cleaning.

Here is what S&W had to do to fix it; they replaced the hammer stud, and since I’d knarfed the frame, too (when it broke, not me directly) they had to drill through.
If you have put fewer than 100 rounds through your revolver since the last cleaning and it already has trouble chambering, you may have undersized chambers. An undersized chamber is already a tight fit; with just a little powder residue you can have a problem. To correct it, you need purchase a chambering reamer, open the chambers up to the average range for your caliber, and polish the chambers again. Between doing the job yourself and having a gunsmith do it is a toss-up. The cost of the reamer will probably be close to, maybe a little more than, the labor of having a professional do it. And unless you expect to run into this same problem again, in the very same caliber, you’ll never need the reamer again.
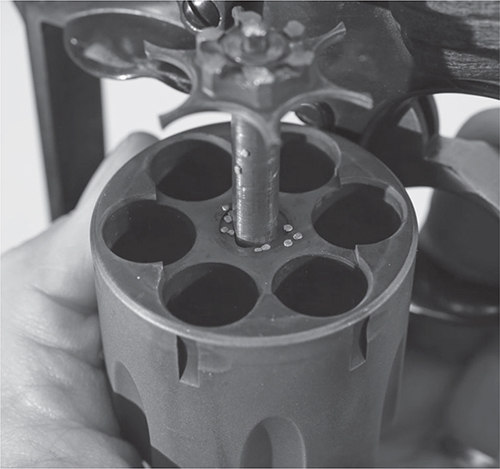
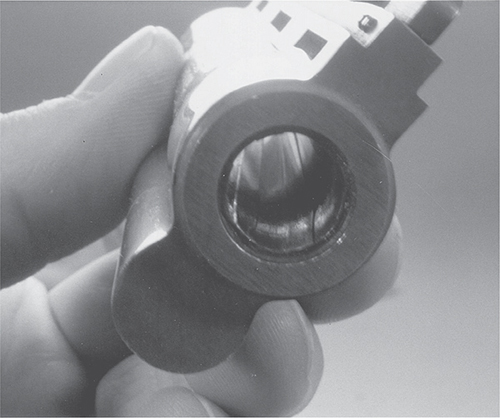
The big problem with revolvers is often the ammo, and this is what happens when you get unburnt powder under the extractor star. The cylinder won’t close, and you need a brush to clean it.
Fourth, are there any nicks or burrs on the edge of the chambers? Nicks and burrs, more common on used revolvers, can bind a cartridge and prevent it from fully sliding into the chamber. Burrs and nicks should be stoned out with an extra fine synthetic round stone.

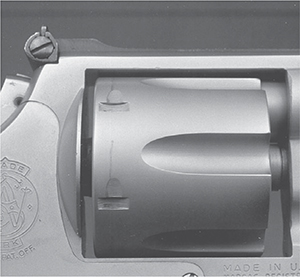
The bottom chamber is bulged, right at the notch for the locking bolt. A hot load that was over pressure has just cost this shooter a new cylinder.
If the cartridges appear to have seated fully, check to see if the cylinder is closing. Don’t bang on the cylinder, or force it closed.
The drag line of the locking bolt against the cylinder shows that this revolver is working properly. Revolvers will get this ring around them, there is no way to prevent it except by not turning the cylinder. Where’s the fun in that?
If the cylinder fails to lock into place, start with a check for dirt. First look under the extractor star. Revolvers commonly end up with flakes of unburned powder and powder residue here. This gunk pushes the extractor star out from its seat by a few thousandths of an inch and makes the cylinder assembly too long to fit into the frame. If this is your problem, remove the rounds, push the ejector rod to lift the extractor star, and brush the back of the extractor star and the cylinder clean of gunk and unburnt powder flakes.
You may wonder how those flakes got there. Occasionally, when an empty case is being extracted, powder residue and powder flakes will drop out. If the flakes fall at just the right moment, they can land between the extractor and the cylinder. Ironically, you can also cause this condition when cleaning the cylinder. If your chamber brush fits so tightly that when you pull it out it lifts the extractor star, the gunk the brush is removing from the chamber will end up between the extractor and the cylinder. Don’t stop cleaning your revolver! Instead, when you finish brushing out the chambers, hold the extractor open and brush behind it, too.
If the extractor star is not the problem check the front of the frame where the crane fits when closed. A buildup of powder here can also keep the cylinder from closing. Scrub it out. Check the back of the barrel. If you have allowed powder residue to build up on the back of the barrel, it can bind on the cylinder face. The powder residue on both the back of the barrel and the front of the cylinder will be crusty and burnished from the action of the cylinder. Scrub both clean.

Abused or damaged cases can be rolled to the proper dimension with the Case-Pro from Image Industries. (photo courtesy Image Industries)
If residues and buildups are not your problem, the next likely cause is reloaded ammunition. Check your cases. Look for one with a very minor bulge — not enough to keep from chambering, just enough to keep the cylinder from closing. A nicked rim will also keep the cartridge from fully seating. If your top round is the nicked one, you won’t be able to close the cylinder. Similarly, a high primer will prevent the cylinder from closing. You’ll have to be more critical in your reloading, and use the Case-Pro to iron your cases and their rims smooth and even.
You’ve checked for residue, and you’re shooting factory ammunition or perfect reloads. What next? Try closing the cylinder without any ammunition in it. If the cylinder closes but won’t latch, press the cylinder with one or both thumbs. If it latches with a click, your crane is out of alignment.
To align the crane, you’ll need a plastic wedge, a plastic-faced mallet, and a crane alignment gauge. Look ahead to Chapter 15, where crane realignment is covered in detail.
Did you just detail strip and clean your revolver? Perhaps you replaced the side plate screws in the wrong holes. On earlier S&W revolvers the front screw is precisely fitted to hold the crane in the frame but let it swing freely. The other two screws are longer and will bind the crane if you mix up the three (or four) screws. To check, back that front screw out half a turn. If the crane now moves freely, you need to switch the screws around until you find the short one. The next time you take the revolver apart, be sure to keep the side plate screws in order, so you don’t have to do this again.
Look at the ejector rod. A bent one will bind against the barrel and prevent closing. To check yours for straightness, open the cylinder and remove the ammunition. Hold the revolver in your right hand, braced against a padded vise. Give the cylinder a spin with your left hand. If you see the tip of the ejector rod spinning in a little circle, your rod is bent. The fix is easy only if you have the right tools. With the fixture, straightening the rod is a ten minute operation (see Chapter 15). Without a Powers centerpin/ejector rod alignment fixture, you are likely to make the problem worse.
Failure to rotate follows two paths. In the first, the cylinder binds and won’t rotate. In the second, although the cylinder seems to turn freely, it does not advance when you pull the trigger or cock the hammer.
A revolver that binds and won’t rotate is useful only as a paperweight. To return the handgun to its intended function, check the same things that can keep it from closing. Examine the extractor star for powder residue. Look for a buildup of powder in the crane cutout and on the back of the barrel and the front of the cylinder. Also inspect the rounds to see if any have high primers. A high primer will stop a cylinder cold.

A bulged barrel may not be apparent on the outside. When you look down the barrel you may see a dark ring.
Look under the cylinder, and see if the cylinder stop (or locking bolt) is disengaging properly. If the cylinder doesn’t unlock, it can’t turn. An incorrect trigger job can prevent the stop from unlocking. If the trigger or cylinder stop has been altered, you may have to buy new parts to get the revolver running again.
A bent crane binds the cylinder unevenly. The cylinder may move at first, stopping only when it rotates against the bent section of the crane.
Open the cylinder. Look at the tip of the centerpin that sticks out of the extractor star. Is it centered? Push it into the extractor with a drift punch. Does it bind? Now release it. Does it return from the extractor sluggishly? The same wrist-closing and opening that can bend the crane can bend or put a kink in the centerpin. If yours is bent, you must replace it. A new one is inexpensive and easily fitted.
While you have the cylinder open examine the back of the frame opening. The firing pin passes through a hole in the frame and the recoil shield. The edge of this firing pin hole can become burred from dry firing. If it has, the rims of the cartridges may catch on this burr, slowing or stopping rotation. Stoning the burr down will solve the problem, and it’ll be another 10,000 hammer falls before the problem crops up again.
If the cylinder rotates freely except for one chamber, remove the ammo. Recheck rotation. If removing the ammunition does not correct the problem inspect the cylinder from front to back, checking for each mechanical problem listed above. If all other causes come up negative, the extractor star ratchet may be damaged. Dropping a cylinder on the ratchet can burr or peen one of its studs. You will have to re-time that stud, a simple, but fussy job requiring a modified file.
This ring is right near the muzzle, and the barrel might be salvaged if it is shortened.
In the second type of rotation failure, the hammer and trigger may seem to be working, but although the cylinder does not seem to bind, it simply will not turn. Or, it turns but not far enough to lock up. The hand may not be doing its job. To check a Smith & Wesson, point the empty revolver straight down. Try again. If the cylinder now rotates, strip the revolver and make sure you have the hand spring, found in the trigger, properly hooked over the pivot pin of the hand. Without the spring, the hand flops around in its slot and will not push the cylinder. Gravity holds it in place when you point down, but pulls it away when you point up. If the spring is broken, a replacement will solve the problem.
Check the side plate to see that it is tight. Especially on the Colt DA revolvers, the side plate holds the hand in place. If the side plate is loose, the hand can drift away from the cylinder, and not fully rotate it.
On a used revolver, check the hand. A previous owner may have shortened it during a badly done trigger job. With the side plate off, watch the action as you cock the hammer and see if the hand stops short. Fitting a new hand will take an evening’s work. If the cylinder only fails to rotate and lockup on one chamber, you’re in luck. You can peen the ratchet stud on which the hand fails to carry up, and get the cylinder to lock up.
If the cylinder fails to carry up on several chambers, you will have to fit an over-sized hand. See Chapter 20.
One particularly disturbing reason for failure to rotate is a bullet stuck across the cylinder/barrel gap. A poorly reloaded round, usually one with no powder in its case, will still have enough power to launch the bullet from the case and into the forcing cone. If the revolver is clean, the primer can push the bullet an inch or two into the barrel, allowing the cylinder to rotate with the round stuck in the bore. Fire another behind it and, at the very least, you’ll bulge the barrel. In that event, a close inspection will reveal the bulge.
Hold the so-treated revolver up with the barrel pointing towards the light, and look at the shadows running down the barrel. If your barrel looks like a snake after a big snack, it’s got a bulge. Or look down the bore. A bulge will look like a dark ring. A bulged barrel rarely stays as accurate as it was before. A large bulge can be dangerous, bursting at some future, unknown moment when fired.
Another cause of bullet jump (besides insufficient neck tension) is an ultra-light revolver. If you have one of the Smith & Wesson Scandium revolvers, the weight (or rather, lack of weight of the revolver) is great for carry. You probably found out right away in your first practice session the recoil can be sharp. The recoil can be so snappy the inertia of the bullet is enough to cause bullet pull even in ammunition that would be fine in a regular-weight revolver. The only cure is proper ammo, factory or reloaded.
To remove the bullet (or bullets) stuck in the bore, use your range rod to find the location of the bullet’s nose. Exercise some caution here, as there may still be loaded rounds in the other chambers. If the measuring shows you that there is only one bullet, you can heave a sigh of relief. Use the range rod and a hammer to pound the bullet back into the cylinder. Open the cylinder and remove the cartridges. Complain vociferously to your reloader.
If there is more than a single bullet in your barrel, you will probably have to replace the barrel. Try pounding the bullets back with the range rod, until you come to the joint of the nose of one bullet and the base of another. See if you can open the cylinder. If you cannot, you must cut through the bullet at the cylinder gap. Removing the barrel to open the cylinder will not work well. Frame wrenches for unscrewing barrels are used on a revolver that already has the cylinder removed. You can’t remove it until you can open it.
Resign yourself to cutting through the bullet. Take a spare blade for an X-ACTO knife, and with a carbide cutter in your hand-held grinder, serrate the blade. With the now serrated blade, you can now saw through a lead bullet. While it is tedious, you will eventually open the cylinder, and the blade will not damage the cylinder as a hacksaw blade would. Once open, scrub the bore and inspect it closely. If the extra bullets did not bulge the barrel, consider yourself lucky. If they did, you’d need a new barrel and a new source of ammunition in the future.
A cocked hammer should stay cocked. If it doesn’t, you may have a serious problem.
First check the hammer spur and the grips. A dropped revolver will sometimes fall on the hammer, bending the spur. A bent spur can bind against the frame or grips. Exercise care when straightening a bent spur. Since hammers are usually very hard, if you try to bend the spur back cold it can easily crack and break off. Don’t take this risk. Instead, use heat. Clamp the hammer in an unpadded vise, with only the spur sticking out. Use the mass of the vise as a heat sink, to protect the hardness of the rest of the hammer. Heat the spur to cherry red, and with a pair of pliers bend back to shape. Let it cool, and reassemble. Yes, it will be ugly and heat-scorched. Such is life. Use it as a learning lesson, and don’t drop your handgun again. Oversized grips can interfere with the path of the hammer spur. While rare, it can happen. If that is your problem, dress back the grips to clear the hammer spur.
Some shooters cut the spur off. If you are carrying your revolver for defense, you may want to consider this as a way to prevent the hammer spur from catching on clothing when you draw.
If your problem is not in the hammer spur or grips, you’ll have to look inside for its source. Strip the revolver and examine the hammer notch. The surface of the hammer notch should be square, even and unaltered. If it isn’t, you could have a big problem. Some previous owner may have tried to lighten the trigger pull by stoning the hammer notch. A hammer notch that’s been stoned must have the hammer replaced. The hammer is surface-hardened, and stoning generally removes the hard layer of steel. If the first stoning hasn’t, your corrective stoning certainly will. It should be obvious from this description that you never stone a hammer. If you need a lighter, single-action trigger pull (highly unlikely) the place to work is the trigger nose or single-action sear (see Chapter 20)
If the revolver was dropped when it was cocked, the hammer notch might be chipped or broken. Again, the only solution to a damaged or altered hammer notch is a new hammer. A new hammer will cost 20 percent of the handgun’s new cost, the trigger nearly that. If you have to replace both parts, your outlay will be over a third of the cost of a new revolver. The labor will run an additional 20 percent, bringing the expense to over half the cost of a new handgun.
Can you re-fit the parts yourself? On some Smith & Wesson revolvers, yes, with careful and detailed work. If your S&W is a Magnum, .357, .41, or .44, S&W will not sell you parts for it, for fear someone will try to turn something into a .44 Magnum that shouldn’t be. They will gladly sell non-magnum parts. Try to get a hammer and trigger from them. If they turn you down, go elsewhere. If you have a Colt “V” mainspring revolver, send it back to the factory or off to Bill Laughridge at Cylinder & Slide. Trying to re-fit the hammer and trigger on one of these could drive the Pope to drink. The Colt coil spring revolvers are a piece of cake.
If the sear and hammer notch look fine, check elsewhere.
Modern revolvers have internal safeties intended to keep the action from working if the cylinder isn’t fully closed and latched. To see if your latch is the problem, open the cylinder. Pull the cylinder release all the way back, forward, or out, as it naturally moves when closing. Try to cock the hammer. Hold the latch closed. Does it cock now? If it does, the latch is gunked up. Clean it.
Smith and Wesson revolvers use a flat spring as the mainspring. If you have backed out the mainspring strain screw to make the trigger pull lighter, you could have caused your problem. When you cock the hammer, you should be bending the spring. With the relaxed spring, at a certain point the angle of the spring lines up with the axis of the hammer. You end up compressing the spring along its length, not bending it. Called “knuckling,” the problem is easy to fix. Just turn the strain screw in a half-turn. The problem goes away. If you still want a very light trigger pull, use another spring.
Failure to fire can be very embarrassing. Far worse, it can be dangerous.
Open the cylinder or the loading gate, and check to see if the revolver is loaded. If it is, unload it and look at the primers of each round. Look for any sign of a firing pin strike. A full indent from the firing pin, but no “bang” is an ammunition problem. A slight firing pin hit usually means weak springs. Firing-pin strikes that are off-center are a big problem that needs work. If there is no sign at all of a strike, the firing pin had better be broken or you have one puzzling problem to solve.
Professional gunsmiths joke about the number of firearms, handguns included, they see with the same problem. As described by the customer, the story goes something like this. “It wouldn’t fire. Must be a broken firing pin.” Sometimes the tale is even accompanied by a lament about the size of the buck that was standing in the open. The firing pin is very rarely the cause of failure to fire. Even so, the first thing the pro checks, and the first thing you should check, is the firing pin. Is it broken? A broken firing pin is pretty obvious: there is part of it missing. Is it bent? A bent firing pin is more subtle, but with close inspection you can tell. Bent or broken, you have to replace the pin. You can try to straighten a bent one, but it will break soon after. Save yourself the effort and just replace it.
If it is a frame-mounted firing pin, is it binding in its seat? Petrified oil or grease, or Loctite that has flowed into the firing pin hole from some other screw can bind a frame-mounted firing pin. You’ll have to remove the firing pin and its spring from the frame, clean them off and re-install them.
Sometimes the firing pin is just too short, the result of a “modification” to gain some unknown improvement. If you just got a great deal on a used revolver that doesn’t fire, check firing pin protrusion. First measure the gap between the recoil shield and the cylinder with feeler gauges. Then dry-fire the revolver and hold the trigger back, to keep the firing pin forward. Use your feeler gauges again to measure the gap between the tip of the firing pin and the cylinder. Deduct the second measure from the first, and you have firing pin protrusion. The firing pin protrusion should be more than .040 inches and less than .050 inches. If someone has shortened the firing pin so the protrusion is less than .040", you will have to replace the firing pin.
Some S&W revolvers will not let you measure protrusion so easily. Older Magnum revolvers were made with recessed chambers. Each chamber was reamed with a seat for the rim of the cartridge, leaving the firing pin protruding past the back of the cylinder. To check these, you must use the Brownells protrusion gauge. Remove the cylinder. Measure the gauge in its closed position, with the locking screw unlocked. Then, holding the cylinder latch in the closed position, cock and dry-fire the revolver. Hold the trigger back. Position the gauge over the firing pin, which will push the center out. Lock the gauge with the locking nut. The extra length of the gauge over the previous measurement is the protrusion.
More likely than a shortened, broken, or bent firing pin is that someone has decreased the strength of the mainspring. If you’ve noticed light and insufficient firing pin strikes on the primers, check the mainspring. It is the second thing a professional always checks.
When modifying a handgun some shooters just jump in, lightening springs until the action “feels good.” What feels good, though, may not work so “good.” The strain screw on Smith & Wesson revolvers is a favorite target of unenlightened experimenters. With a turn or two of the screw, they can lighten their trigger pull remarkably. But now the screw is not secured. It is loose in the threads and the vibration of dry-firing or shooting will further unscrew it. The light trigger pull gets steadily, but only very slowly, lighter until the revolver starts misfiring. Tighten the screw.
Some shooters clip a few coils off the mainspring on revolvers with coil mainsprings. Sure enough, the trigger pull gets lighter, and just as sure, the revolver starts misfiring. Replace the cut spring with a new one.
One of the oldest tricks to lightening the trigger pull of the Colt “V” mainspring revolver is to place a small-diameter rod in the “V”, and cock the revolver. Cocking bends the mainspring over the rod and the resulting kink can lessen the force of the spring. If you bend in the wrong spot, however, either you don’t lessen the trigger pull or you make the spring too light, and have misfires.
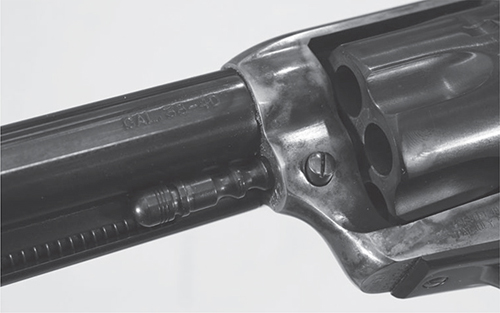
Maybe ammo, maybe not; the center pin on this SAA clone has walked forward.

The solution, in most instances, is to replace the center pin retaining pin assembly. By this time it probably has been battered to uselessness. Dial back your ammo, too; it is likely too hot.
A seriously worn revolver can have so much endshake that the firing pin can’t reach the primer and strike it hard enough to fire the cartridge. See the buyer’s checklist in Chapter 4 for the endshake test. Once you remove this much endshake, you’ll probably have to set back the barrel as well.
If, when you inspect the rounds for firing pin strikes, you find ones that are heavy enough, but in the wrong spots (say, on the rims of the cartridges), you have a cylinder out of time. It is skipping over the locking bolt or falling off the hand and failing to carry up. In either of these cases, the cylinder will not present the primer correctly for the firing pin. If the cylinder doesn’t carry up, you will have to adjust the hand. If the cylinder skips, you must adjust the locking bolt. See Chapter 20.
The trigger return spring and rebound block push the trigger back to its resting position. Unlike pistols, revolvers have very clean, crisp, light, single-action trigger pulls, right from the factory. I have rarely seen a revolver that needed improvement in the single-action pull. While you should leave this spring alone, because the trigger return spring affects the weight of the single-action trigger pull, it is oft the subject of poorly-considered experimentation.
A shortened trigger return spring can cause such sluggish trigger return in double-action shooting your trigger finger may move forward and back so fast the trigger will not be able to reset. The action locks up tight because it can’t keep up. While light trigger return springs are common in PPC shooting, they’re not useful for IPSC, ICORE, IDPA, or bowling pin shooters. With the speed of fire an issue, the failure of the sluggish, weak spring to return quickly enough can be enough of a handicap light trigger pull isn’t worth it.
Even a standard-strength factory spring can be overworked if the mechanism is too dirty. Heavy grease or petrified oil, mixed with powder residue, dust, dirt and lint can bind the spring and rebound block. Cold weather can render a dirty revolver completely useless. Clean the gunk out. Use light oil, preferably a synthetic, and you will not have this problem.
The last source of trigger return failure is heavy-handed reassembly. The stud behind the return block is long enough to fit a recess drilled into the side plate. Forcing the side plate during reassembly will bend the stud. The bent stud will bind the block and freeze it in place. This will require a return to the factory.
Look at the front of the ejector rod to see if it has unscrewed. If it has, screw it back in. Once you get the revolver open and unloaded, tighten and lock the ejector rod down properly.
The cylinder latch may be binding. On the S&W, there is a slot cut into the frame. The cylinder latch moves a bar that rests in this slot. The gap between the bar and the slot provides a large area in which oil can petrify, preventing the latch from moving the bar. Disassemble and clean the bar. Use a synthetic lubricant.
A bent centerpin that makes closing the cylinder difficult will also, when you are done shooting, make opening it difficult. A centerpin bent from swinging the cylinder open and closed will be difficult to push open and may stay wedged in the extractor star. You will have to replace the centerpin.
If the cylinder latch moves smoothly, but the cylinder won’t swing out of the frame, check that pesky crane screw again. On the S&W revolvers, the crane screw is the front one on the side plate. You may have the screws in the wrong order.
A cylinder that fails to open because of a bullet in the gap has already been covered.
An empty has failed to eject, and not for the first time. Are your reloads too hot? A sufficiently heavy reload not only might make ejecting these empties difficult but it can also make future ejection difficult.
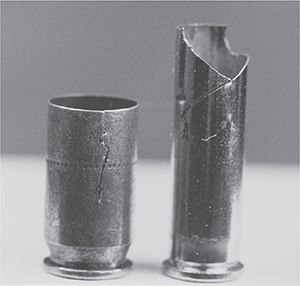
Cracked or broken cases will prevent your handgun from working properly.
Colt revolvers have their locking slots cut into the side of the cylinder, but slightly offset from the chamber. Revolvers with an odd number of chambers have the slots in-between the chambers. On many revolvers (those with an even number of chambers) the locking slot is directly in line with the chamber. With these revolvers, there is not much steel left between the slot and the chamber. A very heavy load can bulge the steel from the chamber into this slot. Even a small bulge can cause difficult ejection.
The bulge may be so slight only an experienced eye can see it. Whether obvious or not, the cure is the same. You must replace the cylinder.
Have you been shooting shorter cases in your revolver, say .38 Specials in a .357 Magnum revolver? As discussed in Chapter 5, in the section on specialized cleaning tools, the shorter cases create a buildup of powder residue and lead particles between the mouth of the case and the front of the chamber. When you switch back to longer cases, your empties may wedge against this buildup, defying ejection. The solution lies in better cleaning. Reread Chapter 5.
When the cylinder is in the open position, the ejector rod sticks out with no support and may bend if you’re not careful. A bent rod may only allow the empties to be pushed partway out of the cylinder before it binds and stops. To see if your ejector rod is bent, brace your hand and spin the cylinder. A damaged rod will be obvious. Unload the revolver and turn it over to a professional pistolsmith. To straighten the rod properly requires an expensive, specially-made fixture. You can spend half the cost of your revolver for one, and might never use it again.
One rare reason for failure to eject is the wrong ammunition — rare because there are just a few combinations of calibers that you can mix up and escape with only a funny story to tell. If you own a pair of revolvers in these two caliber combinations (.41/.44 Magnum or .44 Magnum/.45 Colt), be especially careful not to mix your ammunition. Some shooters go so far as to mark all the brass in one caliber with a felt-tipped pen so as to not get them mixed up.

Another ammo problem: Too light a crimp, and the bullet will “walk” forward under recoil. When that happens, it won’t rotate into position. Solution; improve your ammo.
Unique to the single-action are centerpin problems. Since it has no crane, the single-action needs only a simple axle, or centerpin, for its cylinder. The very first Colt single-action cartridge revolver used a screw to keep the centerpin in the frame. Shooters who lost the screw quickly found their revolvers unusable. The centerpin would jump forward, and the cylinder would not rotate until you lined the up centerpin with its seat in the rear of the frame and pressed it back into place.
Probably because they were receiving a lot of complaints from shooters with lost screws, Colt changed to a spring-loaded cross-bolt. Pushing the cross-bolt to one side released the centerpin. The cross-bolt stayed in the frame. The method worked fine even with the stout recoil of a full-power .45 Colt cartridge but is not so effective when subjected to the recoil of a .44 Magnum. Not a problem for Colt as they never offered the SAA in a .44 Magnum.
Ruger does. Their .44 Magnum single-action revolvers, the Blackhawk and Super Blackhawk, use the spring-loaded cross-bolt to keep the centerpin in place. Under the repeated recoil of Magnum loads, the cross-bolt can become battered and start failing to do its job. If yours is looking beat up, you will have to replace the cross-bolt assembly.
Under the stoutest of .44 Magnum loads advocated by J.D. Jones, the centerpin can batter right past the cross-bolt, tying up the action. These loads, using 290- to 315-grain bullets at up to 1,200 fps, are so heavy in recoil they aren’t even any fun to shoot. If you insist on using such loads, the only thing you can do is lay in a supply of cross-bolt assemblies and a couple of extra centerpins. Replace the cross-bolts as they become battered, and replace the centerpin when the recoil has battered its locking shoulder beyond repair.
On the original single-action design, both the two-leaf spring, which actuates the cylinder-locking bolt and the trigger, and the hand spring are fragile. If you plan to do any competitive shooting, or want to get lots of practice with your single-action, buy several replacements for each. Replacing them is easy.
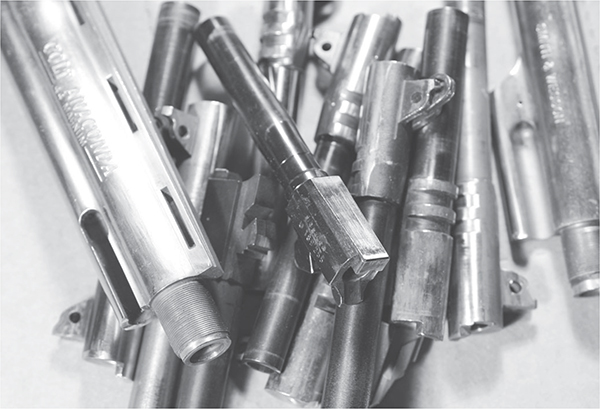
It doesn’t take long for a professional pistolsmith to collect a box of damaged, bulged or broken barrels and cylinders. If you want more power than your caliber can deliver, buy a bigger one. If you hot-rod yours you may break something.