
The history of magazines and their collection fascinates some shooters. Others view magazines as tools, simply “bullet holders” required for the task of shooting. In summation, magazines are vital for proper performance, both for the performance of your pistols and your performance in the match or in your own defense. The great advance (and advantage) of pistols over revolvers is the magazine. As a more efficient storage and feeding device for ammo, it allows for greater capacity in a compact package. However, as with all technological advances, in order to take advantage of the increase you must obtain, and maintain, the additional parts. The electrical starter for automobiles was a huge step forward when it was introduced by Cadillac in 1912, but in order to have that advantage, your mechanic must keep the starter and its associated parts working. So it is with magazines.
Manufacturers ship pistols with one or two magazines. When you buy a used pistol, you may only get the magazine in it. While a pistol with a single magazine works, it can be a drag at the range. If you are going to shoot in competition, or want to have more fun at the range, you will need more magazines. When buying, remember pistols were once viewed as much less reliable than revolvers mostly because of their magazines. Cheap magazines are no bargain. The most expensive are often the best value in the long run.
The snarky answer is “One more than the match or gunfight called for.” A pistol used for defensive work should have at least three tested, marked and utterly reliable magazines. You want the one in the gun and two on your belt. Competition shooters need more. A single-stack 1911 shooter with only three magazines is on the line with 22 to 31 rounds, depending on the magazine type and capacity. As it is not unusual for a USPSA/IPSC field course to be more than 30 rounds, you’ll need more. It is not unusual to see a competitor step to the line with six magazines on their belt. With a magazine in the pistol, that is up to 71 rounds. You may think that is too much, but I’ve seen shooters with that many magazines need all they had, what with misses, fumbled/dropped magazines, and magazines lost when stripped off the belt by doorways.
It used to be finding good magazines was a chore. Shooters did not loan magazines (still a good idea, by the way) because reliable ones were too rare a thing to part with even temporarily. I would sometimes buy twice as many magazines as I needed for a given handgun, so I could be sure of finding enough reliable ones in the batch.

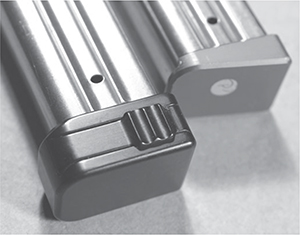
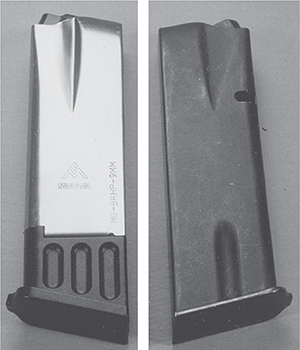
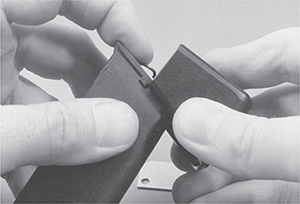
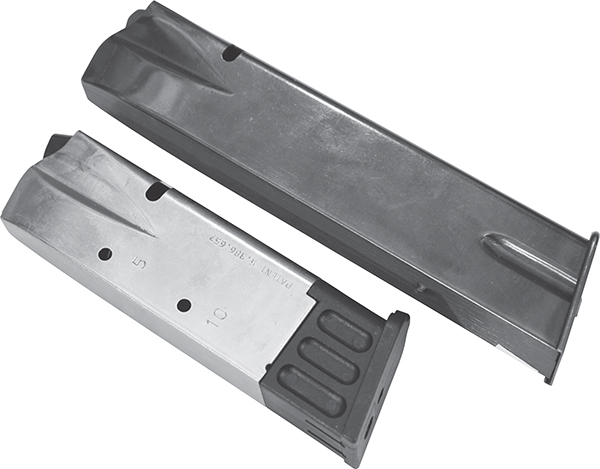
The old-style tapered feed lips on the left, and the newer, shouldered lips on the right. Generally, the newer style feed more dependably than the old. This is not an iron-clad rule, and you may get fine results from a magazine with the old style.
When police departments began switching to pistols from revolvers, they absolutely would not tolerate unreliable pistols or poor-quality magazines. As a result, magazines sold with police pistols are top-notch. Glock, Beretta, Ruger, Sig-Sauer, FNH, and Smith & Wesson all make police pistols. If you want reliable functioning from these pistols, do what police forces do: buy the magazine the manufacturer makes.
For 1911’s, the demand for improved magazine quality started with competitive IPSC shooters. The matches would not allow an “alibi,” or re-shoot because of a malfunction. Once shooters became willing to pay for reliable magazines, manufacturers started making better magazines. One of the first was Bill Wilson in 1980. I bought some right away, and they have yet to give me any problems.
Soon after Bill Wilson, other magazine makers cropped up. Now, finding reliable magazines for the 1911 is simple. Buy from one of the “old” names — Wilson, McCormick, Magpack, Ed Brown, Novak, and you will not have problems. All offer impressive warranties.

Gone are the days (for most of us) of ten-round magazines being the norm. While they aren’t mandated, they are still in existence. If you can buy a 10-shot mag for cheap, use it for practice, and to remind us all “never again.”
If you are looking at a magazine out of its package, perhaps a used one, give it a thorough inspection. Each manufacturer has a distinct, if subtle “look” to its magazines. Sometimes, as in the case of the Wilson magazines, the look is not so subtle. Is the magazine you’re looking at a name brand one? Great. Check the magazine tube for hammer or plier marks. While you’re at it, check for tire tracks, too. If you see none, then bargain for a good price.
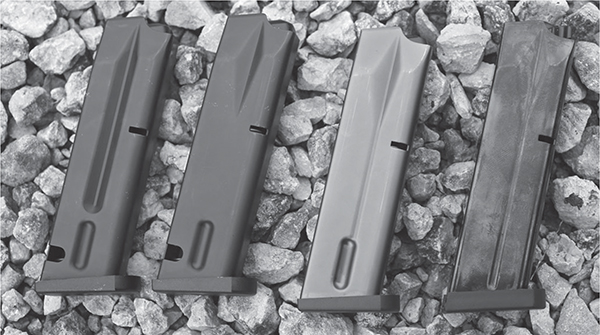
Magazines can go through various “editions” or generations. Left to right, these are Beretta 92 magazines; 10-shot, original, new sand-proof, and 17-shot commercial.
If the magazine is not a name brand, look at the quality of its construction. Look especially hard at the weld. Most magazine tubes are formed by wrapping sheet metal around a form, and welding the joint in the spine. A good magazine will have a single continuous weld down the length of the spine. If the weld is ugly, uneven or ground down, pass. A magazine with the spine folded over and spot-welded should also be passed over. Tap the tube itself. Does it sound tinny, like it’s made of soft or thin steel? If so, leave it.

Ten-shot magazines for the 1911 are tough to carry concealed, and some matches do not allow them. but they can be fun for a day’s plinking, and if a match does allow them, well, knock yourself out.
Except for the Glock magazines, your magazines are made of steel and prone to rust. And the Glock magazines have a steel sleeve inside of the polymer. Even a magazine made of stainless steel or one with an electroless nickel finish, has a carbon steel spring inside of it.
If you have been in the rain or snow, or your magazines have fallen onto wet ground or grass, you should wipe them off. Strip the spring and follower out of each of them one at a time, and wipe these parts dry. If you find the spring or follower rusted, use 0000 steel wool and light oil to scrub it clean. Leave the spring lightly oiled from the scrubbing by wiping it down with a cloth, wipe the oil off the follower until it is dry to the touch, and do not oil the inside of the magazine. Magazines with polymer followers should not have oil applied to the follower.
Do not let your magazines stay wet for any length of time.
Some shooters have an inordinate fear of dropping their magazines. Some even put plastic or rubber bases on their magazines to ease the shock of the magazine hitting the ground. Don’t worry. A good quality magazine will not be damaged by dropping it onto the ground, but concrete may be a problem. If you are shooting at an indoor range, and the floor has some sort of carpeting, then your magazines will be safe from the concrete. The base pads don’t help much in falling but are useful in loading.
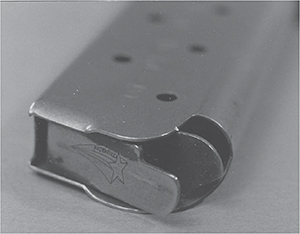
The patented follower on this Chip McCormick 1911 magazine increase the capacity to eight rounds of 45ACP without making the magazine any longer.

This brush scrubs grit and dirt out of the magazine interior.

Keep your magazines in good working order by cleaning them.
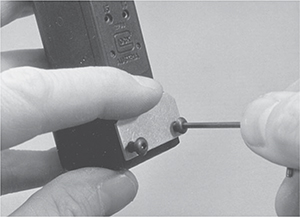
The only magazines made today without a removable base plate are certain 1911 magazines. To disassemble the non-removable base plate magazines, push the follower half-way down with a pencil or dowel. Take a drift punch that fits through the view holes in the magazine, and push the punch through the magazine. Select a view hole that will let you capture the magazine spring, but not the follower. With the spring captured, turn the magazine upside down and gently tap it until the follower falls free.
Hold your hand over the magazine lips, and pull the drift punch out. Before you remove the spring, take note of its orientation. The top coil of the spring is designed to fit against the follower a certain way. You’ll want to put it back that way when you reassemble it.
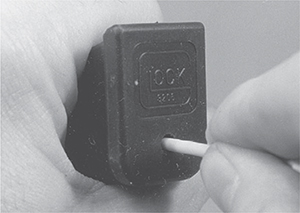
To disassemble the Glock, press a punch into the bottom hole until the inside plate snaps to the side.

Squeeze the sides of the magazine and slide the floorplate off.
To reassemble, push the spring back and compress it fully into the magazine. Holding the spring down with one thumb, slide the follower into the magazine with the rear leg parallel to the feed lips. Once the corner of the follower is in the magazine tube, rotate the follower to its upright position. Remove your thumb from the feed lips. Reach under the follower with a dental pick, and push the top coil of the spring until it correctly bears against the follower.
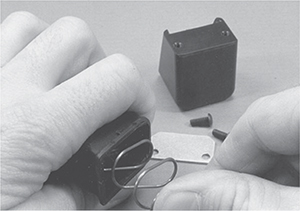
Except for Glocks, magazines with removable base plates are easier. On the bottom of the base plate, you’ll find a hole. A retaining plate inside the magazine locks in this hole. Use a drift punch to push the retaining plate away from the base plate. Push the now-unlocked base plate off the rails on the bottom of the magazine tube. With the base plate off, the locking plate, spring and follower will come out of the bottom. If you aren’t careful, they will launch out and hide under the furniture. Again, note the spring’s orientation. It is designed to fit only this way. If you swap it end for end or front to back, the magazine will not feed properly.
With the magazine apart, wipe or scrub the follower and spring. Brush or swab out the magazine tube. Do not oil them. You can prevent malfunctions of your high-capacity magazines by lubricating the interior of the tube, but not with oil. A spray silicone that dries on the surface can keep your cartridges sliding smoothly, without attracting grit or dirt. Most outdoor ranges have a large amount of dust or sand blowing about and the silicone will keep your dropped magazines from collecting too much gunk.
To reassemble, first place the follower, spring and retaining plate in the correct order, in the tube. Make sure again the spring is oriented correctly. Compress the spring and retainer. While holding them in place with one thumb, slide the base plate on. Look through the hole in the base plate. If the retaining plate is not locked into this hole, tap the side of the magazine until the retaining plate snaps into place.
For Glock magazines, push the drift punch into the base plate hole until the retaining plate snaps out of alignment with the base plate. The Glock magazine tube has two little shoulders on its bottom rails, to keep the base plate from sliding off. You must squeeze the bottom sides of the magazine to remove the base plate. Reassembly of the Glock magazine is the same as other removable base plate magazines. Again, you must squeeze the bottom of the magazine, this time to get the base plate to clear the locking shoulders and snap into place. A GTul helps a lot here, lacking that, careful use of large pliers can get the job done.
Having bought top quality magazines, mark them with your name or initials. Why? So you’ll get them back; or at least be able to identify them. If you are shooting in a match that requires reloads, you and the other competitors could end up with a bunch of magazines scattered over the firing line.
The simplest marking method is a stencil and spray paint. Use your initials or simply number your magazines. Between your initials, the number and the color of the paint, you should be able to identify your mags. At the end of a stage, make a quick count. If you come up short, you know. “Hey, anyone got a magazine with ‘PJS’ and a green four on it?”
You can also make your magazines easy to find, and separate them from other shooters’ mags by using a particular color of base pad. They are available in colors that will sear your eyes. Color-coded base plates also are a way to keep the capacities straight. If your base pads are all the same color, then you can stencil the capacity onto the base pad. That way you needn’t try to memorize which is which.
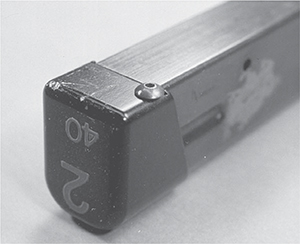
This is a CPMi magazine base pad for the EAA Witness. It increases magazine capacity by two rounds of 40S&W. The small screw keeps it from shifting.
If you have reliable carbon steel magazines, you can protect them from rust by plating them. Robar will NP3 plate them and Accurate Plating will hard chrome them. With either method, your magazines will last longer and work more smoothly. The cost can run as much as a third of the cost of the magazine, but that is still less than buying a new stainless magazine. Before you get them plated, make sure they feed reliably.
As with your handguns, send your magazines for plating only after you have done everything else you want to them. Fire enough rounds to determine they work 100% for you, engrave or electric-pencil them, and then send them for plating.

Magazine base pads come in a variety of colors and materials. The left one is black aluminum, the next is black plastic, the center one is black rubber, the second from the right is bright yellow rubber, and the right-hand one is brass. Only the first one increases capacity.
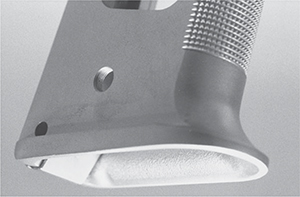
Base pads or buffers make it easier to insert the magazine, especially if you have a magazine funnel. If you do not have a funnel, the extra length of the base pad keeps you from pinching your hand between the magazine and the magazine opening. Some magazines already have an oversized base plate that acts as a base pad. Glock and Beretta both feature oversized base plates. The 1911 magazines with attached base plates do not. However, many magazine makers provide a buffer pad and screws to secure the pad. To make it dead simple they even drill two holes in the magazine for you. The screws are euphemistically called “self-tapping.” Don’t count on it. The magazine steel is hard and screws are small. Rather than exhaust yourself trying to self-tap the screws, get a 4-40 tap. Tap the holes with the much harder, and sharper, purpose-made tap, and then screw the pad on.
Basepads help a great deal when your frame has a magazine funnel on it that adds length. Even if the frame isn’t longer, your reloads will be faster.
For magazines that are not drilled, the procedure is still simple. Take your dial calipers and measure the width of the magazine. Divide this number in half, adjust your calipers and mark a line down the center of the base plate. Measure the distance of the holes in the base pad from the front and the back and use the calipers to mark these distances on the centerline. Center punch the hole locations. Drill the holes with a #43 drill, and tap with your 4-40 tap. Install the base pads.
If basic black plastic is not what turns you on, the pads can be bought in a variety of colors, some not even found in nature. You can buy them in plastic, rubber, aluminum or brass. The metal base pads speed up your reloads a fraction of a second, as the extra weight gets the magazine out of the pistol a tad faster.

The Pachmayr magazine on the left came with a rubber base pad attached. It is also a 9mm magazine. The crease is for feeding, not to decrease capacity. The next magazine is a Mag-pack, eight rounds of .45ACP and an included mag pad, also black rubber. The Wilson-Rogers magazine has a brass base pad, and the McCormick magazine on the right has a CP Bullets bright green rubber pad screwed on. All the pads work, it is just a matter of taste which one you use.
Base pads are also available for magazines with removable base plates.

Wilson makes magazine buffers in various thicknesses in both slide-on models for their magazines and screw-on for others.
Those who feel black is best, but do not like the idea of drilling and tapping their magazines, there is a secure but messy way of attaching base pads. The following method only works for magazines that do not have removable base plates. You’ll need a bottle of contact cement, some crepe rubber from a shoe repair store, and a belt sander. Carefully cut rough base pads from the rubber. Sand and degrease the bottom of the magazine. Apply contact cement to both magazine and rubber. Allow for drying time, and then attach the rubber. Now use the belt sander to dress the rubber even with the magazine. Wear a mask as you will fill the air with rubber dust. Once done, the pad will stay for years of hard use. Fair warning: 20 years later, the crepe rubber you’ve glued onto your magazines will have hardened to a concrete-like substance, and you’ll have to pry them off and do it all over again. So, in 2035 or so, don’t say I didn’t warn you. And if we’re all still around then, we can have a good laugh about the much-better substances we could have made the magazine pads out of, if only they had been invented back in the halcyon days of 2015.
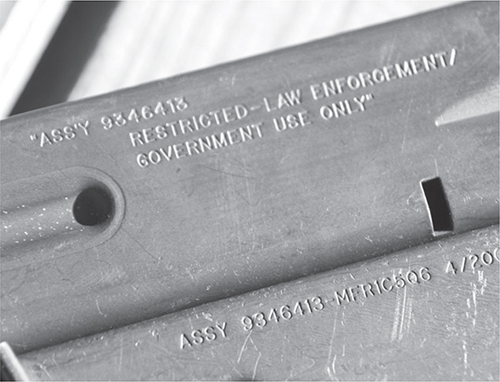
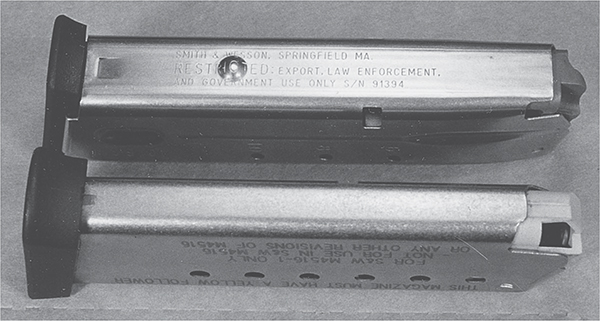
Magazines made during the AWB/94 were marked “LEO Only” but it means nothing now in most states. The bottom one was likely at one time government property, but no one really cares about that.
Current legislation in some states still prohibits manufacturers from making new magazines with a capacity greater than 10 rounds. Thankfully, Federal law restricting magazine production has expired. Those living in free states can buy whatever we want. For a while, during the Federal ban, prices skyrocketed. At the peak, a high-capacity magazine for a Glock went for a quarter of the cost of the gun!

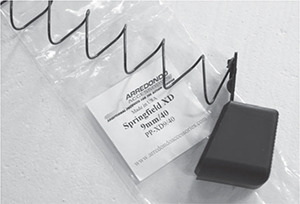
This particular Arredondo extension is for 9mm/40 Glocks, and won’t work on other guns or Glock 10mm or .45 magazines.
As shooters became used to the idea of “only” 10 rounds per magazine, prices stabilized. Some of the lesser-capacity magazines were re-designed upwards to hold ten. The 1911 was the first. Soon after enactment of the “ban” in 1994, you could buy 10-round magazines from Wilson, McCormick and Ed Brown. There were even 10-round magazines available for the little Colt .380!
The 10-year Federal foray into the stupidisphere produced a large supply of ten-round-only magazines, which is actually a good thing. First, each of them acts as a reminder of that period, and second, they are also reliable magazines for practice.
It has not been illegal to increase the capacity of a magazine that already holds more than 10 rounds, since 2004, in free states. And it wasn’t illegal to increase the capacity of magazines that held more than ten rounds, even during the ban. To this end, the makers of base pads make over-sized, hollow base pads. Depending on the pistol, the caliber, and the extension manufacturer, you can increase your capacity an additional two to eight or even ten rounds. However, there is one limit you have to be aware of: extensions only work on magazine tubes with removable base plates, and those tubes must have the bottom lips bent outwards. Inward-bent lips that hold the base plate in place make it impossible to increase the distance the follower can travel downwards.
Magazine extensions add capacity. Check the rules for a given competition to make sure such changes are kosher. And be sure, if you travel to another State, that your mags are legal there, and all the States you drive through in-between.

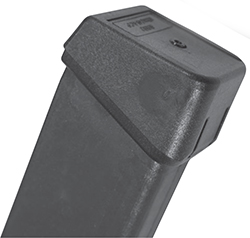
Longer-than-normal magazines are sometimes referred to as “big stick” magazines. it is easy to see why.
A simple cap like this +2 adds a couple of rounds to your Glock. Just be sure it is lawful in your state.
Some magazine extensions, like this Arredondo, add so much length they need a new, longer spring to fill the space and push the rounds.
Magazine-capacity increasing base plates are currently available from Taylor Freelance, Arredondo, Dawson Precision, Grams Engineering, and Taran Butler. You can get anywhere from two to ten more rounds, depending on caliber and base plate size.
To install one of these base plates, strip the magazine. Pull off the old base plate. Some extensions (such as the CPMi) use the old spring, others come with new springs. If it increases capacity more than two rounds, it will come with a new, longer, spring. If you use the old parts, compress the spring, or spring and retainer, and slide the new extension onto the magazine rails. The CPMi extensions use a small screw at the back of the extension to keep the extension from sliding forward.

Glock magazines come in a variety of capacities. On the left, a full-size high-cap magazine, 15 rounds of 40S&W. In the center, a full-size magazine that holds 10 rounds. On the right is a 29- round magazine. While the high-caps are legal, they are also hard to find.

Robin Taylor makes magazine extensions with added capacity up to eight more rounds. The floor plate for Glocks also includes a new magazine spring.
The Taylor Freelance Glock extensions use a pair of screws and an external retaining plate to keep the extension in place. The factory Glock +2 extensions sometimes pop off the magazine if they are bumped, launching bullets, spring and base plate out onto the floor. The Taylor Freelance doesn’t come off so easily, and you can get a +4 or a +8. The latter brings your Glock 17 up to a 25-round magazine! You cannot count on all hi-cap magazines having the option of a replacement base plate to increase capacity. The most popular pistols and those used in practical competition are most likely to have aftermarket extensions. Basically, you can get an extension for Glocks, the STI/SVI pistols, Beretta, CZ-75 and its clones and a few others. By searching out the manufacturers catalogs, you can find gems like magazine extensions for the Browning Hi-Power from CPMi.
One detail about the old ten-round mags; they were typically tougher than nails. use the old ones for practice, and save wear-and-tear on the expensive hi-caps.
Compress the spring.
Screw the retaining plate on the Taylor Freelance, and your magazine now holds four more rounds.
Keep the spring compressed while you slide the new bottom on.
A new magazine capacity increasing base plate also comes to us from Canyon Creek; made by Rich Dettlehouser, and are made for XD and XDm pistols.
If the conversion replaces the spring and retainer, pull the old parts out and save them in a plastic bag marked with the magazine type and number. The Arredondo extensions use a new retainer to keep the extension in place. Install this new retainer along with the new, longer spring.
If your high-capacity magazine becomes damaged, you can now replace the tube or have it repaired. You can buy replacement tubes for some brands. Other companies will repair or replace their tube if you send them the old one. Brownells lists replacement tubes and whole magazines.
High-capacity magazines made after the Crime Bill was signed were intended for law enforcement and military use only. They are so-marked. Possession of one of these magazines used to be a federal felony. Now they are curiosities.
There are three critical parts of a magazine; the spring, the feed lips and the magazine catch. A weak or bent spring can cause malfunctions by lifting the cartridge stack late or crooked. Malformed or damaged feed lips can present the round badly to the chamber. And an incorrectly located mag catch slot can position the magazine too low or high, defeating an otherwise correctly made magazine.
The spring must be strong enough, but not too strong. It used to be impossible to get a spring “too strong.” Such is no longer the case. If you rebuild a 140mm hi-cap magazine (such as is used for USPSA Limited competition) and use a spring intended for a 170mm magazine tube, you’ll find you’ve just reduced the magazine capacity. The spring is too long. And, when fully loaded, the spring tension on the top round may be too much for the slide to strip a round to chamber it.

The old Glock magazines would not drop-free from the pistol. They have round notches on the spine. The newer ones do drop free, and they have square notches on their spine.
When replacing a tired spring, get one intended for your application, not something “stronger to improve feeding.” How can you tell when your springs are tired? One clue is that the slide doesn’t lock open. If an otherwise reliable pistol and magazine starts not locking open when empty, your springs are probably tired.
Another clue (especially for guns that never locked open when empty, even from the beginning) is the “bolt over base” feeding failure. Seen more often in AR-15 rifle, the bolt (in our case, the slide) has over-ridden the rim of the cartridge and struck it in the middle of the case. The slide is held open, with the bottom edge of the stripper rail pinning the cartridge against the feed ramp, and mangling it in the process. The reason for this is that the spring is late in lifting the stack, and the bolt arrives before the top round has settled snugly up into the feed lips. Again, replace the spring to solve the problem.
Mangled or improper feed lips are a much tougher problem to solve. Many magazines that are unreliable are unreliable due to experimentation on the part of their owners. The experimentation usually involves a pair of pliers and the feed lips of the offending magazine. Let me begin the advice by suggesting that you not alter the feed lips of the magazine unless you are willing to scrap a few experimental magazines in practice. Preferably surplus ones from the gun show, and not brand-new Wilson or McCormick mags. Indeed, if you pull one of the latter out of its plastic bag, test it and find it wanting, you should look first to the ammo or the pistol itself as the source of the problem. If the problem persists, send the mag back. If you try to “adjust” it, and then send it back, the plier marks will have immediately voided the warranty.
Unmarked Glock aftermarket magazines can be troublesome. They do not look so different that a quick glance will tell you which magazine you have. To be sure you need to measure the gap of the feed lips. A quick measure with dial calipers will uncover the info. Magazines with the following measurements serve only the rounds specified.
.325 inches to .335 inches are for 9mm
.360 inches to .370 inches are for 40, .357 SIG or 10mm
.425 inches to .435 inches are for .45
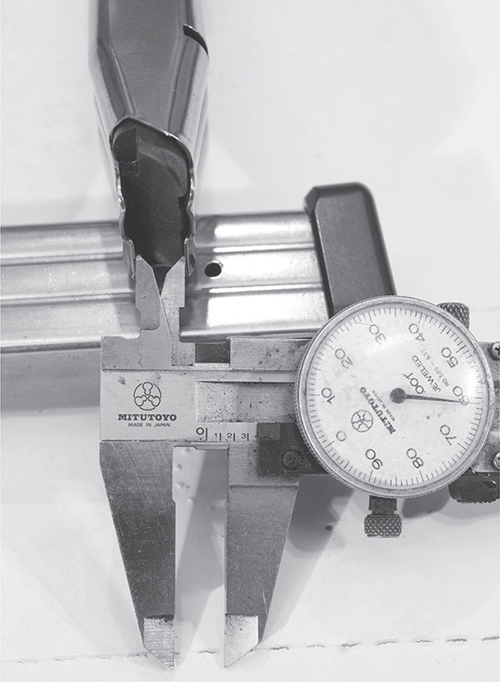
Measure the spread of your magazine feed lips. Record the numbers and check your magazines periodically. If they start to spread you may have to have a wizard like Bevin Grams re-tune them.
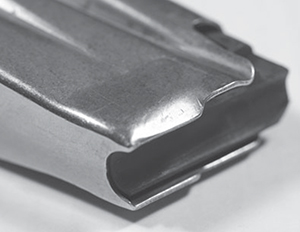
When buying magazines, get ones with smooth, unaltered feed lips, like this one. Don’t buy magazines with marks on them. Not unless you want an unreliable magazine that you’ll spend hours fussing over to try to make right.
Once you have tested your magazines to be sure they work reliably in your pistol, mark and number them. Then record the relevant statistics. Use a dial caliper to measure the gap between the feed lips at the rear, middle and front. Don’t be surprised if the measurements vary a bit from magazine to magazine. If it works, there is no point is adjusting a working magazine just so its measurements agree with another working magazine. Then check spring strength. Lay the pistol flat on the table, mag catch up. With the slide forward, lock a magazine in place. Press the mag catch and see how far the empty magazine is pushed by the spring with the slide forward. Record the distance. At any time in the future, you can check each magazine. If the feed lips have begun to spread, you’ll know. If the magazine then begins to give feeding problems, you have the exact measurement to give to the manufacturer when you request a warranty replacement. If the springs become weak, you have a means of measuring the change.
You should also strip the magazines and one at a time, measure the relaxed length of their springs. If they get to be too short, replace them. You’ll know they are too short when one starts to fail to lock open. Measure its spring length, compare to your records, and you now know when to preemptively replace them. At the point any one of them begins failing to lock the slide back, you have two choices: replace all the springs, or replace those whose decrease matches or exceeds that of the offending magazine. My choice would be “all.” Magazine springs are not so expensive changing all the springs in your magazines will be an onerous expense.
Ten round magazines are mostly historical curiosities, but they are still ultra-reliable. The twenty-round magazine next to it is very useful, just be sure you test it.