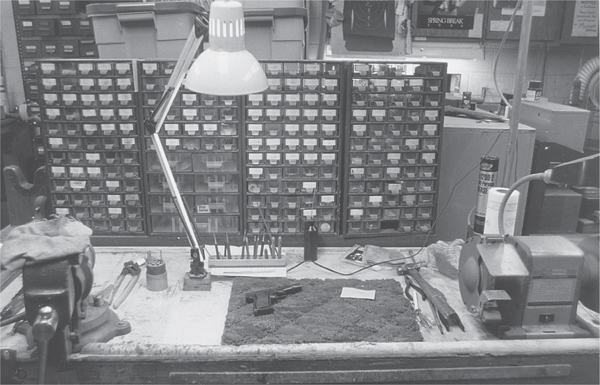
A clean and neat workbench is a must. This workbench not only has fluorescent lights in the ceiling, but a flexible lamp on the bench itself. On the left is a vise, and on the right is a bench grinder. Drawers in the back hold parts and small tools.
If you are working for yourself on your own guns, you don’t require a full-sized shop, but you need dedicated space. Struggling to assemble your handgun as you reach around the chainsaw, trying all the while not to knock the motor oil off the shelf above your head is not conducive to concentration. It can also get you hurt.
Installing a recoil spring while standing in the laundry room and errantly spilling oil on freshly folded linens may get you more than just hurt. Launching them across the room to land on something delicate, irreplaceable, or just painful, will likely find you exiled for your gunsmithing work and perhaps from your domicile.
If you have no choice and must do your pistol work in the same place as the rest of your work around the house, at the very least dedicate an end of a workbench exclusively to it. And keep your gunsmithing tools in a separate toolbox from your other tools.
A clean and neat workbench is a must. This workbench not only has fluorescent lights in the ceiling, but a flexible lamp on the bench itself. On the left is a vise, and on the right is a bench grinder. Drawers in the back hold parts and small tools.
The first space often considered for gunsmithing work is the garage. The garage can be a great place to do your work, provided it is tight enough from the weather and heated so the tools and chemicals will not freeze or bake. Sadly, most garages fail this test. A garage used as workspace also must be amply wired for lights and power tools. Again, many garages have but a single, two-plug outlet, and perhaps one overhead bulb.
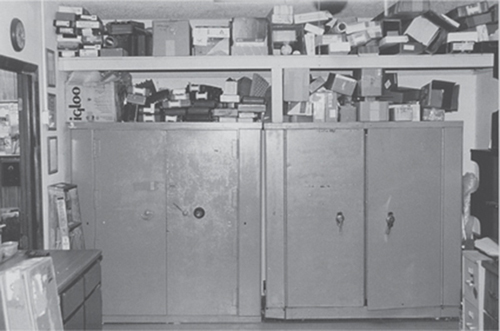
In a large, modern garage, you can build a separate bench for the pistol work, but there are also security issues to consider. If you live in a typical suburban neighborhood, cleaning your firearms in clear view of the neighbors walking by is bad manners, and the local constabulary may drop by to discuss this habit with you.
There is also the matter of operational security. If your open garage door leaves a clear view of your workspace, then you must add completely closeable and lockable cabinets and drawers, and probably, a safe.
It’s a good idea to install a screen to block the outside view of the bench. The screen can serve double duty to block drafts or errant breezes when you’ve opened the door for ventilation. If leaving the door open is not a viable option then you must add proper ventilation. Some of the solvents used in cleaning are not only noxious, but hazardous.
As long as you have a clear space big enough to work in, a bench with tools on it isn’t too much of a problem. But when the tide of “stuff” starts to encroach on your workspace, deal with it.

A machinist’s vise is a good thing to have, but you must have the room for it. Loose on the bench, it isn’t much use.

Parts loose on the bench can get damaged. You paid good money for them, treat them right and put them safely away.
For these privacy and security reasons, basements are another strong option for establishing your dedicated gunsmithing space. Without X-ray vision, your neighbors can’t just walk by and look in at you. Curtains over existing windows, or glass-block window replacements would be a useful addition. A full, modern basement will already be wired for some electricity and can be upgraded for more. You and your gear will most likely stay warm enough in the winter and cool enough in the summer for all gunsmithing work. A basement with exterior entrances is not as secure as one with only interior entrances, but the exterior door can be reinforced, dead-bolted, and cross-barred.
The most common drawback with basements is they are often damp. Humidity is a disaster for your tools and parts. The quickest way to dull a file, even faster than misuse, is to let it rust. Ditto other delicate gunsmithing tools.
The tools you use and all the steel parts of your pistols are subject to rust, even the stainless ones. Wherever you set up shop, you must keep them dry. To deal with moisture, you should invest in a dehumidifier. A whole house unit is great, but back it up with a secondary, portable unit just for the basement. Either the dump-pan or a tube to the floor drain lets you get rid of the moisture removed from the air. Seal any wall cracks you find and paint the walls.
A small spare room or large closet can be used as a pistolsmithing space, without the potential poor security of the garage or the dampness of the basement. The closet may require re-wiring to get enough outlets for all of your lights and tools, and, in hot weather, may be a bit stuffy.
I built a workroom for pistolsmithing in a small room at home that measures 5 feet by 8 feet. The bench runs away from the door the full 8 feet, with shelves above, drawers below, and sufficient elbowroom. It is plenty large enough for all but the most involved work. A larger room of 8 feet by 10 feet would be spacious enough to do everything except machine work with large machines. If you have a miniature lathe or mill, even those will fit a room this size.
An internal room or closet may be noisy to other occupants of the house when you are using power tools. In this case you may have to install additional soundproofing. Be sure to wear ear and eye protection at all times and keep the door closed.
Renters must check lease agreements carefully especially when it comes to installing/running big power tools, creating noise and using any smelly, caustic chemicals.
Once you have selected a location, what do you need there?
First, you must have sufficient working light. Straining your eyes and struggling to work in the dark can damage pistols, tools, and you. Large fluorescent fixtures over your workspace will ease the eyestrain and make your work pleasant. You cannot get too much light unless you have so many bulbs strung up in the room that the heat drives you out. Fluorescents provide plenty of light with little or no heat and don’t draw much power.
To avoid casting a shadow on your work, buy a flexible desk lamp. Get one with a heavy base or with a base that can be clamped to the bench. Swivel or position it to shine directly where you are working, and from a direction where your body will not block the light.

This clamp on swing arm table light can extend up to 35 inches, offering plenty flexibility to illuminate projects and eliminate shadows.
Along with light, you need physical comfort. A bench that is too high or low, or in the wrong location is a ticket to torture, back pains and repetitive-motion injuries. A work chair that doesn’t offer back support or is uncomfortable can give you leg cramps or a backache in short order.
Proper bench height depends on your stature and your reach. If you are starting from scratch, test simple disassembly and reassembly of your pistol on different benches, tables, and counters in your house. You will quickly find out which ones are the wrong heights. If you have more options at the gun club, do your testing there.

Efficient Machinery Co. makes a modular workbench that can be a portable unit, or a starter bench. (photo courtesy Efficient Machinery Co.)
If you are working with a bench already installed and find it’s too high, make shallow boxes to stand on or get a higher chair and sit down. A low bench can be useable if you work from a low chair. You have to try it a few times. With shoes, you know in a few steps if you have the incorrect size. A wrong-height vs. proper height workbench takes some time and repetition to discern.
When starting from scratch the best way to make sure your bench will be solid enough is to make it out of 2x4s with 4x4 legs, and a plywood top at least 5⁄8 inch thick. If you are good with wood, you can make your own. If the prospect of constructing a bench from scratch is more than you care to contemplate, bench kits are available for order or at the big box home stores.
You can test the solidity of an existing bench by sitting on it. If you can’t climb onto it and sit down without it creaking and groaning it needs reinforcing. You can add an extra support leg in the center, or directly under the location for your vise. You can also stiffen a top surface of particle board by gluing an extra layer of plywood laminate to the top.
Add diagonal bracing to a bench that doesn’t have any. In order to keep the bench from walking around the room with you, secure it to the wall if you can. Do not, however, simply bolt it to the drywall with mollies. Cut the drywall open, and bolt the bench directly to the wall studs. This way, if you are wrestling with a particularly recalcitrant part, you won’t be wrestling with the bench too. If bolting the bench to the wall isn’t an option, then use bricks, sandbags or bags of lead shot on lower shelves to keep the bench from moving.
Simply tossing your tools into a pile on top of the bench is messy and a good way to damage them. Don’t do it. The five places to put your tools are shelves, cabinets, racks, drawers, and toolboxes.

If you have an on-going project, have a box for it. That way, all the parts it will stay with it.
Shelves are easy to make and easy to install. If you don’t mind taking a step or two when you need something, the shelves don’t even have to be right over your bench. In shelves over the bench, store objects that cannot be damaged by falling and can’t damage anything on which they land.

A small set of shelves are handy for holding tools, parts, fixtures and the occasional handgun in process.
Light, non-fragile things such as masking tape, instructions for your tools, packets of steel wool, cleaning patches and cleaning rods, and other such stuff are OK above you. Seal your epoxy, solder, cold blue, cleaning solvents, and other chemicals in individual plastic bags to keep potential (and inevitable) leakage from making a mess, and put them up there too.
Shelves under the bench are the place for heavy and/or bulky objects. This way you cannot drop a heavy object onto yourself or a valuable firearm while trying to put something on an overhead shelf. The added weight also acts to stabilize the bench. Shelves do not offer any security; they are not lockable, and objects on shelves gather dust.

If there is one thing all professional shops have in common, it is that they have many shelves, drawers, benches and cabinets.
When you make shelves, anchor them securely to the wall. (A bolt pulled from the wall due to weight means tools and parts all over the floor, and maybe on you too.) Build for the maximum anticipated weight, and use lumber or constructed boards, rather than particleboard, as shelving material.
Standing or sitting, it is your choice. Find what works for you and build accordingly.
If you can obtain wooden cabinets, they will offer more secure storage of your tools and parts. Just remember most kitchen cabinets are designed for dishes and cooking utensils. If you overload them, they will fall apart or come off the wall. If you are using salvaged cabinets, study the design to see if you can reinforce them to hold more weight. Be certain to bolt them directly to the studs or concrete walls, and create a way to reinforce the attachment.
If your bench is large or deep enough, store frequently-used tools in racks located on the bench top, at the rear. Place the screwdrivers and drift pins here, where they are out of the way but easy to reach. A rack at the back of the bench can hold the hammers.
Objects that need protection go into the drawers. Here is where the files, dial calipers, micrometer, and any fixtures for fitting or cutting parts go to rest between jobs. Taps and dies should also be stored in the protection of drawers and not left on the bench. If your bench isn’t large enough to keep punches and hammers out on top, (and out of the way) keep them in drawers separate from the delicate things.
If building cabinets or drawers sounds like work that will keep you from pistolsmithing, go to your local tool warehouse store. There you can find toolboxes like mechanic’s use. If you get free-standing cabinets, you’ll need floor-space for them. If you buy wall-mounted ones bolt them to the studs.
The finest bench in the world is not sufficient by itself. You need the right tools to accomplish anything.
Central to your use, but not always centered on the bench, is your vise. A vise is your third hand, holding objects so you can see them, work on them, assemble them. A vise also holds things more steadily than your hands can, and more firmly. A vise also doesn’t flinch when you accidentally sweep the soldering torch across it.
Buying a vise smaller than you need is false economy. A small vise will not securely hold large parts, no matter how firmly you tighten the handle. A large vise, however, can hold small parts, provided it is precisely fitted. For pistol work, you need a vise with jaws at least 5 inches wide, and an opening of not less than 4.5 inches. While bigger is better, there is a limit. Don’t go out and buy a vise large enough to hold an engine block just to show off. Such a vise may break both your wallet and your bench.

If you are going to do heavy work, you need a big vise, like this one. The bigger the better, and there is no such thing as a bench too sturdy to which you should attach it.
Before you attach the vise to your bench, you’ll need to find the best spot for it. Place it on the bench and pretend you are working on a part. Can you get to the part from every angle? Position your light and look at the part. Are you working in your own shadow? Move the vise around to assess multiple locations. Find what works for you.
I need at least three feet between my vise and the wall to the side or behind for my comfort. This distance will be different for you. Make it comfortable. Before you mark and drill, take a look at the underside of the bench. Make sure you aren’t positioning one of the bolts right at a support beam. Mark, look, then pull out your drill to install the vise bolts.

A “Kennedy” box is a superb storage place for tools. It is also heavy and takes up real estate. If you can score one inexpensively, do so.
A bench grinder allows you to sharpen or alter tools, modify parts, and remove stock fairly quickly. It is also noisy and dirty and can get you in trouble. With too heavy a hand, you can take off much more metal than intended. You can overheat a part and draw the temper from it. You can burn yourself. I have seen people using a bench grinder lose hold of the part they were grinding, have the grinder snatch it away from them, and launch it across the room. It could just have easily been thrown at them.
For many things, however, such as quickly grinding down the frame of a pistol to fit a beavertail grip safety, a bench grinder is just the ticket to save you hours of filing by hand.
If you go with a bench grinder, get one with a 1⁄4-horsepower or larger motor and at least a 6-inch wheel diameter. More horsepower means you are less likely to slow down the grinder by pressing a part against the wheel. Large wheels give you a larger surface area for wear of the wheel and a larger ground surface on the part. If the noise and the mess are too much in the house or basement, then banish the bench grinder to the garage. It will do fine out there.

A bench grinder is useful, noisy and dirty. Do not get a little one, it will disappoint you.
You’ll need several types of hammers. Most important is the ball-peen hammer. The ball-peen hammer is alloyed and tempered for the job of banging against metal. The more common claw hammer is not. Use the claw hammer for peening, and it’s likely to suffer damage from repeated use. It could even injure you.
Hammers are not so expensive you need to be cheap about this. Buy a 12-ounce ball-peen. Yes, a heavier hammer can strike a harder blow, but you will become tired using it and make more errors. You do not want to peen the wrong spot on a part or your thumb.
Next buy yourself a combination plastic and rubber mallet. Be sure and get one with replaceable faces. With some jobs, such as lapping a slide onto a 1911 frame, you may end up pounding the plastic end to bits after a few slides. Replacing the face is cheaper than buying a new mallet. You’ll use the rubber end when you want to tap something on or off without leaving marks.
Some pistolsmiths use a smaller hammer than the 12-ounce ball-peen or the large plastic mallet, but I only keep small hammers in my emergency tool kit. The larger hammer on my bench will do all the work of a smaller one. The only advantage of the smaller hammer is less weight to lug around in your shooting bag.
The screws used in firearms are different from the screws found around the house, and need slightly different screwdrivers. Pick up one of your household screwdrivers and take a close look at the tip. A standard screwdriver has a tip that is ground with the flats at a slight angle towards each other. In a cross-section, it looks wedge-shaped. This angle of the blade lets the tip fit into the slot of a screw regardless of the slot’s tolerances. While it isn’t exactly a “one size fits all” it is a method to get a whole lot of screws handled by just a few screwdrivers.

A good set of screwdrivers such as these from Dillon are a must-have item.
Firearms screws are different: the slots of the screws are machined with parallel walls. You need a screwdriver that has parallel faces, not the tapered. If you use a household screwdriver in the screws on your pistol, you will round the corners of the slot. Not only is this unsightly, it is also the obvious mark of an amateur. Also, you won’t be able to get the screw as tight. The tapered blade of the household screwdriver cams itself up out of the slot once you have applied enough torque. It is an unavoidable aspect of the design.
The tip on the standard household screwdriver is tempered to be softer than you need. The softness keeps the tip from breaking. When working on firearms, we would rather break the tip of the screwdriver than mar the screw slot.
Firearms screwdrivers have a hard tip, and the tip is ground so the flats are parallel. The screws on firearms come in a much larger variety of slot sizes than common household screws. In order to properly fit a screwdriver to each screw you will encounter, you either have to have dozens of screwdrivers or be willing to modify the ones you have. Professionals do both.
A good way to start is to buy one of the many replacement tip screwdriver sets. The hollow shaft is magnetized and will hold the tips in place until you pull them out to replace them. If you have to modify one of them, a new tip is cheap to buy.
You won’t need much in the way of pliers. However, when reassembling pistols after cleaning, a narrow needle-nose pliers can be handy.
Buy a bushing wrench for your 1911, so you can remove tight fitting bushings. (In the 1911 chapter I’ll show you how to fit a bushing so it is accurate and still removable with your fingers.) As for other wrenches, I haven’t found a use for them in pistol work.

A small block with holes drilled through it will organize your punches. Make another one for your files.
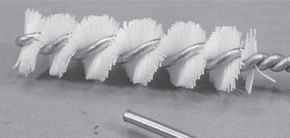
You’ll need cleaning brushes. Some handguns come with a brush. This one from Glock has plastic bristles and will last quite a long time.
A constant companion at the bench will be a top-quality calipers. Either dial or digital, you will use it almost all the time. When fitting parts calipers will tell you how much metal you have removed and how much more you have to go. In the professional’s shop, the dial or digital calipers are used a hundred times a day. You can spend as little as $30 for the dial type and $120 for the digital type. Take care of it, keep it clean, and store it safely.
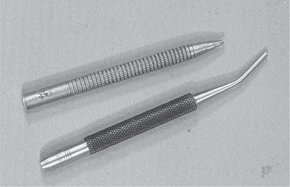
Buy two types of punches, steel and brass. The brass ones are for drifting sights or pressing parts together when you don’t want to leave a mark. A 1⁄4-inch rod long enough to hold onto without hitting your hand with a hammer works well. Even though it is brass you still have to be careful. Too heavy a blow with a hammer will leave a mark on a soft steel part from the brass rod. Some pistolsmiths prefer nylon to avoid this, but I have found nylon flexes just a bit, and makes removing tightly bound sights tougher.
You will eventually bend a drift punch. Use your bench grinder to cut the bent shaft off and turn the punch into a tapered punch, so you won’t bend the next one.
Use steel drift punches to remove pins that hold assemblies together (like the safety on a Beretta M-92 or the ejector on a 1911). If you plan to do a lot of work on a pistol with roll pins, and you don’t want to mar the pins, buy drift punches specifically for roll pins.
The steel punches come in sets or individually. A good basic set is the Brownells Gunsmith Professional Punch Set. It contains ten punches: a selection of drift punches, a center punch, and a staking punch. It covers most everything you’ll need.
With the workspace finished and stocked, you now have to secure it. Back in the “old days” shooters left their firearms in glass-fronted display cases for their friends to admire. Now, the consideration of many shooters is “to safe, or not to safe?” If you have a specific room that is used for nothing but your pistol work, then putting a deadbolt lock on the door is a good idea and a good start. If you have a part of the garage or basement devoted to your work that is not separate from the rest of that space, the best approach is to build or install cabinets above and drawers below that can all be locked. When you are done and clean up your workbench, there is nothing left out in the open to be seen as “gun stuff.”
The pistols themselves can either go into locked cabinets or into a small gun safe inside the house, not out in the garage. For extra security, put individual gun locks on each of your handguns. You can also arrange your handguns on a rack, and then thread a plastic-coated steel cable through the trigger guards, bolted at one end and locked on the other.
Safes are comforting, heavy and expensive. If you can get a safe into your home, great. If not, then make sure your guns and workspace are in a locked room.
If you built your bench into the corner or end of the basement, you can install French doors to block the view of visitors to your basement. Make sure the safe is hidden by the doors, too.
You may also want to consider a gun lock, even if your handguns are in a safe or locked cabinet.
Security is not just a matter of keeping guns out of the hands of kids or thieves. What if you don’t secure your workroom, and out of curiosity a party guest who has wandered off turns on your lathe? Lock the cabinets and drawers, use a master power switch, and then lock the door!
All these tools and the handguns themselves need protection from moisture. If you lock everything up in a closet, cabinet or a gun safe, you may be locking moisture in with them. Invest in a canister of desiccant or a dehumidifier. Both is the best option.

Moisture tarnishes and rusts metal. A desiccant in the safe or cabinet can protect your valuable tools and handguns. Handled carefully it will serve as a protectant for years.
The desiccant sucks moisture from the air, protecting your guns and tools. When it has had its fill, bake it in your oven to dry it out and start again. A power dehumidifier sucks the water out and deposits it in a reservoir, or down the drain.

If you live in a humid climate, or a wet house, a room dehumidifier can keep your guns and gear dry.
As a last item, you may want to talk to your insurance agent about the coverage for your tools. It would be a shame to spend a chunk of money and have a ball learning to do your own pistolsmithing, only to find out that the insurance company won’t replace the tools when your basement floods or the house burns or … fill in the blank.
Don’t be cute with your agent, and declare that you have a “home workshop of woodworking tools” when what you want to cover is all your specialized gunsmithing tooling. Tell him what you have. If he is uncomfortable about your gear, find a new agent or a new insurer. Document everything with photographs, invoices and serial numbers, if possible. Making a narrated video tour of your work area and the contents of your gun safe is a great way to do it.
With all the “real” gunsmithing gear in your shop, there are a couple of extra items I realize I have failed to mention in previous editions. And I did so not because I didn’t have them, but because they were such mundane, ordinary, and obvious items it never crossed my mind to include them. The first is a fire extinguisher. You’ll be working with flammable stuff and open flames. Things might get scorched or even set on fire.
The second item is a basic first aid kit. Just your basic kit with Band-Aids, antibiotic ointment, and salves will do nicely. If you work on guns long enough, you will cut yourself, raise a blister from touching a hot object, or splash something on you that needs some tending-to. It’s a comfort to have the kit there.
