
For a quick touch-up of blued handguns, Outers makes a felt-tip pen applicator set. Clean the steel, touch it up, and give it a final wash.
The newest high-tech wonder weapon has just hit the marketplace. All over Greece and Persia, hunters and would-be Olympians are clamoring for their chance to try a great new metal. Iron, they hear, will change everything. It’s stronger, harder, all around better. It has just one itty, bitty, little problem. But then, it’s always something, isn’t it?
Iron was a definite step up from bronze. It was also more difficult and more expensive to manufacture. When blended with other elements, iron becomes an alloy. The alloy we call steel is iron with a certain small percentage of carbon in it. Carbon imparts strength and hardness. Other trace elements in the steel can improve machinability, allow forging, or change its response to heat-treating. A “hardening” steel is one that can be heated and then quickly cooled, thus changing its crystal size, and, as a result, its hardness. A “stainless” steel has chromium and nickel mixed in it. Many people believe stainless steel doesn’t rust; it does, but takes a long time.
Not merely an aesthetic affront, rust can impede proper function and destroy an iron/steel mechanism. Oddly enough, the very first protective finish “applied” to iron was rust. By carefully controlling the process, a somewhat preservative rust layer can be built up. One problem of using rust bluing or browning as a finish is they do not seal the body from atmospheric oxygen. Some other metals create an oxidized layer that acts as a seal, and prevents further oxidation. Iron does not. For nearly 3,000 years, it and the choice of scouring the iron bright and keeping it bright, were the only finishes available for iron implements.
Steel is much stronger than iron. It is also amenable to chemical protective finishes.
The question arises: Do you really need to have a finish on your handgun? Well, no. A stainless handgun, for example, will rust only if exposed to severe conditions and neglect. But it will rust. With some regular work, carbon steel also can be left bare, but it will rust more quickly than stainless.
Protective finishes for your handguns come in two types. The first and oldest — browning, bluing, color case-hardening, and Parkerizing — result from a chemical reaction with the surface of the steel itself.
Instead of merely browning when treated to a controlled rusting process, steel takes on a deep blue color when rusted with the appropriate chemical mixtures. Steel also can be heated to oxidize the surface. When heat-soaked in ovens at the right temperature, the resulting “fire blue” is very striking, albeit not very protective.
For a quick touch-up of blued handguns, Outers makes a felt-tip pen applicator set. Clean the steel, touch it up, and give it a final wash.
Heat bluing of small parts offered manufacturers a one-step way to draw the temper of heat-treated or forged parts, give them color, and protect them from the elements. The small parts on Luger pistols are a yellow color, called “straw.” The manufacturer heat-blued them, but the process stopped short of bringing the steel to the full blue color and left it simply yellow, or straw in color.
As attractive as these finishes are, they are not any more durable than the old browning method. Firearms manufacturers looked for a more lasting method, and their customers insisted on it. Hot bluing, a boiling solution of caustic salts, proved more durable than browning, rust-bluing, or fire bluing. By the standards of yesterday, it was a big advance. By the standards of current coatings and platings, even hot-dip blue is marginally effective against corrosion.
The second type of finish includes chrome, nickel, gold, or even paint. These coatings or platings adhere to the steel and seal it away from oxidation. Firearms manufacturers and aftermarket firearms refinishers are constantly developing combinations and improvements of these finishes.
Before WWII, if you wanted to blue your handgun, you bought the assorted chemicals and mixed the bluing solution yourself. In his book The Modern Gunsmith, last updated in 1941, James V. Howe listed more than 50 formulae for various firearms finishes, none of which could be purchased over the counter. The raw ingredients needed to mix the formulas included nitric acid, hydrochloric acid, sulfuric acid, and copper sulfate, combined with alcohol and chased with a whiff of distilled water.
Today, any finishing that can be done at home is done with pre-mixed, somewhat safer, chemicals. Brownells offers pages of solutions and tanks, ready for you to set up and start the work. You might be tempted to try. But should you?
No. Except for a few finishes you can apply without going to the trouble of setting up a separate room for the process, re-finishing should be left to professionals. DIY works for chemical cold bluing, heat bluing of small parts with a propane torch, various Brownells bake-on epoxy finishes, cold rust bluing, and Brownells Parkerizing. Any other finish you may be tempted to apply to a firearm requires tanks, chemicals, heat or electricity, and ventilation. The cost of the equipment alone exceeds that of a dozen bluing jobs by a professional. And you still need a dedicated space.
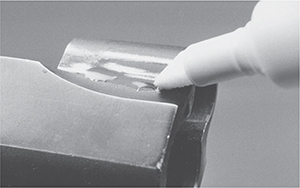
Cold bluing, or chemical bluing, is used to touch-up slightly worn or nicked blued finishes. It is suitable for covering up the holster wear on the muzzle of a revolver or a spot on a slide where your sweat lifted the blue. It is not nearly as durable as a hot-dip blue finish. Some cold-blue formulas contain sulfides, and a handgun that has been touched-up too much can have a very slight, but noticeable, smell of rotten eggs. Sniffing a used firearm, to see if there has been any use of cold blue, is an old trick in the gun business.
My standard cold-blue solution is Brownells Oxpho-Blue. It gives a reasonably durable finish and can repeatedly be applied until the color is dark enough to match the existing finish. To use a cold-blue solution first scrub the area to be blued with 0000 steel wool and light oil. You do this to clean the surface of powder residue, mild oxidation and any pre-existing finish that is good-and-ready to lift off. Obviously, you don’t cold blue a handgun with a plated surface or a stainless steel handgun. Once scrubbed, thoroughly degrease the area. Degrease with several applications of a fast-evaporating solvent or a mix like brake cleaner. Do this in a well-ventilated area! Clamp the handgun in a padded vise, and bring your work lamp close to the surface. Use the lamp to warm the area you’re working. With a cotton swab, brush the Oxpho-blue onto the steel. Leave it on the surface for a minute, and then polish with dry 0000 steel wool. Degrease, and apply the Oxpho-blue again. Repeat until you get the color you want. Oil the surface to finish the process.
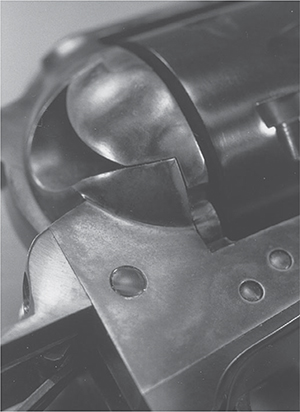
This is the cleaner being applied.

Now the bluing solution. You can see that some of the bright metal is already reacting.
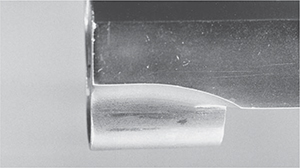
The touched-up slide. The only way to see the cold-blued area is to angle the light.
To heat-blue small parts requires a propane torch and oil. You must use a petroleum-based oil; a synthetic will not do. Have the oil in a small cup or jar. Polish the part to match the rest of the gun. Degrease the part and hold with a pair of needle-nose pliers. Grip an area that won’t be visible after assembly because the pliers act as a heat sink and will not let the part blue in that spot. Play the torch on the surface to be blued.
As the part heats, you will see the surface change color. First you’ll see a straw color, followed by violet, light blue, and finally Colt fire blue. If you heat too quickly, the part will pass through all shades and turn white again. They you’ll have to cool the part, buff the surface, and begin again. When the part is hot enough the surface turns a light blue, drop it in the oil which will darken the blue finish. Remove the part to cool. Buff by hand with 0000 steel wool and oil.
Practice on odd bits of steel, parts taken from dead test guns, and other such items. Learn and then apply your skills. Practice will let you easily gauge the right moment to drop the part into the oil. If you don’t want a dark finish, let the part air cool without the oil bath. For the darkest finish, immerse the part in the oil when hot, fish it out of the oil with pliers and use the torch to briefly burn off the oil.
You can only heat-blue small parts. To heat-blue a slide evenly takes a temperature-controlled heat furnace, which costs as much as a dozen or more blue jobs on your handguns.
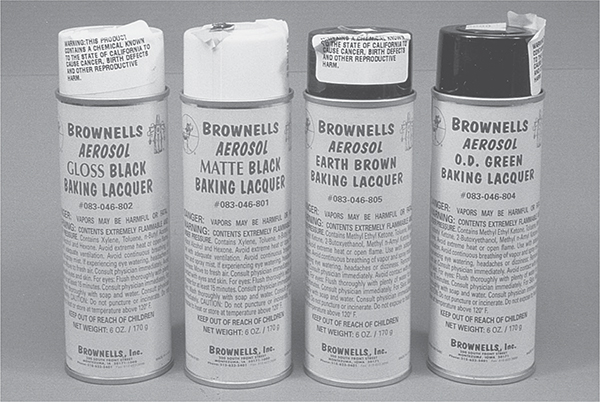
Brownells baking lacquer is available in several colors, gloss and matte, and is easy to apply. While not greatly durable, it is better than standard blueing and can be touched-up when it shows wear.
The Brownells baked-on epoxy finish is simple, reasonably durable, and does not require a large investment in equipment. It turns a bright stainless or plated handgun an even black, brown, or green. If you want to, you can even get all three colors and apply your own camouflage pattern. The final finish looks like paint. It smells bad when you bake it. Brownells offers two finishes, with pretty much the same application process. One is Baking Lacquer. The other is Teflon/Moly Oven Cure.
In order to hold the parts while you spray them and bake them, you should make supports. For the slide, I take scrap pieces of steel that fit under the slide. I wrap the supports in aluminum foil, to make cleanup easier. For 1911 frames, I just use my holding bar. Since you are heating only to 350 degrees, you could even cut supports from wood, or bend them from metal hangars. Brownells suggests you can apply the baked-on finish right over a blued finish. I prefer bare metal for better bonding. Rub the parts with 0000 steel wool to remove all of the old blue finish that will come off. Degrease. Take a blow dryer and gently heat the parts you will be spraying. Hold your hand close to the part to check its warmth, but don’t touch it. Alternately, use the warm setting in the oven to warm the parts before applying the spray. Spray the finish onto your parts and let dry for 30 minutes. You can use this time to change the oven from warm to 350 degrees, and it will be up to temp when you’re ready.

The Brownells Teflon/Moly oven cure finish offers greater durability than the baking lacquer.
Spray the finish on in even, thin coats, passing smoothly from end to end. For the Lacquer, give the parts three thin passes, for the Teflon/Moly, only two.
Open the windows! The process smells BAD! Bake the parts for 30 minutes. DO NOT use any regular cooking pans for baking on your finish! Cool. When done, wipe the oven with warm water and detergent.
The resulting finishes are unaffected by oils and solvents. It will take some doing before they start wearing through. When they do, wet-sand only the worn area with your finest, smallest-grit grade of cloth, degrease and apply a new “patch” of the same color, or if a camo scheme, whatever matches.

This is Amer-lene Parkerizing covered with Brownells baking lacquer. After five years of daily carry, 5,000 rounds of ammunition, and two trips to Gunsite, this is all the wear that shows.
Cold rust-bluing, used more in the past than today, does not require the kind of equipment needed for hot-dip bluing, but is a labor-intensive process that takes at least four days. Some old formulas even suggested ten days or two weeks!
In a cold-rust bluing process, the gunsmith would polish the steel, degrease it, and swab on the bluing solution. The firearm was then suspended over a tank of warm water, which rusted the steel. To properly control the rate of rusting/bluing, requires a dedicated cabinet. Obviously you’d want it made of wood, so you wouldn’t be rusting out your cabinet on a monthly basis.
After rusting, any crusty sections were carded off with a wire wheel or brush, leaving the surface of the steel darkened. This process was repeated daily, with each day’s start a dip in a boiling water bath. The finish on the steel became darker and darker. It took four days to get a good finish with the fastest formula. Oiling halted the rusting process and protected the finish.

This is a S&W M-65 in .357 Magnum. Coated with Accurate Platings Enduracoat, this locking notch shows no chipping or wear after 2,000 times of dry-firing.
Modern improvements in chemistry have shortened the time, and reduced or removed the need for the warm water tanks to keep the surface humid. They have not removed the need for a tank of boiling water or the carding of the steel over several days of waiting.
On a handgun for presentation or exhibition, a rust-blued surface can be gorgeous. To get that gorgeous finish requires lots of practice, patience and skill, and the basis is the polishing. A rust-blued handgun shows every flaw of the polishing, so keep that in mind.
The most important part of any refinishing job is the polishing of the surface. Only baked-on epoxies or Teflon finishes will hide flaws, and they won’t hide all of them. Flaws in the polishing of the steel will show up in a blue or color-case job. Hard chrome or nickel will highlight errors. Polish out the flaws before you ship!

Firearms refinishing requires tanks, chemicals and lots of ventilation. This plating room at Accurate Plating uses the natural breezes of the Gulf of Mexico for ventilation.
If you do not want to polish out flaws in the surface of your handgun yourself, you can have the refinisher do it. Think about it first. Good polishing takes time, and the refinisher will be charging for his time. At the highest hourly rate I have seen, two hours of polishing will equal the cost of the plating job itself.
Whether or not you do your own polishing, try to see a sample of the refinisher’s work beforehand. Look for pulled letters or dished screw holes. If you find any signs of these, go somewhere else.
Unlike the home-applied finishes described earlier, which can be touched up or repaired, all professional finishes must go on whole. Once done, they’re done. They cannot be touched up, and you can’t change your mind. For hot-dip blued handguns, the cost of later “corrections” is not terribly high, because the process is simple: through the strip tank, into the hot dip, back to you. But if your handgun is plated and you make a change to it, the handgun must be stripped completely by hydrochloric acid and/or sand-blasting and then back into the re-plating process. Consider getting your handgun plated as having it carved in stone.

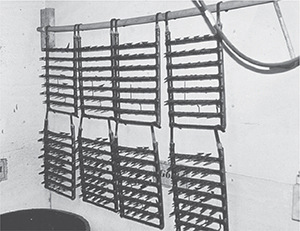
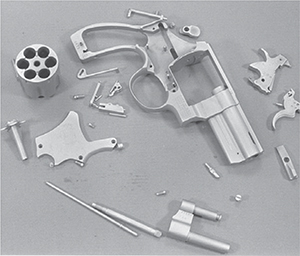
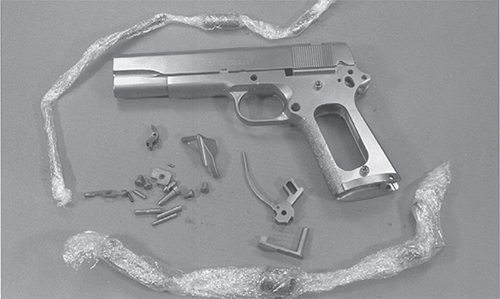
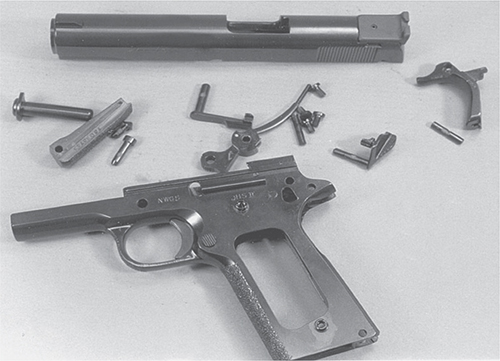
Proper refinishing also requires a means of holding the parts or handguns. These hooks have been custom-built to hold the frames, slides and cylinders.
If the hooks and racks are not kept separated by process, they may contaminate other tanks.
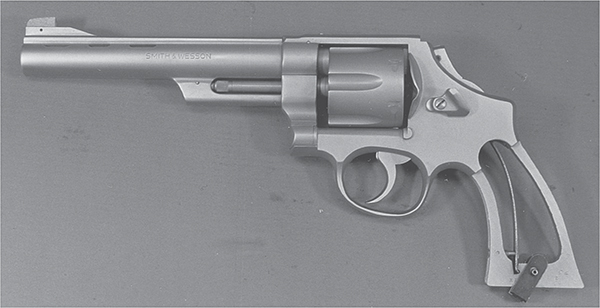
The blue finish on your handgun is the best finish the factory can apply at a reasonable cost. Not everyone wants a nickel- or chrome-plated handgun, or one in stainless. Shooters’ tastes have been firmly in favor of blued steel for nearly 200 years. Using a solution of caustic chemicals heated to temperatures from 270 degrees to 285 degrees, hot-dip bluing is the standard of the industry.
The process begins with a dip in a boiling cleaning solution to remove oil, gunk, wax, and fingerprints. Then, if necessary, the parts are polished or bead blasted. Next is an acid etching solution to remove any oils or oxidation accumulated during polishing. This also removes any remaining blue finish and creates a clean surface to which the bluing will react.
Now the parts are ready to be blued. They go into and out of the caustic bluing salt solutions several times. When they reach the desired color, the parts go into a stop bath. Finally, they go through a hot oil bath, to remove any water left behind by the stop bath.
The particular chemical solution used by a factory or a re-finisher really doesn’t matter. Any hot-dip solution can be used on all carbon steels, including springs. Tossing a stainless part in the solution is a waste of time, as the part will come out looking dirty, not blued. On anything but stainless, all hot-dip methods produce a dark blue, almost black finish. While attractive, this finish will not cover pits or errors in polishing. It is not durable. If neglected, it will quickly rust.
Hot-dip bluing has some drawbacks. The caustic chemicals won’t attack silver solder, but will dissolve soft solder. Any plastic, polymer, Loctite, anything not steel, will be attacked. Aluminum parts will suffer heinously. So if you do send a handgun off to be blued, make sure you have all that in mind, take off all the non-steel parts, and check everything twice. Those tritium-filled night sights of yours? The tubes will not survive, but the bluer, if he’s any good, will tell you that when he opens the package to inspect.
Very few still use this as a refinishing process. The heat-and-water-quench warps too many parts unless your workers are very skilled and experienced, and both end up making the process too expensive.
Color case-hardening is an old method of both protecting the surface and hardening the iron. While attractive, it doesn’t do either very well.
The process of phosphate coating, in use since the late 1800s, was refined around 1910 and trade-named Parkerizing. Later, the trade name came into common usage to describe the general process. Parkerizing is a very durable finish, but not very appealing to civilian hunters and shooters.
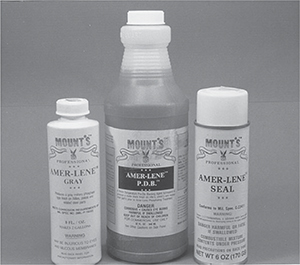
The Amer-lene Parkerizing kit is one of the few finishes that can be applied at home.
The firearm is first dipped in a cleansing, mild acid bath. Once clean, the parts are immersed in a boiling solution of phosphoric acid containing iron and either zinc- or manganese-phosphate. Depending on the particular steel and the precise solution, the surface reacts to form either manganese phosphate or zinc phosphate. The color of the final finish is dark gray. The manganese phosphate is a heavier, thicker, and more durable finish than the zinc.
Because a rough surface is larger than a smooth one, and provides more area with which the phosphate can react, Parkerizing is best done to a surface that has been bead blasted or brushed with a coarse wire wheel. After Parkerizing, a firearm is even rougher than it was going into the tanks as any previous polishing gets matted both when the steel is dipped in acid and during the Parkerizing process itself. A tightly-fitted pistol may require re-lapping the slide and frame until they slide smoothly. The newly rough surface traps and holds oil and is very rust resistant. Think of it as a phosphate sponge layer on top of the steel, and the sponge, soaked with oil, resists oxidation.
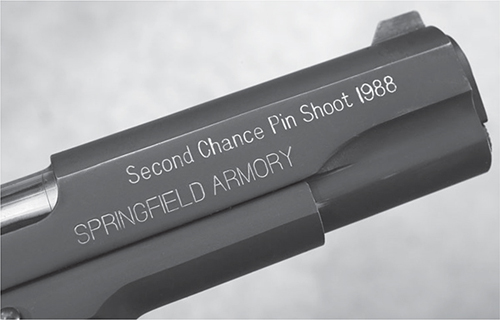
While many pistols can be had Parkerized (such as this old Springfield) you can also do it yourself with the Brownells Parkerizing kit. Yes, this was loot from Second Chance.
Near the end of the 19th century, nickel began showing up as a protective finish. First available in mirror-bright, and later in brushed or bead blasted, nickel finishes did offer protection from corrosion.
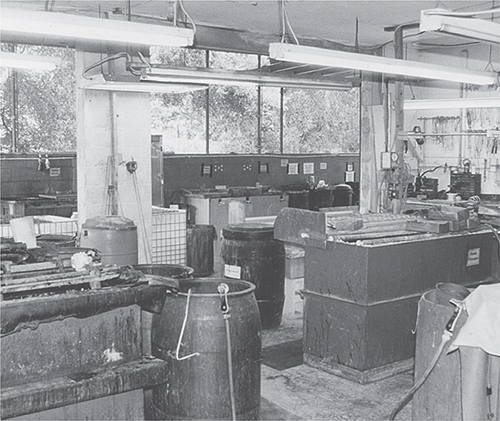
Large tanks of chemicals require good ventilation. Those aren’t windows in the background, that’s open air.
The first nickeling processes involved a tank full of nickel dissolved in metallic cyanide salts. The parts to be plated were suspended at one end of the tank while at the other was a sacrificial bar of nickel. An electrical current was pumped into the tank, passing through the nickel bar and the gun parts to complete the circuit. The current removed nickel atoms from the bar and deposited them on the gun parts.
Electrolytic nickel plating is a complicated and costly process, involving electricity, expensive chemicals, and disposal of those chemicals when exhausted. A firearm that isn’t plated properly will easily chip or flake. Firearms manufacturers gradually phased out nickel, replacing the finish with stainless steel.
Because some shooters desire a shiny finish, nickel is available from refinishing shops. Even properly done, electrolytic nickel can peel and crack away from the underlying steel.
The social stigma of shiny guns has faded a great deal in the last couple of decades. The advent of stainless first made a white handgun acceptable. Now, extremely durable finishes such as hard chrome are accepted and not exceptional. For about the same cost as electrolytic nickel, these new finishes leave the handgun both bright and protected.

A good reason to mark your parts before shipping them. Eight trays, eight handguns, eight different states of the union. You want to get your parts back.
This is a Smith & Wesson 25-2, .45ACP revolver that was plated by Accurate Plating. Powder residue wipes off, and the surface shows no wear even after many practice sessions and thousands of rounds of hot bowling pin ammunition.
Using the same metal as decorative chrome, hard chrome was developed to plate cutting edges of milling and drilling tools for longer life. When hard chroming had grown common enough, in the mid- to late 1970s, shooters started treating handguns. Hard chrome is a bright, white plating with a thickness of less than .001 inches, commonly .0004, and is very stark. It will not hide anything. Any flaw in the surface will stand out.
The surface hardness of hard chrome is between 65 and 70 on the Rockwell C scale, much harder than the 30 of a handgun’s frame and the 40 of its slide. The bond is so good a blow hard enough to dent the underlying steel does not break the chrome away. Properly done, hard chrome will not crack, chip or flake. To remove it, your refinisher must use an acid bath.
Hard chrome also has a very low coefficient of friction and two chromed surfaces sliding on each other rub less than two steel pieces do. The harder surface and decreased friction greatly increase the service life of moving parts.
In many regards, hard chrome comes very close to being an ideal firearms finish. Although it is not the ultimate in corrosion resistance, (steel will rust underneath hard chrome, though very slowly) it is popular with competitors whose firearms see a lot of use. The rusting process of a hard-chromed handgun happens due to the surface of chrome not being amorphous. That is, there are microscopic gaps in the plated chrome. However, given enough exposure to strong-enough oxidizers, a hard-chromed pistol can rust. The solution is to plate it two or three times, so the microscopic gaps don’t line up. Not just “leave it in” longer, but plate, remove, prep, and plate again.
Hard chrome is a white plating that shows the texture of the surface finish. This is Enduraguard from Accurate Plating, and they did a very nice job of bead-blasting the surface before plating it.
In addition to electroless nickel plating and industrial hard chrome, the Armoloy company offers a specialized application of chrome. Called Armoloy, it is a nodular thin dense chrome application. The thickness applied is .0002 inches! As with all hard chrome, it is hard stuff, 70 on the Rockwell C scale. The plating is a slightly darker gray than regular hard chrome, resists salt and acids, and is a snap to clean up. You can plate any kind of steel, carbon or stainless. You should not put Armoloy on springs, and they will not plate aluminum or plastic. Armoloy is a plating company and does not offer any pistolsmithing services. You must ship your handgun completely disassembled, with a list of the parts. Also, they cannot plate composite parts. That is, they cannot plate an aluminum frame with steel parts attached to it.
This Armoloy finish shows all the markings, good or bad. The caliber designation is needed, and the small dimple is a reminder. Both stayed, and both show.
Armoloy does not have a gunsmith on the premises, you must ship your handgun to them completely disassembled. It will come back the same way.

Armoloy looks different. Different form hard chrome, nickel, stainless, etc.
Teflon started appearing on handguns in the 1970s. Just like the early Teflon frying pans, the first Teflon-plated guns weren’t very durable. A few months of daily carry in a holster could wear the Teflon right through, exposing the steel underneath. The finish tended to fade. The process has improved greatly since.
If you are going to have a revolver Teflon-coated, do not have the inside, or any of the interior parts coated. Teflon is applied in a thicker layer than the metal plating, and this can cause problems with tightly fitted revolver parts. If you send a pistol with a snug slide-frame-rail fit, after the Teflon is applied over the rails the pistol may not go back together. You can end up lapping the rails again until the slide moves freely.
Electroless nickel is a definite improvement over the old nickel process. For one thing, it offers a matte finish, with a slight gold or yellow tinge instead of the bright nickel. Electroless nickel is a chemical deposition process that provides uniform plating. Electroless nickel starts off as a heated solution containing nickel. When the solution is driven through the proper temperature ranges, the nickel precipitates onto the firearm. While it is not as hard as hard chrome, “only” 53 to 56 Rockwell C, electroless nickel does not build up the slightly thicker deposits on corners and edges that electrically-driven plating processes such as hard chrome can. A properly applied electroless nickel plating will not peel away from the underlying steel, even if the part is bent through 180 degrees.
As icing on the cake, Robar developed a process that combines electroless nickel with Teflon. Called NP3, the electroless nickel solution incorporates sub-micron particles of Teflon throughout the plating. If the nickel wears, a fresh Teflon-bearing surface is exposed. The plating is extremely even, and only .0002 inch thick. It is slightly less hard than straight electroless nickel, measuring 48-51 on the Rockwell C scale.
The finish is a silver-gray and shows the texture of the base metal. If you have the surface of your handgun sandblasted, you will end up with a dark gray finish. A curious aspect of NP3 is that if you scratch the surface down to the bare steel, any rust that forms does not seem to spread under the edges of the plating.
Because of the Teflon trapped in the nickel, NP3 has a very high lubricity, and the friction between parts is as low as you find. NP3 is a very popular finish for desert applications. Because of the low friction, you don’t have to oil the parts. Without oil to attract and hold the grit of the desert, the NP3 actually lasts longer dry than it would oiled.

Rambear Enterprises makes a teflon-kevlar finish called Bearskin. You can have it in a spectrum of colors, and even applied in a camo finish.

The Bearskin finish on this Gunsite ATP 1911 shows all the markings, and does not dull the forward grasping grooves.
This 1911 came back from Robar in protective layers of plastic wrapping film. If it gets scratched, it won’t happen at Robar, or coming back from Robar.

The NP3 finish from Robar is an electroless nickel that incorporates teflon in the plating. It is less than .001 inches thick, and clearly shows the markings on the bottom of this slide.
Rambear still does Bearskin. The newer finish, such as Ceracoat, comes in a lot more colors. Both are very good.
Robar also offers a blackening process for stainless steel. The chrome already in the stainless alloy is oxidized in a chemical treatment, resulting in a chrome-sulfide surface. Since the surface is not plated, the dimensions of parts are not changed. While not changing the heat-treatment or durability of the steel, the process increases resistance to corrosion.
Stainless steel blackening depends on the treatment plant knowing the alloy being treated. Robar has a chemistry lab right on site. If you ship them something they haven’t seen before, they can test it before treating it. If you want to send your stainless handgun to someone else for blackening, ask if they have treated that model before you ship it.
Back from Robar, this 1911 was covered with Roguard. It is a semi-gloss black that promises great durability, and is curiously soft to the touch.
In the 1980s, black chrome was deemed the next, great leap forward in firearms finishes. With a black chrome finish, it was thought, shooters could have the durability of hard chrome and the black color of bluing. Unfortunately, black chrome is not very durable. Accurate Plating applies it over a base coat of nickel or electroless nickel to increase durability and adhesion. It does not reach into the internal spaces of a handgun, so the magazine well of a pistol may not be fully blackened. While the jet-black finish is attractive, for the same durability, at a lower cost and the ability to patch-repair, you are better off with baked-on epoxy.

The Enduracoat faithfully reproduces all the markings on this M-65.

The Roguard finish reproduces the serial number stamped on this mainspring housing, as well as the stippling.

This is a S&W M-65 in .357 Magnum. Coated with Accurate Platings Enduracoat, this locking notch shows no chipping or wear after 2,000 times of dry-firing.
Flashy, expensive, and very soft, gold plating offers no durability. On very expensive custom firearms, gold can be inlaid into the surface of the steel. As inlaid wire, gold is slightly more durable. The most frequent use for gold plating is on small parts of a presentation handgun.
Paint to protect metal has been common for the last couple of centuries. In the early attempts, paint quality was so poor a painted metal surface wasn’t really protected. Maintaining the paint was more work than maintaining the metal.
While modern paints are more effective, they’re still not durable. Epoxies provide the needed durability. A reaction between two or more chemicals, epoxy forms a tough and lasting coating. The epoxy finish for a handgun doesn’t fade and is scratch- and chip-resistant. Paint dries, epoxy reacts. Epoxy, unfortunately, also costs.
One of the best epoxy finishes for your handgun is Roguard, from Robar. They offer a lifetime warranty.
Roguard goes on .001 inches thick, so you do not lose any of your markings. Any mars and blemishes will likewise be sealed, but not covered up if you do not first remove them. Roguard can be patched. If you wear the high spots down to the bare metal, you can ship it back for a touch-up session.
Accurate Plating also does a baked-on epoxy finish, called Enduracoat. Another good one is Tev-Cote by Altitude Gun Works.
“Airweight” handguns have frames made of aluminum alloys. Aluminum can be finished with electro- and electroless nickel, hard chrome, Teflon, and any of the epoxy finishes. The factory anodizes the aluminum to finish it. A heat and chemical treatment, anodizing forms a hardened skin out of the surface layer of the metal. Properly done, anodizing is amazingly hard. If you have to file anodized aluminum, you’ll find your file sliding off the surface until you bear down and scuff through it.
Depending on the dye used near the end of the process, you can have aluminum anodized a whole series of colors, including the ever-popular black. Over time and under use, however, anodizing will fade. The black dyes commonly used turn a blue-ish or purple color.
An aluminum frame must have all steel parts removed, or they will contaminate the chemical solutions. If you have to repair an aluminum revolver frame, you have two choices for a new finish. One, send it back to the manufacturer. They can properly remove the steel parts without damaging the frame, re-anodize, and reassemble. Two, use some other finish that is compatible with both steel and aluminum.
Black Oxide is the newest “old fashioned” firearms finish. It is a surface conversion of the steel, using sodium hydroxide along with a mixture (depending on the alloy, manufacturers production requirements, and waste-disposal methods) of nitrates and nitrites. The sodium hydroxide bonds to the surface of the steel, forming a porous layer that traps oil. It also converts the surface layer of the steel to a harder form, but the darkening agent/dyes and the porous layer provide most of the protection to your handgun.
This is a newer case-hardening process. At temperature (depending on process and chemicals, 1,000 - 1,200 F) the surface of steel being treated is exposed to nitrogen and/or carbon, and the result is a surface that has both been hardened and “passivated.” Passivation is a process where the bonding sites where oxidation may occur have already been appropriated by a neutral, non-oxidating element. If there is no place for oxygen to get a hold, it can’t oxidate. These finishing methods come under a number of names, two of which will be familiar; Tenifer and Melonite.

If you think you might want to take up re-finishing as a hobby, look at the tanks, lights and ventilation needed for one room.

First, consider how much work you want to do yourself to prepare the surface. The process of plating is exactly like the process of painting a car. If you turn your car over to the paint shop with dirt, bugs and scratches on the surface, you’ll either get back a paint job with dirt, bugs and scratches under it, or a bill for cleaning before painting. If you don’t care that tool marks, casting lines and scratches show through the plating on your pistol, fine. Your plater, though, may have a different idea.

If you are shipping your handgun off for finishing or re-finishing, do it and the guy doing the job a favor; pack a list, wrap the parts to protect them, and count them up one last time before you seal the box.
Some platers are so concerned with their work, and the image of their plating, they insist on polishing out the more egregious marks. They’ll charge you for that work, too. Do your homework. Get catalogs. Along with the request for a catalog, find out their shop policies. Do they insist on polishing out “ugly” guns? If so, find out the rate and the average charge. Armed with policies, rates, etc., you can make an informed decision.
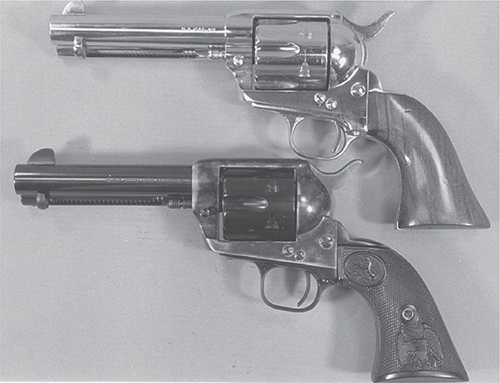
Call me old-fashioned, or conservative, but for a single-action revolver I think that a mixture of blueing and color case-hardening is the only appropriate finish. I also think the earliest T-birds are the most attractive cars ever made.
You will see many handguns with a matte or brushed finish under their plating jobs, but not many with a mirror finish. Why? There are three reasons. First, the acids used to clean the parts prior to immersion in the plating tanks will slightly etch the surface. Even the brightest mirror finish will lose some of its luster. Second, the plating will adhere better to a rougher surface. To reduce the possibility of the finish lifting, platers prefer a matte or brushed surface. Third, a mirror polish is not easy to do. It takes skill, practice, and time. Rather than charge twice as much money, (and not make twice as much) the plater might say “no” to a mirror finish.
Ask if they want the handgun in pieces. If you are plating the whole thing and the plater can disassemble it, ship the handgun assembled. This is the best way to ensure all the parts are there. If you are only having parts of the handgun plated, or you are polishing before you ship, disassemble the handgun first.
Mark your parts before shipping them. This safety has the last three digits of the serial number stamped on the back side.
While you have the handgun apart, mark the major parts with the receiver’s serial number. In case a tray of parts gets knocked over at the plater, there will be no problem figuring out what parts go with your handgun. On a revolver, this is not a big deal, as the major parts already have either the serial number or the factory assembly number on them. On a pistol, I mark the parts to be shipped with the last three digits of the serial number, using a set of punches I keep in a drawer for just this task. An electric marking pencil does the same thing. Marking the parts also helps you if you have more than one handgun of a particular model. Yes, one may be blue and the other stainless, but often, matched pairs are just that, matched. Your backup may be identical except for a serial number to your main competition gun. Having the precisely fitted parts numbered to the gun to which they are fitted only makes sense.
Separate objects that won’t, or can’t, be plated. Put them in a box or bag, with the serial number clearly marked. Yes, you may only have one of this model, but it pays to be careful and consistent.
Platers simply won’t plate plastic parts.
Platers will not plate springs. Even if the spring survives the cleaning acid bath, and the plating process does not change the compression qualities of the spring steel, the extra layer of the plating can bind the spring.
Platers do not plate titanium or tungsten. If you send your pistol assembled, note what parts are titanium or tungsten. If you are shipping it in pieces, leave those parts out and note in your cover letter that you have retained them.
Unless you want your sights plated, take them off. The plater, before plating, can mask a staked front sight, but there is a better way. Have him plate the front sight. When you get it back, use a paint or epoxy to blacken it. For a three-dot set of sights, blacken the sight, then paint the dot back in. Or, remove the front sight and stake a replacement back on when the pistol gets back. If your front sight is in a dovetail, remove it before shipping the pistol. Always remove the rear sight.
None of the radioactive Tritium night sights will survive the plating process. If you do not remove them, the plater must remove or mask them, and charge you for the extra work.
Write up a detailed list of all the parts being shipped. Everything shipped goes on this list or noted that it wasn’t shipped. Note by name the parts that have been removed: “Sights removed, recoil spring guide rod not shipped,” etc. Total the number of parts on the list, and count the number being shipped. If the plater receives a package, and there are not enough parts for a complete pistol, they have a puzzle. Without your note, they have a problem. You will receive a phone call or email, asking if all the parts you wanted plated are there, and perhaps is there a fax number or email address they can use to send a detailed list of what you shipped. You will be charged for the time and phone call. Save the time and money. Send a list, make sure the handgun serial number, model, and your name are on this list.
Print or type a letter detailing what level of polish and what finish you want. Keep it simple. As an example; “Enclosed, please find Colt Series 70 pistol #123, caliber .45 ACP, assembled, without sights. Two magazines, assembled. Please wire brush the surface and hard chrome all parts of pistol and magazines, excluding springs. Check enclosed. Ship UPS Next Day when finished.”
In the letter, if something is not factory-spec, explain. Specify which parts are soldered, and what solder was used. Solder is softer than steel, and can be eroded by bead-blasting, or wiped out of the edge of a joint by a wire wheel. Some acids can attack solder. By telling the plater which parts are soldered you let them exercise due caution when stripping those parts. In this new age of digital-everything, it is easy enough to take a digital photograph of your parts, laid out before you pack and ship them. Include a copy along with the written list.
For liability reasons, the plater will not plate the interior of the barrel. Your barrel was manufactured to a precise interior dimension. Plating thick enough to be durable in the bore would change those dimensions, increasing pressure. Plating thin enough to prevent pressure rises would not be durable. The chrome-lined barrels you read about for military rifles? The thickness of that plating is several times greater than the plating on your handgun. The barrel maker took into account the thickness of the chrome plating when broaching and rifling the barrel.
Tell the plater how tightly the slide and frame fit. If you have made the fit so tight they cannot plate it and get the slide back on the frame, they will call you. Do you want them to lap the fit before or after the plating goes on? Or will you re-fit the slide and frame after the pistol comes back?
Once your package returns, count the parts. Same number you shipped? Assemble, and have fun. If not, call immediately!
Two-tone finishes, like this Spradlins Tech-cote, are now all the rage. Color hardly matters, but durability does. And this finish is as tough as the rest.