
We used the following single-step machine-binding technique to finish all the quilts in this book. All the bindings were made from strips cut with the crosswise grain (straight across from selvage to selvage), not on the bias (diagonal to the grain). We do not feel that it is necessary to cut on the bias if the quilt edge is straight. Cutting from selvage to selvage saves both time and money. This binding method requires just one tool: a bias tape maker. Our favorite is the Clover brand 1″ (25mm) bias tape maker. It transforms 2″ strips into ½″ finished binding.
If you are interested in learning about pillowcase binding or the more traditional hand-and-machine method, you will find complete instructions in our book Quilts Made Modern.
1. Calculate the perimeter of the quilt and add 12″. For a 55″ × 75″ quilt, for example, this would be 55″ + 75″ + 55″ + 75″ + 12″ = 272″. This is the total length of binding needed.
2. Divide this by 40″ (the length of strips cut from selvage to selvage). Round up the result to determine the number of strips you need to cut. In this case, 272″ ÷ 40″ = 6.8, which you round up to 7 strips.
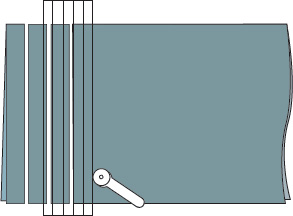
Fold fabric in half with selvages together and cut strips with crosswise grain.
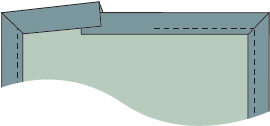
1. Pin the right sides of 2 binding strips together at right angles and sew across diagonally.
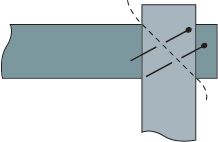
Join strips.
2. Sew the remaining strips together to form a continuous strip.
3. Trim the seam allowances to 1/4″.

Trim.
4. Press open the seams to avoid bulges in the binding.
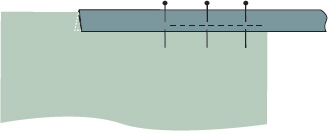
1. Cut an end of the continuous binding strip to a taper and insert it into the bias tape maker. Working on an ironing board, pull the strip through the tool, pressing the finished strip edges together in the center with light steam. As you encounter seams in the binding strip, make sure they are open and ease them through the tool.

Press as you pull strip through tool.
2. Press the binding in half lengthwise to make a ½″ binding, setting with light steam.

Fold and press lengthwise.
3. Square off the tapered end.
1. With the front of the quilt facing up, start 6″ beyond a corner and wrap the folded binding around the raw edge of the quilt so it is snug. Pin the binding in place up to the next corner.
2. Leaving the first few inches of binding unsewn, stitch ⅛″ from the inner edge of the binding. Use your left hand to guide the quilt under the presser foot and your right hand to keep the binding snug against the quilt, sewing all the way to the corner. Lift the presser foot and cut the thread.
Fit binding on quilt and sew.
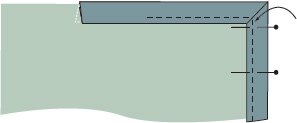
3. To miter the binding at the corner, hold the quilt in your left hand. Place your right thumb inside the binding strip and fold it open, creasing it at a 45° angle on the front and back.

Open binding.
4. Fold the binding back toward the quilt, making crisp, finger-pressed miters on the front and back. Fit the raw edge of the quilt fully into the folded binding and pin in place to the next corner. You may find that with practice you can keep the binding snug enough without pinning. Backtack the mitered corner and then sew the binding ⅛″ from the inner edge to the next corner.
Fold and sew.
5. Repeat until you come to the last corner. Lift the presser foot and cut the thread.
6. Trim the free end of the binding so that it overlaps ½″ with the beginning.
Trim, leaving ½″ overlap.
7. Sew the ends together using a ¼″ seam allowance. Refold the binding in place, finger-pressing to crease.

Sew ends.
8. Miter the last corner and continue sewing the binding until you overlap the first stitching. Backtack to reinforce.

Finish sewing.
If you find that your stitching missed the binding on the back or if your binding separates from the quilt, it means you didn’t keep it snugly and evenly wrapped around the quilt edge as you sewed. You might find it helpful to pin the binding in place until you get the hang of it. You’ll be able to overcome these problems with a bit of practice.