
Unlike almost every other craft, origami is about ethics at least as much as it is about aesthetics. In origami, ethics means the rules that paperfolding designers impose upon themselves about what they may, and may not, do in creating and realising a design. There are many origami ethics but the most important is the idea of pure origami, which basically means that the designs should be achieved just by folding paper. In pure origami, paper and folding together are enough. The Kabuto is a representation of a traditional Samurai warrior’s helmet that completely encapsulates this ideal.
Location Creases
Often the location points for a fold will be part of the existing structure of the design, corners and edges, for instance. Sometimes, however, the location points for a fold have to be created by making extra creases which are not necessary for the design itself. The folds made in Step 4 of the Kabuto, for instance, are only there so that the folds made in step 6 can be made accurately.
The Sideways Squash
The Kabuto also uses a technique called the ‘sideways squash’. You will meet this in Steps 14 and 18. In essence this entails picking the design up, separating the layers at the bottom of the design and squashing it flat sideways, so that the two outside corners of the design are brought together in the centre. If you have ever folded a newspaper hat and changed it into a boat, you will be familiar with this move.
Materials
Kabuto is created from a square using the simplest of folds, which can all be made individually in isolation from each other. The design works well in ordinary mono paper and almost any weight or size of paper. The Kabuto is therefore a very good place to begin. Both surfaces of the paper are visible on the outside of the finished design.

1 Fold in half sideways, crease, then unfold.
2 Fold in half downwards to form a triangle.
3 Fold both outside corners to the bottom.
4 Fold both front flaps in half upwards.
5 Fold both front flaps in half outwards, crease, then unfold. These creases are used to locate the folds to be made in Step 6.
6 Fold both front flaps outwards as shown.
7 There are two layers at the bottom. Fold the front layer upwards as shown.
8 Fold the front layer upwards again.
9 Turn the piece over sideways.
10 Fold the bottom point upwards.
11 Turn the piece over sideways.
12 Squeeze the model so that the centre opens up in front and behind.
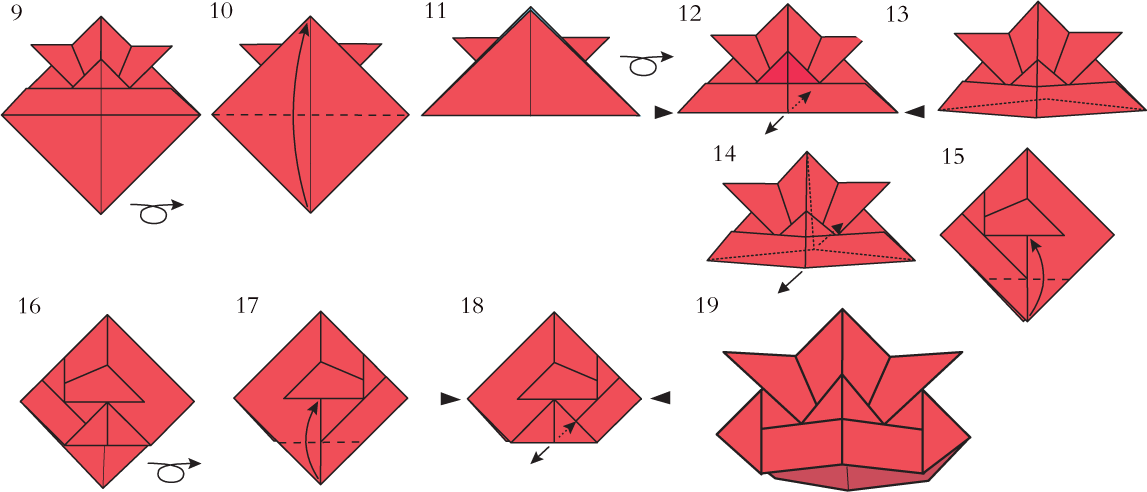
13 This is the simplest version of the Kabuto. Steps 14 through 19 show you how to improve it.
14 Squeeze the left and right hand corners together until they meet in the centre. The result should look like picture 15.
15 Fold the point of the front layers upwards as shown.
16 Turn the piece over sideways.
17 Repeat Fold 15 on this side of the design.
18 Squeeze the left and right hand corners together so that the centre opens up in front and behind. Continue squeezing until the corners meet in the centre.
19 The improved Kabuto is finished.