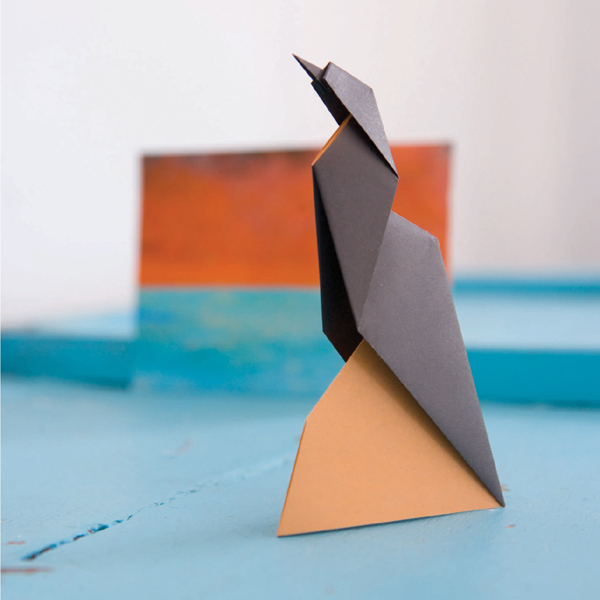
Cormorant on a Rock is a design that incorporates two separate elements, the cormorant and the rock, which are differentiated by a colour change. The cormorant is formed from one surface of the paper and the rock from the other. The colour change here is achieved using a reverse fold rather than the simple valley folds used in Banana Boat. Dual subjects like this are quite common in origami design and they can be extremely complex. Fortunately, this is one of the easiest to fold.
Materials
A single square of black/brown duo paper, black/white irogami, or any similar suitable colour combination is required. Both surfaces of the paper are visible on the outside of the finished design.
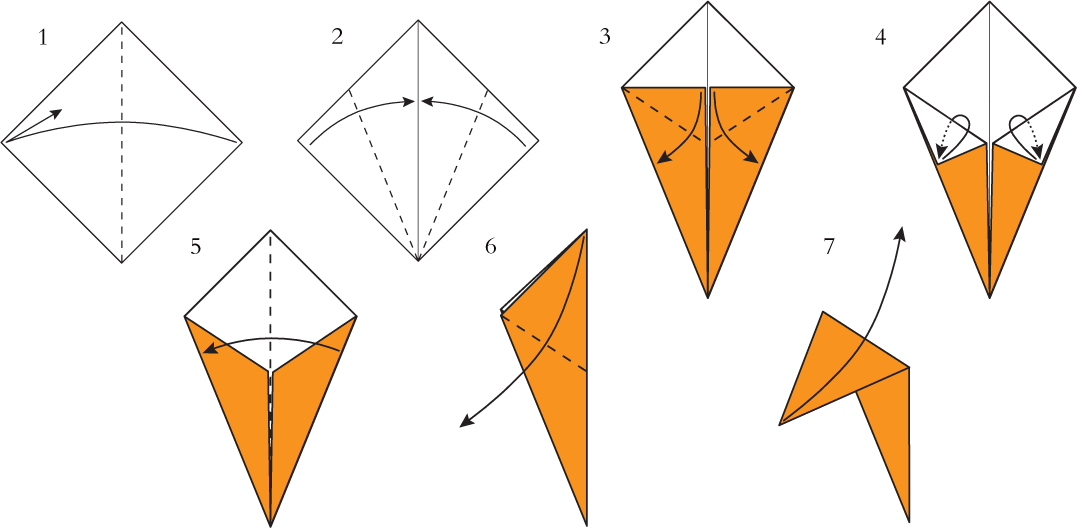
Begin with your paper arranged so that the surface of the paper you want to form the Cormorant is facing away from you.
1 Fold in half sideways, crease, then unfold.
2 Fold both the bottom edges inwards to lie along the crease made in Step 1, leaving a tiny gap between them. Try to make sure the point at the bottom remains sharp.
3 Fold the inside corners of the front flaps outwards as shown.
4 Swing both front flaps out of sight by reversing the direction of the creases made in Step 3.
5 Fold the piece in half sideways.
6 Fold the top point down to the right along the line of the edge of the internal layers.
7 Crease firmly, then open out the fold made in Step 6.
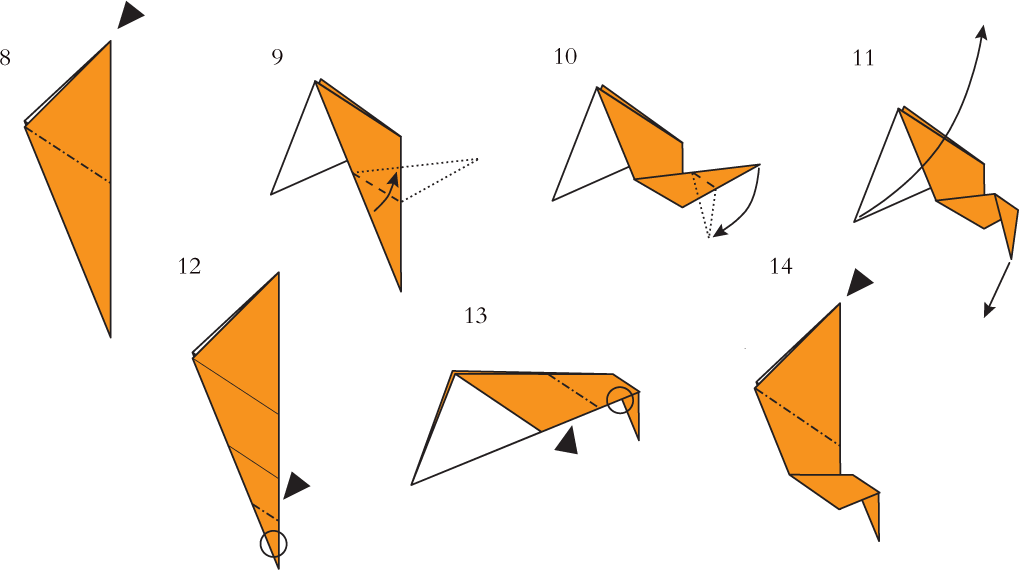
8 Turn the top point inside out between the other layers using the creases made in Step 6. You will have to reverse the direction of the crease made in the top layer of the paper as you do this. This kind of fold is called an inside reverse fold.
9 Fold the bottom point across to the right in the way shown here. There are no location points for this fold. You have to make it by eye so that it looks as much like picture 10 as possible. It might help if you notice that the crease line is parallel to the sloping top right-hand edge.
10 Fold the right-hand point downwards in a similar way.
11 Open out/undo the folds made in Steps 8 through 10.
12 This design can be created just using inside reverse folds like this. Hold the bottom point at the point marked with a circle and turn the rest of the design inside out using the crease made in Step 10.
13 Now hold the right-hand folds and turn the rest of the design inside out using the creases made in step 9.
14 Repeat step 8. Turn the top point inside out etc.

15 The more usual way of doing this would, however, be to use outside reverse folds. To practice this open back out to Step 9.
16 Turn the bottom point inside out outside the other layers using the creases made in Step 9. This is called an outside reverse fold.
17 Turn the right-hand point inside out outside the other layers using the creases made in Step 10.
18 The basic design is finished. Rotate and align with Picture 19 then follow instructions for 19 through 26 to add the fine details.
19 Begin to improve the rock the Cormorant is sitting on by folding over the tip of the right-hand point.
20 Open out the fold made in Step 19.
21 Inside reverse fold the right-hand point.
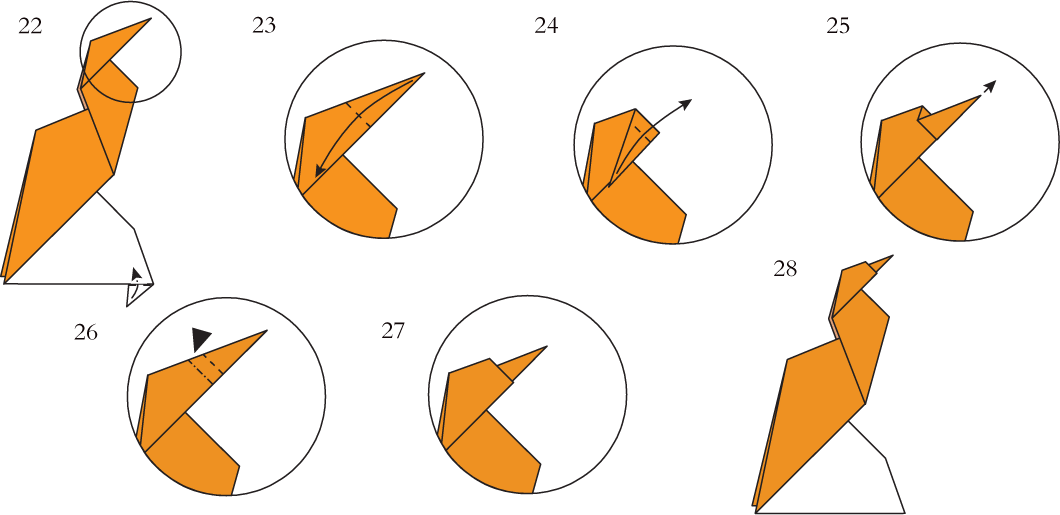
22 Fold the visible part of the flap away inside the design to lock the layers of the rock together. The enlargements will show how to improve the beak.
23 Fold the tip of the beak downwards to the left like this.
24 Then back upwards to the right.
25 Open out the folds made in Steps 23 and 24.
26 Separate the layers of the head and inside reverse fold the section of paper between the two fold lines out of sight inside the head leaving the beak sticking out.
27 The improved head and beak are finished.
28 The Cormorant on a Rock is finished, too. If you spread the layers at the bottom slightly, this design will stand up.