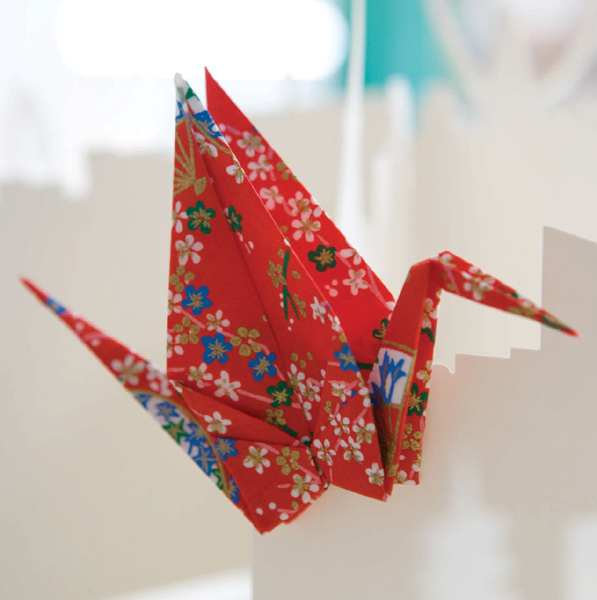
The huge popularity of the Tsuru paperfold is because of its cultural associations rather than its intrinsic beauty. In Japan, the Tsuru is a traditional symbol of longevity and it is said that if you fold a thousand cranes you will live forever. Outside Japan the Tsuru has become a symbol of good health, happiness and international peace. These modern associations have arisen as a result of the central part the folding of many Tsuru played in the story of Sadako Sasaki, a temporary survivor of the bombing of Hiroshima in 1945. Cranes are often now folded as gifts of hope for friends who are seriously ill, or as symbols of peace.
Preliminary Fold
This base is derived from a simple configuration of folds known as the preliminary fold (Step 7). The preliminary fold can be used to show how a series of intersecting creases possess the ability to be configured in two different ways, without the necessity of reversing the creases, just by turning the intersection inside out. We can borrow and misuse a mathematical word and call these two configurations ‘duals’.
The Tsuru, or Crane, is almost certainly the most famous and widely folded origami design ever. Judged purely as an origami design, though, the Tsuru lacks elegance. It is a difficult design to fold well because the thinning of the sides of the bird base creates points which are too thick to manipulate easily. Being able to fold the Tsuru well is a good test of a paperfolder’s skill.
Materials
A single square of any kind of paper. Only one surface of the paper is visible on the outside of the finished design. If you are using duo paper or irogami, begin with your square arranged so that the surface you want to show on the outside of the design is facing towards you.
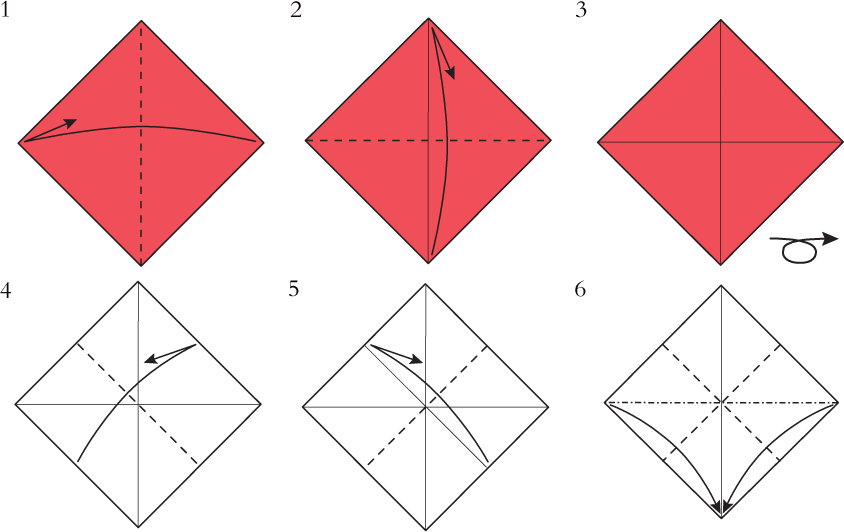
1 Fold in half sideways, crease, then unfold.
2 Fold in half upwards, crease, then unfold.
3 Turn the piece over sideways.
4 Fold in half diagonally from edge to edge as shown, crease, then unfold.
5 Fold in half diagonally from edge to edge in the other direction, crease, then unfold.
6 Bring all four corners together at the bottom. The square will collapse into the form shown in Step 7.
7 Step 8 shows this form on a larger scale.
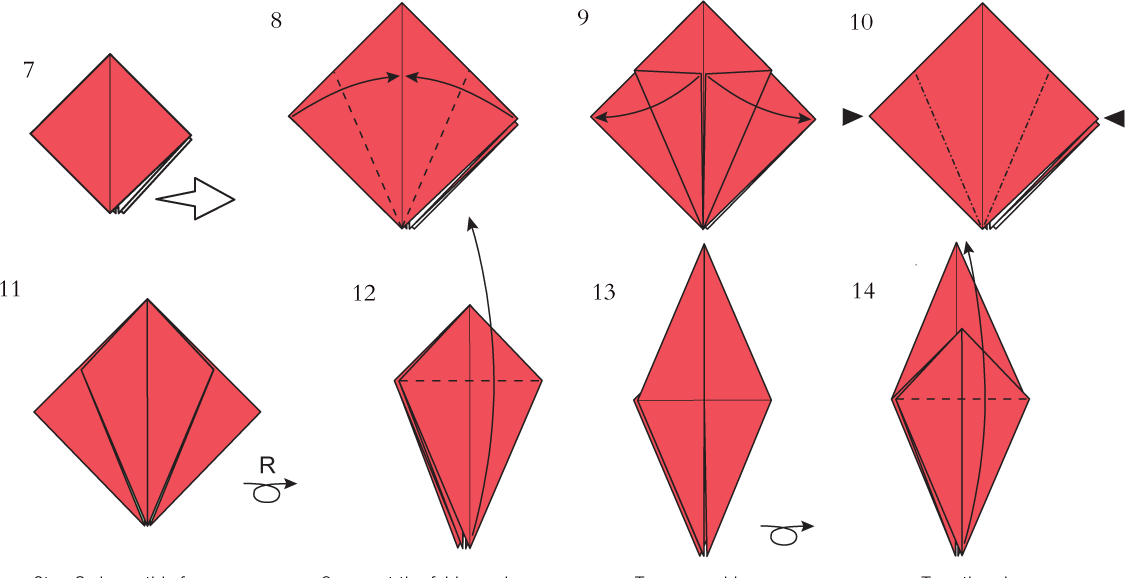
8 This form, known as the preliminary fold, is one of the traditional bases of origami from which many other bases and designs have been developed. Carefully fold the outside edges of the two front flaps inwards so that they meet along the vertical centre crease. Try to make sure that you get sharp points at the bottom.
9 Open out the folds made in Step 8.
10 Inside reverse fold the outside edges of the front flaps. You will need to reverse the direction of the creases in the front layer as you do this.
11 Turn over sideways and repeat Steps 8 through 10 on the other half of the paper. The result should look like Step 12.
12 This is the Bird Base. Fold the front flap upwards.
13 Turn the piece over sideways.
14 Fold the new front flap upwards in the same way.
The Bird Base
The bird base, the standard base from which the Tsuru is developed, has been called the greatest achievement of traditional Japanese origami and there is a good deal of justification for this opinion. The reason is that it possesses four points, each of which can be developed and manipulated with a great deal of freedom.
Four points is a useful number to have available. If you are modelling a bird, four points will give you two wings, a head and a tail, or two legs, a head and a tail, if you prefer.
Modelling animals generally requires a few more. A short tail can generally be developed without using an entire point, but one is certainly required for the head, and legs usually require one each as well. Five points are hard to find from a square, which explains why the bird base has been developed into so many designs for three-legged origami animals.
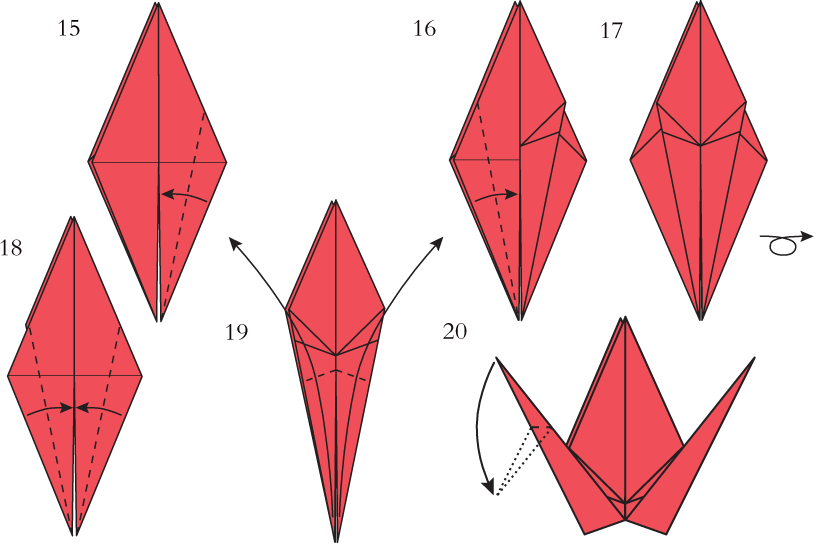
15 Fold the sloping right-hand edge of the front layer inwards to lie on the vertical centre crease.
16 Repeat Fold 15 on the left-hand side of the design.
17 Turn the piece over sideways.
18 Repeat Folds 15 and 16 on the other half of the paper.
19 Fold both the points at the bottom upwards as far as they will go. Step 20 shows what the result should look like.
20 Fold the left-hand point downwards as shown.
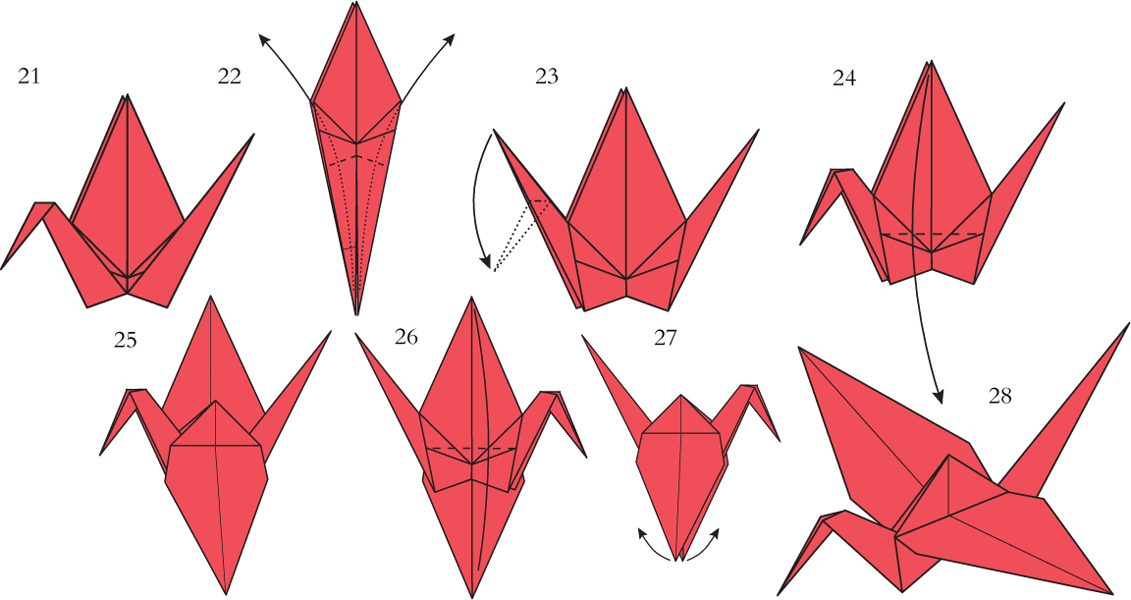
21 Crease firmly then undo the folds made in Steps 19 and 20.
22 Inside reverse fold the bottom flaps upwards using the creases made in Step 19.
23 Inside reverse fold the head downwards using the creases made in Step 20.
24 Fold the front wing downwards as far as it will go.
25 Turn the piece over sideways.
26 Fold the other wing downwards in the same way.
27 Lift the wings up at right angles in front and behind.
28 Spread the layers at the base of the tail slightly so that the Crane will stand.