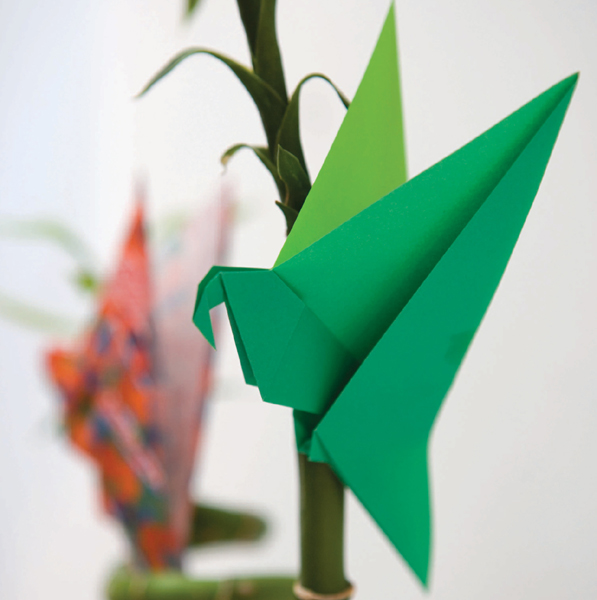
The Flapping Parrot is a development of a design known as Merlin’s Bird, which was folded from a rhombus. Changing the starting shape to a square provided sufficient paper to change a rather generic bird into a recognisable parrot and to provide it not only with an excellent flapping action but also the ability to perch on the edge of a box or table. The design also makes excellent use of a colour change. If you fold the Flapping Parrot from irogami or, even better, from duo paper, the white surface, or, in the case of duo paper, the second colour, will flash into view as you manipulate the design to make the wings flap.
Beyond Standard Bases
The representational designs so far have mostly been folded from standard bases: Cormorant from the diamond base, Piranha from the windmill base, Tsuru from the bird base, and the Chinese Goldfish from the water bomb base. The Flapping Parrot is different. It is designed around a mechanism rather than a base, though the basic principle of representational origami design, that excess paper is used as effectively as possible to add detail to the design, is maintained.
There was a time when most new origami designs were manipulated from standard bases. Modern paperfolding designers tend to either dispense with bases altogether or to design their own custom bases for each individual design in order to provide the right number of manipulable points, in the right relationship, to allow them to develop the design they have in mind.
Materials
A single square of any kind of paper. Thin paper works best. Both surfaces of the paper are visible on the outside of the finished design.
If you are using duo paper, or irogami, begin with the surface you want to show on the outside of the design facing towards you.
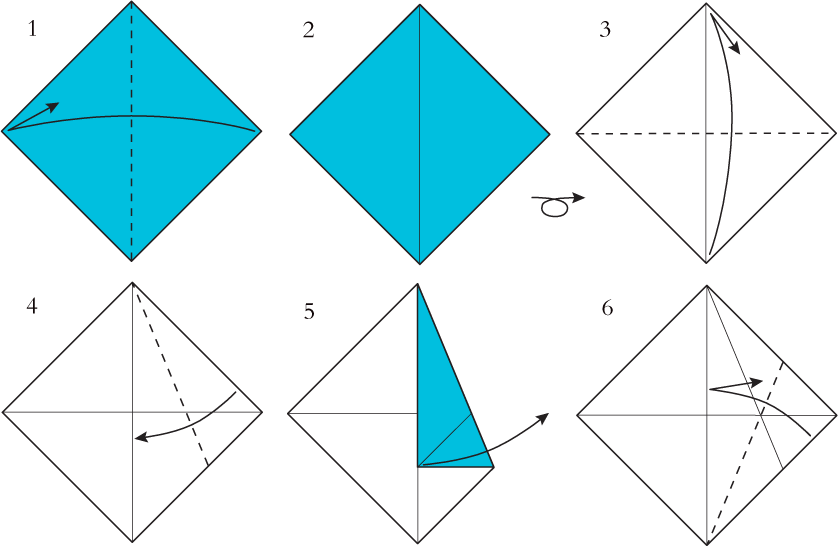
1 Fold in half sideways, crease, then unfold.
2 Turn the piece over sideways.
3 Fold in half upwards, crease, then unfold.
4 Fold the top sloping right-hand edge onto the vertical centre crease.
5 Crease as shown, then unfold.
6 Repeat Folds 4 and 5 on the bottom sloping right-hand edge, crease, then unfold.
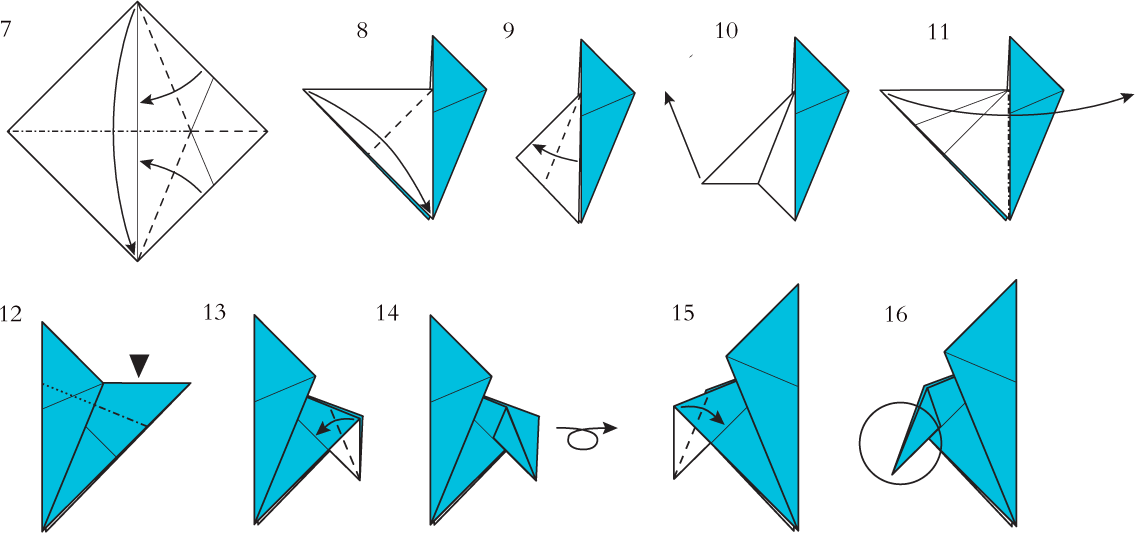
7 You will need to pick the paper up to make this fold. Fold the paper in half backwards while allowing the folds made in Steps 4 through 6 to reform. The result should look like Picture 8.
8 Fold the left-hand point in half inwards like this.
9 Fold the front flap in half again outwards as shown.
10 Crease, then pull the left-hand point upwards to open out the folds made in Steps 8 and 9.
11 Pick the paper up again and fold the left-hand point to the right in between the layers.
12 Inside reverse fold the right-hand point down in between the layers using the crease made in Step 9.
13 Fold the front layer of the right-hand point in half.
14 Turn the piece over sideways.
15 Repeat Fold 13 on this side of the design.
16 The enlargements show how to form the head and beak.
That Sinking Feeling
By this point in the book you will already be completely at home with inside and outside reverse folds, both of which are made in a point which has an open edge. There is a further kind of reverse fold which is made in a point which has no open edge and which is known as a sink. Sinks come in two varieties, open and closed. Open sinks are relatively easy to make. Closed sinks can be fiendishly difficult. Fortunately the sink needed to make the Flapping Parrot (see Step 25) is of the easy, open variety.
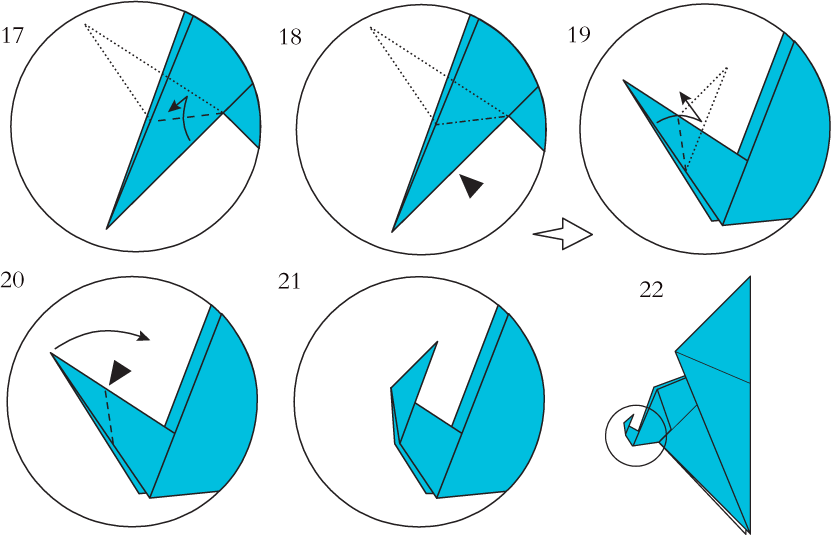
17 Fold the point upwards as shown, crease, then unfold.
18 Inside reverse fold the point to form the head using the creases made in Step 17.
19 Fold the point upwards again as shown, crease, then unfold.
20 Outside reverse fold to form the beak.
21 This is what the result should look like. Adjust if necessary.
22 This is the simplest form of the Flapping Parrot. If you prefer you can go straight to Step 31 now, or follow Steps 23 to 29 to create a more sophisticated bird.
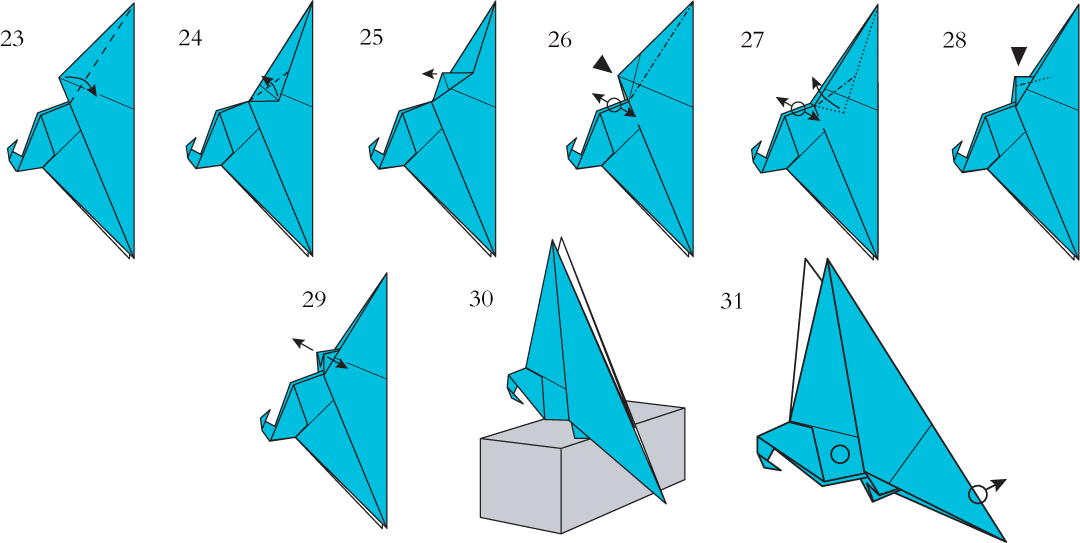
23 Fold the sloping edge of the top point inwards as shown.
24 Fold the obtuse point of the front flap outwards again so that the result looks like Step 25.
25 Open out the folds made in Steps 23 and 24.
26 Open out the layers at the point marked with a circle and turn the sloping edge of the top point inside out between them. In technical origami language this kind of inside reverse fold, which does not affect an open edge, is known as an open sink.
27 Open out the folds at the point marked with a circle and pull out the small flap inside using the creases made in Step 24.
28 Inside reverse fold the tip of the new flap to separate the feet.
29 Gently separate the feet and rotate the design to align it with Step 30.
30 The Flapping Parrot will perch on the edge of a small box.
31 To make the Flapping Parrot flap, hold the front layers together at the point marked with a circle and gently pull the tail upwards to the right.