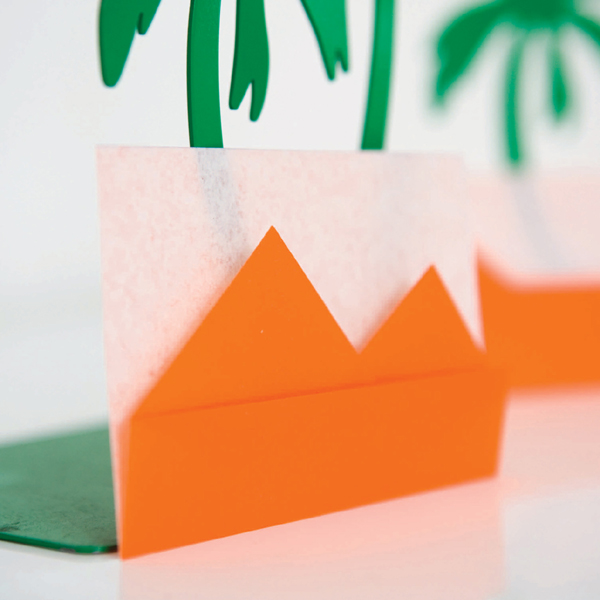
Egypt is a minimalist landscape created by using the contrast between the two surfaces of irogami or duo paper to draw a sketch of the pyramids. Two versions of the design are given. The first version, folded directly from a square, is simple to fold, but the pyramids are set too far apart, one at each edge of the paper. In the second version the pyramids are close together, indeed they overlap, but the design is a little more difficult to fold. The improvement between the versions is achieved by changing the starting shape from a square to a 3x4 rectangle.
Changing the Starting Shape
Almost all the designs so far have been folded from squares. Squares are undoubtedly the most popular starting shape for origami designs and some designers use them to the virtual exclusion of any other shape. There is even a school of thought within origami, that pure origami should only be about folding from squares. Squares certainly do have some advantages over other paper shapes, better symmetry, the ease with which it is possible to construct the location points for many angular systems, and the fact that designs can be laid out on the diagonal.
But other starting shapes, particularly other rectangles, have their advantages too. They can be used to vary the proportions of the design to improve its artistic qualities or verisimilitude, or to facilitate the elegant development of alternative folding geometries.
Materials
Each version requires a single square of duo or irogami paper. Both surfaces of the paper are visible on the outside of the finished design.
Version 1
You will need a square of duo or irogami paper. Begin with the side of the paper you wish to form the sky facing towards you.
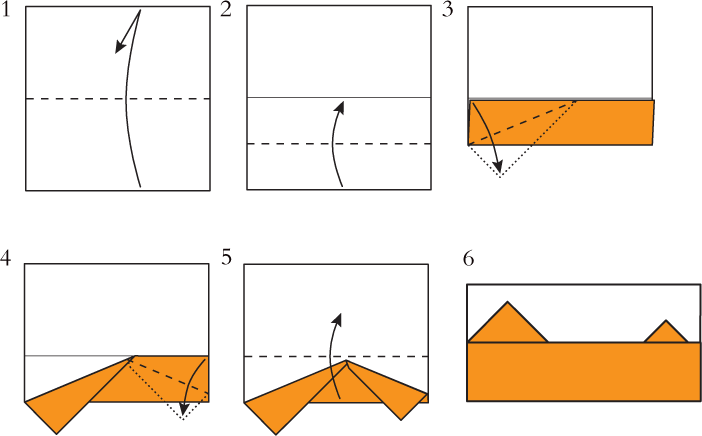
1 Fold in half upwards, crease, then unfold.
2 Fold the bottom edge up to the horizontal centre crease.
3 Fold the top left hand corner of the front flap downwards to form the first Pyramid. Try to make sure that both sides of the Pyramid slope at the same 45° angle.
4 Create a second, smaller, Pyramid in a similar way.
5 Fold the bottom layers upwards using the crease made in Step 1.
6 The basic version of Egypt is finished. Now follow Steps 7 through 13 to see how much the design can be improved by changing the starting shape.
Version 2
You will need a second square of duo or irogami paper and a small pair of scissors. Begin with the side of the paper you wish to form the sky facing towards you.
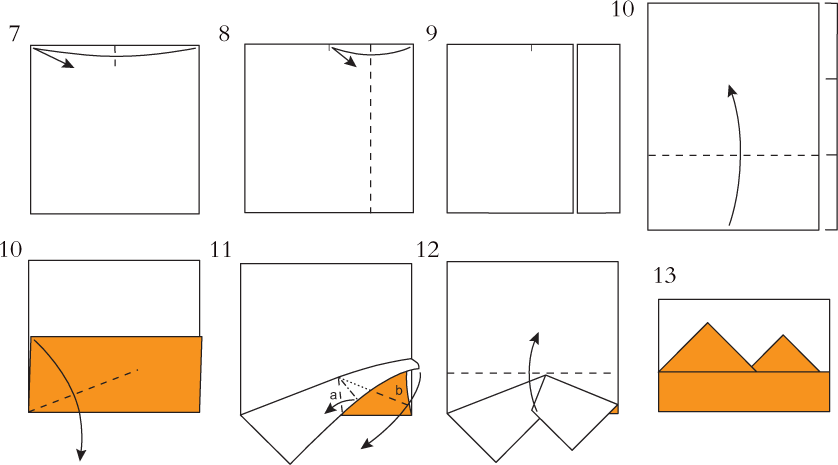
7 Make a tiny crease to mark the centre of the top edge.
8 Fold the right-hand top corner into the centre, crease, then unfold.
9 Remove the right-hand quarter of the paper by cutting along the crease made in Step 8. The thinner piece is no longer required. The next picture shows the wider piece on a larger scale.
10 Fold approximately one third of the paper upwards. A slight inaccuracy will not matter here.
11 Fold the top left-hand corner of the front flap downwards to form the first Pyramid. Be careful only to crease about two-thirds of the way across the paper.
12 Form the second Pyramid by making fold a then fold b. Fold softly at first and only make firm creases once you are sure they will form in the right place.
13 Fold the bottom layers upwards using the crease made in Step 10.
14 The result is a much improved version of Egypt. For a perfect picture, both sides of both pyramids should slope at exactly 45 degrees.
Minimalist Design
The object of the minimalist style of origami design is to portray a subject in a recognisable way in the minimum number of folds. Five or less folds is a creditable result. Banana Boat used four (and a curl), the first version of Egypt uses five, the second four, providing you count Step 12 as just a single fold.
There are still surprisingly few good minimalist designs around. This is probably because of the ‘recognisability’ factor. It is easy to create something that to you looks like, for instance, a stegosaurus, but to someone else may look like nothing much at all. The best test is often to show it to a child. If they recognise what it is then you may well be on to a winner.