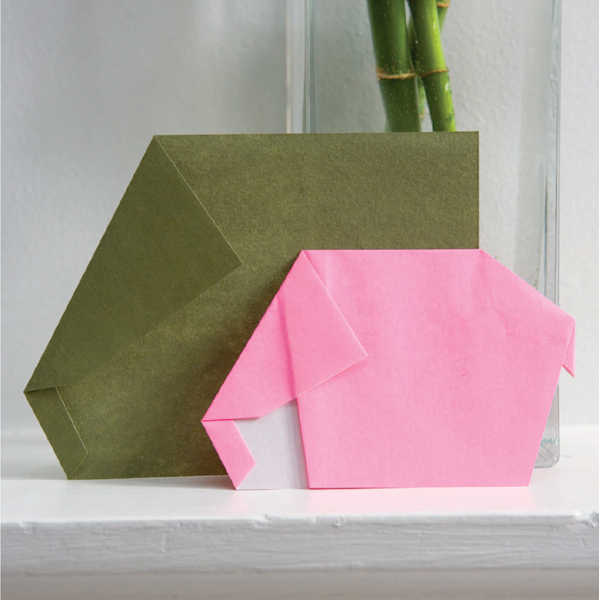
Too small to call a herd, we have three different elephants to fold, each with its own origami virtues. Pink Elephant is a hybrid elephant folded from a square. It is hybrid in the sense that while the back half of Pink Elephant is created in the traditional manner by reverse folds, the front half is created in the modern minimalist ‘drawing with paper’ style. Strip Elephant shows what happens if much the same elephant is folded from a strip of paper rather than a square. The result is a much, much simpler and more elegant design, although the representation of the elephant’s tail leaves much to be desired. Three-fold Elephant retains the trunk of Pink Elephant but abandons the colour change that separates the trunk from the body as well as any pretence at modelling any kind of tail.
The Perfect Elephant
Perfect Elephant goes against the grain of this book in that it starts with complexity and then moves towards simplicity. It is an attempt to do things the other way around.
Here we begin with a moderate degree of complexity (well, okay, Pink Elephant is actually very simple in origami terms) and look at how it can be simplified and made more elegant. How can we really make every fold count for something? Presumably by using as few as we possibly can to do the job.
With the Strip Elephant, the head and trunk were designed by the author, while fellow paperfolder Paul Jackson came up with the idea of using a strip of irogami to create the colour change that separates the head and trunk from the body.
Materials
You will need a square of irogami.
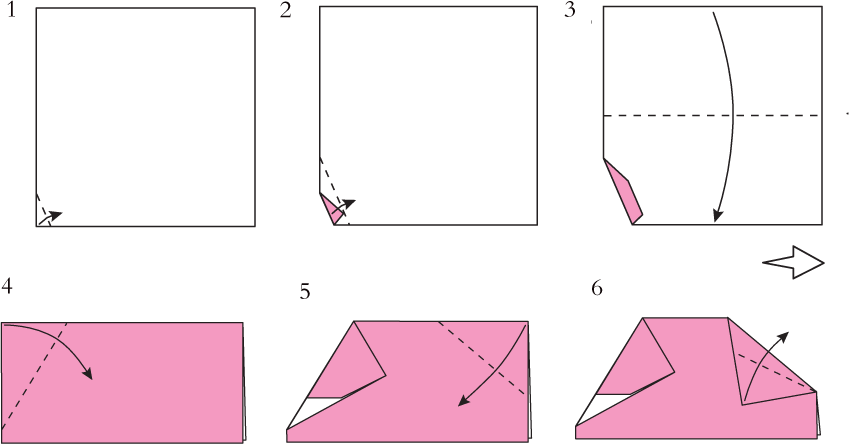
To make Pink Elephant
Begin with the surface you want to form the Elephant’s hide facing away from you. It is important to make the folds of this design at the correct angles. The easiest way to do this is to lay your paper on top of the diagrams as you fold.
1 Make a tiny fold in the bottom left-hand corner.
2 Make a second, slightly larger, fold at the same angle.
3 Fold the paper in half downwards. The next picture is on a larger scale.
4 Fold the top left-hand corner inwards as shown. Note that the crease does not go to the bottom corner. Picture 5 shows what the result should look like.
5 Begin to form the tail by folding the top right-hand corner inwards.
6 Fold the tip of the tail outwards again as shown.
7 Open out the folds made in Steps 5 and 6.
8 Pull the layers apart then push the folds gently inside each other to begin to form the tail. Study Step 9 to see what the result should look like.
9 Fold all the layers of the left-hand edge across to the right as shown. Note that the crease bisects the point marked with a circle.
10 Open out the front layer only.
11 Swing this flap in between the other layers by reversing the direction of the existing crease.
12 Fold this flap away in between the other layers in a similar way.
13 Flip the point of the tail inside out and pull it down as far as it will go. Be careful not to tear the paper as you do this.
14 Turn the front layers of the left hand edge underneath and inside the body to suggest the front legs and reveal the trunk. Look at Step 15 to see what the result should look like.
15 Pink Elephant is finished. A very similar but much simpler elephant can be folded from a long strip.
Materials
You will need a square of irogami and a small pair of scissors.
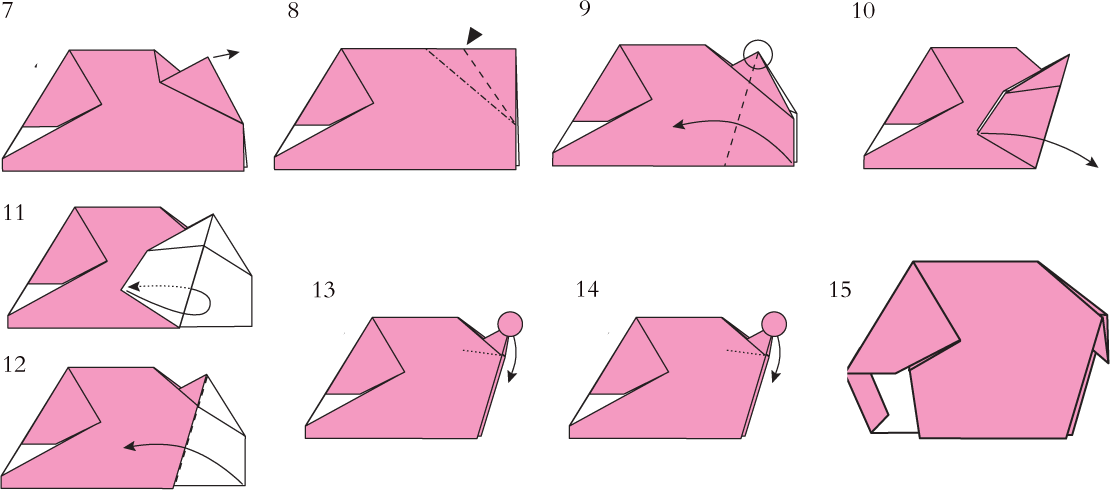
To make Strip Elephant
Begin with the side you want to form the elephant’s hide facing towards you.
1 Make a tiny crease to mark the centre of the right-hand edge.
2 Make a tiny crease to mark the quarterway point.
3 Fold the top right-hand corner downwards onto the quarterway mark, crease, then unfold.
4 Separate the two sections of the paper along the line of the crease made in Step 3. Only the top section is required.
5 Make a tiny fold in the bottom left-hand corner like this.
6 Make a second, slightly larger, fold at the same angle.
7 Form the ears by folding the top left- hand corner inwards.
8 Fold the right-hand edge across to the left and tuck it behind the ears, like this.
9 Fold the top right-hand corner inwards to form a simple tail.
10 Strip Elephant is finished. An even simpler Elephant can be folded from a shorter rectangle of mono paper by dispensing with the tail and the colour change.

Materials
You will need a rectangle of mono paper. A4 or US letter paper are both the right shape for this elephant though the result will be better if you use a smaller sheet of the same shape (which you can get by dividing either rectangle into four, eight, or sixteen equal parts).

To make Three-fold Elephant
1 Make a tiny fold in the bottom left-hand corner.
2 Make a second, slightly larger, fold at the same angle.
3 Form the ears by folding the top left-hand corner inwards.
4 Is this the perfect elephant? Probably not. Now that the origami elephant has been reduced close to its bare essentials like this it is clear that all that we need to create a recognisable elephant is the bulk of the body and the suggestion of ears and a trunk.