
David’s Star is a multi-layer Star of David pre-creased, then collapsed, from a bronze rectangle in two distinct stages. Most origami tessellations collapse flat by the use of a rotational technique known as twist folding. David’s Star is a little different. The initial tessellation is three-dimensional rather than flat and is collapsed into shape in just one direction. The tessellation itself then collapses in the opposite direction, which is when some degree of rotation takes place. Sounds complicated? Try it and see. Like many things to do with origami it is easier to do in practice than it is to explain in words.
Origami Tessellations
Tessellations are composed of regular shapes which butt up against each other to cover a surface. In origami this kind of design is called a tiling pattern. Origami tessellations are related to tiling patterns but are also entirely different. The difference arises because origami tessellations are folded from a single large sheet of paper. The surface of an origami tessellation may look like a pattern of individual tiles laid edge to edge but it is actually an interconnected matrix of crease and collapse motifs.
Bronze Rectangles
A bronze rectangle is a rectangle with sides in the proportion of 1:root3. It yields a natural 60° folding geometry and so is ideal for using to fold geometric forms. If the bronze rectangle is divided into three equal parts along its longer side, each of the three resulting rectangles will also be bronze.
Materials
You will need two sheets of mono or duo A4 or US Letter size paper. One sheet is used for the star, the other as a template to help you fold it. Only one surface of the paper is visible on the outside of the finished design. Though there is no equivalent of pre-cut paper available in bronze rectangle proportions. Steps 1 to 9 of the diagrams provide an easy method, using a template, for cutting a large bronze rectangle from A4 rectangles.
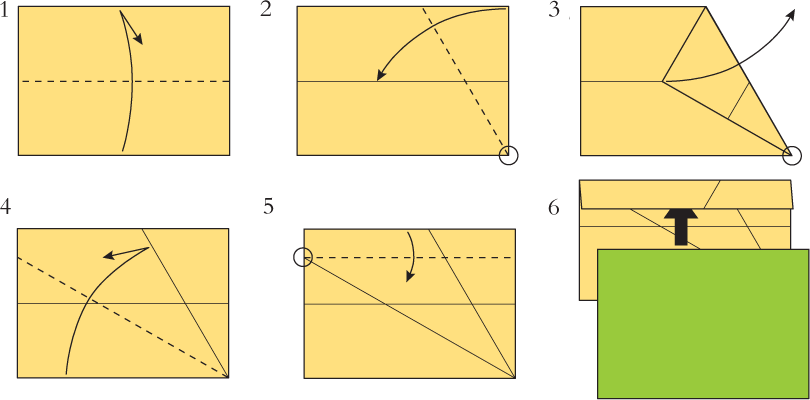
Preparing the template
1 Fold in half upwards, crease, then unfold.
2 Fold the top right-hand corner onto the horizontal crease, making sure the crease starts from the bottom right-hand corner.
3 Make sure the point of the bottom right-hand corner is sharp. Open out the fold made in Step 2.
4 Fold the bottom edge onto the crease made in Step 2, crease, then unfold.
5 Fold the top edge downwards. Use the top left-hand edge of the fold made in Step 4 to locate this new crease accurately.
Making the bronze rectangle
6 Insert the paper you want to fold David’s Star from underneath the flap. Make sure you push it all the way in.
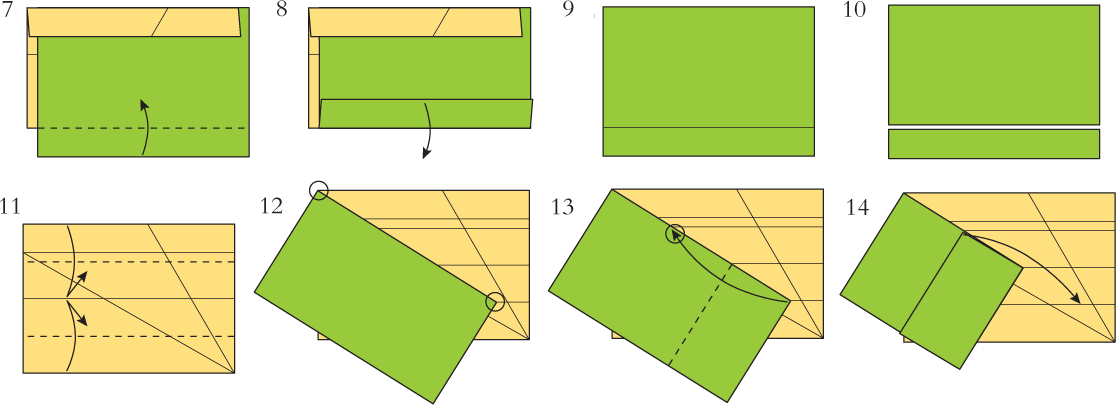
7 Fold the bottom edge upwards along the bottom edge of the template. It is important you do this as accurately as possible.
8 Open out the fold made in Step 8 and remove the paper from the template.
9 Separate the two parts of the paper along the horizontal crease.
10 The larger piece is a bronze rectangle. The smaller piece is no longer required.
Rejigging the template
11 Fold both the top and bottom edges into the centre, crease, then unfold.
Folding David’s Star
12 Lay the paper on top of the template and align it like this.
13 Fold the top right-hand corner of the paper onto the top edge at the point where it intersects the second to top horizontal crease.
14 Undo the fold made in Step 13.
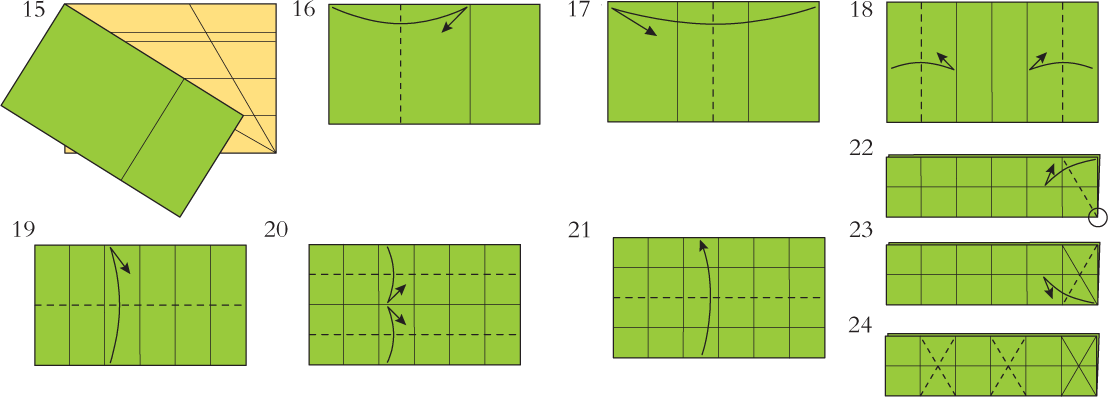
15 Remove the paper from the template. The template is not needed any more.
16 Fold the left-hand edge onto the crease made in Step 12, crease, then unfold.
17 Fold in half sideways, crease, then unfold.
18 Fold the two outside thirds in half sideways, crease, then unfold.
19 Fold in half upwards, crease, then unfold.
20 Fold the top and bottom edges onto the crease made in Step 19, crease, then unfold.
21 Fold in half upwards again.
22 Fold both layers of the top right-hand corner onto the horizontal crease making sure the crease starts from the bottom right-hand corner, crease, then unfold. This is the same type of fold as you made in the template in Steps 2 and 3.
23 The result is a diagonal crease across the right-hand sixth of the paper. Make a similar fold to crease in the other diagonal.
24 Use a similar technique to crease in both diagonals of the third and fifth sixths from the right like this. Try not to make any creases in the other sections as you do this.
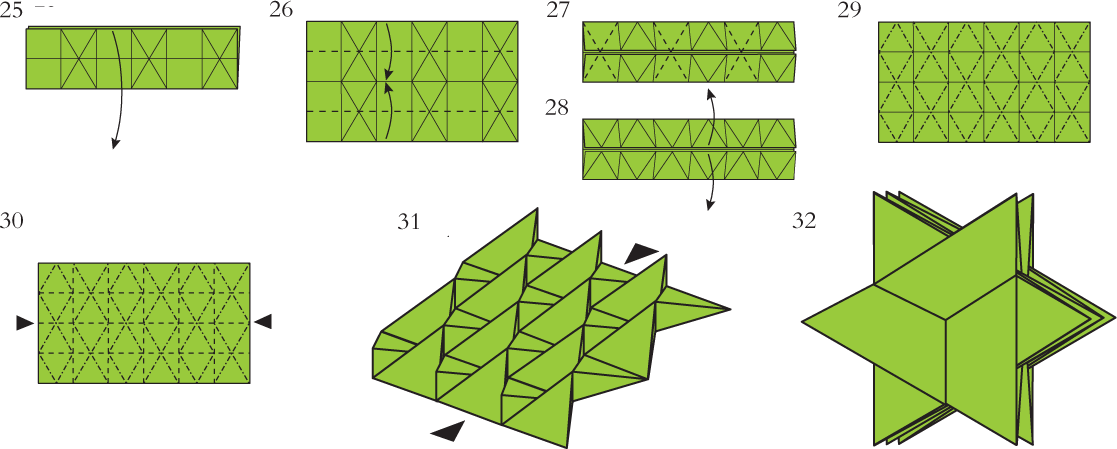
25 Open the paper out completely.
26 Fold the top and bottom edges into the middle using the existing creases.
27 Make diagonal creases across the remaining sections of the paper like this.
28 Open the paper out completely.
29 Turn all the diagonal creases into mountain folds. The direction of half of them will need to be reversed to achieve this. Try to do this without putting any new creases in the paper. The crisper your paper remains, the easier the next few steps will be.
30 You now have a grid of creases running in opposite directions through the paper which will allow you to collapse the paper into the three-dimensional tessellation shown in Step 31. Do this slowly starting at one end. Be careful you don’t change the direction of any of the creases at this stage. The collapse will not work if you do.
31 Once you have reached this stage it is possible to gently collapse the tessellation sideways into David’s Star. Sometimes this collapse just seems to happen by itself. Sometimes the paper needs persuading a little. The more accurately and cleanly you have folded, the less persuasion the paper will need. Persevere, gently. It is possible!
32 If necessary, re-arrange the flaps at the front and back to create a symmetrical appearance. David’s Star is finished.