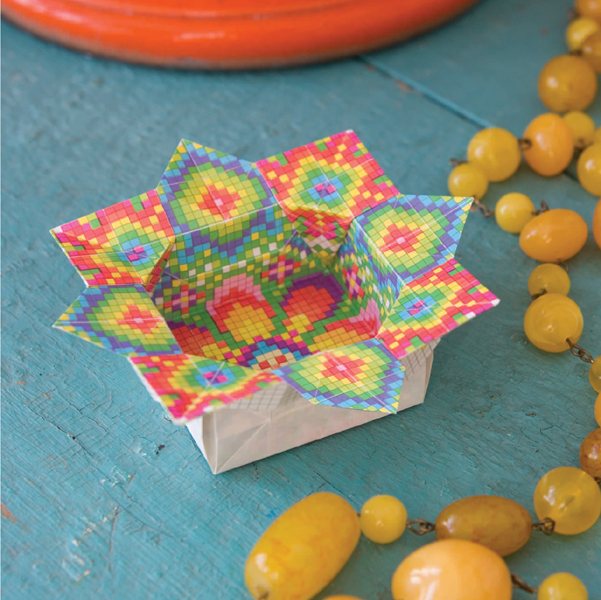
The Enigma Bowl is a complex geometrical paperfold of great intrinsic beauty which can also be put to practical use. The flat rim of the bowl is an 8-pointed star surrounding an octagonal hole, while the base of the bowl is a square. In order to accommodate these differences, the final move stretches the corners into triangular facets creating a three-dimensional effect.
Complex Bases
In the earlier projects we saw that traditional origami bases are configurations of folds that act as points of departure from which many origami design journeys can be undertaken. A base can be viewed as a place where the path splits. Complex bases are not difficult to create, but it is difficult to find one which offers as many opportunities for development in as many different ways as the much simpler traditional bases do.
My personal favourite is the enigma base. Not only can it be developed in numerous interesting ways - only two of which, the Enigma Bowl and Gaia, are explained in this book - but the folding sequence that creates it is perhaps the most elegant in the whole of origami. Every move creates potential for development which is taken advantage of by the next. In fact this sequence is worth folding over and over just for the sheer pleasure of it, even if you never go on to finish folding the designs themselves.
Materials
You will need two squares of mono, duo or irogami paper, one to use as a template and one to fold the bowl from. Arrange the square that you want to fold the bowl from so that the surface you want to form the decorative rim of the bowl is facing towards you.
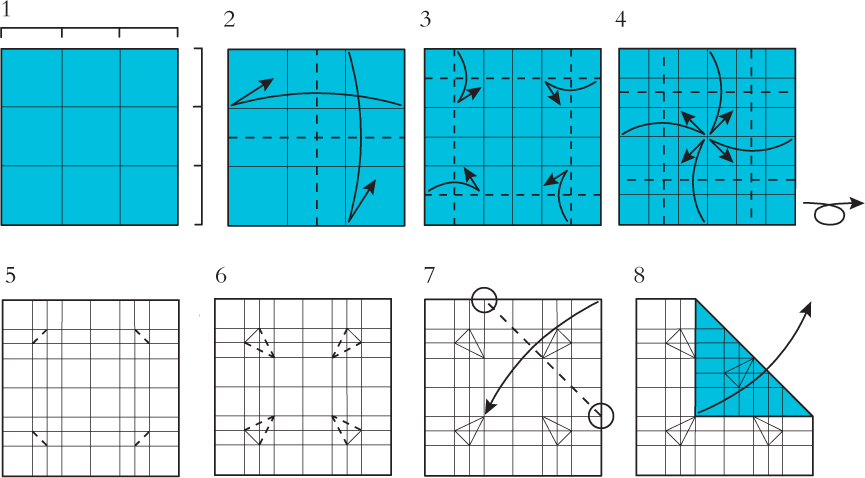
1 Begin by dividing each sheet into a 3x3 grid of smaller squares. Steps 1 through 9 of the Dresden Bowl show you how to use a template to do this.
2 Fold in half edge to edge both ways, crease, then unfold.
3 Fold each of the outside thirds in half, crease, then unfold.
4 Fold each edge into the centre in turn, crease, then unfold.
5 Make four tiny diagonal creases in the way shown here.
6 Crease in the other sides of four tiny triangles.
7 Fold the top right-hand corner inwards diagonally.
8 Open out the fold made in Step 7.
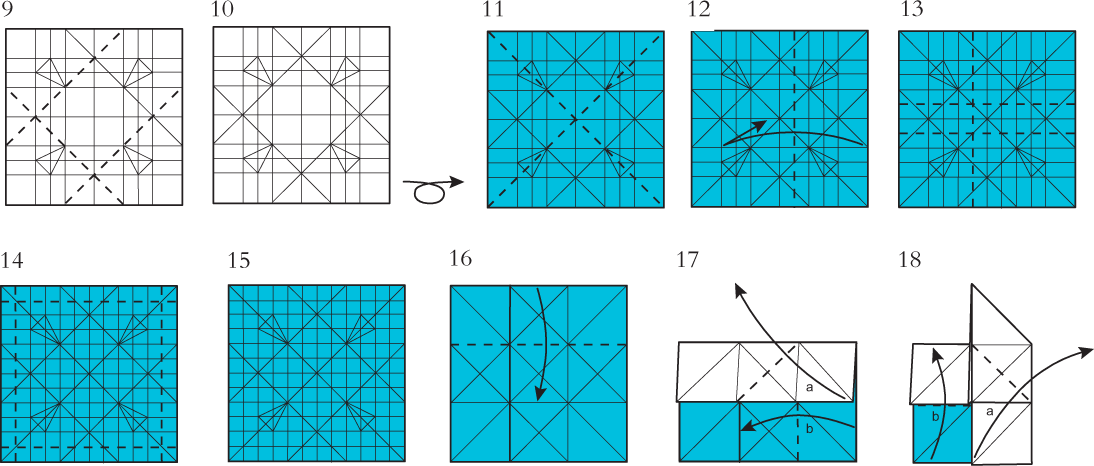
9 Repeat Steps 7 and 8 on the other three corners.
10 Turn the piece over sideways.
11 Crease in both diagonals.
12 Fold the right-hand edge onto the vertical crease nearest the left-hand edge, crease, then unfold.
13 Add three further creases in a similar way.
14 Complete the 12 x 12 grid by folding the outer sixths in half all the way round.
15 Check that you have made all these creases before moving on.
The remaining pictures would be too difficult to read if all these creases were shown all the time. From here onwards only the creases you need to see to understand the folding instructions are shown.
16 Fold the top third of the paper downwards.
17 Make fold a then fold b using the existing creases.
18 Make fold a then fold b using the existing creases.
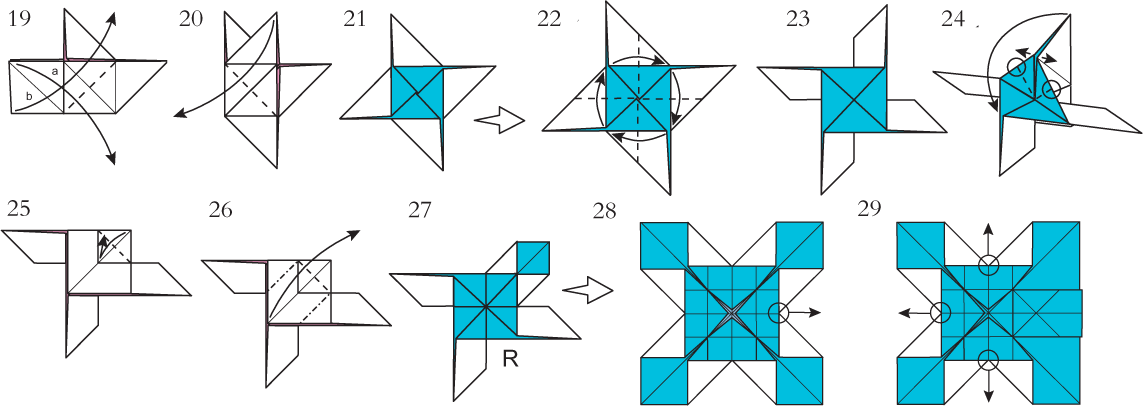
19 Make fold a then fold b using the existing creases.
20 Open out the remaining flap.
21 This form is known as the Pinwheel. The next picture is on a larger scale.
22 Take the right-hand arm of the Pinwheel and fold it in half downwards in the way shown. This fold is made through all the layers of the arm. Repeat this fold on the other three arms working anticlockwise around the design. The paper will not lie flat until you have completed all four folds. Flatten and crease firmly.
23 This is the result. Lift one of the arms upwards and towards you so that it looks like Step 24.
24 Open the centre of this arm then squash it flat. The centres of the two flaps marked with circles fold away from you to allow this to happen. Step 25 shows what the result should look like.
25 Fold the top right-hand corner inwards using the existing creases as a guide, crease firmly, then unfold.
26 Fold the front flap up to the right using the crease made in Step 25 and squash symmetrically. The two creases marked with mountain fold lines will form as you flatten the flap into its new position.
27 Repeat steps 24 through 26 on each of the other three arms in turn. The next picture is larger scale.
28 This is the result. Take hold of the front layer at the point marked with a circle and pull gently to the right. Squash symmetrically to look like Step 29. All the creases you need to do this are already there.
29 Repeat Step 28 on each of the other three edges in turn.
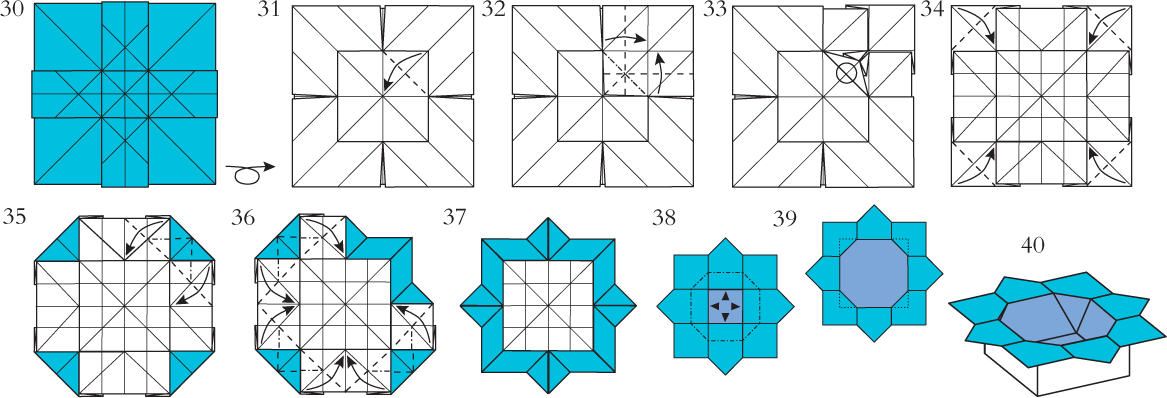
30 This is the enigma base. Turn over sideways.
31 Fold the top right-hand corner of the central square inwards.
32 Fold the left-hand and bottom edges of the front layers outwards simultaneously. The result of this is shown in Step 33.
33 Fully flatten the flap marked with a circle and repeat Folds 31 and 32 on all four corners of the central square.
34 Fold all four corners inwards.
35 Make these two folds simultaneously. As you flatten them other folds will automatically form behind them. Flatten these as well. You don’t need to make any new creases when doing this. Folds that automatically entail making other folds like this are known as swivel folds.
36 The result should look like this. Repeat Fold 35 on the other three corners.
37 Flatten all the creases firmly then turn over sideways.
38 Insert your fingers in the centre of the design to open out the body of the bowl along the existing crease lines shown. As you do this small triangular collars (created by the creases made in Steps 5 and 6) will appear and flatten inside the bowl at each corner. This manoeuvre is difficult, but persevere, the result is worth it. The position of the collars inside the corners of the bowl can clearly be seen in Step 40.
39 The result is an octagonal hole with a square base. The position of the triangular collars is indicated by the dotted lines.
40 The Enigma Bowl is finished.