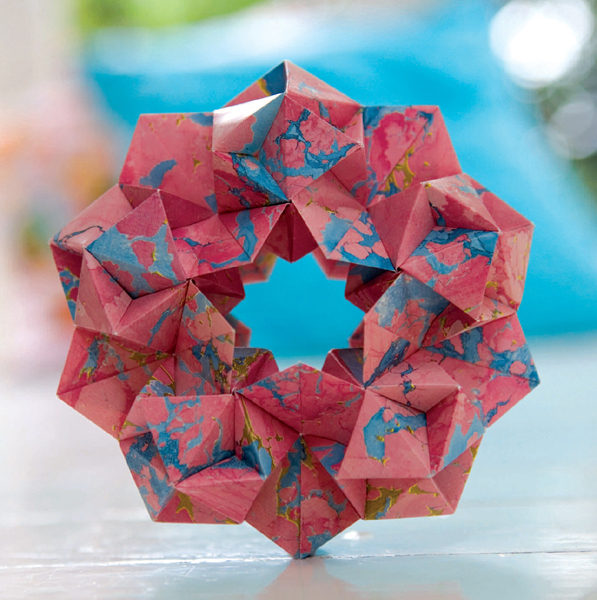
Stargate is a macro-modular sculpture made from five Artifact assemblies linked by joining pieces. Like the Artifact modules, these joining pieces are also folded from silver rectangles. The pentagonal geometry of the finished Stargate sculpture is very attractive, and the finished design also has a secret, a five-pointed star, concealed in the centre underneath the outer ring of joining pieces.
Integrating Modular Assemblies
One of the difficulties in creating complex modular sculptures using origami is that such designs tend to deform under their own weight. One way around this is to assemble complex forms in stages by combining complete modular assemblies into integrated second-generation structures. This technique is called macro-modular origami.
Modular origami is sometimes defined in terms that suggest all the modules used should be identical. This is often the case, but not a defining characteristic. The key concept in defining modular origami is that of integration. Many excellent designs exist in which several different types of module are integrated within the same structure. The use of joining pieces here is just one example of the opportunities for artistic creativity that the macro-modular approach offers.
Materials
Stargate is a macro-modular sculpture made from Artifact assemblies linked together with joining pieces. You will need five complete Artifact assembles and fifteen silver rectangles of mono, duo or irogami to fold the joining pieces from. Only one surface of the paper is visible on the outside of the finished joining pieces.
Folding the joining pieces
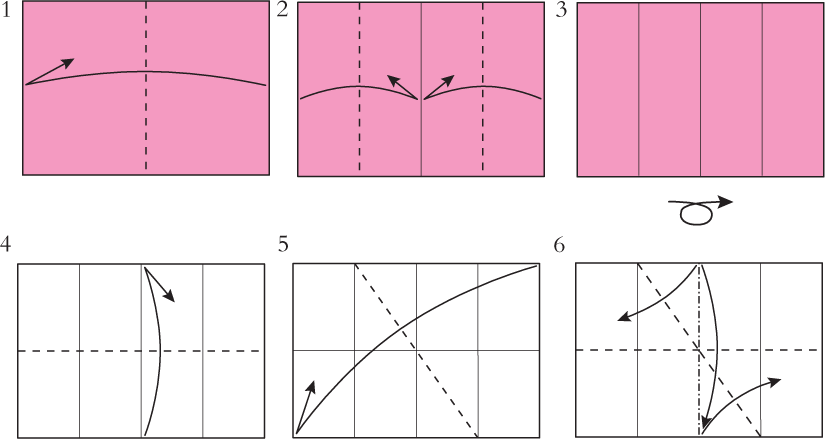
Begin with the side of the paper you want to form the visible surface of the module facing towards you.
1 Fold in half sideways, crease, then unfold.
2 Fold both outside edges into the centre, crease, then unfold.
3 Turn the piece over sideways.
4 Fold in half upwards, crease, then unfold.
5 Fold in half corner to corner, diagonally, crease, then unfold.
6 Remake these folds simultaneously to collapse the paper into the form shown in Step 7.
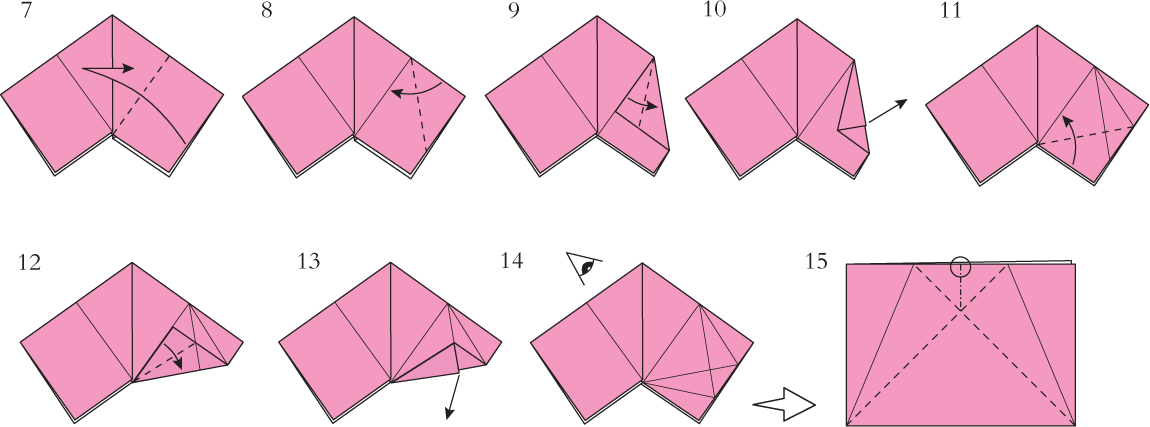
7 This is the result. Remake the sloping right hand crease through all the layers as shown.
8 Fold the top edge of the right hand point onto the crease you have just remade in Step 8.
9 Fold the front flap in half to the right.
10 Open out the folds made in Steps 8 and 9.
11 Repeat Step 8 on the bottom edge.
12 Repeat Step 9 on the front flap.
13 Open out the folds made in Steps 11 and 12.
14 The next diagram shows just the right-hand flap, on a larger scale, and drawn from the viewpoint indicated.
15 Remake the two diagonal folds so that the point marked with a circle rises up towards you in the way shown in Step 16.
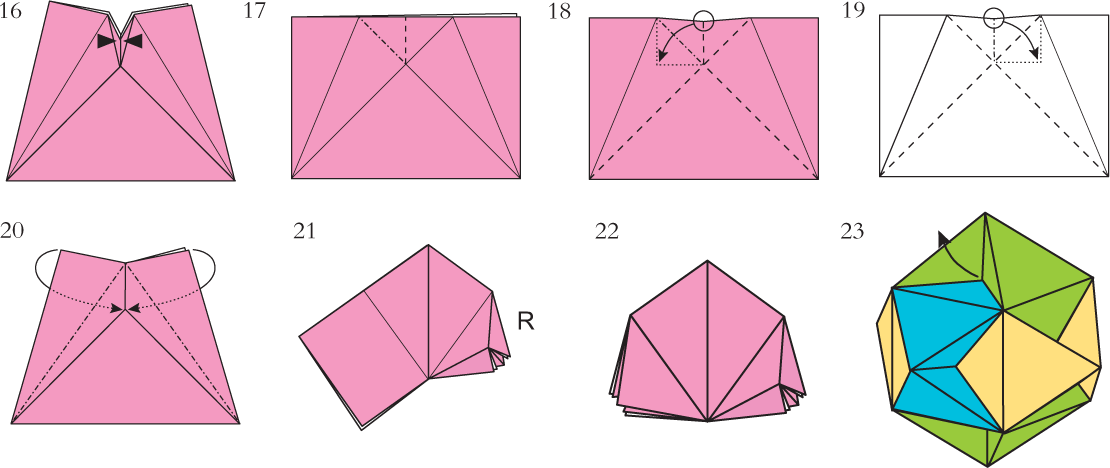
16 Pinch in a new crease then flatten gently.
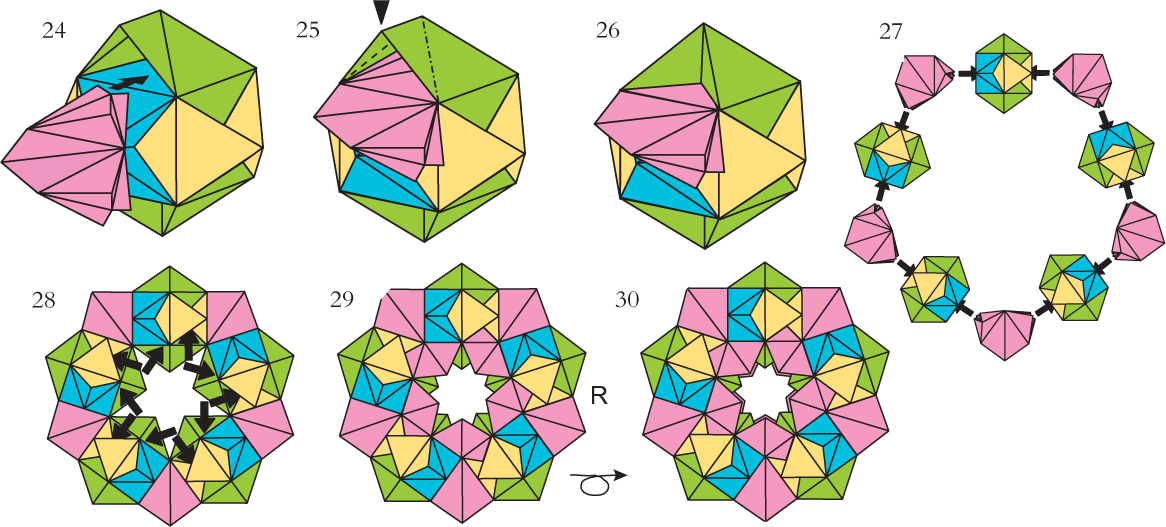
17 Separate the layers and reverse the direction of these two short creases in the top layer only. The next move is difficult. It cannot be drawn in a single picture. Step 18 shows the fold that is made in the top layer. Step 19 shows the fold that is made in the rear layer. These folds must be made at the same time. Take care you understand what you need to do before you do it and make sure your paper stays crisp.
18 Remake Fold 16 but making sure that the point marked by a circle moves away from you and swings round behind to the left between the layers. The dotted line shows where the flap ends up.
19 Remake Fold 16 but making sure that the point marked by a circle moves towards you and swings to the right between the layers. The dotted line shows where the flap ends up.
20 This is the result. The flap in the top layer has swung behind to the left. The flap in the rear layer has swung in front to the right. Both flaps now lie in between the layers. Fold both outer flaps backwards and crease firmly to lock the whole caboodle in place.
21 Your module should now look like this. Turn over sideways and repeat steps 15 through 20 on the other end of the module. The result should look like Step 22.
22 The Stargate joining piece module is finished. Make all 15.
Attaching the joining pieces
23 Open out one of the sunken corners of the Artifact assembly.
24 Insert one end of the joining module inside the Artifact assembly.
25 Turn the open corner inside out to lock the module in place.
26 The joining piece is now firmly linked to the Artifact assembly.
Assembling Stargate
27 Join the five Artifact assemblies into a ring using five joining pieces like this.
28 Add five more joining pieces in the positions shown here.
29 Turn over sideways and repeat Step 28 on the other side of the design.
30 Stargate is finished. Stargate makes an effective hanging ornament. To hang it simply open up one of the outside sunken corners and thread a knotted cotton thread up through the centre of the corner to the outside.