Chapter 3. Objects... Get Oriented! Making code make sense

Every program you write solves a problem.
When you’re building a program, it’s always a good idea to start by thinking about what problem your program’s supposed to solve. That’s why objects are really useful. They let you structure your code based on the problem it’s solving so that you can spend your time thinking about the problem you need to work on rather than getting bogged down in the mechanics of writing code. When you use objects right—and really put some thought into how you design them—you end up with code that’s intuitive to write, and easy to read and change.
If code is useful, it gets reused
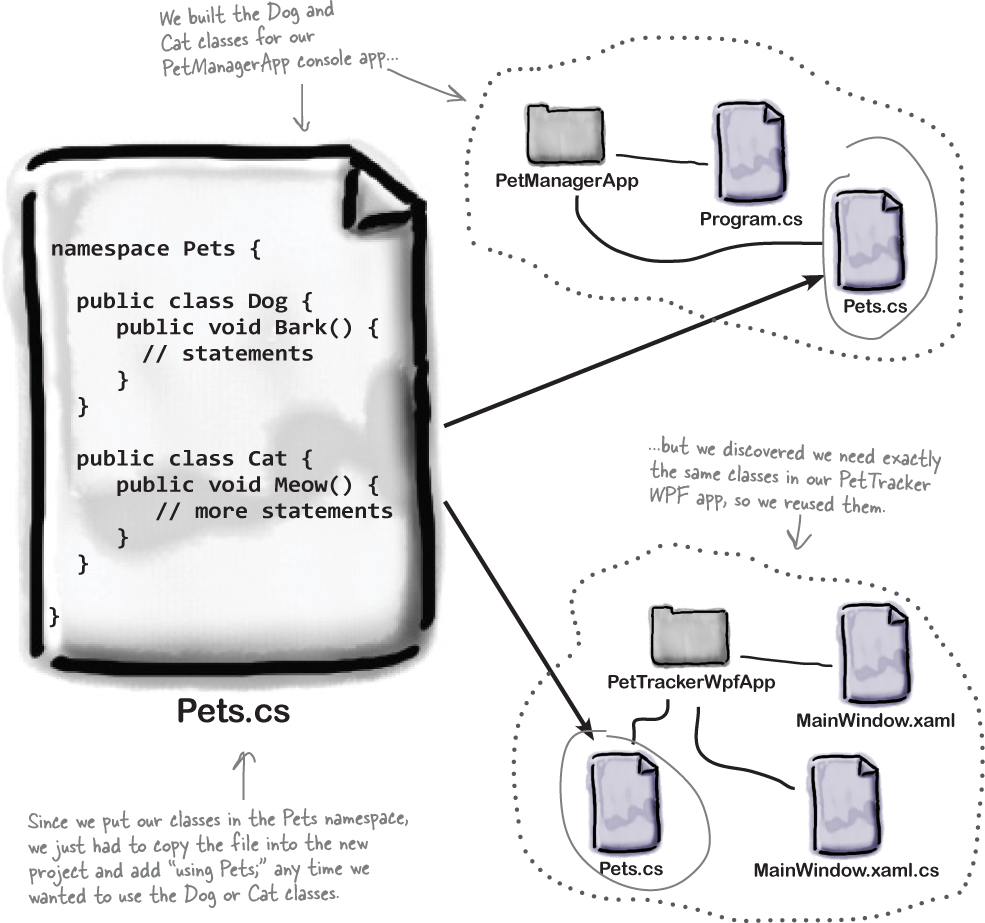
Developers have been reusing code since the earliest days of programming, and it’s not hard to see why. If you’ve written a class for one program, and you have another program that needs code that does exactly the same thing, then it makes sense to reuse the same class in your new program.
Some methods return a value
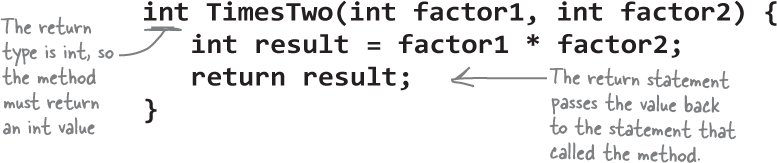
In the next project, we’ll use methods that have a return value, or a value that’s calculated or generated inside the method, and sent back to the statement that called that method. The type of the return value (like string or int) is called the return type. If a method has a return type, then it must use the return statement.
Here’s an example of a method that has a return type—it returns an int:
Note
A method with a return type uses the return keyword to send a value back to the statement that called it.
The method takes two parameters called factor1 and factor2. It uses the multiplication operator * to calculate the result, which it returns using the return keyword.
This code calls the TimesTwo method and stores the result in a variable called area.

Do this!
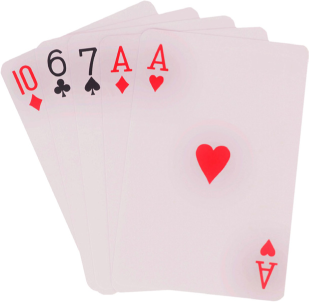
Let’s build a program that picks some cards
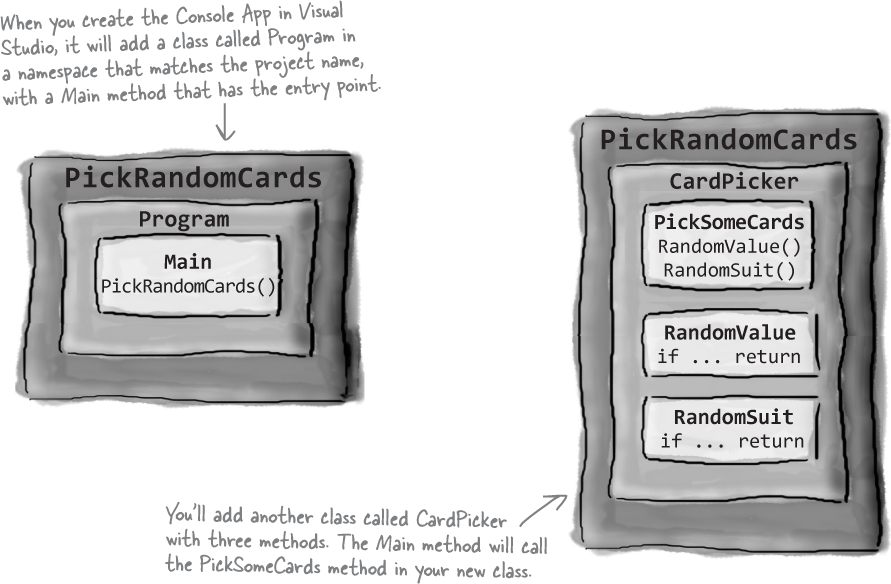
In the first project in this chapter, you’re going to build a .NET Core Console App called PickRandomCards that lets you pick random playing cards. Here’s what its structure will look like:
Your PickSomeCards method will use string values to represent playing cards. If you want to pick five cards, you’ll call it like this:
string[] cards = PickSomeCards(5);
The cards variable has a type that you haven’t seen yet. The square brackets [] mean that it’s an array of strings. Arrays let you use a single variable to store multiple values—in this case, strings with playing cards. Here’s an example of a string array that the PickSomeCards method might return:
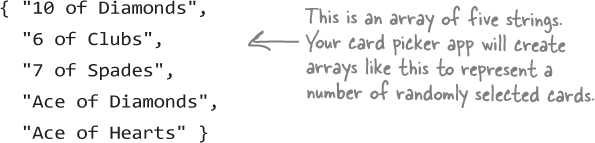
After your array is generated, you’ll use a foreach loop to write it to the console.
Create your PickRandomCards console app
Do this!
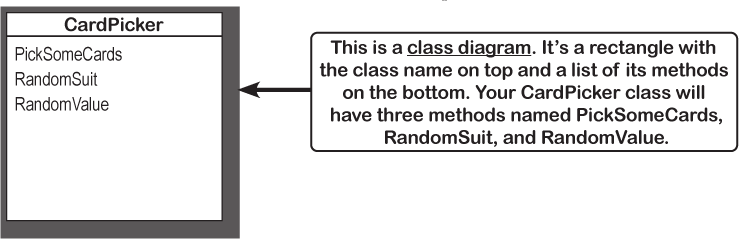
Let’s use what you’ve learned so far to create a program that picks a number of random cards. Open Visual Studio and create a new Console App project called PickRandomCards. Your program will include a class called CardPicker. Here’s a class diagram that shows its name and methods:
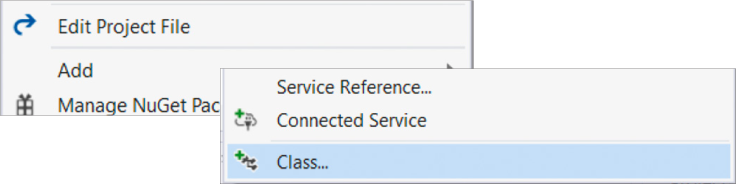
Right-click on the PickRandomCards project in the Solution Explorer and choose Add >> Class... from the pop-up menu. Visual Studio will prompt you for a class name—choose CardPicker.cs.
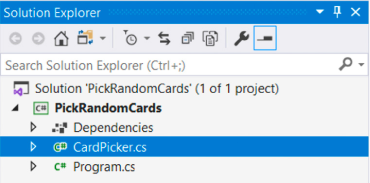
Visual Studio will create a brand new class in your project called CardPicker:
Your new class is empty—it starts with class CardPicker and a pair of curly braces, but there’s nothing inside of it. Add a new method called PickSomeCards. Here’s what your class should look like:
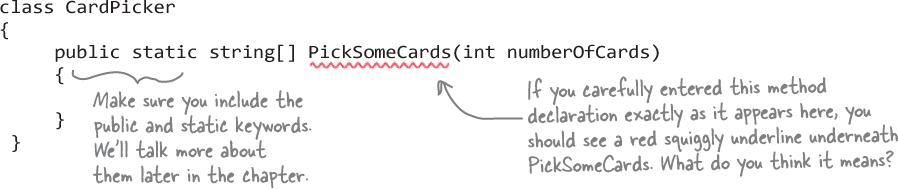
Finish your PickSomeCards method
Now do this!
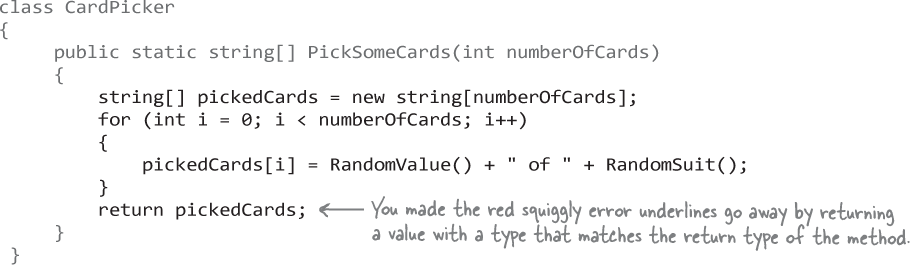
Your PickSomeCards method needs a return statement, so let’s add one. Go ahead and fill in the rest of the method—and now that it uses a return statement to return a string array value, the error goes away:
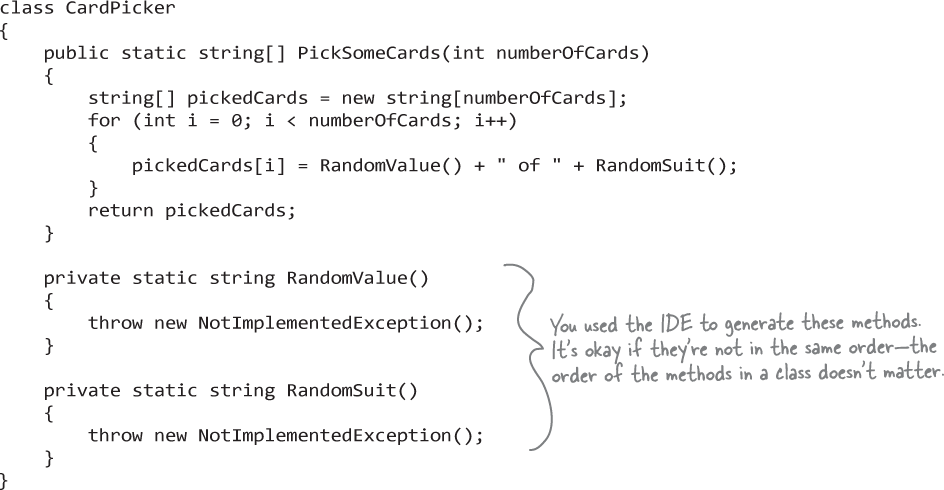
Generate the missing methods. Your code now has different errors because it doesn’t have RandomValue or RandomSuit methods. Generate these methods just like you did in Chapter 1. Use the Quick Actions icon in the left margin of the code editor—when you click it, you’ll see options to generate both methods.

Go ahead and generate them. Your class should now have RandomValue and RandomSuit methods:
Use
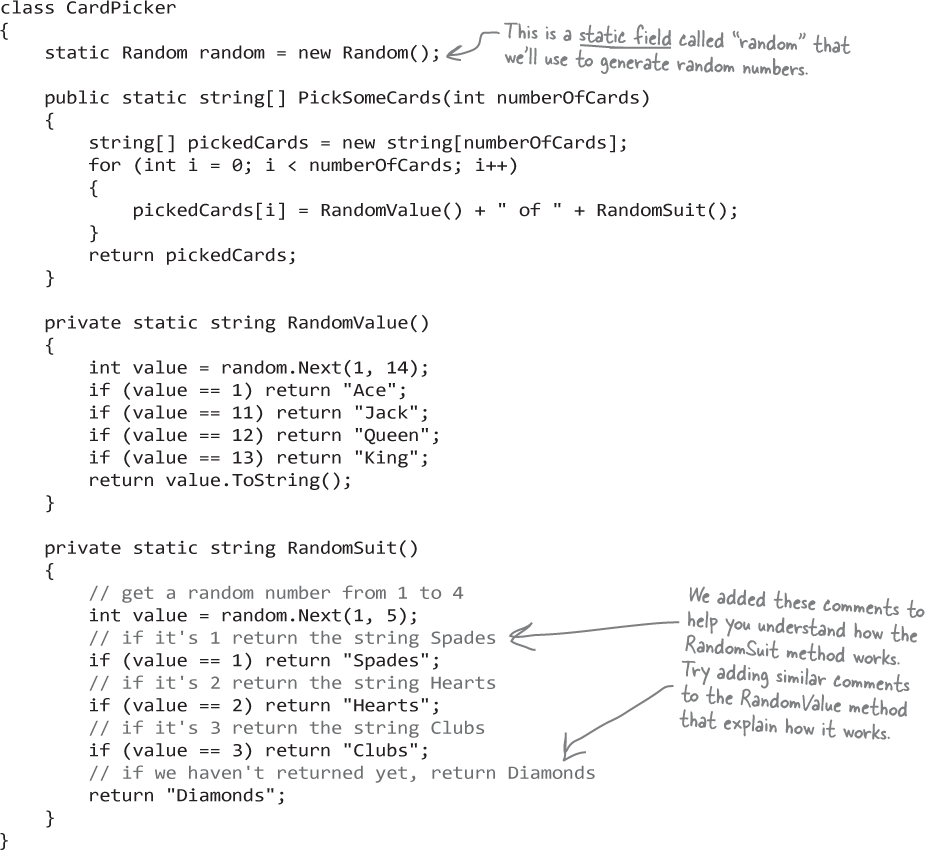
returnstatements to build out your RandomSuit and RandomValue methods. A method can have more than one return statement, and when it executes that statement it immediately returns—and does not execute any more statements in the method.Here’s an example of how you could take advantage of return methods in a program. Let’s imagine that we’re building a card game, and you need methods to generate random card suits or values. We’ll start by creating a random number generator, just like we used in the animal matching game in the first chapter. Add it just below the class declaration:
class CardPicker
{
    static Random random = new Random();
Now add code to your RandomSuit method that takes advantage of return statements to stop executing the method as soon as it finds a match. The random number generator’s Next method can take two parameters:
random.Next(1, 5)returns a number that’s at least 1 but less than 5 (in other words, a random number from 1 to 4). Your RandomSuit method will use this to choose a random playing card suit: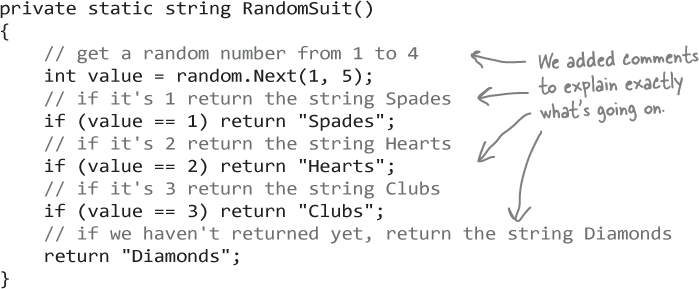
Here’s a RandomValue method that generates a random value. See if you can figure out how it works.
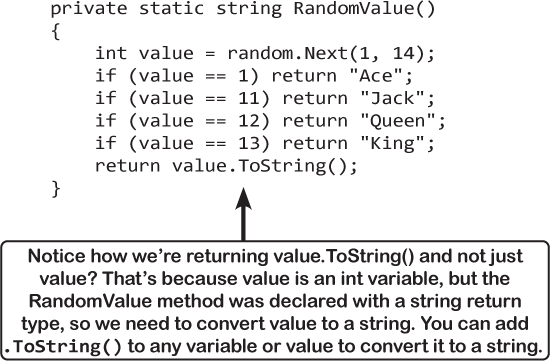
Note
The return statement causes your method to stop immediately and go back to the statement that called it.
Your finished CardPicker class
Here’s the code for your finished CardPicker class. It should live inside a namespace that matches your project’s name.
Ana’s working on her next game
Meet Ana. She’s an indie game developer. Her last game sold thousands of copies, and now she’s just getting started on her next one.

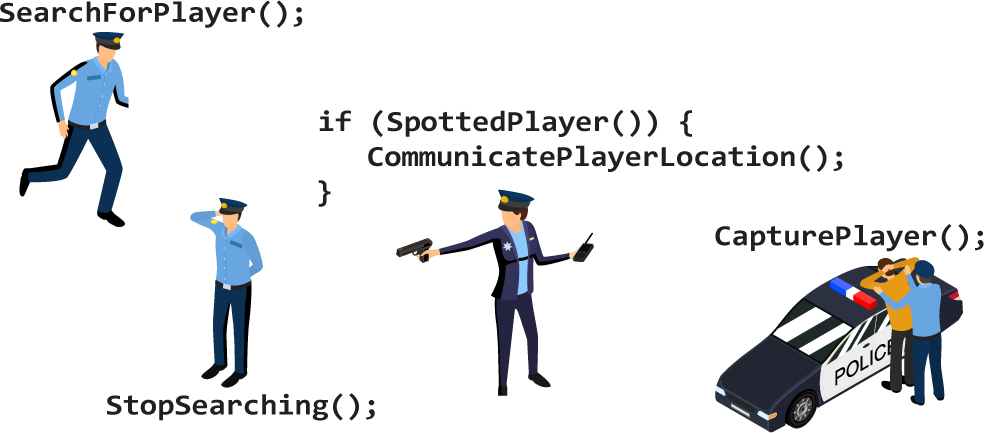
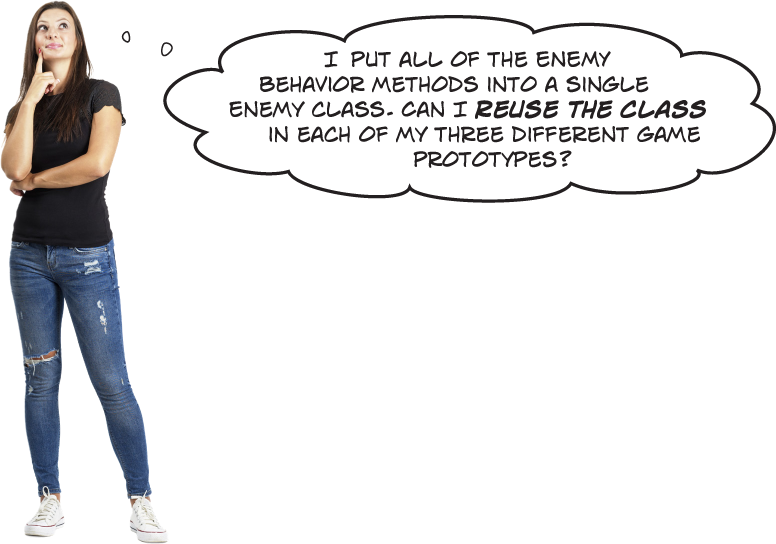
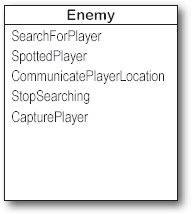
Ana’s started working on some prototypes. In one exciting part of the game, the player needs to escape a failed heist attempt and evade the cops. She’s been working on the code for the enemies that the player has to avoid. She’s written several methods that define the enemy behavior: searching the last location the player was spotted, giving up the search after a while if the player wasn’t found, attacking the player if the player was found, and capturing the player if the enemy gets too close.

Ana’s game is evolving...
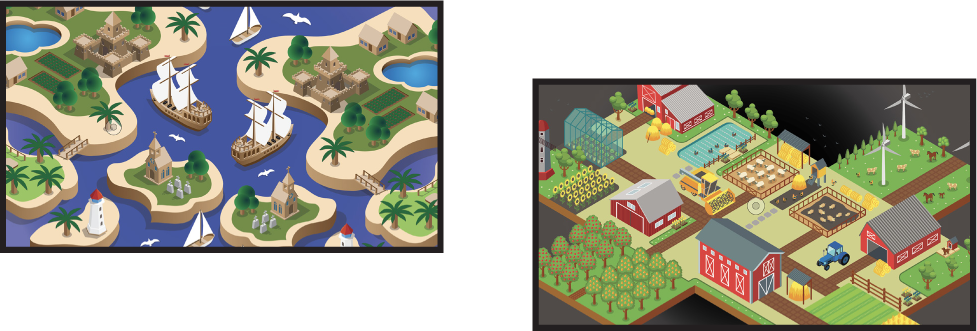
The bank heist idea is pretty good, but Ana’s not 100% sure that’s the direction she wants to go. She’s also thinking about a nautical game where the player has to evade pirates. Or maybe it’s a zombie survival game set on a creepy farm. In all three of those ideas, she thinks the enemies will have different graphics, but their behavior can be driven by the same methods.

... so how can Ana make things easier for herself?
Ana’s not sure which direction the game should go, so she wants to make a few different prototypes—and she wants them all to have the same code for their enemies, with the SearchForPlayer, StopSearching, SpottedPlayer, CommunicatePlayerLocation,, and CapturePlayer methods. She’s got her work cut out for her.

Build a simple paper prototype for a classic game
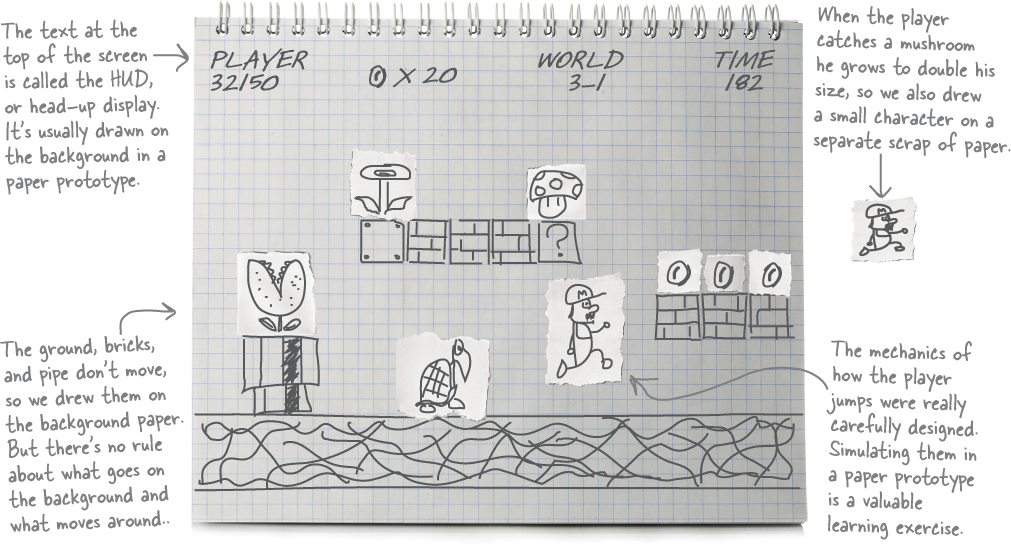
Paper prototypes are really useful for helping you figure out how a game will work before you start building it, which can save you a lot of time. And it’s easy to get started building them—all you need is some paper and a pen or pencil. Start by choosing your favorite classic game. Platform games work especially well, so we chose one of the most popular, most recognizable classic video games ever made... but you can choose any game you’d like! Here’s what to do next:
Draw this!
Draw the background on a piece of paper. Start your prototype by creating the background. In our prototype, the ground, bricks, and pipe don’t move, so we drew them on the paper. We also added the score, time, and other text at the top.
Tear small scraps of paper and draw the moving parts. In our prototype, we drew the characters, the piranha plant, mushroom, the fire flower, and the coins on separate scraps. If you’re not an artist, that’s absolutely fine! Just draw stick figures and rough shapes. Nobody else ever has to see this!
“Play” the game. This is the fun part! Move the player around the page. Try to simulate player movement. Drag the player around the page. Make the non-player characters move. It helps to spend a few minutes playing the game, then go back to your prototype and see if you can really reproduce the motion as closely as possible. (It will feel a little weird at first, but that’s okay!)
Note
All of the tools and ideas in “Game design... and beyond” sections are important programming skills that go way beyond just game development – but we’ve found that they’re easier to learn when you try them with games first.
Yes! A paper prototype is a great first step for any project.
If you’re building a desktop app, a mobile app, or any other project that a user interface, building a paper prototype is a great way to get started. But sometimes you need to create a few paper prototypes before you start to get the hang of it. That’s why we started with a paper prototype for a classic game...because that’s a great way to learn how to build paper prototypes. And prototyping is a really valuable skill for any kind of developer, not just a game developer.
Up next: build a WPF version of your card picking app
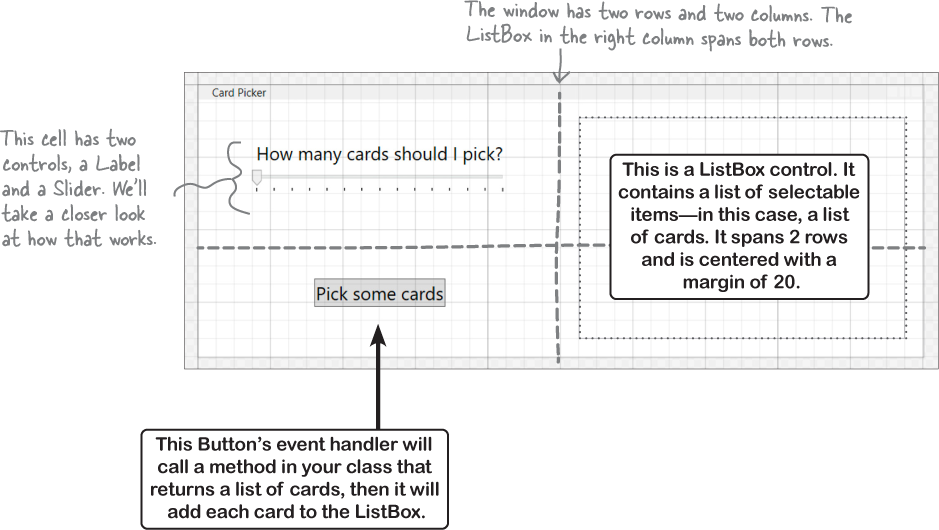
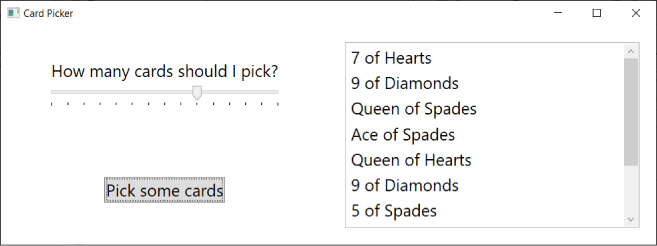
In the next project, you’ll build a WPF app called PickACardUI. Here’s what it will look like:
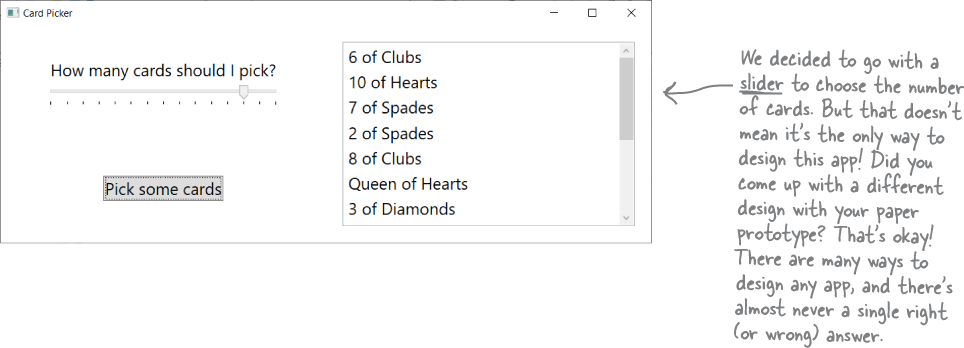
Your PickACardUI app will let you use a Slider to choose the number of random cards to pick. When you’ve selected the number of cards, you’ll click a button to pick them and add them to a ListBox.
Here’s how the window will be laid out:
Note
We won’t keep reminding you to add your projects to source control—but we still think it’s a really good idea to create a GitHub account and publish all of your projects to it!

A StackPanel is a container that stacks other controls
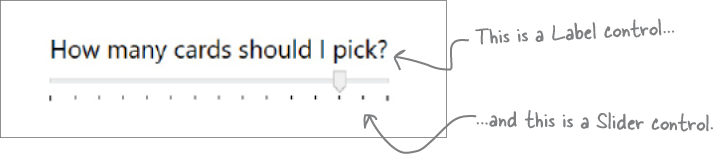
Your WPF app will use a Grid to lay out its controls, just like you used in your match game. Before you start writing code, let’s take a closer look at two controls in the upper left cell of the grid:
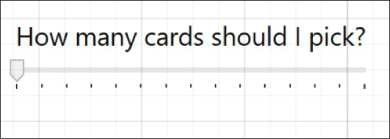
So how stack them on top of each other like that? We could try putting them in the same cell in the grid:

But that just causes them to overlap each other:

That’s where a StackPanel control comes in handy. A StackPanel is a container control—like a Grid, its job is to contain other controls and make sure they go in the right place in the window. But while the Grid lets you arrange controls in rows and columns, a StackPanel lets you arrange controls in a horizontal or vertical stack.
Let’s take the same Label and Slider controls, but this time use a StackPanel to lay them out so the Label is stacked on top of the Slider. Notice that we moved the alignment and margin to the StackPanel—we want the panel itself to be centered, with a margin around it:
<StackPanel HorizontalAlignment="Center" VerticalAlignment="Center" Margin="20">
    <Label Content="How many cards should I pick?" FontSize="20" />
    <Slider Minimum="1" Maximum="15" Foreground="Black"
            IsSnapToTickEnabled="True" TickPlacement="BottomRight" />
</StackPanel>
The StackPanel will make the controls in the cell look the way we want them to:
Note
So that’s how the project will work. Now let’s get started building it!
Reuse your CardPicker class in a new WPF app
If you’ve written a class for one program, you’ll often want to use the same behavior in another. That’s why one of the big advantages of using classes is that they make it easy to reuse your code. Let’s give your card picker app a shiny new user interface, but keep the same behavior by reusing your CardPicker class.
Reuse this!
Create a new WPF app called PickACardUI.
You’ll follow exactly the same steps that you used to create your animal match game in Chapter 1:
Open Visual Studio and create a new project.
Select WPF App (.NET Framework).
Name your new app PickACardUI. Visual Studio will create the project, adding MainWindow.xaml and MainWindow.xaml.cs files that have the namespace
PickACardUI.
Add the CardPicker class that you created for your Console App project.
Right-click on the project name and choose Add >> Existing Item... from the menu.

Navigate to the folder with your console app and add CardPicker.cs to add it to your project. Your project should now have a copy of the CardPicker.cs file from your console app project.
Change the namespace for the CardPicker class.
Double-click on CardPicker.cs in the Solution Explorer. It still has the namespace from the console app. Change the namespace to match your project name. The IntelliSense pop-up will suggest the namespace PickACardUI—press Tab to accept the auto-suggest:

Now your CardPicker class should be in the PickACardUI namespace. :
namespace PickACardUI
{
    class CardPicker
    {
Congratulations, you’ve reused your CardPicker class! You should see the class in the Solution Explorer, and you’ll be able to use it in the code for your WPF app.
Use a Grid and StackPanel to lay out the main window
Back in Chapter 1 you used a Grid to lay out your animal matching game. Take a few minutes and flip back through the part of the chapter where you laid out the grid, because you’re going to do the same thing to lay out your window.
Set up the rows and columns. Follow the same steps from Chapter 1 to add two rows and two columns to your grid. If you get the steps right, you should see these row and column definitions just below the
<Grid>tag in the XAML: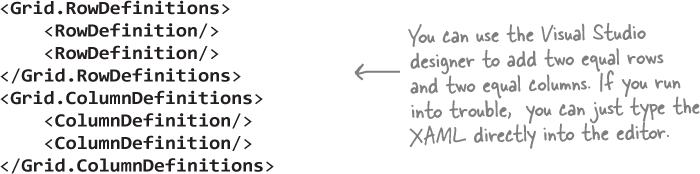
Add the StackPanel. It’s a little difficult to work with an empty StackPanel in the visual XAML designer because it’s hard to click on, so we’ll do this in the XAML code editor. Double-click on StackPanel in the Toolbox to add an empty StackPanel to the grid. You should see

Set the StackPanel’s properties. When you double-clicked on StackPanel in the Toolbox, it added a StackPanel with no properties. By default it’s in the upper left cell in the grid, so now we just want to set its alignment and margin. Click on the StackPanel tag
in the XAML editorto select it. Once it’s selected in the code editor, you’ll see its properties in the Properties window. Set the vertical and horizontal alignment toCenterand all of the margins to20.
You should now have a StackPanel in your XAML code:

Lay out your Card Picker desktop app’s window
Lay out your new card picker app’s window it has the user controls on the left and displays the picked cards on the right. You’ll use a StackPanel in the upper left cell. It’s a container, which means it contains other controls (just like a Grid). But instead of laying other controls out in cells, it stacks them either horizontally or vertically. Once your StackPanel is laid out with a Label and Slider, you’ll add ListBox control, just like the one you used in Chapter 2.
Design this!
Add a Label and Slider to your StackPanel.
A StackPanel is a container, When a StackPanel doesn’t contain any other controls, you can’t see it in the designer, which makes it hard to drag controls onto it Luckily, it’s just as easy to add controls to it as it is to set its properties. Click on the StackPanel to select it.

While StackPanel is selected, double-click on Label in the Toolbox to put a new Label control inside the StackPanel. The Label will appear in the designer, and a <Label> tag will appear in the XAML code editor.
Next, expand the All WPF Controls section in the Toolbox and double-click on Slider. Your upper left cell should now have a StackPanel that contains a Label stacked on top of a Slider.
Set the properties for the Label and Slider controls.
Now that your StackPanel has a Label and a Slider, you just need to set their properties.
Click on the Label in the designer. Expand the Common section in the Properties window, and set its Content to
How many cards should I pick?– then expand the Text section and set its font size to20px.Press Escape to deselect the Label, then click on the Slider in the designer to select it. Use the Name box at the top of the Properties window to change its name to
numberOfCards.Expand the Layout section and use the square (
 ) to reset the Width.
Expand the Common section and set its Maximum to
15, Minimum to1, AutoToolTipPlacement toTopLeft, and TickPlacement toBottomRight. Then click the caret ( ) to expand the Layout section and expose additional properties, including the IsSnapToTickEnabled property. Set it to
 True.Let’s make ticks a little easier to see. Expand the Brush section in the Properties window and click on the large rectangle to the right of Foreground—this will let you use the color selector to choose the foreground color for the slider. Click in the R box and set it to
0, then set G and B to0as well. The Foreground box should now be black, and the tick marks under the slider should be black.
The XAML should look like this—if you’re having trouble with the designer, just edit the XAML directly:
<StackPanel HorizontalAlignment="Center" VerticalAlignment="Center" Margin="20">
    <Label Content="How many cards should I pick?" FontSize="20"/>
    <Slider x:Name="numberOfCards" Minimum="1" Maximum="15" TickPlacement="BottomRight"
     IsSnapToTickEnabled="True" AutoToolTipPlacement="TopLeft" Foreground="Black"/>
</StackPanel>
Add a Button to the lower left cell.
Drag a Button out of the toolbox and into the lower left cell of the grid and set its properties.
Expand the Common section and set its Content property to
Pick some cards.Expand the Text section and set its font size to
20px.Expand the Layout section. Reset its margins, width, and height. Then set its vertical and horizontal alignment to
Center( and
and  ).
).
The XAML for your Button control should look like this:
<Button Grid.Row="1" Content="Pick some cards" FontSize="20"
        HorizontalAlignment="Center" VerticalAlignment="Center" />
Add a ListBox that fills the right half of the window by spanning two rows.
Drag a ListBox control into the upper right cell.
Use the Name box at the top of the Properties window to set the ListBox’s name to
listOfCards.Expand the Text section and set its font size to
20px.Expand the Layout section. Set its margins to
20, just like you did with the StackPanel control. Make sure its Width, Height, Horizontal alignment, and Vertical alignment are reset.Make sure the Row is set to 1 and Column is set to 0. Then set the RowSpan to 2 so that the ListBox takes up the entire column and stretches across both rows.

The XAML for your ListBox control should look like this:

Set the window title and size.
When you create a new WPF app, Visual Studio creates a main window that’s 450 pixels wide and 800 pixels tall with the title “Main Window” – so let’s resize it, just like you did with the animal match game.
Click on the window’s title bar in the designer to select the window.
Use the Layout section to set the width to 300.
Use the Common section to set the Title to
Card Picker.
Scroll to the top of the XAML editor and look at the last line of the Window tag. You should see these properties:
Title=" Card Picker " Height="300" Width="800"
Add a click event handler to your Button control.
The code-behind—or the C# code in MainWindow.xaml.cs that’s joined to your XAML—consists of a single method. Double-click on the button in the designer—the IDE will add a method called Button_Click and make it the Click event handler, just like it did in Chapter 1. Here’s the code for your new method:
private void Button_Click(object sender, RoutedEventArgs e)
{
   string[] pickedCards = CardPicker.PickSomeCards((int)numberOfCards.Value);
   listOfCards.Items.Clear();
   foreach (string card in pickedCards)
   {
       listOfCards.Items.Add(card);
   }
}
Note
The C# code joined to your XAML window that contains the event handlers is called code-behind.
Now run your app. Use the slider to choose the number of random cards to pick, then press the button to add them to the ListBox. Nice work!
Ana’s prototypes look great...
Ana found out that whether her player was being chased by cops, pirates, or zombies, she could use the same methods from her Enemy class to make them work. Her game is starting to shape up. Ana’s early prototypes only had a single enemy. That worked fine with her Enemy class.
... but what if she wants more than one enemy?
And that’s great... until Anna wants more than one enemy! What should she do to add a second or third enemy to her game?
Ana could copy the Enemy class code and paste it into two more class files. Then her program could use methods to control three different enemies at once. Technically, we’re reusing the code... right?
Hey Ana, what do you think of that idea?

Note
She has a point. What if she wants a level with, say, dozens of zombies. Creating dozens of identical classes just isn’t practical.

Maintaining three copies of the same code is really messy.
A lot of problems you have to solve need a way to represent one thing a bunch of different times. In this case, it’s enemies in a game. But it could be songs in a music player app, or contacts in a social media app. Those all have one thing in common: they always need to treat the same kind of thing in the same way, no matter how many of that thing they’re dealing with. Let’s see if we can find a better solution.
Ana can use objects to solve her problem
Objects are C#’s tool that you use to work with a bunch of similar things. Ana can use objects to program her Enemy class just once, but she can also use it as many times as she wants in a program.

You use a class to build an object
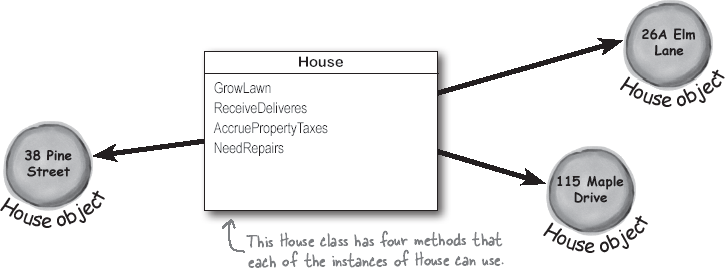
A class is like a blueprint for an object. If you wanted to build five identical houses in a suburban housing development, you wouldn’t ask an architect to draw up five identical sets of blueprints. You’d just use one blueprint to build five houses.

Note
A class defines its members, just like a blueprint defines the layout of the house. You can use one blueprint to make any number of houses, and you can use one class to make any number of objects.
An object gets its methods from its class
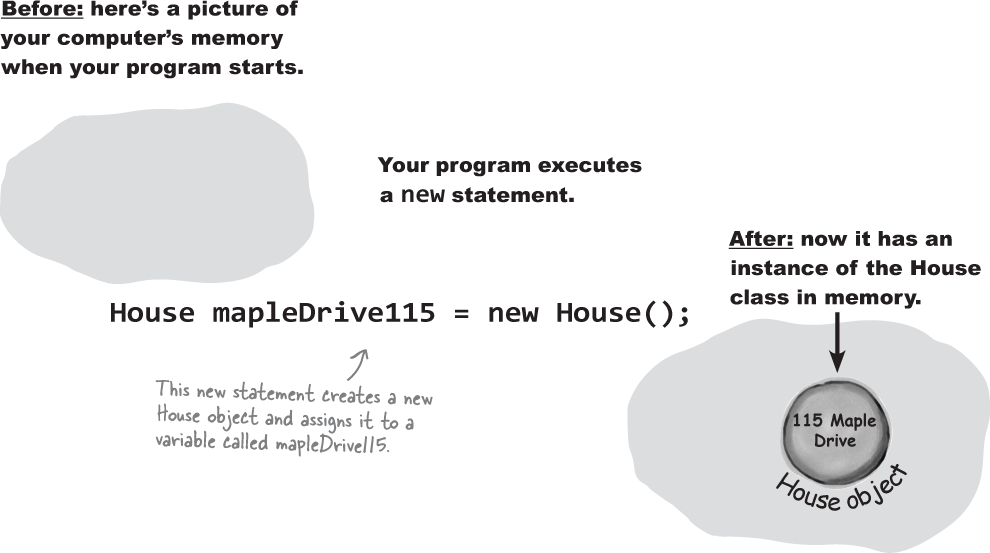
Once you build a class, you can create as many objects as you want from it using the new statement. When you do, every method in your class becomes part of the object.
When you create a new object from a class, it’s called an instance of that class
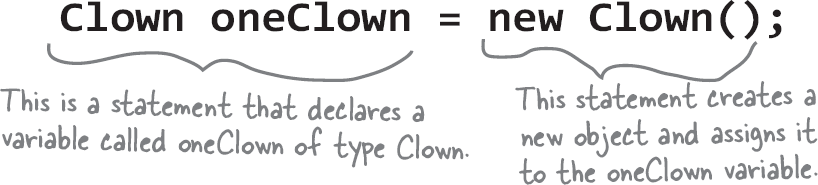
You use the new keyword to create an object. All you need is a variable to use with it. You the class as the variable type to declare the variable, so instead of int or bool, you’ll use a class like House or Enemy.
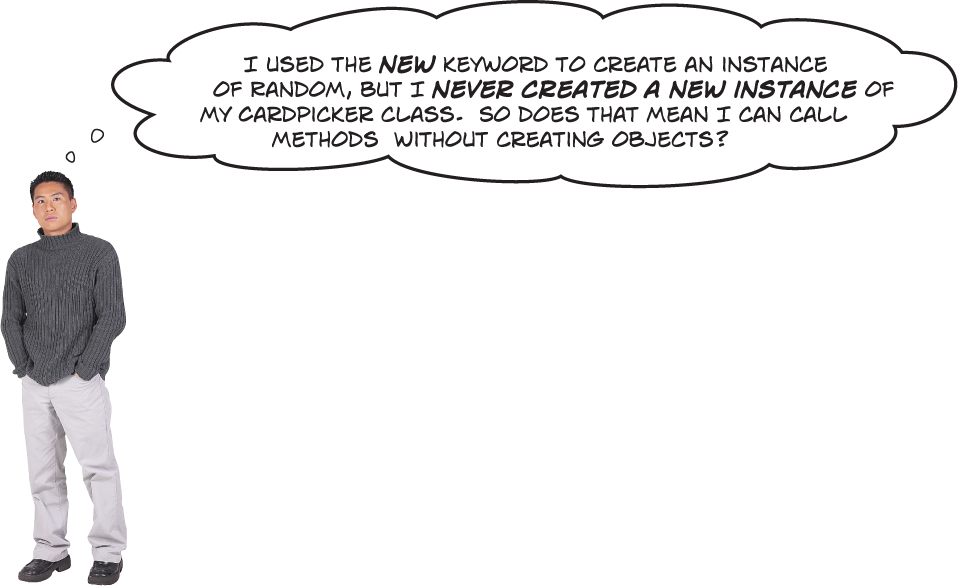
Yes! You’ve already created instances in your own code.
Go back to your animal matching program and look for this line of code:
Random random = new Random();
You’re creating an instance of the Random class, and then you called its Next method. Now look at your CardPicker class and find the new statement. You’ve been using objects this whole time.
A better solution for Ana... brought to you by objects
Ana used objects to reuse the code in the Enemy class without all that messy copying that would leave duplicate code all over her project. Here’s how did it.
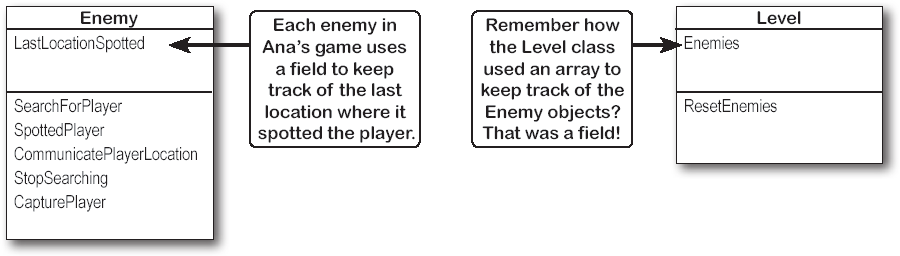
Ana created a Level class that stored the enemies in an Enemy array called
enemies, just like you used string array to store cards or animal emoji.
She used a loop that called
newstatements to create new instances of the Enemy class for the level and add them to a array of enemies.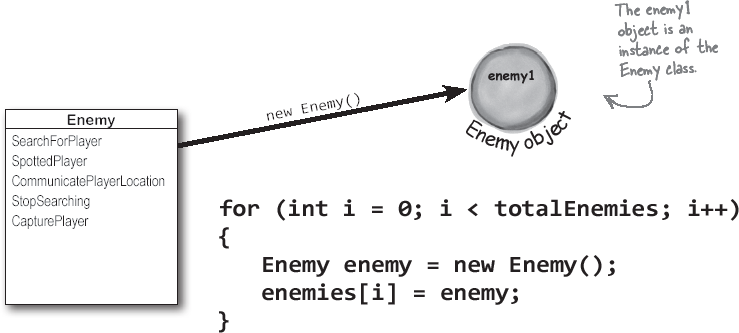
She called methods of each Enemy instance during every frame update to implement the enemy behavior.

Note
When you create a new instance of a class, it’s called instantiating that class.
That’s right, we didn’t. Some game prototypes are really simple, while others are much more complicated—but complicated programs follow the same patterns as simple ones. Ana’s game program is an example of how someone would use objects in real life. And this doesn’t just apply to game development! No matter what kind of program you’re building, you’ll use objects in exactly the same way that Ana did in her game. Ana’s example is just the starting point for getting this concept into your brain. We’ll give you lots more examples over the rest of the chapter—and this concept is so important that we’ll even revisit it in future chapters, too.
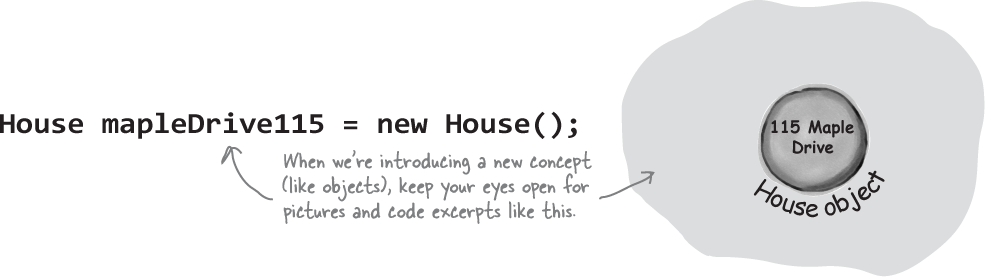
Theory and practice
Speaking of patterns, here’s a pattern that you’ll see over and over again throughout the book. We’ll introduce a concept or idea (like objects) over the course of a few pages, using pictures and short code excerpts to demonstrate the idea. This is your opportunity to take a step back and try to understand what’s going on without having to worry about getting a program to work.
An instance uses fields to keep track of things
You’ve seen how classes can contain fields as well as methods. And we just saw how you used the static keyword to declare a field in your CardPicker class:
static Random random = new Random();
But what happens if you take away that static keyword? Then the field becomes an instance field, and every time you instantiate the class the new instance that was created gets its own copy of that field.
Note
Sometimes people think the word “instantiate” sounds a little weird, but it makes sense when you think about what it means.
When we want to include fields on a class diagram, we’ll draw a horizontal line in the box. The fields go above the line, and methods go below the line.
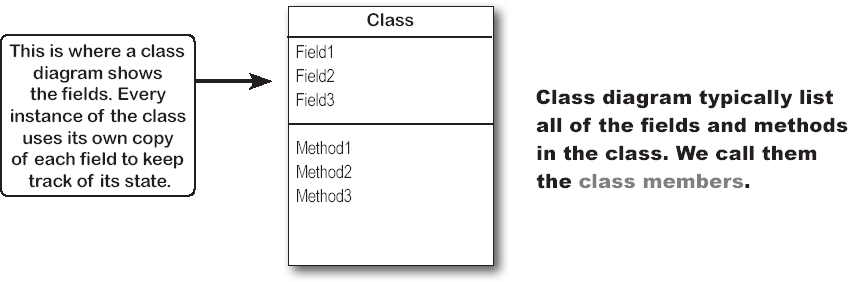
Methods are what an object does. Fields are what the object knows.
When Ana’s prototype created three instances of her Enemy class, each of those objects was used to keep track of a different enemy in the game. Every instance keeps separate copies of the same data: setting a field on the enemy2 instance won’t have any effect on the enemy1 or enemy3 instances.
Note
An object’s behavior is defined by its methods, and it uses fields to keep track of its state.
Yes! That’s why you used the static keyword in your declarations.
Take another look at the first few lines of your CardPicker class:
class CardPicker
{
    static Random random = new Random();

    public static string PickSomeCards(int numberOfCards)
When you use the static keyword to declare a field or method in a class, you don’t need an instance of that class to access it. You just called your method like this:
CardPicker.PickSomeCards(numberOfCards)
That’s how you call static methods. If you take away the static keyword from the PickSomeCards method declaration, then you’ll have to create an instance of CardPicker in order to call the method. Other than that distinction, static methods are just like object methods: they can take arguments, they can return values, and they live in classes.
When a field is static there’s only one copy of it, and it’s shared by all instances. So if you created multiple instances of CardPicker, they would all share the same random field. You can even mark your whole class as static, and then all of its members must be static too. If you try to add a nonstatic method to a static class, your program won’t build.
Note
When a field is static, there’s only one copy of it shared by all instances
Thanks for the memory
When your program creates an object, it lives in a part of the computer’s memory called the heap. When your code creates an object with a new statement, C# immediately reserves space in the heap so it can store the data for that object.

Note
When your program creates a new object, it gets added to the heap.
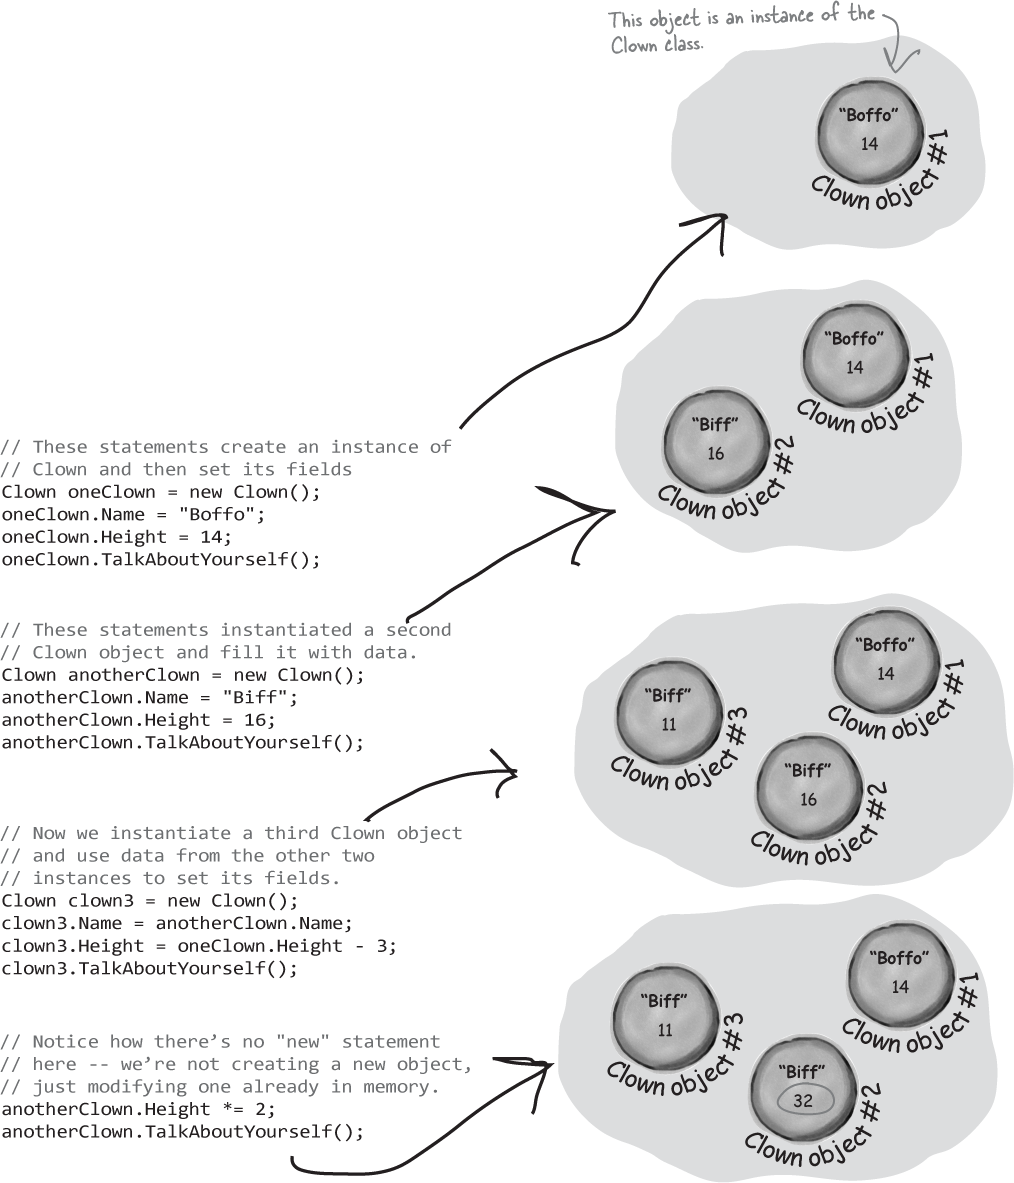
What’s on your program’s mind
Let’s take a closer look at the program in the “Sharpen your Pencil” exercise, starting with the first line of the Main method. It’s actually two statements combined into one:
Next, let’s look closely at what the heap looks like after each group of statements is executed.
Sometimes code can be difficult to read
You may not realize it, but you’re constantly making choices about how to structure your code. Do you use one method to do something? Do you split it into more than one? Or do you even need a new method at all? The choices you make about methods can make your code much more intuitive—or if you’re not careful, much more convoluted.
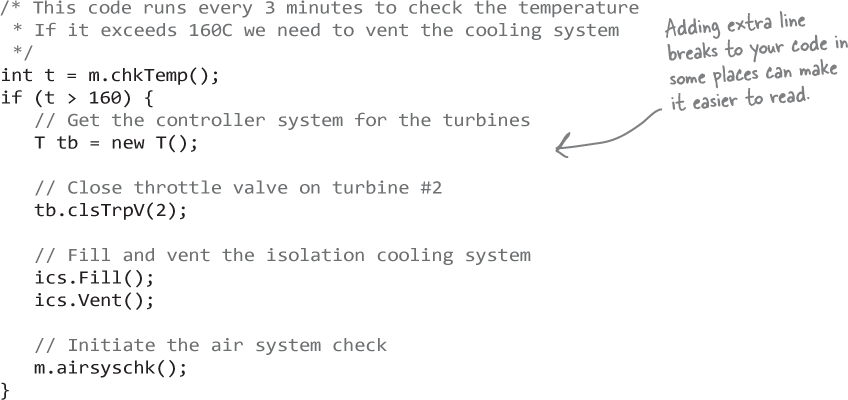
Here’s a nice, compact chunk of code from a control program that runs a machine that makes candy bars.
 int t = m.chkTemp();
 if (t > 160) {
    T tb = new T();
    tb.clsTrpV(2);
    ics.Fill();
    ics.Vent();
    m.airsyschk();
 }
Extremely compact code can be especially problematic
Take a second and look at that code. Can you figure out what it does? Don’t feel bad if you can’t—it’s very difficult to read that code. Here are a few reasons why:
We can see a few variable names:
tb,ics,m. These are terrible names! We have no idea what they do. And what’s thatTclass for?The chkTemp method returns an integer... but what does it do? We can guess maybe it has something to do with checking the temperature of... something?
The
clsTrpVhas one parameter. Do we know what that parameter is supposed to be? Why is it 2? What is that 160 number for?
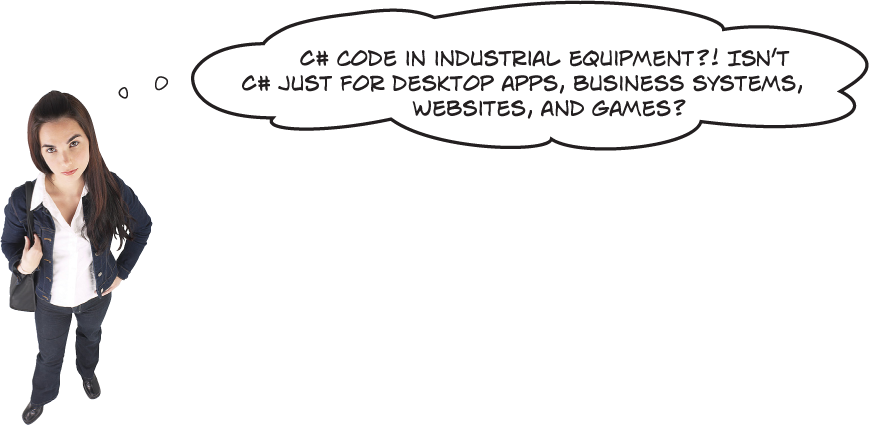
C# and .NET are everywhere... and we mean everywhere.
Have you ever played with a Raspberry PI? It’s a low-cost computer on a single board, and computers like it can be found inside all sorts of machinery. And thanks to Windows IoT (or Internet of Things), your C# code can run on them. There’s a free version for prototyping, so you can start playing with hardware any time.
You can learn more about .NET IoT apps: https://dotnet.microsoft.com/apps/iot
Most code doesn’t come with a manual
Those statements don’t give you any hints about why the code’s doing what it’s doing. In this case, the programmer was happy with the results because she was able to get it all into one method. But making your code as compact as possible isn’t really useful! Let’s break it up into methods to make it easier to read, and make sure the classes are given names that make sense.
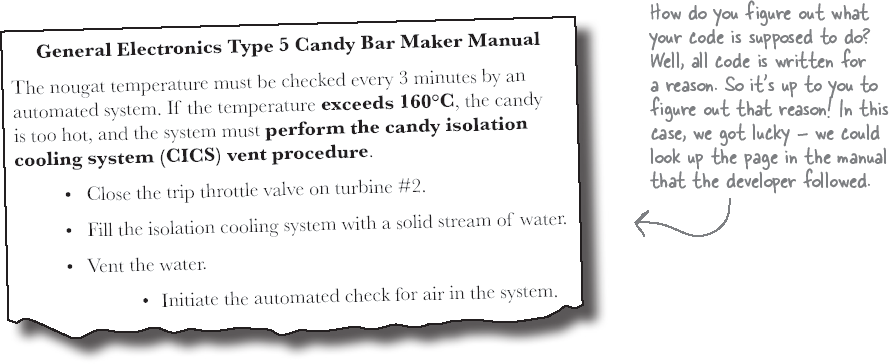
But we’ll start by figuring out what the code is supposed to do. Luckily, we happen to know that this code is part of an embedded system, or a controller that’s part of a larger electrical or mechanical system. And lucky for us, we happen to have documentation for this code— specifically, the manual that the programmers used when they originally built the system.
We can compare code with the manual that tells us what the code is supposed to do. Adding comments can definitely help us understand what it’s supposed to do.
Use intuitive class and method names
That page from the manual made it a lot easier to understand the code. It also gave us some great hints about how to make our code easier to understand. Let’s take a look at the first two lines:
/* This code runs every 3 minutes to check the temperature
 * If it exceeds 160C we need to vent the cooling system
 */
int t = m.chkTemp();
if (t > 160) {
The comment we added explains a lot. Now we know why the conditional test checks the variable t against 160—the manual says that any temperature above 160°C means the nougat is too hot. And it turns out that m was a class that controlled the candy maker, with static methods to check the nougat temperature and check the air system.
So let’s put the temperature check into a method, and choose names for the class and the methods that make the purpose obvious. We’ll move these first two lines into their own method that returns a boolean value, true if the nougat is too hot or false if it’s okay.
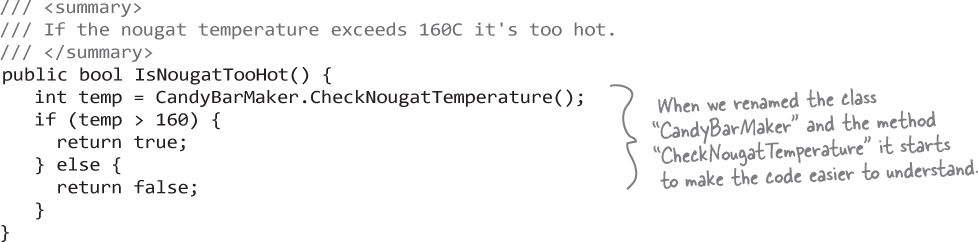
Did you notice the special /// comments above the method? That’s called an XML Documentation Comment. The IDE uses those comments to show you documentation for methods—like the documentation you saw when you used the IntelliSense window to figure out which method from the Random class to use.
What does the manual say to do if the nougat is too hot? It tells us to perform the candy isolation cooling system (or CICS) vent procedure. So let’s make another method, and choose an obvious name for the T class (which turns out to control the turbine) and the ics class (which controls the isolation cooling system, and has two static methods to fill and vent the system), and cap it all off with some brief XML documentation.
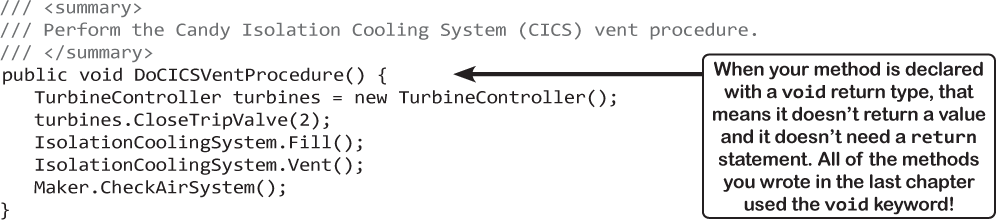
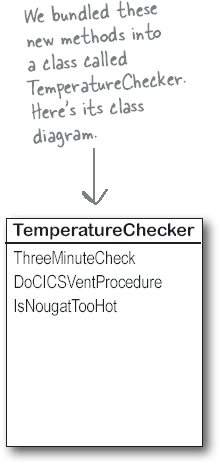
So now we that we have the IsNougatTooHot and DoCICSVentProcedure methods, we can rewrite the original confusing code as a single method—and we can give it a name that makes clear exactly what it does.
/// <summary>
/// This code runs every 3 minutes to check the temperature.
/// If it exceeds 160C we need to vent the cooling system.
/// </summary>
public void ThreeMinuteCheck() {
   if (IsNougatTooHot() == true) {
       DoCICSVentProcedure();
   }
}
Now the code is a lot more intuitive! Even if you don’t know that the CICS vent procedure needs to be run if the nougat is too hot, it’s a lot more obvious what this code is doing.

That’s right. When you change the structure of your code without altering its behavior, it’s called refactoring.
Great developers write code that’s easy to understand. Comments can help, but nothing beats choosing intuitive names for your methods, classes, variables, and fields.
You can make your code easier to read and write by thinking about the problem your code was built to solve. If you choose names for your methods that make sense to someone who understands that problem, then your code will be a lot easier to decipher and develop. But no matter how well we plan our code, we almost never get things exactly right the first time.
That’s why advanced developers constantly refactor their code. They’ll move code into methods and give them names that make sense. They’ll rename variables. Any time they see code that isn’t 100% obvious, they’ll take a few minutes to refactor it. They know it’s worth taking the time to do it now, because it will make it easier to add more code in an hour (or a day, a month, or a year!).
Build a class to work with some guys
Joe and Bob lend each other money all the time. Let’s create a class to keep track of them. We’ll start with an overview of what we’ll build.
We’ll create two instances of a “Guy” class.
We’ll use two Guy variables called
joeandbobto keep track of each of our instances. Here’s what the heap will look like after they’re created.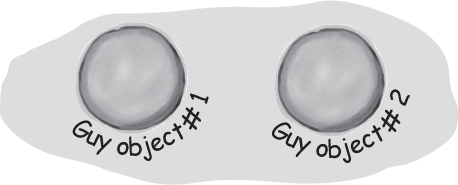
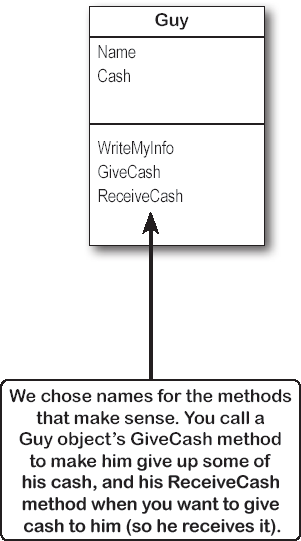
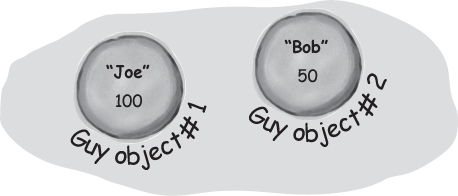
We’ll set each Guy object’s cash and name fields.
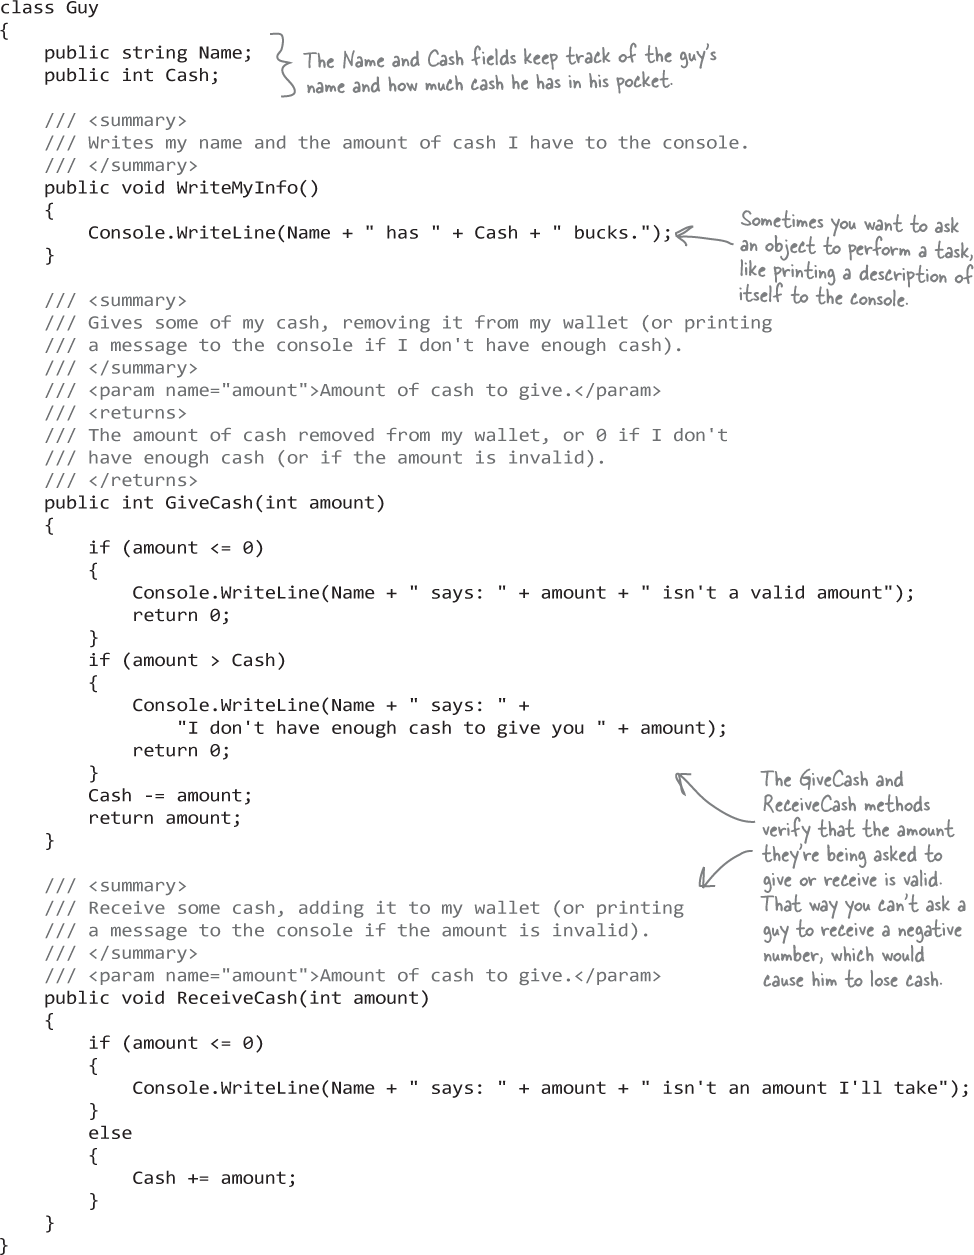
The two objects represent different guys, each with his own name and a different amount of cash in his pocket. Each guy has a Name field that keeps track of his name, and a Cash field that has the number of bucks in his pocket.
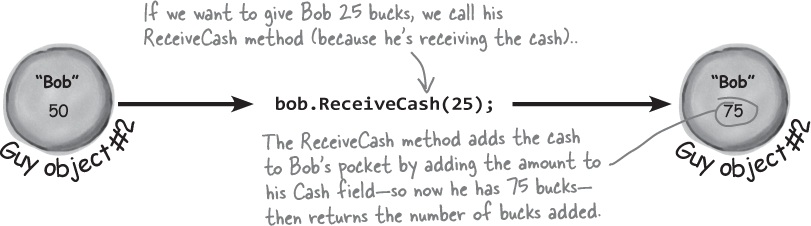
We’ll add methods to give and receive cash.
We’ll make a guy give cash from his pocket (and reduce his Cash field) by calling his GiveCash method, which will return the amount of cash he gave. And we’ll make him receive cash and add it to his pocket (increasing his Cash field) by calling his ReceiveCash method, which returns the amount of cash he received.
Note
Compare the comments in this code to the class diagrams and illustrations of the Guy objects. If something doesn’t make sense at first, take the time to really understand it.
There’s an easier way to initialize objects with C#
Almost every object that you create needs to be initialized in some way. And the Guy object is no exception—it’s useless until you set its Name and Cash fields. It’s so common to have to initialize fields that C# gives you a shortcut for doing it called an object initializer. And the IDE’s IntelliSense will help you do it.
Note
Object initializers save you time and make your code more compact and easier to read... and the IDE helps you write them.
You’re about to do an exercise where you create two Guy objects. You could use one new statement and two more statements to set its fields:
joe = new Guy();
joe.Name = "Joe";
joe.Cash = 50;
Instead, type Guy joe = new Guy() {
As soon as you add the left curly bracket, the IDE will pop up an IntelliSense window that shows all of the fields that you can initialize:

Choose the Name field and set it to 50 and add a comma.
Guy joe = new Guy() { Cash = 50,
Now type a space—another IntelliSense window will pop up with the remaining field to set.

Set the Name field and add the semicolon. You now have a single statement that initializes your object.

Note
Now you have all of the pieces to build your console app that uses two instances of the Guy class. Here’s how it will look:
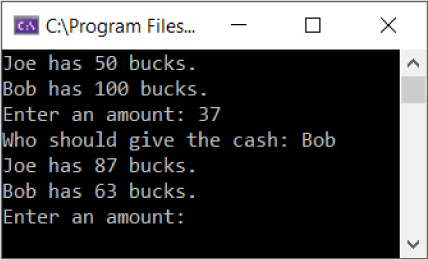
First, it will call each Guy object’s WriteMyInfo method. Then it will read an amount from the input and ask who to give the cash to. It will call one Guy object’s GiveCash method, then the other Guy object’s ReceiveCash method. It will keep going until the user enters a blank line.
Note
Don’t move on to the next part of the exercise until you have the first part working and you understand what’s going on. It’s worth taking a few minutes to use the debugger to step through the program and make sure you really get it.
Use the C# Interactive window to run C# code
If you just want to run some C# code, you don’t always need to create a new project in Visual Studio. Any C# code into the C# Interactive window is run immediately. You can open it by choosing C# Interactive from the View >> Other Windows menu. Try opening it and pasting in code from the exercise solution. You can run it by typing this and pressing enter: Program.Main(new string[] {})
Note
You’re passing an empty array for the “args” parameter.
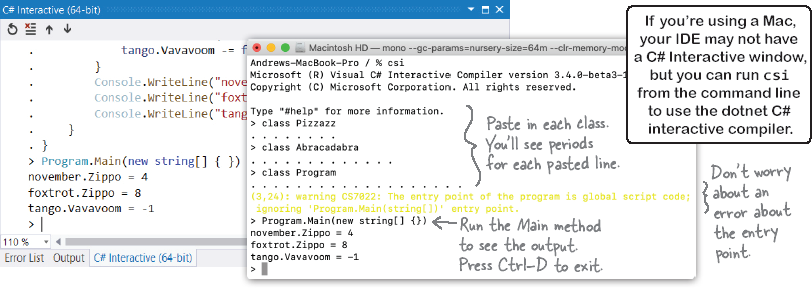
You can also run an interactive C# session from the command line. On Windows, search the Start menu for developer command prompt, start it, and then type csi. On Mac or Linux, run csharp to start the Mono C# Shell. In both cases, you can paste Pizzazz, Abracadabra, and Program classes from the previous exercise directly into the prompt, then run Program.Main(new string[] {}) to run your console app’s entry point.