Chapter 10. Reading and writing files Save the last byte for me!

Sometimes it pays to be a little persistent.
So far, all of your programs have been pretty short-lived. They fire up, run for a while, and shut down. But that’s not always enough, especially when you’re dealing with important information. You need to be able to save your work. In this chapter, we’ll look at how to write data to a file, and then how to read that information back in from a file. You’ll learn about the streams, and also take a look at the mysteries of hexadecimal, Unicode, and binary data.
.NET uses streams to read and write data
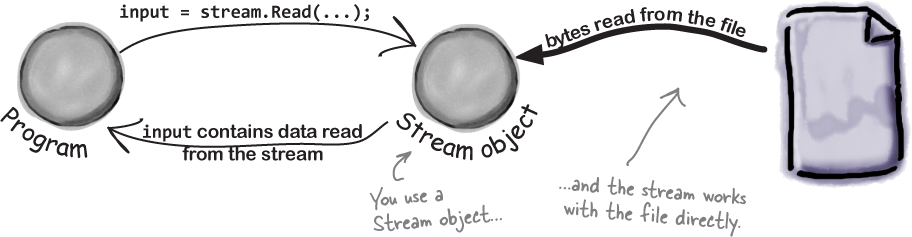
A stream is the .NET Framework’s way of getting data in and out of your program. Any time your program reads or writes a file, connects to another computer over a network, or generally does anything where it sends or receives bytes from one place to another, you’re using streams. Sometimes you’re using streams directly. But even when you’re using classes that don’t directly expose streams, under the hood they’re almost always using streams.
Whenever you want to read data from a file or write data to a file, you’ll use a Stream object.
Let’s say you have a simple app that needs to read data from a file. A really basic way to do that is to use a Stream object.
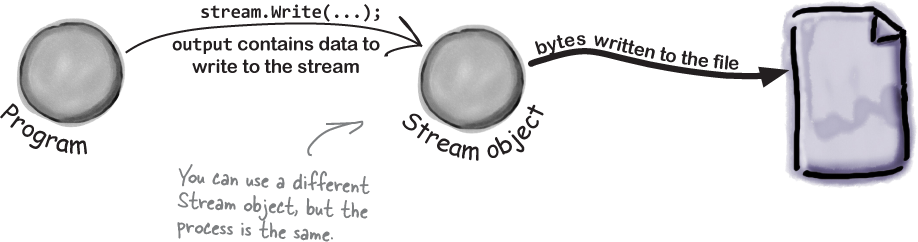
And if your app needs to write data out to the file, it can use another Stream object.
Different streams read and write different things
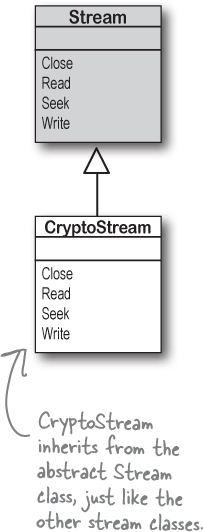
Every stream is a subclass of the abstract Stream class, and there are many subclasses of Stream that do different things. We’ll be concentrating on reading and writing regular files, but everything you learn about streams in this chapter can apply to compressed or encrypted files, or network streams that don’t use files at all.
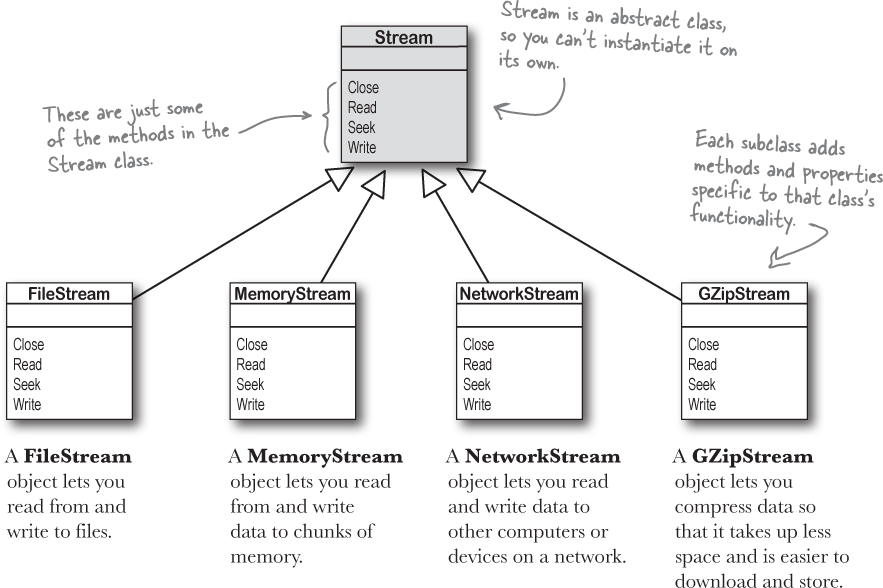
Things you can do with a stream:
Write to the stream.
You can write your data to a stream through a stream’s Write method.
Read from the stream.
You can use the Read method to get data from a file, or a network, or memory, or just about anything else, using a stream. You can even read data from really big files, even if they’re too big to fit into memory.
Change your position within the stream.
Most streams support a Seek method that lets you find a position within the stream so you can read or insert data at a specific place. But not every Stream class supports Seek—which makes sense, because you can’t always backtrack in some sources of streaming data.
Streams let you read and write data. Use the right kind of stream for the data you’re working with.
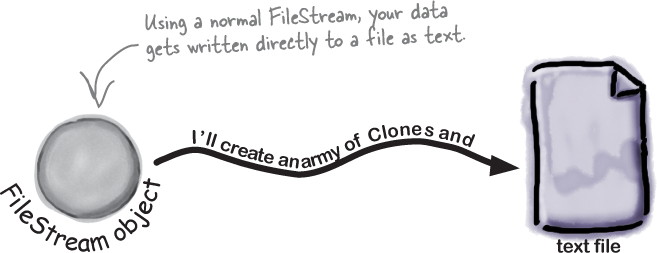
A FileStream reads and writes bytes to a file
When your program needs to write a few lines of text to a file, there are a lot of things that have to happen:
Create a new
FileStreamobject and tell it to write to the file.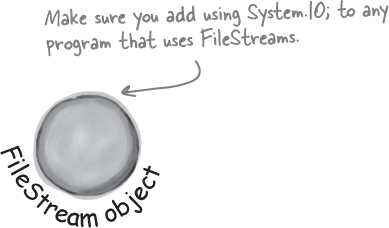
The
FileStreamattaches itself to a file.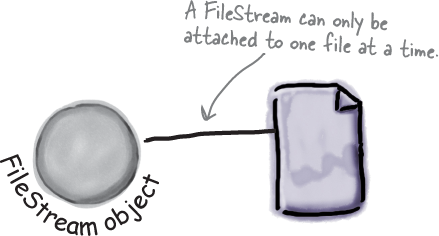
Streams write bytes to files, so you’ll need to convert the string that you want to write to an array of
bytes.
Call the stream’s
Writemethod and pass it thebytearray.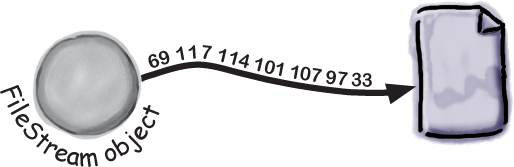
Close the stream so other programs can access the file.

Write text to a file in three simple steps
C# comes with a convenient class called StreamWriter that does all of those things in one easy step. All you have to do is create a new StreamWriter object and give it a filename. It automatically creates a FileStream and opens the file. Then you can use the StreamWriter’s Write and WriteLine methods to write everything to the file you want.
StreamWriter creates and manages a FileStream object for you automatically.
Use the StreamWriter’s constructor to open or create a file.
You can pass a filename to the StreamWriter’s constructor. When you do, the writer automatically opens the file. StreamWriter also has an overloaded constructor that lets you specify its append mode: passing it true tells it to add data to the end of an existing file (or append), while false tells the stream to delete the existing file and create a new file with the same name.
var writer = new StreamWriter("toaster oven.txt", true);
Use the Write and WriteLine methods to write to the file.
These methods work just like the ones in the Console class: Write writes text, and WriteLine writes text and adds a line break to the end.
writer.WriteLine($"The {appliance} is set to {temp} degrees.");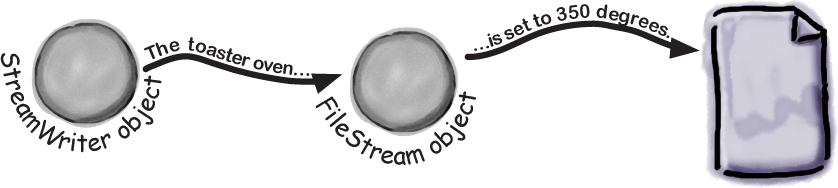
Call the Close method to release the file.
If you leave the stream open and attached to a file, then it’ll keep the file locked open and no other program will be able to use it. So make sure you always close your files!
writer.Close();
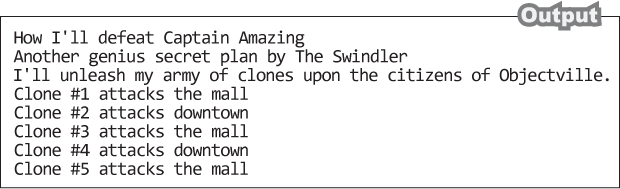
The Swindler launches another diabolical plan
The citizens of Objectville have long lived in fear of the Swindler, Captain Amazing’s arch-nemesis. Now he’s using a StreamWriter to implement another evil plan. Let’s take a look at what’s going on. Create a new Console Application and add this Main code, starting with a using declaration because StreamWriter is in the System.IO namespace.
StreamWriter’s Write and WriteLine methods work just like Console: Write writes text, and WriteLine writes text with a line break. And both classes support {curly brackets} like this:
sw.WriteLine("Clone #{0} attacks {1}",
          number, location);
When you include {0} in the text, it’s replaced by the first parameter after the string; {1} is replaced by the second, {2} by the third, etc.
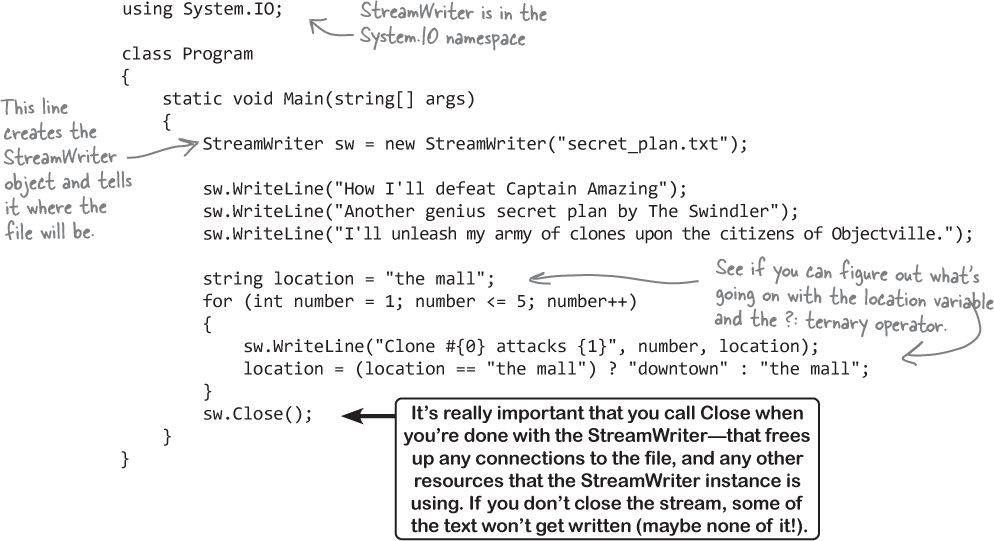
Here’s the output of the app. Since you didn’t include a full path in the filename, it wrote the file to the same folder as the binary—so if you’re running your app inside Visual Studio, check the bin\Debug\netcoreapp3.1 folder underneath your solution folder.
Here’s the output that it writes to secret_plan.txt:
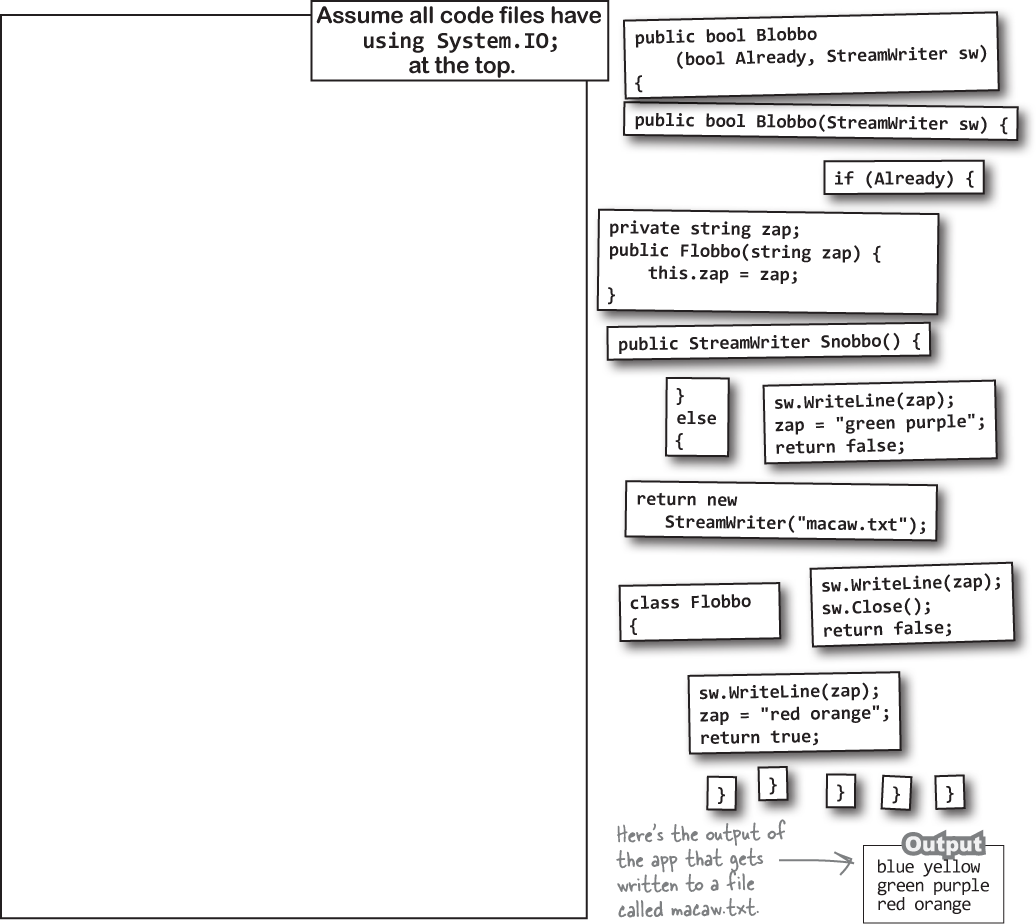
StreamWriter Magnets

Oops! These magnets were nicely arranged on the fridge with the code for the Flobbo class, but someone slammed the door and they all fell off. Can you rearrange them so the Main method produces the output below?
static void Main(string[] args) {
    Flobbo f = new Flobbo("blue yellow");
    StreamWriter sw = f.Snobbo();
    f.Blobbo(f.Blobbo(f.Blobbo(sw), sw), sw);
}
We added an extra challenge.
Something weird is going on with the Blobbo method. See how it has two different declarations in these first two magnets? We defined Blobbo as an overloaded method—there are two different versions, each with its own parameters, just like the overloaded methods you’ve used in previous chapters.
StreamWriter Magnets Solution

Your job was to construct the Flobbo class from the magnets to create the desired output.
static void Main(string[] args) {
    Flobbo f = new Flobbo("blue yellow");
    StreamWriter sw = f.Snobbo();
    f.Blobbo(f.Blobbo(f.Blobbo(sw), sw), sw);
}
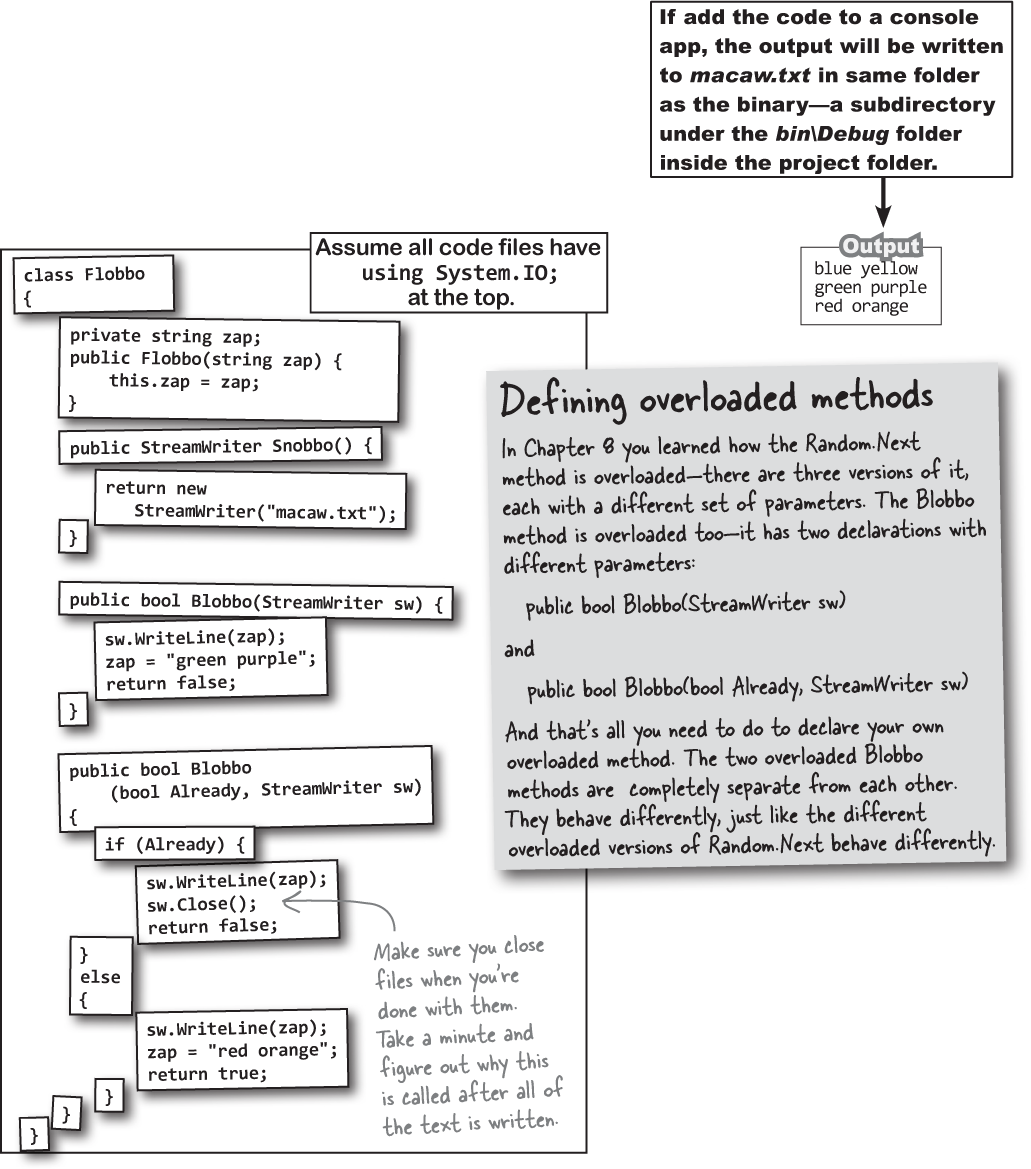
Just a reminder: we picked intentionally weird variable names and methods in these puzzles because if we used really good names, the puzzle would be too easy! Don’t use names like this in your code, OK?
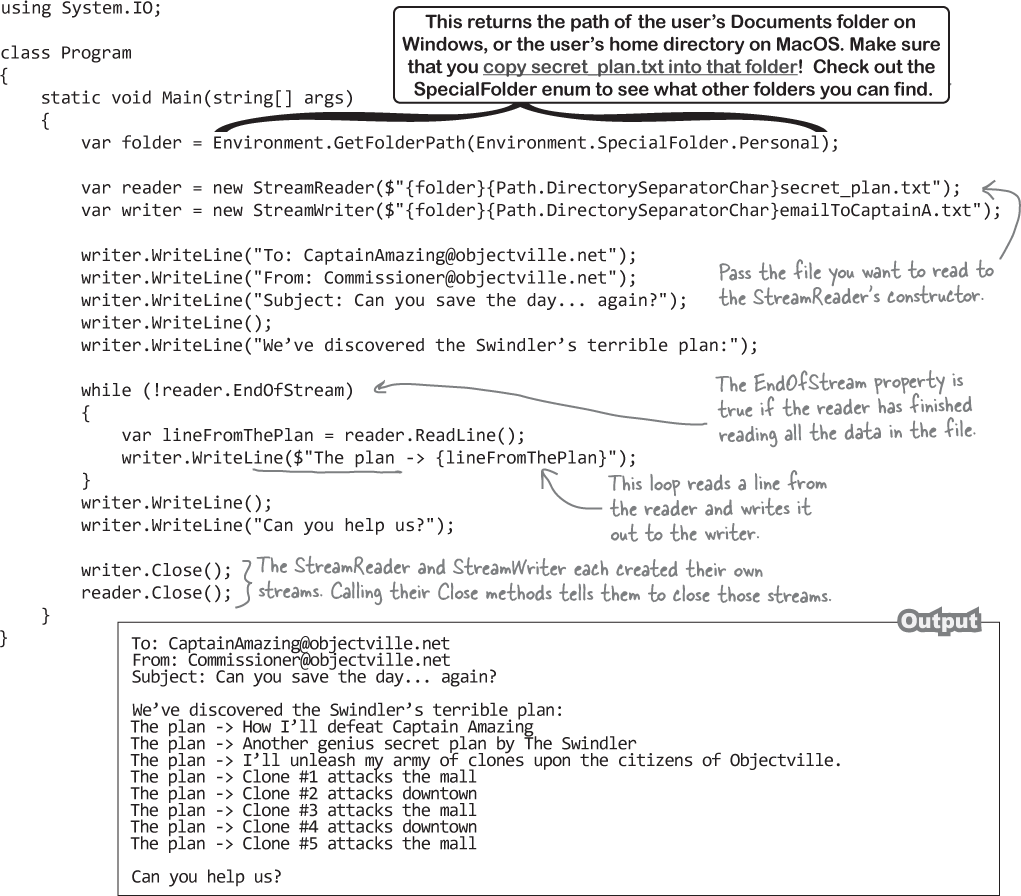
Use a StreamReader to read a file
Let’s read Swindler’s secret plans with a StreamReader, a class that’s a lot like StreamWriter—except instead of writing a file, you create a StreamReader and pass it the name of the file to read in its constructor. Its ReadLine method returns a string that contains the next line from the file. You can write a loop that reads lines from it until its EndOfStream field is true—that’s when it runs out of lines to read. Add this Console app that uses a StreamReader to read one file, and a StreamWriter to write another file.
StreamReader is a class that reads characters from streams, but it’s not a stream itself. When you pass a filename to its constructor, it creates a stream for you, and closes it when you call its Close method. It also has an overloaded constructor that takes a reference to a Stream.
Data can go through more than one stream
One big advantage to working with streams in .NET is that you can have your data go through more than one stream on its way to its final destination. One of the many types of streams in .NET Core is the CryptoStream class. This lets you encrypt your data before you do anything else with it. So instead of writing plain text to a regular old text file: The Swindler can chain streams together and send the text through a CryptoStream object before writing its output to a FileStream.
The Swindler can chain streams together and send the text through a CryptoStream object before writing its output to a FileStream.
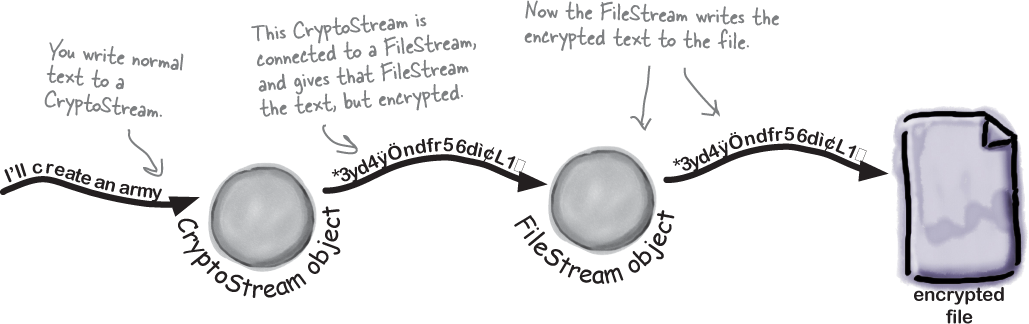
You can CHAIN streams. One stream can write to another stream, which writes to another stream…often ending with a network or file stream.

Pool Puzzle
Your job is to take code snippets from the pool and place them into the blank lines in the program. You can use the same snippet more than once, and you won’t need to use all the snippets. Your goal is to make the program produce the output shown to the right.
 Mini Sharpen your pencil
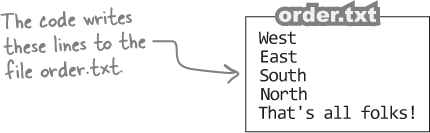
What text does the app write to delivery.txt?
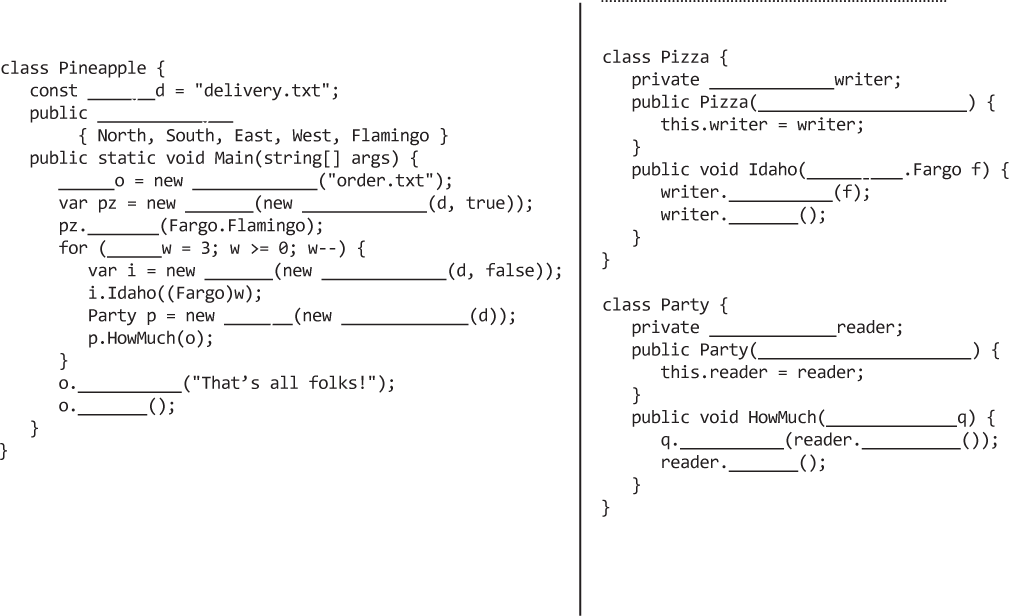
Note: each snippet from the pool can be used more than once!
Pool Puzzle Solution
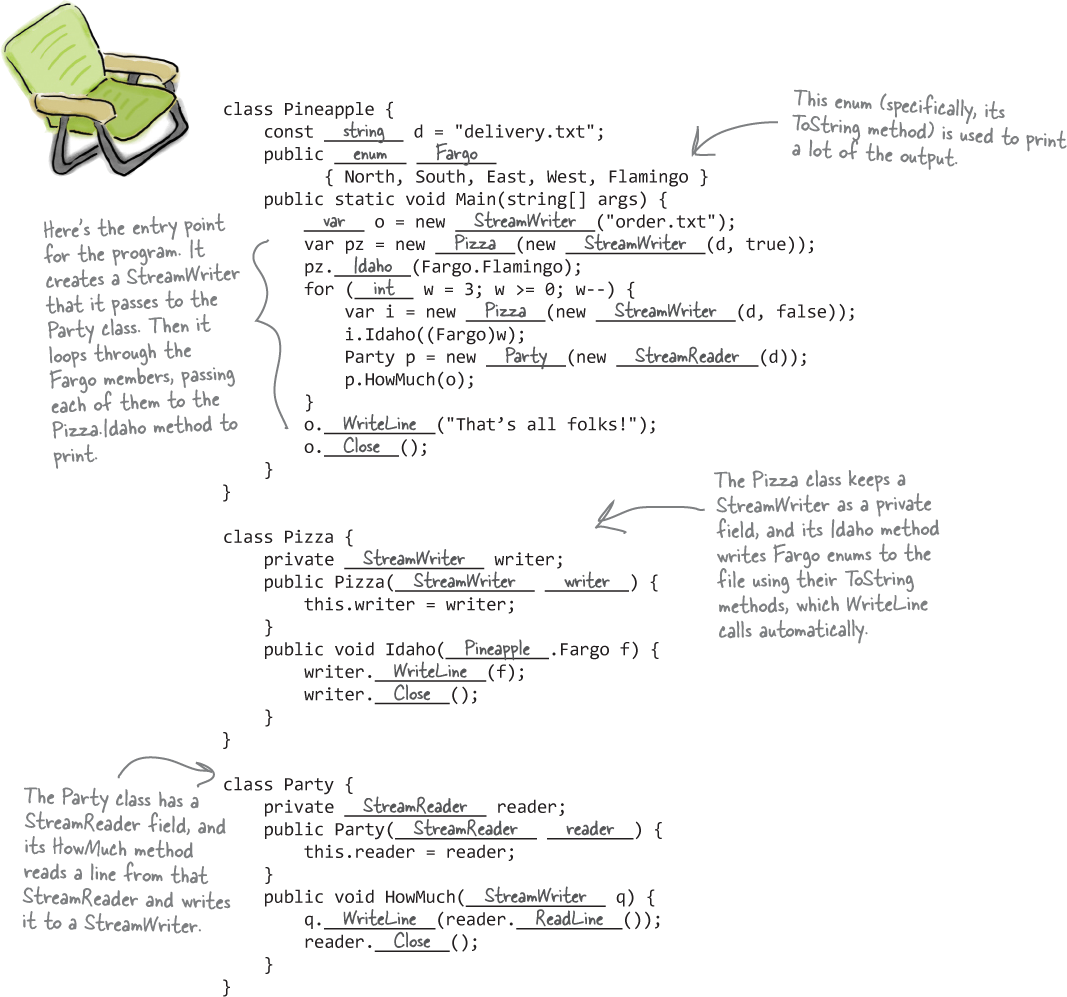
Mini Sharpen your pencil Solution
What text does the app write to delivery.txt?
North
Both Console and StreamWriter can use composite formatting, which replaces placeholders with values of parameters passed to Write or WriteLine.
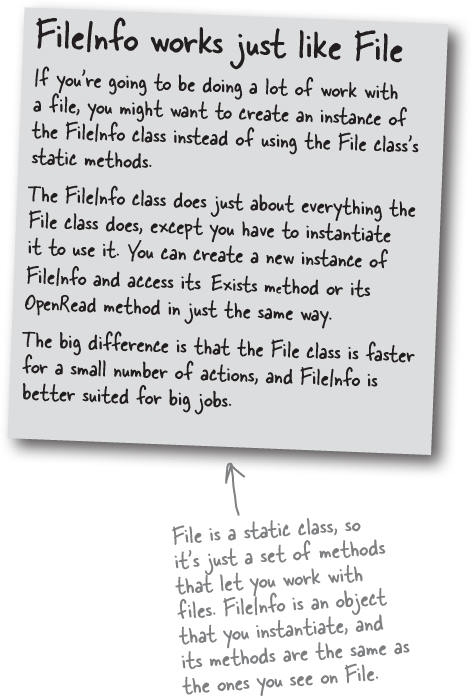
Use the File and Directory classes to work with files and directories
Like StreamWriter, the File class creates streams that let you work with files behind the scenes. You can use its methods to do most common actions without having to create the FileStreams first. Directory objects let you work with whole directories full of files.
Things you can do with File:
Find out if the file exists.
You can check to see if a file exists using the Exists method. It’ll return true if it does, and false if it doesn’t.
Read from and write to the file.
You can use the OpenRead method to get data from a file, or the Create or OpenWrite method to write to the file.
Append text to the file.
The AppendAllText method lets you append text to an already created file. It even creates the file if it’s not there when the method runs.
Get information about the file.
The GetLastAccessTime and GetLastWriteTime methods return the date and time when the file was last accessed and modified.
Things you can do with Directory:
Create a new directory.
Create a directory using the CreateDirectory method. All you have to do is supply the path; this method does the rest.
Get a list of the files in a directory.
You can create an array of files in a directory using the GetFiles method; just tell the method which directory you want to know about, and it will do the rest.
Delete a directory.
Deleting a directory is really simple too. Just use the Delete method.
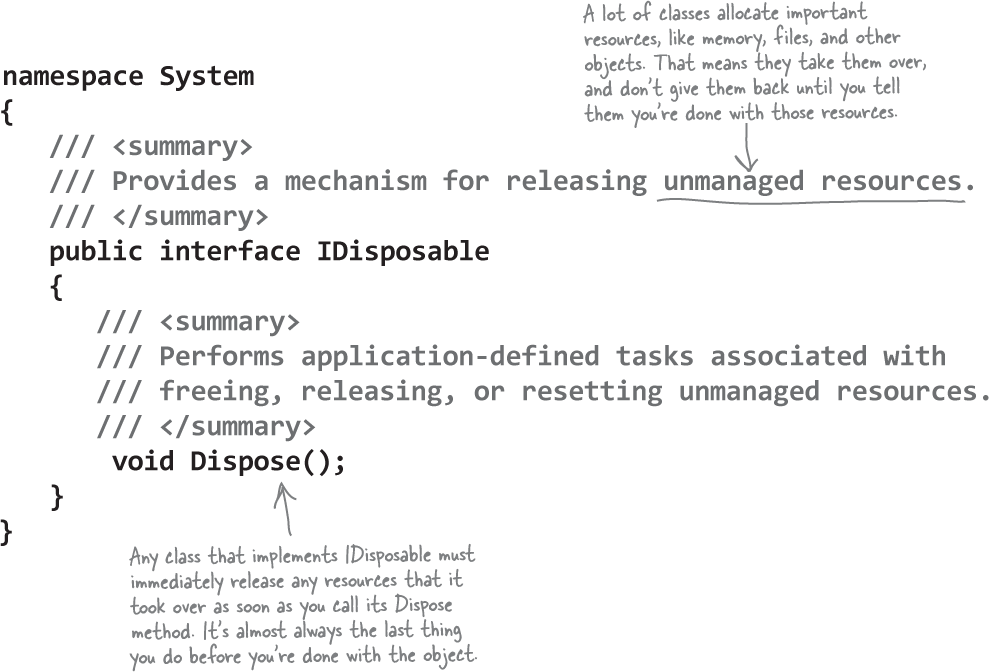
IDisposable makes sure objects are closed properly
A lot of .NET classes implement a particularly useful interface called IDisposable. It has only one member: a method called Dispose. Whenever a class implements IDisposable, it’s telling you that there are important things that it needs to do in order to shut itself down, usually because it’s allocated resources that it won’t give back until you tell it to. The Dispose method is how you tell the object to release those resources.
Use the IDE to explore IDisposable
You can use the “Go to Definition” (or “Go to Declaration”) feature in the IDE to show you the definition of IDisposable. Go to your project and type IDisposable anywhere inside a class. Then right-click on it and select “Go To Definition” from the menu. It’ll open a new tab with code in it. Expand all of the code and this is what you’ll see:
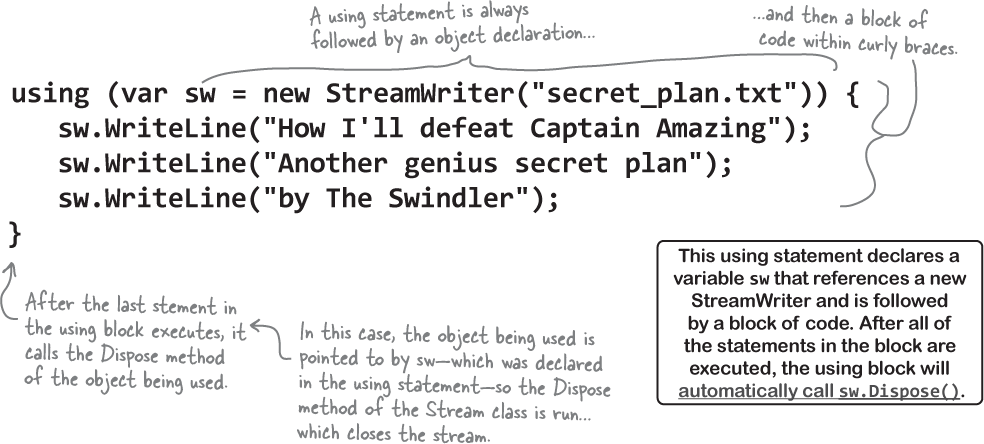
Avoid filesystem errors with using statements
We’ve been telling you all chapter that you need to close your streams. That’s because some of the most common bugs that programmers run across when they deal with files are caused when streams aren’t closed properly. Luckily, C# gives you a great tool to make sure that never happens to you: IDisposable and the Dispose method. When you wrap your stream code in a using statement, it automatically closes your streams for you. All you need to do is declare your stream reference with a using statement, followed by a block of code (inside curly brackets) that uses that reference. When you do that, C# automatically calls the Dispose method as soon as it finishes running the block of code.
These “using” statements are different from the ones at the top of your code.
Use multiple using statements for multiple objects
You can pile using statements on top of each other—you don’t need extra sets of curly brackets or indents.
using (var reader = new StreamReader("secret_plan.txt"))
using (var writer = new StreamWriter("email.txt"))
{
   // statements that use reader and writer
}
When you declare an object in a using block and that object’s Dispose method is called automatically.
Every stream has a Dispose method that closes the stream. When if you declare your stream in a using statement, it will always get closed! And that’s important, because some streams don’t write all of their data until they’re closed.
We gave you a chance to sleuth this problem out on your own. Here’s how we fixed it.

There’s an easier way to store your objects in files. It’s called serialization.
Serialization means writing an entire object’s state to a file or string. Deserialization means reading the object’s state back from that file or string. So instead of painstakingly writing out each field and value to a file line by line, you can save your object the easy way by serializing it out to a stream. Serializing an object is like flattening it out so you can slip it into a file. And on the other end, you can deserialize it, which is like taking it out of the file and inflating it again.
OK, just to come clean here: there’s also a method called Enum.Parse that will convert the string “Spades” to the enum value Suits.Spades. And it even has a companion, Enum. TryParse, that works just like the int.TryParse method you’ve used throughout this book. But serialization still makes a lot more sense here. You’ll find out more about that shortly....
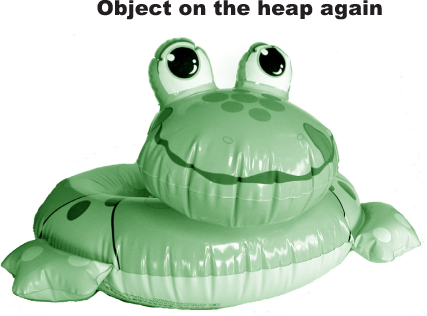
What happens to an object when it’s serialized?
It seems like something mysterious has to happen to an object in order to copy it off of the heap and put it into a file, but it’s actually pretty straightforward.
1 Object on the heap

When you create an instance of an object, it has a state. Everything that an object “knows” is what makes one instance of a class different from another instance of the same class.
Object serialized

When C# serializes an object, it saves the complete state of the object, so that an identical instance (object) can be brought back to life on the heap later.
And later on…
Later—maybe days later, and in a different program—you can go back to the file and deserialize it. That pulls the original class back out of the file and restores it exactly as it was, with all of its fields and values intact.
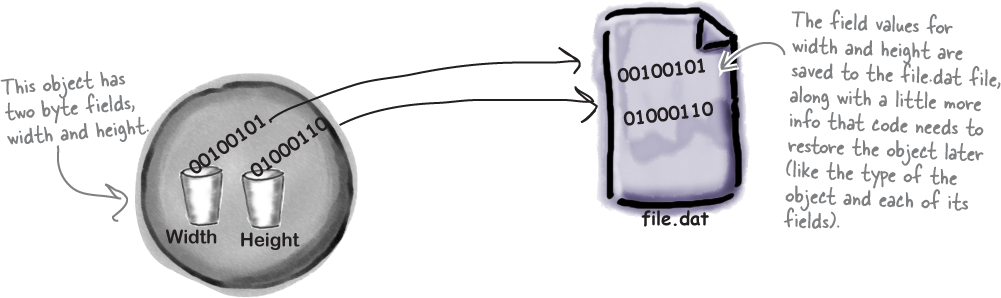
But what exactly IS an object’s state? What needs to be saved?
We already know that an object stores its state in its fields and properties. So when an object is serialized, each of those values needs to be saved to the file.
Serialization starts to get interesting when you have more complicated objects. Chars, ints, doubles, and other value types have bytes that can just be written out to a file as-is. But what if an object has an instance variable that’s an object reference? What about an object that has five instance variables that are object references? What if those object instance variables themselves have instance variables?
Think about it for a minute. What part of an object is potentially unique? Imagine what needs to be restored in order to get an object that’s identical to the one that was saved. Somehow everything on the heap has to be written to the file.
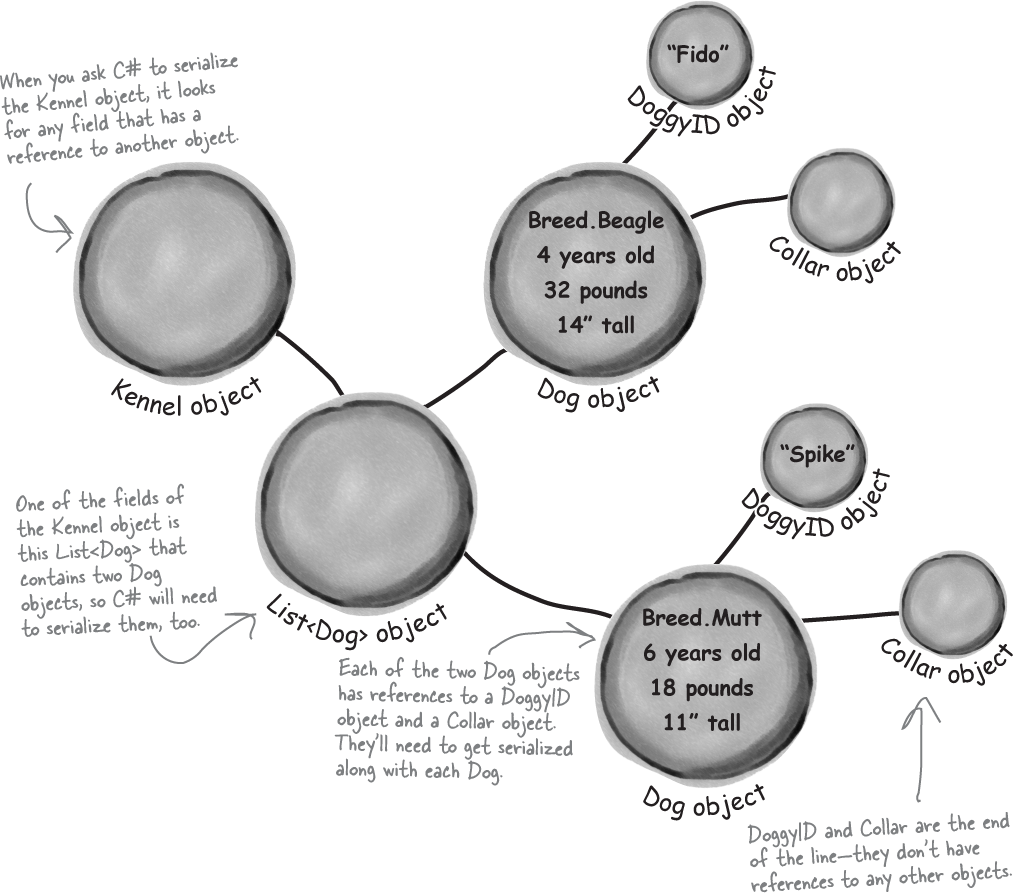
When an object is serialized, all of the objects it refers to get serialized, too…
…and all of the objects they refer to, and all of the objects those other objects refer to, and so on and so on. But don’t worry—it may sound complicated, but it all happens automatically. C# starts with the object you want to serialize and looks through its fields for other objects. Then it does the same for each of them. Every single object gets written out to the file, along with all the information C# needs to reconstitute it all when the object gets deserialized.
A group of objects connected to each other by references is sometimes referred to as a graph.
Use JsonSerialization to serialize your objects
You’re not just limited to reading and writing lines of text to your files. You can use JSON serialization to let your programs copy entire objects to strings (which you can write to files!) and read them back in…all in just a few lines of code! Let’s take a look at how this works. Start by creating a new console app.
Do this!
Design some classes for your object graph.
Add this HairColor enum and these Guy and HairStyle classes to your new console app.
class Guy {
    public string Name { get; set; }
    public HairStyle Hair { get; set; }
    public Outfit Clothes { get; set; }
    public override string ToString() => $"{Name} with {Hair} wearing {Clothes}";
}

class Outfit {
    public string Top { get; set; }
    public string Bottom { get; set; }
    public override string ToString() => $"{Top} and {Bottom}";
}

enum HairColor {
    Auburn, Black, Blonde, Blue, Brown, Gray, Platinum, Purple, Red, White
}

class HairStyle {
    public HairColor Color { get; set; }
    public float Length { get; set; }
    public override string ToString() => $"{Length:0.0} inch {Color} hair";
}
Create a graph of objects to serialize.
Now create a small graph of objects to serialize: a new List<Guy> pointing to a couple of Guy objects. Add this code to your Main method that uses a collection initializer and object initializers to build the object graph:
static void Main(string[] args) {
    var guys = new List<Guy>() {
       new Guy() { Name = "Bob", Clothes = new Outfit() { Top = "t-shirt", Bottom = "jeans" },
          Hair = new HairStyle() { Color = HairColor.Red, Length = 3.5f }
       },
       new Guy() { Name = "Joe", Clothes = new Outfit() { Top = "polo", Bottom = "slacks" },
          Hair = new HairStyle() { Color = HairColor.Gray, Length = 2.7f }
       },
};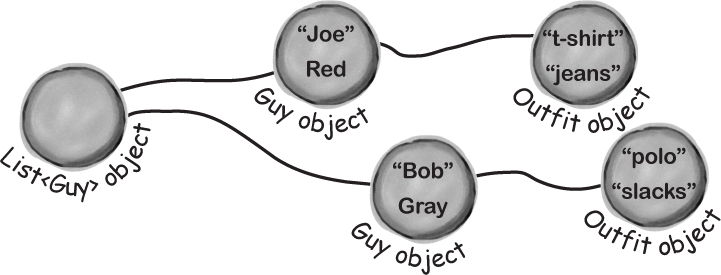
Use JsonSerializer to serialize the objects to a string.
First add a using directive to the top of your code file:
using System.Text.Json;
Now you can serialize the entire graph with a single line of code:
  var jsonString = JsonSerializer.Serialize(guys);
  Console.WriteLine(jsonString);
Run your app and look closely at what it prints to the console:
[{"Name":"Bob","Hair":{"Color":8,"Length":3.5},"Clothes":{"Top":"t-shirt","Bot
tom":"jeans"}},{"Name":"Joe","Hair":{"Color":5,"Length":2.7},"Clothes":{"Top":
"polo","Bottom":"slacks"}}]
That’s your object graph serialized to JSON (which some people pronounce “Jason” and others pronounce “JAY-sahn”). It’s a human readable data interchange format, which means that it’s a way to store complex objects using strings that a person can make sense of. And because it’s human readable, you can see that it has all of the parts of the graph: names and clothes are encoded as strings (“Bob”, “t-shirt”) and enums are encoded as their integer values.
Use JsonSerializer to deserialize the JSON to a new object graph.
Now that we have a string that contains the object graph serialized to JSON, we can deserialize it. That just means using it to create new objects. And JsonSerializer lets us do that in one line of code, too. Add this to the Main method:
var copyOfGuys = JsonSerializer.Deserialize<List<Guy>>(jsonString);
foreach (var guy in copyOfGuys)
    Console.WriteLine("I deserialized this guy: {0}", guy);
Run your app again. It deserializes the guys from the JSON string and writes them to the console:
I deserialized this guy: Bob with 3.5 inch Red hair wearing t-shirt and jeans
I deserialized this guy: Joe with 2.7 inch Gray hair wearing polo and slacks
JSON only includes data, not specific C# types
When you were looking through the JSON data, you saw human-readable versions of the data in your objects: strings like “Bob” and “slacks”, numbers like 8 and 3.5, and even lists and nested objects. But did you think about what you didn’t see? JSON data does not include the names of types like Guy, Outfit, HairColor, or HairStyle. That’s because JSON just contains the data, and JsonSerializer will do its best to deserialize the data into whatever properties it finds.
Let’s put this to the test. Add a new class to your project:
class Dude
{
    public string Name { get; set; }
    public HairStyle Hair { get; set; }
}
Now add this code to the end of your Main method:
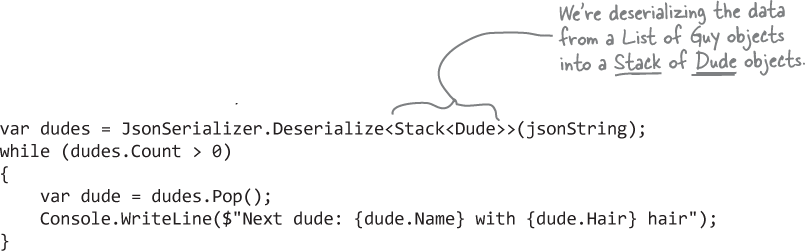
And run your code again. Since the JSON just has a list of objects, JsonSerializer.Deserialize will happily stick them into a Stack (or a Queue, or an array, or another collection type). And since Dude has public Name and Hair properties that match the data, it will fill in any data that it can. Here’s what it prints to the output—it prints Bob first because it’s popping them off of the stack in first-in-last-out, and Joe was added before Bob:
I deserialized this guy: Bob with 3.5 inch Red hair wearing t-shirt and jeans
I deserialized this guy: Joe with 2.7 inch Gray hair wearing polo and slacks
C# strings are encoded with Unicode
We’ve been using strings since you typed “Hello, world!” into the IDE at the start of Chapter 1. And because strings are so intuitive, we haven’t really needed to dissect them and figure out what makes them tick. But ask yourself... what exactly is a string?
A C# string is a read-only collection of chars. So if you actually look at how a string is stored in memory, you’ll the string "Elephant" stored as chars 'E', 'l', 'e', 'p', 'h', 'a', 'n', and 't'. But now ask yourself... what exactly is a char?
A char is a character represented with Unicode. Unicode is an industry standard for encoding characters, or converting them into bytes so they can be stored in memory, transmitted across networks, included in documents, or do pretty much anything you want with them—and you’re guaranteed that you’ll always get the correct character.
This is especially important when you consider just how many characters there are. The Unicode standard supports over 150 scripts (sets of characters for specific languages), including not just Latin (which has the 26 English letters and variants like é and ç) but scripts for many languages around the world. The list of supported scripts is constantly growing, as the Unicode Consortium adds new ones every year (here’s the current list: http://www.unicode.org/standard/supported.html).
Unicode supports another, really important set of characters: emoji. All of the emoji, from the winking smiley face ( ) to the ever-popular pile of poo (
 ) are Unicode characters.

Every Unicode character—including emoji—has a unique number.
The number for a Unicode character is called a code point. You download a list of all of the Unicode characters here: https://www.unicode.org/Public/UNIDATA/UnicodeData.txt – that’s a large text file with a line for every Unicode character. Download it and search for this “ELEPHANT” and you’ll find a line that starts like this: 1F418;ELEPHANT. The numbers 1F418 represent a hexadecimal (or hex) value. Hex values are written with numbers 0 to 9 and letters A to F. You can create a hex literal in C# by adding 0x to the beginning, like this: 0x1F418.
1F418 is the Elephant emoji’s UTF-8 code point. UTF-8 is the most common way to encode a character as Unicode (or represent it as a number). It’s a variable-length encoding, using between 1 and 4 bytes. In this case, it uses three bytes: 0x01 (or 1), 0xF4 (or 244), and 0x18 (or 24).
But that’s not what JSON serializer printed. It printed a longer Hex number: D83DDC18. That’s because the C# char type uses UTF-16, which uses code points that consist of either one or two two-byte numbers. The UTF-16 code point of the elephant emoji is 0xD83D 0xDC18. UTF-8 is much more popular than UTF-16, especially on the Web, so when you look up code points you’re much more likely to find UTF-8 than UTF-16.
Visual Studio works really well with Unicode
Let’s use Visual Studio to how the IDE works with Unicode characters. You saw back in Chapter 1 that you can use emoji in code. Let’s see what else the IDE can handle. Go to the code editor and enter this code:
Console.WriteLine("Hello ");
If you’re using Windows, open up the Character Map app. If you’re using Mac, press Ctrl- -space to pop up the Character Viewer. Then search for the Hebrew letter shin (
 ) and copy it to the clipboard.

Place your cursor at the end of the string between the space and the quotation mark, and paste the shin character that you copied to the clipboard. Hmm, something looks weird:

Did you notice that the cursor is positioned to the left of the pasted letter? Well, let’s continue. Don’t click anywhere in the IDE—keep the cursor where it is, then switch over to Character Map or Character Viewer to search for the Hebrew letter lamed ( ). Switch back to the IDE—make sure the cursor is still positioned just left of the shin—and paste in the lamed.

When you pasted the lamed, the IDE added it to the left of the shin. Now search for the Hebrew letters vav (I) and final mem ( ). Paste each of them into the IDE—it will insert them to the left of the cursor:

The IDE knows that Hebrew is read right-to-left, so it’s behaving accordingly. Click to select the text near the beginning of the statement, and slowly drag your cursor right to select Hello and then  – watch carefully what happens when the selection reaches the Hebrew letters. It skips to the shin
  and then selects from right to left—and that’s exactly what a Hebrew reader would expect it to do.
.NET uses Unicode to store characters and text
The two C# types for storing text and characters—string and char—keep their data in memory as Unicode. When that data’s written out as bytes to a file, each of those Unicode numbers is written out to the file. Let’s get a sense of exactly how Unicode data is written out to a file. Create a new Console app we’ll use the File.WriteAllBytes and File.ReadAllBytes methods to start exploring Unicode.
Do this!
Write a normal string out to a file and read it back.
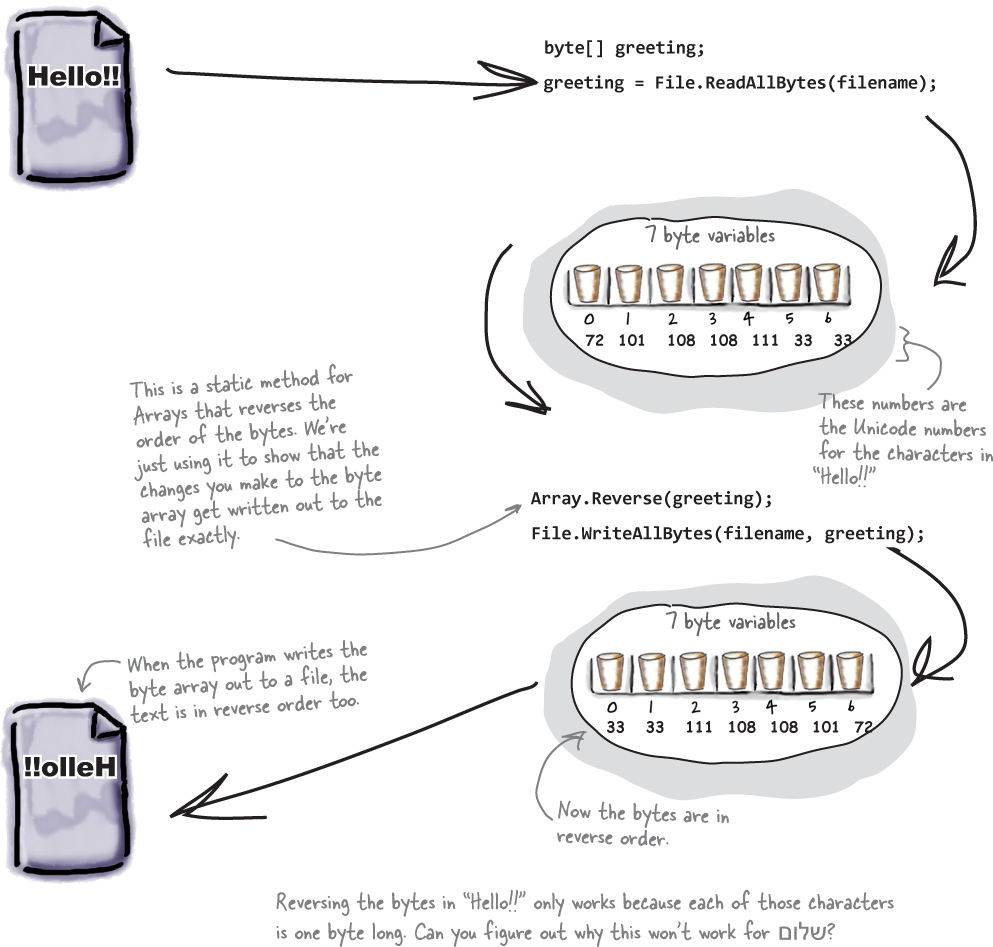
Add the following code to the Main method—it uses File.WriteAllText to write the string “Eureka!” out to a file called eureka.txt (so you’ll need using System.IO;). Then it creates a new byte array called eurekaBytes, reads the file into it, and prints out all of the bytes it read:
File.WriteAllText("eureka.txt", "Eureka!");
byte[] eurekaBytes = File.ReadAllBytes("eureka.txt");
foreach (byte b in eurekaBytes)
    Console.Write("{0} ", b);
Console.WriteLine(Encoding.UTF8.GetString(eurekaBytes));
The ReadAllBytes method returns a reference to a new array of bytes that contains all of the bytes that were read in from the file.
You’ll see these bytes written to the output:
69 117 114 101 107 97 33. The last line calls Encoding. UTF8.GetString, which converts a byte array with UTF-8 encoded characters to a string. Now open the file in the Notepad (Windows) or TextEdit (Mac). It says “Eureka!”Then add code to write the bytes as hex numbers.
Whenever you’re encoding data you often use hex, so let’s do that now. Add this code to the end of the Main method that writes the same bytes out, using {0:x2} to format each byte as a hex number:
foreach (byte b in eurekaBytes)
    Console.Write("{0:x2} ", b);
Console.WriteLine();
Hex uses the numbers 0 through 9 and letters A through F to represent numbers in base 16, so 6B is equal to 107.
That tells Write to print parameter 0 (the first one after the string to print) as a two-character hex code. So it writes the same seven bytes in hex instead of decimal: 45 75 72 65 6b 61 21
Modify the first line to write Hebrew letters “
 ” instead of “Eureka!”
You just added the Hebrew text "
" to another program using either Character Map (Windows) or Character Viewer (Mac). Comment out the first line of the Main method and replace it with the following code that writes "" to the file instead of "Eureka!“. we’ve added an extra Encoding. Unicode parameter so it writes UTF-16—the Encoding class is in the System.Text namespace, so add using System.Text; to the top:File.WriteAllText("eureka.txt", "", Encoding.Unicode);Now run the code again, and look closely at the output:
ff fe e9 05 dc 05 d5 05 dd 05. The first two characters are “FF FE”, which is the Unicode way of saying that we’re going to have a string of two-byte characters. The rest of the bytes are the Hebrew letters—but they’re reversed, so U+05E9 appears ase905. Now open the file up in Notepad or Text Edit to make sure it looks right.Use JsonSerializer to explore UTF-8 and UTF-16 code points.
When you serialized the elephant emoji, JsonSerializer generated this: \uD83D\uDC18 – which we now know is the four-byte UTF-16 code point in hex. Now let’s try that with the Hebrew letter shin. Add using System.Text.Json; to the top of your app and then add this line:
Console.WriteLine(JsonSerializer.Serialize(""));Run your app again. This time it printed a code with two hex bytes:
"\u05E9"– that’s the UTF-16 code point for the Hebrew letter shin. It’s also the UTF-8 code point for the same letter.But wait a minute—we learned that the UTF-8 code for the elephant emoji is
0x1F418, which is different than the UTF-16 code point (0xD83D 0xDC18). What’s going on?It turns out that most of the characters with two-byte UTF-8 code points have the same code points in UTF-16. But once you reach the UTF-8 values that require three or more bytes—which includes the familiar emoji that we’ve used in this book—they differ. So while Hebrew letter shin is 0x05E9 in both UTF-8 and UTF-16, the elephant emoji is 0x1F418 in UTF-8 and 0xD8ED 0xDC18 in UTF-16.
Use Unicode escape sequences to encode
 .
.Add these lines to your Main method to write the elephant emoji to two files using both the UTF-16 and UTF-32 escape sequences:
File.WriteAllText("elephant1.txt", "\uD83D\uDC18");
File.WriteAllText("elephant2.txt", "\U0001F418");
Run your app again, then open both of those files in Notepad or Text Edit. You should see the correct character written to the file.
You used UTF-16 and UTF-32 escape sequences to create your emoji, but the WriteAllText method writes a UTF-8 file. The Encoding.UTF8.GetString method you used in step 1 converts a byte array with UTF-8 encoded data back to a string.
C# can use byte arrays to move data around
Since all your data ends up encoded as bytes, it makes sense to think of a file as one big byte array. And you already know how to read and write byte arrays.
Here’s the code to create a byte array, open an input stream, and read the text ‘Hello!!’ into bytes 0 through 6 of the array.
Use a BinaryWriter to write binary data
StreamWriter also encodes your data. It just specializes in text and text encoding—it defaults to UTF-8.
You could encode all of your strings, chars, ints, and floats into byte arrays before writing them out to files, but that would get pretty tedious. That’s why .NET gives you a very useful class called BinaryWriter that automatically encodes your data and writes it to a file. All you need to do is create a FileStream and pass it into the BinaryWriter’s constructor (they’re in the System.IO namespace, so you’ll need using System.IO;). Then you can call its methods to write out your data. So let’s create a new Console Application that uses BinaryWriter to write binary data to a file.
Do this!
Start by creating a console Application and setting up some data to write to a file.
  int intValue = 48769414;
  string stringValue = "Hello!";
  byte[] byteArray = { 47, 129, 0, 116 };
  float floatValue = 491.695F;
  char charValue = 'E';
If you use File.Create, it’ll start a new file—if there’s one there already, it’ll blow it away and start a brand-new one. There’s also the File.OpenWrite method, which opens the existing one and starts overwriting it from the beginning.
To use a BinaryWriter, first you need to open a new stream with File.Create:
  using (var output = File.Create("binarydata.dat"))
  using (var writer = new BinaryWriter(output))
  {
Now just call its Write method. Each time you do, it adds new bytes onto the end of the file that contain an encoded version of whatever data you passed it as a parameter.

Now use the same code you used before to read in the file you just wrote.
  byte[] dataWritten = File.ReadAllBytes("binarydata.dat");
  foreach (byte b in dataWritten)
      Console.Write("{0:x2} ", b);
  Console.WriteLine(" - {0} bytes", dataWritten.Length);
Write down the output in the blanks below. Can you figure out what bytes correspond to each of the five writer.Write(...) statements? Put a bracket under each group of bytes that corresponds with each statement, and write the name of the variable under it.
__ __ __ __ __ __ __ __ __ __ __ __ __ __ __ __ __ __ __ __ - ___ bytes
Use BinaryReader to read the data back in
The BinaryReader class works just like BinaryWriter. You create a stream, attach the BinaryReader object to it, and then call its methods. But the reader doesn’t know what data’s in the file! And it has no way of knowing. Your float value of 491.695F was encoded as d8 f5 43 45. But those same bytes are a perfectly valid int—1,140,185,334. So you’ll need to tell the BinaryReader exactly what types to read from the file. Add the following code to your program, and have it read the data you just wrote.
Don’t take our word for it. Replace the line that reads the float with a call to ReadInt32. (You’ll need to change the type of floatRead to int.) Then you can see for yourself what it reads from the file.
Start out by setting up the
FileStreamandBinaryReaderobjects:using (var input = File.OpenRead("binarydata.dat")) using (var reader = new BinaryReader(input)) {You tell BinaryReader what type of data to read by calling its different methods.

You tell BinaryReader what type of data to read by calling its different methods.
    Console.Write("int: {0} string: {1} bytes: ", intRead, stringRead);
    foreach (byte b in byteArrayRead)
        Console.Write("{0} ", b);
    Console.Write(" float: {0} char: {1} ", floatRead, charRead);
  }
Here’s the output that gets printed to the console:
int: 48769414 string: Hello! bytes: 47 129 0 116 float: 491.695 char: E
A hex dump lets you see the bytes in your files
A hex dump is a hexadecimal view of the contents of a file, and it’s a really common way for programmers to take a deep look at a file’s internal structure. We’ve been talking about hexadecimal (or hex) throughout the chapter.
It turns out that hex is a convenient way to display bytes in a file. A byte takes 2 characters to display in hex: bytes range from 0 to 255, or 00 to ff in hex. That lets you see a lot of data in a really small space, and in a format that makes it easy to spot patterns. And it’s useful to display binary data in rows that are 8, 16, or 32 bytes long because most binary data tends to break down in chunks of 4, 8, 16, or 32…like all the types in C#. (For example, an int takes up 4 bytes.) A hex dump lets you see exactly what those values are made of.
How to make a hex dump of some plain text
Start with some familiar text using Latin characters:
  When you have eliminated the impossible, whatever remains, however
  improbable, must be the truth. - Sherlock Holmes
First, break up the text into 16-character segments, starting with the first 16: When you have el
Next, convert each character in the text to its UTF-8 code point—and since the Latin characters all have one-byte UTF-8 code points, each will be represented by a two-digit hex number from 00 to 7F.
Then print each segment, starting with its offset (or position in the file) written as a hex number followed by a colon and a space, then the first eight code points in hex, then a divider (a space, two hyphens, and another space), then the next eight code points, then four spaces and the dumped characters:
0000: 57 68 65 6e 20 79 6f 75 -- 20 68 61 76 65 20 65 6c When you have el
Repeat until you’ve dumped every 16-character segment:
  0000: 57 68 65 6e 20 79 6f 75 -- 20 68 61 76 65 20 65 6c   When you have el
  0010: 69 6d 69 6e 61 74 65 64 -- 20 74 68 65 20 69 6d 70   iminated the imp
  0020: 6f 73 73 69 62 6c 65 2c -- 20 77 68 61 74 65 76 65   ossible, whateve
  0030: 72 20 72 65 6d 61 69 6e -- 73 2c 20 68 6f 77 65 76   r remains, howev
  0040: 65 72 20 69 6d 70 72 6f -- 62 61 62 6c 65 2c 20 6d   er improbable, m
  0050: 75 73 74 20 62 65 20 74 -- 68 65 20 74 72 75 74 68   ust be the truth
  0060: 2e 20 2d 20 53 68 65 72 -- 6c 6f 63 6b 20 48 6f 6c   . - Sherlock Hol
  0070: 6d 65 73 0a             --                           mes.
And that’s the dump. There are many hex dump programs for various operating systems, and each of them has a slightly different output. Each line in our particular hex dump format represents 16 characters in the input that was used to generate it. The first four characters are the offset in the file—the first line starts at character 0, the next at character 16 (or hex 10), then character 32 (hex 20), etc.
A hex dump is a hexadecimal view of data in a file or memory, and can be really useful tool to help you to debug binary data.
Use SteamReader to build a simple hex dumper
Let’s build a simple hex dump app that uses StreamReader to read data from a file and writes it dump to the console. We’ll take advantage of the ReadBlock method in StreamReader, which reads a block of characters into a char array: you specify the number of characters you want to read, and it’ll either read that many characters or, if there are fewer than that many left in the file, it’ll read the rest of the file. Since we’re displaying 16 characters per line, we’ll read blocks of 16 characters.
Create a new console app called HexDump. Before you add code, run the app to create the folder with the binary. Use Notepad or TextEdit to create a text file called textdata.txt, add some text to it, and put it in the same folder as the binary.
Here’s the Main method—it reads the textdata.txt file and writes a hex dump to the console:
The ReadBlock method reads the next characters from its input into a byte array (sometimes referred to as a buffer). It blocks, which means it keeps executing and doesn’t return until it’s either read all of the characters you asked for or run out of data to read.

The String.Substring method returns a part of a string. The first parameter is the starting position (in this case, the beginning of the string), and the second is the number of characters to include in the substring. And the String class has an overloaded constructor that takes a char array as a parameter and converts it to a string.
Now run your app. It will print a hex dump to the console:
0000: 45 6c 65 6d 65 6e 74 61 -- 72 79 2c 20 6d 79 20 64   Elementary, my d
0010: 65 61 72 20 57 61 74 73 -- 6f 6e 21                  ear Watson!
Use Stream.Read to read bytes from a stream
The hex dumper works just fine for text files—but there’s a problem. Copy the binarydata.dat file you wrote with BinaryWriter into the same folder as your app, then change the app to read it:
using (var reader = new StreamReader("binarydata.dat"))
Now run your app. This time it prints something else—but it’s not quite right:

The text characters (“Hello!”) seem okay. But compare the output with the “Sharpen your pencil” solution—the bytes aren’t quite right. It looks like it replaced some bytes (86, e8, 81, f6, d8, and f5) with a different byte, fd. That’s because StreamReader is built to read text files, so it only reads 7-bit values, or byte values up to 127 (7F in hex, or 1111111 in binary—which are 7 bits).
So let’s do this right—by reading the bytes directly from the stream. Modify the using block so it uses File.OpenRead, which opens the file and returns a FileStream. You’ll use the Stream’s Length property to keep reading until you’ve read all of the bytes in the file, and its Read method to read the next 16 bytes into the byte array buffer:
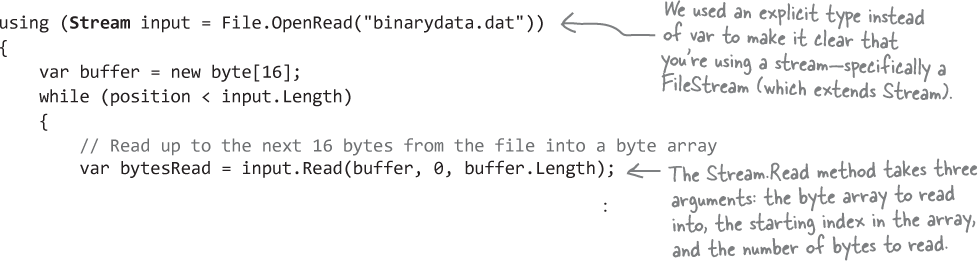
The rest of the code is the same, except for the line that sets bufferContents:
  // Write the actual characters in the byte array
  var bufferContents = Encoding.UTF8.GetString(buffer);
You used the Encoding class earlier in the chapter to convert a byte array to a string. This byte array contains a single byte per character—that means it’s a valid UTF-8 string. And that means you can use Encoding.UTF8.GetString to convert it. And since the Encoding class is in the System.Text namespace, you’ll need to add using System.Text; to the top of the file.
Now run your app again. This time it prints the correct bytes instead of changing them to fd:

There’s just one more thing we can do to clean up the output. Many hex dump programs replace non-text characters with dots in the output. Add this line to the end of the for loop:
if (buffer[i] < 0x20 || buffer[i] > 0x7F) buffer[i] = (byte)'.';
Now run your app again—this time the question marks are replaced with dots:
  0000: 86 29 e8 02 06 48 65 6c -- 6c 6f 21 2f 81 00 74 f6    .)...Hello!/..t.
  0010: d8 f5 43 45             --                            ..CE
Modify your hex dumper to use command-line arguments
Most hex dump programs are utilities that you run from the command line. You can dump a file by passing its name to the hex dumper as a command-line argument: C:\>HexDump myfile.txt
If you don’t pass it a filename, it reads its input from standard input (or stdin): C:\>dir || HexDump
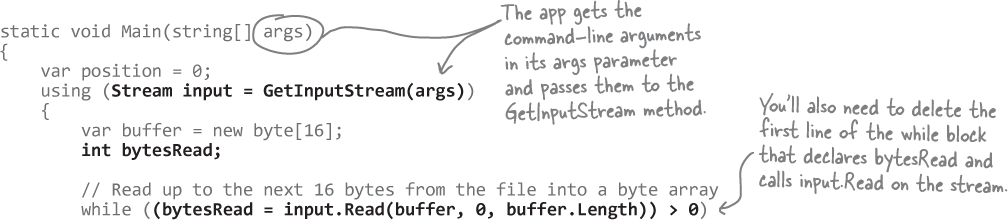
When you create a console app, C# makes the command-line arguments available as the args string array that gets passed to the Main method:
static void Main(string[] args)
Let’s modify the hex dumper to use command-line arguments. First, add this GetInputStream method that uses a switch expression to return a stream. If the user passed a command line argument, the app will use it to call File.OpenRead to get a FileStream. If they didn’t, the app will open the standard input instead. static Stream GetInputStream(string[] args) => args.Length switch

Now modify the Main method to use the stream—and it will work the same whether that stream comes from a file or standard input. We’ll
Test the dump from stdin by debugging the app in the IDE. Type some text into the console or terminal—as soon as you press enter, the app will generate the hex dump for it. You can also test the command line argument in the IDE. Right-click on the project in the solution, then:
On Windows, choose Properties, then click Debug and enter the filename in the Application arguments box (either the full path or the name of a file in the binary folder)
On Mac, choose Options, expand Run >> Configurations, click Default, and enter the filename in the Arguments box
You can also run the app from the command line. On Windows, Visual Studio builds an executable under the bin\Debug folder (in the same place you put your files to read), so you can run the from that folder.
On Mac, you’ll need to build a self-contained application. Open a Terminal window, go to the project folder, and run this command: dotnet publish -r osx-x64
The output of the command will include a line like this: HexDump -> /path-to-binary/osx-x64/publish/
Then you can open a Terminal window, cd to the full path that it printed, and run ./HexDump.
If you’re writing a string that only has Unicode characters with low numbers, it writes one byte per character. But if it’s got high-numbered characters, they’ll be written using two or more bytes each.
One more thing! We showed you basic serialization with JsonSerializer. But there are just a couple more things you need to know about it.