Part IV. Unity Lab 4: User Interfaces
In the last Unity Lab, you started to build a game, using a prefab to create GameObject instances that appear in random points around your game’s 3D space and fly in circles around circles. This Unity Lab picks up where the last one left off.
Your program so far is an interesting visual simulation. The goal of this Unity Lab is to finish building the game. It starts off with a score of zero. Billiard balls will start to appear and fly around the screen. When the player clicks on a ball, the score goes up by 1 and the ball disappears. More and more balls appear; once 15 balls are flying around the screen, the game ends. For your game to work, your players need a way to start it and to play again once the game is over, and they’ll want to see their score as they click on the balls. So you’ll add a user interface that displays the score in the corner of the screen, and shows a button to start a new game.
Add a score that goes up when the player clicks a ball
You’ve got a really interesting simulation. Now it’s time to turn it into a game. Add a new field to the GameController class to keep track of the score—you can add it just below the OneBallPrefab field:
public int Score = 0;
Next, add a method called ClickOneBall to the GameController class. This method that will get called every time the player clicks on a ball:
    public void ClickedOnBall()
    {
        Score++;
    }
Unity makes it really easy for your GameObjects to respond to mouse clicks and other input. If you add a method called OnMouseDown to a script, Unity will call that method any time the GameObject it’s attached to is clicked. Add this method to the OneBallBehaviour class:
    void OnMouseDown()
    {
         GameController controller = Camera.main.GetComponent<GameController>();
         controller.ClickedOnBall();
         Destroy(gameObject);
    }
The first line of the OnMouseDown method gets the instance of the GameController class, and the second line calls its ClickedOnBall method, which increments its Score field.
Now run your game. Click on Main Camera in the hierarchy and watch its Game Controller (Script) component in the Inspector. Click on some of the rotating balls—they’ll disappear and Score will go up.

Add two different modes to your game
Start up your favorite game. Do you immediately get dropped into the action? Probably not—you’re probably looking at a start menu. Some games let you pause the action to look at a map. Many games let you switch between moving the player and working with an inventory, or show an animation while the player is dying that can’t be interrupted. These are all examples of game modes.
Let’s add two different modes to your billiard ball game:
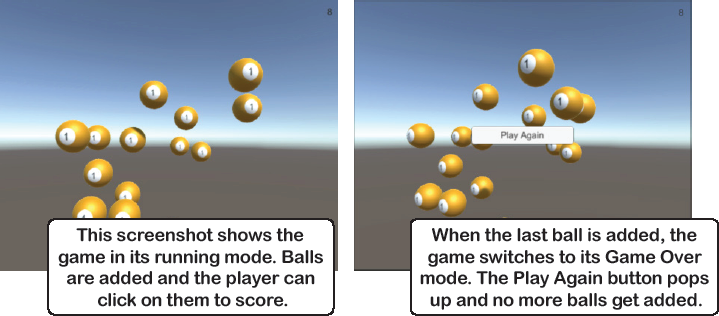
Mode #1: The game is running. Balls are being added to the scene, and clicking on them makes them disappear and the score go up.
Mode #2: The game is over. Balls are no longer getting added to the scene, clicking on them doesn’t do anything, and a “Game over” banner is displayed. This screenshot shows the game in its running mode. Balls are added and the player can click on them to score.

Note
You’ll add two modes to your game. You already have the “running” mode, so now you just need to add a “game over” mode.
Here’s how you’ll add the two game modes to your game:
Make GameController.AddABall pay attention to the game mode.
Your new and improved AddABall method will check if the game is over, and will only instantiate a new OneBall prefab if the game is not over.
Make OneBallBehaviour.OnMouseDown only work when the game is running.
When the game is over, we want the game to stop responding to mouse clicks. The player should just see the balls that were already added continue to circle until the game restarts.
Make GameController.AddABall end the game when there are too many balls.
AddABall also increments its NumberOfBalls counter, so it goes up by 1 every time a ball is added. If the value reaches MaximumBalls, it sets GameOver to true to end the game.
Note
In this lab, you’re building this game in parts, and making changes along the way. You can download the code for each part from the book’s GitHub repository: https://github.com/head-first-csharp/fourth-edition
Add game mode to your scripts
Modify your GameController and OneBallBehaviour classes to add modes to your game by using a Boolean field to keep track of whether or not the game is over.
Make GameController.AddABall pay attention to the game mode.
We want GameController to know what mode the game is in. And when we need to keep track of what an object knows, we use fields. Since there are two modes—playing and game over—we can use a Boolean field to keep track of the mode, so add the GameOver field to your GameController class:
public bool GameOver = false;
The game should only add new balls to the scene if the game is playing. Modify the AddABall method to add an if statement that only calls Instantiate if GameOver is not true:
    public void AddABall()
    {
        if (!GameOver)
        {
            Instantiate(OneBallPrefab);
        }
    }
Now you can test it out. Start your game, then click on Main Camera in the Hierarchy window.

Set the GameOver field by unchecking the box in the script component. The game should stop adding balls until you check the box again.
Make OneBallBehaviour.OnMouseDown only work when the game is running.
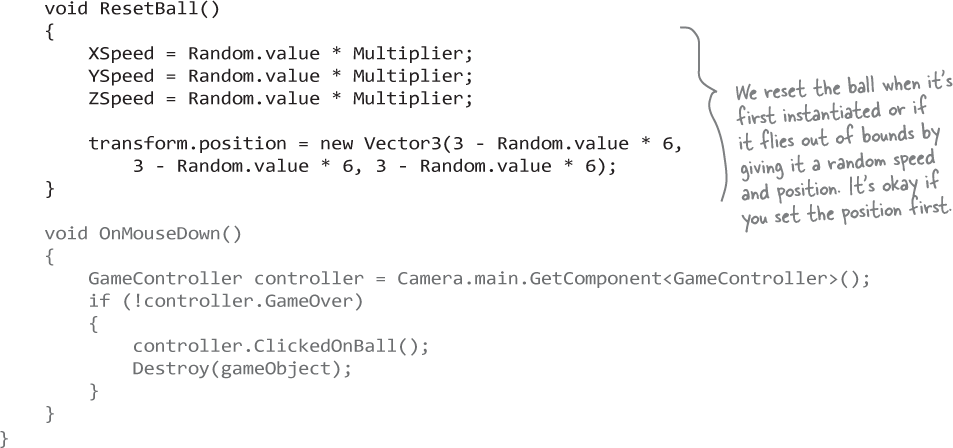
Your OnMouseDown method already calls the GameController’s ClickedOnBall method. Now modify OnMouseDown in OneBallBehaviour it to use the GameController’s GameOver field as well:
    void OnMouseDown()
    {
        GameController controller = Camera.main.GetComponent<GameController>();
        if (!controller.GameOver)
        {
            controller.ClickedOnBall();
            Destroy(gameObject);
        }
    }
Run your game again and test that balls disappear and the score goes up only when the game is not over.
Make GameController.AddABall end the game when there are too many balls.
The game needs to keep track of the number of balls in the scene. We’ll do this by adding two fields to the GameController class to keep track of the current number of balls and the maximum number of balls:
    public int NumberOfBalls = 0;
    public int MaximumBalls = 15;
Every time the player clicks on a ball, the ball’s OneBallBehaviour script calls GameController. ClickedOnBall to increment (add 1 to) the score. Let’s also decrement (subtract 1 from) NumberOfBalls:
    public void ClickedOnBall()
    {
        Score++;
        NumberOfBalls--;
    }
Now modify the AddABall method so that it only adds balls if the game is running, and ends the game if there are too many balls in the scene:

Now test your game one more time by running it and then clicking on Main Camera in the Hierarchy window. The game should run normally, but as soon as the NumberOfBalls field is equal to the MaximumBalls field, the AddABall method sets its GameOver field to true and ends the game.

Once that happens, clicking on the balls doesn’t do anything because OneBallBehaviour.OnMouseDown checks the GameOver field and only increments the score and destroys the ball GameOver is false.
Note
Your game needs to keep track of its game mode. Fields are a great way to do that.
Add a UI to your game
Almost any game you can think of—from Pac Man to Super Mario Brothers to Grand Theft Auto 5 to Minecraft— features a user interface (or UI). Some games like Pac Man have a very simple UI that just shows the score, high score, lives left, and current level. But many games feature an intricate UI incorporated it into the game’s mechanics (like a weapon wheel that lets the player quickly switch between weapons). Lett’s add a UI to your game.
Choose UI >> Text from the GameObject menu to add a 2D Text GameObject to your game’s UI. This adds a Canvas to the Hierarchy, and a Text under that Canvas:

Double-click on the Canvas in the Hierarchy window to focus on it. It’s a 2-D rectangle. Click on its Move Gizmo and drag it around the scene. It won’t move! The Canvas that was just added will always be displayed, scaled to the size of the screen and in front of everything else in the game.

Then double-click on Text to focus on it—the editor will zoom in, but the default text (“New Text”) will be backward because the Main Camera is pointing at the back of the Canvas.
Note
A Canvas is a 2-dimensional GameObject that lets you lay out your game’s UI. Your game’s Canvas will have two GameObjects nested under it: the Text GameObject that you just added will be in the upper left corner to display the score, and a Button GameObject that to let the player start a new game.
Use the 2D view to work with the Canvas
The 2D button at the top of the Scene window toggles 2D view on and off. Hover over it to see its tooltip:

Click the 2D view—the editor flips around its view to shows the canvas head-on. Double-click on Text in the Hierarchy window to zoom in on it.

You can click the 2D button to switch between 2D and 3D. Click it again to return to the 3D view.
Set up the Text that will display the score in the UI
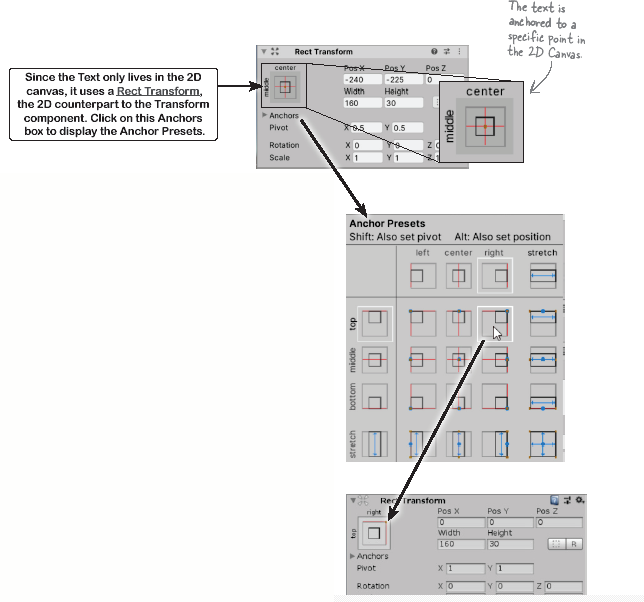
Your game’s UI will feature three Text GameObjects and one Button. Each of those GameObjects will be anchored to a different part of the UI. For example, Text GameObject that displays the Score will show up in the upper right corner of the screen (no matter how big or small the screen is).
Click on Text in the Hierarchy window to select it, then look at the Rect Transform component. We want the Text in the upper right corner, so click the Anchors box in Rect Transform.

The Anchors Presets window lets you anchor your UI GameObjects to various parts of the Canvas. Hold down alt and shift (or option-shift on a Mac) and choose the top right anchor preset. Click the Anchor Presets button again to dismiss the window. The Text is now in the upper right corner of the Canvas—double-click on it again to zoom into it.

Let’s add a little space above and to the right of the text. Go to the Rect Transform and set the Pos X and Pos Y both to -10. Then set the Alignment to right, and use the box at the top of the Inspector to change the GameObject’s name to Score.

Your new Text should now show up in the Hierarchy window with the name Score. It should now be right-aligned, with a small gap between the edge of the Text and the end of the Canvas.

Make the “Play Again” button and score text work
Here’s what you’ll do to make your game’s UI work:
The game starts in the “Game Over” mode
Clicking a “Play Again” button starts the game
Text in the upper right corner of the screen displays the current score
You’ll be using the Text and Button classes in your code. They’re in the UnityEngine.UI namespace, so add this using statement to the top of your GameController class:
using UnityEngine.UI;
Now you can add Text and Button fields to your GameController (just above the OneBallPrefab field):
   public Text ScoreText;
   public Button PlayAgainButton;
Click on Main Camera in the Hierarchy window. Drag the Score GameObject out of the Hierarchy and onto the Score Text field in the script component, then drag the Button GameObject onto the Play Again Button field.

Go back to your GameController code and set the GameController field’s default value to true:

Now go back to Unity and check the script component in the Inspector.
Hold on, something’s wrong!

The Unity editor still shows the Game Over checkbox as unchecked—it didn’t change the field value. Make sure to check the box so your game starts in the Game Over mode:

Now your game will start in the “Game Over” mode. The player can click the Play Again button to start the game.
Finish the code for the game
The GameController object attached to the Main Camera keeps track of the score in its Score field. Add an Update method to the GameController class to update the Score Text in the UI.
  void Update()
  {
      ScoreText.text = Score.ToString();
  }
Next, modify your GameController.AddABall method to enable the Play Again button when it ends the game:

There’s just one more thing to do: get your StartGame method working so that it starts the game. It needs to do a few things: destroy any balls that are currently flying around the scene, disable the Play button, reset the score and number of balls, and set the mode to “running.” You already know how to do most of those things! You just need to be able to find the balls in order to destroy them. Click on the OneBall prefab in the Project window and set its tag:

Now you have everything in place to fill in your StartGame method. It uses a foreach loop to find and destroy any balls left over from the previous game, hides the button, resets the score and number of balls, and changes the game mode.
    public void StartGame()
    {
        foreach (GameObject ball in GameObject.FindGameObjectsWithTag("GameController"))
        {
            Destroy(ball);
        }
        PlayAgainButton.gameObject.SetActive(false);
        Score = 0;
        NumberOfBalls = 0;
        GameOver = false;
    }
Now run your game. It starts in “Game over” mode. Press the button to start the game. The score goes up each time you click on a ball. As soon as the 15th ball is instantiated, the game ends and the Play Again button appears again.

Here are our answers to the questions—did you come up with similar answers?

Note
Did you notice that you didn’t have to make any changes to the GameController class? That’s because you didn’t make changes to the things that GameController does, like managing the UI or how the game mode. If you can make a change by modifying one class but not touching others, that can be a sign that you designed your classes well.
Get creative!
Can you find ways to improve your game and get practice writing code? Here are some ideas:
Is the game too easy? Too hard? Try changing the parameters that you pass to InvokeRepeating in your GameController.Start method. Try making them fields. Play around with the MaximumBalls value, too. Small changes in these values can make a big difference in gameplay.
We gave you texture maps for all of the billiard balls. Try adding different balls that have different behaviors. Use the scale to make some balls bigger or smaller, and change their parameters to make them faster, slower, or move differently.
Can you figure out how to make a “shooting star” ball that flies off really quickly in a direction and is worth a lot if the player clicks on it? How about making a “sudden death” 8 ball that immediately ends the game?
Modify your GameContorller.ClickedOnBall method to take a score parameter instead of incrementing the Score field add the value that you pass. Try giving different values to different balls.
If you change fields in the OneBallBehaviour script, don’t forget to reset the Script component the OneBall prefab! Otherwise, it will remember the old values.
Note
The more practice you get writing C# code, the easier it will get. Getting creative with your is a great opportunity to get some practice!


