1
Getting Started
An article in a 1945 issue of Popular Mechanics encouraged readers to try leathercrafting. "Few tools are needed," said the writer, "and most of these can be made from nails, bolts, nutpicks, and other common objects."Years later, when the craft became more popular, the Tandy Leather Factory began selling the "Lucky Seven,"a collection of essential carving and stamping tools that is still available.
There's no need to fashion your own tools today— machine-manufactured tools are affordable and widely available. While many leathercrafting tools are specific to the craft, there are suitable substitutions for some, and these are noted throughout this book. Where possible, we've offered alternative methods of completing a step so that the purchase of a tool that might only be used occasionally isn't necessary.
Some suppliers offer several types of leathercraft starter sets. These "workshops in a box"include basic tools and supplies along with project kits to make such items as a wallet, checkbook cover, key chain, and the like. Generally speaking, they are a good value, especially if they are on sale. Tool quality can be on the low end, however, and you will want to pass over sets aimed at children.
If you decide to take up leathercrafting as a lifelong hobby, you will likely want to add to your collection and trade up for the more expensive tools. If you're lucky enough to have a leathercraft specialty store nearby, take advantage of specials and clearance-priced merchandise. Consider, too, joining a leathercraft club sponsored by leathercraft specialty stores and online vendors. They offer members generous discounts and regular specials.
If you don't live near a store, everything you need is available online. Refer to the Resources section for a list of suppliers that offer everything you need.
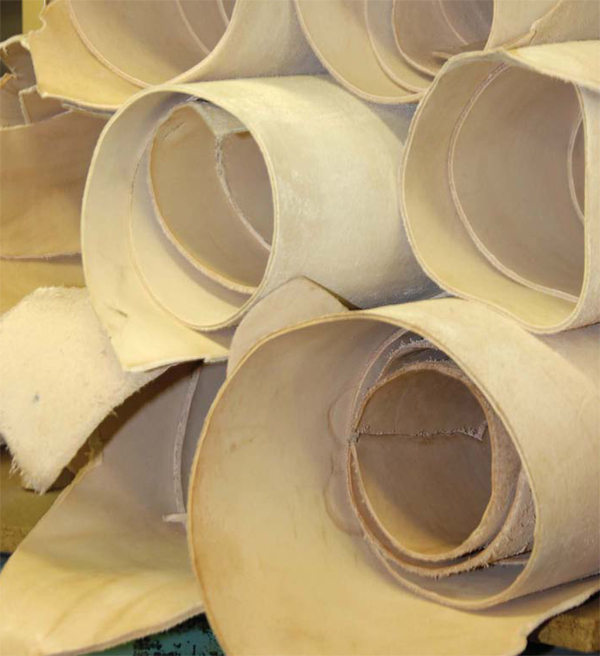
Leather is best stored loosely rolled with the grain side facing inward, and always in a dry place.
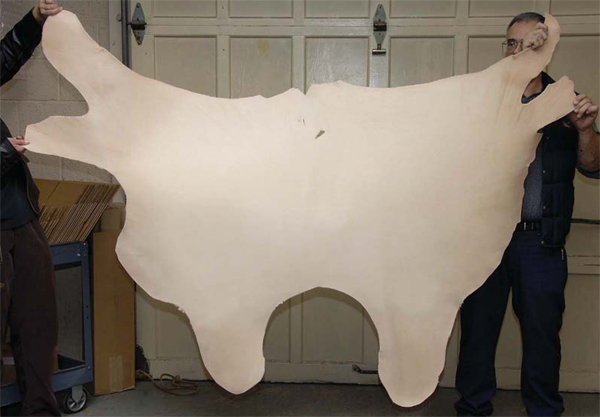
Many leather projects can be cut from this double shoulder hide.

The belly—located on the sides of a double shoulder hide—is the least expensive part of a hide and prone to stretching. For that reason, it is not recommended for good quality leather work. It is the best portion to use, though, for kids' projects and sometimes used to make small stamped items.
Leather for Tooling
Tooling is the art of carving and stamping designs on leather goods. The only type of leather suitable for tooling is full grain and vegetable tanned. Full grain refers to a cow hide that has had the hair removed ("top grain"leather, which is unsuitable for tooling, has been sanded to remove imperfections). Vegetable-tanned leather has gone through a tanning process that uses vegetable matter, tree bark, and other natural materials so it doesn't decay.
Tooling is done on the smooth grain side of the leather. The underside is referred to as the flesh side. The price of a hide goes up based on the quality of the grain side: economy hides may have holes, barbed-wire marks, brands, and stains; good quality hides may have slight blemishes and imperfections; and excellent quality hides are almost blemish free.
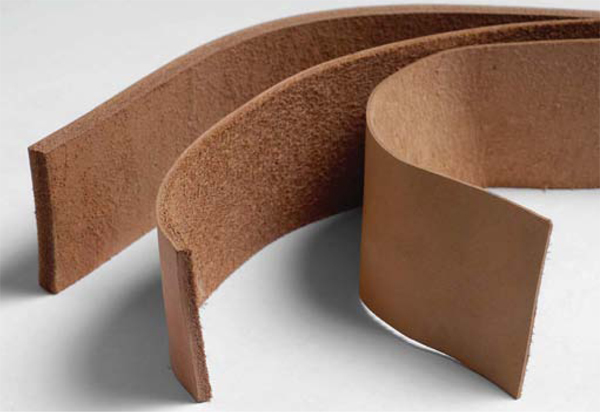
From left to right: 8-ounce, 6-ounce, and 4-ounce leather strips are 8/64-inch, 6/64-inch, and 4/64-inch thick, respectively.
Leather thickness is expressed in ounces. To create a uniform thickness, the hides are split with a machine. Leather that measures 1/64 inch (0.0156 inch) thick equals 1 ounce. So a weight of 5 ounces means that the hide is 5/64 (0.0781) inch thick. A 6-ounce hide is 6/64 (0.0937) inch thick.
A split cowhide is rarely the same thickness throughout. Because there will be slight variations throughout the hide, it will be sold in a weight (thickness) range. A 5- to 6-ounce hide means that some parts of the hide may be 5/64 inch thick while others may be 6/64 inch thick. The heavier (thicker) the hide is, the higher the price.
Vegetable-tanned leather is sold by the section and priced by the square foot. Modern tanneries use a computer program to measure the usable portions of a hide, so you won't be paying for any holes. The hide measurement in square feet is usually indicated on the flesh side of the hide.
Basic Hide Sections with Corresponding Sizes in Square Feet
Belly: 4 to 8 square feet
Shoulder: 5 to 7 square feet
Double shoulder: 11 to 14 square feet
Back: 15 to 18 square feet
Side: 21 to 28 square feet
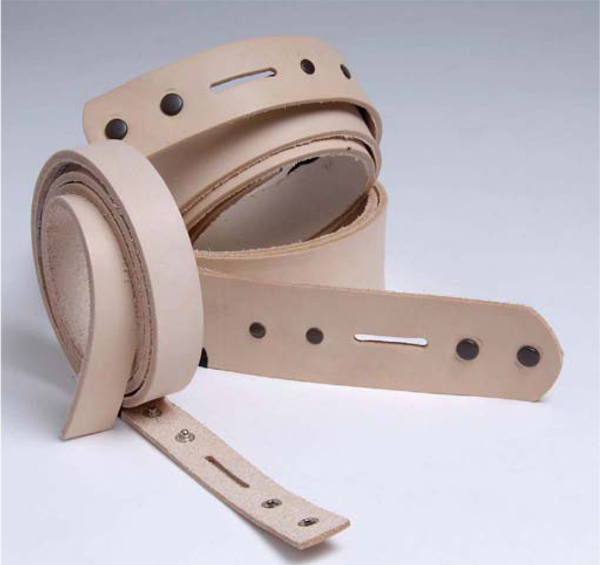

Beginning leathercrafters are well served by the variety of precut belt strips and blanks available. Some blanks have prepunched holes and others are complete with snaps and a belt keeper. The unique geometric-shaped blanks above would be very difficult to cut by hand. Strips and blanks are also available in sizes to make dog collars and hatbands.
Project Kits
KIT ADVANTAGES
KIT DISADVANTAGES
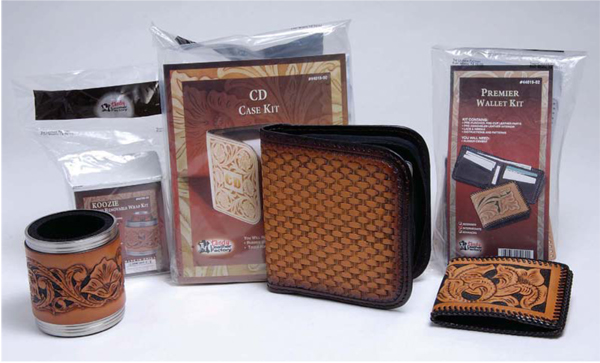
Tandy Leather produces a large assortment of project kits available through its own stores, other leathercraft suppliers, and large craft stores. Kits eliminate the preparation work so you can start tooling right away. They enable a beginner to produce a fairly advanced item with less work.
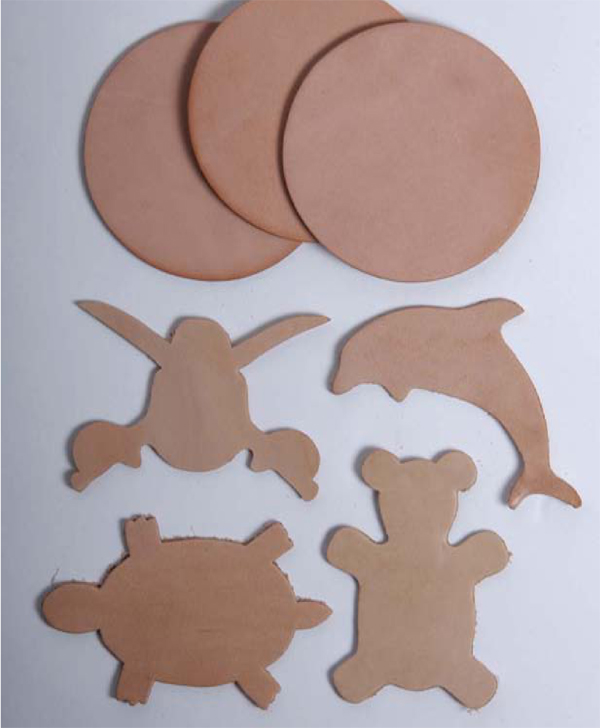
Many precut leather shapes are available. The "rounders" are great for carving and stamping practice and for testing dyes.
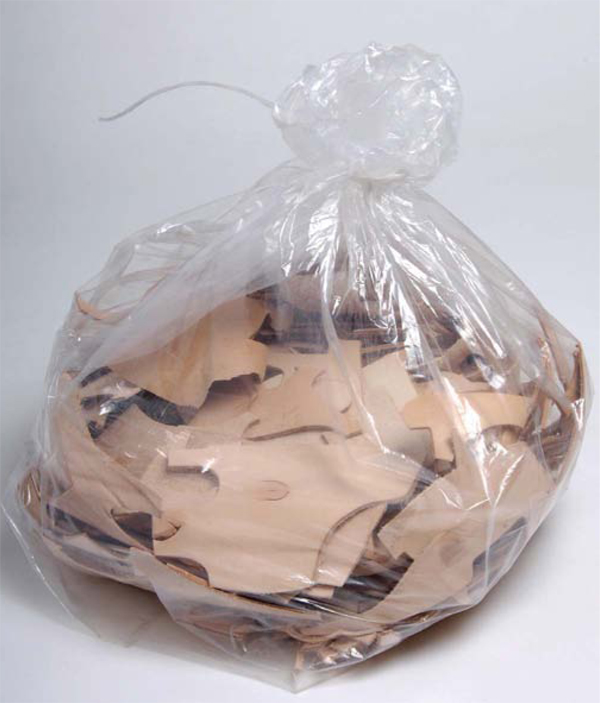
Leather retailers sell bags of remnants, sometimes called "off fall,"that may be used for small projects. Off fall pieces are also ideal for practicing stamping and carving and testing dyes and finishes. Of course, if you cut large projects from a hide you will have a collection of free off fall for smaller projects.
Specialty Leathers
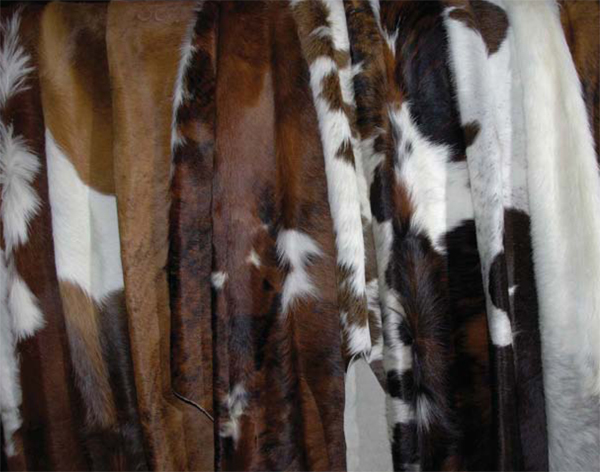
HAIR-ON HIDES
These are very expensive and generally used as floor coverings or to upholster furniture. If you come upon a deal at an auction or find a damaged hide, however, you can use small pieces as an insert in a tooled CD case, notebook, binder, and the like.
LINING LEATHER
To line a small project, 2-ounce or 3-ounce full-grain, vegetable-tanned leather may be tooled or used as is. Other options include chrome-tanned cow hide, pigskin, kidskin (goat hide), and sueded versions of these hides. Lining leather is sold the same way as cowhide: by weight and square feet. Prices and selection vary between specialty stores and online vendors, so search around to get what you like at a fair price.
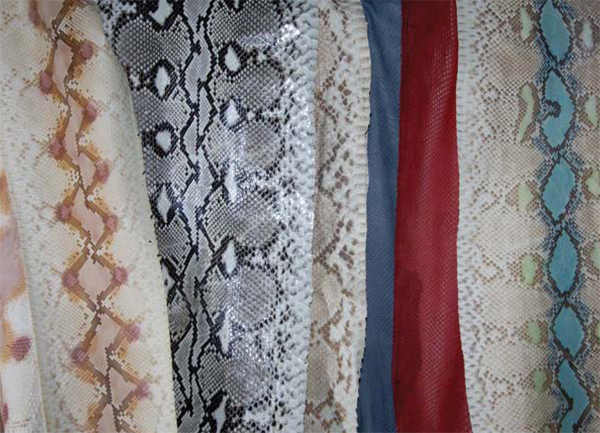
SNAKE SKINS
Authentic or man-made snake skins are used to cover belts and for accessories and inlay work. Authentic skins are pricey; synthetic ones, less so.
GARMENT LEATHER
Garment leather is often chrome tanned, predyed, soft, and flexible. Although it cannot be tooled, it can be used to line projects such as handbags and cosmetic bags. Don't overlook fabric stores as a source for real and synthetic
The Work Surface

Tip: Our expert uses contact cement to adhere a Poundo Board to a stone slab, creating a double-sided surface.
A good leathercrafting work surface starts with a sturdy table large enough to give you space to maneuver and have easy access to your tools. Although a card table will suffice, a better choice would be a table that won't wobble while you are stamping. Keep in mind, too, that the surface could be marred by an accidental dye spill or knife gouge, so the table should not be an heirloom or antique.
Good lighting is essential. Supplement natural light or overhead lighting with a swing-arm lamp. Such lamps are inexpensive and can be found at craft, hardware, office supply, or large discount stores. Some have a heavy base while others have a clamp that attaches to most table edges. Energy-saving fluorescent bulbs provide more light and less heat, making them more comfortable to work under.
As you work, you'll want to keep your work surface clean. Leather is very delicate when wet and easily marred. Be sure there are no metal chips, filings, or residue on your work surface. Ferrous metals, which include steel and iron, react to the chrome salts in leather and can cause permanent marks.
Once you have your table and lighting in place, you'll need three additional portable surfaces for stamping, cutting, and punching. These are available specifically for leather working, but there are suitable substitutes.
RUBBER MAT
A hard rubber mat protects your work surface and punching tools. Placed under your tooling slab, it absorbs noise and vibration from repeated mallet strikes. Mats sold commercially are called Poundo or Protecto Boards. Some leathercrafters use a heavy (8 to 10 ounce) piece of tooling leather underneath their work. Another option is a linoleum flooring square. True linoleum, as opposed to thin, sticky-backed floor tiles, can be found at stores that specialize in flooring materials.
POLYETHYLENE CUTTING BOARD
Protect your cutting blades and work surface with a textured polyethylene cutting board. These are sold in discount stores, kitchen shops, and grocery stores. A smooth-surface plastic or acrylic board allows work to slide, so choose a textured board.
STONE SLAB
A hard, heavy, smooth granite or marble slab is ideal for using when carving or stamping designs on leather. Slabs for leather tooling are usually made of granite and available in 12-by-12-inch or 12-by-24-inch sizes. Both are 1½ inches thick.
Suitable substitutes include 2-inch-thick natural flagstone or slate from a garden store. Another possibility is man-made solid-surface acrylic countertop material (sold under many brand names), found at building supply stores.
Leathercrafting Tools
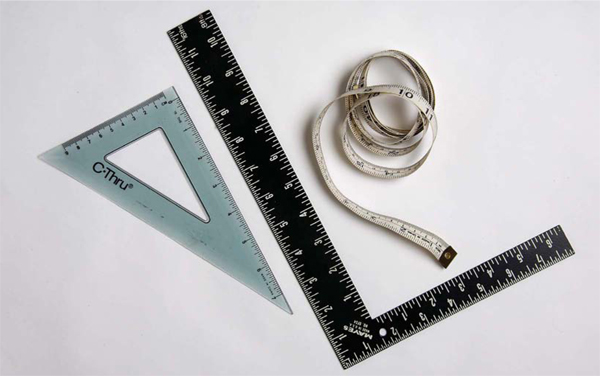
TRIANGLE
A plastic triangle can be useful but is no substitute for a large metal L square.
L SQUARE
A measuring tool with a 90-degree angle is essential for cutting a square piece of leather and making precise angles. Hardware stores offer the most options for this must-have tool. An 8-by-12-inch version is a practical size for many projects. Squares with a longer arm are useful when marking and cutting large cowhides into belt strips. If you have an uncoated steel version, protect it from moisture, as a rusted tool is impractical for leather work.
MEASURING TAPE
Used to measure the waist or hips to determine the proper length of a belt as well as hole and concho placement.
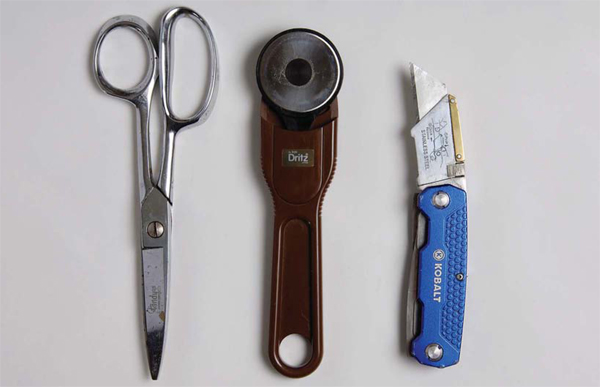
LEATHER SHEARS
Ordinary household scissors are not suitable for leather. Find heavy-duty shears specifically made for leatherwork
ROTARY CUTTER
An ideal tool for cutting lining leather, a rotary cutter can be run along a metal ruler to cut a straight line or used freehand to cut curves. Keep a supply of replacement blades on hand. A heavy-duty model is best.
UTILITY KNIFE
A handy tool for cutting leather strips, evening up an edge, trimming lace, and much more. Keep plenty of replacement blades in stock.
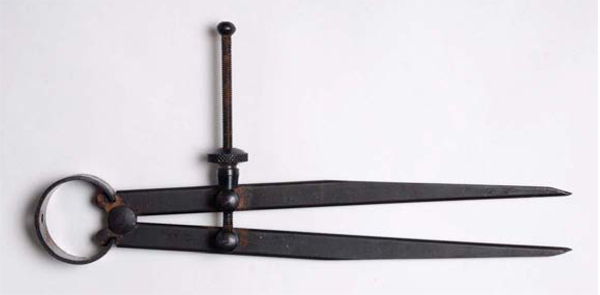
WING DIVIDERS
Indispensable for determining correct spacing, transferring measurements from a ruler, and scribing lines on leather. A moderately priced set (under $20) will work for the leathercrafter. You can find them at woodworking and drafting supply stores. A well-worn tool will also work as long as the locking nut isn't loose.
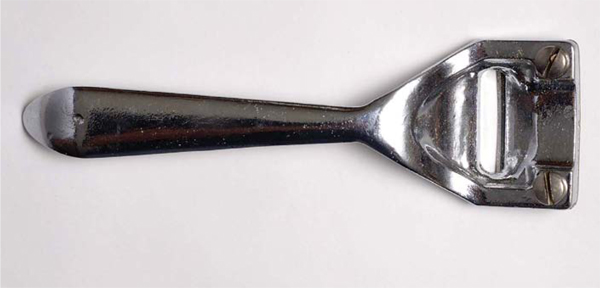
SKIVER
"Skive" means to thin down or pare. In leatherwork, skiving is used to remove the surface of the leather where a fold will be made or reduce the thickness of two pieces of leather that will be joined. A skiver can be purchased at leathercraft supply stores and through many online vendors. (There is a French edge skiving tool that will make a small channel, but the tool shown here is more versatile.)

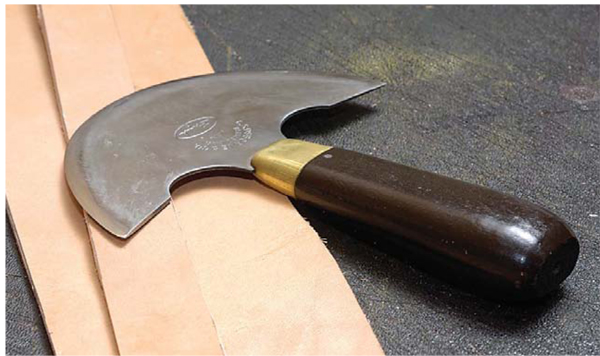
ROUND OR HEAD KNIFE
Professional leatherworkers and avid amateurs cannot get by without this tool. It's more expensive than the other cutting tools but does a better job and can replace the rotary cutter, strap cutter, utility knife, and skiver. Get a good one.
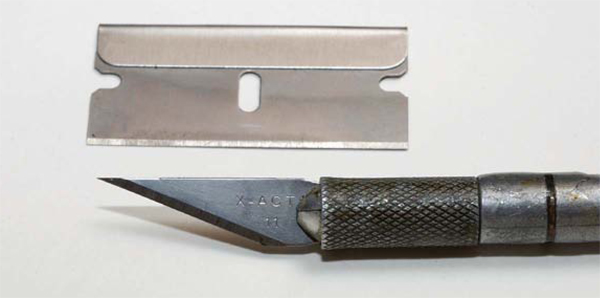
STRAIGHT RAZOR BLADES
Razor blades are used for small jobs, such as trimming the ends of lace, and larger tasks, such as cutting a glued lining from a tooled project piece. They must be sharp for best results, so have plenty on hand.
CRAFT KNIFE
A craft knife has many light-duty uses. The popular brand X-ACTO features an aluminum handle and easy-to-replace blade. A good choice is a #1 X-ACTO handle and a #11 blade.
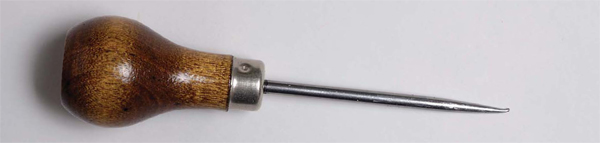
SCRATCH AWL
Most woodworkers have several of these in the toolbox. In leatherwork, it has multiple uses: scribing lines, centering patterns, punching small location holes, and more. A moderately priced version is adequate for leathercrafting.
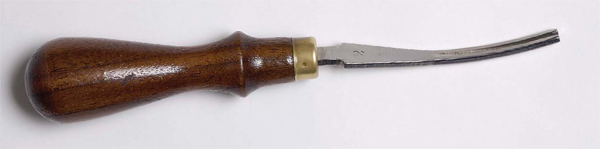
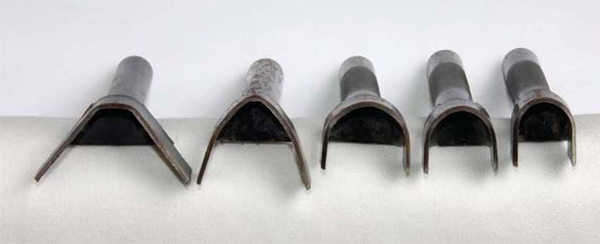
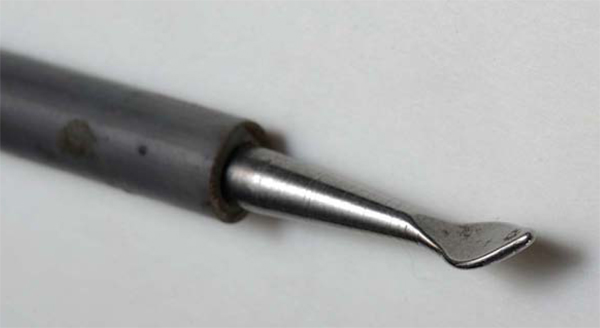
EDGE BEVELER
Another tool made exclusively for the leathercraft trade. Used to round off edges to achieve a neat finished appearance, bevelers come in various sizes to accommodate different leather thicknesses. A size 2 edge beveler is a good starter size. A good-quality beveler is worth the investment; cheaper versions tend to tear the leather rather than cut it.

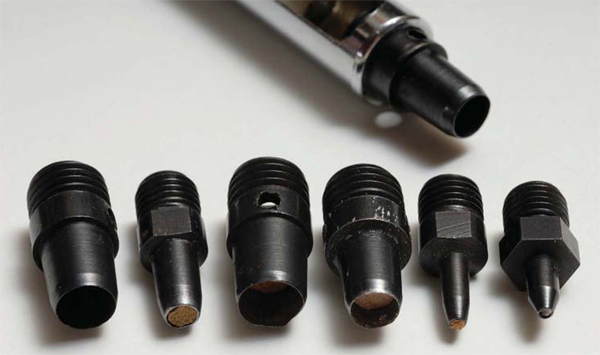
SINGLE-HOLE PUNCH AND HOLE PUNCH SETS
Round and oval hole punches are needed for belt making. Single punches or multipunch sets are available with interchangeable tubes. They range in size from 1/16 to 3/8 inch. Their uses include making billet holes and holes for attaching snaps and rivets. Oval holes resist stretching better than round ones, so the recommended punch for belt billet holes is a ¼-inch oval punch.
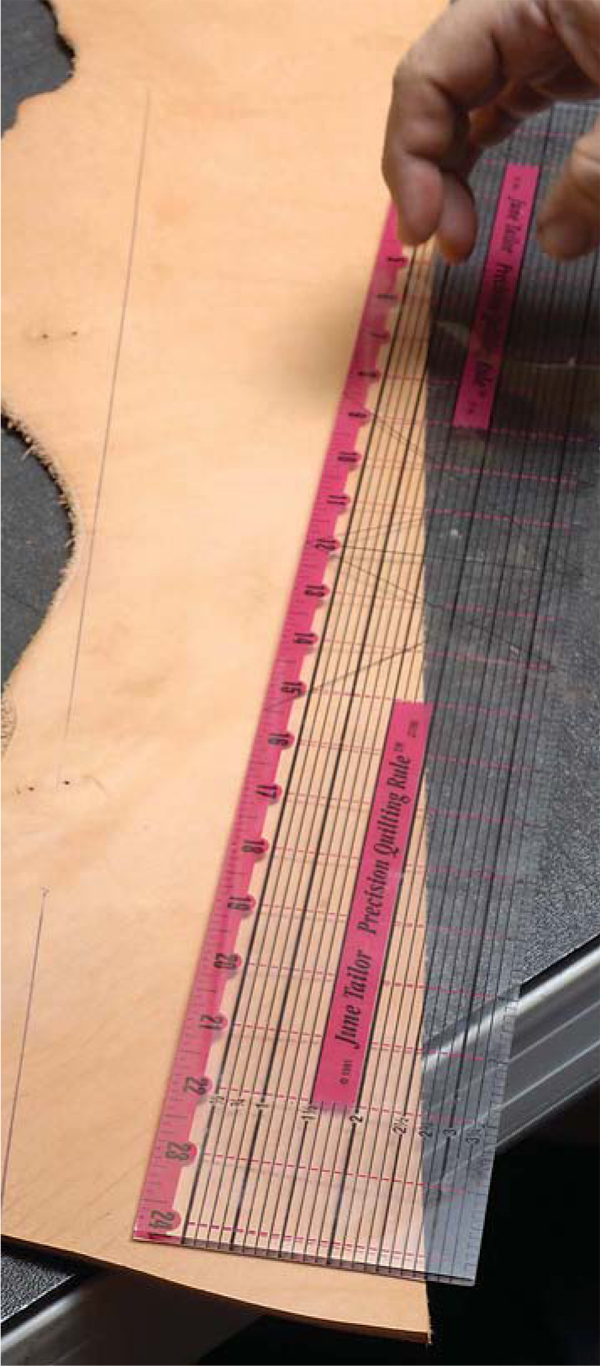
TRANSPARENT RULER
A see-through ruler is handy when you are selecting an area of a hide for a project.
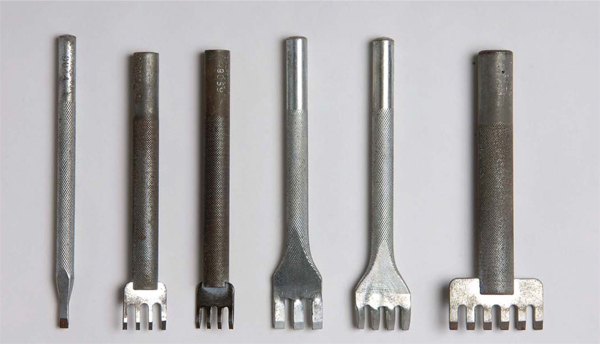
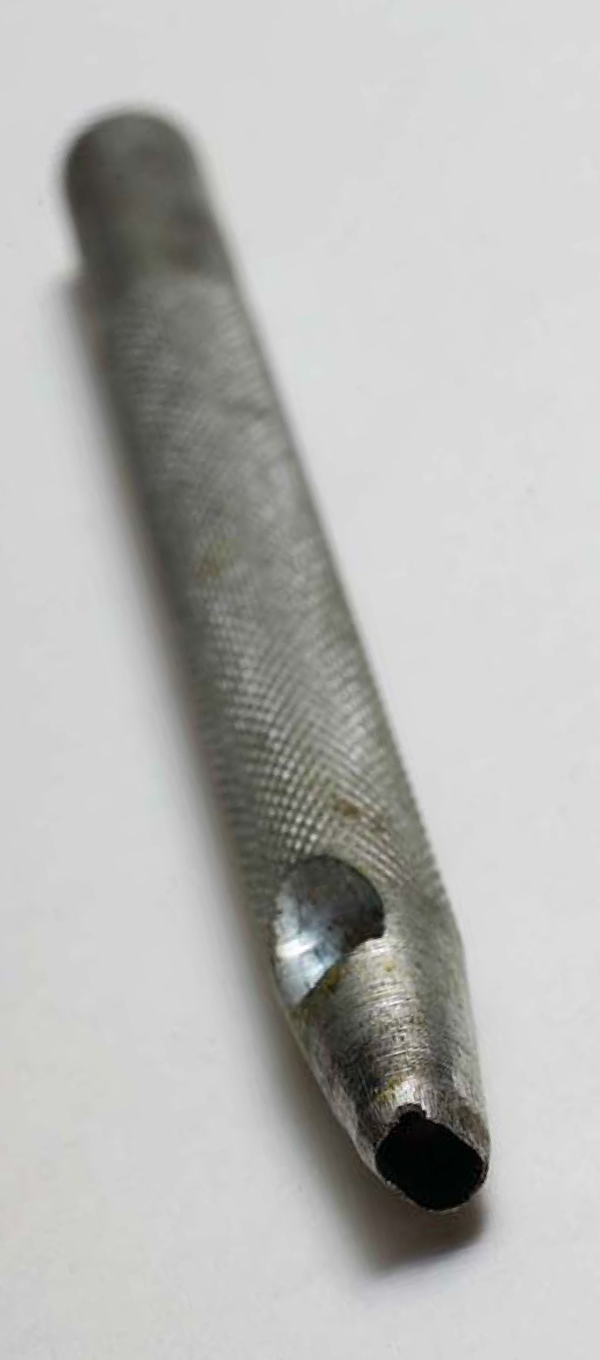
LACING CHISELS
These tools stamp slits for flat lacing. They are available in prong widths of 3/32 and 1/8 inch with straight or angled prongs. (To lace the card case in this book, you will need a 1/8-inch width one-prong chisel and a 1/8-inch width three- or four-prong straight line chisel.
BELT STRAP END PUNCH
These punches make precision belt end cuts. They can be used on belt straps of varying sizes. If you like to make belts, you will want to add these to your tool bag.

OBLONG PUNCH
An oblong punch, also called a bag hole punch, makes a perfect hole to accommodate the tongue of a belt buckle. They are available in five sizes, from ½ to 1½ inches.

ROTARY PUNCH
Allows you to select from a range of hole sizes. While a budgetpriced model will work on light leather, a deluxe model is required for heavy-duty work. This tool is used only for narrow items such as belts and straps (The belt project featured here calls for a ¼- inch single hole punch; you can use a ¼-inch tube from a punch set or the ¼-inch punch setting on a round-hole rotary punch.)
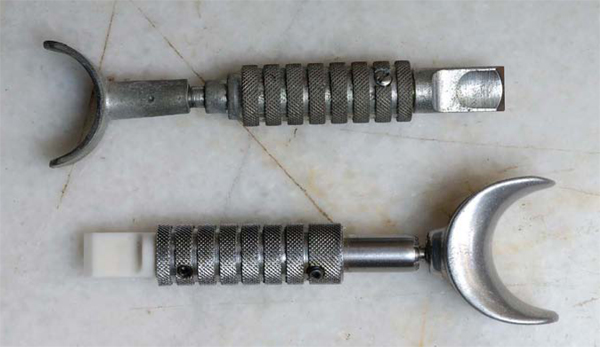
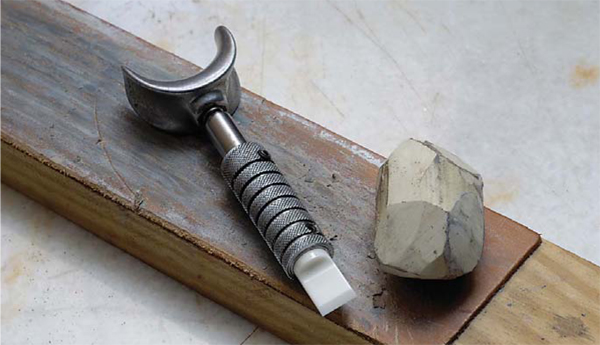
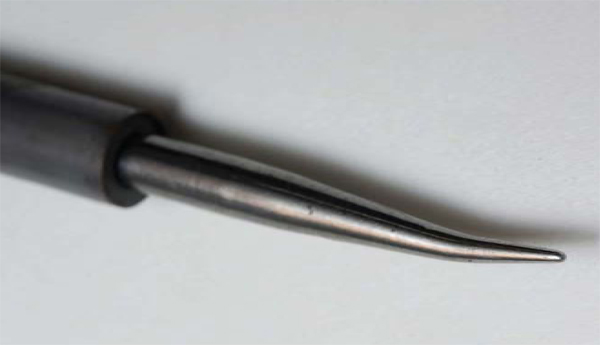
SWIVEL KNIFE
A leathercraft supply specialty item. The standard model is chrome plated with a steel blade. Deluxe models are made of stainless steel. The steel blade will need to be sharpened periodically with a sharpening stone, while the slightly more expensive ceramic blade will never need to be sharpened or honed. (Ceramic replacement blades can be purchased to fit a steel handle.)
WHITE JEWELER'S ROUGE
Jeweler's rouge is a compound made of abrasive material and a grease binder, and is used to polish precious metals. Leathercraft suppliers sell "white"jeweler's rouge: a 2-inch piece will last a long time.

LEATHER STROP
The verb strop means to sharpen: stropping will help maintain a sharp and clean edge on your tools. It's done to remove dirt and debris from tools and is not a substitute for using a honing stone to sharpen dull blades. Strops are made of a board to which a leather strip is glued, flesh side up. White jeweler's rouge is applied to the leather. All knives, carving blades, and some leather stamping tools should be stropped before use and repeatedly while in use. This tool is necessary to achieve good-quality leather items.
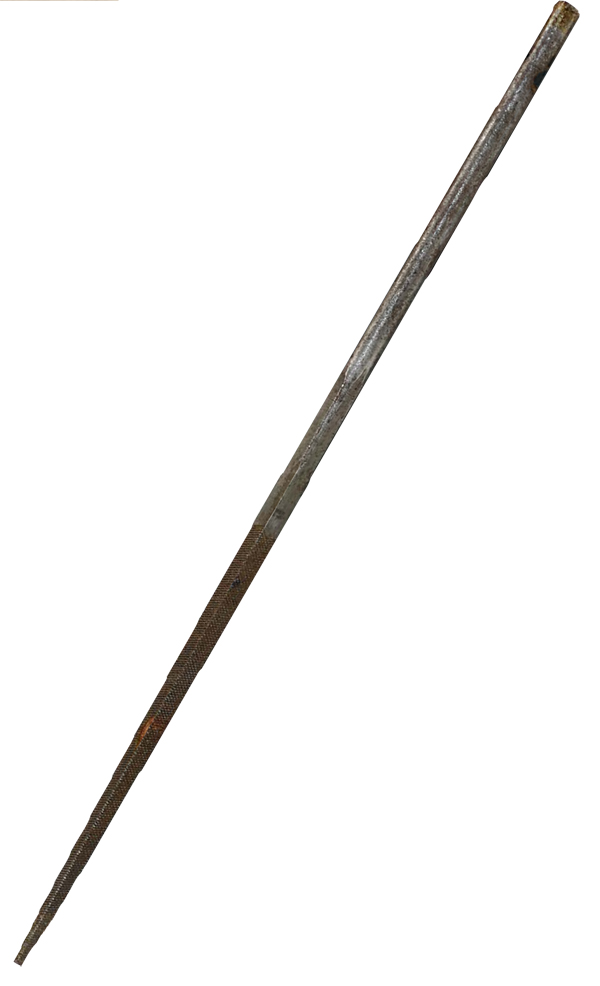
JEWELER'S FILE
Also called a needle file, this is used to smooth the inside edge of hole punches to maintain maximum sharpness. They are available singly in a specific size or in sets of varying sizes.

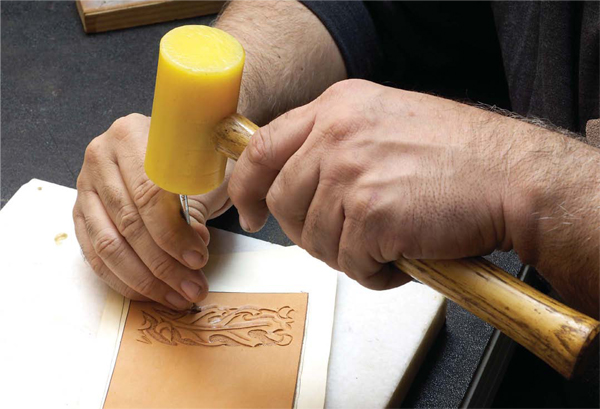
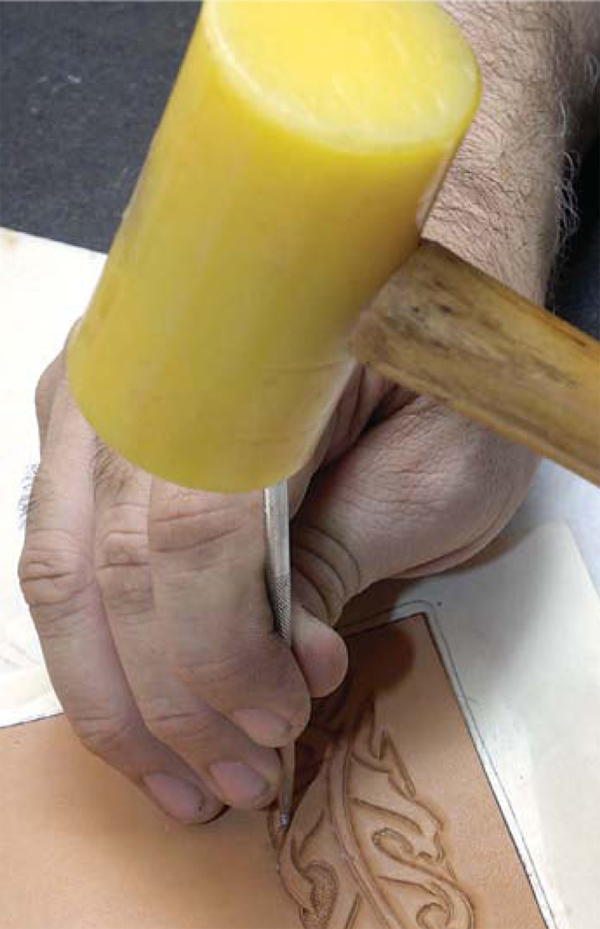
RAWHIDE MALLET
Most leathercrafters prefer the feel of a rawhide mallet over a polymer one. Easy to control and "break in" to your style of tapping, they come in various weights (2 to 24 ounces) and head diameters (1 to 2¾ inches). A 9- or 11- ounce mallet is a good starter weight.
Rawhide mallets are "dead blow" tools—all of the energy is transferred to the tool head rather than causing the tool to bounce. The heavier the mallet, the less force you need. Lighter mallets may be less tiring to use if you plan to tool for several hours at a time.
POLYMER MALLET
Polymer mallets are less expensive and won't wear out. The disadvantage is that they are not dead blow tools and so they bounce back after striking, which results in less control. Some poly mallets are adver tised as having less bounce than others. (A mallet's bounce has no effect on making leatherwork go faster; work speed comes only with experience.)
CLEAN WATER AND CELLULOSE SPONGE
If your tap water is drinkable, it's suitable for wetting leather in preparation for stamping and carving. You will also want to have a supply of new household cellulose sponges on hand to apply water or colorants. Plan to use a new sponge with each technique that requires one. Cut them in half with regular scissors, and you will have a perfect palmsize applicator.
SPOON/STYLUS MODELING TOOL
This combination spoon/stylus tool has multiple uses. The spoon end is used for transferring Craftaid template patterns, for figure carving, and to smooth out beveling marks. The stylus end can be used to transfer designs when using transfer film or tracing paper and for tooling.
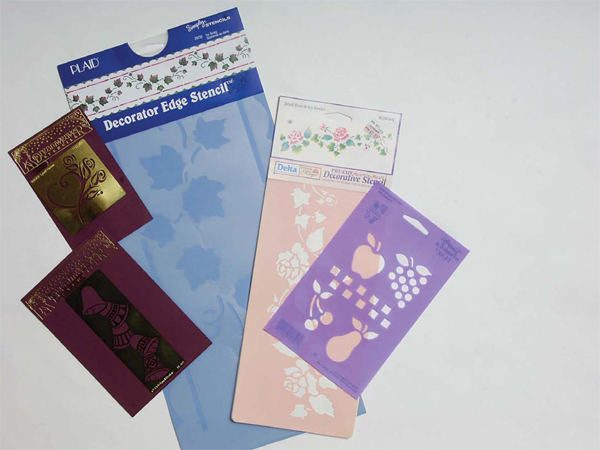
STENCILS
There has been a huge increase in the range of stencil designs available thanks to the scrapbooking craft. Stencil outlines can be transferred directly onto leather to be embellished with carving and stamping.
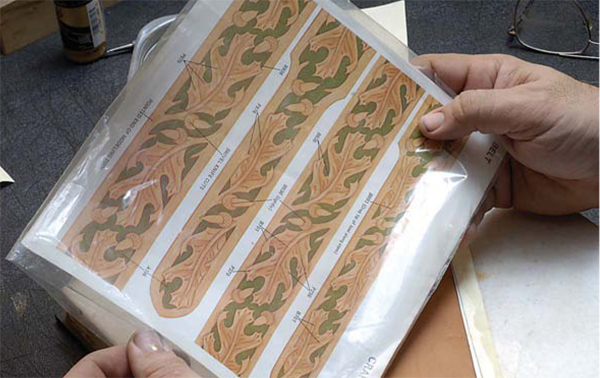
DESIGN TEMPLATES
These Craftaid templates are clear plastic sheets with raised ridges. They produce a crisp, clean transfer. An array of designs is available.
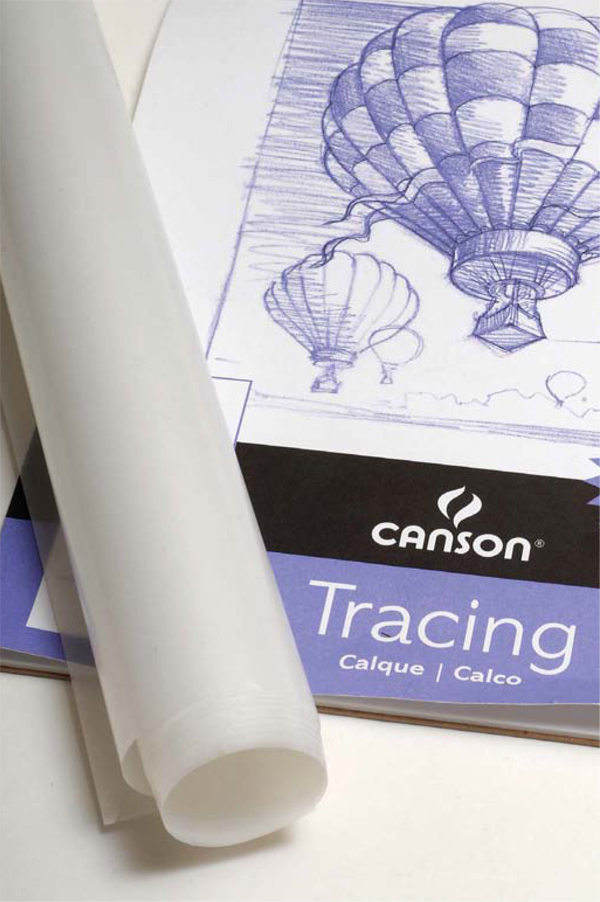
TRANSFER FILM OR TRACING PAPER
Used to transfer a design from a pattern, book, magazine, or drawing to your leather project. Tracing paper is a coated translucent paper that comes in pads. It is more delicate than film but can still be used several times. Transfer film is heavier, translucent, waterproof paper sold by the yard. It is more expensive than tracing paper but is more durable and can be used over and over.
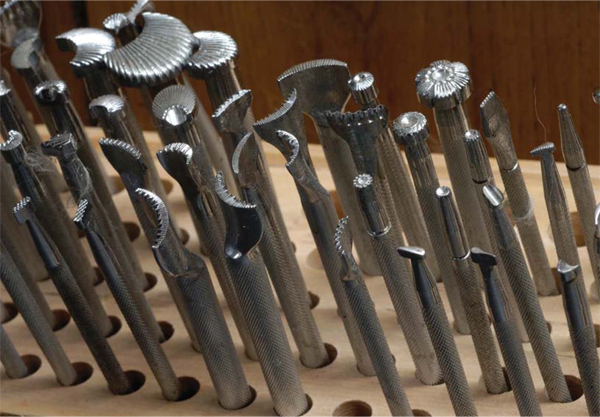

TOOLING STAMPS
Hundreds of reasonably priced stamping tools are now available. In the early days, tools were handmade from nails. In the late 1940s, commercial production began in the United States, with the Craftool Company taking the lead. Most tools sold today are produced in Asia under the Craftool brand name.
New tools have a prefix letter and number stamped on the handle. Purchased design patterns will specify which tool to use to stamp each element of the design. Older Craftool stamps may have just a number (if they were made prior to 1963) or no number at all (made before 1950).
The beginner is advised to use the exact tool specified in the pattern while learning tooling techniques. Once the basics are mastered, older unmarked tools will be easy to incorporate into your work.
Most stamping tools are made of chrome-plated steel. Care must be taken to protect the chrome finish. If it is damaged, the tool is unusable. Don't store tools loosely in a bag or box where they can bang against one another. If you don't have a tool rack, space tools apart on a length of felt or other plain fabric or use a case intended for knitting or crochet needles.
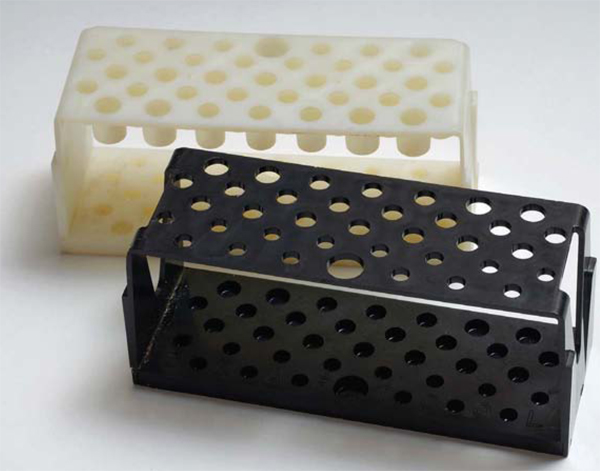
An inexpensive plastic tool rack protects tools and makes them easy to reach. More costly wood racks are also available.
Key to the Code
The prefix letter refers to the category of tool. Even with this system, sometimes the designations differ or are mismarked. Smart buyers will take a good look at a stamp before buying it.
A: Background
B: Beveler
BW: Barbed Wire
C: Camouflage
D: Border
E: Special
F: Figure Carving
G: Geometric
H: Stop
J: Flower Center
K: Special
L: Leaf
M: Matting
N: Sunburst
O: Special
P: Pear Shader
R: Rope
S: Seeder
U: Mulefoot
V: Veiner
W: Flower, Acorn, Pinecone
X: Basketweave
Y: Flower Petal
Z: Special Craftool Code
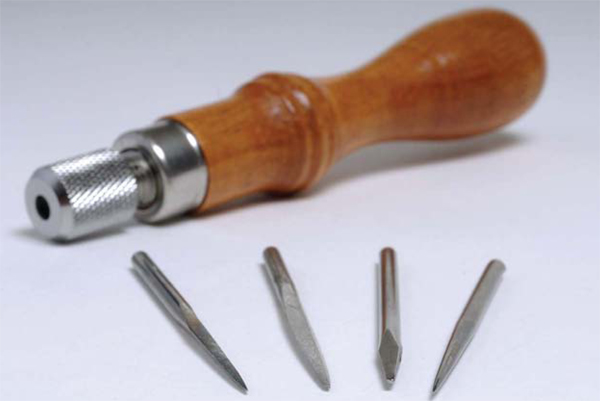
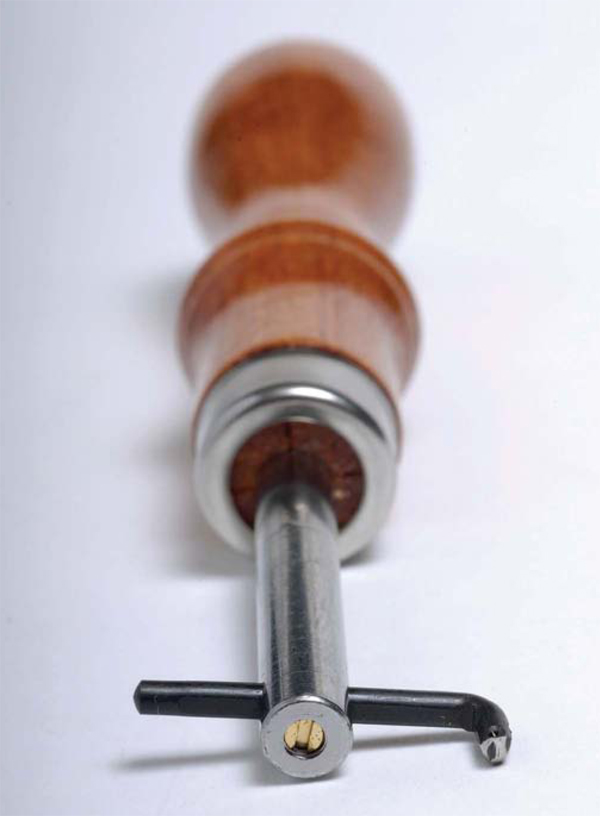
4-IN-1 AWL SET
Comes with four interchangeable tips: a scratch awl blade, size 2 and 3 stitching awl blades, and a lacing fid blade.
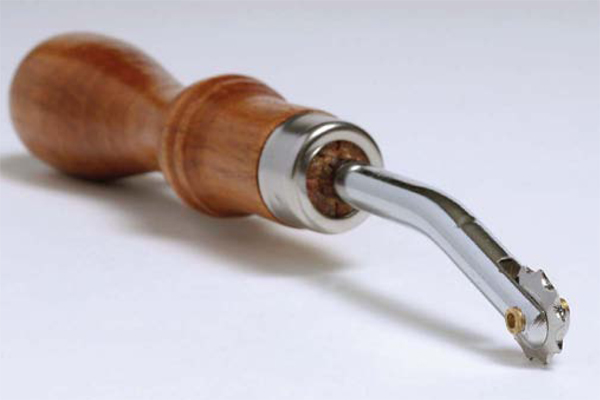
OVERSTITCH WHEEL
Does two jobs: It makes evenly spaced thread-hole marks for hand stitching. After the piece is stitched, it is used to set the stitches by rolling the tool across the threads to push them down into the groove. The tool is sold in specific sizes to make five, six, or seven holes per inch. If you are purchasing only one, the six-holes-per-inch size is most useful. (Also available at a higher price is a spacer set that comes with a handle and interchangeable five-, six-, and seven-holes-per-inch wheels.)
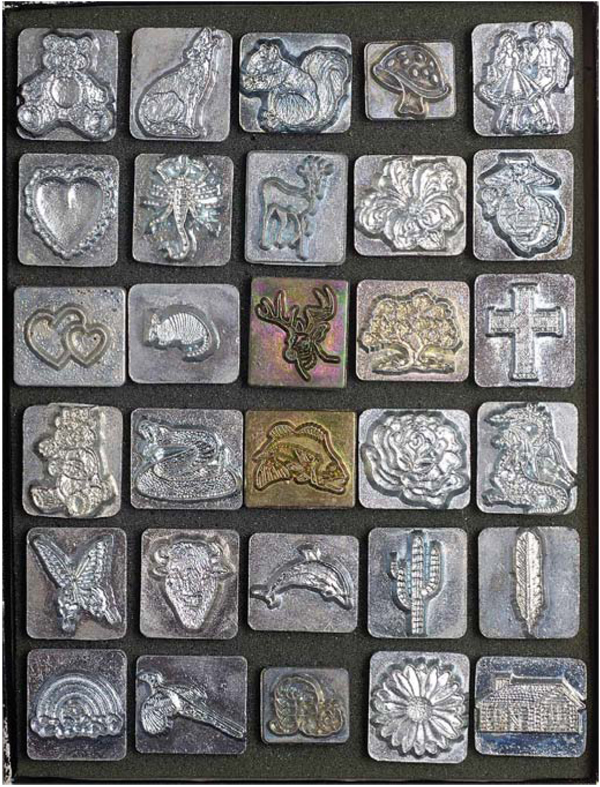
THREE-DIMENSIONAL STAMPS
A huge variety of designs is available in the heavy-duty 3-D stamp category. Some specialty sets come with a detachable handle; otherwise the handle is purchased separately. Several styles of alphabet and number sets in various sizes are also sold; these are great for personalizing your project.
ADJUSTABLE GROOVER
Slices a uniform channel near the edge of the leather piece to accommodate stitching thread. It adjusts to the width of the leather you are using.
STITCHING THREAD
Waxed linen thread is the best choice. If you don't use prewaxed thread, you must wax it by passing it through beeswax. It's sold in black, natural, and brown. Avoid nylon thread for leather projects; it is not as flexible and tends to cut the leather over time.

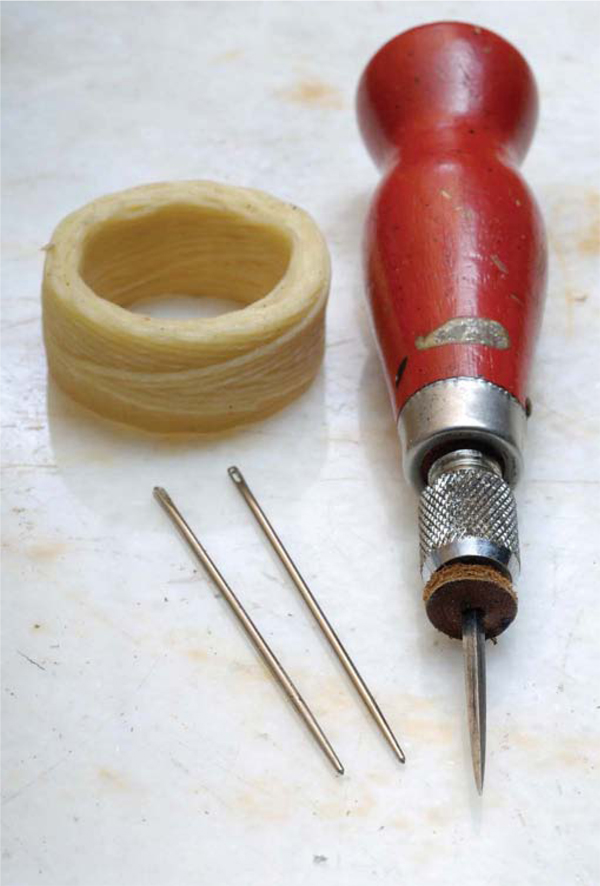
STITCHING NEEDLE
Also called saddler's needles, they have large eyes and blunt tips.
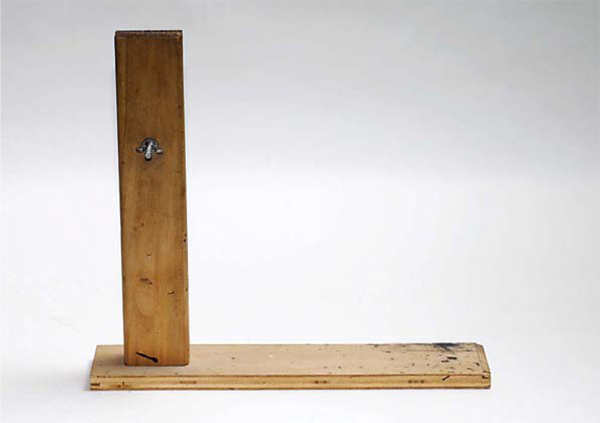
STITCHING PONY
Holds your work firmly during lacing or stitching. Place the horizontal arm under your legs while sitting in a chair. Wing nuts allow you to adjust the pressure to hold various projects.
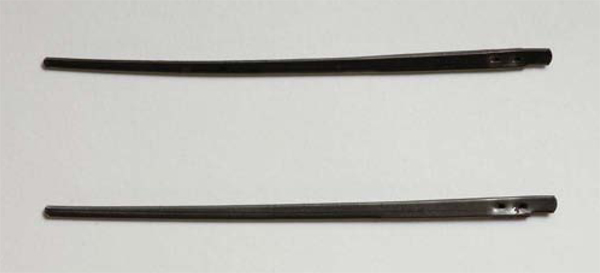
LACING NEEDLE
These flat needles have tiny spikes to securely hold lace in place. Keep several backups on hand in case you damage the spikes while clamping the lace into the needle. These are available through lace suppliers.
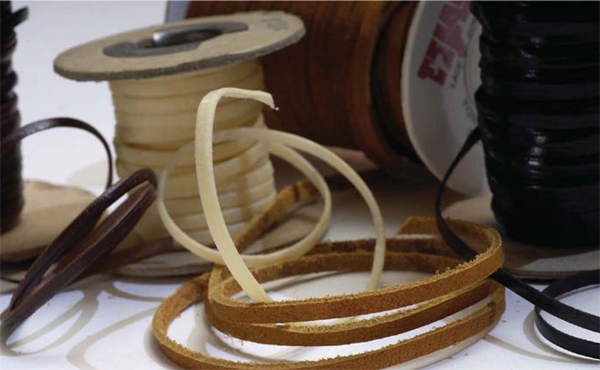
LACE
Don't skimp on lace quality. Buy the best you can afford. Kangaroo lace is recommended; it's available in ⅛-, 3/16-, and ¼-inch widths, in black, brown, whiskey, and natural colors. Less-expensive options such as cowhide and vinyl are good for practice. These tend to stretch and are more difficult to work with, however.
Adhesives, Colorants, and Finishing Products
APPLICATORS
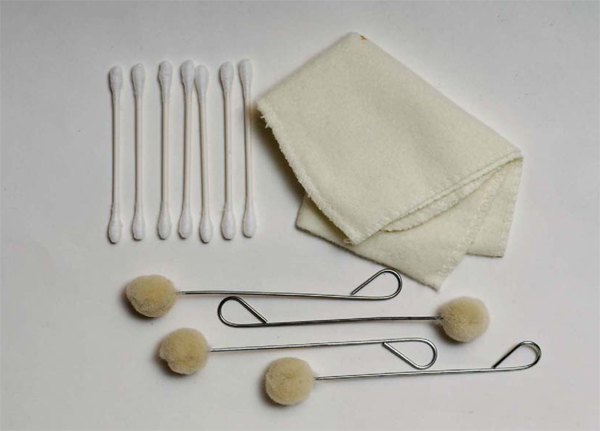
Wool daubers are a mess-free way to apply stains, dyes, and edge wax. Inexpensive alternatives are lint-free cloths, such as t-shirts, or good quality cotton swabs.

RUBBER CEMENT
Used whenever a temporary bond is needed, primarily to adhere a leather piece to card stock to prevent stretching and shrinking during tooling.

LEATHER WELD
Used for various applications, such as to attach a lining prior to lacing or stitching.
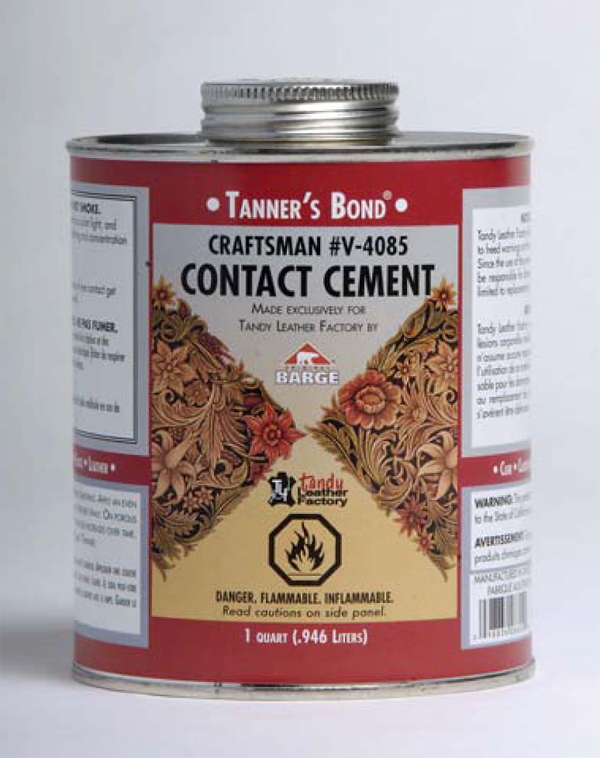
CONTACT CEMENT
Contact cement is used whenever a permanent bond is required, such as for attaching linings to tooled leatherwork. Good ventilation is a must when using this product, and you should always follow the manufacturer's instructions. Note that water-based cements lack sufficient adhesive strength and durability. Contact cement is available at leathercraft, building supply, woodworking, and hardware stores.
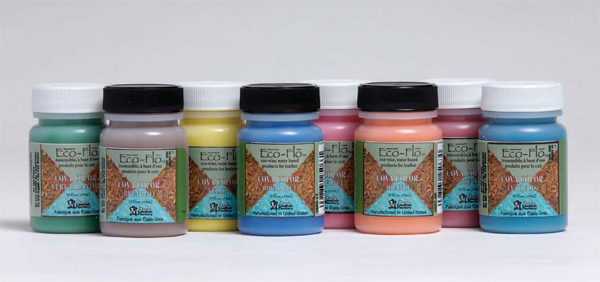
ACRYLIC PAINT
Choosing how to add color to a leather project is another artistic decision the leathercrafter needs to make. By experimenting with the different dyes and paints, you will learn which ones you prefer. Some of the products sold today are available in less-toxic forms for those who are sensitive to fumes or want to be environmentally responsible.
Water-based paints become permanent when dry. They are best used for accent and detailing work rather than overall coloring. They can be used straight out of the bottle or thinned with water to create a wash.

GEL ANTIQUE
Probably the cleanest product to apply, gel antique is thick enough to squirt onto a wool dauber with little mess. It's available in black, dark and medium brown, tan, saddle tan, and mahogany.
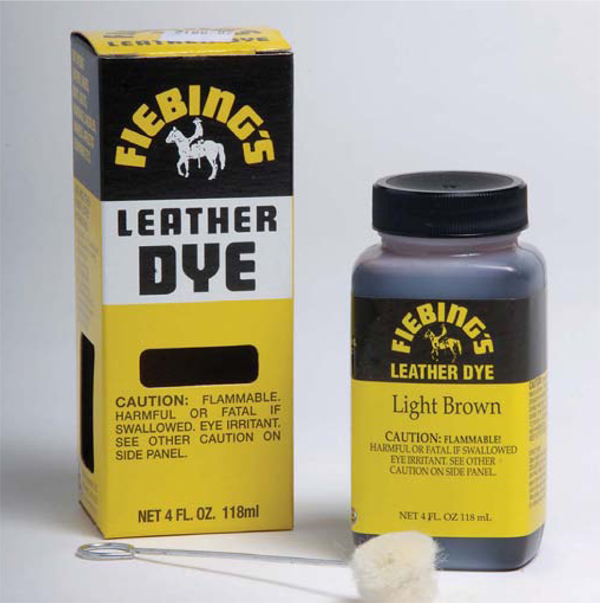
LEATHER DYE
A permanent alcohol-based dye that can be applied with a wool dauber or dry sponge. Can be mixed to create different colors or tones.
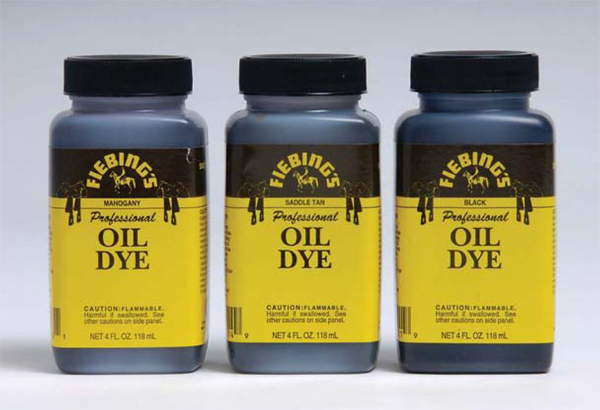
OIL DYE
Available in black, a range of browns, and several other colors. They penetrate leather deeply and will result in even, highly opaque coverage. They can be applied with a wool dauber or a dry sponge. Latex gloves are recommended to keep the dye from staining your hands.
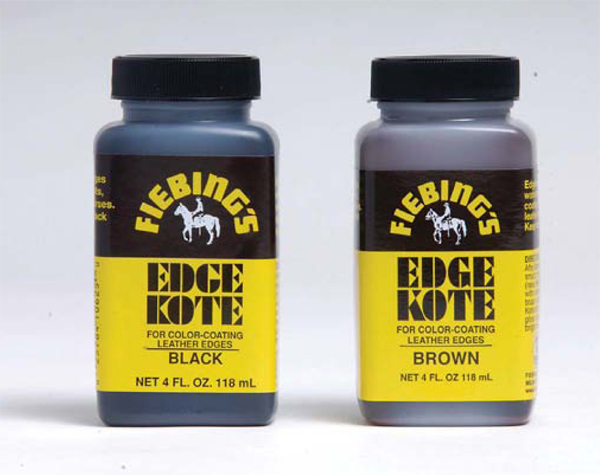
EDGE KOTE
Protects leather from moisture and imparts a professional finished look. Available in brown and black and is applied with a wool dauber or high-quality cotton swab.
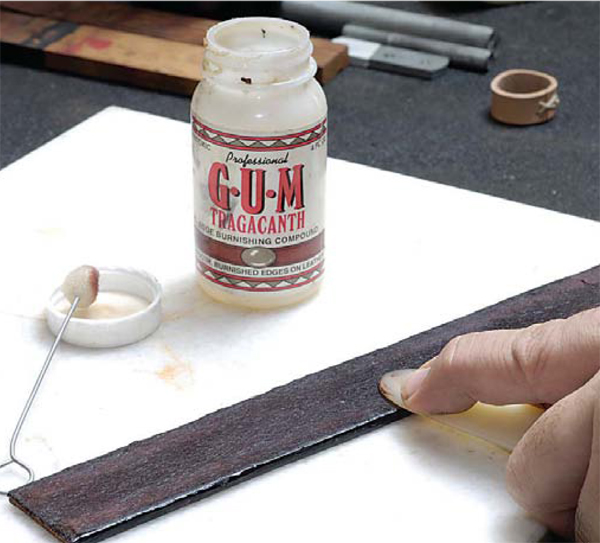
GUM TRAGACANTH
Gum tragacanth comes from the dried root of a legume. When water is added, it becomes a gel. It's the ideal product to help waterproof the flesh side of any unlined leather project. Available at leathercraft supply stores as well as bakery supply stores (it's also used to make cake decorations).

EDGE WAX
Using edge wax to seal the raw edges of belts and other projects is a mark of professionalism. While you can use straight beeswax, many professional leatherworkers use a blend of beeswax and paraffin. It's easy to make and a batch will last for years. Beeswax is available at craft and farm stores; paraffin can be found at most grocery stores.
Making Edge Wax
To make edge wax, you will need equal parts of beeswax and paraffin. An ounce or two of each is plenty. A clean pet food or tuna can is an ideal container for making the wax. Pair it with a plastic pet food can lid and you'll have a convenient storage container. Edge wax can be left out on your work bench or placed in your tool box; it doesn't need to be kept in a sealed container.
The last item you need is a candle warmer or tart burner to melt the wax and paraffin. Alternately, you could melt the waxes on the stove over very low heat using a double boiler. Keep in mind that overheated wax will smoke and catch fire. Never leave melting wax unattended.

1. Place equal parts of paraffin and beeswax on a cutting board. One to two ounces of each will make a long-lasting supply. Use a small kitchen knife to cut the paraffin and beeswax into chunks. Then plug in the candle warmer (or light the candle of the tart burner).
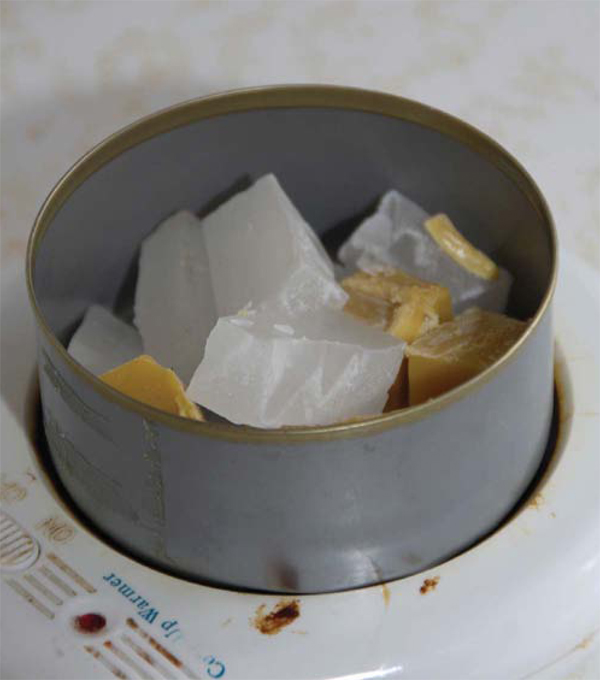
2. Place the chunks in the can and set the can on the warmer.
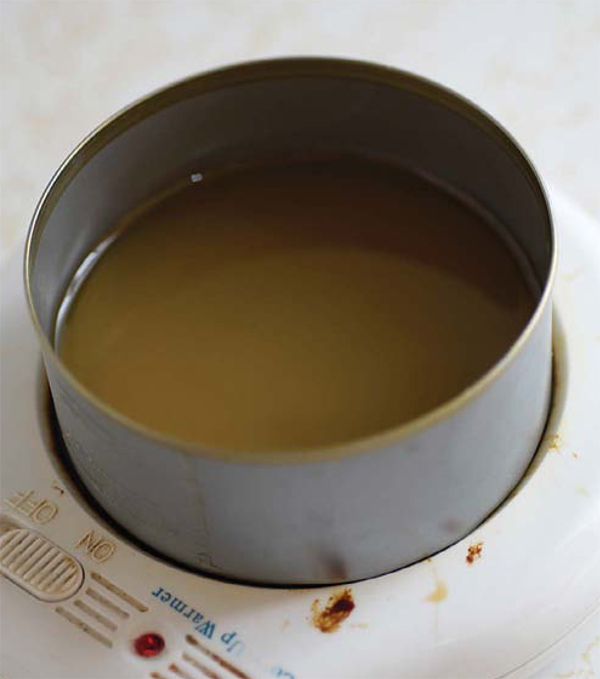
3. It will only take about a half hour for the wax and paraffin to melt and blend together. The actual time will depend on how much product you use. If the mixture does not appear to be fully blended, gently swirl the can or use a craft stick to stir.
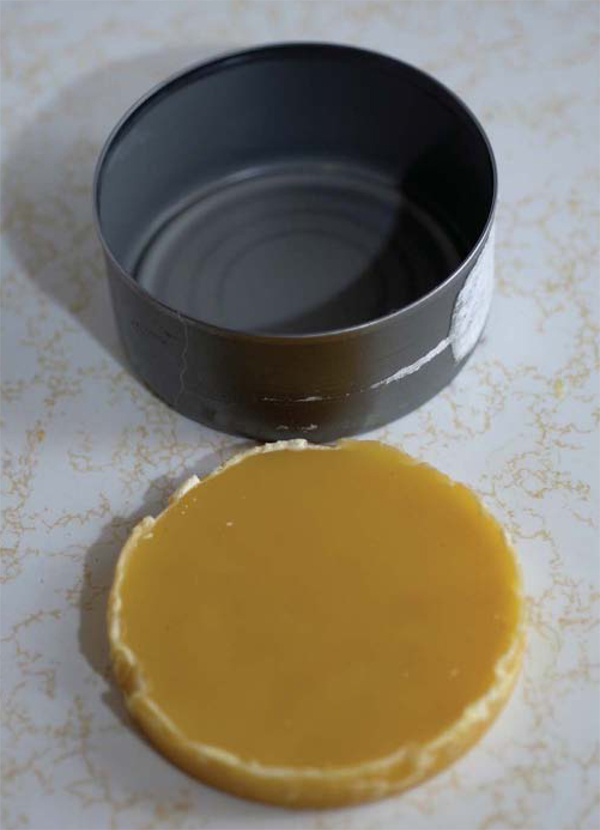
4. Remove the can from the warmer and let cool. Place in the freezer for an hour or so and the mixture can be easily removal by rapping the can upside down on a hard surface.
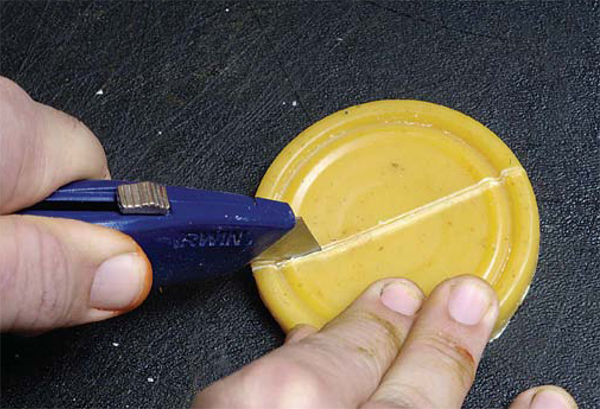
5. To cut for use, score a shallow line down the center with a utility knife.
6. Place the disk on the corner of a table and push down on the part that extends over the table to break it.

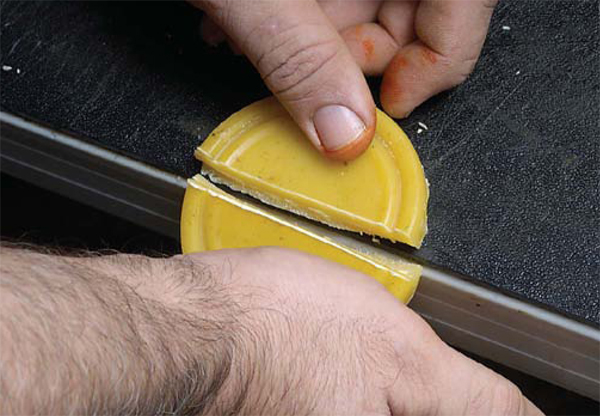
7. Use a craft knife to score a shallow line in the center of the two halves.

8. Line up the scored line with a table edge and push down on the part that extends over the table to break it.
BURNISHING CLOTH
Burnishing the edge of a belt or other project evens out the edge wax, makes two joined pieces of leather look like one, and imparts a warm glow to the leather. One of the best burnishing fabrics is ballistic nylon, a large-weave, shiny, smooth fabric. A good substitute is sports nylon, such as a piece of an old gym bag or an outdoor banner.
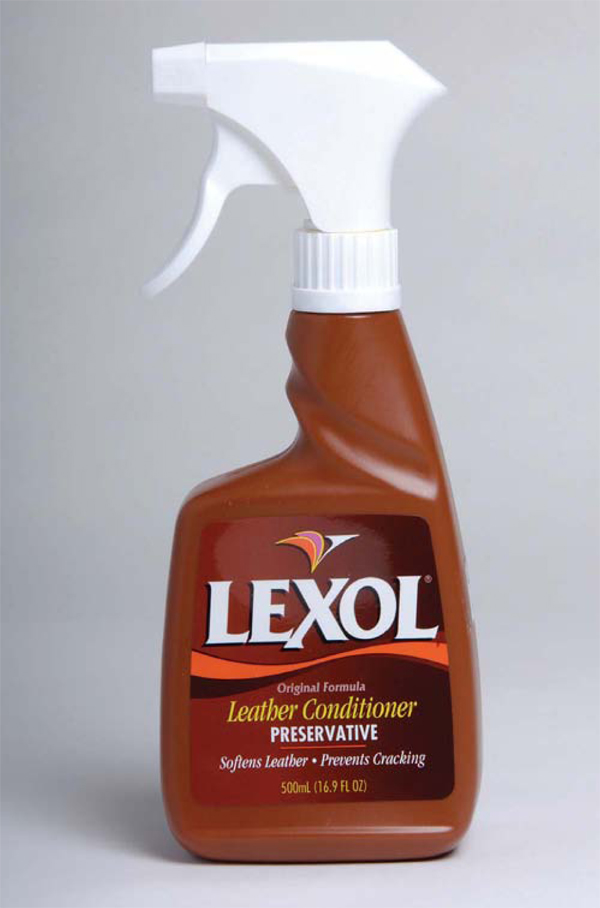
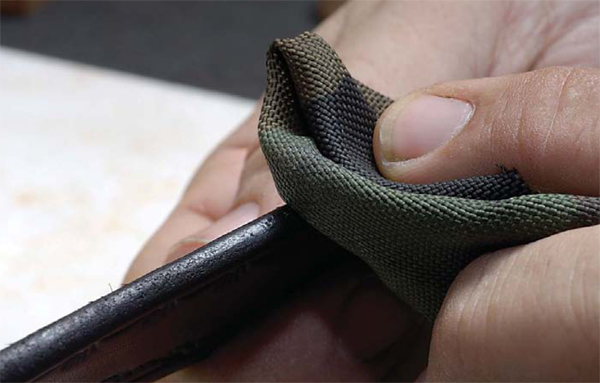
LEATHER CONDITIONER
Replaces oils that may have been lost after the leather leaves the tannery and helps preserve leather flexibility and enhance its natural beauty. It also aids in the leather tooling process. Lexol is among the leading brands of leather conditioners.
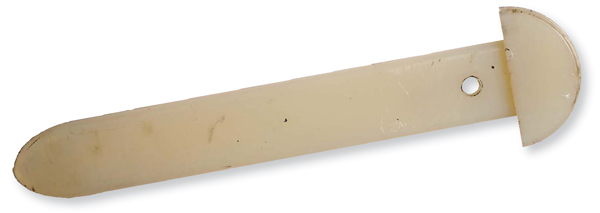
3-IN-1 BONE FOLDER-CREASER-SLICKER
This multipurpose Craftool is used for edge burnishing and finishing, splitting a sewing seam, applying a guide line, and much more. The head pops off for added versatility. An alternative is a straight bone folder, available at craft stores.

NEATSFOOT OIL
This natural preservative is mostly used on belts, shoes, saddles, and other articles that may be exposed to moisture. It repels water and helps keep leather from drying and cracking. It will also make dried-out leather pliable. May permanently darken light-colored leathers.
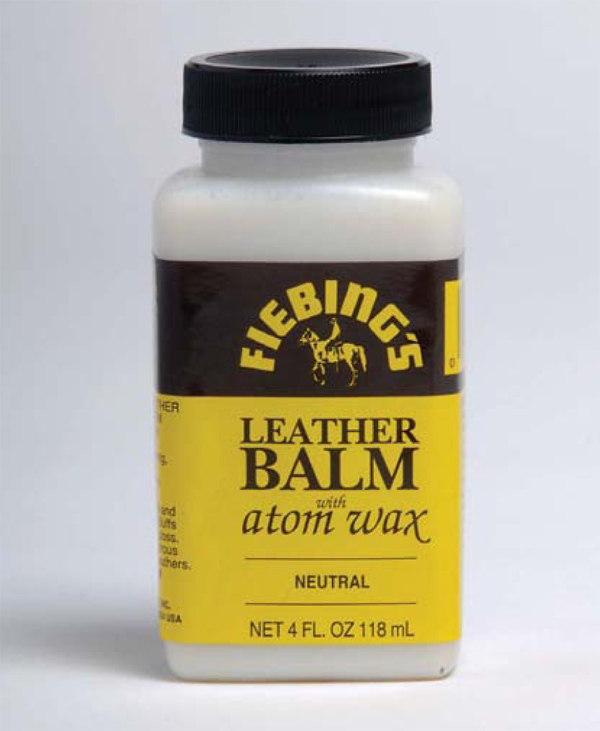
LEATHER BALM
Although it does not waterproof leather, this product will add a measure of protection and a warm glow to your leather projects. Apply the neutral color with a clean, soft cloth, let dry, then buff with another clean cloth.
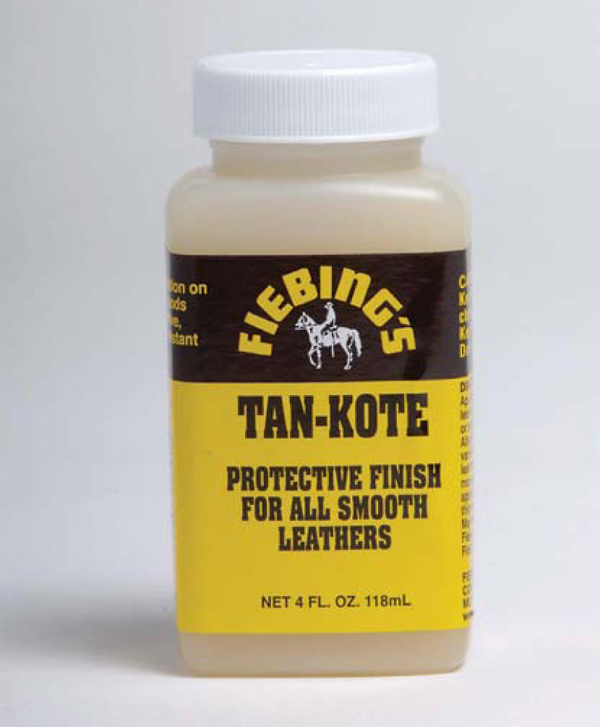
TAN-KOTE
Tan-Kote will provide the same warm nonglossy finish as leather balm but will make your project water-resistant. It's a good choice for work and motorcycle belts that will be exposed to the weather or perspiration.
Fasteners and Decorative Elements
Snaps and rivets are available in several sizes. Common colors include nickel, brass, copper, black, and brown. Snaps are not as sturdy as rivets for belts but allow you to switch buckles. Rivets provide a strong, permanent hold and can serve a decorative function as well. Both are applied using similar tools in much the same manner.
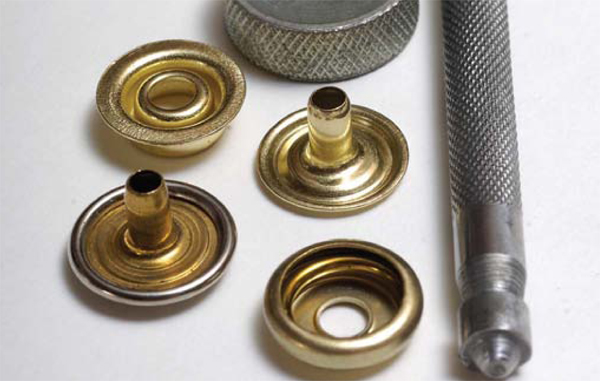
SNAPS
A snap-setting kit is made up of four-part snaps, a specially sized setter, and a concave anvil. Snaps come in four parts: a top cap and a bottom female socket, and a rear post and a bottom male socket. Heavy-duty snaps made for 8- to 10-ounce leather are called Line 24 snaps. The setter must be sized to match the size of snap you are using. The anvil is concave to prevent the curved cap from being dented during the application process.
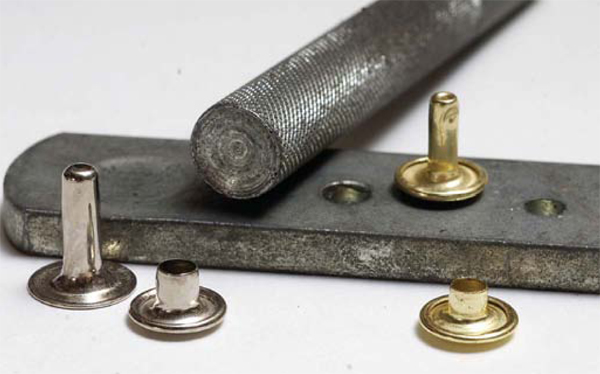
RIVETS
A rivet-setting kit typically comes with a rivet setter and bar anvil along with two-part silver- or brass-colored rivet sets. Rivets are composed of two parts: the top cap, which may be rounded or flat, and the rivet, which has a longer post. They are made of iron or brass coated with a metal alloy finish. Brass-base rivets are preferred; iron-base ones can rust.
Sizing your rivets is important. Select a size that is no more than 2 millimeters (0.08 inch) larger than the width of the two (or more) pieces of leather you are joining. If the rivet post is too short, it will not properly attach the leather pieces. If it is too long, the rivet will tilt and move around in the hole.
The setter has a concave head to prevent marring rounded top caps. The anvil has setting holes to accommodate various sizes of rivets.
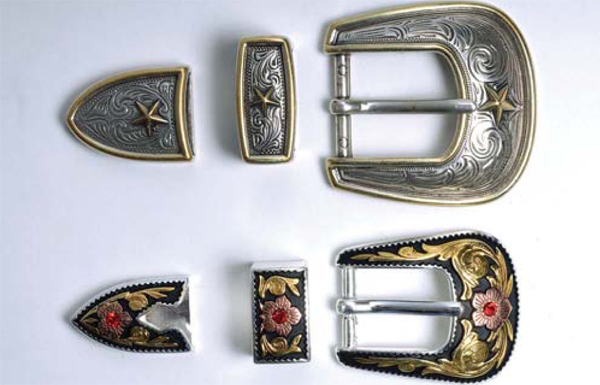
BUCKLES
Once you start your search, you probably will be amazed at the variety of belt buckles that are available. They range in price from a couple of bucks to many hundreds of dollars. Most buckles are made with a standard-sized bar fastened at the base of the buckle (heel bar) or in the center of the buckle (center bar). Regardless of the type, use a leather belt strip that is at least 1/8 to ¼ inch smaller in width than the bar.

CONCHOS
Decorative adornments add personality to your work. They are particularly favored for belts and accessories used by historic reenactors, motorcycle riders, cowboys, and rodeo riders. The inexpensive ones are chrome-, silver-, nickel- or brass-plated metal. Expensive versions are made of brass or sterling silver plate. They are also available in genuine or faux turquoise, mother of pearl, and gemstone. They may have a screw back for easy changing or a rivet back for permanent placement. Slotted types are threaded with lace.