
2
Basic Techniques
Now that you are familiar with the various leathercraft tools and supplies, learn how to properly use them. The following step-by-step instructions start with selecting the proper carving and lining leather and end with applying finishing products. Practice these techniques on scrap leather until you feel comfortable with each procedure. And don’t be afraid to experiment as you develop your skills, as every leathercrafter’s method differs slightly. Once you master these techniques, you’ll be able to make the belt and card case covered in chapter 3.

Economy-grade leather is fine for the beginner. Once you gain experience, you can upgrade to the more expensive good and best grades. Purchasing a hide differs from buying fabric. A shoulder or side is priced by the square foot, but you need to choose it based on its intended use. Leathercrafters must take into account the shape of the hide and work around defects, such as soft spots, scars, branding marks, and the like. The leather that is not usable for project pieces can be suitable for carving and stamping practice and colorant testing.
For the demonstration project belt in this book, you'll need a 1½-inch-wide precut belt strip. For the card case, you'll need a 4- to 6-ounce piece of cowhide about 6 inches square.
Kidskin leather made from a young goat has a shiny appearance, wears well, and is in the higher-price range. It’s the best choice to line a card case, wallet, or similar project. You can also use 2-ounce, full-grain, vegetabletanned cowhide to line your project. This leather may be carefully carved and stamped, unlike other lining options.
Cowhide Weight Guidelines
Here are general guidelines for selecting leather for specific projects.
Belts: 7- to 8-ounce for 1½ inches wide, 9- to 10-ounce for wider belts
Card case: 4- to 5-ounce
Cell phone case: 4- to 5-ounce
Checkbook cover: 4- to 5-ounce
Dog leash: 7- to 8-ounce
Guitar strap: 9- to 10-ounce
Journal and notebook covers: 5- to 6 ounce
Key fob: 4- to 5-ounce
Lining: 2- to 3-ounce
Portable media case: 4- to 5-ounce
Wallets: 4- to 5-ounce
Selecting Designs
Master leather toolers render complex patterns, landscapes, and animals in a remarkably realistic way. The beginner should start with simple shapes and borders. A variety of stencils, Craftaids, and patterns allow the novice to get right to tooling. Inspiration can come from almost anywhere: nature, fabric, wallpaper, magazines, catalogs, even a child’s coloring book.
Be mindful of using copyrighted material, which often requires written permission to reproduce. The copyright may stipulate that the pattern may be used for personal use only, which means that projects using the patterns may be for your own use or for gifts for family or friends but may not be sold. General ideas for a project, however, are not covered by copyright protection. You can put a rose on a checkbook cover, an eagle on a wallet, or a basket - weave pattern on a belt—just don’t use a copyrighted pattern to do so.
Some patterns may be used commercially. Tandy Leather’s catalog specifies that Craftaid plastic templates may be used to create leather items for “pleasure, production, or profit.”To stay out of trouble, read, understand, and comply with copyrights—and when in doubt, don’t use the pattern.
Once you learn the basics of tooling, you will find that design possibilities are boundless. Experiment with different tools and arrange design elements in fresh ways to produce artwork that is uniquely yours.
Transferring Designs
You are limited only by your imagination when selecting a subject for leather tooling. To transfer a design from the original image to the leather, you will trace it using transfer film or tracing paper. Then transfer the design to wet leather using a stylus tool or ballpoint pen.

1. Transfer film is used here, but you can use tracing paper, too. Cut your film or paper slightly larger than the design using regular scissors.

2. It’s helpful (though not necessary) to tape your original design on the table and place the film or paper over the original. Tape the film or paper onto the table as well. Experienced tracers hold both down with their free hand.


3. Use a sharp pencil to trace all of the lines on the original design.

4. A trick to good tracing is to look ahead of the line rather than looking where the pencil point is placed.

5. Be sure you have traced all of the lines

6. If you missed one, replace the film or paper, reregistering it precisely over the original, and complete the tracing.

7. To prevent the oil on your hands from damaging the leather, wash them with dishwashing liquid before making the transfer. With a clean cellulose sponge, wet both sides of the leather with clean water.

8. Spray a moderate amount of leather conditioner (such as Lexol) onto the grain side of the leather.


9. Gently rub the leather conditioner in until it disappears. Do not press hard, to avoid marking the leather.


10. First mark the center position of the design on the leather piece then locate the center of your design on the film.


11. Position the film or paper over your leather and match up the center marks.

12. Trace the design with the tip of the stylus, pressing hard enough to make an impression but not so hard that you punch through the film or paper.

13. Continue tracing until all the lines are transferred onto the leather.

14. Check to make sure you traced all the lines. If not, replace the pattern precisely over the transferred design and complete all lines.
Using a Pattern Template

1. Choose the pattern you want to use (one leaf of a Craftaid template is used here).

2. Wet the front and back of your leather. Use your project pattern and mark the center point where the design should be placed on the leather. Locate the center of the portion of the design you wish to use. Match the center marks and adjust the pattern as needed.

3. Slide card stock under the template to mask any portion of the pattern you don’t want to transfer.


4. With the spoon end of a stylus tool, or a metal teaspoon, press the lines of the template into the leather.

5. Only moderate pressure is needed to produce clear guidelines. Be sure to transfer all of the lines in the pattern.

6. Carefully check the edges of the pattern to be sure you are not pressing on any lines you do not want. Remember that the guidelines will be permanently embossed on the leather.

7. Check your design to make sure you transferred all the lines by careful lifting the template up on one side.

8. If you missed some lines, replace the template, reregister the lines, and complete the transfer.

9. The plastic template does a good job of producing easy-to-see guidelines. Your design is now ready to be carved and stamped.
Cutting Tooling Leather

1. To make a straight cut, you can use a utility knife. Position a transparent ruler or L square on the grain side of a piece of leather where you want to cut. Use a pen or pencil to draw a line along the length of the rule.

2. Keep the straight edge on your line as you move it several inches at a time to continue marking a straight line. Do this until you reach the end of the hide.


3. Hold the straight edge down firmly with one hand and place the blade of a utility knife at the beginning of the line at a 90-degree angle to the line.

4. Apply even pressure and start cutting the leather by pulling the knife toward you, going about 5 or 6 inches with each pull. Carefully reposition the hand holding down the leather so it is close to where you are cutting. Try to keep the knife at a 90-degree angle as you cut.
Keep the utility knife below the hand that holds it at all times so that if the knife slips, you won’t cut yourself. Beginners may find it easier to use an L square that has a thicker edge, making it easier to keep the knife against the straight edge.

5.Uneven pressure or a dull blade will result in spurs. Use your utility knife to clean up the edge.

Here, the blade was not held against the straight edge throughout the entire cut. The entire edge should be remarked about ¼ inch in from the original line and the hide should be re-cut.
Using a Round Knife

1. This tool can cut straight and curved lines and is a key part of the experienced leathercrafter’s tool kit. To use it, grip the knife tightly close to the blade with the thumb pressing on the handle. Place the blade tip closest to you at the beginning of the cut.

2. Hold the blade at a 90-degree angle so the cut edge is straight. Roll the blade forward on your guideline. Keep your free hand well away from the blade.

3. Lift the blade then re-set the tip where you left off.

4. Repeat the cutting process by rolling the blade forward.

5. Don’t be concerned if the end of the leather curls toward you or portions start to buckle. Concentrate only on the area you are cutting.

6. When you reach the end, roll the knife off the leather onto your cutting surface.
Using a Rotary Cutter
Seamstresses and quilters are fond of this tool, as it will cut through several layers of fabric with one pass and is easily maneuvered on curves. A heavy-duty model is a must for leathercrafters. It is best suited for use on lining leather and lightweight tooling leathers, but it will cut through a heavier 8- to 10-ounce vegetable-tanned piece of tooling leather.

To use a rotary cutter, hold the handle firmly and roll the blade along the straight edge using even downward pressure along the entire length of the leather you are cutting. Move the straight edge as needed to reach the end of the line. On heavy leather, you may need to repeat the process several times until you cut completely through the leather. Blades must be sharp, so have spares on hand.
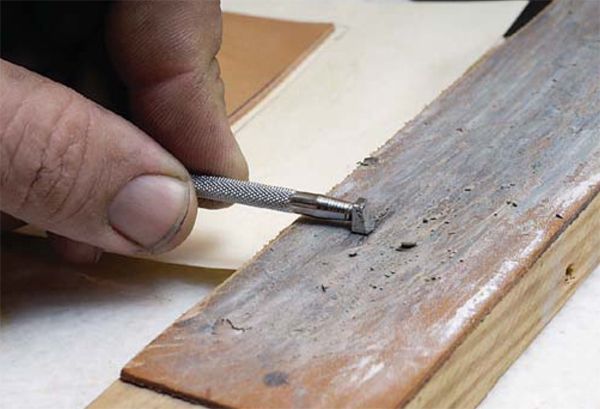
Using a Skiver

1. The skiver is used on dry leather. Sharp blades make the job go easier, so have spares on hand. A skiver removes up to half the thickness of a piece of leather so that it doesn’t crack when folded. Leather is skived from the flesh side in small areas, a little at a time.


2. Grip the skiver near the neck with your thumb or first finger resting on the handle. Place the skiver blade on the leather and, with medium pressure, pull back and up. Don’t skive in the same direction with every stroke. Rotate the blade to evenly remove leather.


3. For small pieces, such as this belt keeper, it is easier to place the piece at the edge of your table (on your cutting surface) and skive downward off the table.
Tooling Leather
Artists have used hand tools to decorate leather goods for centuries. Carving leather refers to using a swivel knife to carve basic shapes into the leather and using stamps to give the object a three-dimensional and detailed appearance.
Tooling also encompasses stamping patterns without initial carving. An infinite number of designs can be created with the stamps available today.
The following oak leaf tutorial demonstrates the basics of carving and stamping.

1. When thin leather is wet, it has a tendency to stretch out of shape when stamped. To prevent this, use rubber cement to adhere the leather to a piece of poster board or heavy card stock. Note that this technique is used on 4- to 6-ounce cowhide and not on belts, which are made from heavier 6- to 8-ounce hide.

2. Start with a piece of cowhide cut to the size of your project. Cut a piece of card stock slightly larger than the leather. Trace the outline of the project onto the paper.

3. Brush rubber cement on the paper only—not the leather—within the lines.


4. Be careful not to get rubber cement of the grain side of the leather. Place the leather flesh-side down on the rubber-cemented area of the card. Press down firmly to adhere. Place a stone block or other heavy object over the piece and let it dry overnight.
Note that leather heavier than 6 ounces is typically not glued for tooling: It’s not an exact science, so when in doubt, it’s best to glue it down.
Carving with a Swivel Knife
The swivel knife is used to cut the primary lines of your design. These lines are then beveled to make the design three-dimensional. This is enhanced by stamping the area around the design with a background tool, and the object can be further embellished with various other stamps.
Design patterns you purchase should come with instructions that will show which lines to carve, making it easier for the beginner. Once you complete a few tooling projects, you will understand the process and should not hesitate to carve a design unaided by a guide.
Practice and experience will enable you to become an expert carver. Remember, leather tooling is an art and need not be perfect. Most “mistakes”can be corrected, and chances are only you will notice minor flaws.
Just as determining the proper wetness of the leather is a matter of experience, so is determining the depth of a cut. The cuts need to be deep and aggressive, but smooth. Some carvers will say the depth of the carving should be a specific proportion of the thickness of the leather, but there is no firm rule.
General Rules of Carving
• Carve with the leather piece on the smooth side of your stone block.
• Never carve on dry leather.
• Leather conditioner makes the leather claylike and easier to carve.
• Strop your blade every time you put the knife down and pick it up again.
• Strop your blade if it starts to drag while making a cut.
• Strive to consistently cut through the leather at the same depth.
• Carve your lines from the inside of your design toward the outside. This will keep you from squashing the lines you already made.
• Don’t allow lines to intersect. Leave a tiny space of leather between lines.
• Be more concerned about cutting smoothly rather than following the lines exactly.

1. You’ll get the best results from your swivel knife work if you strop it every time you pick it up and when it starts to drag. First apply a generous amount of white jeweler’s rouge onto the strop surface.

2. Place the swivel knife blade on the strop and pull it toward you with the bevel of the blade held flat against the strop.


3. Use a paper towel or cloth to remove the dirt and residue the blade might have picked up.

4. The blade is clean and ready to cut.
The Tooling Process

1. Use clean water and a clean sponge to wet the entire surface of the leather on both sides.

2. Spray on a generous amount of leather conditioner.


3. Gently rub in the leather conditioner in a circular motion using your fingers until it is all absorbed. Then transfer the design to the leather as described on pages 27–32.

4. Once your leather is at the proper moisture level, you’re ready to carve. A ceramic blade is used here. It’s okay if your blade is metal: The procedure is exactly the same, and, if you carve properly, you will achieve the same results.
Hold the swivel knife by placing your forefinger in the yoke. Place your thumb and middle fingers on the knurled areas. These two fingers control the swivel action of the blade. Your little finger rides lightly on the leather as you make your cuts.


5. Insert the corner of the blade on an angle at the tip of a line.
Always Carve and Stamp on Wet Leather

Too dry for tooling

Too wet for tooling

Just about right

6. Tilt the blade forward slightly and press into the leather. Use an even downward pressure on the blade while pulling it toward you in one smooth motion.

7. When you reach the end of the line, swoop the blade out of the leather. Remember, cutting with a smooth, continuous motion is more important than following the line exactly.

8. Carve your pattern from the inside to the outside of the design. With this oak leaf, the main vein is carved first.

9. The vein lines should be completed in one continuous motion without lifting the blade.

10. Instead of stopping at the end and lifting, swoop the blade out.


11. The same technique is used to carve the short secondary leaf veins in the design.

12. Curved lines are the most difficult to master because you need to use the swivel feature of the blade to make the curve in one continuous cut. Start by inserting the corner of your blade at the top of the curved line.

13. With even, downward pressure, pull the knife toward you, swiveling the blade with your thumb and middle fingers as you go around the curve.

14. Swoop the blade out at the end of the cut.

15. This is how the curved cut should look.

16. This is how the whole design appears at this point. Note that no carved lines intersect.


17. Round shapes, such as the acorn, are completed in two steps. Place the corner of the knife blade at the top of one side. In one smooth stroke, pull the knife toward you and swoop out where the line starts to curve.


18. Place your blade at the tip of the acorn again and cut the second side of the acorn, but this time continue your cut around the base of the nut. If you find it easier to cut a curve one way or another—to the left or the right—simply turn your work upside down.


19. The cap of the acorn is carved in one complete stroke. Place the corner of your blade at the beginning of one end of the cap. (Carve the curve from the side that is most comfortable for you.) Use the tool’s swivel action to curve around the arc and stop at the end of the line.

20. Carve the other acorn and the edge lines at the top and bottom. Note that some of the design lines on the right and left are being left uncarved. You will see how this treatment works once the piece is stamped.
Sign Your Work
These days, almost everything is factory-made, so a handmade item is relatively rare and special. Your handmade leather piece is one-of-a-kind, even if you use a project and/or design pattern. Your time and talent deserves to be recognized with a signature. Some leathercraft suppliers sell three-dimensional stamping tools that include the words "Handcrafted by."You can either use your swivel knife to carve your initials or alphabet stamps to finish the phrase. Or you can develop your own signature mark. Either way, your signed leather pieces will become treasured gifts or heirlooms.

Add your name or initials to a three dimensional stamp.

Create your own signature mark using your swivel knife.
Making Final Decorative Cuts

1. Fine decorative cuts are made after the stamping is complete. These smooth curvy cuts add visual interest to the design.


2. Detail cuts are made by plunging the knife tip into the leather, making a short stroke, and removing the knife with a swift swoop.


3. The crosshatch pattern in the acorn caps is made very lightly.

4. Decorative cuts sometimes violate the no-intersectinglines rule. Notice that you need only to suggest the pattern in the acorn cap. You don’t need to overdo the crosshatch lines to create a realistic look. Also note how the decorative leaf cuts are broader where the knife was first plunged in.
Stamping
Once your design is carved, put your creativity to work by enhancing the design with tooling stamps. This section shows the purposes of the stamping tools used most in design work and how to use them.

1. The first step in stamping is to test your leather for the proper moisture content. If it is too dry, rewet it and wait until it is ready. Unless otherwise noted, all tools should be held vertically with the thumb and forefinger. Often, leather toolers will rest their little finger lightly on the project piece.
Basic Rules of Stamping
• Use the smooth side of your stone block for stamping.
• Never stamp on dry leather.
• If you tend to pound the stamp too hard, try choking up on the mallet by holding the handle closer to the mallet head.

2. The beveling tool is one of the only stamping tools that should be stropped. Rub the face and sides of the tool across the strop before use and periodically while stamping. This will ensure a smooth movement across the leather, resulting in a nicely beveled edge.

3. With some exceptions, most stamping tools are struck lightly two or three times with the tool held vertically.
Remember: If your leather dries out too much while you are working (if the swivel knife drags or stamp impressions are too light), rewet the entire piece of leather, not just a portion. If a piece is not finished in one sitting, rewet the entire piece of leather before you begin again.
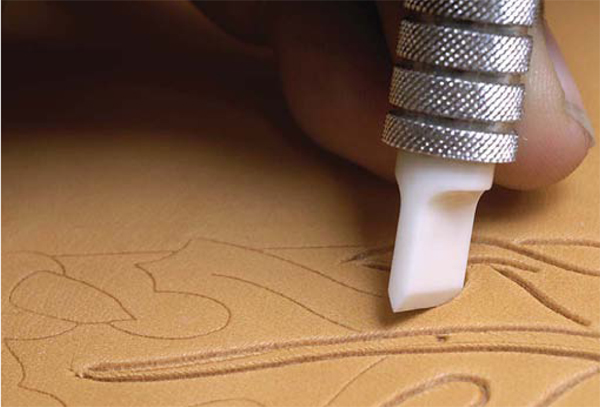
Beveling

Beveling is the single most important process in creating three-dimensional leatherwork. The goal of using this tool is to free the figure from the background. The beveling tool is placed next to a cut edge and is used to compress the leather. To achieve the 3-D effect, you must bevel only one side of a line.
Bevelers come in many widths and can have a smooth-finish head or a textured head. Leather is always beveled first with the smooth-finish tool and beveled a second time with the textured beveler if more detail is desired.
To bevel a carved line, you place the flat edge of the beveler on the cut. Lightly tap the tool multiple times while moving it along the line.

1. The beveler used here is Craftool B-203. Place the flat side of the beveling tool against the outside of the vein line.


2. Keep the beveler tool moving smoothly along the line as you gently tap with the mallet as you go. Generally, the tool is moved about half of its width with each tap. Hold the tool loosely and allow the tool to bounce as you go along.

3. Continue tapping and moving the beveler until you come to the end of the vein. If the tool starts to drag, strop it. As with carving, you want to bevel the figures from the center of the design outward to the edges.

4. You should not see any individual tool marks along the beveled cut. If you can see tool marks or want the vein to stand out more, rebevel the cut. Bevel the other side of the vein on the outside so that the entire vein is lifted off the leather.

5. You’ll bevel all of the smaller veins on the same side of the cut line. Notice the darker color produced by the beveler. This indicates that there is proper moisture content in the leather.

6. You’ll bevel all of the leaf parts along the outside edges.

7. Switch to a smaller smooth-faced beveler to bevel tight spots. Here, Craftool B935 is used. Take your time when beveling curves in tight areas. Notice how high the leaf has been raised over the background—the goal of beveling.

8. Notice the difference beveling has made on the upper side of the oak leaf.


9. You’ll continue beveling the entire leaf and acorn outlines. Check your work before moving on to ensure that you didn’t miss any lines.
Adding a Background

Basic backgrounds are usually made with one of the many crosshatch or matte tools, but you will find some fanciful work that uses flower shapes, too.

A background adds focus to your main carving figures.
The face of the background tool is small and care must be taken not to strike the tool too hard. It’s also important that the impressions are evenly spaced and the entire background area is stamped.
The tool can be angled to get into small spaces.

1. The background tool is held at a 90-degree angle and tapped with the mallet one or two times. To make light, controlled taps, hold the mallet close to the head.

2. Then lift up the tool and move it to an adjacent area. The tool used here is Craftool A104.

3. Turn the head of the background tool in different directions as you go.

4. Stamping should be of even depth and not overlapped, though some overlapping is inevitable. When dyed, the background will appear to be much darker.

5. Take care to stay within the carved lines of the outside border.

6. The goal of a good background is to appear inconspicuous. Its purpose is to draw attention to the main figures.
USING A BALL END MODELING TOOL
This tool is used to make hard edges round and smooth. By rounding the edges, you accentuate the three-dimensional effect of carving and beveling. Use a gentle hand with this tool so you don’t depress the beveled edge.


1. Run the ball tip along the leaf veins to make them appear to have rounded edges

2. The modeling tool also helps make these acorns appear to have a curved shape.
USING A PEAR SHADER

A pear shader makes a design element, such as a flower petal or leaf, appear curved. It has either a smooth or textured face. The tool can be held at a 90-degree angle or tilted to fit into a tight area and can be “walked”across an area as it is tapped for even coverage.


In this instance, just the tip of the shader is used to add dimension to the leaf tips. Be sure to position the tool exactly where you want it. Hold the tool at a 90-degree angle and tap one or two times with the mallet.
USING A TEXTURE BEVELER

1. A texture beveler is used to add more dimension and interest to the oak leaf center vein. Unlike other stamping tools used in this project, the texture beveler is used alone, without a mallet.

2. Hold the tool at a 90-degree angle and run it down the stem in a continuous movement with moderate to heavy pressure.

3. Follow the line of the vein, keeping the tool centered between the edges.


To detail the area beveled with a smooth beveler, you may wish to go over it again with the texture beveler to add more interest and dimension to the work. Here we wanted to emphasize the leaf veins. The texture beveler is used in the same manner as the smooth beveler. The goal is to make a smooth bevel with no visible tool marks.
OTHER TOOLS
Seeder, veiner, and camouflage tools are used extensively in western floral tooling. They are also effective design elements in borders.

The seeder tool is often used to represent seeds. Impressions are made at the same depth and should not be overlapped. Care should be taken not to strike this tool too hard as it could go right through the leather. The tool is held at a 90-degree angle and tapped lightly with the mallet.

The camouflage tool adds interest to leaves and flowers. It is held at a 90-degree angle to make evenly spaced (not overlapped) impressions.

The veiner tool makes a curved line impression and is used to make an object, such as a leaf, appear to be curved. To achieve this, the tool is often tilted so that the impression is deeper and darker on one side. There are many veiner tool designs in curve sizes from just under ½ inch to 1¼ inches.
Coloring Leather

1. Water-based antique gels impart a rich color and a polished luster to leather projects. The gels are easy to apply. The project you are dying should be dry. Start by applying a moderate amount of gel to a wool dauber or a clean, lint-free cloth.


2. Apply a generous amount to dye the entire grain surface. If you are working on a project that will not be lined, dye the flesh side, as well.

3. Reapply gel to the dauber or cloth as needed.

4. Be sure to dye all exposed edges of the piece, regardless of whether they will show after final assembly.

5. As soon as you are finished applying the gel, use a clean lint-free cloth to rub the gel into the leather and remove the excess.
TIP: Stained projects should be left to dry for 24 hours before any other work is done or final finish is applied.

6. Don’t be concerned if you see a bit of color variance. Some striations can be expected.

7. Keep turning your cloth as it becomes saturated with dye to expose a clean area.

8. Continue rubbing the gel into the leather until there is no raw leather showing.

9. Don’t be stingy with the amount of gel you use. Use the wool dauber to really work the color into the stamped areas. Then rub with a cloth and check to see that the stain has penetrated the leather.

10. The trickiest part of staining a stamped leather piece is ensuring that the gel penetrates all crevices. A close-up inspection shows two areas that were missed in the process. Misapplied colorant can be corrected by restaining the item, as antique stain is very forgiving. You can restain only the areas that require it, rather than the entire piece.
Using Antique Gel with Dye as an Accent Color


1. Use a good quality paintbrush for precise application. Here the red dye is applied along a stamping guideline and on both edges of a belt. Take time to ensure that the dye is applied evenly and completely.

2. A second coat may be applied right away if you want the color to be darker.

3.Let the dye dry overnight before apply antique gel stain to the center of the belt.


4. The easiest way to color the center of the belt is to apply an all-over coat of antique gel. Light brown was used here. Use a slightly damp sponge or a wool dauber to apply the gel.

5. Depending on what color you use, the gel stain may slightly darken other dyed areas, such as the red edge. If the antique gel color isn’t dark enough to suit you, reapply while the leather is still damp.

6. Gel stain enhances the stamping pattern by making it darker than the surrounding leather. Streaks or dark marks are caused by imperfections and striations in the leather and are unavoidable.
Note: If you were to use dye instead of the antique gel stain, you would not be able to apply it over previously dyed areas. In this example, dye would drastically darken the red edge or it would overdye it completely, depending on the dye color used.
Acrylic Paint
Acrylic paints can be used to highlight a three-dimensional stamp, edge a border, or color large areas. These water-based paints may be thinned to create a wash or combined with other colors to make new ones.

1. Select the proper size brush to suit the area you are painting. For detail work, use a fairly good quality liner or script brush to apply acrylic paints.

2. If you are doing fine work, dip the brush in water and use your fingers to sharpen the point of the brush.

3. Pour, dip, or squirt a small amount of paint on a piece of cardstock or paper plate.

4. Thin the paint if it is too thick for a smooth application.


5. Carefully apply the paint. Should you brush or splatter some where you don’t want it, wipe it off immediately with a damp cloth.


6. Acrylic paints dry quickly and are waterproof when dry.

The leather disk in this holiday ornament was dyed and then detailed with acrylic paint.
Leather and Oil Dyes

Alcohol-based leather dye and oil dye are permanent and come in a wide range of colors. Oil dye is touted as offering better coverage and being more colorfast that alcoholbased dye. Latex gloves are recommended while applying these, as they will stain your hands.
The easiest way to apply dye is to dip the entire piece into a dye-filled bowl or pan until the dye is evenly absorbed and then leave it to dry for several days on newspapers or an old towel. As with all colorants, it’s a good idea to test your color on a scrap piece of leather before dyeing your project.
If your piece is too large to dip or you want to use more than one color on your project, use a wool dauber to apply the dye completely and evenly. Dyes are usually used for an all-over application, but they can be applied decoratively to select areas.
Remember that if you use dye instead of antique gel, you must keep the colors separate. Dye is very opaque and will darken, change, or obliterate any previously applied colors.
NEATSFOOT OIL

1. You might not want to color your project at all. By applying neatsfoot oil, you can achieve a warm, natural appearance without dyes. The most efficient way to apply this oil is by dipping leather into it.

2. Fill a container large enough to hold your item with an ample amount of oil so the item can be dipped.

3. Submerge the item fully. Neatsfoot oil will not harm your skin, so gloves are not necessary.


4. Continue to dip the item until it is completely covered. The used oil can be returned to its original container for reuse; the bucket can be cleaned with soap and water.

5. Towel off the item so it no longer drips.

6. Hang the item over a paper towel or set it the edge of the bucket to dry for several days.

7. The neatsfoot oil will darken the leather, giving it a subtly colored appearance. The oil will help repel water and keep the leather from drying out and cracking.
Attaching Fasteners

Attaching fasteners isn’t difficult, but it does take practice and proper technique. If you don’t tap the fastener hard enough, it won’t stay put. If you tap it too hard, you risk damaging it.
Here are some good tips to follow:

1. First match up your snap parts: the cap attaches to the female socket, and the rear rivet attaches to the male socket. Then select the anvil hole that is the same size as the cap.

2. Make sure the snap handle is the proper size. The handle prong should fit snugly in the female socket.

3. Prepare the anvil by placing a piece of masking tape over the correct anvil depression to prevent it from marring the surface of your snap cap.

4. Push the stem of the female socket from the flesh side through the snap hole to the grain side.

5. Place the cap on the anvil and insert the female socket.


6. Place the setting handle at a 90-degree angle. Make one or two strong taps to set the snap, and then tap lightly while moving the top of the handle in a circular motion to secure the top to the bottom.

7. The cap and the female socket are in place.

8. To set the bottom set of snap parts, place the male socket in the proper anvil hole.

9. Place the male rear rivet through the grain side to the flesh side of the leather.


10. Press the two pieces together until you hear a snap.

12. As before, place the snap setter handle on the snap at a 90-degree angle. Make one or two moderate taps. Then make additional light taps while moving the top of the handle in a circular motion to secure all sides of the snap.

Rivets are set in the same manner as snaps, except there are only two parts: the cap and post.
Attaching Rivets

Here are a nickel and a brass set of rivets. The male posts are at the top and the caps are below.
1. Refer to page 24 for information on sizing your rivets properly.
2. Line up the holes in both pieces of leather you are attaching and insert the post. Be sure you are orienting your cap and post properly.
3. Place the post in the cap and use your fingers to press the two parts together.
4. Place the rivet cap top-side-down in the proper anvil hole. (If your rivet cap is rounded, use a circular concave anvil.)
5. Make a series of small taps until the rivet is properly set.
Stitching Leather
1. Tools you will need to saddle stitch include waxed linen thread in the color of your choice, two stitching needles, and a stitching awl with a trapezoidal needle. You also need a stitching groover and a stitching wheel. (A stitching wheel is used here.) A stitching pony holds your project while you use both hands to punch thread holes and manipulate two needles to sew the leather pieces together.

2. As a general rule, stitching lines should be as far from the edge of the piece as the leather is thick. Set the width on your stitching groover by inserting a strip of the same leather thickness you are using for your project.

3. Use a small screwdriver to secure the bar loosely.

4. Using the stitching groover, make marks where the two grooves coming into a corner will meet. Repeat for the other three corners.


5. Place the groover tip on one of the marks you just made. Hold your project down with one hand and, with the other, pull the groover toward you. The shaft of the groover tool rides along the edge of the leather. Pull with moderate pressure. Stop when you reach the corner mark.

6. Repeat this process on all edges you want to stitch. (Only three edges have been grooved here.)

7. Use the groover tool to deepen the cut by going over each groove a second time.

8. To make the stitching-hole indicator marks, place one of the points of the overstitch wheel in a corner hole.

9. With firm, even pressure, run the tool along each edge, being careful to keep the tool in the groove.

10. Here is how the stitch marks should look. Stop at each corner and place one of the points in the corner hole to mark the next groove.

11. Go over the groove again to deepen the stitching hole indicator marks. Make sure you realign the tool points in the stitching holes you just made.
Working With Thread
Determine the maximum amount of thread you can work with by holding one end of thread in one hand and the spool in the other. Extend one hand out as far as you can reach. Double this length and cut the thread off the spool. (As a general rule, lengths over 6 feet are hard to handle.)

1. Insert the tip of the thread through one of the needles. It may help to flatten the tip by pressing it between your fingers. Leave about a 2-inch tail extending from the end of the needle.


2. You are now going to pierce the thread several inches away from the needle to form a straight line knot.
Note: If you run low on thread while stitching your project, you can splice in additional thread (the splicing technique is illustrated on page 84).

3. Push the point of the needle all the way through the thread.


4. Hold the short and long ends of the thread and pull the needle all of the way through the thread. When you pull the thread taut, it will form a knot at the base of the needle.

5. Repeat the process with the other end of the thread and the second needle.

6. Set aside your needles, being careful not to tangle the threads, while you set your project in the stitching pony.

7. Place your project—here we’re using a card case— between the jaws of the stitching pony with the stitching line about ¼ inch above the wood post. Secure firmly by tightening the wing nuts.

8. Use the stitching awl with the 2 blade to punch the first hole in the corner mark made by the stitching wheel. All punching is done from the front side of the item.

9. Punch the entire needle through the leather up to the tool’s hilt.
Orienting your awl blade properly

Correct: This diagram shows the proper orientation of the punch awl blade within the stitching groove when making stitching holes.

Incorrect: This diagram illustrates punches that were made above and below the stitching groove and with the blade tilted at various angles.

10. The punch awl blade is in the shape of a parallelogram. It is very important that you maintain the correct orientation of the blade with every punch and to stay within the stitching groove.

11. Continue punching on the hole marks. Be sure to keep your fingers clear of the awl blade. Continue punching until you reach the end of the stitching pony arm.

12. Pick up your needles and insert one in the corner hole. Pull the thread through until half of the thread is on either side.

13. Put both needles in one hand and extend you arm to check that the thread is of equal length on both sides. Adjust if necessary.
Note: A piece of tooling leather cut the diameter of the hilt will prevent the tool from making marks on your leather piece as you are making the stitching holes. After cutting out the proper size circle, mark the center and punch through using the stitching awl.


14. Place the front-side needle through the second hole from front to back and pull it through.

15. With the other needle, go through from the back side into the same hole you just used.


16. Take note that the stitch is placed behind and under the previous one. Be careful to not split the other thread with the needle. If you do split the thread, you must pull the needle back through the hole and make the stitch again. You will not be able to go to the next stitch until this is corrected.

17. Pull the stitch tight with equal tension on both sides. Always go through in the same order on each and every stitch: front to back, then back to front. If you don’t, the stitches will be uneven and inconsistent.

18. Continue stitching by inserting the needle on the front side in the next hole.


19. Pull the thread through until it is tight.

20. Then insert the needle from the back side into the second stitching hole, just as you did for the first stitch, being careful not to split the thread of the front side stitch.

21. Pull this thread through until it is taut. Pull the stitch tight with equal tension on both sides.

22. Continue stitching in the same manner to your last punched hole.


23. When you reach your last punched hole, readjust your project on the pony. Punch more holes until you reach the width of the pony’s grip or the end of the leather, whichever comes first. (In this case, it is roughly the same.)


24. Stitch to your last hole. Note that if you were stitching all the way around a project, your last stitch would share the same hole as the first stitch you made.

25. Pull the stitches taut.

26. To secure the stitching when finishing off, you now will backtrack and make another stitch in the previous hole. You will still be following the same sequence of stitching—front to back and then back to front.

27. Because there is already a stitch in this hole, it is a bit tricky to ensure that you do not split any thread with your needle.

28. Use the end of the stitching awl handle to help push the needle through the hole.

29. Pull the stitches taut.

30. Backtrack one hole again by inserting your needle from front to back in the second hole from the end.

31. Insert the other needle from back to front, being careful to not split the other thread.

32. Use the end of the stitching awl hilt if needed to push the needle through the hole.

33. Pull the stitches taut.

34. Cut the thread by placing a craft knife blade flat against the leather and pulling the thread back and forth over the blade. This works better than sliding the knife blade back and forth over the thread.

35. Using this method of cutting the thread produces a clean cut that’s close to the stitching.

36. Cut the thread on the other side using the same method.

37. The final step is to set the stitches. You will use the overstitch wheel to compress the finished stitches down into the groove. This not only makes the stitching line look better, it helps the stitches last longer because they rest below the surface of the leather.

38. Wet the entire grain side of the leather with clean water and a clean sponge.

39. Place one of the points of the overstitch wheel into the first hole and, with moderate pressure, push the stitches down evenly into the groove.

40. Repeat the process on the other side.
Splicing Stitching Thread

1. Follow these steps when you run out of stitching thread in the middle of a project. Use your craft knife or razor blade to cut both lengths of thread you’ve been stitching, leaving about 2 inches.

2. Thread two needles onto one length of thread, as before. Insert one needle into the hole two stitches back from where you left off.

3. If necessary, use the end of the stitching awl hilt to push the needle through.

4. Use pliers if necessary to pull the needle through from the flesh side.

5. Pull the thread through until half of the thread is on either side.

6. Insert your needle in the next hole from the grain side to the flesh side and pull the thread through.

7. Place the other needle in the same hole from flesh side to grain side and pull the thread through.

8. Pull both threads until they are drawn tight against the leather.


9. Continue stitching in the same manner, this time going into the hole that contains the tails from the previous thread. Pull both threads tight against the leather.


10. Make several more stitches beyond the hole that contains the tails from the previous thread.


11. Use your craft knife to cut the tail close to the stitching.

12. Cut the tail from the grain side in the same manner. Continue stitching using your rethreaded needles.
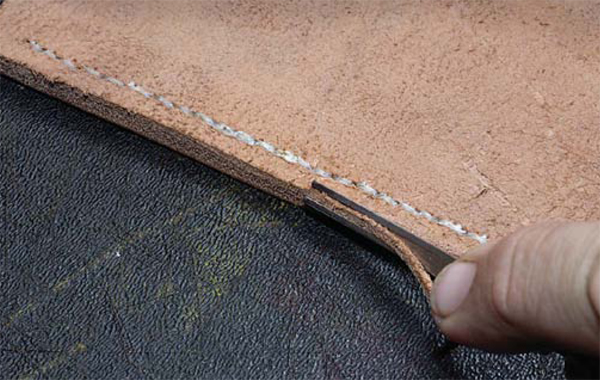
Beveling Edges
Raw leather edges that will remain exposed in the final project should be finished for a high-quality appearance. You can start anywhere to bevel, on either the flesh side or the grain side. And beveling can be done on moist or dry leather.

1. Hold the beveler at a 30-degree angle throughout the process.
2. Push the tool away from you using long strokes and a medium amount of downward pressure.

3. Don’t be concerned if the leather comes off in short lengths. With practice, you will be able to take off the leather edge in long strips.

4. Bevel the grain side of the project in the same manner, using long strokes and holding the tool at a 30-degree angle.

5. You’ll probably notice that the grain side is easier to bevel.

6. The rough texture of the bevel will be eliminated when the edge is finished.
Edge Dressing
A nicely finished project edge is the mark of a good craftsperson. The process is easy but does require some elbow grease.

1. Use a wool dauber or good-quality cotton swab to apply a liberal amount of Edge Kote along the entire edge of your project (black is used here).

2. Be extremely careful not to get the dye on the finished side of your project. Should this happen, wipe it off immediately.


3. Let the Edge Kote dry for at least two hours. Then use a small chunk of edge wax to rub an even coat along the entire edge. For belts, this will help the belt go through the loops and add a professional appearance to your project. Straight beeswax could also be used.

4. Use the flat side of a bone tool or Craftool 3-in-1 tool to burnish the top and bottom edges of the bevel to make them smooth and round.

5. Use lots of pressure to compress the fibers of the leather. Wipe off the tool as needed.


6. Rub a wad of ballistic nylon rapidly over the edge in 2- to 3-inch sections. The purpose of this step is to melt the wax and even out the finish. You should feel the leather heat up and see and feel the edge become smooth. Finish by applying Edge Kote over the wax.

7. Applying gum tragacanth to the flesh side will add years to the life of your project. Moisture is leather’s biggest enemy, and this finish will add a protective barrier, which is especially important for items used outdoors and for belts, which are exposed to perspiration. Note that gum tragacanth should only be used after the piece is dyed, because it acts like a mask and will prevent any further dyeing or staining.


8. Soak a wool dauber with a generous amount of gum tragacanth and apply to the flesh side evenly.


9. Use the back side of the Craftool 3-in-1 tool or a bone folder to push the liquid into the pores of the leather. Do so by moving the tool in a circular motion while using firm, even pressure. Keep burnishing until the liquid is absorbed and the flesh side has a smooth, shiny finish.

10. The flesh side of this belt is now waterproof and will resist moisture.
Lacing Leather
Before you lace your first project, you may want to practice on a small square first. How much lacing you’ll need depends on several things: how tight you pull your stitches, what kind of lace you are using, and how thick your project is. You’ll need to lace a few projects and see how much you need of a particular lace to complete a project. It’s best to use a length of lacing you can manage so it won’t get twisted as you stitch. Procedures to add additional lace are provided on pages 102 and 104.

1. Always work from the front of your project. This test square includes round and square corners, which are laced differently. (The square shown here is composed of two leather pieces cemented together and edge dressed.)

2. The leather should be edge dressed prior to lacing.

3. Start by setting your wing dividers to ¼-inch spacing.


4. Run the wing dividers around the round edge of the dry leather to make a faint line. Follow the curve as you round the corner.

5. When you come to the square corner, follow the edge to make a 90- degree scribe line.

6. All punching should be done on your rubber mat or Poundo board. Begin in the square corner. With your single slot punch, make an impression by pushing the tool into the leather with the edges of the punch meeting the left and right guidelines at a 45-degree angle.

7. Use a single-tong slot punch as a spacer. Place a multiprong punch so it touches that tool and make an impression in the leather along the scribe line.
8. Place the end tongs of the multiprong tool in the last two impressions to line it up then make another set of impressions along the scribe line.

9. When you near the corner, you might have to center the last couple of impressions by eye. Make an angle impression as before in the corner using your single-prong tool. Continue making impressions along the entire perimeter of the piece.

10. Before punching, wipe both sides of the multiprong tool on a piece of ordinary bar soap to lubricate the tongs so they will penetrate the leather cleanly and smoothly.

11. Place the punch on the impressions on the straight line impressions. (The corner slots will be made last.) Strike the punch hard a couple of times with a mallet.

12. The punch should go all the way through the leather.

13. Reset the punch so the first two prongs are placed in the last two existing holes to line up the punch.

14. Be sure to align the tool on the scribe lines. Punch again.

15. If the tool starts to stick, resoap the tines.


16. Punch all slots on all sides, except for the corner slots. As you approach the rounded corner, don’t punch the next-to-last hole, either. This will allow you to adjust the last slot if need be to maintain even spacing.

17. Space the two slots for the round corner by eye so they appear to be evenly spaced, making a light impression in the leather. Punch holes only after you are happy with the spacing.

18. Once all of the straight-edge slots are cut, make the corner cut, with the edges of the tool touching each of the scribe lines at a 45-degree angle.
The Lacing Process

1. Measure out about 3 feet of lacing and cut with a razor blade or scissors.


2. Straighten the lace by placing your finger on it with the grain down. Pull the end through and down over a table or rubber mat edge.

3. Prepare the lace tip by skiving the flesh side edge with a razor blade about ½ inch from the end.

4. Your goal is to skive the tip to a feather edge.

5. Use your razor blade to nick off each side of the tip to create a V shape.

6. This is how your lace end should look.

7. Hold the needle with the prongs facing upward.

8. With the grain of the lace facing upward, insert the Vshaped end into the needle as far as it will go.

9. Use pliers to gently squeeze the needle closed over the lace.

10. Use a razor blade to slice off any lace that protrudes from the edges of the needle.

11. You’re now ready to begin lacing.

12. Push the lacing awl through each hole only until it opens up. Be sure to keep the awl blade oriented the same way and always push from the front to the back.

13. With the grain side of the lace facing down, go through the first hole.

14. Pull the lace through, leaving a 2-inch tail.

15. Keep the lace to the right of the tail.


16. Hold the tail and wrap the lace around it clockwise.

17. While still holding the tail firmly, insert the needle in the next hole to the right, exactly as before.

18. Pull the stitch tight.

19. This is how your lacing should look.

20. Insert the needle underneath the stitch you just made.

21. Pull the lace through.

22. Gently tighten the lace.

23. Insert the needle into the third hole and pull through.

24. Go back under the last stitch you just made, as you did in step 20.

25. Insert the needle into the fourth hole and pull the lace through until it is taut.

26. Again, place the needle underneath this stitch and pull the lace through until it is taut.

27. If you get the hang of this stitching sequence, you can speed up the process by placing the needle underneath the lace before pulling it taut. This photo and the previous one show the same spot in the process. Notice that the needle is going through the stitch in the same place.
LACING A SQUARE CORNER

1. Use the awl to make the corner hole larger. To lace a square corner, you will use the exact same stitch, except you will be going through the same hole three times.

2. Place the needle in the angled corner slot and pull taut.

3. Place the needle underneath the loop you just made and pull through until taut.

4. Place the needle through the same corner hole a second time.

5. Pull the lace through and pull until it is taut inserting the needle underneath the stitch as before.

6. This is how your lacing should look.

7. Use the awl to make the corner hole larger.

8. Place your needle through the same corner hole a third time and make another stitch just as you did in step 5.

9. Use your awl to make the next few holes larger, if necessary.

10. Now you can move on by placing your needle in the next straight slot. Make the stitch as before, inserting the needle underneath the stitch you just made.

11. Continue stitching, using your awl to make the holes larger as necessary.

12. This is how your lacing should look.


13. When you want to add more lace, use your awl to separate the two layers of leather.

14. Insert your needle through the hole, but go only through the front layer of leather, coming up between the layers.

15. Pull the lace taut.


16. With your razor, cut all but 1/4 inch off the remaining lace. Feather the tip to reduce the thickness of the tail.

17. Push this ¼-inch end between the two layers using your awl.

18. Insert the new threaded needle between the layers from front to back.

19. Push the tail of this end between the layers with your awl.

20. Continue the sequence of stitching with the second threaded needle by placing your needle underneath the last stitch you made (from the first threaded needle).

21. Insert your needle in the next hole from front to back. Be sure the two tails are below the needle. Pull the lace taut.

22. Continue by placing the needle underneath the last stitch you made.
Adding Lace to an Unlined Project
If you need additional lace but you don’t have two layers to hide the tails, you need to make a “wet splice.”

1. Use a razor blade to skive the end off the flesh side of the lace that is attached to the project. Skive to produce a feather edge.

2. Cut the top straight.

3. Skive to a feather edge the end of the grain side of the lace you are attaching.

4. You should have two skived ends: one on the flesh side and one on the grain side.

5. Place Leather Weld on one end as shown, completely covering the skived area.

6. Line up the two ends—grain side to flesh side—and press together.

7. Hold the splice for several minutes to allow the glue to set. Let dry about 20 minutes before proceeding.
LACING ROUNDED CORNERS

1. To lace a rounded corner, you go through the corner hole multiple times, just like with a square corner—but this time you will make only two stitches in the hole. Use your awl to open up the corner hole.

2. Place your needle through the corner hole and draw the lace through until it is taut.

3. Insert your needle underneath the stitch you just made and pull taut.

4. Place your needle through the corner hole again and pull through until the lace is taut.

5. Again, place your needle underneath the previous stitch and pull until taut.

6. Use your awl to open up the hole next to the corner hole and continue with the standard stitch sequence.
Finishing Off

1. Proceed until all holes have been laced.

2. Use your awl to split the leather to make room for the lacing ends.


3. Next, you need to pull the tail from the first lacing stitch you made through the loop without disturbing the loop. To do so, insert the pointed end of your spoon tool into the loop. If this loop untwists, you’ll need to pull the lace from the loop of the next stitch and try again.

4. Hold the spoon tool that’s holding the loop and your project with one hand. With the other, use the awl to pull the tail through the loop and let it hang.

5. Carefully remove the spoon tool from the loop. Insert your needle into this loop from the top.

6. Pull the needle and lace through the loop. Leave a small loop instead of tightening the lace down.

7. Put the needle through the slot left empty by the tail.

8. Pull the lace that’s connected to the needle until the loop closes securely.

9. Note how this loop falls between the tail and the lace connected to the needle.

10. Insert the needle through this loop.


11. Note that the tail and the lace still connected to the needle are next to each another. At this point, you want to use your fingers to manipulate the stitches until they lie flat and are evenly spaced. You may need to use your awl to loosen and tighten various stitches until they lie flat.


12. Once you are satisfied with the stitch placement, hold the two strips of lace taut. Place your craft knife or razor blade against the stitches, close to the other stitching, and cut the tails off.

13. This is how the final lacing looks.

14. Roll your mallet handle back and forth across the lace to burnish and flatten it. Don’t press too hard or you will damage the lace.
CORRECTING TWISTED STITCHES

1. You must always keep your needle oriented with the grain side down to help prevent the lace from twisting. If you notice you have made a twisted stitch, take out all of the stitches after the point where the lace is twisted.

2. To take out stitches, loosen the stitches so there is room to work. Use your awl to enlarge the hole so that the lace may be removed without breaking or stretching it.

3. After enlarging the hole, place your needle through from back to front. When you reach the twisted stitch, take it out, untwist your lace, and continue.
Applying a Finishing Product
Although Leather Balm with Atom Wax will not waterproof your project, it will add a measure of protection and give the leather a nice soft sheen. (If you do want to make your project moisture-resistant, you can use an acrylic coating, such as Super Sheen.)

1. Don’t shake Leather Balm prior to applying, to avoid creating unwanted air bubbles. Place a generous amount on a clean, lint-free cloth.

2. Gently apply the wax to the entire grain side of the project, including any areas that are folded under. Don’t press too hard.

3. Wait about 15 minutes then buff using a clean side of the applicator cloth.
Cleaning and Conditioning
Before you apply any product to your leather, you should test it on a scrap piece of leather dyed or painted with the same products already on your project. If that’s not possible, test on an inconspicuous portion of your project. Some products may pull the dye out, leaving an unsightly mess.
To clean leather: Start by using a soft brush to remove loose dirt then wipe with a soft cloth. If you need more cleaning power, use a mild product that does not strip the natural oils out of the leather. Be wary of multifunction products, such as those that claim to clean and protect. These may leave a greasy film behind that will clog pores and could lead to bacteria formation. Over time, bacteria will eat away at the leather and break down the stitching. A final tip: Never use saddle soap on anything other than a saddle; it will destroy items made from thinner leather.
To condition leather: When a leather item starts showing signs of stiffness, it is time to condition. A good conditioner is usually a lanolin-based product that will replace natural oils and fats. Those that contain petroleum or mineral oils can damage leather over time. Apply the conditioner as directed on the product label.
To treat water spots: Moisture is leather’s biggest enemy. If water spots are treated while they are still wet, there’s a chance you can disguise them by wetting the entire piece as in the tooling process and placing it away from direct heat to dry.

Mildew is more difficult to correct. The mildew damage shown here is most likely too severe to fix, although it may be possible to mask the problem by coloring the piece with an oil-based black dye.