4
The Whole Fire
Coals, Flames, and Smoke
No matter how experienced you are in the kitchen, when cooking with wood, your most important job is to manage that fire. This is true whether you’re maintaining a blaze in the firebox of an offset cooker or sustaining a coal bed on a grill to get just a flicker of smoke as you quickly cook some steaks. It takes a long time to get comfortable cooking with fire. Of course, cooking outdoors is appealing, except when it isn’t—cold nights, hot nights, wet nights, late nights, snowy nights. But to gain meaningful experience, you have to do it regularly for a long time, as I did when we had our barbecue trailer and the restaurant. This means you will often be covered in grime and smell like smoke.
In a way, to cook with fire is to tend to its needs, to serve its interests so it will serve yours. After a while, live-fire cooking can get exhausting—even just a week or three, like when testing the recipes for this book. If you think about it, what makes modern cooking modern is the fact that you no longer have the burden of tightly managing your heat source. This has been true in every leap of cooking innovation, from the gas range to the electric stove to the microwave to sous vide. The evolution of cooking is about eliminating guesswork and removing some of the requirements of experience, feel, and intuition.
I’ve certainly made my share of mistakes in tending fires. I’ve used the wrong kind of wood, not enough of it, and too much of it. I’ve turned my back at the wrong time or missed the window when the coals are at their peak. There’s always something to learn from these simple and universal errors.
This chapter is all about what I’ve learned from many years of staring into fires. I talk about essential tools, the stages of a fire, and the concept of using the whole fire: cooking different ingredients over the entire duration of a fire (from ignition to ash) to create a meal. Getting the most out of a fire (your principal ingredient) is not only efficient but also the greatest honor you can pay it.
I talk about lighting and maintaining the different kinds of fire you need for the various types of fire-related cooking in this book. The variability of fire makes recipes a little difficult to write, as your food may take more or less time to cook depending on the heat you generate.
And finally, I talk about smoke—how to attract it, collect it, and ultimately get the most out of it. Since it is the most important seasoning and a cooking method, taking smoke seriously is a hugely important aspect of the job.

The Stages of Fire
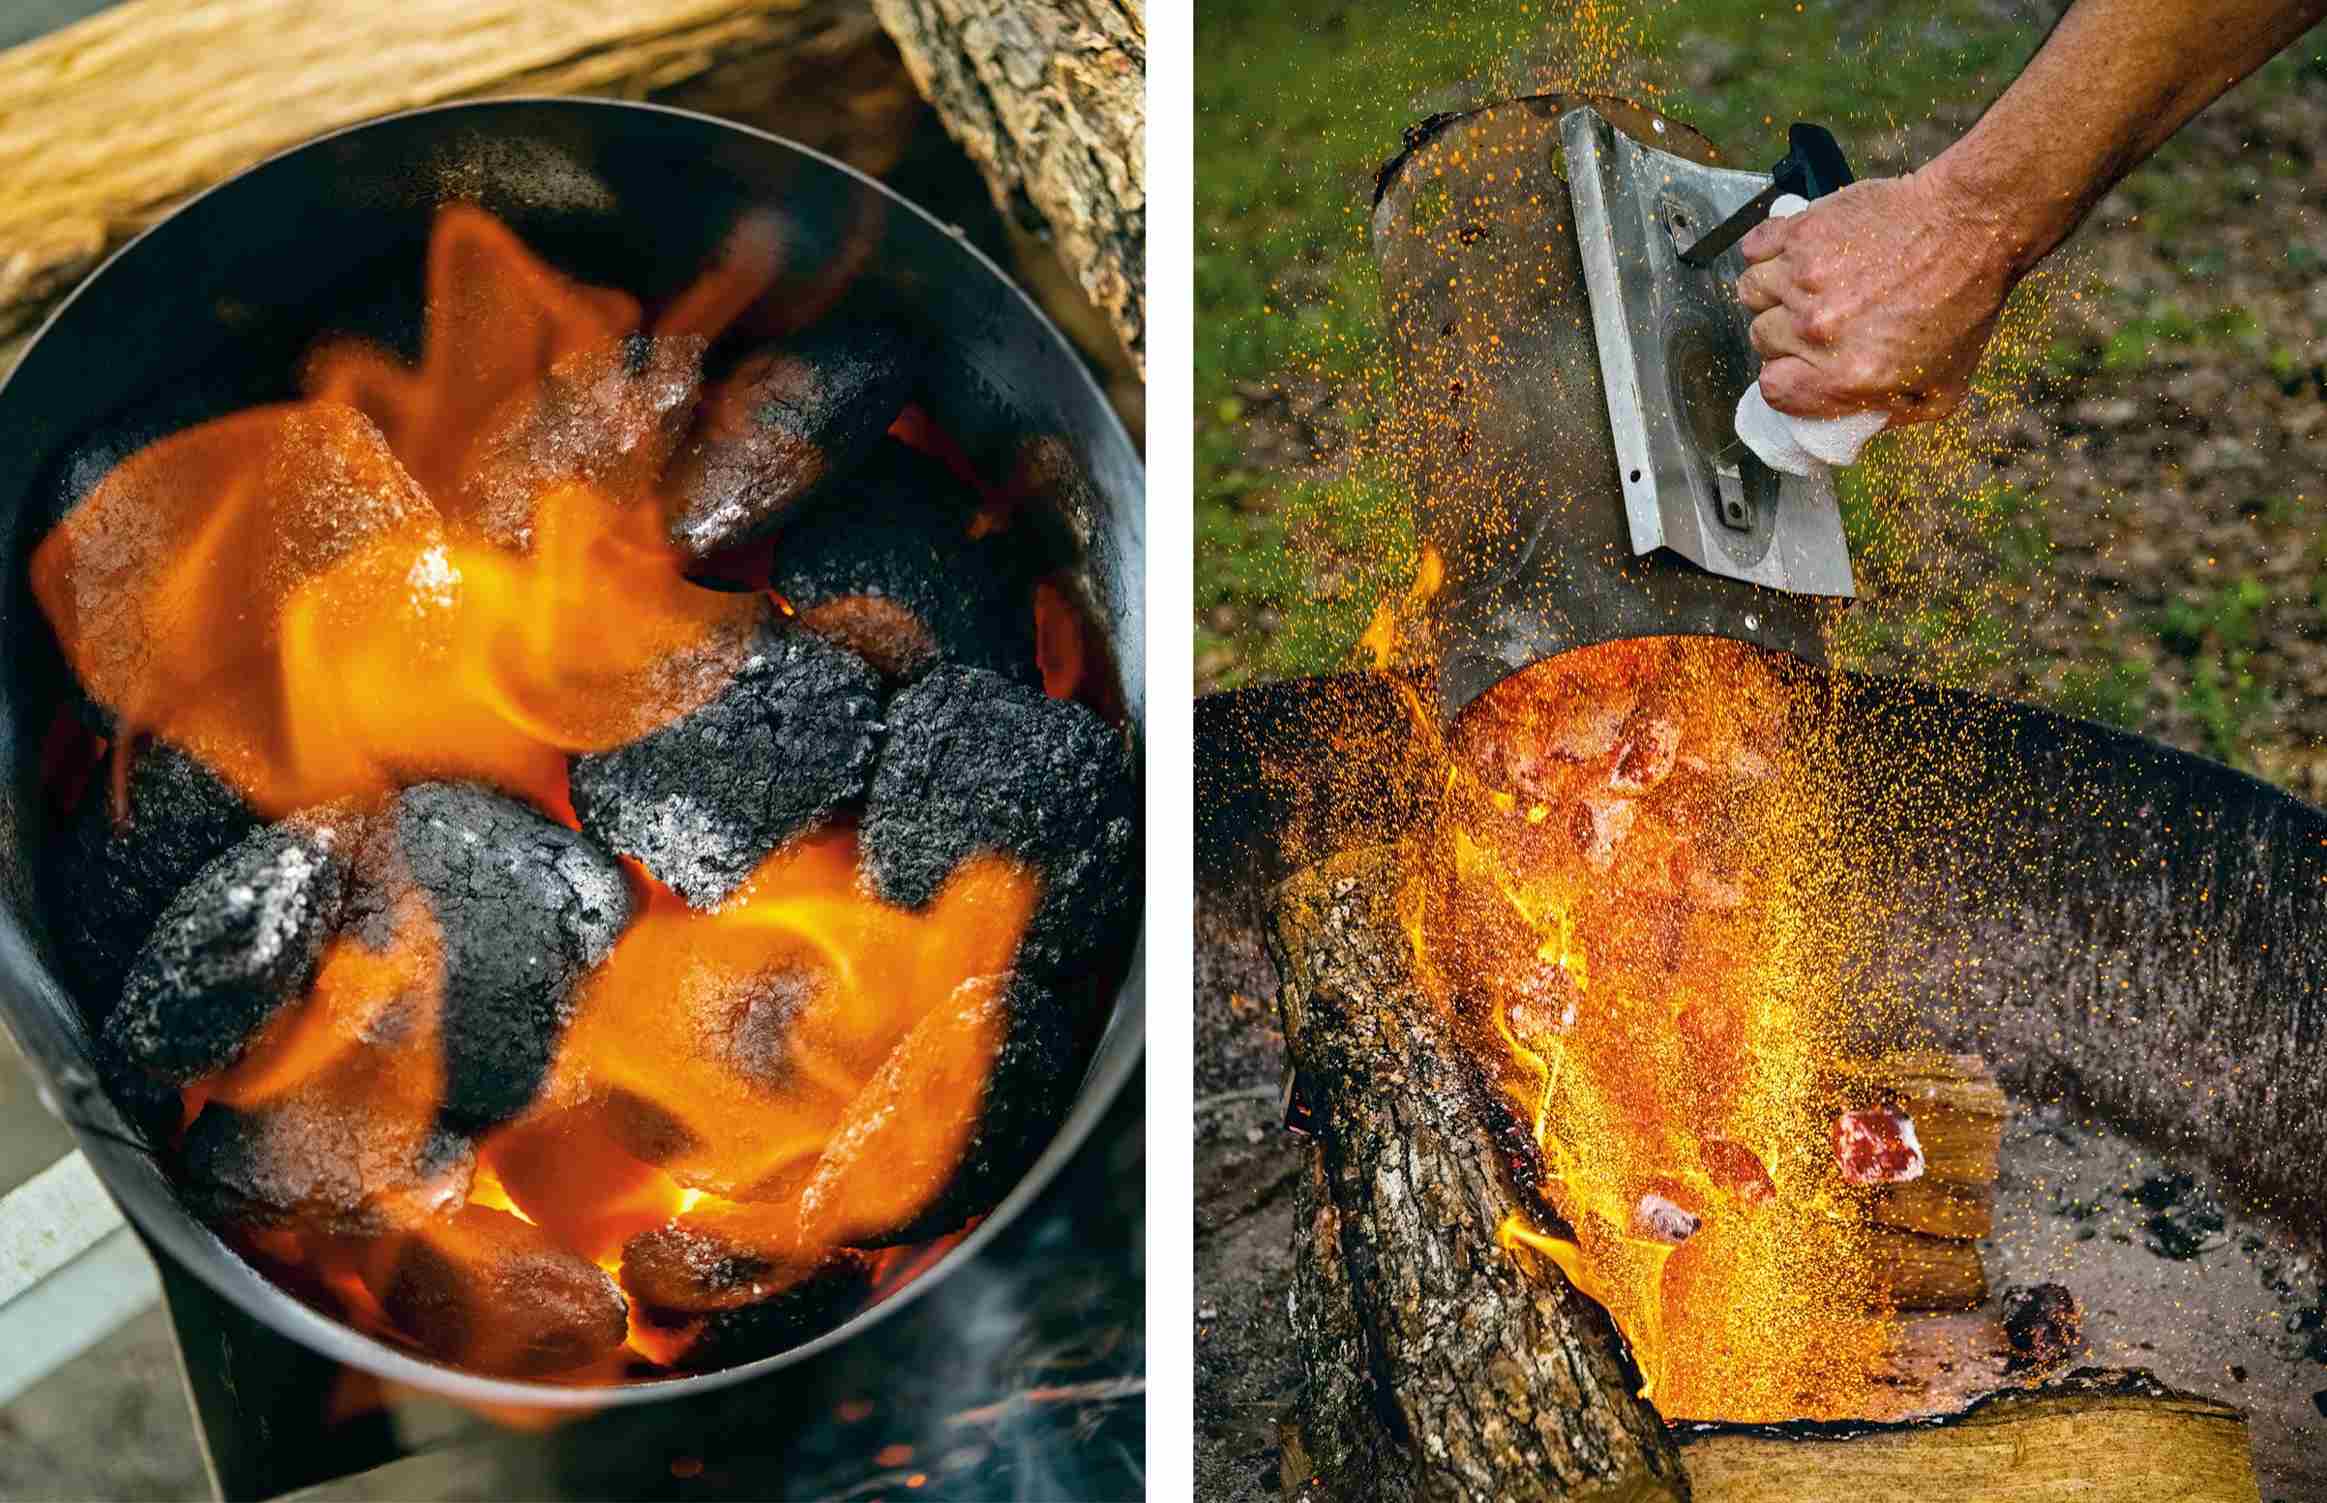
From the second a fire is lit to the moment it has truly gone out, you can chart its progression through separate but connected stages. Officially, the four stages of fire are ignition, growth, fully developed, and decay. (Too bad they couldn’t find a single word for “fully developed”; it would sound a lot better.) But for the purposes of cooking, I look a little more granularly at fire, adding a couple more stages and using some slightly different terminology. My six stages of fire are ignition, white smoke, flame, coals, embers, and ash.
Understanding the stages of fire is important to cooking with the whole fire. Each embodies a unique dynamic of heat, flame, and smoke that can help you achieve nuanced and distinctive results in your cooking. In a fully blazing fire, all the stages are happening at the same time, which amounts to a chain reaction. (For this reason, some people consider the reaction itself to be another side of the fire triangle—fuel, heat, oxygen—and now call it the fire tetrahedron.) This chemical chain reaction occurs when each element acts on and enables the others, continuing the series of reactions without any additional external inputs. So, for instance, in a charcoal chimney, the heat generated by the burning of fuel contributes to the ignition of new fuel, or the departure of volatile gases draws in the oxygen to feed the fire.
Ignition This is when the fire is just getting going. Or when, say, you’ve just lit the newspaper in a chimney to get the charcoal going. Be sure you have ample tinder with plenty of oxygen around it that is easily accessed by your spark.
White smoke This stage, characterized by dehydration, begins after the wood or charcoal is ignited and heating but before it’s fully burning. You’ll recognize it by the billowing white smoke and steam—a mixture of water vapor, carbon dioxide, and volatile compounds. The water in the wood is literally boiling off, often leading to intense popping and the violent ejection of particles and sparks. As moisture dissipates, the fuel continues to warm.

Flame Eventually, fire breaks out. You will see active and vigorous flames emanating from the wood. You may also have an intuitive sense of when the fire is thriving: there’s a sound, a rhythm, a quickening to the noises it makes. It has a life of its own as it increases in heat, builds momentum. The smell of clean, sweet smoke starts to surround the fire. An aura of heat beckons us in (but not too close!). Make sure the fire has plenty of available fuel at this time because it’s also stabilizing itself, producing the foundation of heat it needs to continue the chain reaction. The smoke, you’ll notice, will no longer billow gray and white; it becomes more transparent, maybe with a light gray to blue tint. This is the ideal time for indirect cooking. You can cook over the flames also, but not too closely or intensely. Without focused attention, it’s far too easy to burn things at this stage unless the distance is such that the tips of the flames only occasionally lick the food.
Coals For those who are cooking or even just seeking warmth, this is the sweet part of the fire, its lifeblood. The wood has lost its water and burned down into its constituent elements, which are slowly being disassembled by the heat and chemical reactions of the fire. These constituent parts, made of the carbon and hydrocarbons (lignin, hemicellulose, and cellulose) at the heart of wood, glow and radiate intense heat, but the volatile gases that create flames have for the most part burned off. This is the coal bed.
At this point, many chefs will rake off some coals to cook over, while leaving the rest as the heat source onto which they’ll periodically throw fresh logs to keep it going. The consistent, dry, and intense flameless heat from the coals enables searing, caramelization, and smoking.
Embers If you don’t refuel the fire, the coals will eventually begin to peter out. They’ll develop a thin coating of ash and some white smoke may return. The ash slows the passive intrusion of oxygen, further dampening the fire. If you want to revive it, add some light fuel, blow to clear off the ash, and fan the flames or continue to blow. This environment offers some nice opportunities for gentle cooking.
Ash The fire is dead. No amount of oxygen or fuel will rekindle it without significant heat. Funny enough, this stage is harder to achieve than you might think, which is why forest fires get started when campers think they’ve extinguished their campfire. (To be clear, when this happens, the campfire was in the embers stage when it should have been cinders/ash.) Once you’ve combed through the ashes and cinders and found no pockets of residual heat, feel free to rake up the remains and deposit them in your ash bucket. Larger chunks can be reused in your next fire. Just add them after the fire is going or relight in the chimney.

Cooking with the Whole Fire
There’s no reason to waste a good fire. Making fires at home is not something most of us do every day, so it’s good to make the most of it when you have it. That’s why I love using the whole fire when I cook, that is, from the earliest, spiking moments past ignition and white smoke all the way to the slow, smoldering coals.
What might this look like?
Before you dump the coals, blister vegetables over a red-hot chimney, which focuses and concentrates the heat.
Put a wok over the chimney and stir-fry on it!
Then, if you’re still on charcoal, grill.
Or close the lid of your cooker and roast or smoke something (say, a chicken) with a two-zone setup.
Add wood to a firepit and cook over it directly. Cook steaks or chops quickly over the flames while cooking a large roast off the coals.
Finally, slow roast vegetables, like onions, squashes, or eggplants, in the coals and embers.
Consider the whole, malleable life of a fire when planning a meal. Even if you’re not camping or out in the woods, think like you are. How would you prepare a meal if the fire was your only heat source? How would you efficiently combine searing, blackening, roasting, smoking, and grilling to get the most out of one blaze?
By the way, meals in which every single item comes off the fire can be rather intense. After all, smoke is an incredibly powerful flavor. So keep each meal balanced and remember that you can grill or smoke ingredients not only for the next meal but also for meals later in the week.
Essential Fire Tools
You don’t need a lot of equipment to handle a fire, but in the interests of safety, cleanliness, and workflow, these are the tools I keep on hand.
Ash bucket Cleaning out ash is the unfortunate penance we all pay for the joys of outdoor cooking. Having a dedicated receptacle makes the job much easier. A simple galvanized bucket or can is easy to find at a hardware store. Ash is very heavy and dense, so look for one that’s big enough to suit your cooker or firepit but not so big that you can’t lift it. Also, make sure the bucket has a lid to keep the rain out so the bottom doesn’t rust out. Let fresh ash sit in the bucket for at least a number of days before disposing, as you never know what’s still smoldering. Down here in Texas, it’s so hot that it may take more than a week for all of the coals to die out—and you don’t want to start a dumpster fire.
Chimney If you don’t already use a chimney to light your charcoal, I don’t know what to say. It’s the easiest, cleanest, and most efficient way to start a cook. If you’re going for a real outdoor-kitchen setup with a smoker, a grill, and even a firepit or side fire, I suggest that you invest in two chimneys because sometimes you need to get a second one started while the first one is already going. (Tip: To start a second chimney, put it right on top of the lit grill or even the first lit chimney.) Also, I recommend buying large chimneys. You’ll find a number of smaller chimneys on hardware store shelves, but nothing’s more annoying than not being able to spark up as much charcoal as you need. And if you need less than a large one holds, just fill it up halfway! Weber still makes the standard go-to chimney. It can get beat up pretty fast and doesn’t always last more than a year, but it works well enough.

Closed-toe shoes You’ll never see me in a pair of flip-flops or sandals around a fire, even in the summer, even if I’m playing the lead in a staging of Julius Caesar. (Won’t catch me in a toga either!) I know plenty of people who exclusively sport sandals when the weather heats up. But hear me, friends, you want to wear closed-toe shoes during a cook. Ever try dumping a chimney full of hot coals with bare feet? Don’t do it. Be safe and injury-free. Let’s keep those toesies unburned!
Firebricks These heavy fireproof bricks are useful to have around and can be deployed and redeployed depending on your needs. Put them on top of your grill grates and rest another grilling surface on top of the bricks to crudely mimic the action of a Santa Maria grill (see this page). Stack them like LEGOs to build a makeshift konro grill for searing yakitori skewers. Lay them flat as a platform on which to set your charcoal chimney after dumping. So many uses! The only downside is their weight.
Fire tongs This is my preferred tool for finely manipulating logs in a firepit or firebox. I use extra long ones to reach into fireboxes and firepits from a safe distance. I often shift and rearrange the structure of my fires, and tongs are never far from my hand.
Hose with a sprayer Hey, summer is hot and dry and only getting hotter and drier in many places. So I always keep a hose with a powerful nozzle nearby and set to on, just in case I need to hose something down quickly or to spritz the ground around my cooker before I go night-night.
Shovel A good old-fashioned shovel has been my number-one tool for as long as I’ve been cooking barbecue. Its uses are almost countless, but you’ll mainly want one for manipulating and shaping your fire in the firebox. For a large, professional cooker like we use at the restaurant, any heavy-duty shovel will do. For a firebox the size of the one in the Franklin Pit, I recommend something smaller. You want a forty-eight-inch-long handle so you can reach all the way to the back of the firebox without having to stick your hands too close to the fire. Shovels are also essential for firepit cooking, which involves lots of shifting around of logs and coals. And if you’ve got a side fire going, you’ll want a full-size shovel for transporting a load of coals from it to your cooker.
Trowel I don’t use one, but Jordan swears by this handy mini-shovel, particularly when configuring coals in a PK or kettle grill or even shifting things around in a Big Green Egg. They’re inexpensive and come in different shapes and sizes. He recommends keeping a few around. And when you’re not using them for cooking, they’re great for repotting petunias.


Building Fire
I used to be kind of orthodox about only lighting a fire with wood and a little piece of butcher paper dabbed with brisket fat or cooking oil. But I have to admit that, in my old age, I’ve softened a bit. Nowadays, I might start by lighting a few charcoal briquettes and letting them start the wood. And there’s no getting around the fact that there are all kinds of idiot-proof thingamajigs available to help, like those little hockey pucks you light with a match that keep burning until your charcoal or kindling gets going. (Even I use those things when they’re around, so yeah, definitely idiot-proof.)
However, I still use the log-cabin method to stack my logs in a square on top of one another, two or three logs high, depending on the size of the fire I’m building. (Two heavy logs on the bottom, lighter ones in the middle, and a heavy one on top; so, when the middle logs collapse, the heavy one drops in.) If I’m making a fire inside the small firebox of the Franklin Pit, I’ll stack up about six mini-logs and drop in some hot charcoal. If I’m building a bigger fire in the firepit, I’ll make the same structure but use full-size logs.
To create fire you need three things: fuel, heat, and oxygen. That’s called the “fire triangle” because you can’t have a fire without all three elements. The log cabin is an elegant and simple structure that ensures each of the three elements is present. The wood is obviously the fuel. In the middle of the log cabin’s square, you place a little extra fuel—some kindling and tinder in the form of newspaper, wood shavings, or charcoal. The loose openings between the stacked logs allow oxygen to easily access the tinder and continue to supply the growing reaction.
Many people confuse fire for heat but, the fact is, fire is an ongoing chemical reaction whose effects we perceive as light and heat. If you want to put out a fire, remove one of the three elements (hence the lid on the ash can). Heat is introduced at the beginning in the form of a match, a lighter, or one of those thingamajigs, which is placed in the middle next to the tinder. (In the firepit, I often just light some charcoal in a chimney and either dump it into the middle of the log cabin or build the log cabin around my chimney and remove the chimney once the logs catch.) That should do the trick. Just wait a while and you’ll have fire.
The triangle is important because if you’re having trouble keeping your fire going, you know how to diagnose the problem. Are you lacking fuel, oxygen, or heat? The latter is the one element that many people have trouble with yet don’t realize. If you overload your fire with fuel but don’t have enough heat to cause the chemical reaction, you won’t have fire. Also, remember that a log of firewood on its own isn’t solely fuel. If it’s green (carrying a lot of water), it contains a ton of anti-fuel, which makes it hard to generate enough heat. The temperature of your fuel has an impact too. Really cold wood takes longer to light (and removes energy from an already-lit fire). While I don’t generally feel the need to pre-warm logs inside the firebox, in cold weather I will occasionally place a piece or two of wood on top of the firebox or on the perimeter of the firepit—especially if they’re somewhat green—just so they are rarin’ and ready to go when I throw them on.
Controlling Fire
You want to be the boss of your fire, not the other way around. Being in total control is a major requirement for successful cooking. It’s very easy to let a fire get away from you in one way or another and end up cooking over insufficient heat or too much heat or with bad smoke. If this doesn’t ruin your expensive ingredients, it will at least make them far less delicious than they should be and can be super-frustrating.
Luckily, you can control fire with surprising accuracy if you carefully consider what you’re doing and plan ahead. That is, many of the adjustments you can make to a fire don’t have instant results—they may take some time to develop. To stay on top of your game, you need to think a couple of moves ahead. What does this look like? Your approach isn’t too different whether you’re tending an offset cooker, a kamado, a live fire in a firepit, or coals in a grill.
If you need to lower the temperature in an offset cooker, close the firebox door a smidge (but never too much) to restrict airflow. Use your shovel to slide the coal bed back toward the firebox door, where it will leak some heat out the back side; this makes the heat less aggressive. If you need to raise the temperature quickly, push the coal bed forward toward the cook chamber or add a quick-burning piece of well-seasoned wood. If you need to bring the heat up over twenty minutes or so, add a larger piece of denser wood that will take a little while to get going but anchor the fire for another half hour or so.
Lowering the temperature in a Big Green Egg or kamado grill is one of the challenges of these cookers. But you can always close the vents a bit to minimize oxygen intake or open the lid periodically to let excess heat out until the whole thing dies down.
When tending an open fire in a firepit, the shovel is always your friend. I constantly shift logs and coals around depending on the needs of what I’m cooking. Pay attention to the direction of the breeze and expose your fire to it if you want a burst of heat. Conversely, shield the fire against the sides of the firepit if you want less flame. Throw on heavy wood to dampen a fire for a while (and have a place to move it off if you don’t want a deluge of flame and heat).
To drop the intensity of the radiant heat on a grill, use tongs or a trowel to spread out the coals.
You got this—after all, you’re just one more person following along after thirty-eight thousand years of people cooking over flames. Fire may seem intimidating, but if you have the right tools and ample space, you will be the one in control.
Side Fires and Burn Barrels
One thing that you always need on a cook is a backup supply of fresh coals. That could be in the form of a chimney full of charcoal, lit and ready to go. But in the event you want to cook over only wood coals—my favorite way, but not always the most practical—you need a second supply of wood that’s ready to go. One of the advantages of firepit cooking—especially if your firepit is big enough—is that you can always separate fresh coals from the larger fire and cook over them directly. But if you’re cooking on a PK or kettle grill and you want fresh wood coals, the answer is a side fire.
One good reason to keep an old grill or firepit around, even if you don’t use it much, is as a place to burn down a couple of logs so you’re fully stocked with fresh wood coals as you need them. Then you can just shovel or bucket them over to your grill in the exact quantity needed for what you’re cooking. Also, in cooler weather, it’s a nice way to keep yourself warm!
Another alternative is what is commonly used in whole hog cooking: the burn barrel. This contraption is usually made from an old steel drum and a few pieces of rebar that have been driven through a foot or so above the bottom of the drum to create a matrix whose openings are not quite large enough to let a log fall through. A good-size opening—big enough to get a shovel in—is cut in the bottom of the barrel. After igniting a bunch of logs in the barrel, the fire quickly burns the wood and drops the coals down onto the ground (firebricks or another inflammable surface). These can then be shoveled off and used. Keep adding wood as needed. In fact, this is a good place to use fairly green wood, as these barrels create a serious inferno (keep them away from anything burnable). It’s the exact same principle often seen with wood grills at restaurants, where logs are stacked in a cage at the rear of the grill. The bottom logs on fire slowly drop their coals down to the surface, and the grill chef rakes them into use.
Tips for Successful Fire Cooks
These tips will help you manage your fire effortlessly so you can keep your attention focused on what you’re cooking.
Set yourself up for success.
French chefs call it mise en place, roughly, “everything in its place.” What it means, basically, is to be physically prepared. Have all of your tools ready and within easy reach. Think through your systems. Do you have a handy place to dump waste? If you need water, do you have access to it? How many different knives will you need and are they all within easy reach? With fire cooking, this means having all the firewood you need at the ready. It means having tongs, spray bottles, sheet pans, and towels at hand for when you need them.
Preheat, preheat.
Cooking on an apparatus that’s not fully at the desired temperature is a surefire way to slow things down or cook poorly. For that reason, give your cooker or grill time to heat up, which often means starting earlier than dinnertime. Get your cooker going and allow it not only to reach the right temperature but to hold it for a good ten or fifteen minutes. This prep will make the rest of your cook so much better.
Patience pays off.
Along with the principle of preheating, having the patience to let your fire get to the proper stage is key. How many times have you dumped your chimney of charcoal too soon? You put your food on the grill and the temperature is waaaay too hot, so your food cooks too quickly and unevenly or flares up and burns. With all forms of fire, patience pays. Give yourself enough time to be sure the coal bed is at the right heat, it’s not spiking too much, and it will last as long as you need it to.
Have backup ready.
Have the additional coals you may need at the ready to keep your fire controlled. Say you’re cooking chicken pieces on the bone, and they’re going to take longer than one chimney of charcoal is going to give you. Well, have a second chimney going for the moment you predict that to happen. I’ve had second chimneys going that I just allowed to burn out because didn’t end up needing the coals. Yes, the charcoal was wasted, but better that than not having enough heat to finish the cook.
Cooking with Smoke
Smoke, the inspiration for this book and one of the foundations of everything I’ve done professionally, is something with which I have a rather complex relationship these days. Perhaps because I’ve been around it almost continuously for many years now, I approach smoke with more apprehension than when I was just a bright-eyed fledgling looking to get that enticing smoky flavor onto brisket. These days, as my knowledge of smoke has grown, my approach has become quite a bit more nuanced, as has my taste for it.
Without question, smoke remains an alluring flavor for many people. However, it’s also important to consider whether you’re using good smoke or bad smoke and enough smoke or too much smoke. While the title of this book may suggest a full-throated endorsement of smoke culture, it’s not that simple. I support a subtle, measured approach to smoke and want to talk about how to get good flavor and in just the right amount. I see smoke as a seasoning, and just as with any seasoning—salt, hot sauce, cilantro (yuck!)—moderation is key.
What Is Smoke?
A remarkable substance, smoke is a staggeringly complex mixture of gases, liquids, and solid particles that can range from visible specks of ash to microscopic molecules. The incomplete combustion of wood results in smoke, and the temperature of the fire dictates which particles are released and at what time. As wood is broken down during combustion, these components interact with ingredients in complex ways.
Research has shown that the visible part of smoke has the least (positive) impact on food. The vaporous or gaseous elements (invisible to the naked eye) are the most influential and desirable. The color of the resulting smoke can actually tell you something about its qualities. The hotter the fire, the smaller the particles. So if the wood went through complete combustion—requiring extraordinarily high temperatures—the by-products would be mostly carbon dioxide and water as well as some ash. Its “smoke” would be clear, as the particulate matter would be invisibly fine.
Poor combustion happens when there’s not enough heat or oxygen and results in a large amount of very heavy particles, like tar and creosote—gross stuff. Those heavy particles absorb light and look sooty—black and gray in a viscerally unappealing way.

Cold Smoking versus Hot Smoking
Primarily a method of food preservation, cold smoking can certainly be practiced at home, but you’ll need both your smoke chamber to be far enough from the heat so the food doesn’t cook and some sort of mechanism or setup that helps the airflow. Some methods of cold smoking suggest using the smoke from a cool or barely smoldering combustion, which, as you know, I think yields an undesirably dirty smoke.
Cold smoking is also tricky. It requires its ingredients to sit from several hours to several days at room temperature or slightly warmer. Furthermore, the low-acid environment of meat and the absence of oxygen create a dangerous breeding ground for bacteria, especially the spores that cause botulism. Because of this, cold-smoked meats are cured with sodium nitrate, which itself needs to be used with care. Long story short, if errors are made in temperature control, precise dosing of salt and preservatives, and other forms of food safety and storage, much can go wrong.
Hot smoking is much easier and requires no special equipment. It’s as forgiving as it is delicious, and as long as you cook your meat to the proper internal temperature, you don’t have to worry about getting sick. Unless you’re really serious about cold smoking from a technical point of view, it’s probably best left to the experts while you fire up your coals for a classic hot smoke.
White smoke is a little better, but smoke that looks faintly blue is the result of just the right amount of incomplete combustion. The fire is hot enough to break down the wood to finer particles that reflect the blue spectrum. This is the smoke that has the best flavor and the most nuanced impact on your food. It is created when your fire is between 600° and 750°F, which is where we aim to keep ours at the restaurant. It is also why I love the offset smoker, which supports the high temperatures that create such fine smoke in a moderate-size cooking space.
Carbonyls, which are released at lower temperatures when the wood compounds of cellulose and hemicellulose are being dismantled, primarily contribute to the browning of meat. At this stage, gasified acetic and formic acids add subtle hints of citric tartness and bitterness. At higher temperatures (around 600°F), lignin starts to break down, releasing phenols into the smoke. The phenols are what carry most of the flavors that we associate with smoke, both good (savory, smoky spice) and bad (medicinal and bitter).
One phenol, syringol, has the textbook flavor of smoke, while guaiacol (also present in oak wine barrels) offers toasty and spice notes, and vanillin imparts creamy sweetness. Phenols also have antimicrobial effects that sanitize meat, allowing it to be preserved for prolonged periods, yet another solid reason why you want to smoke with high combustion and aim for that fine blue smoke.
Attracting Smoke
Once you have your fire burning nice and hot and clean blue smoke is emanating from the stack, the next goal is to get your food in the best possible position to accumulate smoke. Although it seems like smoke gets into everything it touches, it actually just gets onto ingredients. Penetration doesn’t reach very deep into the food, which is a good thing if you don’t want too much smoke. Your taste buds do the work of merging the smoky flavor of the meat’s exterior with the moist, meaty flavor of the interior.
Given that, it’s important to attract plenty of smoke onto the outside of the meat. However, even in the very smoky environment of an offset cooker, smoke doesn’t want to settle on the surface of the meat because of a very thin veneer of static air that surrounds objects. Known as the boundary layer, this is a concept most frequently used in the physics of turbulence (as with airplane wings). In our case, the boundary layer repulses smoke from the meat’s surface.
To attract smoke, you want to keep the meat’s exterior moist. Smoke particles move from warm to cool surfaces, and the constant evaporation that occurs on the surface of moist meat keeps it cooler than the surrounding air (even in the oven-like heat of a smoker), attracting the particles in smoke. Moisture also helps to trap the smoke particles when they do contact the meat. This is one reason why I periodically spray the exterior of the meat during a cook. (But be careful with that spray bottle. Excess wetting can remove smoke! The surface just needs to be a little damp.)
Finally, rubs also help, as the uneven surfaces they create flummox the boundary layer and attract smoke particles.
Delivering Smoke
Given the range of smoke’s characteristics, it’s important to get elements of each into the mix. Luckily, the chain reaction of the fire means that, to some degree, all of the qualities of smoke are available simultaneously: new wood starts to burn as old coals are exhausted. One of the benefits of having a strong fire and coal bed is that the smoky by-products of lower-temperature burning are minimized because newly introduced wood spends a much shorter time in that state before its lignin starts offering up those tasty phenols.
Still, it takes a good long while for smoke to accumulate enough phenols to get that complex, even, and tasteful flavor. Can you have too much smoke? In a word, yes! Every piece of food has its own smoke threshold, meaning the amount of smoke that tastes good on it. Something like a brisket, rich in gelatin and fat, can take a lot of smoke. But a chicken wants far less—just enough to add savory complexity to each bite.
Typically, you get a sense for how much smoke naturally wants to accrue by observing the surface of the meat. As the surface dries, it will stop attracting as much smoke. If you want more smoke, keep spraying and wetting the meat. At some point, however, this becomes a futile proposition, as the pellicle (a thin coating of proteins on the surface of the meat) will evaporate faster than you can keep it wet. By then you can be sure your food is plenty smoky, but I don’t recommend even getting to that stage. Once you’ve reached a desired texture or color, you’ve probably gone far enough.
Throw too much smoke or stale smoke when there’s not much airflow and you’ll have something nasty and bitter. If you have a good temperature but not enough smoke—such as when your heat comes from charcoal but not enough wood—you’ll just end up with roast beef. But when slow and steady wins the day, you’ll have the perfect accretion that is the definition of good smoke.
Repelling Smoke—Avert Your Eyes!
While smoke is an appealing ingredient to our taste buds, it’s not so appealing to the rest of our body, which is why it’s important to get in the habit of only taking in the most minimal, unavoidable amount of smoke while cooking with fire. The number-one practice that I observe every time I open the smoker door is turning my head, closing my eyes, and holding my breath. Once it’s been open for a second and the initial wave of smoke has rushed by me, I turn my head back and open my eyes to check out the meat, then maybe hit it with the spray bottle, all while holding my breath. After three to five seconds total, I close the smoker door and breathe sweet, fresh air!
