It’s a rare web application that doesn’t need to send email from time to time. For example, you may want to send messages to welcome users who sign up on your website, send “reset password” links, or confirm orders placed with an online store. Rails ships with a library called Action Mailer, which provides developers with an easy-to-use yet powerful tool to handle email.
This chapter explains how Action Mailer works and how to use it in your applications. You first learn how to configure it, and then you’ll see a few examples of how to send email in various formats.
In addition to sending email, your Rails app can also receive email with the help of Action Mailbox—a new feature in Rails 6. With Action Mailbox, we can receive email destined for different email addresses, parse the email however we want, and then decide what action to take (if any) in response to that email. For example, we could allow authors to send an email to our app, which would then parse the email and create an unpublished article—great for allowing authors to save ideas for an article when it’s not convenient for them to use the browser. Toward the end of the chapter, we’ll add the ability for our blog to do just that.
If you need to get the code at the exact point where you finished Chapter 11, download the source code zip file from the book’s page on www.apress.com and extract it on your computer.
Setting Up Action Mailer
Like Active Record and Action Pack, Action Mailer is one of the components that make up the Rails framework. It works much like the other components of Rails: mailers are implemented to behave like controllers, and mailer templates are implemented as views. Because it’s integrated into the framework, it’s easy to set up and use, and it requires very little configuration to get going.
When you send email using an email client such as Outlook or a web-based email application like Gmail or Yahoo Mail, your messages are sent via a mail server. Unlike a web server, Rails doesn’t provide a built-in mail server. You need to tell Action Mailer where your email server is located and how to connect to it. This sounds a bit complicated, but it’s really quite easy. Depending on the kind of computer you’re using, you may have a mail server built in (this is true of most UNIX systems). If not, you can use the same server that you use to process your regular email. If this is the case, you can find your server information in your email client settings, as provided by your Internet service provider (ISP) , or in the settings section of your web-based email application, like Gmail.
Configuring Mail Server Settings
Before you can send email from your Rails application, you need to tell Action Mailer how to communicate with your mail server. Action Mailer can be configured to send email using either sendmail or a Simple Mail Transfer Protocol (SMTP) server. SMTP is the core Internet protocol for relaying email messages between servers. If you’re on Linux, OS X, or any other UNIX-based system, you’re in luck: you can use sendmail, and as long as it’s in the standard location (/usr/bin/sendmail), you don’t need to configure anything. If you’re on Windows or if you want to use SMTP, you have some work to do.
Action Mailer options are set at the class level on ActionMailer::Base. The best place to set these options is in your environment files, located in the config directory of your application. You can also add your configuration in an initializer file in config/initializers; doing so ensures that your settings apply for all environments. In most cases, though, you have different settings for the development and production environments; so it may be wiser to add settings in any of the environment-specific configuration files (config/environments/*.rb), because this takes precedence over the global configuration.
Server Connection Settings
Setting | Description |
|---|---|
address | The address of your mail server. The default is localhost. |
port | The port number of your mail server. The default is port 25. |
domain | If your email server responds to different domain names, you may need to specify your domain name here. |
authentication | If your mail server requires authentication, you need to specify the authentication type here. This can be one of :plain, :login, or :cram_md5. |
user_name | The username you use to authenticate when you connect to the mail server, if your server requires authentication. |
password | The password you use to authenticate when you connect to the mail server, if your server requires authentication. |
Storing Sensitive Secrets
Since we know we’re going to need to set some sensitive information in our configuration—our user_name and password for our SMTP server—we need to know where to put them. We could just put them directly in our config file. While that would be the simplest choice, it’s not the safest choice. Our config files may be version controlled, deployed to servers, or copied to developers’ laptops—and our sensitive information will be sitting there in plain text, vulnerable to misuse. How can we prevent this?
Naturally, there are various ways to prevent this. A common approach is to put sensitive configuration values in environment variables which are not version controlled and must be manually added and updated to servers and workstations as they’re needed. The Rails application would then fetch these values from the special ENV hash. This approach works well, but can be tedious to maintain. For example, when a code change requires a new environment variable, care must be taken to ensure the servers are updated with the new environment variables in conjunction with deploying the code. This can be an error-prone manual task.
Rails now offers an integrated approach, called credentials. With Rails’ approach to handling sensitive information, we generate a secret key in config/master.key which is not to be version controlled. (But it can and should be shared with other developers and servers.) This secret key can then be used to encrypt and decrypt a YAML file which stores our sensitive data–in config/credentials.yml.enc. This strikes a good balance between security and convenience; we only share the master key once, and then future updates to the contents of config/credentials.yml.enc are shared via version control, and we avoid the risks of storing sensitive data in plain text.
Running this command will open an editor with the unencrypted contents of config/credentials.yml.enc. Now we can edit our sensitive credentials, and when we save and close our editor, the contents will be encrypted again and saved.
Easy enough, but there’s one complication—which editor will it use? Like many CLI (command-line interface) programs, rails credentials delegates that decision to the $EDITOR environment variable on your system. Depending on your system, this may be a console-based editor like nano or vim, or on Windows it could be Notepad. If the default editor isn’t to your liking, use your favorite search engine to find how to set your preferred default editor for command-line programs like rails credentials:edit.
Adding SMTP Credentials via rails credentials:edit https://gist.github.com/nicedawg/d1691274c9b99de6cf81a80a89d3ae3f
Save and close your editor, and your config/credentials.yml.enc file will be created or updated to include your encrypted information. Now that we have our sensitive data securely stored, we can configure our SMTP settings in our config files and reference our encrypted credentials rather than store them in plain text.
Let’s configure our SMTP settings now. Listing 12-2 shows a typical configuration for a server that requires authentication, in this case, Gmail. You can use this sample configuration as a starting point to configure your connection. Change each of the settings to connect to your own SMTP server. You may need to search for correct SMTP settings for your particular email service. If you’re using sendmail as the delivery method, add config.action_mailer.delivery_method = :sendmail; then, everything should “just work.”
Sample Action Mailer Configuration Using SMTP, in config/environments/*.rb https://gist.github.com/nicedawg/0424d7892cbb3ef3e0fa87f2a777f40c
Make sure to modify the options to match your own connection details for your email provider. Restart your server if it’s running, and your application is ready to send email. If your server fails to restart, check the error messages and look closely at your config/environments/development.rb file and your encrypted credentials via rails credentials:edit to make sure your changes match the listings.
If you need to use any advanced Action Mailer settings, the Rails API has a good chunk of information at https://api.rubyonrails.org/classes/ActionMailer/Base.html.
Configuring Application Settings
Common Action Mailer Application Settings
Option | Description |
|---|---|
raise_delivery_errors | Determines if exceptions should be raised when an error occurs during email delivery. |
delivery_method | Determines which subsystem to use to deliver emails. Valid options are :smtp, :sendmail, :file, and :test. Additional options for the chosen subsystem may be required. |
perform_deliveries | Indicates whether emails should actually be delivered. |
deliveries | Keeps an array of all delivered emails when the delivery method is set to :test. This is useful when writing tests as we can inspect the delivered messages without sending them anywhere. |
default_options | Allows you to specify default arguments for the mail method used inside mailers (e.g., setting default from or reply_to addresses). |
default_url_options | Allows you to specify default arguments for URL helpers used inside your mailers (e.g., setting host so generated URLs have the correct domain name). |
asset_host | Allows you to specify the base URL used when including assets like images in your emails. |
When you create a new Rails application, the configuration files automatically use sensible defaults for each of the development, test, and production environments. Take a quick look in config/environments to see how Action Mailer behaves in development, production, and test mode to make sure you understand your application’s behavior.
Sending Email
Now that you have Action Mailer configured, it’s time to see it in action. This section explores all the possibilities in the Action Mailer world, starting with basic text-only email and then adding extra email options such as attachments.
To demonstrate Action Mailer, let’s enhance the blog application by allowing users to send email to their friends, so they can share information about a specific article. This is a common feature in today’s web applications, affectionately referred to as “send to friend.”
By now, you know that Rails provides helpful generators to get started writing your own code. You saw generators in action when you created models and controllers in previous chapters. The mailer generator works just like the other generators.
As we can see, the generator created several files, which we’ll briefly describe before diving into more detail.
First, it created the NotifierMailer class in app/mailers/notifier_mailer.rb. By convention, any other mailers we create will be located in app/mailers as well. Inspecting NotifyMailer, we notice two things: First, the NotifyMailer class contains the email_friend method we requested on the command line. Second, we see that it is a subclass of ApplicationMailer class (found in app/mailers/application_mailer.rb), which is in turn a subclass of the ActionMailer::Base class . This gives us a chance to make app-wide changes to our mailers (by setting default options or changing layouts) while still inheriting all the features ActionMailer::Base provides.
Next, we see that it also created two template files in the views directory (email_friend.text.erb and email_friend.html.erb) which correspond to the email_friend method (action) found in our mailer class. These template files will control the HTML and text content of our emails. (Though most prefer to view the HTML version of an email, it’s still considered a best practice to include a plain-text alternative. As you can see, Action Mailer encourages this best practice.)
Doesn’t this look familiar? Just like controllers, Action Mailer classes contain methods that, when triggered, execute some code and render a related view of the same name, unless otherwise specified.
Lastly, the generator created a test file for our mailer, which we won’t use yet. It also created a preview file, which we will cover later in this chapter.
ApplicationMailer Class in app/mailers/application_mailer.rb https://gist.github.com/nicedawg/d77cbbcf9705fbe917cf3caeddaaa5cb
We see a couple of things happening here. First, the default method is called on the hash from: ‘from@example.com’. This sets the given email address as the default, making it unnecessary to specify the same From address for each mailer action we might add. It would be a good idea to go ahead and change this From address to be the same as the account you configured in your SMTP settings in config/environments/development.rb, to stave off any possible delivery problems.
We also see that the layout is set to mailer. Similar to how view templates rendered by controller actions are usually wrapped in a layout template, mailer templates are by default as well. This default “mailer” layout is defined in app/views/layouts/mailer.html.erb and app/views/layouts/mailer.text.erb. If you want to make changes that affect all (or most) of your mailer templates, these mailer layout template files are the perfect place to do so.
NotifierMailer Class in app/mailers/notifier.rb https://gist.github.com/nicedawg/7db1799fd4eaa504d1a81ddc41930333
We see a comment about setting up our subject line for the email which our email_friend mailer action will send in our I18n (internationalization) file. We won’t do that now, but we will cover internationalization in a later chapter in this book.
Next, in the email_friend method body, the first line defines an instance variable named @greeting; just like in controllers, instance variables are also available in your views.
Mail Method Options
Option | Description | Example |
|---|---|---|
subject | The subject of the email message to be sent. | subject: "Action Mailer is powerful" |
to | A string or array of email addresses to which the message will be sent. | to: "friend@example.com" |
from | A string specifying the sender of the email message. | from: "sender@example.com" |
reply_to | A string specifying the reply-to email address. | reply: "sender@example.com" |
date | The date header. The default is the current date. | date: Time.now |
cc | A string or array of email addresses to carbon copy with the message. | cc: "admin@example.com" |
bcc | A string or array of email addresses to blind carbon copy with the message. | bcc: ["support@example.com", "sales@example.com"] |
Handling Basic Email
Let’s start enhancing the blog application by adding “Notify a Friend” functionality to the article page. The first iteration is a very basic example that sends an email (with both HTML and plain-text formats) containing a brief message.
Added a notify_friend Action to config/routes.rb: https://gist.github.com/nicedawg/1b848339e03a9ce2204836e744d9c272
Using the member method inside your resources block helps define a route that requires the id of the resource. Custom member routes are similar to the default member routes, such as edit_article_path and article_path. Following the same convention, you can define collection routes using the collection method. Custom collection routes are similar to the default collection routes, such as articles_path, which don’t require an id.
Now that we have the route in place, let’s show users a link which, when clicked, shows a form where they can enter the email address of the friend to whom they want to send a message. (Please note, a feature like this could be abused. In a production environment, it may be necessary to add security measures to restrict usage of a form like this to prevent malicious users using your form to send unsolicited emails. That’s beyond the scope of this book, but be aware.)
“Email a Friend” Link and Partial Added to app/views/articles/show.html.erb:https://gist.github.com/nicedawg/5fac226dd94990290eb2deb18d67951d
We added a link which may look a little strange. We set its URL to ‘#’, which is one way to make a link clickable without it navigating anywhere. We’re only using the link to trigger some JavaScript when clicked—namely, to display the “Notify a Friend” form. (We also added return false to the onclick handler to prevent the browser from navigating.)
We also added a partial—notify_friend—and passed the article as a local variable. This partial doesn’t exist yet, but we’ll create it next. We wrapped the partial in a container which will be hidden by default. We gave the container an id so that the preceding link can reference it and display the form. Generally, it’s best to keep your JavaScript behavior separate from your HTML—perhaps in app/javascript/—but this works for now and keeps us focused on our goal. And that’s okay!
“Notify a Friend” Partial in app/views/articles/_notify_friend.html.erb: https://gist.github.com/nicedawg/c39b08e008df3daab297ba9998b0f178
This form is pretty standard. We configured it to send the name and email values to the new route we added. And remember that, by default, form_with will send its data via Ajax. The only other thing to note is the Cancel link; it’s similar to the “Email a Friend” link from the previous listing, except that it hides the form.
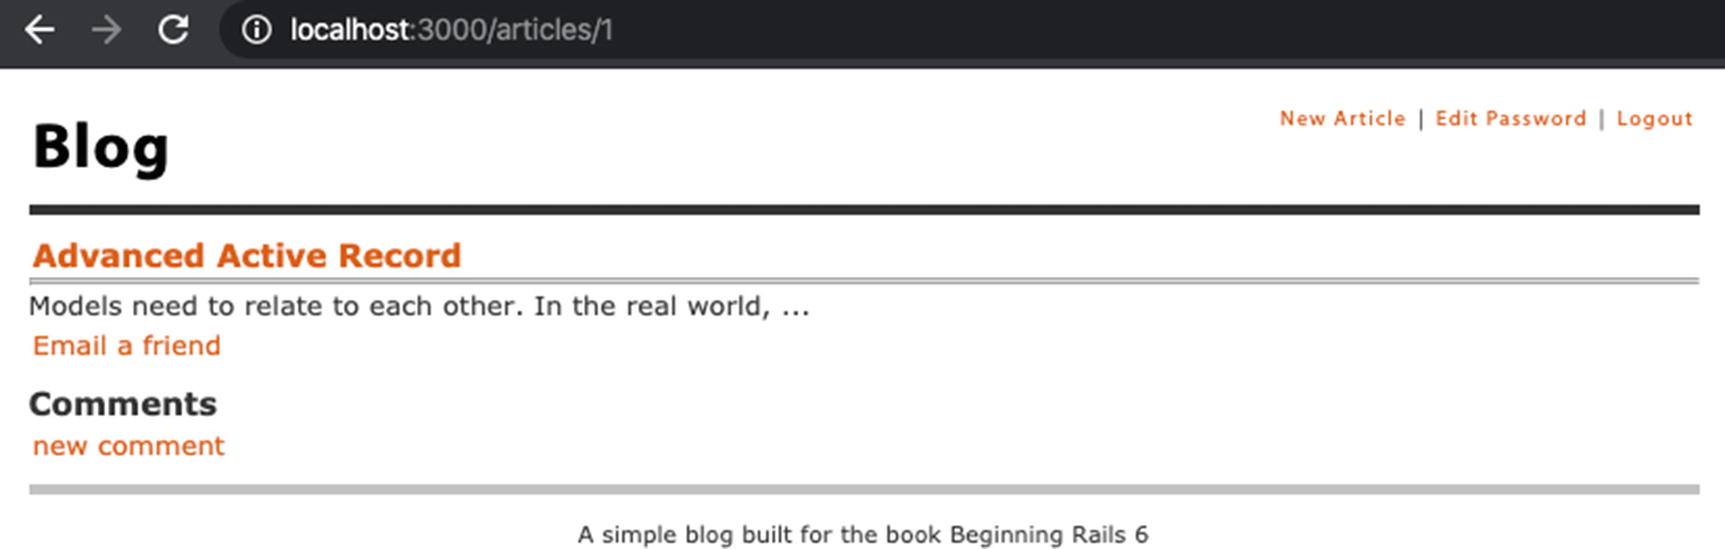
Article page without “Notify a Friend” form
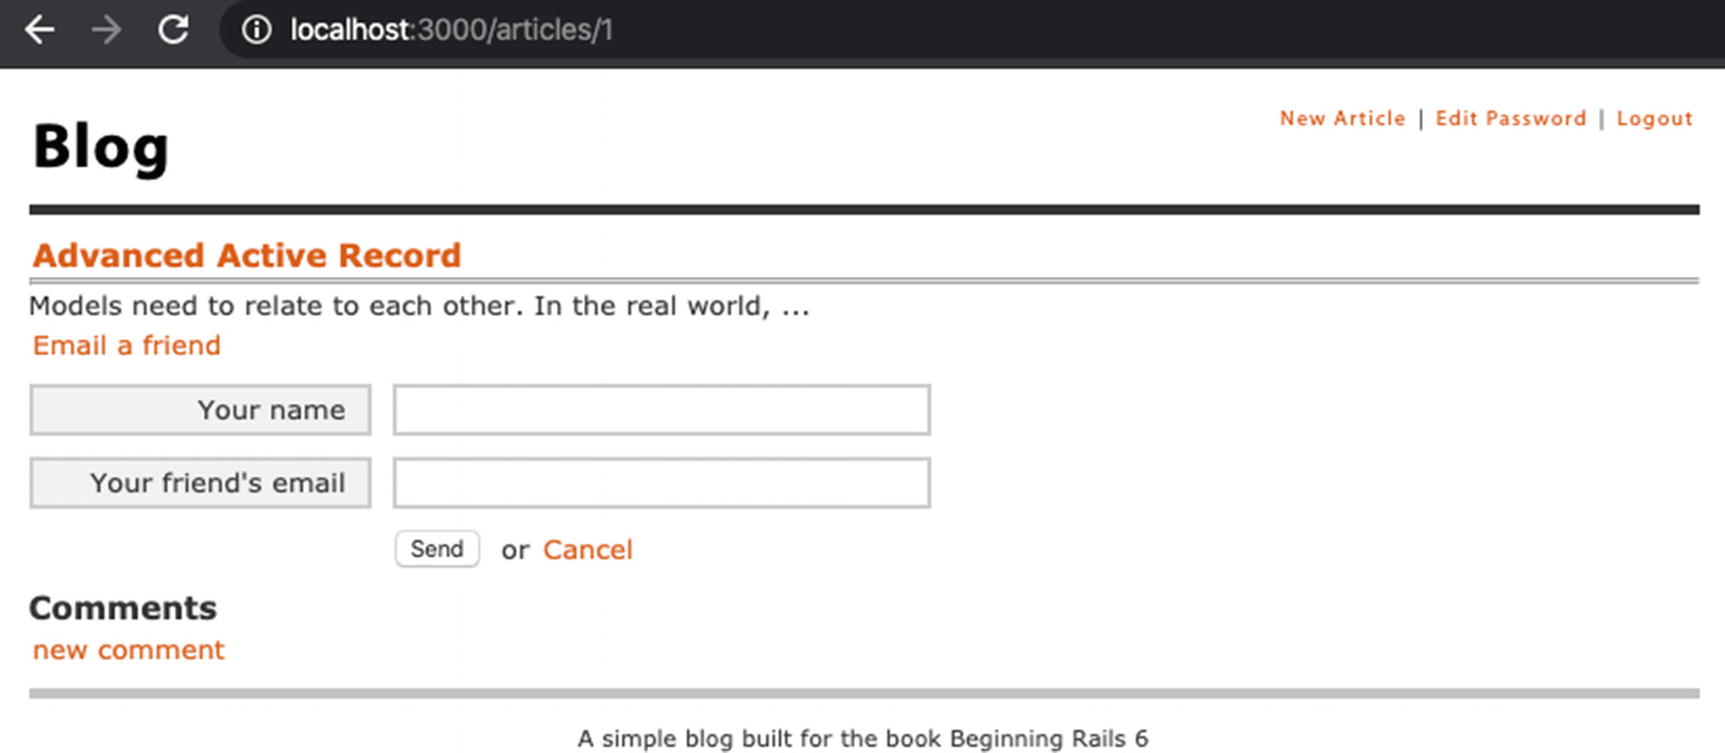
Article page with visible “Notify a Friend” form
The notify_friend Action Added to app/controllers/articles_controller.rb: https://gist.github.com/nicedawg/9447cf251055501a1d3a4105af4fa208
We used a handy shortcut—the underscore—as an alias for the last object returned by rails console and assigned its value to a variable we defined called email, for more convenient investigation.
Then, we asked for the name of its class and were surprised to find out that it’s ActionMailer::MessageDelivery, not Mail::Message as we thought. Why did that happen? ActionMailer::MessageDelivery is a thin wrapper around Mail::Message—it relies on Mail::Message for its expertise in manipulating emails and adds some methods to facilitate the delivery of these emails. It’s such a thin wrapper that it delegates almost every method call to the Mail::Message object it contains—even the inspect method inherited from the base Object class, which rails console uses to print the value of the last returned object. That’s really interesting!
We see that our email object has a long list of messages we can send it; many are for inspecting the details of the email message itself. Others are for managing the delivery of it. There were too many methods to include in the listing, but we included some of the more interesting ones. We see several methods with “deliver” in their name. We used :deliver in our controller already, but we also see :deliver_later and :deliver_now; the next chapter will explain those in more depth, though we can easily imagine what they might do.
Lastly, we ran email.deliver, and the rails console output indicated the delivery was performed—or at least attempted.
We don’t need to remember all these details every time we send an email; we just need to remember that we call the mailer action as a class method on the mailer class and then call deliver (e.g., NotifierMailer.email_friend.deliver).
Updated NotifierMailer in app/mailers/notifier_mailer.rb: https://gist.github.com/nicedawg/a9d4779d99d442d9beddf76d169e92b6
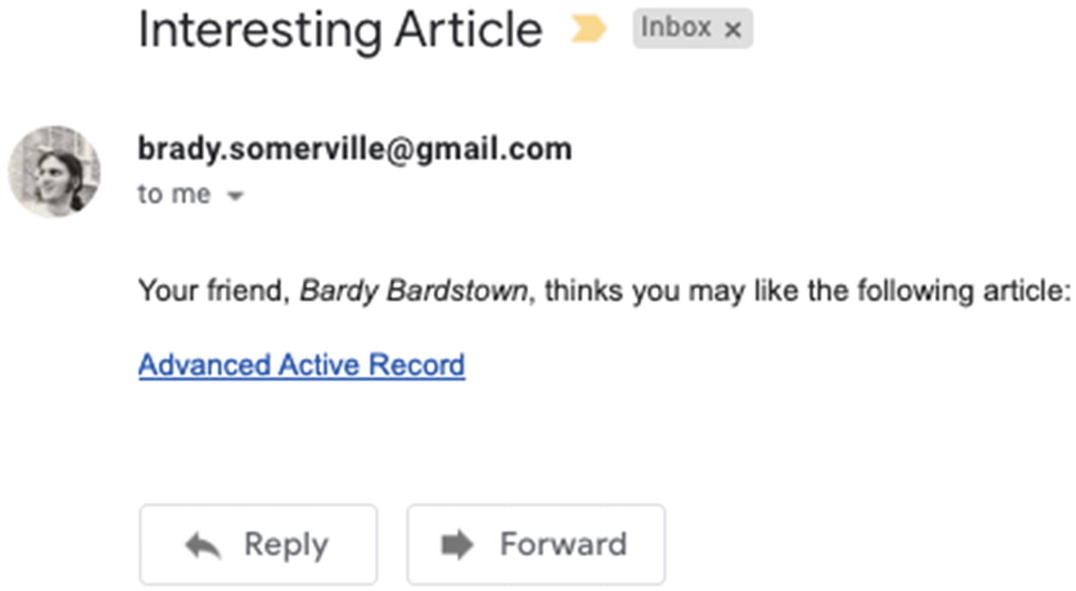
We added three arguments which correspond to the arguments we added to the controller action in Listing 12-8: article, sender_name, and receiver_email. We assigned two of those values—article and sender_name—to instance variables so they will be available for use in our mailer templates. Then, we modified the mail method call to send the email to the receiver_email address with the subject “Interesting Article.”
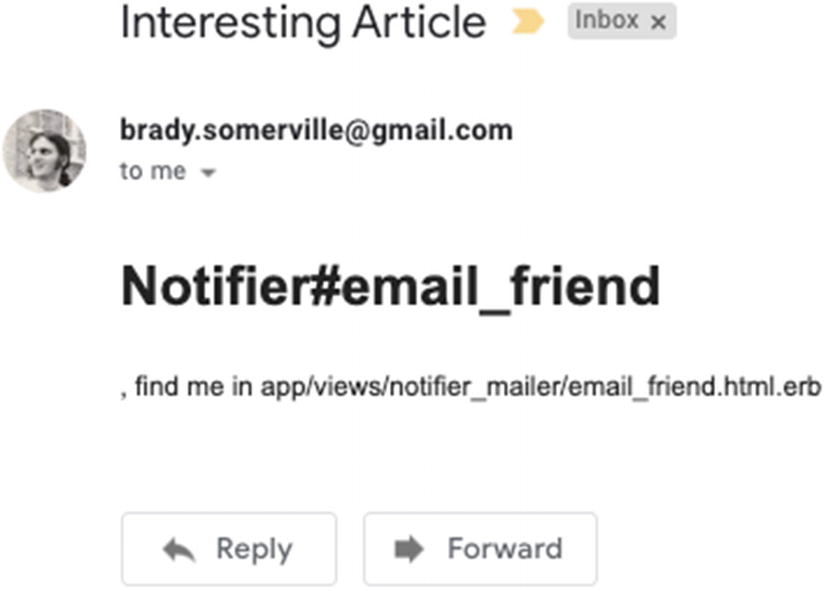
Message delivered to a user’s inbox
If you didn’t get the message, don’t worry. Sending email can be tricky, but there are a few things we can try.
First, look at your server output. Do you see any errors? If so, it may be a syntax error in your code which you can fix. Address any errors by making sure your code matches the preceding listings, and try again.
Does it look like everything was successful, but you still didn’t receive the message? Checking your Spam or Junk folder or simply waiting another minute could clear this up. However, there could be an SMTP error that’s being hidden. Edit your config/environments/development.rb file, and change the following option so it says config.action_mailer.raise_delivery_errors = true. (It was set to false, meaning SMTP delivery errors would be suppressed.) Then restart your Rails server and try to send the message again. Perhaps this will reveal the problem.
Email providers must continuously evolve to fight security risks and spam. It’s quite likely that a security feature or spam-blocking feature from your email provider is blocking your delivery attempts. For instance, if using a Gmail account with two-factor authentication enabled, you may need to go to your Google Account settings page, visit the Security section, and add an “app password” for your Rails app and then replace the password in your SMTP settings (via rails credentials:edit) with the new app password in order to send email from your Rails app.
Unfortunately, we cannot provide solutions for every type of SMTP delivery problem that might exist with every provider—and even if we did, the solutions would soon be obsolete! But knowing how to reveal the problem (via raise_delivery_errors) and using your favorite search engine, you’re bound to solve the problem. But if not, don’t worry. We can still preview the emails, even if they can’t be delivered right now.
Previewing Email
Hopefully, you were able to successfully send the email from your app. But if not, don’t worry. We can still preview what the email would look like with the help of another feature of Action Mailer—previews.
With Action Mailer’s previews, we can configure a mailer action to be previewed with some predefined data for its templates and then view the HTML and plain-text variations of that mailer action in our web browser—without having to send the email.
Certainly this is helpful when you’re having trouble sending emails from your development environment, but even if you don’t have any delivery problems, using Action Mailer previews helps shorten the feedback loop for making incremental changes to your mailers. Instead of filling out a form and waiting for the message to be sent to your email account, simply refresh your browser! We’ll walk through the steps necessary to make our email_friend mailer action previewable.
NotifierMailerPreview in test/mailers/previews/notifier_mailer_preview.rbhttps://gist.github.com/nicedawg/c5522dc35fcb2f4cdca3b3b29edab451
Instead of passing arguments to email_friend based on user input, we’re predefining the values which will be sent to the mailer action for the purpose of previewing.
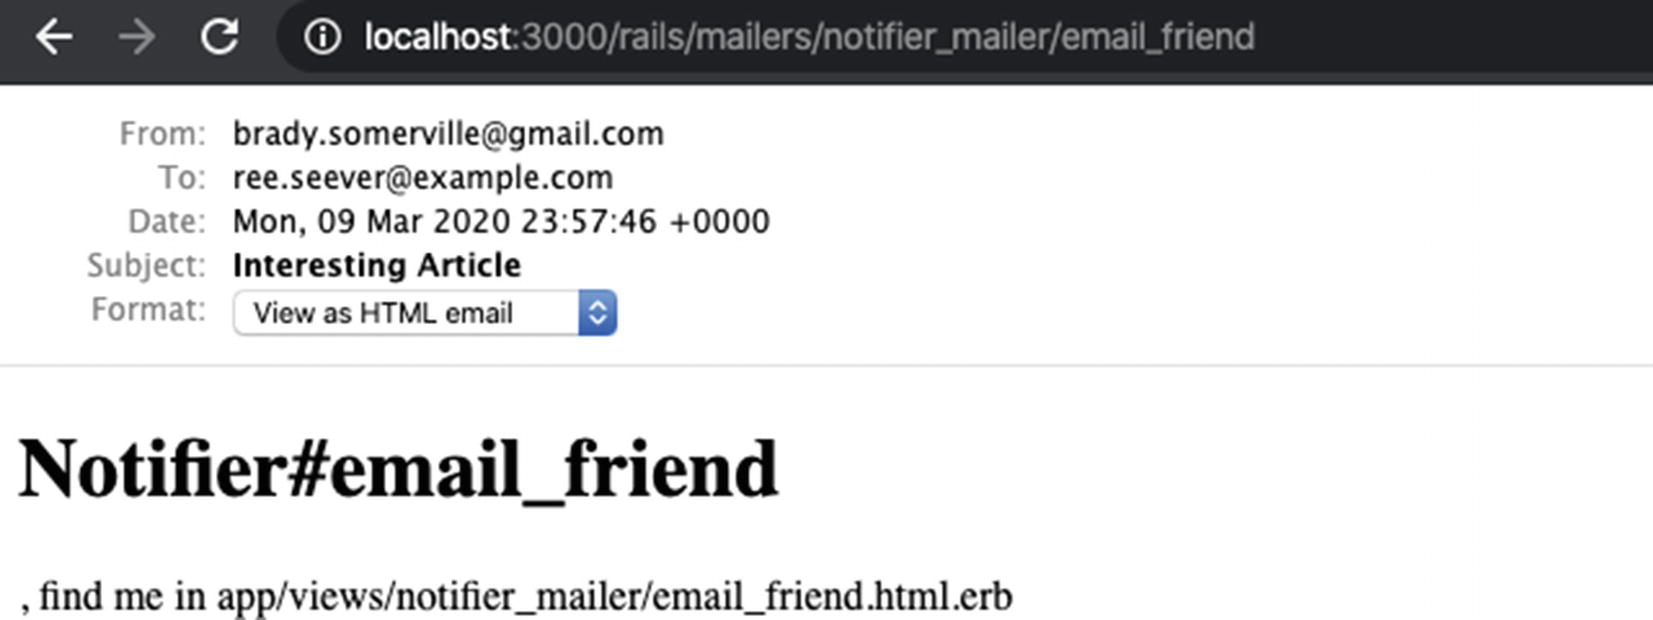
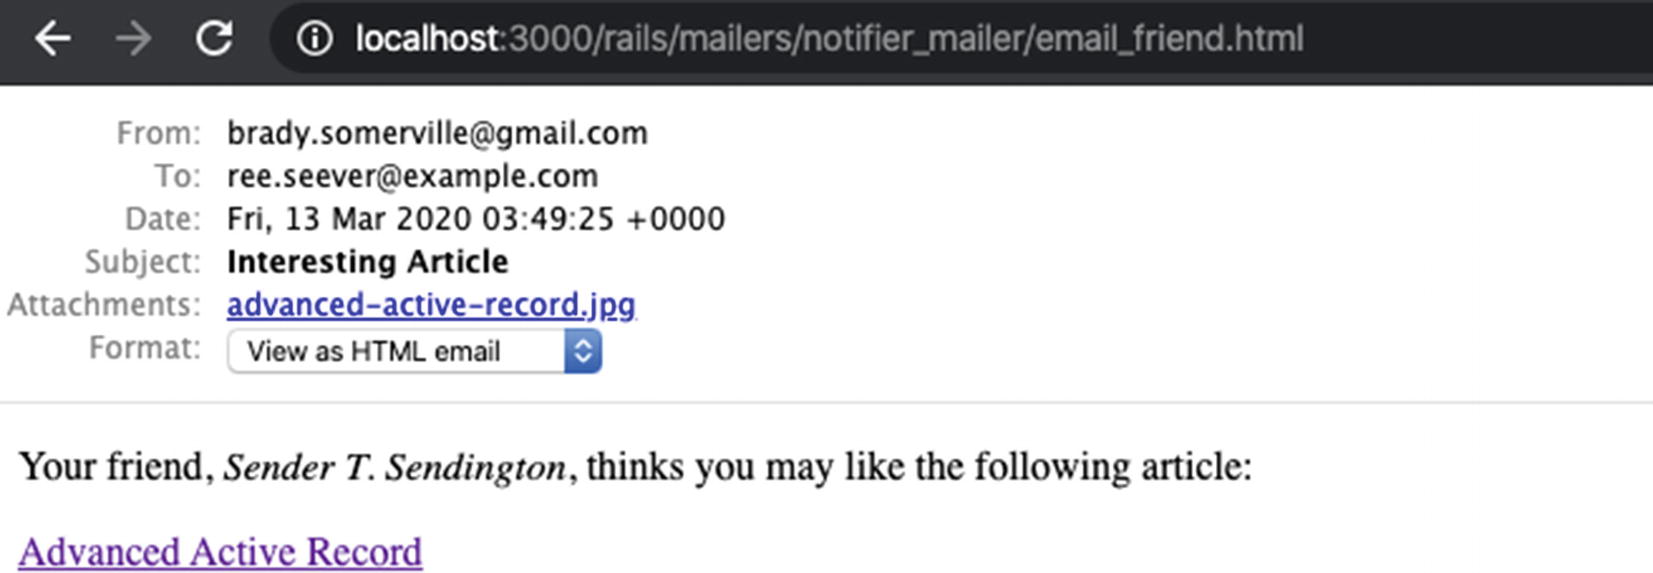
Action Mailer preview of NotifierMailer#email_friend
Notice that we see essentially every important part of the message—the From address, the Subject, the content, and more. Also, notice the Format menu; we see we’re currently viewing the HTML version of our email, but can easily switch to viewing the plain-text version as well.
Please be aware that email clients may not display the email exactly as it appears here. Email clients tend to support a subset of HTML and CSS, and each email client has its particular quirks. A good rule of thumb is to keep your layout and styles simple and to test your messages with a variety of popular email clients.
NotifierMailer Template in app/views/notifier_mailer/email_friend.text.erb: https://gist.github.com/nicedawg/a68c65b8b15b21be7a6346e8e3375969
HTML email_friend Template in app/views/notifier_mailer/email_friend.html.erb: https://gist.github.com/nicedawg/1cc96d3de7b9bdf3bb0980bd87a2803e
Now that we’ve updated our text and HTML versions of our mailer action, try previewing the email again in your browser by visiting http://localhost:3000/rails/mailers/notifier_mailer/email_friend. Much better!
HTML message delivered to a user’s inbox
If you think maintaining both text and HTML versions of an email message is a lot of work, it may be safer to stick with the HTML message. While it is best practice to send both, most email users prefer the HTML version.
Adding Attachments
In some cases, you may want to add attachments to an email message. Action Mailer makes this a straightforward task by providing an attachments helper. You tell attachments which file you want to attach to the email, and it does its magic.
Adding an Attachment to the Mailer in app/mailers/notifier_mailer.rb: https://gist.github.com/nicedawg/bdf43103d0cb0f896047d9c458600afc
Message with an attachment delivered to a user’s inbox
In addition to sending dynamic attachments like the preceding example, you can also add a static attachment that exists on disk by using the File.read method. For instance, if you wanted to send an image found in app/assets/images/blog.png, you’d use File.read(Rails.root.join(‘app’, ‘assets’, ‘images’, ‘blog.png’)) when adding an attachment.
Letting Authors Know About Comments
Just to make sure you’ve grasped how to send email from your Rails applications, this section quickly goes over the complete flow to add another mailer action.
Adding the comment_added Method to app/mailers/notifier_mailer.rb: https://gist.github.com/nicedawg/b6572b22e3627a93072b5a1eb2dead50
The comment_added HTML Mailer Template in app/views/notifier_mailer/comment_added.html.erb: https://gist.github.com/nicedawg/f60a353d255661cdb181ad8306cecf62
The comment_added Text Mailer Template in app/views/notifier_mailer/comment_added.text.erb: https://gist.github.com/nicedawg/4d0690011557da8bf7526a76760995e3
Adding a Previewer for NotifierMailer#comment_added in test/mailers/previews/notifier_mailer_preview.rb: https://gist.github.com/nicedawg/8f6ebddb661a4939f7732dc9de000695
Updates to app/model/comment.rb: https://gist.github.com/nicedawg/a523e8af12c2559d539351aeb8d9f66d
Most of the code changes we made probably look familiar to you. However, we did something in the preview class we should mention: we built a comment belonging to the first article to use in our mailer. Why did we do this? When the preview action runs, it is connected to your development database. If we had chosen to create a comment instead of building one, then every time you previewed the email, it would add another comment to your database. While that’s not necessarily a problem, you may not want that to happen. By building instead of creating, the comment is never saved to the database. Alternatively, we could have manually created a comment for the first article so we could preview this email—but if we deleted that comment during the course of development, this preview would suddenly be broken.
Another thing we should point out is the email_article_author method in the Comment model; we passed self as the argument to NotifierMailer.comment_added. That’s because the mailer action expects a comment, and in this context, the comment is the current object, which can be referred to as self.
Now that those changes have been made, create an article with your user account and add some comments. You should receive one email message per comment. If you want to, you could add the comment text to the email; that way, you wouldn’t need to go to the article page to read the comment. You could easily implement that by changing the mailer view.
Receiving Email via Action Mailbox
So far, you’ve seen that Action Mailer has extensive support for sending all types of email messages. But what if your application needs to receive email? Action Mailbox is a new feature in Rails 6 which makes it as easy as possible to receive emails into your app and process them.
Though Action Mailbox makes it as easy as it can to receive and parse emails, it can still be tricky to set up. Being able to actually receive email may involve domain name registration, deploying your application to a publicly available web host, signing up for third-party email services, or configuring mail servers to call a Rails command when receiving certain messages.
Walking you through the process of configuring your app to receive actual email would be too difficult, as the variety of systems and services to integrate with is too great and may require payment. However, Action Mailbox offers a tool in development mode to let you submit emails to your app via a form. So we’ll use that tool to help us as we modify our blog to let our authors submit draft articles via email. If at some point you decide to send actual email to your app, be sure to check out the Action Mailbox guide at https://edgeguides.rubyonrails.org/action_mailbox_basics.html.
Installation
That's it! Next, let's take a look at configuring Action Mailbox.
Configuration
Action Mailbox Configuration Options
Option | Description |
|---|---|
ingress | Specifies which adapter to use to receive emails. Valid options include :relay, :mailgun, :mandrill, :postmark, and :sendgrid. Depending on the adapter chosen, additional credentials may be required. |
logger | Specifies which logger Action Mailbox should use for its logging output. By default, it will use the standard Rails logger. |
incinerate | Action Mailbox stores the emails it receives for a certain amount of time and then deletes them. If you wish to keep them forever, set this value to false. |
incinerate_after | By default, when incinerate is true, Action Mailbox will destroy emails after storing them for 30 days. You can alter the storage policy by changing this value. (e.g., config.action_mailbox.incinerate_after = 60.days). |
queues | Action Mailbox uses queues to schedule routing and incineration jobs. We haven’t talked about queues yet, but we will in the next chapter when we discuss Active Job. For now, just know this option gives you a chance to rename the queues which Action Mailbox uses by default. |
Now that we’ve installed Action Mailbox and perused its options (though we didn’t need to change any yet), let’s get started on enhancing our blog by allowing authors to create draft articles via email.
Creating Draft Articles via Email
Before we jump in to adding this feature, let’s think about the various things we need to do in order to accomplish this.
First, we need to give each author a special email address, so that when we receive an email, we know what it’s for (creating a draft article) and we know whom it’s for. Ideally, we’ll make this a hard-to-guess email address to help prevent the public from being able to create draft articles for the author.
Then, we’ll need to process the email. Based on the email’s To: address, subject, and body, we’ll create a draft article associated with the right user, the right subject, and the draft body.
Finally, we’ll send an acknowledgement email to the author, so they know our app successfully processed their content. It will also have a convenient link to allow them to edit their draft article.
Assigning Authors a Special Email Address
First, let’s give each author a unique email address which they can use to create draft articles via email. To do this, we will add a secret token to each user record for this purpose and display it on their “Edit Password” page.
Notice we gave a hint to the migration generator that our new field—draft_article_token—is a token. Rails handles that specially. We can see in the output that it created our field as a string in the database, but also added a unique index to the column, ensuring that each user has a different token. (If two users had the same draft_articles_token, we might end up creating a draft article associated with the wrong user!)
Next, we’ll modify our User class so that it will treat the draft_article_token like a token, as shown in Listing 12-19. By doing so, it will automatically set a random, unique token when a user is being created. It also gives the User class a method called regenerate_draft_article_token we could use if we needed to.
Adding draft_article_token to User Model https://gist.github.com/nicedawg/6848c1a2348a1afa28406f93ced19e97
Now that we have secure draft article tokens for each user (and will automatically create tokens for new users), let's show our authors their unique, secure email address they can use to send draft articles via email.
Showing the Draft Article Email at the Top of app/views/articles/new.html.erb https://gist.github.com/nicedawg/6a6dbb6049f28c9873ed0d963488e477
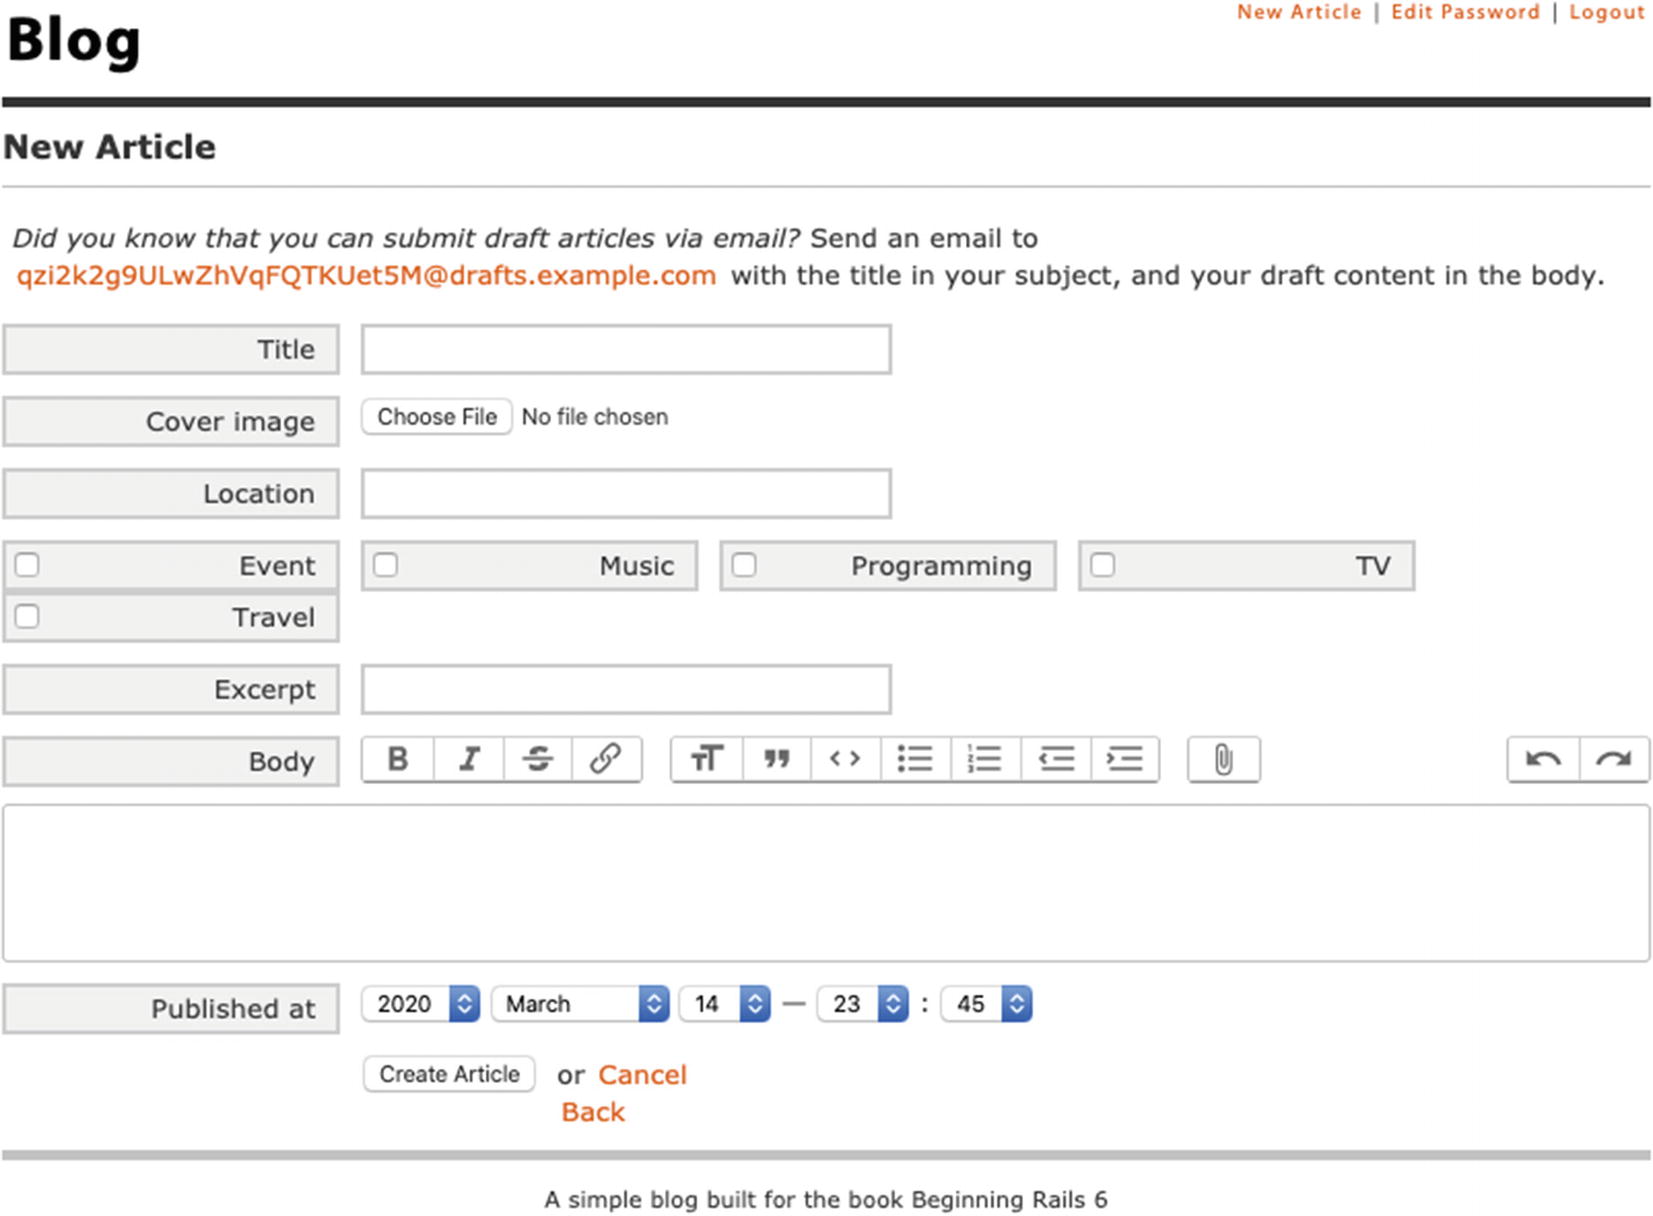
New article form with special draft article email address
With these changes, authors are aware of their special draft article email address and can start sending email to our blog to create draft articles. But what will our application do with those emails when it receives them? We clearly have more work to do. Next, we’ll add code to process these emails and create draft articles from them.
Processing the Email
We need a place to put code that can handle incoming emails which are meant to create draft articles. It needs to be able to find the right author record and then create an article with the right title and body. If we wanted to take this action in response to an incoming HTTP request, we’d do that in a controller. But when receiving email input, we’ll do that in a mailbox.
In an Action Mailbox context, a mailbox receives emails and decides what to do with them. We can have many mailboxes, each one for a particular purpose, similar to controllers. Since we’re going to be creating draft articles from emails, we should name our new mailbox accordingly.
As we can see, the generator created our DraftArticlesMailbox class in the app/mailboxes directory and also added a placeholder test file for us (which we won’t use yet.)
Processing Emails in app/mailboxes/draft_articles_mailbox.rb https://gist.github.com/nicedawg/fdb5245cb9a8235d6f0894f0d4dc31f5
This isn’t a ton of code, but there’s a bit to unpack here. First, we see that our DraftArticlesMailbox class inherits from ApplicationMailbox. Any mailboxes we create to work with Action Mailbox should inherit from this class.
Next, we see before_processing :require_author. Similar to how Action Controller allows you to define filters to run before, after, or around your controller action, Action Mailbox allows you to define filters to run before, after, or around your process method. Here, we reference a method we added called require_author which we’ll explain in a minute. We could have put the code for require_author at the top of our process method, but extracting it to a separate method keeps our process method tidy and encourages reuse. So now we understand the general idea—before we process the email, we make sure we could locate the right user object.
Before we dig into the methods we added, let’s talk about some magic that Action Mailbox added to our class. First, notice how we referenced something called mail a few times in our class. Where did that come from? Action Mailbox provides that to our class—and it returns the object representing the email we’re processing. So we can use it to access the email’s To, Subject, and Body fields and more.
We also used a method called bounce_with; this method marks the inbound email record as “bounced” (so the system knows it was processed but failed), and the method takes an ActionMailer::MessageDelivery instance as an argument. Action Mailbox will then deliver this message in response to the failure. This is an elegant way to let you do both things—mark as bounced and deliver an error message—with very little code.
Now we can understand the code we added more clearly. In require_author, we bounce a message back to the sender unless we can find a valid author.
In author, we search for the user record with the right token. You may not have seen the ||= operator yet, often referred to as the “or equals” operator. Using this in conjunction with an instance variable, as we did in the author method, is a common pattern called memoization —which attempts to prevent redundant, expensive queries. We refer to author multiple times in this class, but don’t need to actually execute an SQL query more than once. So the author method returns the value of @author if it has a value. Otherwise, it executes the User.find_by query, assigns the value to @author, and then returns the value.
In token, we access the object representing the email and get its to value…which rightly returns an array of email addresses (since an email’s To field may have multiple recipients). For our purposes, we assume the first address is the one we want, and then we split the address based on the @ symbol and take the first piece of the resulting array to return the token portion of our email address.
Finally, to the meat of the class. The process method creates an article associated with the author found via the token in the email address and sets its title and body based on the email’s subject and body, respectively.
You might notice the explanation of this class is longer than the code itself, a tribute to the concise readability of well-written Ruby code. The code is rather self-documenting. Even if you don’t know what’s happening behind the scenes, a developer could read the code and have a good sense of the class’s intentions.
Sending Notifications That the Draft Article Couldn’t Be Created https://gist.github.com/nicedawg/653f0fefb94f8afda2e1021a0b6287e4
Notice how in addition to specifying the “To:” address and subject of the message, this time we passed a block which takes format as an argument. This lets us provide the content inline for our HTML and text formats. Since we just want to send a plain, simple message for now, we’ll do this instead of creating separate mailer view template files.
Update DraftArticlesMailerPreview https://gist.github.com/nicedawg/d24dcc1464e41ef468589ee4ad2e8755
Now we can preview our new mailer via http://localhost:3000/rails/mailers if we want to.
Finally, our mailbox is prepared to turn emails into draft articles when it can and send an email back to the sender when it can’t find the right user. That sounds good, but how will our app know to send emails to our new DraftArticlesMailbox? We have a little more work to do.
Routing Emails to Our DraftArticlesMailbox in ApplicationMailbox https://gist.github.com/nicedawg/1ac117138347346a67bf7a82f9117023
We added a routing line which says “if the To: address of the email has ‘@drafts.’ in it, then send it to the DraftArticlesMailbox.” If you have multiple mailboxes in your app, you will likely need multiple routing calls to send emails to the right mailboxes. Note that the routes will be processed in top-down order, executing the first match (similar to Action Pack’s router). Action Mailbox’s router also allows the symbol :all instead of a regular expression to say “send all emails to this mailbox.”
Now that we’ve added the mailbox and routed the right types of email to it, let’s see if it works! As mentioned in the beginning of the chapter, Action Mailbox provides a helpful tool in development to “send” emails to your app. Visit http://localhost:3000/rails/conductor/action_mailbox/inbound_emails/ in your browser, and you should see a page that says “All Inbound Emails” and has an empty table. This page lists all of your ActionMailbox::InboundEmail records in your database.
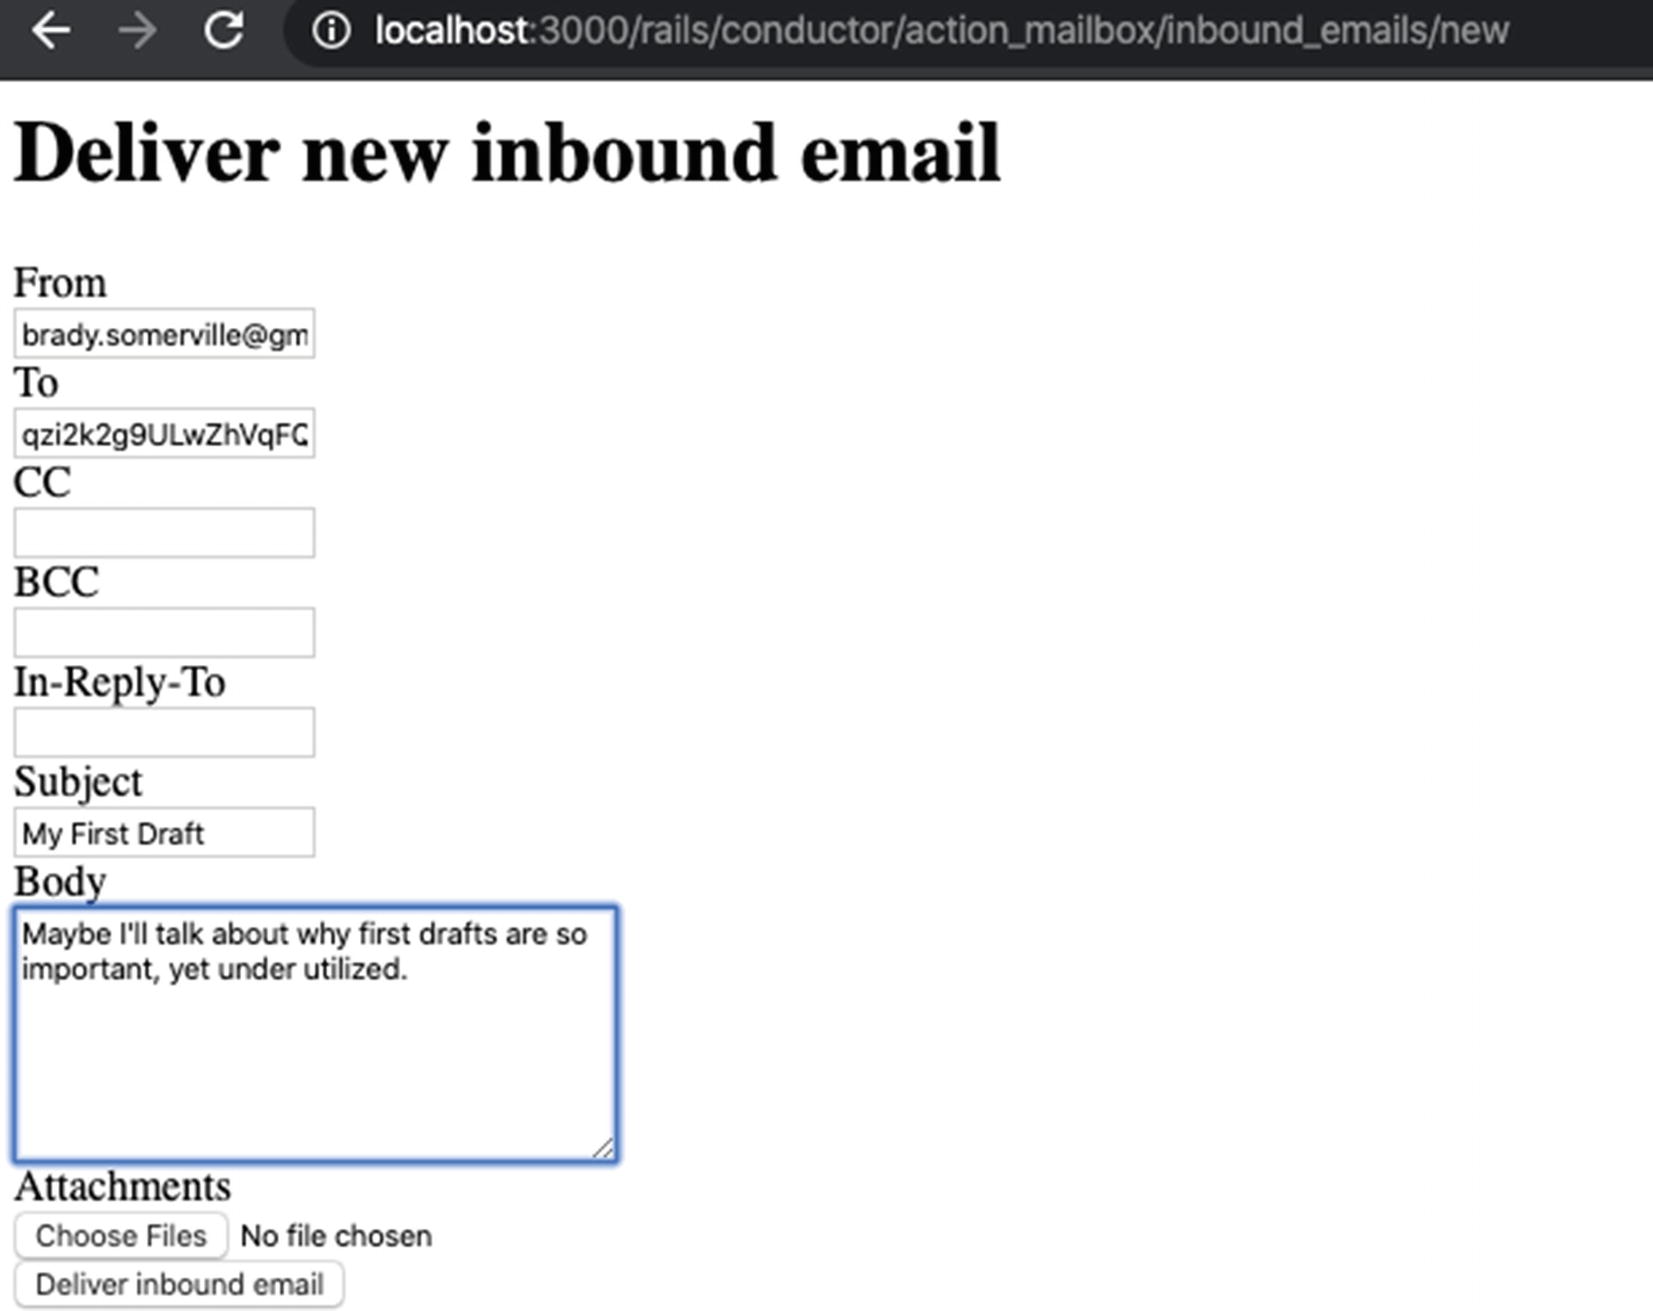
Testing our new mailbox with a new inbound email
Once you submit the email, your app should receive the email, route it to the DraftArticlesMailbox, find your user record based on the token from the To: address, and create an article with the subject of your email as its title and the body of your email as its body.
Did it work? Go back to your blog’s root URL, http://localhost:3000. If the email was able to be processed, you will see the unpublished article there. (Hmm, we ought to change that! We won’t take time to do it now, but a live blog wouldn’t want to serve unpublished articles to the public.)
If it didn’t work, make sure you addressed your email correctly. The dev tool we used to send an email redirected to a details page for the email we sent. It shows the full source of the email we generated and gives us a chance to send it again.
If the email was addressed correctly, then check over our recent code changes closely. You may also look in your server’s output for clues, though sending/processing an email generates quite a bit of logging.
Now that we can create draft articles by processing an email, we’ve almost finished adding our feature. However, there’s one last thing that will make it more polished—letting the author know their email has been processed.
Responding to the Author
As our feature currently stands, the author is left wondering if the email they sent to create a draft article actually created a draft article. Rather than leaving them worried or in doubt, we can send them an email to acknowledge their submission and even to give them a helpful link to edit the draft article.
Adding DraftArticleMailer#created Action https://gist.github.com/nicedawg/760e8a533498503ab8f7133318830fe6
app/views/draft_articles_mailer/created.html.erb https://gist.github.com/nicedawg/9ba9ca657cd66e34a6b0cbaf82f0edf9
app/views/draft_articles_mailer/created.text.erb https://gist.github.com/nicedawg/b5ed9f8d972b90cdf0baeac23ca5f668
test/mailers/previews/draft_articles_mailer_preview.rb https://gist.github.com/nicedawg/adeaf5ae0325a1c6c1a5b460861f2099
Updating DraftArticlesMailbox to Send “Created” Email https://gist.github.com/nicedawg/b6bdb5d3289079cd7f91c6e6657658d2
In this last code change, we changed author.articles.create to say author.articles.create! instead. This will ensure that if the article can’t be created, an exception will be raised and the process method will stop before sending the created message. If create! succeeds, then we’ll construct our created message using the “From” address of the sender, and the resulting draft article, and then deliver it.
Try it out! Visit http://localhost:3000/rails/conductor/action_mailbox/inbound_emails/ to resend an email or to send a new email. If your Action Mailer delivery works correctly and you use your email address as the “From” message, then in response to your email to create a draft article, you will receive an acknowledgement email with a link to the newly created draft article. It did take a bit of work to make it happen, but in retrospect, that was a really cool feature to add with not that much work.
Summary
In this chapter, we learned how to send email from our web application using Action Mailer. We configured Action Mailer to talk to our mail server and learned the most common configuration parameters we can use to fine-tune how Action Mailer works with our application.
We learned that Action Mailer allows us to send email messages based on view templates and how to use implicit parts for text and HTML messages, as well as how to use the attachments helper to add attachments to our messages. We also learned how to preview messages so we don’t even have to deliver them while developing.
We also learned how to receive and process email using Action Mailbox. This chapter only scratched the surface, but serves as a good starting point. Should your application ever need to perform this task, you know where to look when you need more information.
Now that our app is sending (and even receiving) emails, it’s time to talk about another component of Rails—Active Job. In the next chapter, we’ll discuss how it can be used to improve performance of your application when performing tasks that have the potential to bog it down.