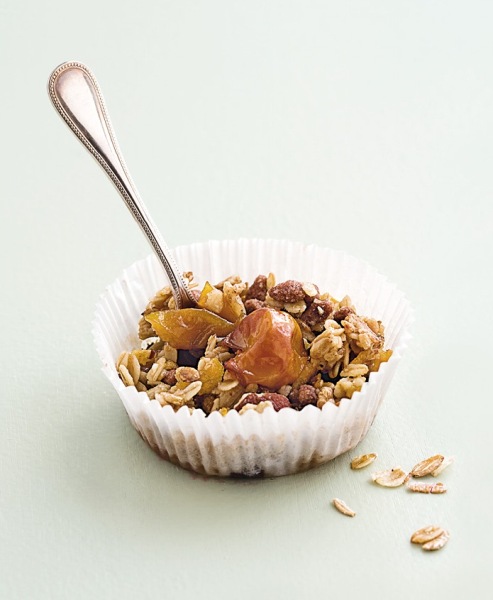
muesli crumbles
Crispy and crunchy on top, soft and gooey underneath: Beyond the health benefits of the whole grains and fresh fruit (full of vitamins, fiber, and minerals) they contain, these muesli crumbles are a veritable mine of gustatory exploration—and pleasure, too!—for little ones. These “big-kid snacks” are easy to eat: Bébé can peck at the pieces of crunchy crumble and pop the pieces of softened fruit into her mouth with her little fingers. I make them in disposable muffin tin liners; paper liners if I want to reheat them in the microwave or aluminum if they will be served cold at a picnic. For an extra treat, add a big scoop of vanilla ice cream on the side of Bébé’s dish and be careful nobody tries to steal it away from her!

banana-mango muesli crumbles
muesli-crumble bananes et mangues
 |
 |
| 5 |
15 |
Makes 6 or 12 treats
6 standard (or 12 mini) muffin tin liners
2 bananas
12 slices frozen peeled mango
1¼ cups (250 g) muesli or granola with raisins
2 tablespoons butter
1 teaspoon honey
- Preheat the oven to 425°F (210°C).
- Line a muffin or mini-muffin tray or sheet pan with the tin liners.
- Peel the bananas and slice them into rounds.
- Distribute the slices of frozen mango among the muffin tin liners and add the banana slices on top.
- Cover the fruit with the muesli and add a few small bits of butter and 1 or 2 drops of honey to each crumble.
- Bake for 15 minutes. Make sure the crumble doesn’t brown too much. You can cover the tins with aluminum foil for the final minutes, if needed.
- Remove the crumbles from the oven and let cool. Serve warm, or once cool, put them into a freezer bag and freeze.
yummy tips
This tropical fruit crumble can be made with pineapple or lychees instead of mango.
yellow plum and chocolate muesli crumbles
muesli-crumble mirabelles et chocolat
|
|
| 5 |
15 |
Makes 6 or 12 treats
6 standard (or 12 mini) muffin tin liners
12 to 15 yellow (Mirabelle) plums, about 2½ pounds (1 kg)
1 tablespoon sugar
1¼ cups (250 g) crunchy chocolate chip muesli
2 tablespoons butter
1 teaspoon honey
- Preheat the oven to 425°F (210°C).
- Place the muffin tin liners in muffin tins or on a sheet pan.
- Wash and pit the plums, then cut them into quarters.
- Distribute the plums among the muffin liners and sprinkle with sugar.
- Cover the fruit with the crunchy chocolate chip muesli and add a few small bits of butter and 1 to 2 drops of honey to each crumble.
- Bake for 15 minutes. Make sure the crumble doesn’t brown too much. You can cover the tins with aluminum foil for the final minutes, if needed.
- Remove the crumbles from the oven and let cool. Serve warm, or once cool, put them into a freezer bag and freeze.
yummy tips
Can’t find crunchy chocolate chip muesli? If you don’t want to miss out on the chocolate, simply chop a few squares of your favorite chocolate and add it to the muesli.

raspberry-mint muesli crumbles
muesli-crumble framboises et menthe
|
|
| 5 |
15 |
Makes 6 or 12 treats
6 standard (or 12 mini) muffin tin liners
1 pound (450 g) raspberries
1 tablespoon sugar
6 fresh mint leaves
1¼ cups (250 g) crunchy muesli with dried fruit
2 tablespoons butter
1 teaspoon honey
- Preheat the oven to 425°F (210°C).
- Line a muffin or mini-muffin tray or sheet pan with the tin liners.
- Wash the raspberries well and distribute among the muffin liners. Sprinkle with sugar. Finely mince the mint leaves and sprinkle them over the raspberries.
- Cover the fruit with crunchy muesli and add a few small bits of butter and 1 or 2 drops of honey to each.
- Bake for 15 minutes. Make sure the crumble doesn’t brown too much. You can cover the tins with aluminum foil for the final minutes, if needed.
- Remove the crumbles from the oven and let cool. Serve warm, or once cool, put them into a freezer bag and freeze.
yummy tips
You can also make this recipe with strawberries or blueberries when they’re in season. For a quick dessert (no cooking required), fill small glasses with a layer of fruit, then fromage blanc or plain, unsweetened Greek yogurt, a couple drops of honey, and crunchy muesli on top. Quick, attractive, and above all, delicious!

melon-peach kabobs
brochettes melon-pêche
|
| 5 |
Makes 2 treats
2 slices melon
1 yellow peach
2 wooden skewers
- Peel and deseed the melon, then cut it into small cubes.
- Wash the peach and remove the pit, then cut it into small pieces.
- Slide the fruit onto wooden skewers, alternating melon cubes and peach pieces.
- Before serving the kabobs to Bébé, use scissors to cut off the sharp tip of the skewers.
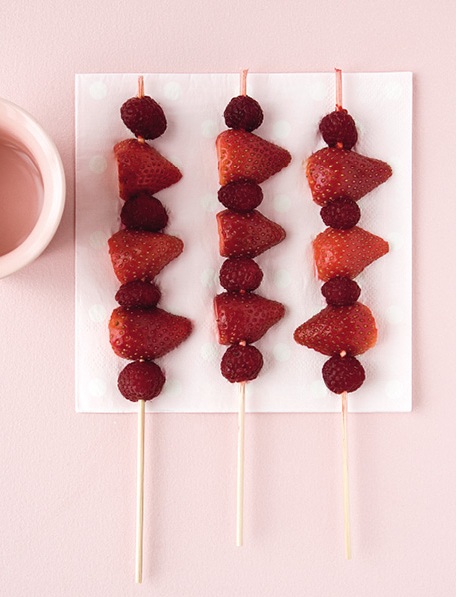
strawberry-raspberry kabobs
brochettes fraise-framboise
|
| 5 |
Makes 2 treats
5 strawberries
10 large raspberries
2 wooden skewers
- Wash the strawberries well, remove any leaves, and cut them in half.
- Wash the raspberries well, inside and out.
- Slide the berries onto wooden skewers, alternating strawberries and raspberries.
- Before serving the kabobs to Bébé, use scissors to cut off the sharp tip of the skewers.

mango-banana kabobs
brochettes mangue-banane
|
| 5 |
Makes 2 treats
½ mango
1 banana
2 wooden skewers
- Without breaking through the peel, score the flesh of the half mango first lengthwise and then widthwise. Invert the mango half by pressing the peel side, then slide the knife along the peel to remove the mango cubes that are now sticking up.
- Peel the banana and slice it into rounds.
- Slide the fruit onto wooden skewers, alternating cubes and rounds. Before serving the kabobs to Bébé, use scissors to cut off the sharp tip of the skewers.

clementine-grape kabobs
brochettes raisin-clémentine
|
| 5 |
Makes 2 treats
10 seedless green grapes
1 clementine
2 wooden skewers
- Wash the grapes and cut them in half.
- Peel the clementine and remove as many of the white filaments as possible. Separate the sections.
- Slide the fruit onto wooden skewers, alternating grapes and sections of clementine. Before serving the kabobs to Bébé, use scissors to cut off the sharp tip of the skewers.

lemon-yogurt cake
gateau au citron et au yaourt
|
|
| 10 |
45 |
Serves 8 to 10
½ cup (120 ml) plain, unsweetened Greek yogurt
1 cup (200 g) sugar
1 vanilla bean
2 eggs
3½ tablespoons melted butter
Pinch of salt
2 teaspoons and a pinch of baking powder
1¼ cups (250 g) all-purpose flour
Juice from 1 lemon
- Preheat the oven to 350°F (180°C).
- Mix the yogurt and sugar in a bowl.
- With a knife, open the vanilla bean lengthwise and scrape out the seeds into the bowl.
- Break the eggs into the yogurt mixture and beat them in vigorously.
- Add the butter and salt, and mix. Then add the flour in small amounts, stirring each time until the batter is smooth. Stir in the lemon juice.
- Pour the cake batter into an 10-inch (25 cm) silicone mold or buttered cake pan. Bake for 45 minutes.
- Verify that the cake is cooked by inserting a toothpick or knife into its center: If the toothpick comes out clean, the cake is ready.
- Let it sit for a few minutes before removing it from cake pan.
- Serve the cake warm with a fruit kabob!
yummy tips
Try variants of this cake by replacing the lemon juice with 3 tablespoons of cocoa powder, the juice of ½ orange, or ½ cup frozen raspberries.

Maya’s mini-muffins
les mini-muffins de Maya
|
|
| 10 |
15 |
Makes 20 mini-muffins
20 mini-muffin tin liners
4 eggs
1¼ cups (250 g) sugar
1 vanilla bean
6 tablespoons water
2 teaspoons and a pinch of baking powder
1¼ cups (250 g) all-purpose flour
- Preheat the oven to 350°F (180°C).
- Place the muffin tin liners in muffin tins or on a sheet pan.
- Break the eggs into a bowl and add the sugar. Beat vigorously.
- With a knife, open the vanilla bean lengthwise and scrape out the seeds into the bowl.
- Add the water and continue to beat the mixture. Add the baking powder, then incorporate the flour gradually, mixing constantly.
- Fill the muffin tin liners halfway with batter. Bake for 15 minutes.
- Verify that the mini-muffins are done by sticking a toothpick or a knife into their center. If the toothpick comes out clean, the muffins are ready.
- Remove the muffins from oven and let them cool on a rack before you serve them with fruit kabobs.
yummy tips
You can turn these kids’ mini-muffins into light financiers by adding 3 tablespoons and 1 teaspoon (50 g) almond powder in with the flour. Very, very enjoyable, but only recommended for babies older than twelve months and with no family history of food allergy.

oatmeal cookies
cookies aux flocons d’avoine
|
|
| 10 |
10 |
Makes 16 to 20 cookies
1 stick (110 g) butter
1¼ cups (250 g) oats
⅔ cup (150 g) brown sugar
⅔ cup (100 g) raisins
¾ cup (150 g) all-purpose flour
5 tablespoons water
- Preheat the oven to 350°F (180°C).
- Melt the butter.
- Put the oats into a mixing bowl, then pour the melted butter over them and stir.
- Add the sugar and raisins, then incorporate the flour gradually. Mix in the water. Your batter should be firm.
- Make small balls of cookie mixture and place them 2 inches apart on a baking sheet lined with parchment paper. Flatten them slightly and bake in the center of the oven for 10 minutes.
- Remove the cookies from the oven and let them cool on a rack before serving with fruit kabobs.
yummy tips
Feeling naughty? Replace the raisins with chocolate chips . . . Shhh! We won’t tell Dr. Lalau Keraly!


milkshakes: the basics . . .
milk-shake–la base . . .
 |
 |
| 24h |
0° |
Makes two 5-ounce (150 ml) servings
½ cup (120 ml) plain, unsweetened Greek yogurt
½ cup (120 ml) milk
strawberries and a pinch of brown sugar
6 to 8 strawberries, washed well and leaves removed
1 teaspoon brown sugar
½ mango, skinned and pitted
½ banana with skin removed
blueberries and raspberries
2 tablespoons blueberries, washed well
10 raspberries, washed well
peach and a drop of honey
1 peach, pitted and skinned
1 teaspoon honey
- Put the yogurt, milk, and fruit into a bowl, as well as any sugar or honey (if you’re serving to children twelve months and up).
- Blend well until there are no lumps.
- If the milkshake is too thick, add a bit more milk and stir.
toasted fruit pockets
Because there is nothing more satisfying than a child taking immense pleasure from a meal, I came up with these “fruit pockets,” which elicited a hip-hip-hooray from my children and their friends. The most fabulous thing about these fruity snacks is, of course, that they are fun. Obviously, these pockets are full of the nutritional benefits of fresh fruit, which helps your child fill up on vitamins, minerals, and fiber. But at this exploratory stage when Bébé begins to enjoy seeing familiar objects appear and reappear, watching her plate become a hide-and-seek playground will be an unmatchable pleasure for her. And if she manages to hold these little fruit pockets in her own little foodie hands, the bonus is another step toward independence. Everything about these snacks is good!

basic recipe
recette de base
Makes 1 fruit pocket
2 slices whole wheat or whole grain bread
½ teaspoon butter
One of the fruit fillings in the following recipes
- Butter the slices of bread on one side.
- Spread the fruit filling (see the following recipes) on the buttered side of one of the slices and cover with the other slice, buttered side toward the fruit.
- Place the fruit pocket in a sandwich press, close, and let cook for about 3 minutes.
- Remove the fruit pocket from the grill and let cool before cutting diagonally in half.
- Bébé can eat these fruit pockets all on her own, at home, at a picnic, on the road . . . it’s the most practical snack ever!
yummy tips
When you bring your favorite toasted fruit pockets on a picnic with you, let them cool entirely before wrapping them in aluminum foil. And don’t cut them in half, or the fruit will ooze out before snack time! These will keep for a couple of hours in a plastic bag.

apple-banana filling
garniture pomme-banane
½ apple
½ banana
- Wash the apple and remove the core and any spare seeds. Grate the apple and squeeze the pulp between your hands to remove some of the juice, which would otherwise make the fruit pocket soggy.
- Peel the banana and slice it into rounds.
- Place the grated apple and the banana slices on a slice of buttered bread, cover with the other slice, and cook according to the basic recipe.

mango-lychee filling
garniture mangue-litchi
4 slices mango
3 lychees, peeled and pitted
- Cut the pitted lychees into quarters and place them on a paper towel for a few minutes to absorb some of their juice. Wet fruit will result in a soggy fruit pocket.
- Place the slices of mango and the lychees on a slice of buttered bread, cover with the other slice, and cook according to the basic recipe.

vanilla-pear filling
garniture poire-vanille
½ pear
1 vanilla bean
- Wash the pear and remove the core and any spare seeds. Store one half of the pear in plastic wrap in the refrigerator. Slice the other half into thin slices.
- With a knife, open the vanilla bean lengthwise and scrape out the seeds.
- Place the pear slices and the vanilla bean seeds on a slice of buttered bread, cover with the other slice of bread, and cook according to the basic recipe.

fig and honey filling
garniture figue au miel
1 very ripe fig
1 teaspoon honey
- Cut the fig in half and scrape out all of the red pulp. Discard the skin.
- Spread the fig pulp on a slice of buttered bread, add the honey, cover with the other slice of bread, and cook according to the basic recipe.
first birthday
Pffffffttt! In a spray of spittle, Bébé is already blowing out her first candle. Along with her first teeth, her first words, and her first steps, this is a marvelous moment. And just because she’s only twelve months old doesn’t mean she has to stick to her usual apple-banana compote! At one year, you can serve her a real big-kid birthday treat. Because, once in a while, it’s great to indulge in something exceptional—and to do so as a family. So here is my favorite selection of crème de la crème birthday cakes for “big bébé gourmets”! They have brought joy to my daughter’s and son’s, my nieces’ and nephews’ birthday parties . . . and to their respective parents. Get ready for sticky faces and hands!

my grandmother’s birthday cake
gateau d’anniversaire de ma grand-mère
|
|
| 10 |
45 |
Serves 8 to 10
4 eggs
1¼ cups (250 g) sugar
1 vanilla bean
6 tablespoons water
2 teaspoons and a pinch of baking powder
1¼ cups (250 g) all-purpose flour
2 vanilla beans
13.5 fluid ounces (400 ml) heavy cream
1 teaspoon vanilla extract
1½ teaspoons sugar
6 tablespoons raspberry or strawberry jam
1 pound (450 g) raspberries, washed well
And one magnificent birthday candle!
- Preheat the oven to 350°F (180°C).
- Break the eggs into a bowl and add the sugar. With a knife, open the vanilla bean lengthwise and scrape out the seeds into the bowl. Beat well. Add the water and continue to beat the mixture. Add the baking powder, and incorporate the flour gradually.
- Pour the batter into a buttered 10-inch (25 cm) round cake pan. Bake in the preheated oven for 45 minutes. Verify that the sponge cake is cooked through by inserting a toothpick or knife into the center: If the toothpick comes out clean, the cake is done. Let the cake cool in the pan, then transfer it to a cooling rack.
- Next, prepare the icing. With a knife, open the vanilla beans lengthwise and scrape out the seeds.
- Put the cream, vanilla extract, sugar, and vanilla bean seeds into a bowl. Whip this mixture until it becomes firm whipped cream. (I advise using an electric mixer.) Let it sit in the refrigerator for 30 minutes.
- When the sponge cake has cooled completely, cut it horizontally into 3 discs, each about ½” thick.
- Take the top disc, always a little rounded, turn it over, and place it on a serving dish or large plate. Spread 2 tablespoons of jam on top (cut side), add a layer of vanilla whipped cream, then half of the fresh raspberries. Place the second sponge cake disc on top and repeat the previous step, reserving 9 raspberries for the top. Finish with the last sponge cake disc.
- Cover the cake entirely with the remaining whipped cream and decorate with the reserved fresh raspberries and the birthday candle. Let sit 1 hour before serving.

chocolate-covered dried fruit treats
bonbons de fruits secs en robe de chocolat
|
|
| 15 |
5 |
Makes 20 treats
20 mini-muffin tin liners
10 dried apricots
⅓ cup (60 g) raisins
4 prunes
3½ ounces (100 g) milk chocolate
- Place the tin liners on a tray.
- Chop the dried fruit.
- Place the chocolate in a metal bowl or small pan and place in a pot full of water to create a double boiler. Bring the water to a boil and allow the chocolate to melt, stirring gently from time to time (no water should spill into the chocolate).
- Once the chocolate is melted, add the dried fruit. Mix well, until all the fruit is covered with chocolate.
- Using 2 teaspoons, drop a small amount of chocolate-covered fruit into each tin liner.
- Place the tray immediately into the refrigerator and let the treats chill 2 hours before serving.
yummy tips
These treats are so easy to make. I frequently make an adult version by adding chopped hazelnuts and using dark chocolate. They’re perfect with coffee after a nice meal, and much more nutritious than an ordinary chocolate truffle.

caramel-covered fresh fruit lollipops
sucettes de fruits frais au caramel
|
|
| 10 |
5 |
Makes 20 lollipops
20 wooden skewers
20 strawberries
3 sweet-tart apples (Royal Gala, Pink Lady)
1¼ cups (250 g) sugar
⅔ cup (160 ml) water
- Use scissors to cut off the sharp ends of the skewers and cover a dish with wax paper.
- Wash the strawberries and remove any leaves. Wash the apples, remove the cores and any spare seeds, and cut into small cubes. Slide a strawberry and two apple cubes onto a wooden skewer.
- Now get any children out of the kitchen. You are going to make caramel and it’s very, very hot! Pour the sugar and water into a pot. Bring to a boil without stirring. When the sugar begins to brown, stir delicately. As soon as the caramel is golden in color, remove the pot from the heat and set it in cold water to stop the caramelization.
- Caramel solidifies rapidly, so don’t waste any time: Dip your fresh fruit lollipops one by one into the caramel. Lay them on the dish covered in wax paper to cool and harden.
- Once cool, arrange the lollipops in a vase or a sturdy glass and let the children help themselves to these crunchy, fruity lollipops.
yummy tips
You can make these lollipops using any firm and slightly tart fruit. Forget about bananas, but melon, nectarines, and apricots work well.

raspberry roll
roulé aux framboises
|
|
| 10 |
8 |
Serves 10
3 eggs
1 cup (200 g) sugar
2 teaspoons and a pinch of baking powder
¾ cup (200 g) all-purpose flour
¼ cup (60 ml) milk
1 pound (450 g) raspberries, washed well and crushed
- Preheat the oven to 400°F (200°C) and line a jelly roll pan or rectangular 10½ x 15½-inch (30 x 40 cm) oven-safe dish with parchment paper.
- Break the eggs into a bowl and add the sugar. Beat with an electric mixer until light and airy.
- Stirring constantly, add the baking powder and flour. Pour in the milk and whip lightly until the batter is smooth.
- Pour the batter into the pan. Bake in the preheated oven for 8 to 10 minutes. It should be springy to the touch and beginning to shrink away from the sides of the pan.
- Remove the sponge cake from the oven and turn it out onto wax paper on your countertop. Spread the crushed raspberries evenly over the surface and, starting with the short side, roll the cake until you have a formed a jelly roll.
- Place the roll in the refrigerator with the seam underneath. Let it sit for 1 hour.
- Cut the roll into ¾-inch (2 cm) slices and serve!
yummy tips
No fresh fruit in the refrigerator? In lieu of raspberries, you can fill your roll with any thick compote, such as Peach Compote and the other fruit compotes that follow.