
Row 6: Posy Flowers
You will master the following techniques with this row:
• Careful color placement for paper piecing
Materials
See Fabrics for a complete list of suggested fabrics for this quilt.
 When choosing colors, remember that the row will be far more vibrant if you use a full range of light to dark fabrics with lots of contrast. Don’t be afraid of using black.
Templates
You only need templates for the stem/leaf sections. Trace the stem/leaf section of the pattern onto template plastic. This includes sections A, B, and C (all numbers).
Cut out all pattern pieces directly on the lines, and throw away section C (you will not need a template for this).
Cutting
 To give your flowers a beautiful scrappy look, cut every piece in a variety of fabrics. For example, when cutting the flower stems, use as many different greens as possible.
STEM/LEAF SECTIONS
 Because there are so many angles on these leaves, you must add a ⅜˝ seam allowance while cutting.
Use the templates to cut out all the stem/leaf fabric pieces on the bottom half of the flowers for both sections A and B. Pay careful attention to which ones are the off-white background pieces.
• Cut pieces for all 7 large flowers and all 9 small flowers.
 Since you are cutting many different section pieces in many different fabrics for these flowers, we strongly suggest that you keep all the pieces for each flower together in a clearly labeled pile.
• Cut 7 strips 1˝ × 6˝ for the large flower stems (section C).
• Cut 9 strips ¾˝ × 3½˝ for the small flower stems (section C).
FLOWERS (NO TEMPLATES)
 This row looks best if it is really scrappy. Make sure you also cut the flower pieces in a variety of colors and prints. For example, when you cut 9 squares for the small flower center, cut from several different fabrics.
Fat quarters
• Cut 1½˝ × LOG strips from a variety of colors for the large flower petals (2 through 4).
• Cut 1¼˝ × LOG strips from a variety of colors for the small flower petals (2 through 4).
• Cut 7 squares 1¾˝ × 1¾˝ for the large flower centers (1).
• Cut 9 squares 1¼˝ × 1¼˝ for the small flower centers (1).
OFF-WHITE SOLID
• Cut 2 strips 1¼˝ × WOF for the large flower background (5); you’ll need about 70˝ total.
• Cut 1 strip 1˝ × WOF for the small flower background (5); you’ll need about 41˝ total.
• Cut 9 rectangles 3˝ × 4˝. These will be stitched at the top of the small flowers so they fit into the row.
• Cut 14 squares 2˝ × 2˝; then cut them in half diagonally to create 28 corner triangles for the large flowers (6).
• Cut 18 squares 1¾˝ × 1¾˝; then cut them in half diagonally to create 36 corner triangles for the small flowers (6).
Paper Piecing
1. Photocopy or trace the large and small flower patterns onto vellum paper, making sure to transfer all numbers and markings. You need 7 large flower templates and 9 small flower templates. It is helpful to make an extra template of each in case of mistakes.
2. Cut apart the vellum flowers by section, creating a flower top and sections A, B, and C.
3. Paper piece sections A and B as you did in Row 5: Birds, Paper Piecing.
 Because sections A and B of the leaves have so many angles, it can be difficult to judge where to place the fabric pieces prior to stitching. We suggest you use an extra ⅛˝ seam allowance to help with this problem. Prior to pinning the fabric piece down, fold the seam allowance under and hold the piece in place; then check if it is correct.
4. Complete all sections A and B for all flowers.

Cut apart vellum flower sections.
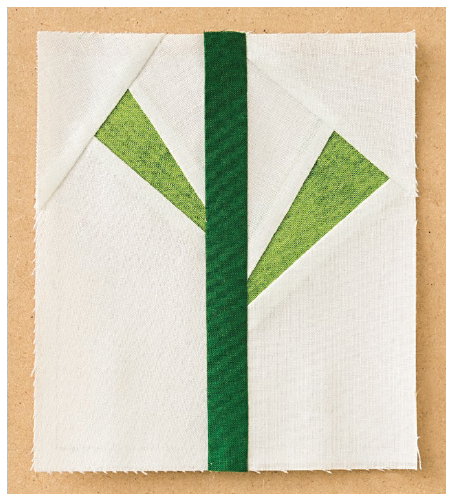
5. Stitch together the A and B sections for all flowers by joining a C stem strip in the middle. Make sure to use the correct size of strips depending on whether it is a large or small flower. Trim the stem/leaf section, leaving a ¼˝ seam allowance all the way around.

Completed stem/leaf section
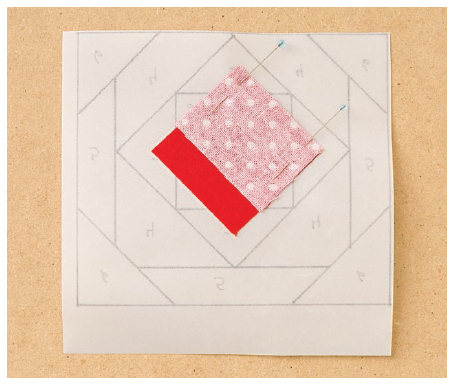
6. Turn the vellum piece for the top of the flower to the wrong side. Using a fabric glue stick, glue the fabric for center square 1 into place with a dot of glue (remember to only glue down the first piece to a section). From this point forward, make sure there is a ¼˝ seam allowance outside the stitch line on all sides when attaching fabrics.
7. Cut a piece of a correct-size strip (depending on if you are starting with a large or small flower) for 1 of the section 2s, and pin it right sides together on top of the center piece 1. The piece should be long enough to extend at least ¼˝ beyond each side of the line between sections 1 and 2.

Pin a piece 2 fabric on top of piece 1.
8. Repeat Step 7 for the opposing piece 2.

Repeat for the opposing piece 2.
9. Stitch on the lines for both of the piece 2s. Trim both seam allowances down to about ¼˝ on the large flowers and ⅛˝ on the small ones. (There is no need to use a ruler; just gauge the measurement roughly.) Press.

Stitch, trim down the seam allowances, and press.
10. Repeat this process with the other 2 opposing piece 2s and all of the following numbers through 5 for all of the flower tops.

All 4 of the piece 2s have been stitched and pressed.

Add the first 2 of the piece 3s and press.

Add the remaining piece 3s and press.

Add the piece 4s and press.
11. Add the piece 5s using background fabric, and then stitch the correct-size triangles for the corner 6s in the same manner on all of the blocks.

Stitch the corner triangle 6s.
At this point, you should have all of the stem/leaf and flower sections completely paper pieced for both sizes and trimmed with a ¼˝ seam allowance.
12. Match the 2 block sections, right sides together, and stitch with a ¼˝ seam allowance to complete the block. Press the seam open.

Stitch together the block halves.
13. Stitch an off-white 3˝ × 4˝ rectangle to the top of every Small Flower block. Press the seam allowances toward the plain block.

Complete flower blocks
Putting Together the Row
Stitch together all the flowers in a row. Press the seams open.

For all printable patterns or digital content: http://tinyurl.com/11277-patterns-download