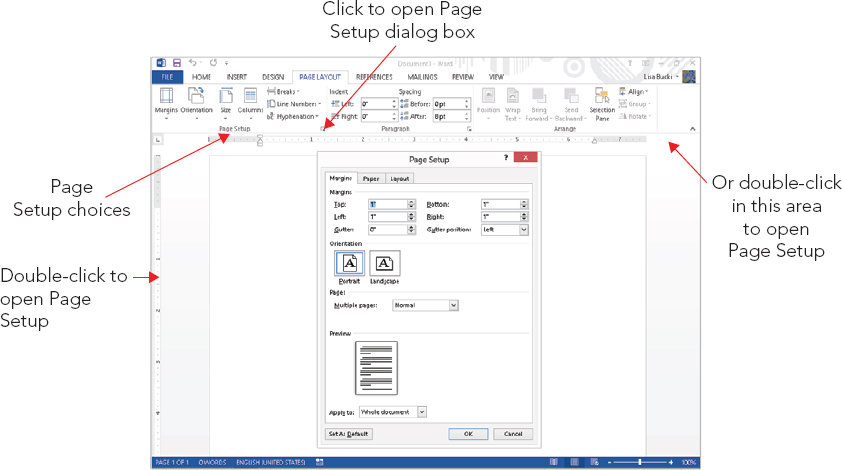
FIGURE 8.1 The Page Setup group of the Page Layout tab enables you to make key document design choices and to open the Page Setup dialog box.
IN THIS CHAPTER
Adjusting basic page setup
Working with section breaks and section formatting
Understanding the header/footer layer
Navigating and designing headers and footers
Including page numbers
Creating and changing columns
Applying page borders
Working with themes
This chapter examines some concepts that might be a bit challenging if you’re new to Word, perhaps even if you’re not new to Word. Grasping these concepts, however, enables you to organize and vary the overall setup in your documents as needed.
The chapter starts out by identifying how to use basic Page Setup choices. From there, you learn how to use section breaks to change the page setup as needed for different parts of the document. Next you learn how to add a header or footer to identify document or section contents and number pages. Finally, the chapter shows you how to use columns to make text more readable in common publications such as newsletters, how to add a page border, and how to work with themes.
The Page Setup group on the Page Layout tab of the Ribbon offers the key settings you might need to change when determining the overall layout of a document. In a basic document without section breaks, most of the Page Setup group choices apply to the entire document. Once you start adding section breaks, as described later in the chapter, you can adjust the Page Setup choices within each individual section as needed.
Unlike some other features in Word 2013 where traditional dialog boxes have been replaced with panes, Word still offers a Page Setup dialog box that you can use to fine-tune page formatting for the overall document (or current section, if applicable). To open the Page Setup dialog box, click the Page Layout tab, and then click the Page Setup group dialog box launcher. Figure 8.1 shows the Page Setup group choices and the Page Setup dialog box. Work on the various tabs of the dialog box as described throughout this chapter, and then click OK to apply your changes and close the dialog box.
FIGURE 8.1 The Page Setup group of the Page Layout tab enables you to make key document design choices and to open the Page Setup dialog box.
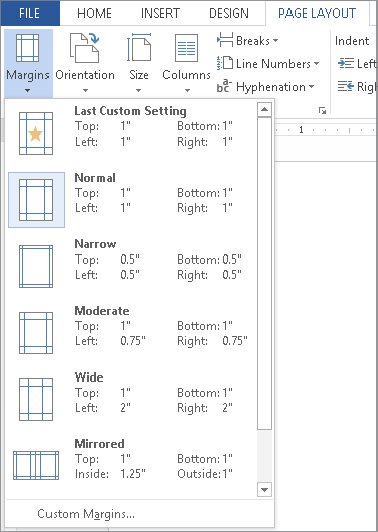
Click Margins in the Page Setup group of the Page Layout tab to display the gallery of choices shown in Figure 8.2. You can apply one of the available preset margin settings by clicking it. If the document contains multiple sections, the presets will be applied only to the current document section if nothing is selected, or only to the selected sections if multiple sections are included in the selection.
FIGURE 8.2 The Margins gallery offers a selection of preset margins.
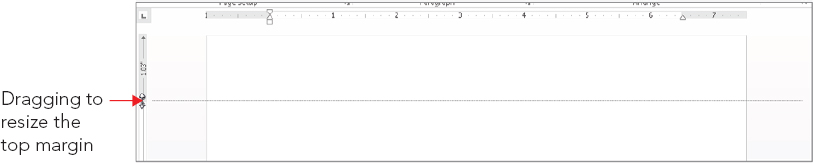
If you want more precise control, choose click Custom Margins, which opens the Page Setup dialog box to the Margins tab, shown back in Figure 8.1. From here you can control all margins as needed and apply the change where you want, which you’ll learn more about later in the chapter. You can also adjust the top and bottom margins by dragging the boundary between the shaded and unshaded areas in the vertical ruler at the left side of the document window as shown in Figure 8.3. To increase the top margin, drag the top border down. To increase the bottom margin, draw the bottom border up. In either case, press the Alt key to display the margin setting as you’re dragging. You can similarly drag to resize the left and right margins on the horizontal toolbar, but you may need to move the indention controls out of the way.
FIGURE 8.3 Drag the vertical ruler to change top and bottom margins.
Orientation refers to whether the page is laid out horizontally (landscape) or vertically (portrait — the default orientation). You might sometimes need to rotate a document to landscape in order to fit wider pictures, charts, tables, or other objects. To change the document orientation, click Orientation in the Page Setup group of the Page Layout tab, and click either Landscape or Portrait as needed.
If you only have one object or page that has content that is too wide to fit, you can keep the orientation as portrait and rotate the table, chart, or picture instead. For pictures and charts, rotation isn’t challenging. With Wrapping (Picture Tools ⇒ Format tab, in the Arrange group) set to anything other than In line with text, simply rotate the picture or chart 90 degrees by dragging the top center rotation handle, or by choosing Picture Tools ⇒ Format ⇒ Arrange ⇒ Rotate Objects ⇒ Rotate Right 90° or Rotate Left 90°. (For shapes and some other objects, the command is on the Drawing Tools ⇒ Format contextual tab.) If you rotate only the object, the headers and footers will still display according to the Portrait orientation.
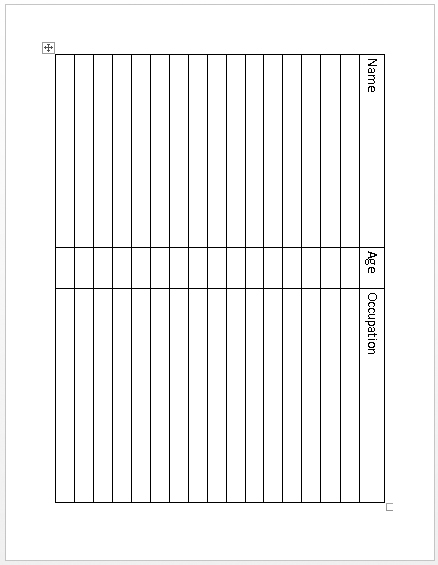
Tables are a bit more challenging, but you have several options. If you’re just now creating the table, select the entire table and in the Table Tools ⇒ Layout tab in the Alignment group, click Text Direction to rotate the text so that it can be read if you tilt your head to the right or left. Keep in mind that columns and rows are reversed. It’s not necessarily easy to work this way, but it can be done, as shown in Figure 8.4.
FIGURE 8.4 With all text in a table rotated 90 degrees, it’s possible to create a sideways table, rather than have to change page orientation within a document.
Another option would be to copy a finished table to the Clipboard, choose Paste ⇒ Paste Special in the Clipboard group of the Home tab, and paste the table into the document as a picture. Because it’s now a picture, you can choose any floating wrapping style and then rotate the table as needed so that it fits comfortably, but sideways, in a portrait-oriented Word document page. Headers and footers will display in portrait mode because you haven’t changed the paper orientation. The downside is that sometimes the graphics resolution of this technique isn’t perfect. You’ll have to decide if it’s acceptable and legible. Plus, to make changes in the table, you need to maintain a copy of the actual table and remake the conversion as needed.
The Size choice in the Page Setup group of the Page Layout tab refers to paper size. Click the Size button display a gallery of preset standard sizes, shown in Figure 8.5. Clicking More Paper Sizes displays the Paper tab in the Page Setup dialog box as shown in Figure 8.6. To create your own paper size, open the Paper size drop-down list at the top and click Custom size. Enter the desired sizes in the Width and Height text boxes; the maximum entry for each is 22 inches. Make sure your printer supports the measurements you enter, and then click OK to apply the size change to the document.
FIGURE 8.5 Click a preset paper size, or click More Paper Sizes to display the Paper tab in the Page Setup dialog box.
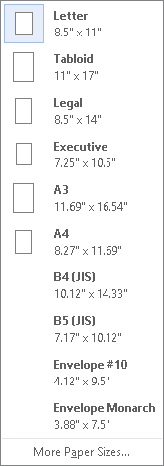
FIGURE 8.6 Choose Custom size and then enter new Width and Height measurements.
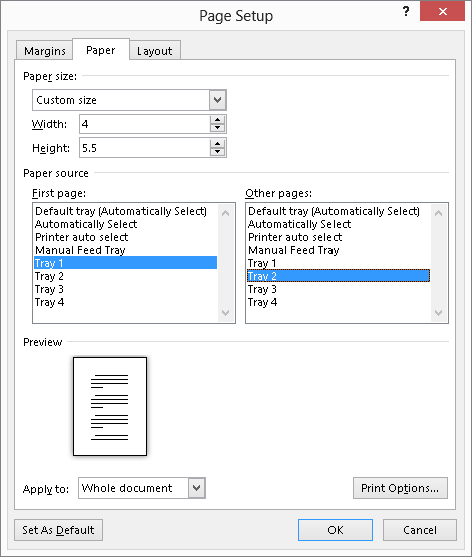
Note that you also can change the Paper source settings on the Paper tab of the Page Setup dialog box, as shown in Figure 8.6. For example, if the first page of the document prints on letterhead and the rest prints on plain paper, choose the applicable sources from the First page and Other pages lists.
Word uses section breaks to separate distinctly formatted parts of a document. Most documents, in fact, start off with and have just a single section. But a more complex document like a product brochure might need different sections if, for example, you want the product description text to appear in two columns on one page and the product specifications to appear in three columns on another page. You have to create new sections when you want to vary the following kinds of formatting within one document:
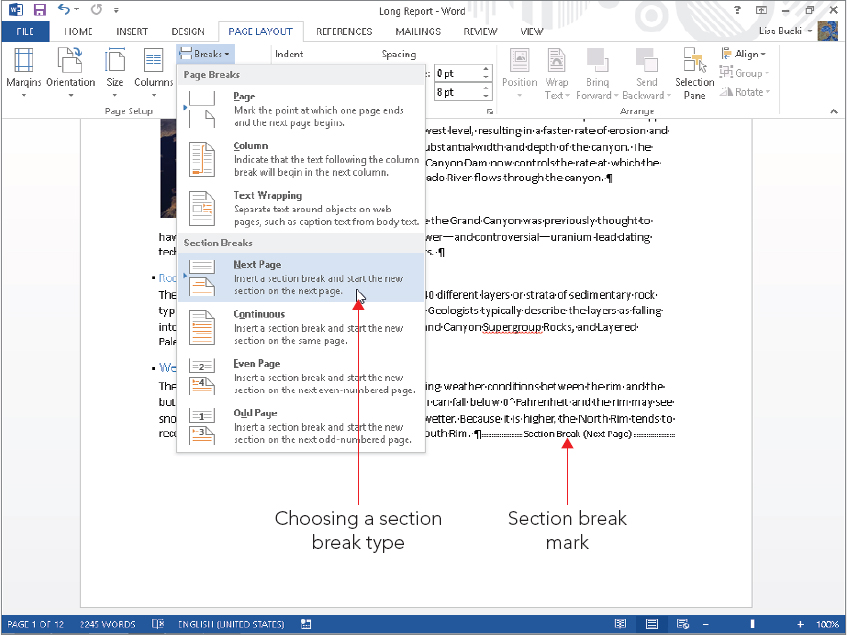
Word uses four kinds of section breaks. What kind of break you use depends on why you’re breaking the text:
If you set up a letter in which the first page is to be printed on letterhead but subsequent pages are to be printed on regular stock (using different paper feed methods), the first page should be in a separate document section, because you will probably not want it to display any header or footer information that might overprint the preprinted letterhead contents. If you set up a letter for which the first or last page is an envelope, the envelope must be in a separate section — for multiple reasons, because envelopes typically use a different printer paper source, different orientation (landscape), and different margin settings.
To insert a section break:
FIGURE 8.7 The icons next to the four section break types provide a graphic hint of what the different breaks do.
To delete a section break, press Ctrl+Shift+8 (Ctrl+∗) or click the Show/Hide button in the Paragraph group of the Home tab of the Ribbon to toggle the display of nonprinting formatting characters, such as the section break mark shown in Figure 8.7. Click just to the left of the section break you want to delete to position the insertion point there, press Shift+Right Arrow to select the mark, and then press Delete. If this results in an extra empty paragraph, delete it.
Because some kinds of formatting require a section break in order to vary within a document, Word automatically inserts one or more section breaks when you apply “qualifying” formatting to selected text. Sometimes it gets those breaks right, sometimes not. You’ll have to be vigilant if you’re going to rely on this feature.
For example, suppose you want an interior set of paragraphs to be formatted in three columns, while the adjacent areas are formatted as a single column. Select the paragraphs you want to differentiate and then set up the columns as described later in this chapter. Word automatically inserts Continuous section breaks before and after the selected text to cordon it off for the distinct formatting.
Sometimes, but not always, Word will insert the wrong kind of section break before and/or after the selected text. It’s never quite clear why, but when that happens the best recourse is to press Ctrl+Z to undo the attempt, bracket the target text with the desired type of section breaks, and then apply the formatting to the section you want formatted differently.
Styles can contain font and character- and paragraph-formatting attributes. However, they cannot contain section-formatting attributes. Therefore, for example, you cannot create a style that would enable you to format a given selection with three columns and 1.5-inch left and right margins. Stand by for a few minutes, however, and you’ll see how you can indeed effectively create a style for section formatting, although it’s not really a style.
Recall that in Chapter 6, “Paragraph Formatting,” you learned that the paragraph mark is the repository of paragraph formatting. Similarly, the section break is the repository of section formatting. If you delete a section break, the current section adopts the formatting of the section that follows — that is, the section whose section break is still intact.
Where is the section break in a document that has only one section? In fact, most documents have only a single section, so this is a serious and valid question. There is an implied section break at the end of the document, so if you insert a section break into a single-section document, the formatting for section one resides in that section break, and the formatting for section two effectively resides in the permanent paragraph mark at the end of the document. (If you create a new, blank document with nonprinting characters displayed, you’ll see that it contains a paragraph mark you cannot delete.)
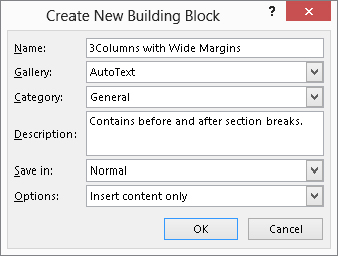
If section formatting can’t reside in a style, then how can you save it for later use? Suppose you often use a precise set of section formatting attributes — margins and columns, for example — and want to save them for use in other documents. There is a way, but it doesn’t involve using what’s traditionally called a style. Instead, use a Quick Part or a Building Block. To do this:
FIGURE 8.8 Save a Building Block to create reusable section “styles.”
Now, whenever you want this particular kind of formatting, it’s there waiting for you. Choose Insert ⇒ Text ⇒ Quick Parts, and if it’s in the Quick Parts gallery, click it to insert it. If it’s in AutoText, point to AutoText and click it. Or, if it’s elsewhere, choose Building Blocks Organizer to find and insert it. Or, if the first part of the name is unique like the example in Figure 8.8 and you saved it to the AutoText gallery, type it and press F3.
You’re already seen the Margins and Paper tabs in the Page Setup dialog box. Click within the section where you want to change the settings, and then make choices from the Margins and Paper tabs as described earlier. After you click OK to close the Page Setup dialog box, the changes will apply in the current section only.
The Page Setup dialog box also includes a Layout tab, visible in Figure 8.9, that houses additional settings that are vital for section setup. The choices under Headers and footers enable you to control whether a section uses all the same header/footer information, or whether the footer information is different. See the discussion of headers and footers later in the chapter to learn more about this. The other type settings on this tab will be described shortly.
FIGURE 8.9 The Different odd and even and Different first page under Headers and footers settings enable you to set different headers and footers without using another section break.
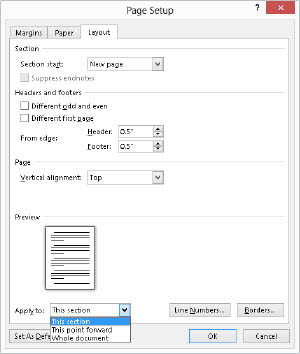
All three tabs of the Page Setup dialog box include an Apply to drop-down list. If you haven’t added any additional section breaks to the document, by default this setting is set to Whole document, although you can open the drop-down list and click This point forward instead. If you’ve created a section, by default, Apply to displays This section, which is why the Page Setup choices apply only to the current section as noted earlier. If you’ve selected text in one or more sections, the list changes to include Selected sections or Selected text options. The bottom line is that you need to pay attention to the Apply to setting on any of the Page Setup dialog tabs to ensure you’ve specified the right document location for applying the Page Setup changes.
The Section start setting shown in Figure 8.9 is a bit cryptic and confusing to many users, but it can be extremely useful. Have you ever ended up with the wrong kind of section break? For example, suppose you want a Continuous section break, but you have a New Page, Odd, or Even section break instead. This can happen either because you inserted the wrong kind of break, or because Word inserted the wrong kind of break automatically.
The ordinary impulse is to delete the wrong one and insert the kind you want. Sometimes, however, despite your best efforts, you still end up with the wrong kind of break. This is exactly the situation where you need to use Section start. Click to put the insertion point in the section that is preceded by the wrong kind of break. Open the Page Setup dialog box using any of the techniques described earlier. Click the Layout tab, open the Section start drop-down list, click the kind of section break you want, and click OK.
Another often-unnoticed feature in Word is the Vertical alignment setting under Page near the center of the Layout tab of the Page Setup dialog box. By default, Word sets the vertical alignment to Top, and most users never discover the additional options, which include Center, Bottom, and Justified (which adds line and paragraph spacing to help the text fill the page vertically between the top and bottom margins). For example, the document in Figure 8.10 has been centered vertically to create a more balanced appearance. Because it is a section-formatting attribute, you can set vertical alignment for the whole document or just for selected sections.
FIGURE 8.10 Center a page vertically to balance the white space at the top and bottom of the page.
Vertical alignment can be extremely useful for particular parts of a publication — such as the title page for a formal report, booklet, or book — as well as for short letters, brochures, newsletters, and flyers. For title pages, setting the vertical alignment to Centered is almost always more efficient than trying to insert the right number of empty paragraphs above the top line, or trying to set the Spacing Before: to just the right amount in the Paragraph group of the Page Layout tab. For one-page notices, vertical alignment is also often just what the doctor ordered.
For some newsletters and other page-oriented publications, setting the alignment to Justified serves a couple of purposes. Not only does it make the most use of the whole sheet of paper, but it also adjusts line spacing to do it. Hence the appearance is smoother than it might be otherwise. This setting also lets you optimize the point size if you want to make the font as large as possible without spilling onto another page.
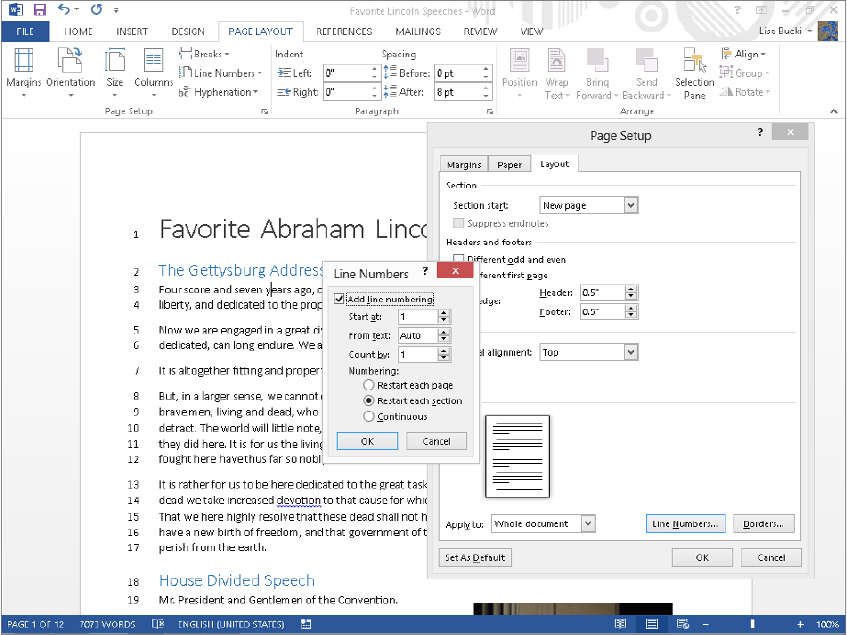
Line numbering, which is different from numbered lists, often is used in legal documents, such as affidavits. The numbering allows for ready reference to testimony by page and line number. Line numbering itself, however, is not a paragraph-formatting attribute. It is a section-formatting attribute. Turn line numbering on with the Line Numbers tool in the Page Setup group of the Page Layout tab, or click Line Numbers in the Layout tab of the Page Setup dialog box to open the Line Numbers dialog box, shown in Figure 8.11. Choose the desired settings in the dialog box, and click OK.
FIGURE 8.11 Line numbering is a section-formatting attribute controlled by this dialog box or the Line Numbers choice in the Page Setup group of the Home tab.
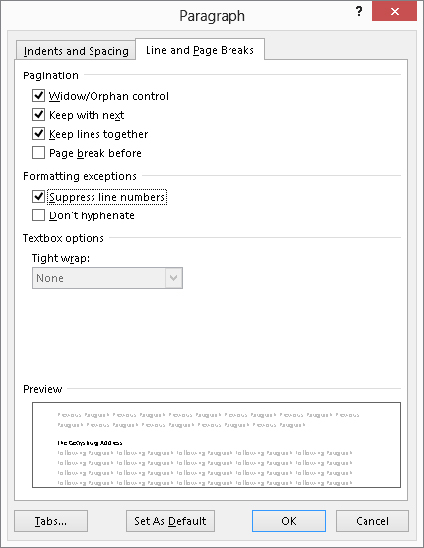
Although line numbering isn’t a paragraph attribute, suppressing line numbering is a paragraph attribute, as shown in Figure 8.12. (Note that line numbers do not display in Draft or Outline view.) To suppress line numbering in any given paragraph, put the insertion point in that paragraph, display the Paragraph dialog box (click the Paragraph Group dialog box launcher), and enable the Suppress line numbers check box under Formatting exceptions in the Line and Page Breaks tab, as shown in Figure 8.12. Then click OK. Another way to turn off numbering for one or more paragraphs is to select the paragraph(s). Click Page Layout ⇒ Page Setup ⇒ Line Numbers, and then click Suppress for Current Paragraph.
FIGURE 8.12 Suppress line numbers on a paragraph-by-paragraph basis.
Seemingly, headers and footers are the areas in the top and bottom margins of each page, but that’s not the whole story. In Word, headers and footers are distinct layers in your document, usually behind the text area. They usually appear at the top or bottom of the page, respectively, but that’s just a convention. Once you’re in Word’s header or footer layer, you can place text and graphics anywhere on the page. (See “Adding side margin material” later in this chapter for more information.)
This means that in addition to titles, page numbers, dates, and other essential bits of information, headers and footers can contain things such as watermarks, logos, or side margin material.
A second area of misunderstanding concerns how headers and footers are inserted into your Word documents. They aren’t inserted — they’ve been there right from the start. When you “insert” or “create” a header, you’re really doing neither. Instead, you’re merely adding content to a previously empty or unused area.
When you’re working in Print Layout view, any text in the header and footer layer usually shows up as grayish text at the top, bottom, or side of your document. To access those areas, double-click where you want to edit — even if you don’t see any text there. This brings the header and footer areas to the surface, as shown in Figure 8.13. When you finish working with the header or footer, click Close Header and Footer in the Close group of the Header & Footer Tools ⇒ Design tab.
FIGURE 8.13: Header and Footer tabs clarify what and where headers and footers are. With headers and footers open for editing, the document body text turns gray.

Headers and footers also display in Print Preview. There, however, because the view is supposed to represent what you’ll see when the document is printed, the header and footer areas aren’t gray and isolated. The same is true in Read Mode. Note that in Print Preview and Read Mode, you cannot perform normal editing — neither to normal text nor to text in headers and footers. In Read Mode view, however, you can insert comments. This chapter assumes that you are working in Print Layout view so that all kinds of editing are possible. If you don’t see what’s shown in the screen shots, then check your view setting.
Figure 8.13 indicates the document section number in the header and footer tabs at the left end of each area. Word documents can be single-section or multi-section. You might use multiple sections for a variety of reasons, particularly in long documents. Some users place each chapter of a document in a separate section, with additional sections being used for front matter (tables of contents, tables of figures, foreword, and so on) and back matter (index, glossary, and so on).
Section formatting enables you to use different kinds of numbering for different sections. It also allows different header and footer text in different sections. For example, the header or footer might include the name of each chapter, or the word Index or Glossary.
Word provides a number of tools that enable you to control the way headers and footers are displayed and formatted. In this section you’ll learn what those are and where to find them in Word 2013.
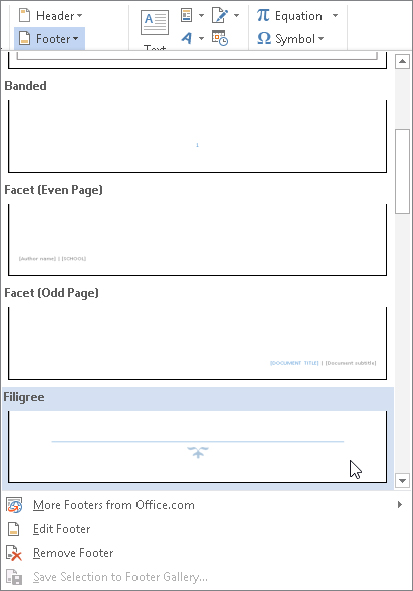
You also can use the Header and Footer buttons in the Header & Footer group of the Insert tab to create and edit headers and footers. Click either button to display a gallery of predefined headers or footers (Figure 8.14). Scroll down until you see the one you prefer, and then click it to insert it into the document.
FIGURE 8.14 Choose a predefined header or footer from the gallery.
When the header or footer area is active, the main set of editing controls appears in the Header & Footer Tools ⇒ Design tab, shown in Figure 8.15. To display the Design tab, double-click the header or footer area in a document. Or, in the Insert tab Header & Footer group, choose Header ⇒ Edit Header (or Footer ⇒ Edit Footer). Once the header/footer layer is open for editing, either the header or the footer can be edited, as can items inserted into the side area (for example, page numbers in the side margins) as well as watermarks.
FIGURE 8.15 The Header & Footer Tools ⇒ Design tab provides complete control over headers and footers.

Notice the Go to Header and Go to Footer commands in the Navigation group of the tab. You can use those commands to quickly switch back and forth between the header and footer areas, but, as suggested by Figure 8.13, both areas are equally accessible. You do not need to click Go to Header or Go to Footer — you can simply click where you want to edit.
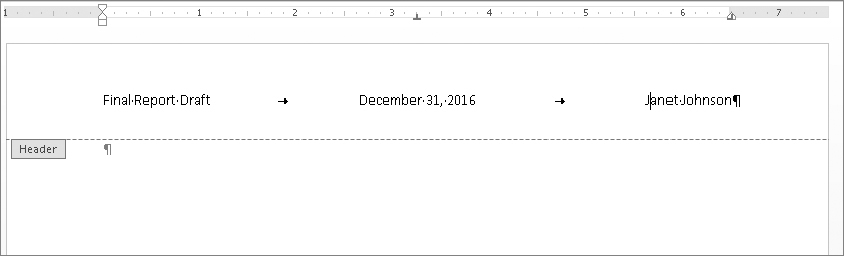
If you are creating a header or footer from scratch rather than inserting one from the gallery, Word’s headers and footers use built-in paragraph styles named Header and Footer. Each is formatted with a center tab and a right-aligned tab to facilitate placement of text and other items. This enables you to have three distinct components, one each at the left, center, and right within the header or footer, without having to resort to using a table, text box, or other device (although tables and text boxes are perfectly acceptable in headers and footers).
For example, to create a header with a left-adjusted document name, a centered date, and a right-adjusted author’s name, you would enter the document name, press Tab, enter the date, press Tab, and finally type the author’s name, as shown in Figure 8.16.
FIGURE 8.16 The default header style makes three-part headers easy.
When editing the header/footer layer of a document, you can use the mouse or keyboard keys to navigate as needed. As long as you don’t double-click in the text area of the document, the header and footer area remain open for business.
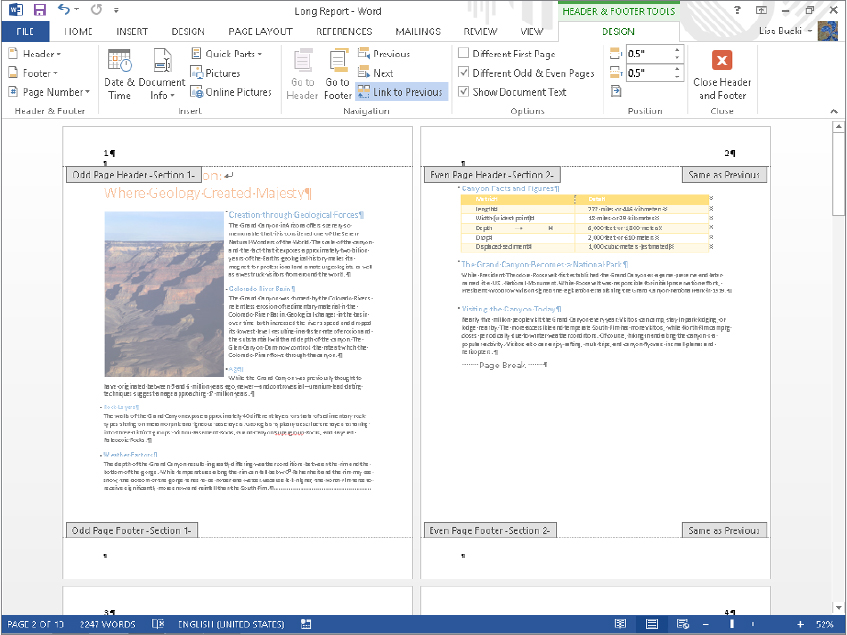
In a long document that contains many sections, however, scrolling can be tedious and imprecise. For greater control and precision you can use the Previous Section and Next Section tools in the Navigation section of the Header & Footer Tools ⇒ Design tab.
Different document sections can contain different headers and footers. When Link to Previous is selected for any given header or footer, that header or footer is the same as that for the previous section. By default, when you add a new document section, its headers and footers inherit the header and footer settings of the previous section.
To unlink the currently selected header or footer from the header or footer in the previous section (which will allow the current section to maintain a distinct header or footer), click Link to Previous in the Navigation group of the Design tab to toggle it off.
Note that headers and footers in any section have independent Link to Previous settings. While Link to Previous initially is turned on for all new sections that are created, when you turn it off for any given header, the corresponding footer remains linked to the previous footer. This gives you additional control over how document information is presented.
Most formal reports and indeed many other formal documents do not use page numbers on the first page. To keep users from having to make such documents multi-section, Word lets you set an exception for the first page of each document section. To enable this option for any given document section, display a header or footer in that section, and click the Different First Page option in the Options group of the Design tab (refer to Figure 8.15).
Unlike with the Link to Previous option, Different First Page cannot be different for header and footer. You cannot suppress just one. To accomplish that you would need distinct document sections (separated by a section break).
You can, without using section breaks, instruct Word to maintain different headers and footers on odd and even pages. This feature is often used in book/booklet printing, where the header/footer always appears closest to the outside edge of the paper — on the left for left-hand pages, and on the right for right-hand pages. To control whether this feature is enabled, click the Different Odd & Even Pages check box, also in the Options group of the Design tab. Like the Different First Page option, this option applies to both headers and footers in the section, not individually for each header and footer. As Figure 8.17 illustrates, you can set up the headers or footers to mirror one another, such as placing the page numbers to mirror one another on the outside corners of the page.
FIGURE 8.17 Use Different Odd & Even pages to set up mirrored headers or footers for booklet or bound document printing.
Sometimes having document text showing is useful and helps provide a frame of reference for headers and footers. At other times, however, it can be distracting and can make it harder to identify header and footer text, particularly if you’re actually using gray fonts in the header or footer area. Displayed text also can make it difficult to access graphics that are stored in the header or footer layer.
By default, Show Document Text in the Options group of the Header & Footer Tools ⇒ Design tab is enabled. To hide document text, click to remove the check next to that option.
Headers and footers are printed in the margin area. The margin is the area between the edge of the paper and the edge of the text layer in the body of the document. If the header or footer is too “tall” for a given page, Word reduces the height of the text layer on the fly so that the header or footer can be printed. That is, it will be printed if the distance between the top of the header or the bottom of the footer and the respective edge of the paper does not spill into the nonprintable areas of the paper.
Printers have a nonprintable area around the perimeter of the paper (usually 0.25 inches for most printers). This is an area in which it is mechanically impossible for a given printer to print. Windows’ printer drivers do a good job of calculating the margin so that the printer does not try to print in the nonprintable region. When the margin is too small, Word will warn you.
Word does not warn you, however, if the header or footer extends too far into the margin. When this happens, all or part of the header or footer is cut off. Everything might look fine in Print Preview, and there is no warning, but part of the footer or header will be cut off in the printout.
You can rein the document in using the Header Position from Top and Footer Position from Bottom settings in the Design tab’s Position group. If you find that the header or footer is being cut off, determine how much is being cut off and make that much additional allowance. For example, if 0.25 inches of text is being cut off the footer, then increase Footer Position from Bottom by that amount. You also can use the From edge settings on the Layout tab of the Page Setup dialog box to make these adjustments.
You can put a variety of things into headers and footers, ranging from file names and various other document properties (author, title, date last printed/modified, and so on) to page numbers and even watermarks. Inserting most text and graphics that will actually be printed in the top or bottom margin is straightforward. There are some special cases, however, such as page numbers, side margin matter, and background images and watermarks, that require special attention.
A common use for headers and footers is to display page numbers. To include page numbers in Word 2013, several methods are available — some new as of Word 2007, and some “legacy.” This section focuses mostly on the new ways because they provide extraordinary ease, flexibility, and variety not found in pre-Ribbon Word. When the legacy ways are best, however, you’ll learn about those.
Inserting page numbers in Word has never been easier. First, decide where you want the page numbers to appear (top, bottom, or side margin). Then click anywhere on the first page in the document section where you want the number to appear. As noted earlier, documents can contain multiple sections, and each section can have independent headers and footers, which means they also can be numbered independently.
In the Insert tab’s Header & Footer group, click Page Number to open its drop-down list, as shown in Figure 8.18, and choose Top of Page, for example. Scroll down the choices as needed, and click the one to insert. Word opens the header and footer layer and displays the inserted page number. Note that you also can use the Page Number button in the Header & Footer group of the Header & Footer Tools ⇒ Design tab to insert a number when you’re already working with the header or footer.
FIGURE 8.18 Word 2013 has extensive galleries with a variety of page number formats from which to choose.
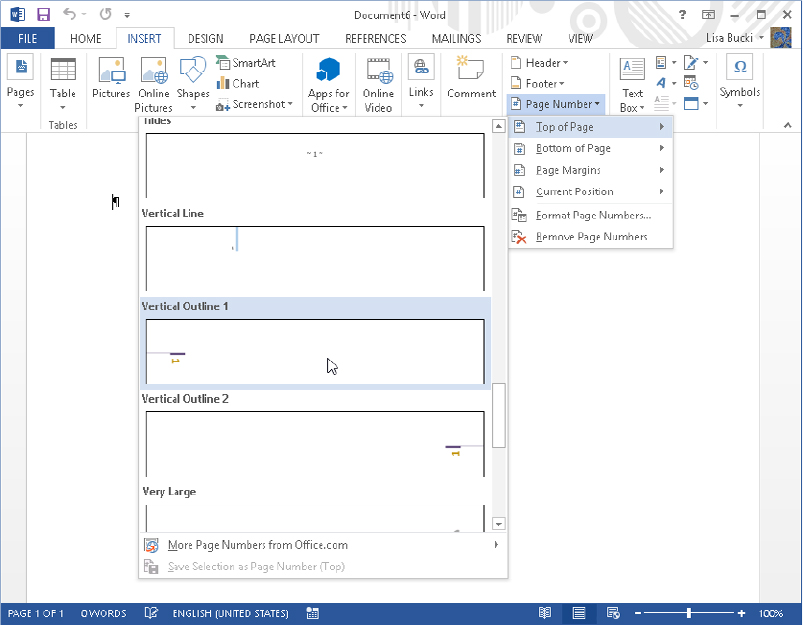
The Page Number menu enables you to select the option that corresponds to where you want the page number to appear:
The bottom of the page is the most common choice for word processing documents, but there are times when the top or side works better for a particular document. Select the desired destination. Word displays a number of preset page number options.
When you find a page number gallery item that suits your fancy, click it to insert the page number into the header or footer (according to which option you chose to get here).
To delete page numbers, move to the document section that contains the numbering you want to remove. In the Header & Footer group of the Insert tab, click Page Numbers ⇒ Remove Page Numbers. You also can remove page numbers via the Header & Footer group of the Header & Footer Tools ⇒ Design tab.
Remove Page Numbers removes all page numbers from headers and footers in the current section — including those in the side margins. It does not remove page numbers from other document sections.
You can choose the page numbering format before or after you insert a page number. On the Insert tab in the Header & Footer group, choose Page Number ⇒ Format Page Numbers (or use the same command in the Header & Footer group of the Header & Footer Tools ⇒ Design tab), to display the Page Number Format dialog box, shown in Figure 8.19. Options are explained in Table 8.1.
FIGURE 8.19 Word provides flexible page numbering options.
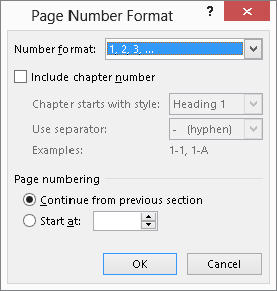
TABLE 8.1 Page Number Options
| Option | Purpose |
| Number format | Specifies numbering scheme: 1, 2, 3; A, B, C; a, b, c; I, II, III; or i, ii, iii. Provides an additional option to bracket Arabic numbers with dashes (to bracket others, edit the header or footer directly.) |
| Include chapter number | Applies a chapter numbering scheme such as I-1, II-5, III-43, where I, II, and III are chapter numbers, and chapters are formatted in a Heading 1 through Heading 9 style, with numbering included in the style definition. |
| Chapter starts with style | Available only if Include chapter number is enabled. For this option to work, chapter numbers must be formatted in a Heading 1 through Heading 9 style, and numbering must be included in the style. |
| Use separator | Specifies the separator to use between chapter and page numbers. |
| Continue from previous section | Indicates whether the current section’s numbering is connected with that of the previous section. Use this option when distinct sections are being used for a reason other than to create distinct numbering, such as when switching sections to accommodate changes from portrait to landscape and back again. |
| Start at | Use this to specify a starting number other than 1. |
Additional options that affect page numbers, such as whether headers or footers are displayed on the first page of a document or document section, are discussed earlier in this chapter, in the section “Different First Page.”
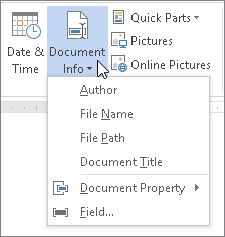
Word 2013 makes it easier to add key information about the document directly into the header or footer. In previous versions of Word, you had to use field codes to insert such information as the document name, author, or title at the insertion point in the header or footer. Now, it’s this easy:
FIGURE 8.20 Inserting document information
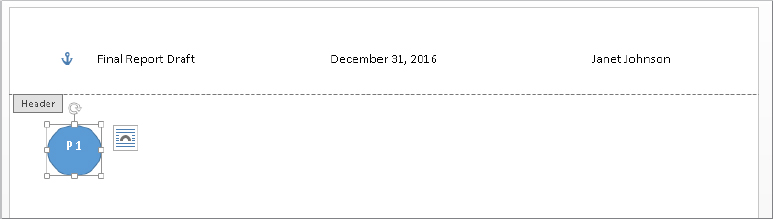
Textual material inserted in the side margins of a document is inserted in either the header or footer layer. The “trick” is to use something like a non-inline text box to serve as a container for the text. You can use an existing page number preset item that inserts text into the side margin. Or you can insert a text box manually by double-clicking the header or footer area, selecting Insert ⇒ Text ⇒ Text Box ⇒ Draw Text Box, and drawing a text box of the desired shape and size in either the left or right margin. Then insert the page number or other matter there as shown in Figure 8.21. In the document in Figure 8.21, I inserted a circle shape, and then added text to it to make a page number bubble that spills over into the margin.
FIGURE 8.21 Add side margin material by editing the header or footer.
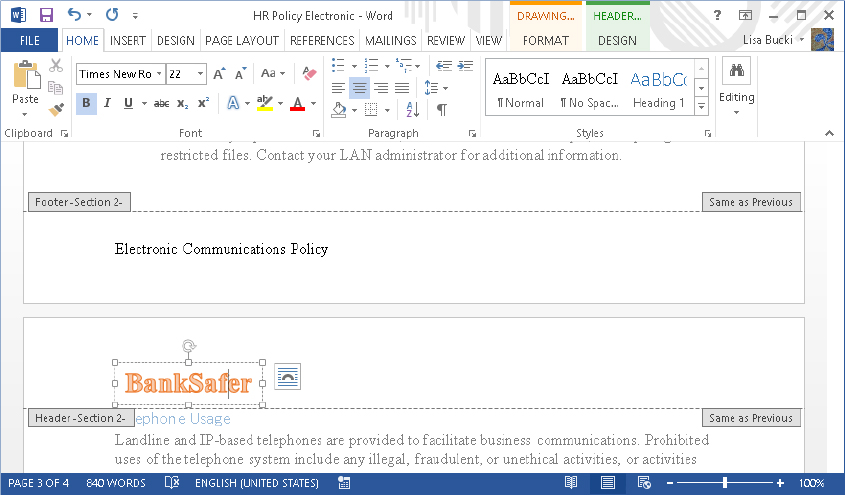
Just as you can add a margin text box or graphic on the header and footer layer, you can insert graphics such as a company logo, WordArt, a watermark message such as Not For Distribution, and so on. The graphic will have a “washed out” appearance when you close the header or footer area (as shown in Figure 8.22), but it will print on every specified page for the document or section, depending on the header and footer settings for the section where you inserted it. Use the process just outlined in the previous section for adding a margin text box to add a graphic into the document header or footer.
FIGURE 8.22 Example WordArt added into a header
You can divide the text in a document into columns. Tables have columns, but that’s not what we’re talking about here. You can also create the appearance of columns by setting up tabs. That’s not what this section is about, either.
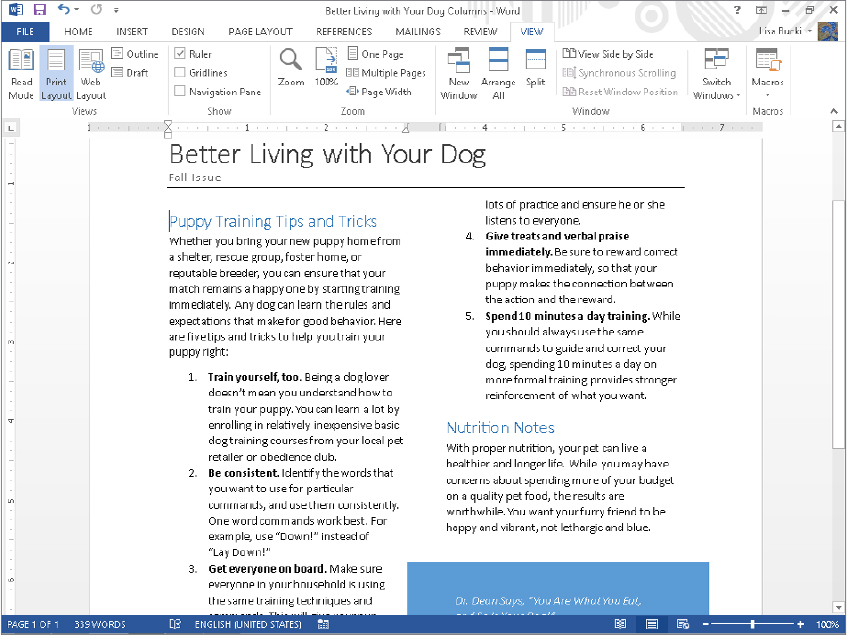
Here, column formatting refers to dividing the text so that it flows in columns across the page, as shown in Figure 8.23. This kind of formatting sometimes is called newspaper columns or snaking columns, and is a common format used in journals, newsletters, and magazines, although it’s unlikely that those publications use Word’s columns feature to accomplish their columnar formatting. Such publications likely use page layout programs because of the precise way in which they feature text, graphics, and advertising.
FIGURE 8.23 Column formatting is sometimes called snaking columns because of the way text zigzags from the bottom of one column to the top of the next.
Why use columns? If you’ve ever analyzed the way you read or if you’ve ever taken a speed-reading course, you already know the answer. We use columns because they’re easier and faster to read. Contrast reading a wide-format book with reading a newspaper. In a wide-format book each column of text (usually the whole page) is 5 or more inches wide. In a newspaper, columns typically are only a couple of inches across. We also use columns for a variety of other reasons, such as to utilize space more efficiently or for aesthetic reasons.
The truth is that whether you want columns or not, you already have at least one in every Word document, so the real question is How many columns do you want? To answer the question, you should consider the nature of what you’re writing, how it will be printed or published, and who will be reading it. Text-dense documents benefit from columns, just as they benefit from graphics. Anything that helps the reader become more engaged with the text is good.
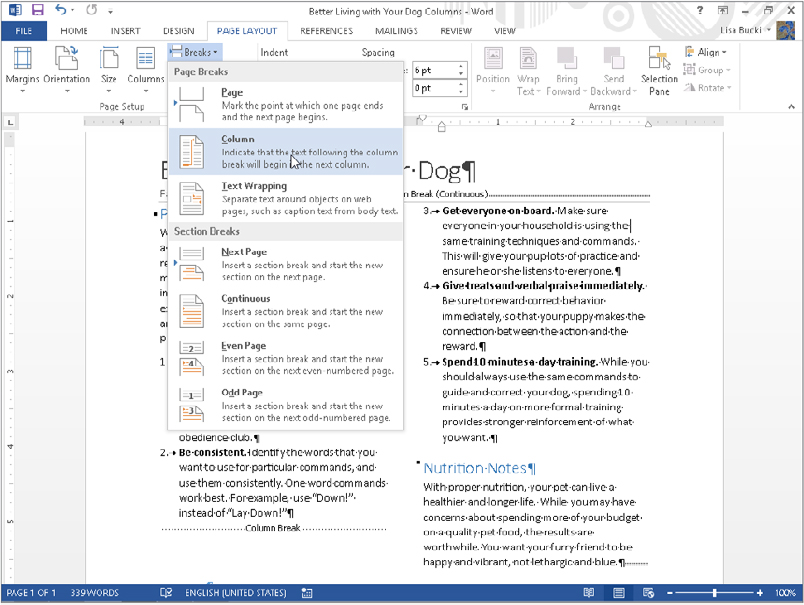
Column formatting is a section formatting attribute. Any part of a document that has a different number of columns must be “sectioned off” with section breaks. To insert a section break, choose the desired kind of break by selecting Page Layout ⇒ Page Setup ⇒ Breaks, as described earlier in the chapter.
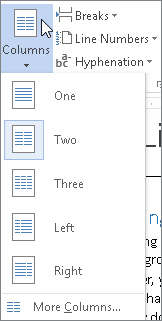
To change the number of columns for the current section (or selected sections or selected text), select Page Layout ⇒ Page Setup ⇒ Columns. The current column formatting (Two, in this case) is highlighted, as shown in Figure 8.24. Remember that if you select a single column of text and format it in multiple columns, Word inserts section breaks as needed.
FIGURE 8.24 Word offers five preset column setups, or choose More Columns to design your own.
If you don’t want any of the default preset column formatting, for additional control click More Columns, which displays the Columns dialog box, shown in Figure 8.25. This dialog box shows the same set of five preset column formats as the Columns drop-down tool, but you can insert as many as two columns per inch of horizontal space between the left and right margins, up to a maximum of 44 columns. For standard paper 8.5 inches wide with one-inch left and right margins, you can have up to 13 columns. To get the maximum of 44 columns you would need paper at least 22 inches wide, assuming no margins and a pretty unusual printer. Note that the Width and spacing controls provide access to only three sets of columns at a time. If there are more than three columns, a vertical scroll bar appears in the Columns dialog box, providing access to additional column settings. When you finish setting up columns, click OK to apply your changes.
FIGURE 8.25 Design your own columns here.
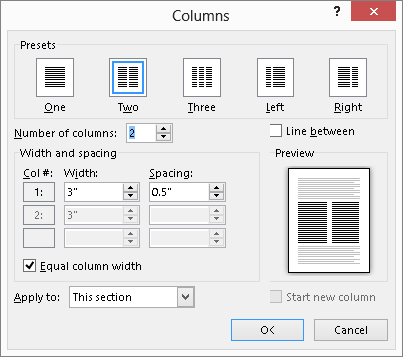
In Figure 8.25, notice the Line between option. Check this option to draw a vertical line between columns. If columns are closely spaced, this can help in maintaining the visual separation of the columns, thereby improving readability. When you’re using ragged-right text edges rather than justified text, adding a vertical line can create the appearance of straighter edges and better visual balance.
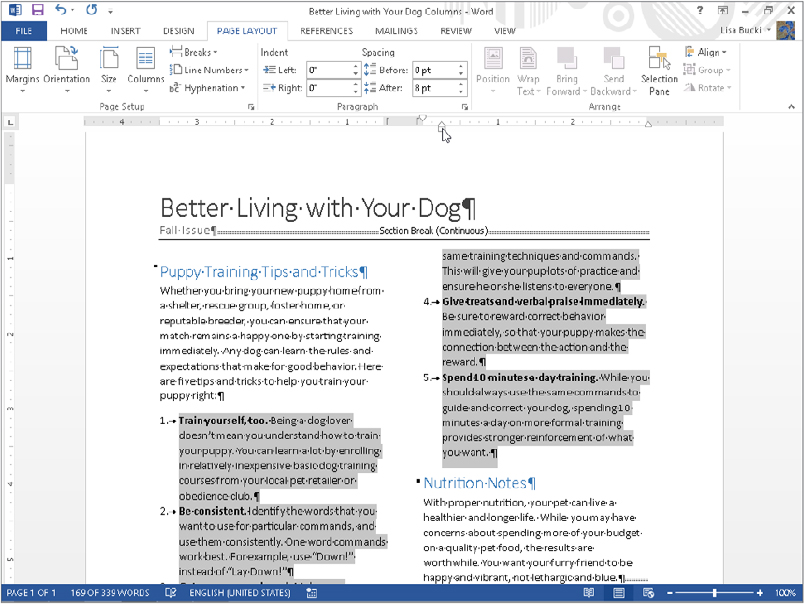
You can format column width and spacing using the horizontal ruler. In Figure 8.26, notice that the Left and Right Indent controls can appear in only one column at a time. This doesn’t mean that you get those controls only in a single column. It simply means that they are shown only for the active column. To change the width of columns, drag the darker and lighter boundaries between the column spacing and width areas. When you drag to make a column larger, the adjoining space gets smaller, and vice versa. When Equal column width is checked in the Columns dialog box, dragging the boundaries of any column expands or contracts all columns at the same time. The minimum column spacing is 0. Select text in a column to format it individually. For example, in Figure 8.26, I selected the numbered list so I could drag the left indent setting and help its items fill the column better.
FIGURE 8.26 Left and Right Indent controls appear above the active column.
If you want part of a document to have three columns and another part to have a single column, those two parts must reside in different sections. Consider the common newsletter format shown back in Figure 8.26. Notice that there is a section break between the top section, which is a single column, and the material that follows, which is in two columns.
One way to create this kind of format is to separate the masthead (the big title and other matter that goes with it) from the body using a Continuous section break, as shown in Figure 8.26. Move the insertion point to the beginning of where you want the multi-column formatting to begin, and choose Break ⇒ Continuous in the Page Setup group of the Page Layout tab. Now use the Columns tool or the Columns dialog box to apply the desired column formatting to the new section.
If there’s a point at which you want the multi-column formatting to change the number of columns again, insert additional section breaks (choosing Continuous, Next Page, Even, or Odd as needed), and apply the desired column formatting to those additional sections.
Alternatively, let Word insert section breaks automatically. Select the part of the document to which you want a given number of columns applied, and then apply the column formatting. You can do this using the Columns tool or the Columns dialog box, but you will get more consistent and predictable results if you use the dialog box. For some unknown reason Word sometimes inserts Next Page section breaks instead of Continuous section breaks. If this happens, you can always convert the section break to the correct kind using the Section Start setting in the Layout tab of the Page Setup dialog box, covered earlier in the chapter.
When you have a multi-column structure, Word treats each column as if it were a page with respect to the flow of text. Ordinarily text must fill column 1 before it goes into column 2, and must fill column 2 before it flows into column 3, and so on.
A column break is used within a column to force text to start at the beginning of the next available column. If you think of columns as mini-pages within a page, then in that sense a column break forces text to the next “page,” even though that next page isn’t necessarily on a new piece of paper. Problems happen when a column breaks awkwardly. For example, if the column contains a numbered list, you might not want a numbered paragraph to begin at the bottom of one column and continue at the top of the next. The solution is to insert a column break at the beginning of the numbered item. To do so, click to position the insertion point, click the Page Layout tab and click Breaks in the Page Setup group, and then click Column under page breaks, as shown in Figure 8.27. In Figure 8.27, I have already inserted a column break at the end of the first column to force the next numbered item to begin at the top of the second column.
FIGURE 8.27 You can use column breaks to control how columns line up or where text breaks at the bottom of the column.
You also can force Word to balance the columns (make them approximately the same height) by inserting a Continuous section break at the end of the last column. When you do that, Word tries to optimize document space to accommodate what comes next, even if nothing comes next. In some cases the columns won’t balance perfectly. That’s because of other constraints, such as widows and orphans. Nonetheless, symmetrically speaking, it’s usually an improvement.
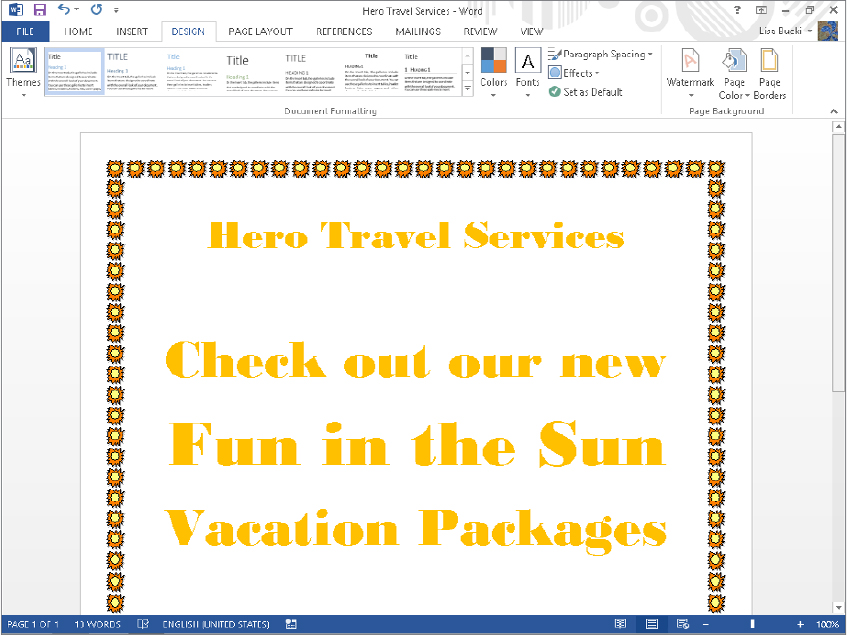
A page border is a line, a set of lines, or decorative artwork that appears around the perimeter of the page. You see them a lot on title pages as well as on flyers and brochures. Borders can be formal, discretely colored lines of various weights, or colorful graphics, as in the border for the flyer in Figure 8.28.
FIGURE 8.28 For page borders, you can insert a variety of lines or choose from dozens of built-in art borders.
To insert a page border:
FIGURE 8.29 Choose page border settings in the Page Border tab of the Borders and Shading dialog box.
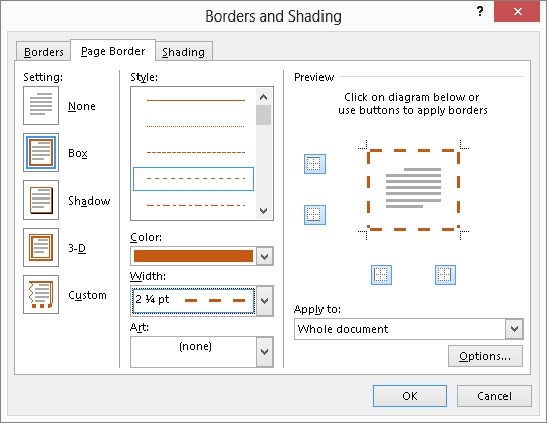
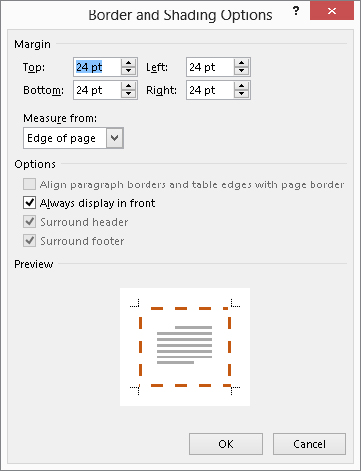
FIGURE 8.30 Use Border and Shading Options if your page border crowds the text too much.
Like many other Word features, Themes work with Live Preview. Unless a document explicitly uses theme-based formatting, such as styles relying on colors and fonts specified by the theme, changing themes will appear to have no effect. Themes are housed at the left end of Word 2013’s Design tab, shown in Figure 8.31. The rest of the tab’s Document Formatting group contains other theme-related features that you’ll learn more about in the following sections.
FIGURE 8.31 Theme settings color-coordinate document contents and change other overall features.
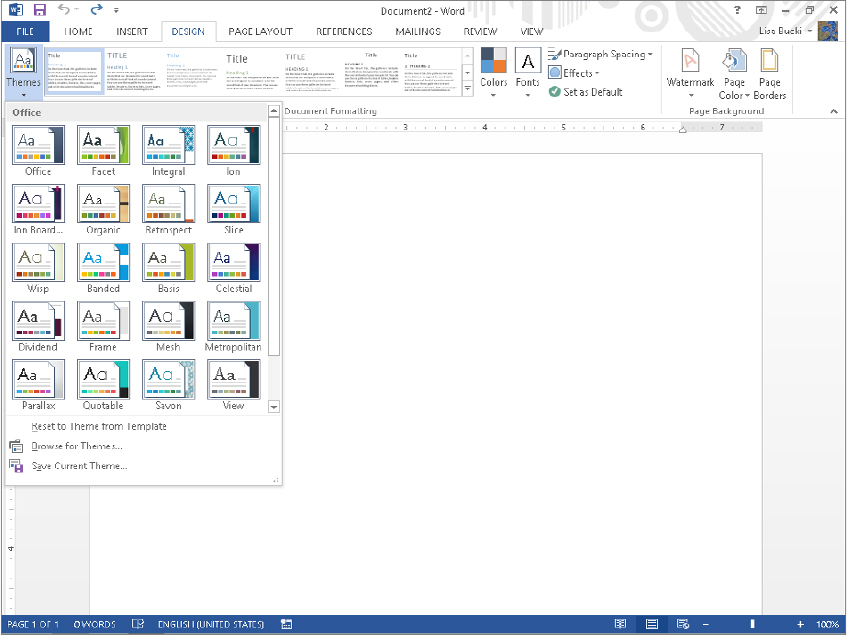
Themes are coordinated sets of colors, fonts, table formats, and other graphic elements used to change the overall look of a document while leaving its content unchanged. Word comes with numerous built-in themes, some of which are shown in Figure 8.31. Although the applied theme’s impact hinges on using certain Word 2013 formatting features such as styles and theme colors, themes are not part of style formatting. There is no way to associate or assign a theme with a particular style. Themes are applied to the entire document, wholly apart from styles, and affect many different aspects of document formatting.
To apply a theme:
A template provides the base level of formatting through styles, page setup, and so on. The theme applies the next level of formatting on top of the template. The theme includes theme colors, theme fonts, and theme effects, each of which you’ll learn more about later in this section.
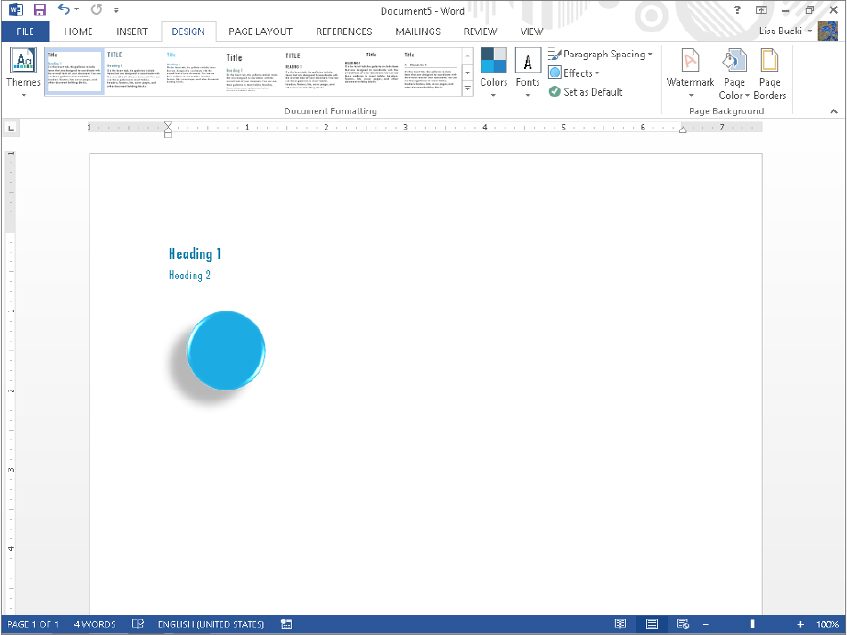
The best way to understand themes and what they bring to the document design table is to use them on documents designed with themes specifically in mind. Follow these steps as a practice example to see how a theme impacts a document:
FIGURE 8.32 The Integral theme applies new heading fonts and more in the quickie practice document.
Themes consist of three elements:
By modifying theme elements, you can apply a new overall look for the document. By creating a new combination of any of these three elements, you effectively create a new theme that you can save. Here’s more about each of these three settings for an applied theme.
While each of the named themes that come with Word has a preassigned set of theme colors, there’s no reason you have to stick with that set of colors. If you want the Organic theme but prefer the Slipstream theme colors set rather than the default colors, you can change the theme colors.
To change color sets, in the Design tab, click the Colors button in the Document Formatting group to display the gallery shown in Figure 8.33. Drag the mouse over the various color sets to see a Live Preview, and then click a color set when you see the colors you want.
FIGURE 8.33 After applying a theme, you can apply a different set of theme colors.

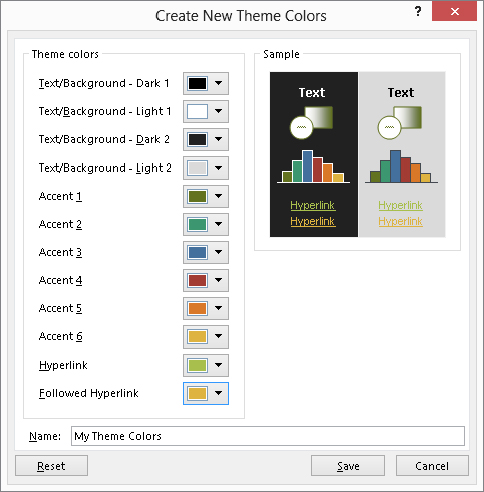
If you click Customize Colors at the bottom of the gallery shown in Figure 8.33, the Create New Theme Colors dialog box shown in Figure 8.34 appears, where you can customize the colors and create your own theme colors. Click the various color buttons to display the color gallery, and click alternate colors as desired. Enter the theme colors set name in the Name text box, and then click OK. The file will be saved in .xml format in C:\Users\user name\AppData\Roaming\Microsoft\Templates\Document Themes\Theme Colors. (This folder is created the first time you save a theme.)
FIGURE 8.34 Create a custom set of theme colors here.
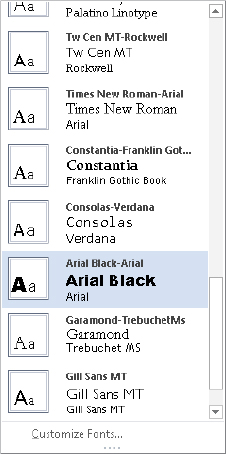
Theme fonts are a bit simpler to understand because there are only two components: the heading font and body text font. Click the Fonts button in the Document Formatting group of the Design tab to change theme fonts. Notice in Figure 8.35 that the Arial Black-Arial theme fonts are selected. For each theme, the larger font shown is the one that will be applied to Heading styles (Heading 1, Heading 2, and so on), and the smaller one is the one that will be applied to body text.
FIGURE 8.35 For each theme, the Theme Fonts gallery shows the fonts used for headings and body text.
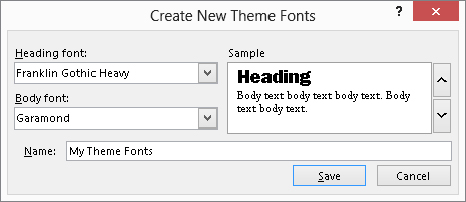
As for theme colors, you can create new theme font sets. Click Theme Fonts in the Document Formatting group of the Design tab, and then click Customize Fonts below the gallery choices, as shown in Figure 8.35. In the Create New Theme Fonts dialog box, shown in Figure 8.36, choose the Heading font and Body font, enter an informative name, and click Save. The theme font will be saved in .xml format in C:\Users\user name\AppData\Roaming\Microsoft\Templates\Document Themes\Theme Fonts.
FIGURE 8.36 When you create new theme fonts, it’s useful if the name you choose either describes the purpose for the fonts or includes the font names.
Theme effects are a bit harder to grasp than other theme elements, mostly because they’re used a good deal less often by the average user. In the Design tab, click the Effects button in the Document Formatting group to display the gallery of options shown in Figure 8.37. If you study the different theme effects, you will see sometimes subtle and sometimes not-so-subtle differences among the elements shown. For example, the Office set looks soft-edged and perhaps a little blurred with shadows at the edges. Grunge has mottled fills applied. (It’s unlikely you can see this in the picture in the book, so look on-screen.)
FIGURE 8.37 Apply theme effects to SmartArt, WordArt, Charts, and Shapes.

The easiest way to see theme effects in action is to create an example shape or graphic and use Live Preview to see the various effects.
You have seen how to save custom theme colors and theme fonts. The Word 2013 interface does not provide a built-in, direct way for you to save custom theme effects. You can indirectly save them, however, by saving the whole theme, as shown shortly.
The Document Formatting group of the Design tab includes a couple of additional settings along with all the theme settings. Chapter 7 discussed Style Sets, which enable you to change the style fonts used throughout the document. Although they are not technically a component of the applied theme, the fonts in the available style sets do change when you apply a different theme to the document. Change style sets using the Style Sets gallery in the Document Formatting group of the Design tab.
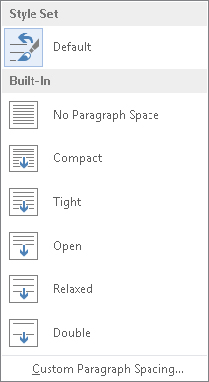
That group also includes a Paragraph Spacing gallery, shown in Figure 8.38. Choose one of the presets from the gallery to apply the combination of line and paragraph spacing that looks appropriate in the current document. For example, you may want to use the Relaxed preset to space out the paragraphs and lines in a flyer document to fill the page better.
FIGURE 8.38 Change overall document paragraph spacing with the Paragraph Spacing choices on the Design tab.
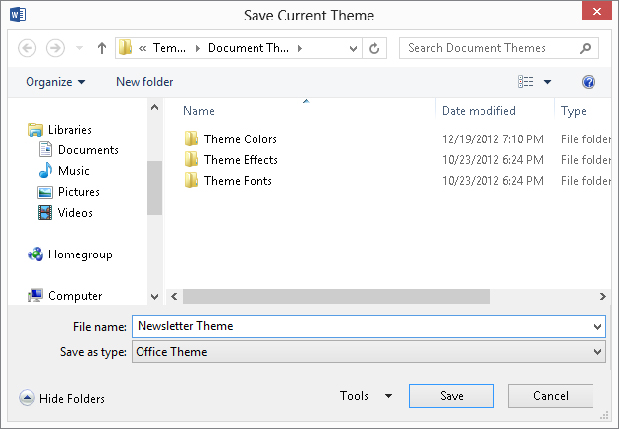
Using the Colors, Fonts, and Effect controls in the Document Formatting group of the Design tab, it’s possible to create sets of theme elements that you want to preserve for future use. As indicated, you can save custom colors and fonts. In addition, you can save entire themes. To save a custom theme, in the Document Formatting Group of the Design tab, choose Themes ⇒ Save Current Theme. In the Save Current Theme dialog box, shown in Figure 8.39, type a descriptive name and click Save.
FIGURE 8.39 Overall themes, theme colors, theme fonts, and theme effects are saved in the same folder set by default.
Alternatively and additionally, you can include other elements, such as text, styles, prebuilt headers and footers, and other document elements, and save the entire setup as a template. When you do that, any custom themes employed automatically become part of the saved template.
In previous Word versions, changing the default theme was a hassle. In Word 2013, open a new blank document, display the Design tab, choose a theme from the Themes gallery in the Document Formatting group, and then click Set as Default in the same group. To change the default theme for a particular template file, open the template file, change the theme, and then save and close the template.
In this chapter you’ve learned about the basic page setup choices, what section formatting is, and how the two interact. You also learned what headers and footers are, what they’re used for, and how to create them with sections. Finally, you learned about creating columns in a document, and working with page borders and themes. You should now be able to do the following: