
Growing food is one of the most important reasons we have gardens. People all over the world live on the food they produce in their own garden. It is something of a miracle when we push a seed into the good ground in one season and harvest its crop in another. Whether you’re a young, beginning gardener or an experienced pro, this simple truth is pretty amazing.


Consider how many varieties of plants you want to grow and how much room you’ll need for each. Leave space between so you can move through the garden to weed and harvest without stepping on your plants.

Planning the Garden
It’s important to think about how large a garden you want and what shape. What do you want to grow? You need a different plan for a flower garden or a vegetable garden or even a butterfly garden. You can start small if you’re a beginner. A lot depends on how much space you have available. Some vegetables, such as gourds and pumpkins, need a lot of room. how much sun comes into your yard? Plants like tomatoes need a lot of sun. Make a list of what you want to plant, get a big piece of paper, and start trying to figure out where you might place each plant. Make your plan colorful and bright. It’s going to be a garden after all. Some of the fun of gardening is in the imagining and anticipation.
When you plan your space, make sure you have a source of water available. Check out the “rain barrels” activity in Chapter 9. Overcrowding can also shade the soil. Leave a 15–24”-wide path between rows. Some of the vine plants (like cucumbers and pumpkins) can grow around the rows and beneath taller plants like tomatoes. Tomato plants will need to be tied to wooden stakes or grown in wire cages that you can buy at most stores.
I’ve seen all kinds of gardens growing successfully in all kinds of shapes and forms. So get creative and have some fun.

A vegetable garden can be an attractive part of the landscape.

Spring comes in like a lion and leaves like a lamb.

Lions and Lambs
March is an important month for gardeners. In the northeast we often say March comes in “like a lion” and leaves “like a lamb.” It sort of takes us by the hand and walks us from winter into spring. The days get longer and warmer and, despite the occasional snowstorm, we know spring is just around the corner. Once things begin to dry out and the frost is out of the ground we can start preparing the garden. Wherever you live your climate is unique. An important part of good gardening is coming to understand your own climate and seasons.
RAISED BEDS. One of the best ways to make a garden is by raising it up. This makes it easier to work and weed and helps it dry out faster between watering. Raising beds usually allows for earlier gardening because the soil warms more quickly. Another reason to create a raised bed is that you can establish better soil conditions. Top soil, compost, and manure are the perfect ingredients for any garden soil.
Building Simple Raised Beds
1. First of all, select a sunny spot. Most flowers and vegetables prefer sun.
2. Start simple: You don’t always need to build a border or frame. You can simply lay old newspaper down on the existing ground and add compost and top soil on top to create a raised area of good dirt.
3. how far up should a raised bed be? Raising the bed up 8–10” inches or even more makes it easier to work around and harvest and ensures good, rock-free soil conditions.
4. Framework: If you prefer a neater, more contained look, you can pile rocks or old brick around the border to hold the soil in place. There are lots of ornamental blocks available that will do the same.
You can build raised beds out of cedar, which lasts a long time and weathers well.
5. Construction: 2” x 6” planks work well; 1” x 6” can also work but will need more bracing. You’ll need to establish vertical braces to hold the frame. See the photo below of a unique solution to a cedar planter constructed by friends of mine. There are no limits to design or construction. Most are simple rectangles narrow enough to reach from all sides. Design your raised beds to fit your site. Make the raised bed a nice part of the overall landscape.


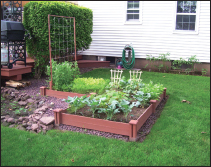

This is a raised bed my friends built in their backyard. They used two store-bought kits and combined them creatively. You can see their granddaughter, Kayla, enjoying the fruits of their labor.
PREPARING YOUR GARDEN SOIL. If it’s a new garden, and there is grass growing, you’ll have to remove the grass or turn the top soil and sod (grass) over well with a shovel and rake the soil under the grass into the bed. Grass roots cling to the best top soil. Shake off the roots and use that nice soil. Adding your own compost, or prepared compost you can purchase at a local garden center, and some dehydrated (no water content) or composted manure will help create good soil for your garden. Now your dirt has become garden soil. Remember: next year, the best time to get the garden ready is in the fall. But if it’s a new garden, just start when you’re able.
Preparing your garden site in advance
If you plan ahead here’s an easy way to get your garden started. Cut a thick clear plastic sheet to the size you would like your garden. Lay it out in a sunny spot in the yard where you would like your garden. Put some stone, boards, or bricks around the plastic to hold it down flat. Then just leave it. Whether it’s lawn or weeds beneath, the clear plastic will make the sunlight more intense and burn up things beneath it. (Don’t worry, the worms can scurry away to cooler spots … but weeds can’t scurry.)
After a few weeks in full sun, the grass will be burned away and it’ll be easier for you to begin to turn the ground over.
If you’re preparing in the fall for next year’s garden, this is a great time to start creating your own compost pile. Remember to save fall leaves and other debris from the yard and kitchen to add to your compost. And this winter you can plan the details of your new garden. (See Chapter 12 for information about composting.)
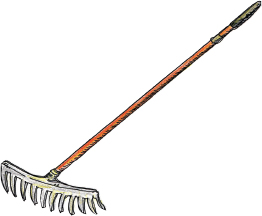
Have a rake on hand.
Turning over soil:
This can be done with elbow grease and a good shovel. Dig, turn, and chop. That’s basically the work of turning over a garden. You’re trying to mix up the top 6–8”-of soil and make it loose and rock free. Or, your family can rent a machine called a rototiller to make it easier to turn the top 6–8” of soil over. Or chip in with a neighbor and you can take turns using it. An adult should run the rototiller … but it’s fun to watch it chew up the soil.
PLANTING SEEDS DIRECTLY INTO THE GROUND. Read the seed packets to see if a plant prefers sun (most do) or shade.
Planting Seeds Directly in the Garden
As soon as the soil can be worked, you can plant:
Peas
Beans
Lettuce
Spinach
Squash
Zucchini
Pumpkins
Gourds
You can also start these seeds indoors, but these are all hardy plants that will grow directly from seed in the garden. As an experiment, plant seeds of each inside peat pots and also directly in the garden and have a race. Which will grow fastest? Will one produce more vegetables than the other? Which method will you choose next year? Gardening is a science and an art. Experimenting is part of the science of good gardening.
How deep to plant a seed?
The seed packets always tell you the recommended depth at which the seed should be planted. Get an old-fashioned wooden ruler so you can check depths easily. And once your garden soil is ready, the ruler will help you make sure there are no hidden rocks or anything else that might get in the way of your new roots. Some seeds can be planted in rows. This means you need to dig a shallow trench and place all of the seeds in the trench. Then simply fill the trench gently and press the soil down. I find a closed fist works well for this.
Fancy Plant Markers
Now that you’ve planted some seeds, how are you going to remember what they are? One of the complicated things about a garden is once you plant the plants or seeds there is a wait—many days or sometimes weeks— before they germinate and even more before they flower or bear fruit. In the meantime, it’s easy to forget what you planted and where. You can buy plant markers that you can write on. But it’s more fun to decorate your own, using popsicle sticks, wooden tongue depressors, or paint stirrers, available from paint stores. Paint stirrers are great because they’re so big. You can write the name of the plant, or paint a picture of what the anticipated flower or vegetable will look like, right there on the stick. The seed packet will have a great picture. Use pencils to outline the plant and acrylic or tempura paint to color them in. If you add beautiful pictures to your markers, they become an attractive addition to the garden.

MAKING A BREAK FOR IT: MOVING YOUR INDOOR PLANTS OUTSIDE. The plants’ young roots (they probably look like tiny white hairs) might already be sticking right through the sides and bottoms of their peat pots. That’s a good thing. They are ready to make a break. When gently tucked in the ground, the roots push their way right through the pot and take off into the good top soil. The bigger root system is going to support a bigger plant as it grows. Check it in a few days. You might be amazed. The pot simply breaks down and becomes part of the planting soil. If the top rim of the peat pot is sticking up over the soil level, simply tear it off so it doesn’t draw moisture away from the plant.
As you move your plants off their trays and into the ground, be gentle and try not to disturb the roots. If you’ve already transplanted into a big box or a bigger container, you simply have to carefully pull the roots from the soil. An old spoon or a tongue depresser will work well.
Set the plant in the ground at the height of the soil in the pot and then tap the soil around it gently with your knuckles. This gets rid of air pockets. Just try to remember to wipe your knuckles off when you’re done, or all that good soil is going to end up in your pockets. I speak from experience.
After planting, moisten the soil. Don’t flood it; water it gently and slowly so the water can seep into the soil around the roots.
PLANTING A VEGGIE GARDEN—A MONTH-BY-MONTH GUIDE. Here’s a short list of a few easy plants. As you begin to enjoy gardening I’m sure you’ll add your own favorites.
March
Lettuce (leaf lettuce) in this sense is not the usual head lettuce called iceberg. Head lettuce forms a round fold of leaves that is harvested as one. Leaf lettuce can be picked leaf by leaf and added to a salad or a sandwich as you desire through the spring and into early summer in many regions. There are many varieties of leaf lettuce plants that can grow and benefit from the long cool spring season.
Peas can be planted even if there’s still snow on the ground. Plant them close together in a shallow trench, about 4” deep. And you can crowd them and let them grow thick. Find some sticks lying around the yard from the long winter and stick them in the ground among the pea seeds. The little branches will support the foliage (leaves) of the new pea plants. Pea plants grow upward and will cling and climb as they grow.
Spinach is another cool weather crop that you can set out in March. I like it in salad, but some people love it cooked. Either way, it’s very good for you. Leaf crops, like leaf lettuce and spinach, prefer soil with nitrogen7 (a natural chemical that some plants need to grow). If you have added good compost to your garden soil you might have plenty of nitrogen in your soil already. Spinach doesn’t like hot weather and will “go to seed,” which means it will start to produce flowers with seed pods, as soon as the season heats up. And when leaf crops go to seed, the leaf suffers and doesn’t taste as good.
April
Broccoli is a heavy “feeder.” This means it should have good rich soil around its roots. You should also add lime (ground-up limestone) because the roots can get something called “clubroot,” which will stunt the growth of the plant. Club root is a fungus. Lime is rich in calcium (a mineral that we humans need for healthy bones). Calcium kills the fungus. Lime powder is available at garden supply stores and is easy to use. It’s easier if you start it indoors or purchase started plants from a garden store, because it can take a while to start working. Broccoli is one of those that benefits from hardening off a few weeks before planting.
Dill (for pickles!) is really easy to grow. It’s an herb8. Make sure it’s in full sun. Plant the seeds shallow, only about ¼” deep, and tamp loose soil over them. Just add water every day and the plants may get as high as three feet tall.
April would be the month you start hardening off the rest of the plants you started indoors (like tomatoes, cucumbers, eggplants, and peppers, and whatever else you still have on your windowsill). Place the plants—in their containers—outside on warm days and bring them in at night.

Cherry tomatoes are a great snack.
May
Tomatoes: Where I live in the northeast, we have to start tomatoes inside in a greenhouse or a cold frame—our warm season just isn’t long enough—or buy tomato plants from a nursery. But if you grew your own from seeds, it’s time to set them out in the garden.
If you grew them in trays or bought them from a nursery in trays, they can be gently separated and set in the ground. If you grew them in peat pots you can put the whole thing right in the ground and the plant will continue to grow without being disturbed. Bury the main stalk a few inches deep. Keep the plants about 24–36” apart.
Plant them in full sun and place a sturdy stake next to them so you can tie them up as they grow. You can make your own stakes out of sticks that are at least ¾” thick and 3’ tall. And at a local garden supply store you’ll find some ties that you can use that won’t hurt the plants. Try a few different varieties of tomatoes. They come in red, orange, and yellow and lots of different sizes. My favorites are cherry tomatoes.
Container Tomato Garden
If you don’t have enough space in the garden, or if you live in an apartment or someplace with limited yard space, you can grow tomatoes in a large container. Use a prepared soil mix and put the plant in full sun. You’ll eventually need a stake to keep the plant upright unless you plant some of the new compact patio plant varieties. But you can grow any kind of tomato plant in a container. Add an herb like oregano to the surrounding soil. The tomato plant grows tall and the oregano stays low. You can also add flowers like marigolds around the base, and you’ll have your own little mini landscape. Remember to let the soil dry between watering. Soil stays moist longer in a container. This is why clay is better than plastic for a container garden. Clay allows for air exchange through its surface and excess water can evaporate more easily.

You don’t necessarily need a big space for a nice little garden.
Peppers: Start the plants inside or purchase plants already started. Wait a couple of weeks after the last frost in spring and then set them in the ground in full sun, about 24” apart. They like good, rich soil and will appreciate it if you add compost and other organic stuff to your garden. A couple of pepper plants can also be grown in a container in full sun. They just need some room to trail over the pot, and you might need to stake them.
Squash: There are lots of different kinds of squash, from zucchini to spaghetti squash. You can plant these as seeds or transplant your indoor plants in slightly raised hills in the garden. Give these plenty of room (at least a foot between mounds). They can take up lots of space. Spaghetti squash actually separates like pasta noodles when cooked. Try it with homemade tomato sauce created from your own home-grown tomatoes and herbs.
Pumpkins: Pumpkins need lots of space. Dig a hole about 6” deep and a foot wide and fill it with soil. Create a mound about 5–6” tall of good rich organic soil. Then press a half dozen pumpkin seeds into the mound. You’ll need about 8–10’ between mounds to grow nice pumpkins. After a week you can pull the weaker seedlings from the mounds and let the remaining ones grow and thrive.
Cucumbers: Like tomatoes, you may need to start cucumber seeds inside or in a cold frame or greenhouse. Cucumbers grow on sprawling vines and ripen in summer. Try planting them by seed directly in your garden one summer and start them indoors the next. See which works best.
Something Sour: Growing and Making Pickles
Grow both your cucumbers and dill in full sun. Plant after all the frost is past. When the dill flowers, it is ready to harvest. Pick the dill and let it dry. There are lots of kits with ready-made mixes to make delicious pickles from your cucumbers.
You can make your own homemade pickles simply by soaking cucumbers overnight in vinegar and water, adding spices like garlic and dill. The longer they soak, the more sour they will become. There are lots of different recipes available and all are quite simple. Try a few until you find one you like and then make it your own with a unique twist. Give it a name like “Peter Piper Pickles” if your name happens to be Peter Piper.
June
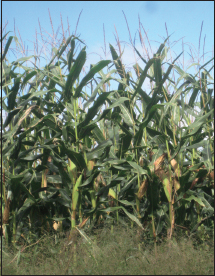
Corn: Music to your ears? No, I don’t suggest you go out and sing to your corn plants, but the truth is the corn fruit (kernels) form along something that is called an ear. And what the heck, there’s no better place to sing than in a garden on a sunny day. And the ears of corn won’t complain, even if you can’t hold a tune.
Set the corn kernels out in mounded rows with the plants about two feet apart. Plant the seeds and remove the weaker seedlings once they sprout. If you have room, leave at least three feet between rows. Plant at least four rows to ensure good pollination. (The bugs and the birds will help with this … and even the wind.) You can plant different varieties.

Some folks claim your corn plants should be as high as an elephant’s eye by the fourth of July.
My favorite corn variety is “Silver Queen.” Its small white kernels are delicious.
A Popcorn Garden
Imagine looking out your window and seeing your garden explode into popcorn. Well that’s not exactly how it happens, but the truth is that a long time ago, this may have been how popcorn was discovered. Popcorn is simply a type of corn that has a little bit of moisture and starch inside the kernel. When it’s exposed to heat the moisture inside expands and “pops.”
You can make your own popcorn garden. The simplest way is to just buy a sack of popcorn at the grocery store. Take some of the kernels and place them in a damp paper towel or cloth and keep them in a cool dark place. You’ll see them begin to sprout. Once the chance of frost is gone, set a bunch of the sprouted kernels about a half-inch deep in the good top soil of your garden. Leave about two feet between seeds. The plants will grow tall, so plant them in rows you can walk between. You’ll have to water them regularly so they’ll grow strong and healthy.

Popcorn was discovered when corn “popped” in the garden.
Once the ear of corn forms and matures in summer, you can pick it from the stalk, open it up, and take the new kernels from it. Lay the harvested kernels on newspaper or paper towels and store them in a cool dry place for about fourteen days. These should be ready to heat up. The heat causes the inside of the kernel to expand and pop. Once that happens, the only popping left to do is into your mouth with the great snack you grew yourself. And you can store some kernels away for fall and winter. Put them in a jar, and store with a fun, creative label.
An Amazing Maize Maze
What’s a maize maze? Well that’s just a tricky way of saying “corn maze.” You can create a corn maze if you have enough room to plant a lot of corn. You’ll need at least sixteen rows each way in an area about 30’ x 30’. Larger is even better, but it depends on how much room you have in the yard. And it might be fun to just experiment with a small one.

An amazing maize maze. This one’s a simple one. You can get complicated.
See the layout above to create secret paths in your corn maze.
A Salsa Garden
Try growing beefsteak and Tuscany tomatoes. If you like spicy stuff, grow some hot peppers to add to your own homemade salsa. Try growing chili peppers. just a few plants will give you plenty of hot stuff to add to your salsa. They need full sun and plenty of water.
Simple Salsa (Also Called Pico de Gallo)
The origin of the name is something of a mystery because it translates to English as “Beak of the Rooster.” It may refer to the shape of a chili pepper, which might resemble a beak, or the sharp feeling on the tongue.
Pico de Gallo
Ingredients
3 or 4 plum tomatoes or any medium-sized tomato
1 white (or red) onion, medium-sized
½ cup chopped cilantro leaves
1 chili pepper, jalapeño, or cayenne (these can be from your garden or bought in the grocery store)
1 small lime
With adult supervision for younger children, use a sharp knife to carefully slice the tomatoes into ¼”-thick slices. Then cut again across the slices to “dice” the tomatoes into little ¼” squares. Put aside in a bowl and allow some of the juice to drain away.
Peel the onion. Slice and dice into cubes (about ½ the size of the tomato chunks) and put in the bowl with the diced tomatoes. (Note: Have a box of tissues nearby because slicing onions makes a lot of people’s eyes tear up.)
Be careful handling the pepper because these are hot stuff. Cut the pepper into small pieces, removing the seeds and stems to discard. You can add some of the seeds if you like it hotter, but you should try it without first. Wash your hands well after handling peppers before you touch anything else, especially your eyes.
Cut the lime into quarters.
Combine all of the ingredients in a bowl. Squeeze the juice of two or three of the lime quarters into the mix.
Place in the refrigerator for about an hour.
Get some chips, start scooping, and enjoy a delicious fresh snack from the garden.
Strawberries, those delicious juicy red fruits, are 100 percent more tasty when you grow them yourself. Buy the plants from a nursery and place them a spot in your garden where they can live for years and not get dug up each spring. Most are perennial, so they come back every year, but many won’t bear fruit until the second year. So it takes patience, but it is well worth the wait. And the leaves are sharp and shiny, so the plants are pretty and the flowers are nice while you’re waiting. Strawberry plants are vigorous growers and re-root themselves, so leave some room to expand.
Strawberry Pots
You can buy special pots at nurseries that have holes in the sides so the strawberry vines can spill right out. Fill the tall pots with good potting soil and plant the roots of the plants in the top, and into the holes along the side of the pot. They’ll sprout out with sun and water and the plants will spill out of the pot, create flowers, and form strawberries in july. These can be fun to watch and great to harvest. Sometimes you can buy the pot all set up with soil and plants and all you have to do is add sunshine and water. If you set these in a sunny window in early spring you’ll have a head start and may even get some fruit early.

Ripe for the picking: strawberry plants spill right out of their pot.
Garden Journal
Keep a log for next year indicating what does well and what doesn’t.
With gardening, experience is the best teacher. The earliest gardeners must have made a lot of mistakes before they figured out the best plants for food and flower. You can do the same by keeping a record of your successes and failures.
Anyone who has gardened knows there are plenty of mistakes to make. And sometimes after the winter it’s easy to forget your mistakes as well as your great ideas. So by keeping a garden journal you can keep a simple record of what happened, from growing the seeds to seeing the flowers or eating the vegetables or fruit. It’s a great way to learn and become a better gardener with each year. Once again, get creative. Decorate your journal with drawings or pictures of your gardens and add some notes on how much fun you had working in the garden or eating the great homegrown food. Collect some simple recipes for all of your own creations.
7 Nitrogen: a gaseous element that is a part of living tissue
8 Herb: a plant or part of a plant used for flavoring, aroma, or medicinal purposes