CHAPTER 2
Storage
Hadoop is not only a data analysis platform but it also handles storage, because you need a place to store data before you can analyze it. Hadoop is a distributed system, and the workload requirements on a distributed system are often different from web applications or consumer applications. The popular Hadoop-implemented specific storage system is called HDFS (Hadoop Distributed File System). As the name suggests, HDFS is a filesystem. The data on HDFS can be a file or a directory, like the ordinal filesystems that you use every day. You might be familiar with the usage and interface of HDFS, but it is built on a totally different architecture for achieving high availability and scalability.
In this chapter, we will introduce the basic concept and the usage of HDFS. In most cases, the Hadoop MapReduce application accesses the data on HDFS. So, improving the HDFS cluster often immediately improves the MapReduce performance. In addition, other external frameworks, such as Apache HBase and Apache Spark, can also access HDFS data for their workload. Therefore, HDFS provides fundamental functionality for the Hadoop ecosystem, and although HDFS was developed during the initial Hadoop era, it continues to be a crucial component. In this chapter we cover important and advanced features of HDFS. This advanced functionality makes HDFS data more reliable and more efficient to access. One of these functions is Erasure Coding, which drastically saves storage capacity in comparison with ordinal replication HDFS. Although this function has not yet been released, it is actively being developed, and is important to examine.
BASICS OF HADOOP HDFS
One challenge with implementing HDFS is achieving availability and scalability at the same time. You may have a large amount of data that can't fit on a single physical machine disk, so it's necessary to distribute the data among multiple machines. HDFS can do this automatically and transparently while providing a user-friendly interface to developers. HDFS achieves these two main points:
- High scalability
- High availability
Some of the machines in the HDFS cluster can be broken at any time due to a broken disk or a power shutdown. HDFS will continue providing its service and the required data, even if some of the nodes are unavailable. HDFS efficiently provides all required data to an application. This is a requirement because there are many types of applications running on Hadoop processes, and also because there is a huge amount of data stored on HDFS. This may require the full use of the network bandwidth or disk I/O operations. HDFS must even provide this same performance when the data stored on HDFS is growing.
Let's examine the basic concepts and architecture of HDFS that provide these requirements for its distributed storage system.
Concept
HDFS is a storage system that stores large amounts of data to be sequentially accessed. HDFS data doesn't fit into a random-access pattern. Here are three important points about HDFS characteristics:
- Huge file: In the HDFS context, huge means hundreds of megabytes, or even gigabytes, and more. HDFS is specialized for huge data files. Therefore, a lot of small files hinder HDFS performance because its metadata consumes a lot of memory space on the master component called NameNode, which is explained in the next section.
- Sequential access: Both read and write operations in HDFS should be handled sequentially. Random access hurts HDFS performance because of network latency. But reading the data once and writing it many times is a suitable situation for an HDFS use case. MapReduce and other execution engines can efficiently read HDFS files any number of times as long as files are read sequentially. HDFS puts an emphasis on the throughput of total access, rather than low latency. It is more important to achieve high throughput than to achieve low latency, because the total time for reading all data relies on throughput metrics.
- Commodity hardware: Hadoop HDFS does not require specialized hardware made for big data processing or storage because many IT vendors already provide this. If Hadoop requires a specific type of hardware, the cost of using Hadoop will increase, and scalability will perish due to the difficulty of always buying the same hardware.
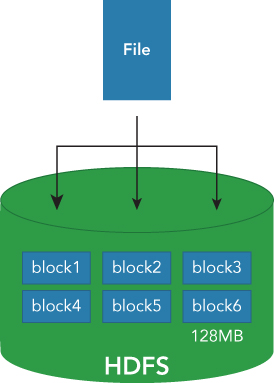
HDFS manages the stored data with block units similar to a standard filesystem. Each block has a limited, maximum size configured by HDFS, which defines how files that would span multiple blocks are divided. The default block size is 128MB. Each file is separated into 128MB blocks when written on the HDFS (see Figure 2.1). A file that's smaller than the block size does not occupy the total block. A 100MB file keeps only 100MB on one HDFS block. The block is an important abstraction of HDFS. The blocks are distributed across multiple nodes, so that you can create a file larger than the disk size of a single node. Thus, you can create any size of file thanks to the abstraction of the blocks that are used to store the file.
In addition to this abstraction, one other thing HDFS does that is different from typical filesystems is to simplify the overall structure. The abstraction of the block's organization also simplifies the disk management. Because blocks are a fixed size, calculating the number of blocks that fit into a single physical disk is easy (divide the disk size by the block size). This means the overall capacity of each node is also easily calculated (by adding the block capacity of each disk). So, the capacity of the entire cluster is also easy to determine. To manage the combination of the blocks and metadata, HDFS is divided into two subsystems. One system manages the metadata, including the name of the file, directory, and other metadata. The other system is used to manage the underlying block organization as blocks are spread across the nodes, and the other is for managing blocks and the corresponding node list. The two systems can be separated by the block abstraction.
The key to the power and flexibility of HDFS is the efficient use of commodity hardware. Rather than relying on expensive, specialized hardware, you can use low-cost commodity hardware instead. Although this low-cost hardware is more likely to fail, HDFS works around this by providing an abstraction layer that overcomes the potential for failure. In a normal system where all of the day's data is stored on a single disk, a failure of that disk creates a loss of this data. In a distributed system, where there are multiple nodes using the same commodity hardware, it's also possible that the entire node would fail, perhaps due to power supply, CPU, or network failure.
Most systems that support High Availability (HA) of the data do so by replicating the entire data structure, usually across two nodes. This ensures that if one node, or data source, fails, the other node or copy of the data can be used in its place. HDFS expands on this by making use of the data block abstraction. Instead of replicating the data once, by default in HDFS, data is replicated twice, making a total of three copies of each block. To improve upon this even further, rather than replicating all of the blocks on, for example, node A to node B, HDFS distributes the blocks across multiple nodes (see Figure 2.2).
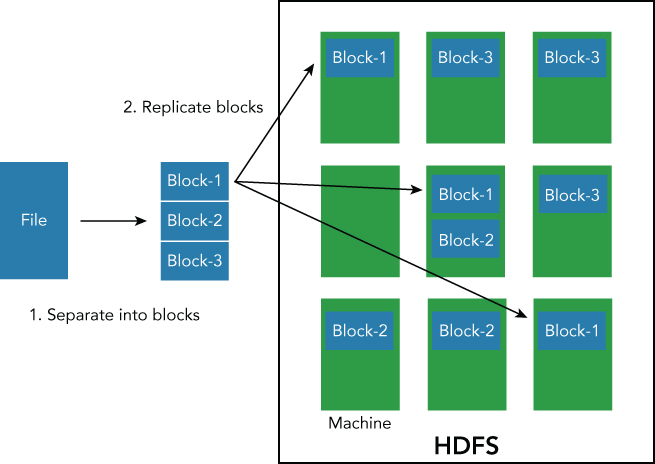
For example, imagine a large file that would normally occupy three blocks on an HDFS filesystem, and we have 5 nodes in the Hadoop cluster. Copy 1 of block 1 might be stored physically on nodes A, B and C; block 2 on nodes B, C and D, and block 3 on nodes D, E and A.
This distribution of the data is made possible by the block abstraction, and also ensures that the data will remain available even if two nodes in the system fail, because the additional copies of the data blocks are spread across multiple nodes. The file can still be recreated by using the copies on the other nodes that are still running. For example, if nodes B and C failed, we can still recover the three blocks from nodes A and D. Of course these replicas must be distributed among different nodes, as described in Figure 2.2.
If more than two replicas are lost, then the failure of one machine can cause the total loss of data. Hadoop controls this by putting each replica on a different machine, and by enabling the number of replicas of each block to be configurable. You can change the replication factor with the dfs.replication configuration, but when you increase the replication factor you decrease available disk capacity (because you have to store N copies of each block). An application accessing the data uses only one of the blocks, since the other blocks are merely copies to be used in the event of a failure. The distribution of data is not used to improve performance (see Figure 2.3).

To improve fault tolerance further, HDFS can be configured to take into account the physical topology of the data and how it is stored, and the location of each machine within the racks used to house modern server hardware. The machines in the data center are usually put in a rack or some type of container for storing server machines. One rack can store dozens of machines. The machines are usually close in proximity and also close in network context. The connection between the machines in the same rack is more efficient than the connection between the machines across racks. By providing HDFS with the physical architecture, the performance and resilience of the distributed file system is improved. Blocks can be distributed across multiple nodes in the same rack, and better, across multiple racks, so that if an entire rack of servers fails, the blocks have been distributed in such a way that the data is not lost.
This process also takes into account the improved connectivity available within a single rack. Consequently, putting all replicas on one rack is very efficient because there is no restriction of network bandwidth between the racks. For example, the first replica (replica1) is put on the same node where the client is running. The second replica (replica2) is put on another machine in a different rack. The third replica is put on a different machine in the same rack where the second replica is located. The result is that HDFS provides a good balance between maximizing network performance within racks and supporting fault tolerance across the racks.
Architecture
Hadoop HDFS uses a master-slave architecture. The master server is called the NameNode, and it is responsible for managing the metadata of the filesystem, such as filename, permission, and creation time. All HDFS operations—such as write, read, and create—are first submitted to NameNode. NameNode does not store the actual data. Instead, slave servers called DataNodes store the individual blocks that make up a file. By default, there is only one Active NameNode in an HDFS cluster. Losing the NameNode can lead to the loss of your data because it stores the only copy of the block allocation.
To improve the fault-tolerance, HDFS can use a high-availability architecture and support one or more backup NameNodes that contain copies of the metadata and block allocation information. Any number of machines can be DataNodes in one HDFS cluster, and in most Hadoop clusters the majority of nodes will be DataNodes, often numbering in the thousands of servers in the larger clusters. The overview of the relationship between NameNode and DataNodes is covered next.
NameNode has a class that retains the information to manage the relationship between file and blocks: FSNamesystem. This class keeps information that is necessary to manage the mapping from file to blocks. Each file is represented as an INode, which is the term used by all filesystems including HDFS to refer to the key filesystem structure. INodes are put under FSDirectory in a tree structure. INode can represent both file, directory, and other entities on the filesystem. The concrete correspondence relationships between INode and blocks are delegated to a structure called the BlocksMap included in the BlockManager. As described in the architecture overview (see Figure 2.4), the NameNode manages the relationship between INode and blocks.
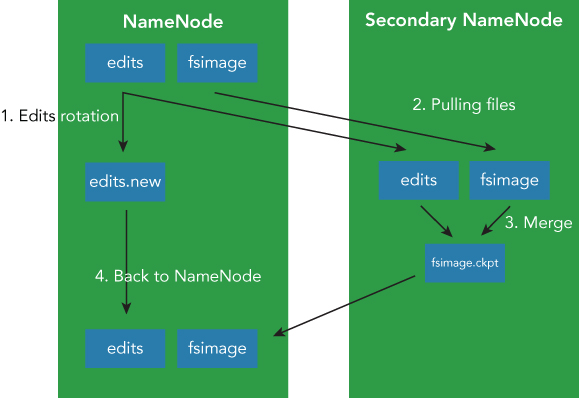
All metadata is managed in memory while the NameNode is running normally. But, in order for the metadata to remain persistent, the NameNode must write the metadata to a physical disk. Without this operation, the metadata and block structure will be lost if the NameNode crashes. A periodic checkpoint is used to write metadata, and the edit log (a record of all of the individual changes) on disk and is usually handled by a new node called a secondary NameNode. A secondary NameNode is almost the same as the normal NameNode except that the secondary NameNode can't behave as a NameNode. The only task the secondary NameNode is expected to handle is to periodically merge metadata changes and the current snapshot of the information stored on disk.
The merging task is often heavy and time consuming. It is not efficient for the NameNode to merge this information by itself, since it has to handle the general requests for metadata and file information for the running cluster. So, the Secondary NameNode handles the merging for NameNode using the periodic checkpoint process. If the NameNode experiences a failure, you need to run the checkpoint manually, but the process often takes a lot of time. HDFS will remain unavailable until the merging process is complete. Therefore, the regular checkpoint process is indispensable for a healthy HDFS cluster.
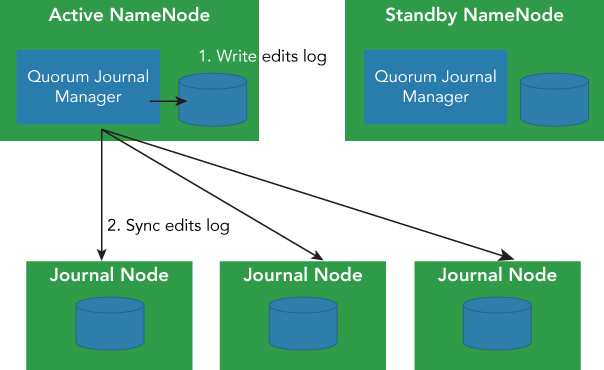
One thing to note here is that HDFS can now support a high-availability (HA) structure. The Hadoop cluster can operate with two NameNodes operating in an HA architecture. One is the active NameNode and the other is the standby NameNode. They share the in-memorying block and log files through the quorum journal manager. Thanks to sharing metadata between the active NameNode and the standby NameNode, the standby NameNode can become active immediately when failover happens. NameNode is not a Single Point of Failure (SPOF) anymore. In addition, the standby NameNode can play a role as a Secondary NameNode, performing the required periodic checkpoint process. It is not necessary to configure a Secondary NameNode and a Standby NameNode. The recommended configuration is to use the HA Standby NameNode, which automatically provides the Secondary NameNode functionality.
The sync process with journal nodes and active NameNode is shown in Figure 2.5. You need to avoid the so-called “split brain” situation in this architecture. A split brain occurs when the standby NameNode becomes active, but the old failed NameNode is technically still available within the cluster. This can be a really serious problem, because the metadata of the HDFS name system can be corrupted by inconsistent updating operations issued by the active NameNode and standby NameNode.
To help prevent this situation, the quorum manager uses an epoch number. When the standby node tries to become active, it increments the epoch number for all of the journal nodes. The number of successes of the increment operation needs to be more than a fixed number that is usually a majority number of journal nodes. If both active NameNode and standby NameNode try to increment the number, both can succeed. But, the writing (authoritative) NameNode includes the NameNode's epoch number with the metadata. The receiver of the journal node accepts the operation and the epoch number; if the epoch number receives the NameNode, the epoch number of the NameNode that matches the journal nodes is the one used as the valid operation. The entire negotiation process and validation with the epoch number and each operation are taken care of automatically by Hadoop, and it is not up to either the developers or administrators to control the operation.
The detail of configuration for setting up HA NameNode is described here: (http://hadoop.apache.org/docs/current/hadoop-project-dist/hadoop-hdfs/HDFSHighAvailabilityWithQJM.html). It is necessary to prepare two machines for active and standby NameNodes, and at least three journal node machines. Since edit log modification has to be written on the majority of journal nodes, the number of journal nodes is recommended to be an odd number (3, 5, 7, etc.). When you are running N journal nodes in your HDFS cluster, your HDFS system tolerates at most (N − 1) / 2 failures in order to operate normally.
Interface
HDFS provides several types of interfaces for filesystem users. The most basic one is the command-line tool included in Hadoop HDFS. Command-line tools can be separated into two categories: the filesystem shell interface and the admin tool for HDFS.
- File system shell: This tool provides various types of shell-like commands that directly interact with HDFS data. You can read or write file data with the shell tool. Also, you can access the data stored in other storage systems such as HFTP, S3, and FS that HDFS is now supporting.
- Java API: This is the most basic API. File system shells and most other interfaces use the Java API internally. In addition, the API is also used by many applications running on HDFS. When you write an application that accesses HDFS data, you should use the Java API.
- WebHDFS: WebHDFS provides an HTTP REST API through NameNode. WebHDFS supports all filesystem operations, including Kerberos authentication. You can enable WebHDFS with
dfs.webhdfs.enabled=true. - libhdfs: Hadoop provides a C library called libhdfs that is transplanted from the Java filesystem interface. In spite of its name, libhdfs can access any type of the Hadoop filesystem, not only HDFS.
libhdfscalls a filesystem client implemented in Java through the Java Native Interface (JNI).
Let's examine the basic usage of the command-line interface and the Java API. The command-line interface is provided by the bin/hdfs script, and it's deprecated. A current command-line tool is used through bin/hadoop fs <args>. The filesystem shell provides a POSIX-like interface, and the full commands are listed in Tables 2.1, 2.2 and 2.3. (http://hadoop.apache.org/docs/current/hadoop-project-dist/hadoop-common/FileSystemShell.html).
Table 2.1 Read Operations
| command | Usage | description |
| cat | hadoop fs -cat <URI> |
Copies the content of source paths to stdout |
| copyToLocal | hadoop fs -copyToLocal <Source URI> <Local URI> |
Copies a file onto the local filesystem |
| cp | hadoop fs -cp <Source URI> <Dest URI> |
Copies a file from the source path to the dest path and is the same as the cp command |
| ls | hadoop fs -ls <URI> |
Returns the stat of the file or directory |
| find | hadoop fs -find <URI> |
Returns all files that match a given specified expression |
| get | hadoop fs -get <Source URI> <Dest URI> |
Copies a file from the source path to the dest path in a local file system |
| tail | hadoop fs -tail <URI> |
Displays the last kilobytes of the file to output |
Table 2.2 Write Operations
| command | Usage | description |
| appendToFile | hadoop fs -appendToFile <Local URI> <dest URI> |
Append some local file data to the dest URI file |
| copyFromLocal | hadoop fs -copyFromLocal <Local URI> <Remote URI> |
Copies a file from the remote filesystem to the local filesystem |
| put | hadoop fs -put <Local URI> …<Remote URI> |
Copies files from the local filesystem to the remote filesystem |
| touch | hadoop fs -touchz <URI> |
Create a file that has zero length |
Table 2.3 Other Operations
| command | Usage | description |
| chmod | hadoop fs -chmod <URI> |
Change the permission of files |
| chown | hadoop fs -chown <URI> |
Change the owner of files |
| df | hadoop fs -df <URI> |
Display free space under a specified URI |
| du | hadoop fs -du <URI> |
Display the size of files contained in a given directory |
| mv | hadoop fs -mv <Source URI> … <Dest URI> |
Move files from source to destination |
| rm | hadoop fs -rm <URI> |
Remove files of a given URI |
| rmdir | hadoop fs -rmdir <URI> |
Remove directories of a given URI |
| stat | hadoop fs -stat <URI> |
Display statistics of a given URI |
You might be familiar with most of the CLI commands. They are for filesystem users, and many of the commands can manipulate a stored file or directory. In addition, HDFS provides the commands for administrators of the HDFS cluster, called dfsadmin. You can use it with bin/hdfs dfsadmin <sub command>. The full list of admin commands is written here: (http://hadoop.apache.org/docs/current/hadoop-project-dist/hadoop-hdfs/HDFSCommands.html#dfsadmin).
The Java filesystem API is helpful if you want to do programming or access HDFS data from your application. The filesystem API also encapsulates the authentication process and the interpretation of a given configuration. Let's create a tool that reads file data and outputs it to stdout. You need to know how to write a Java program and how to use Maven in order to build the tool. We assume that you have this knowledge. The dependency should be written as follows:
        <dependency>
            <groupId>org.apache.hadoop</groupId>
            <artifactId>hadoop-client</artifactId>
            <version>2.6.0</version>
        </dependency>
Of course, the version of Hadoop can change according to your Hadoop cluster. Our tool is named MyHDFSCat. The concrete implementation is shown here:
import org.apache.hadoop.conf.Configuration;
       import org.apache.hadoop.conf.Configured;
       import org.apache.hadoop.fs.FileSystem;
       import org.apache.hadoop.fs.Path;
       import org.apache.hadoop.io.IOUtils;
       import org.apache.hadoop.util.Tool;
       import org.apache.hadoop.util.ToolRunner;
       import java.io.InputStream;
       import java.net.URI;

public class MyHDFSCat extends Configured implements Tool {
    public int run(String[] args) throws Exception {
        String uri = null;
        // Target URI is given as first argument
               if (args.length > 0) {
                 uri = args[0];
               }
        // Get the default configuration put on your HDFS cluster
               Configuration conf = this.getConf();
        FileSystem fs = FileSystem.get(URI.create(uri), conf);
        InputStream in = null;
        try {
                  in = fs.open(new Path(uri));
                  IOUtils.copyBytes(in, System.out, 4096, false);
               } finally {
                 IOUtils.closeStream(in);
               }
               return 0;
    }
    public static void main(String[] args) throws Exception {
        int exitCode = ToolRunner.run(new MyHDFSCat(), args);
               System.exit(exitCode);
    }
}
You can compile the implementation with mvn package -DskipTests. The next thing to do is to upload the JAR file to your cluster. You can see the JAR file under the target directory of the project root. Just before running MyHDFSCat, upload the target file to HDFS.
$ echo "This is for MyHDFSCat" > test.txt
$ bin/hadoop fs -put test.txt /test.txt
You can use the jar subcommand of the hadoop command to run your Java class included in the JAR file. The JAR file is myhdfscat-0.0.1-SNAPSHOT.jar. (The way of constructing the HDFS cluster will be described in the next section.) Running the command of MyHDFSCat can look like this:
$ bin/hadoop jar myhdfscat-0.0.1-SNAPSHOT.jar MyHDFSCat hdfs:///test.txt
This is for MyHDFSCat
You can do other operations, not only reading file data, but also writing, deleting, and referring status info from the HDFS file. Here you can see that the example tool for referring the FileStatus is the same as MyHDFSCat.
Import org.apache.hadoop.conf.Configuration;
       import org.apache.hadoop.conf.Configured;
       import org.apache.hadoop.fs.FileStatus;
       import org.apache.hadoop.fs.FileSystem;
      import org.apache.hadoop.fs.Path;
       import org.apache.hadoop.util.Tool;
       import org.apache.hadoop.util.ToolRunner;
       import java.net.URI;
public class MyHDFSStat extends Configured implements Tool {
    public int run(String[] args) throws Exception {
        String uri = null;
        if (args.length > 0) {
                   uri = args[0];
               }
        Configuration conf = this.getConf();
               FileSystem fs = FileSystem.get(URI.create(uri), conf);
               FileStatus status = fs.getFileStatus(new Path(uri));
        System.out.printf("path: %s\n", status.getPath());
        System.out.printf("length: %d\n", status.getLen());
        System.out.printf("access: %d\n", status.getAccessTime());
        System.out.printf("modified: %d\n", status.getModificationTime());
        System.out.printf("owner: %s\n", status.getOwner());
        System.out.printf("group: %s\n", status.getGroup());
        System.out.printf("permission: %s\n", status.getPermission());
        System.out.printf("replication: %d\n", status.getReplication());
        return 0;
    }
    public static void main(String[] args) throws Exception {
              int exitCode = ToolRunner.run(new MyHDFSStat(), args);
              System.exit(exitCode);
          }
}
You can run MyHDFSStat in the same way as MyHDFSCat. The output will look like this:
$ bin/hadoop jar myhdfsstat-SNAPSHOT.jar \
                    com.lewuathe.MyHDFSStat hdfs:///test.txt
path: hdfs://master:9000/test.txt
length: 18
access: 1452334391191
modified: 1452334391769
owner: root
group: supergroup
permission: rw-r--r--
replication: 1
You can write a program to manipulate HDFS data. If you have no HDFS cluster yet, you should launch your HDFS cluster. We will explain how to set up a distributed HDFS cluster next.
SETTING UP THE HDFS CLUSTER IN DISTRIBUTED MODE
Now that you understand the overview architecture and interface of HDFS, it is time to learn about launching your HDFS cluster. To do this, it is necessary to procure several machines prepared for each component role in an HDFS cluster. One machine should be created for the master machine where NameNode and ResourceManager are installed. The other machines should be created for slave machines where DataNode and NodeManager are installed. The total number of servers is 1 + N machines, where N is dependent on the scale of your workloads. The HDFS cluster can be set up in secure mode. We will omit the detail of a secure Hadoop cluster because it is explained in Chapter 6. So, this time we will set up a normal HDFS cluster. As a prerequisite, please make sure all servers are installed with Java 1.6+ before starting the Hadoop installation. The tested JDK versions of the Hadoop project are listed on this page: (http://wiki.apache.org/hadoop/HadoopJavaVersions).
Install
To start, go ahead and download the Hadoop package from the mirror site (http://hadoop.apache.org/releases.html). Use BUILDING.txt included in the Hadoop source directory if you want to build the Hadoop package from the source file. The Hadoop project provides a Docker image for building the Hadoop package: start-build-env.sh is used for that purpose. If you have already installed Docker on your machine, you can build an environment, including all dependencies for building the Hadoop package:
$ ./start-build.env.sh
$ mvn package -Pdist,native,docs -DskipTests -Dtar
The built package is put under hadoop-dist/target/hadoop-<VERSION>-SNAPSHOT.tar.gz, if you install the package under /usr/local:
$ tar -xz -C /usr/local
$ cd /usr/local
$ ln -s hadoop-<VERSION>-SNAPSHOT hadoop
HDFS configurations are put in core-default.xml and etc/hadoop/core-site.xml, hdfs-default.xml, and etc/hadoop/hdfs-site.xml. The former is the default value for HDFS, and the latter is for specific configurations for your cluster. You should not change hdfs-default.xml, but you can modify hdfs-site.xml if necessary. In addition, there are several environmental variables that must be set.
export JAVA_HOME=/usr/java/default
export HADOOP_COMMON_PREFIX=/usr/local/hadoop
export HADOOP_PREFIX=/usr/local/hadoop
export HADOOP_HDFS_HOME=/usr/local/hadoop
export HADOOP_CONF_DIR=/usr/local/hadoop/etc/hadoop
These variables are used in the hadoop or hdfs script to launch daemons where you find the exec script or configuration files. The actual configurations for each daemon are written in core-site.xml and hdfs-site.xml. As the name specifies, core-site.xml is for the Hadoop Common package, and hdfs-site.xml is for the HDFS package. First, fs.defaultFS is necessary in order to specify the HDFS cluster used in the hadoop script.
<configuration>
  <property>
    <name>fs.defaultFS</name>
    <value>hdfs://<Master hostname>:9000</value>
  </property>
</configuration>
The hadoop script is used for launching MapReduce jobs and the dfsadmin command. Thanks to the fs.defaultFS configuration, the system can detect where the HDFS cluster is, only you should write in core-site.xml. The next step is adding hdfs-site.xml.
<configuration>
    <property>
        <name>dfs.replication</name>
        <value>1</value>
    </property>
</configuration>
dfs.replication specifies the minimum replication factor for each block on HDFS. Since the default value is set to three, it is not necessary to set it again here. The configurations that are related to the NameNode daemon are listed in Table 2.4.
Table 2.4 NameNode Daemon Configurations
| Parameter | Notes |
| dfs.namenode.name.dir | Meta data such as fsimage or edits logs are stored in this directory of the NameNode machine |
| df.hosts / dfs.hosts.excluded | List of permitted/excluded DataNodes |
| dfs.blocksize | Specifies the block size of the HDFS file |
| dfs.namenode.handler.count | The number of threads that it handles |
Since the same configuration files are distributed among HDFS clusters to both NameNode and DataNodes in many cases, the configurations for DataNodes can be written in hdfs-site.xml (see Table 2.5).
Table 2.5 DataNode Daemon Configurations
| Parameter | Notes |
| dfs.datanode.data.dir | DataNode stores actual block data under the specified directory. Multiple directories can be set with a comma separated list of directories. |
After writing configurations for the HDFS cluster, it is necessary to format it if it's the first time to launch the HDFS cluster on that machine.
$ bin/hdfs namenode -format Once NameNode is formatted, you can start the HDFS daemons. The launch commands are included in the hdfs script for both NameNode and DataNodes.
# On NameNode machine
       $ bin/hdfs namenode
# On DataNode machine
       $ bin/hdfs datanode
You can launch these processes as a daemon by using upstart (http://upstart.ubuntu.com/) and daemontools (https://cr.yp.to/daemontools.html). If you want to launch NameNode and DataNodes (see Figure 2.6) as a daemon, there are utility scripts in the Hadoop source code.

# On NameNode machine
       $ sbin/hadoop-daemon.sh --config $HADOOP_CONF_DIR --script hdfs start namenode
# On DataNode machine
       $ sbin/hadoop-daemon.sh --config $HADOOP_CONF_DIR --script hdfs start datanode
After launching the HDFS cluster, you can see the NameNode UI at http://<Master Hostname>:50070.
NameNode also has a metric API provided by JMX. You can see the metrics that show configuration parameters of the HDFS cluster and information of resource usage. This is shown in http://<Master Hostname>:50070/jmx. The JMX metrics will be useful for cluster monitoring and profiling cluster performance. When it is necessary to shut down the HDFS cluster, you can do that in the same way.
# On NameNode machine
       $ sbin/hadoop-daemon.sh --config $HADOOP_CONF_DIR --script hdfs stop namenode
# On DataNode machine
       $ sbin/hadoop-daemon.sh --config $HADOOP_CONF_DIR --script hdfs stop datanode
DataNode also has a web UI at the port number 50075. You can see http://<Slave Hostname>:50075. This is the basic way to set up the HDFS cluster. But, it might be reasonable to use some Hadoop distribution such as CDH from Cloudera or HDP from Hortonworks in many cases on an enterprise usage. These packages include a set up manager called Cloudera Manager or Ambari. These are reasonable options for setting up your HDFS cluster. The details are here:
- Cloudera Manager: https://www.cloudera.com/content/www/en-us/products/cloudera-manager.html
- Apache Ambari: http://ambari.apache.org/
ADVANCED FEATURES OF HDFS
The content shown so far is basically enough to set up and try HDFS. But, there are several features you should know in order to reliably perform operations on HDFS. HDFS often stores business critical data. So, it is very important to run a stable HDFS cluster. We will explain some advanced features of HDFS in this section. The list includes features that are not released yet. For example, Erasure Coding is under active development, yet it is merged into the master branch. Although we cannot use it with a release version, it stores your data more efficiently and saves you money. HDFS is progressing even now so we will show you some of that here.
Snapshots
HDFS snapshot copies a data in the filesystem at some point in time. A snapshot can be taken for a subtree or the entire filesystem. Snapshot can usually be used for data backup for protection against some failures or disaster recovery, and snapshot is read-only data, because it is meaningless if you can modify the snapshot data after it is created. HDFS snapshot was designed to copy data efficiently, and the main effectiveness of making HDFS snapshot includes:
- Creating a snapshot takes constant time order O(1), excluding the inode lookup time, because it does not copy actual data but only makes a reference.
- Additional memory is used only when the original data is modified. The size of additional memory is proportional to the number of modifications.
- The modifications are recorded as the collection in reverse chronological order. The current data is not modified any more, and the snapshot data is computed by subtracting the modifications from the current data.
Any directory can create its own snapshot once it is set as snapshottable. There is no limitation of the number of snapshottable directories in one filesystem, and a snapshottable directory can have at most 65536 snapshots at the same time. Administrators can set any directory to snapshottable, and any user can create a snapshot once it's set as snapshottable by the administrator. One thing to note is that a nested snapshottable directory is not currently allowed. So, a child whose parent is already snapshottable can't be set as snapshottable. Let's explain how to create a snapshot on HDFS along with some administrator operations.
A snapshot directory is created under its own directory. Snapshot is also an HDFS directory, including all data that exists when the snapshot is created. One snapshottable directory can keep multiple snapshots, and they can be identified with a unique name defined at the time they are created. So, let's look at how to use snapshot in your HDFS directory. There are two types of commands in a snapshot operation. One is for users and the other is for administrators.
$ bin/hadoop fs -mkdir /snapshottable
$ bin/hdfs dfsadmin -allowSnapshot /snapshottable
An administrator command will allow snapshots. Although it seems like there is no change with an -allowSnapshot command, it allows users to create snapshots at any time. The creation of a snapshot can be done by using the fs -createSnapshot command.
$ bin/hadoop fs -put fileA /snapshottable
$ bin/hadoop fs -put fileB /snapshottable
$ bin/hadoop fs -createSnapshot /snapshottable
$ bin/hadoop fs -ls /snapshottable/
Found 2 items
-rw-r--r--   1 root supergroup       1366 2016-01-14 07:46 /snapshottable/fileA
-rw-r--r--   1 root supergroup       1366 2016-01-14 08:27 /snapshottable/fileB
fileA and fileB are normally stored under /snapshottable. But, where is snapshot? We cannot see the snapshot directory, only the ls command, but we can find it by specifying the full path to a snapshot directory called .snapshot.
$ bin/hadoop fs -ls /snapshottable/.snapshot
Found 1 items
drwxr-xr-x   - root supergroup          0 2016-01-14 07:47 /snapshottable/.snapshot/↲
s20160114-074722.738
All files stored when snapshot is taken are stored under the directory.
$ bin/hadoop fs -ls /snapshottable/.snapshot/s20160114-074722.738
Found 2 items
-rw-r--r--   1 root supergroup       1366 2016-01-14 07:46 /snapshottable/.snapshot/↲
s20160114-074722.738/fileA
-rw-r--r--   1 root supergroup       1366 2016-01-14 07:46 /snapshottable/.snapshot/↲
s20160114-074722.738/fileB
These files will no longer be modified. So if the files/directories once snapshotted are needed, all you have to do is to move or copy the data to a normal directory. The big advantage of using the HDFS snapshot is that you don't need to know any new commands or operations, because they are only HDFS files. Any operations you can do to normal HDFS files/directories can also be done to snapshot files/directories.
Next, let's take another snapshot and see the difference of modification after a first snapshot.
$ bin/hadoop fs -put fileC /snapshottable
$ bin/hadoop fs -ls /snapshottable
Found 3 items
-rw-r--r--   1 root supergroup       1366 2016-01-14 07:46 /snapshottable/fileA
-rw-r--r--   1 root supergroup       1366 2016-01-14 08:27 /snapshottable/fileB
-rw-r--r--   1 root supergroup       1366 2016-01-14 08:27 /snapshottable/fileC
$ bin/hdfs -createSnapshot /snapshottable
You can see the second snapshot under the /snapshottable directory.
$ bin/hadoop fs -ls /snapshottable/.snapshot
Found 2 items
drwxr-xr-x   - root supergroup          0 2016-01-14 07:47 /snapshottable/.snapshot/↲
s20160114-074722.738
drwxr-xr-x   - root supergroup          0 2016-01-14 08:30 /snapshottable/.snapshot/↲
s20160114-083038.580
The snapshotDiff command can be used to check the total modification that is done to the snapshottable directory. It does not show the actual contents that are modified, but it is enough to check the overview of modifications.
$ bin/hdfs snapshotDiff /snapshottable s20160114-074722.738 s20160114-083038.580
Difference between snapshot s20160114-074722.738 and snapshot s20160114-083038.580 ↲ under↲
 directory /snapshottable:
M      .
+      ./fileC
The first characters of each line represent the modification types, which are listed in Table 2.6.
Table 2.6 snapshotDiff Modification Types
| Character | Modification type |
| + | The file/directory has been created |
| – | The file/directory has been deleted |
| M | The file/directory has been modified |
| R | The file/directory has been renamed |
Note the difference between deletion and rename. It is regarded as a deletion if the result file after renamed goes to the outside of a snapshottable directory. It is regarded as a rename only if the file is kept on a snapshottable directory. HDFS snapshot provides a simple way to keep copies of file/directory at a time. Although it is useful, HDFS snapshot is not recommended to be used as a full backup. As you know, HDFS snapshot is only an HDFS file/directory. Snapshot data has the same fault tolerance and availability to the file/directory of HDFS. So, the full backup must be provided with more safe and secure storage.
The full instruction of the HDFS snapshot is described at: http://hadoop.apache.org/docs/current/hadoop-project-dist/hadoop-hdfs/HdfsSnapshots.html.
Offline Viewer
The offline edit viewer and image viewer provide a way to see the current state of the filesystem by only checking the edits log and fsimage files. All you need is two files. It does not stop the HDFS service to check the name system state. In addition, the offline viewer only depends on files. It is not necessary to operate the HDFS service to check with offline viewers. As described earlier, there are two types of files managed by the HDFS service: the edits log and fsimage. So there are also two types of offline viewers corresponding to these files: the offline edits viewer and offline image viewer. In this section, you learn how to use these offline viewers and their command usage.
First, let's explain the offline edits viewer, which is included as a subcommand of the hdfs command:
$  bin/hdfs oev
Usage: bin/hdfs oev [OPTIONS] -i INPUT_FILE -o OUTPUT_FILE
Offline edits viewer
Parse a Hadoop edits log file INPUT_FILE and save results
in OUTPUT_FILE.
Required command line arguments:
-i,--inputFile <arg>   edits file to process, xml (case
                       insensitive) extension means XML format,
                       any other filename means binary format
-o,--outputFile <arg>  Name of output file. If the specified
                       file exists, it will be overwritten,
                       format of the file is determined
                       by -p option

Optional command line arguments:
-p,--processor <arg>   Select which type of processor to apply
                       against image file, currently supported
                       processors are: binary (native binary format
                       that Hadoop uses), xml (default, XML
                       format), stats (prints statistics about
                       edits file)
-h,--help              Display usage information and exit
-f,--fix-txids         Renumber the transaction IDs in the input,
                       so that there are no gaps or invalid
                       transaction IDs.
-r,--recover           When reading binary edit logs, use recovery
                       mode.  This will give you the chance to skip
                       corrupt parts of the edit log.
-v,--verbose           More verbose output, prints the input and
                       output filenames, for processors that write
                       to a file, also output to screen. On large
                       image files this will dramatically increase
                       processing time (default is false).
Generic options supported are
-conf <configuration file>     specify an application configuration file
-D <property=value>            use value for given property
-fs <local|namenode:port>      specify a namenode
-jt <local|resourcemanager:port>    specify a ResourceManager
-files <comma separated list of files>    specify comma separated files to be copied to↲
 the map reduce cluster
-libjars <comma separated list of jars>    specify comma separated jar files to include↲
 in the classpath.
-archives <comma separated list of archives>    specify comma separated archives to be↲
 unarchived on the compute machines.
The general command line syntax is
command [genericOptions] [commandOptions]
The offline edits viewer is a converter that can convert unreadable binary edits log files into readable files, such as XML. Let's assume you have a filesystem like the one shown in Figure 2.7.
You can see the results here using this filesystem.
$ bin/hdfs oev -i ~/edits_inprogress_0000000000000000001 -o edits.xml
$ cat edits.xml
<?xml version="1.0" encoding="UTF-8"?>
<EDITS>
  <EDITS_VERSION>-64</EDITS_VERSION>
  <RECORD>
    <OPCODE>OP_START_LOG_SEGMENT</OPCODE>
    <DATA>
      <TXID>1</TXID>
    </DATA>
  </RECORD>
  <RECORD>
    <OPCODE>OP_MKDIR</OPCODE>
    <DATA>
      <TXID>2</TXID>
      <LENGTH>0</LENGTH>
      <INODEID>16386</INODEID>
      <PATH>/tmp</PATH>
      <TIMESTAMP>1453857409206</TIMESTAMP>
      <PERMISSION_STATUS>
        <USERNAME>root</USERNAME>
        <GROUPNAME>supergroup</GROUPNAME>
        <MODE>504</MODE>
      </PERMISSION_STATUS>
    </DATA>
  </RECORD>
  <RECORD>
    <OPCODE>OP_MKDIR</OPCODE>
    <DATA>
      <TXID>3</TXID>
      <LENGTH>0</LENGTH>
      <INODEID>16387</INODEID>
      <PATH>/tmp/hadoop-yarn</PATH>
      <TIMESTAMP>1453857409411</TIMESTAMP>
      <PERMISSION_STATUS>
        <USERNAME>root</USERNAME>
        <GROUPNAME>supergroup</GROUPNAME>
        <MODE>504</MODE>
      </PERMISSION_STATUS>
    </DATA>
  </RECORD>
  <RECORD>
…
Although this is only part of the output, you can see how each operation performed on HDFS is recorded in the file. It is useful to investigate the current HDFS state at the binary level. In addition, the offline edits viewer can convert back to binary with the XML file.
$ bin/hdfs oev -p binary -i edits.xml -o editYou can specify the conversion algorithm with -p (processor) option. You can use binary when you want to go back to binary format. The candidates of the option are binary, XML, and stats, but XML is the default. You can see the statistics of each operation with the stats option:
$ bin/hdfs oev -p stats -i edits.xml -o edit_stats
$ cat edits_stats
    VERSION                             : -64
    OP_ADD                         (  0): 1
    OP_RENAME_OLD                  (  1): 1
    OP_DELETE                      (  2): null
    OP_MKDIR                       (  3): 8
    OP_SET_REPLICATION             (  4): null
    OP_DATANODE_ADD                (  5): null
    OP_DATANODE_REMOVE             (  6): null
    OP_SET_PERMISSIONS             (  7): 1
    OP_SET_OWNER                   (  8): null
    OP_CLOSE                       (  9): 1
    OP_SET_GENSTAMP_V1             ( 10): null
    OP_SET_NS_QUOTA                ( 11): null
    OP_CLEAR_NS_QUOTA              ( 12): null
    OP_TIMES                       ( 13): null
    OP_SET_QUOTA                   ( 14): null
    OP_RENAME                      ( 15): null
    OP_CONCAT_DELETE               ( 16): null
    OP_SYMLINK                     ( 17): null
     …
Keep in mind that you can't change the stats file back to an XML or binary file, because it loses some information. So, when should you use the offline edits viewer? If you can read edits log then you can also edit it. If the edits log file has been broken by accident, but remains partially intact, you can restore the original file by manually rewriting the edits log. In that case, first you need to convert the edits log into XML, and then you can edit the XML file as you like if you have a true operation sequence, making it back to binary format. After getting back to binary format, HDFS can read it once it's restarted. But in some cases, the manual editing of the edits log can cause further serious problems, such as a typo or invalid operation types. Please pay attention to the manual operation if you have to do this.
There is one more very similar tool called the offline image viewer. The offline edits viewer is for viewing the edits log in a readable format. In the same way, the offline image viewer is for viewing fsimage in a readable format. The offline image viewer enables you to not only view image file contents, but also to access through the WebHDFS API to analyze and examine it deeply. It is usually necessary to run a checkpoint to create an fsimage file. But, you can do it manually too. If you have fsimage on your cluster, you do not need to do run the checkpoint. Saving a current HDFS namespace into fsimage can be done via the savesNamespace command.
$ bin/hdfs dfsadmin -safemode enter
Safe mode is ON
$ bin/hdfs dfsadmin -saveNamespace
Save namespace successful
$ bin/hdfs dfsadmin -safemode leave
Safe mode is OFF
Although we won't explain the detail of safe mode here, it is a command to make the HDFS read-only mode do maintenance. Otherwise write operations can occur using HDFS while saving the namespace in the fsimage file. After leaving safe mode, you can see the new fsimage file under the HDFS NameNode root directory.
$ ls -l /tmp/hadoop-root/dfs/name/current
-rw-r--r-- 1 root root     214 Jan 27 04:41 VERSION
-rw-r--r-- 1 root root 1048576 Jan 27 04:41 edits_inprogress_0000000000000000018
-rw-r--r-- 1 root root     362 Jan 27 01:16 fsimage_0000000000000000000
-rw-r--r-- 1 root root      62 Jan 27 01:16 fsimage_0000000000000000000.md5
-rw-r--r-- 1 root root     970 Jan 27 04:41 fsimage_0000000000000000017
The latest fsimage file is fsimage_0000000000000000017. Launch the WebHDFS server with the offline image viewer using the oiv command.
$ bin/hdfs oivl -i fsimage_0000000000000000017
16/01/27 05:03:30 WARN channel.DefaultChannelId: Failed to find a usable hardware↲
 address from the network interfaces; using random bytes: a4:3d:28:d3:a7:e5:60:94
16/01/27 05:03:30 INFO offlineImageViewer.WebImageViewer: WebImageViewer started. ↲
 Listening on /127.0.0.1:5978. Press Ctrl+C to stop the viewer.
You can simply access the server by specifying the webhdfs schema.
$ bin/hadoop fs -ls webhdfs://127.0.0.1:5978
bin/hadoop fs -ls webhdfs://127.0.0.1:5978/
Found 3 items
drwxr-xr-x   - root supergroup          0 2016-01-27 01:20 webhdfs://127.0.0.1:5978/↲
otherdir
drwxr-xr-x   - root supergroup          0 2016-01-27 01:20 webhdfs://127.0.0.1:5978/↲
somedir
drwxrwx---   - root supergroup          0 2016-01-27 01:16 webhdfs://127.0.0.1:5978/tmp
This is similar to the directory structure shown in Figure 2.7. WebHDFS provides the REST API through HTTP. So, you can access the offline image viewer through wget, curl, and other tools.
curl -i http://127.0.0.1:5978/webhdfs/v1/?op=liststatus
HTTP/1.1 200 OK
content-type: application/json; charset=utf-8
content-length: 690
connection: close
{"FileStatuses":{"FileStatus":[
{"fileId":16394,"accessTime":0,"replication":0,"owner":"root","length":0,
"permission":"755","blockSize":0,"modificationTime":1453857650965,"type":
"DIRECTORY","group":"supergroup","childrenNum":0,"pathSuffix":"otherdir"},
{"fileId":16392,"accessTime":0,"replication":0,"owner":"root","length":0,
"permission":"755","blockSize":0,"modificationTime":1453857643759,"type":
"DIRECTORY","group":"supergroup","childrenNum":1,"pathSuffix":"somedir"},
{"fileId":16386,"accessTime":0,"replication":0,"owner":"root","length":0,
"permission":"770","blockSize":0,"modificationTime":1453857409411,"type":
"DIRECTORY","group":"supergroup","childrenNum":1,"pathSuffix":"tmp"}
]}}
There is one more offline image viewer command due to the internal layout change of fsimage. The offline image viewer uses a lot of memory and loses some functions. If you want to avoid this problem, use the offline image viewer legacy (oiv_legacy), which is the same as the oiv command in Hadoop 2.3.
Tiered Storage
The storage capacity required for enterprise usage is rapidly increasing, whereas the data stored in Hadoop HDFS is growing exponentially. The cost of data storage is also increasing. While making use of data earns a lot of money and grows businesses, data management costs a lot of time and money. Tiered storage is an idea designed to use storage capacity more efficiently. According to HDFS-6584 (https://issues.apache.org/jira/browse/HDFS-6584), this feature is called Archival Storage in HDFS. Keep in mind that the data frequency usage is not always the same. Some data is frequently used from the workload, such as MapReduce jobs, and others are rarely used because they become old. Archival storage defines a new metric called temperature in terms of the frequency of accessing the data. The frequently accessed data is categorized as HOT. It is better to put HOT data on memory or SSD in order to increase the total throughput of workloads. The data is rarely accessed and categorized into COLD data, which can be put on slow disk or archive storage. You can achieve a reasonable amount of cost savings, because using a slow disk provides more benefits than using a low latency disk. So, archival storage provides you an option for easily managing this type of heterogeneous storage system.
There are two concepts that should be known in advance: storage types and storage policies.
- Storage types: Storage types represent a physical storage system. This is originally introduced by HDFS-2832, aiming to use various types of a storage system under HDFS. Currently
ARCHIVE,DISK,SSDandRAM_DISKare supported. ARCHIVE is a type of machine that has high density storage, but little compute power.RAM_DISKis supported for putting a single replica in memory. Their names do not necessarily represent the actual physical storage, even if you can configure their types arbitrarily according to your hardware. - Storage policies: Blocks can be stored on multiple heterogeneous storages, according to the storage policy. Embedded policies are as follows.
- Hot: The data that is frequently used should stay on the Hot policy. When a block is Hot, all replicas are stored in
DISK. - Cold: The data that is no longer used on a daily basis should stay on Cold policy. Moving Hot data to Cold data is the usual case. When a block is Cold, all blocks are stored in
ARCHIVE. - Warm: This policy is between the Hot and Cold policy. When a block is Warm, some of its replicas are stored in
DISKand the remaining replicas are stored inARCHIVE. - All_SSD: When a block is All_SSD, all blocks are stored in
SSD. - One_SSD: When a block is One_SSD, one replica is stored in
SSD. The remaining replicas are onDISK. - Lazy_Persist: When a block is Lazy_Persist, the single replica is stored in memory. The replica is first written on
RAM_DISKand then persisted inDISK.
- Hot: The data that is frequently used should stay on the Hot policy. When a block is Hot, all replicas are stored in
The preceding list is summarized in Table 2.7.
Table 2.7 Policy Details
| Policy ID | Policy Name | Block placement (n replicas) |
| 15 | Lazy_Persist | RAM_DISK: 1, DISK: n - 1 |
| 12 | All_SSD | SSD: n |
| 10 | One_SSD | SSD: 1, DISK: n - 1 |
| 7 | Hot (default policy) | DISK: n |
| 5 | Warm | DISK: 1, ARCHIVE: n - 1 |
| 2 | Cold | ARCHIVE: n |
The file policy can be specified with the command dfsadmin -setStoragePolicy. The list in Table 2.7 can be seen with bin/hdfs storagepolicies -listPolicies:
$ bin/hdfs storagepolicies -listPolicies
Block Storage Policies:
BlockStoragePolicy{COLD:2, storageTypes=[ARCHIVE], \
         creationFallbacks=[], replicationFallbacks=[]}
BlockStoragePolicy{WARM:5, storageTypes=[DISK, ARCHIVE], \
         creationFallbacks=[DISK, ARCHIVE], replicationFallbacks=[DISK, ARCHIVE]}
BlockStoragePolicy{HOT:7, storageTypes=[DISK], \
         creationFallbacks=[], replicationFallbacks=[ARCHIVE]}
BlockStoragePolicy{ONE_SSD:10, storageTypes=[SSD, DISK], \
         creationFallbacks=[SSD, DISK], replicationFallbacks=[SSD, DISK]}
BlockStoragePolicy{ALL_SSD:12, storageTypes=[SSD], \
         creationFallbacks=[DISK], replicationFallbacks=[DISK]}
BlockStoragePolicy{LAZY_PERSIST:15, storageTypes=[RAM_DISK, DISK], \
         creationFallbacks=[DISK], replicationFallbacks=[DISK]}
In addition, you need to write some type of configuration for HDFS cluster.
dfs.storage.policy.enabled: Enabling/Disabling the archival storage feature on your cluster. The default value is true.dfs.datanode.data.dir: This is a comma separated storage location. It specifies which directory corresponds to which policy. For example, you can specify the/tmp/dn/disk0asDISKpolicy with[DISK]file:///tmp/dn/disk0.
Archival storage is a solution to reduce the unnecessary usage of storage capacity. Using storage efficiently has a huge impact on cost savings, and eventually even on business performance. So, the HDFS project is now progressing with development to solve the problem.
Erasure Coding
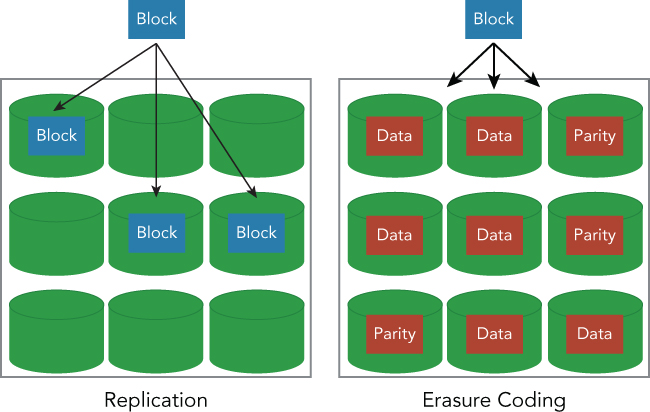
HDFS Erasure Coding has not been released yet. This project is under active development. The purpose of Erasure Coding is the same as Archival storage; it enables you to more efficiently use storage capacity. Erasure coding takes an approach similar to a RAID parity drive system. So, Erasure coding achieves fault tolerance by creating parity blocks instead of replication. This means original data can be reconstructed with other blocks. Reconstructing original data takes time, and can be costly, due to the computing cost of decoding. Erasure coding can achieve a relatively higher fault tolerance than an ordinal replication system on HDFS. The basic architecture of Erasure coding is described next.
In a replication context, a block is replicated and distributed across the cluster. Since a block is usually copied to three replicas, the overhead of storage capacity is 2x, and the redundancy of each block is 3x. This is usually good for the workload itself, because it is necessary to fetch only one replica to obtain a block data. You cannot use only one third of the storage capacity of a whole cluster because of the overhead of storage capacity. On the other hand, Erasure coding divides a block into 9 blocks that have different data than the original block. 6 blocks are called data blocks and 3 blocks are called parity blocks. The total number of data blocks is the same as the original data. So, any 6 blocks out of 9 blocks can reconstruct any other blocks. This means that you can lose at most 3 corresponding blocks, because you can generate the whole data if 6 blocks remain on the storage system. The overhead of storage capacity is 1.5x (= all 9 blocks / 6 data blocks). The redundancy of each block is 3x, because you can lose any 3 blocks. The coding algorithm used in this case is called Reed-Solomon (see Table 2.8), which is the default algorithm used in Erasure coding.
Table 2.8 Reed-Solomon in Erasure Coding
| 3 replication | (6,3) Reed-Solomon | |
| Maximum Toleration | 2 | 3 |
| Disk space usage | 3x | 1.5x |
| Client-DataNode connection (write) | 1 | 9 |
| Client-DataNode connection (read) | 1 | 6 |
As you can see in Table 2.8, the connections that are necessary for reading and writing in the Reed-Solomon case are larger than the replication cases, because Reed-Solomon always requires you to create all 9 blocks when writing, and to read at least 6 blocks to reconstruct original data (see Figure 2.8). This is the cost of using Erasure coding in your cluster. Therefore, Erasure coding should be used infrequently with Cold data. Since Cold data is not used on a daily basis, you might consider reducing the storage cost of keeping cold data, even if it sacrifices some throughput or latency, which can be done using. Erasure coding.
Let's briefly examine some Erasure coding. The Erasure coding feature was merged into the trunk branch of the HDFS source code repository. If you can build it, you can also try Erasure coding in the same way. Since the explanation about how to build HDFS is written in BUILDING.txt in the source tree, we will omit that detail here.
First, you need to specify which directory is for Erasure coding. The hdfs command provides the erasurecode subcommand for this purpose:
$ bin/hdfs erasurecode
Usage: hdfs erasurecode [generic options]
       [-getPolicy <path>]
       [-help [cmd …]]
       [-listPolicies]
       [-setPolicy [-p <policyName>] <path>]
       [-usage [cmd …]]
The policy in the Erasure coding context indicates the algorithm used for calculating data blocks and parity blocks. You can confirm what types of policies are supported using the -listPolicies option.
$ bin/hdfs erasurecode -listPolicies
RS-6-3-64k
RS-6-3-64k specifies the algorithm using Reed-Solomon that has 6 data blocks and 3 parity blocks with a 64KB coding unit. You can set the Erasure coding directory using the -setPolicy option:
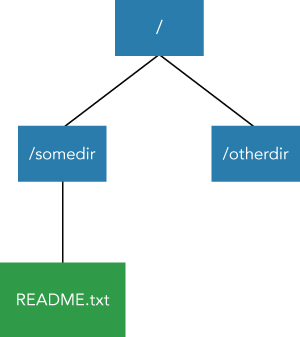
$ bin/hadoop fs -mkdir  /ecdir
$ bin/hdfs erasure code -setPolicy
$ bin/hdfs erasurecode -setPolicy -p RS-6-3-64k /ecdir
EC policy set successfully at hdfs://master:9000/ecdir
All new data put on /ecdir is automatically created according to the Erasure coding algorithm.
$ bin/hadoop fs -put README.txt /ecdir
$ bin/hdfs erasurecode -getPolicy /ecdir
ErasureCodingPolicy=[Name=RS-6-3-64k, Schema=[ECSchema=[Codec=rs, numDataUnits=6, ↲
 numParityUnits=3]], CellSize=65536 ]
You can check that the blocks are separated into nine blocks from the web UI of NameNode (see Figure 2.9).
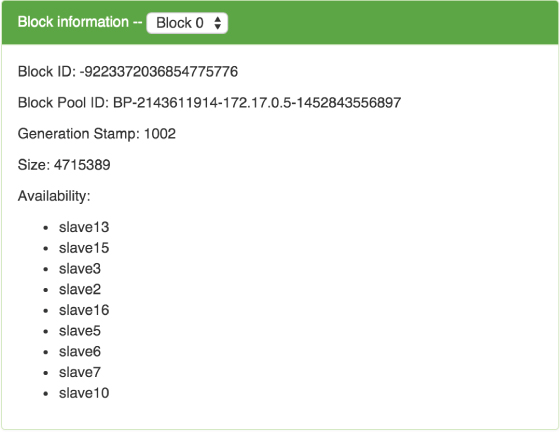
The interface of the Erasure coding file is not changed. You can do any operations with Erasure coded files, as well as ordinal replication files. Thus, Erasure coding provides a new way to more efficiently manage storage capacity. We look forward to seeing the release of the Erasure coding feature in future HDFS versions.
FILE FORMAT
HDFS can store any type of data, including text data in binary format, including even image or audio files. HDFS was initially and currently developed to be used by MapReduce. So, the file format that fits to the MapReduce or Hive workload is usually used. You can achieve better performance by using the appropriate file format for your workload. The detail on how to use these file formats will be described in the following chapters. In this section, we briefly introduce some types of file formats that are usually used by HDFS and MapReduce. It is necessary, however, to know the purpose of the workload and to specify the necessity. For example, the necessity may be to finish the job in 10 minutes or finish processing the job with 10TBs of input data. The purpose and necessity decide not only the job execution engine, such as MapReduce, but also the storage file format. In addition, it is also important to specify the frequency of updating the data in HDFS, or the size of input data in order to choose the compression algorithm. Let's look at some points here before choosing the file format.
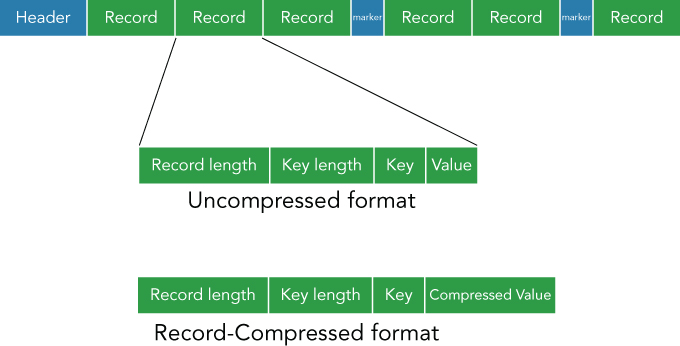
- SequenceFile: SequenceFile is a binary format that contains key/value pairs, and it is the format included in the Hadoop project. SequenceFile supports a custom compression codec that can be specified by
CompressionCodec. There are three different formats for SequenceFile. All of these types share the common header that contains the metadata of actual data, such as version, key/value class name, compression codec, etc. The three data formats are:- Uncompressed SequenceFile format
- Record-compressed SequenceFile format
- Block-compressed SequenceFile format
- The uncompressed format is the most simple and easy to understand. Each record is represented as a key/value pair. The record-compressed format compresses the record data, where each record is represented as a key and a compressed value pair (see Figure 2.10). The block-compressed format compresses many records at once. SequenceFile retains a synchronization marker between some of the records. It is essential to use SequenceFile in a MapReduce job, because MapReduce requires a splittable file format to distribute each task. Since SequenceFile is supported by Hive by default, it is not necessary to write a specific setting. SequenceFile is a row-oriented format, and the API documentation of SequenceFile is written here: (https://hadoop.apache.org/docs/stable/api/org/apache/hadoop/io/SequenceFile.html).
- Avro: Avro is very similar to SequenceFile. Avro was started in order to achieve portability that can't be obtained by SequenceFile. Avro can be used by various types of programming languages: C/C++, C#, Java, Python, and more. Avro is a self-described data format, and it has a metadata that includes a schema of contained records. In addition, Avro supports the compression of contained data just as well as SequenceFile can. So Avro is also a row-oriented storage format. In addition, the Avro file also retains a splittable synchronization marker. The Avro schema is usually written in a
*.avscfile. If the file is put on a class path, you can load any custom schema. Though the API of using the*.avscfile directly is a generic method, you can also generate the specific API code by using the Avro Maven plugin (avro-maven-plugin). The latest getting started guide for Avro is here: (https://avro.apache.org/docs/1.7.7/gettingstartedjava.html). - Parquet: Parquet is a columnar storage format for Hadoop frameworks. Parquet is a format for achieving nested name space in a columnar format, and is inspired by the Dremel paper: (http://research.google.com/pubs/pub36632.html). This nested space feature is the main advantage of using Parquet, compared to using XML/JSON. In addition, it can efficiently store sparse data that contains a lot of null fields. The encoding/decoding specification is described here: (https://github.com/Parquet/parquet-mr/wiki/The-striping-and-assembly-algorithms-from-the-Dremel-paper). Parquet uses Thrift as its serialization format. Ordinary columnar-oriented databases require you to often read columnars from multiple machines. It increases the cost of I/O due to its network accessing requirement. Parquet defines row groups and column chunks. A row group is a logical collection of rows that also consists of some column chunks, which are chunks for a specific column. Since they are guaranteed to be contiguous in a file, it is possible to reduce the cost of a multiple reading I/O. A file contains some columns for each record, so it might not be necessary to read another file in order to fetch another column if a current Parquet file already contains it. There are several implementations of Parquet. They are listed on https://github.com/apache/parquet-mr. You can use Parquet in MapReduce, Hive, or Pig without writing new code. Adapting Parquet can help you achieve good performance and reduce the development cost at the same time.
- ORCFile: ORCFile is an optimized version of RCFile. ORCFile is also a columnar storage file format. Though ORCFile initially was developed inside the Hive project, it doesn't currently depend on the Hive metastore. The original RCFile has limitations, because it does not retain its semantics and type information. ORCFile is a completely self-describing file format that also supports nested type data. It makes use of type information for a reader and writer that provides compression techniques such as dictionary encoding, bit packing, and delta encoding. One characteristic of the ORCFile is that it keeps minimum and maximum values for each column of a set of rows, although a query doesn't need to access actual column data by using this statistical data. ORCFile is mainly stored in HDFS and read by Hive queries. So, the index of data is written at the end of the file because HDFS does not support changing the data after it is written. If your main workload is through Hive, then ORCFile is the best candidate for your storage.
These file formats that we have explored are primarily used by HDFS. Since they are also actively developed, you will see more of them implemented in the future. Of course, the storage file format should fit your workload, meaning you have to choose the storage file format used in your HDFS. Now let's cover some of the important points for choosing storage file formats.
- Query engine: If your SQL engine does not support ORCFile, you cannot use ORCFile. You have to choose the storage file format supported by your query engine or application framework such as MapReduce.
- Updating frequency: Columnar storage format does not fit into high frequency updated data, because it requires the use of a whole file. It is necessary to take into consideration the requirements of data updating.
- Splittability: The data must be splittable in order to be distributed for each task. This is a critical problem if you are considering using a distributed framework such as MapReduce.
- Compression: You may want to reduce the storage cost rather than the throughput or latency of the workload. It is necessary to investigate the compression supported by each file format further in this case.
This list should be helpful when choosing the storage file format for use in your HDFS. Make sure you run the benchmark and also measure the performance of each candidate with your actual use cases.
CLOUD STORAGE
In this last section, we will introduce some cloud services that provide storage on HDFS. We covered how to use HDFS and how to construct an HDFS cluster. But it is not always the best option to use HDFS, because of the cost of maintenance and hardware used in HDFS. Therefore, using a cloud service to fit your enterprise requirements can be a good idea. You may be able to reduce not only the money to buy hardware and network equipment, but also the time to set up a cluster and maintain it. Here is a list of major services that are providing cloud storage on HDFS.
- Amazon EMR: Amazon Elastic MapReduce is a cloud service for Hadoop. It provides an easy way to create Hadoop clusters on EC2 instances and to access HDFS or S3. You can use major distributions on Amazon EMR such as Hortonworks Data Platform, and MapR distributions. The launching process is automated and simplified by Amazon EMR, and HDFS can be used to store intermediate data generated while running a job on an Amazon EMR cluster. Only input and final output are put on S3, which is the best practice for using EMR storage: (http://aws.amazon.com/documentation/elastic-mapreduce/).
- Treasure Data Service: Treasure Data is a fully managed cloud data platform. You can easily import any type of data on a storage system managed by Treasure Data, which uses HDFS and S3 internally, but encapsulates their detail. You do not have to pay attention to these storage systems. Treasure Data mainly uses Hive and Presto as its analytics platform. You can write SQL to analyze what is imported on a Treasure Data storage service. Treasure Data is using HDFS and S3 as its backend and makes use of their advantages respectively. If you do not want to do any operation on HDFS, Treasure Data can be a best choice: (http://www.treasuredata.com).
- Azure Blob Storage: Azure Blob Storage is a cloud storage service provided by Microsoft. The combination of Azure Blob Storage and HDInsight provides a full-featured HDFS compatible storage system. A user who is used to HDFS can seamlessly use Azure Blob Storage. A lot of Hadoop ecosystems can operate directly on the data that Azure Blob Storage manages. Azure Blob Storage is optimized to be used by a computation layer such as HDInsight, and it provides various types of interfaces, such as PowerShell and of course Hadoop HDFS commands. The developers who are already comfortable using Hadoop can get started easily with Azure Blob Storage: (https://azure.microsoft.com/en-us/documentation/services/storage/).
SUMMARY
This chapter covered the HDFS basic architecture and the role it plays among all Hadoop ecosystems, including Spark, Tez, Hive, and Pig. In short, HDFS is a basic system of all big data infrastructures. Operating HDFS can be hard work and requires a skillful DevOps engineer to make the system reliable in your company. This chapter should help you during your daily operational work on the HDFS cluster. In addition, this chapter covered some descriptions about advanced features of HDFS. Of course we didn't cover all of the HDFS features. For a full list of features, see the official documentation: (http://hadoop.apache.org/docs/current/hadoop-project-dist/hadoop-hdfs/HdfsUserGuide.html). You won't find more about Erasure coding in this guide because Erasure coding hasn't been released yet. We strongly recommend that you don't currently use Erasure coding in production, but trying usage and bug reports are always welcome. Please wait for this coming release for one of the biggest features in HDFS!