
No matter what season it is, there is something to be enjoyed or celebrated in each season of the year! Build an adorable LEGO snowman and create a minifigure snowball fight. When the weather gets warm in the summer, build a swimming pool and a snow cone stand. It’s definitely a LEGO year!
Spring is a time when new life is appearing everywhere! It’s always so wonderful after the cold winter weather to see the sun shining, new leaves appearing on the trees and new little animals. Celebrate spring by building some LEGO flowers, a rabbit and a basket full of colorful eggs.
TAN BRICKS
4—2 × 4 bricks
2—2 × 3 bricks
4—1 × 4 bricks
3—2 × 6 bricks
2—1 × 6 bricks
3—1 × 2 bricks
1—1 × 2 brick with two studs on the side
4—1 × 1 bricks with one stud on the side
6—2 × 4 plates
2—1 × 3 plates
4—1 × 2 plates
1—2 × 2 plate
2—1 × 1 plates
1—1 × 2 plate with one stud on the top
4—1 × 2 slopes
1—2 × 2 slope, inverted
2—1 × 3 curved slopes
3—1 × 2 slopes, 30 degree
2—1 × 1 slopes, 30 degree
WHITE BRICKS
1—4 × 6 plate
1—2 × 2 plate
1—2 × 2 brick
4—1 × 2 slopes with cutout
1—1 × 2 slope, 30 degree
ASSORTED BRICKS
1—1 × 1 pink round plate
2— eyes

To build the flowers, use two 1 × 1 round bricks or several 1 × 1 round plates for the stem. The flower part is made up of a 2 × 2 round plate and a 1 × 1 round plate.
STEP 1: To build the rabbit, start with a white 4 × 6 plate for the body.

STEP 2: Add two 2 × 4 tan bricks, two 1 × 4 tan bricks and two 2 × 3 tan bricks. Place a 2 × 2 white plate in between the 1 × 4 tan bricks. The 1 × 4 bricks should hang off the white plate by two studs and the 2 × 2 white plate should hang off by 1 stud.
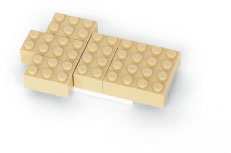
STEP 3: Stack two 2 × 4 tan plates and place them on top of the 2 × 2 white plate. This should create a flat layer of tan.

STEP 4: Add a tan 2 × 2 inverted slope, two 2 × 6 tan bricks and a 2 × 4 brick.

STEP 5: Add two 1 × 2 tan slopes and a layer of tan bricks as shown. Find two 2 × 4 tan plates and a tan 1 × 2 (30 degree) slope for the neck and back of the rabbit.

STEP 6: Add one 2 × 4 tan plate and the 1 × 2 tan slope to the neck. Place the other 2 × 4 tan plate on the back of the rabbit. Build the front legs as shown. Each front leg has a 1 × 3 tan plate, a 1 × 2 tan plate, a 1 × 1 tan slope and a 1 × 2 white slope with cutout.

STEP 7: Gather the bricks shown for each back leg.

STEP 8: Attach a 1 × 1 tan plate and a 1 × 3 tan curved slope to the top of the brick that sticks out for each back leg. Add a 1 × 4 tan brick, a 1 × 2 tan plate and a white 1 × 2 slope with cutout underneath the brick that sticks out for each back leg.

STEP 9: Gather the bricks shown for the rabbit’s face.
STEP 10: Start with a 2 × 4 tan brick. Add a 1 × 2 tan plate in the front and then two 1 × 1 tan bricks with a stud on the side. Add the eyes to these bricks.

STEP 11: Add two 1 × 2 tan slopes (or a 2 × 2 slope) in front of the eyes. Attach a 1 × 2 tan brick with two studs on the side to the underside of this slope brick.
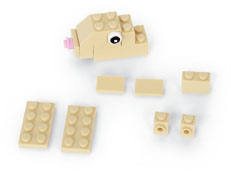
STEP 12: Add a 1 × 2 tan plate with one stud on top and a pink nose as shown. Add a 1 × 2 tan brick behind the eyes.

STEP 13: Complete the head as shown. The ears (2 × 4 plates) attach to the studs on the side of the head.

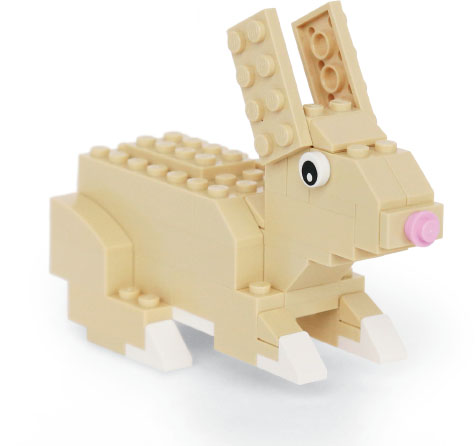
STEP 14: Attach the head and the rabbit is complete!
Use brown bricks to build a basket full of colorful eggs. Lime green 2 × 4 plates make the perfect grass for inside the basket. This basket has a layer of green plates inside the basket and then we used more 2 × 4 plates loose in the basket to look like grass.

Gather 2 × 4 bricks in bright colors to use as colored eggs.

Summer is a time for playing in the sun, splashing in the pool and enjoying ice cold snow cones! Help your LEGO minifigures cool off on a hot day with this refreshing swimming pool. Then get them a treat at the LEGO snow cone stand.
SWIMMING POOL
25—2 × 4 medium azure blue plates
Gray bricks for building the edge of the pool
PATIO CHAIRS
2—4 × 6 white plates
2—1 × 2 white plates with clips on the side
2—1 × 2 white plates with a handle on the side
2—2 × 4 medium azure blue plates
8—1 × 1 red bricks
PATIO TABLE WITH UMBRELLA
4—1 × 2 light gray bricks
1—4 × 6 dark gray plate
1—2 × 2 plate with one stud on top
1—2 × 2 round red plate
1—large disk
1—1 × 6 rod

To build the pool, arrange twenty-five 2 × 4 bright blue plates in rows of five. Or make the pool larger! Add details like plants, patio furniture and accessories for the minifigures.
The patio chairs are very simple to put together. Make the back of the chair adjustable by attaching a 1 × 2 plate with a handle and a 1 × 2 plate with clips.

These are the bricks needed for the patio table and umbrella. The legs of the table are four 1 × 2 light gray bricks.
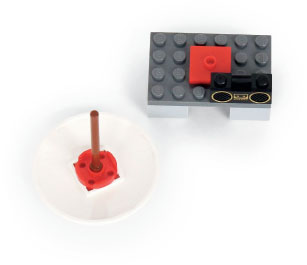
Stick the rod through the hole in the large disk. Then add a 2 × 2 round plate to secure it in place.

The completed table should look like this.
Try building your minifigures a snow cone stand! Build the syrup dispensers by using 1 × 1 bricks in different colors and then putting a nozzle on top. Each snow cone is a 1 × 1 round white brick with a translucent 1 × 1 round plate on top.

The LEGO snow cone stand is a great place to hang out in the summer! But wow, those must be some expensive snow cones! Either that or the kids are going to get a lot of change back. What flavors will you build for your snow cone stand?
After the heat of summer, there is so much to love about fall! Fall brings cooler weather, colorful leaves and pumpkins. Build a pumpkin patch for your mini figures, complete with a hay ride. Look, even the minifigure parents are making their kids pose for photos with the pumpkins!
BLUE BRICKS
3—2 × 4 bricks
1—1 × 4 brick
4—1 × 1 bricks
4—2 × 4 plates
3—1 × 4 plates
1—1 × 2 plate
1—4 × 4 plate
2— car doors
DARK GRAY BRICKS
1—4 × 10 plate
1—4 × 4 plate
1—1 × 4 tile
1—1 × 2 brick with ridges
LIGHT GRAY BRICKS
2—1 × 1 bricks with a stud on the side
2—2 × 4 bricks with axles
2—1 × 1 plates
1—2 × 2 plate with a ball
1—1 × 4 plate with a socket on the side
4—2 × 2 plates with one axle
BROWN BRICKS
8—1 × 4 bricks
2—1 × 2 bricks
6—2 × 4 bricks
1—6 × 12 plate
1—2 × 6 plate
2—4 × 4 plates
4—1 × 4 plates
2—1 × 2 plates
1—1 × 6 plate
1—1 × 10 plate
1 × 1 round plates for the pumpkins
ASSORTED BRICKS
2—1 × 1 yellow round plates
2 × 2 orange bricks for the pumpkins
4—small wheels
2—large wheels
2—medium wheels
1—windshield
1—steering wheel
Various yellow plates for the hay
Various bricks for the trees

The kids are tired of sitting still for photos, but Dad wants to get just one more shot!
Hooray, it’s time to load up for the hay ride!

For the pumpkins, use 2 × 2 orange bricks with a 1 × 1 brown round plate for the stem. Build trees and give them 1 × 2 plate leaves in yellow, orange and red.

STEP 1: To build the tractor, find a 4 × 10 dark gray plate and a 4 × 4 dark gray plate.

STEP 2: Attach the 4 × 4 dark gray plate under the larger plate on one end. This will be the front end of the tractor.

STEP 3: Build the front of the tractor as shown.

STEP 4: Add three 2 × 4 blue plates and a 1 × 4 blue plate to the front of the truck. Add the doors. Place a 1 × 2 blue plate under the steering wheel to boost it up to the proper height.

STEP 5: Attach the 2 × 2 light gray plate with a tow ball and two 1 × 1 light gray plates to the back wheel axle as shown.

STEP 6: Attach the wheels to the body of the tractor. The back axle will only attach to the body with one row of studs.

STEP 7: Add a 2 × 4 blue brick and a 1 × 4 blue brick behind the doors.

STEP 8: Build the roof for the tractor. The back of the cab has two 1 × 1 blue bricks on each side, a 1 × 4 blue plate across them and then a 4 × 4 blue plate for the roof.

STEP 9: Add the headlights and a 1 × 4 dark gray tile at the front of the truck and the tractor is finished!
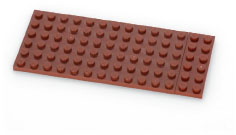
STEP 10: Build the wagon. Start with a 6 × 12 brown plate and a 2 × 6 brown plate.

STEP 11: Add one row of brown bricks and one row of brown plates to the perimeter of the wagon.

STEP 12: Turn the wagon upside down. Add six 2 × 4 brown bricks, two 4 × 4 brown plates and one 1 × 4 light gray plate with a tow ball socket as shown.

STEP 13: Add the wheels.

STEP 14: Use yellow plates to look like hay inside the wagon, and the tractor and wagon are complete!
The weather outside might be dreadful, but what better time to be creative with LEGO inside? Beat the winter blues with a LEGO snowball fight and a snowman. Try building your minifigures some skis. Use some white slope bricks to create a hill to ski down. Maybe you can figure out how to build a sled!
Various brown bricks and plates to build a tree
Various white bricks for the snow fort
1 × 1 white round plates for snow balls
2—1 × 6 plates for the skis
2—1 × 1 slopes, 30 degree, for the skis
2—Technic pins (flick missile style) for the ski poles

Use 1 × 1 round white plates as snowballs. The minifigures will be able to hold them attached to their hands.
Use a large white plate to build a snow fort. Build up the walls of the fort with white bricks and white sloped bricks.

For the skis, use 1 × 6 plates and 1 × 1 (30 degree) slope bricks. Technic connector pins make great ski poles.

A little cross-country skiing is a great activity for a winter day!
Build a snowman for your winter scene! This snowman is a good size to go with minifigures.
WHITE BRICKS
2—2 × 4 slopes, double inverted
3—2 × 2 slopes, inverted
2—2 × 2 slopes
2—1 × 2 slopes, 30 degree
1—2 × 4 brick
4—1 × 2 bricks
4—1 × 1 bricks with a stud on the side
1—1 × 4 plate
5—1 × 2 plates
3—1 × 2 plates with one stud on top
2—1 × 1 plates
RED BRICKS
1—1 × 2 brick
1—2 × 2 x ⅔ high brick, modified with curved end
BROWN BRICKS
2—1 × 3 plates
2—1 × 2 plates
BLACK BRICKS
2—1 × 1 round plates
ORANGE BRICKS
1—orange claw for the nose

It would be fun to watch your minifigures add the snowman’s finishing touches!
STEP 1: Use a white double inverted slope as the base for the snowman.
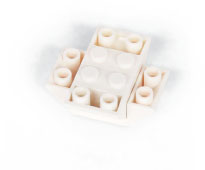
STEP 2: Add two white 2 × 2 inverted slope bricks.

STEP 3: In this step, add a 2 × 4 white brick, two 1 × 2 white bricks and two 1 × 2 white plates with one stud on top. These will hold the snowman’s arms.

STEP 4: Add two 2 × 2 white slope bricks to the body. On top of that, add another double inverted slope and a white 2 × 2 inverted slope.

STEP 5: Add two 1 × 1 white bricks with a stud on the side. Then add two more on top of those. Attach a 1 × 2 white plate with a stud on top to the bottom set of bricks. Attach the eyes (black 1 × 1 round plates) to the top set of bricks.

STEP 6: In this step, add two 1 × 2 white plates, a 1 × 4 white plate and a 1 × 2 white brick.

STEP 7: Add two 1 × 1 white plates on the side of the head. Then add two 1 × 2 white plates and two white 1 × 2 slopes on the sides of the head. Place a 1 × 2 white plate above the eyes. Fill in the hole in the head with a 1 × 2 white brick. Then gather the bricks shown to build the hat and arms.
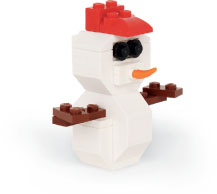
The snowman is complete!
The LEGO minifigures are celebrating a cozy Christmas with their own fireplace, Christmas tree and gifts. The scene also shows the living room chair, end table and lamp from the furniture project in the LEGO Town chapter (here). What do you think could be inside that huge present?
FIREPLACE
2—2 × 2 brown slopes, inverted
1—2 × 8 brown plate
2—1 × 2 brown tiles
Various light gray bricks
1—1 × 2 light gray Technic brick
1—Technic pin ½ length
6—2 × 2 green corner plates
4—1 × 1 red round plates
CHRISTMAS TREE
1—4 × 4 tan plate
3—2 × 2 brown round plates
Red and white 1 × 1 round plates
Green 1 × 2 bricks, 2 × 4 plates, 2 × 2
plates and 2 × 2 corner plates
1—1 × 1 yellow round plate
1—1 × 1 yellow plate

The anticipation is almost as fun as playing with whatever is in the box. Right?
He has the lid off, but what could be in there?

It’s a puppy! What fun to find a puppy under the tree!
Build the fireplace with gray bricks, using brown inverted slopes to hold up the mantle. Build the wreath with six 2 × 2 green corner plates. Decorate it with 1 × 1 red round plates. The wreath hangs on the fireplace with a 1 × 2 Technic brick and a Technic pin (half length).
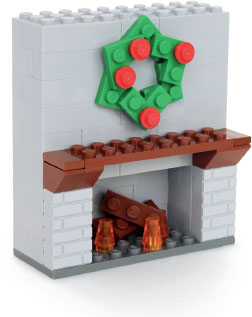
Use 1 × 1 translucent orange cones and 1 × 3 brown plates to make it look like there is a fire in the fireplace.
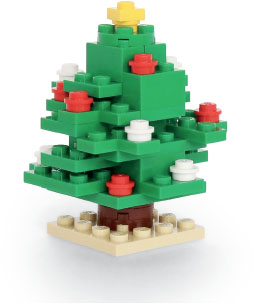
The trunk of the Christmas tree is three 2 × 2 brown round plates or you can also use a 2 × 2 brown round brick. Create your tree with the green bricks that you have on hand and use 1 × 1 green and white round plates to decorate the tree. Or use other colors as well for a more colorful tree!

The tree is trimmed and the fire is blazing! Now you can place LEGO gifts under the tree! Basic 2 × 4 and 2 × 2 bricks work well for gifts. Add tiles or 1 × 1 round plates as bows.
This jolly large-scale Santa is attractive enough to display on the fireplace mantle during the Christmas season. His friendly eyes and rosy cheeks give him plenty of Christmas spirit. The parts list for this project can be flexible. Once you have built the head, there are many possible combinations of red and white bricks that can be used for the body and legs.
RED BRICKS
1—2 × 2 plate
1—2 × 4 plate
2—1 × 4 plates
2—2 × 6 plates
1—2 × 8 plate
5—2 × 4 bricks
5—2 × 8 bricks
4—1 × 2 bricks
8—2 × 2 bricks
10—2 × 3 bricks
1—2 × 4 slope
2—2 × 3 bricks with a rounded end
2—1 × 3 tiles
1—2 × 4 slope, lengthwise
2—1 × 2 slopes, 30 degree
4—2 × 2 slopes, 2 bricks high
1—bracket 1 × 2—2 × 2
BLACK BRICKS
3—2 × 6 plates
2—2 × 3 plates
1—2 × 2 plate
1—2 × 4 plate
2—2 × 4 bricks
4—1 × 2 bricks
1—bracket 1 × 2—2 × 2
2—1 × 2 slopes, 30 degree
WHITE BRICKS
1—1 × 4 plate
1—1 × 2 plate
1—2 × 6 plate
1—1 × 6 plate
2—1 × 3 plates
2—2 × 2 plates
2—2 × 4 bricks
4—1 × 3 bricks
3—1 × 2 bricks
2—1 × 1 bricks
2—2 × 6 bricks
3—1 × 4 bricks
4—2 × 2 slopes, inverted
2—1 × 2 slopes, inverted
1—1 × 4 tile
TAN BRICKS
1—2 × 4 plate
2—2 × 2 plates
2—1 × 3 bricks
2—1 × 2 bricks
2—2 × 4 bricks
4—1 × 1 bricks with a stud on the side
1—2 × 2 slope
ASSORTED BRICKS
2—eyes
2—1 × 1 pink round plates

STEP 1: Begin Santa’s head with a 2 × 4 tan plate.
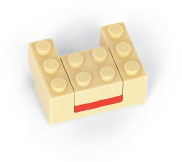
STEP 2: Add a 2 × 2 red plate, two 2 × 2 tan plates and two 1 × 3 tan bricks.

STEP 3: Add a 2 × 2 tan slope for the nose, a 1 × 2 tan brick and four 1 × 1 tan bricks with a stud on the side. These will hold the eyes and two 1 × 1 pink round plates for the rosy cheeks.
STEP 4: Build Santa’s mustache with a 1 × 4 white plate and a 1 × 2 white plate. Add two tan 2 × 4 bricks to the head behind the nose and eyes.
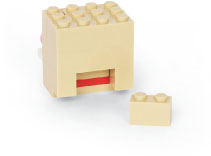
STEP 5: Fill in the gap in Santa’s head with a 1 × 2 tan brick.

STEP 6: Start on the hat with a 2 × 6 white plate, a 1 × 6 white plate and a 2 × 4 red plate.
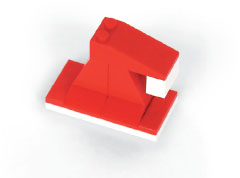
STEP 7: Add two red 2 × 2 slopes (2 bricks high), a red 2 × 4 slope, a 1 × 2 white brick, two 1 × 3 tiles and two 1 × 2 red slopes (30 degree) to the hat.

STEP 8: Build the sides of Santa’s beard as shown. Then gather a white 2 × 4 brick and two white 2 × 2 inverted slopes for the bottom of the beard.

STEP 9: Attach the 2 × 4 white brick and the two white 2 × 2 inverted slopes to the underside of the face as shown.

STEP 10: Arrange white bricks as shown for the bottom of Santa’s coat.
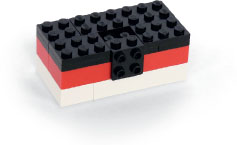
STEP 11: Add a layer of red bricks and two layers of black plates as shown. Place a black bracket in the center (1 × 2—2 × 2) for Santa’s belt.

STEP 12: Add two more layers of red bricks.
STEP 13: Add two 1 × 2 red bricks and two red 2 × 2 slopes (2 bricks high) to the front row. Add a 2 × 8 red brick (or the equivalent) to the back row.

STEP 14: Add two 2 × 3 red bricks with curved ends as Santa’s shoulders. Add two 1 × 2 red bricks and a 2 × 4 red brick to the back row. Add a 2 × 4 red slope brick to the front of his body. Build the arms. Each arm has four 2 × 2 red bricks and a 2 × 2 white inverted slope.
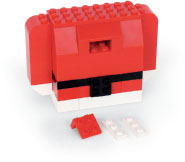
STEP 15: Attach Santa’s arms to his body. Add a 2 × 8 red plate and two 1 × 4 red plates on top of the body. Then gather the bricks shown.

STEP 16: Add a 1 × 2—2 × 2 red bracket to the top of the opening in the body. This will hold the white trim for Santa’s suit.

STEP 17: Attach the white trim. Stack two 2 × 6 red plates and add them to the neck. Place two 2 × 2 white plates on top of that.

STEP 18: Attach Santa’s head to his body. Then gather three 1 × 4 white bricks and one 1 × 4 white tile for his hair.

STEP 19: Build Santa’s hair as shown.

STEP 20: Build the legs and feet and add them to the body. Each leg is five 2 × 3 red bricks. Each shoe is one 2 × 4 black brick, two 1 × 2 black bricks and one 1 × 2 slope. Santa is now ready to display!