MOLD SEAMS (FIGURE 1)
Bottle Facts
As mentioned in the introduction, the first question from a novice is, “How do you know how old a bottle is” or “How can you tell it is really an antique bottle?” Two of the most common methods for determining the age are by the mold seams and the color variations. Also, details on the lip, or top of the bottle, will provide some further identifi cation.
MOLD SEAMS (FIGURE 1)
Prior to 1900, bottles were manufactured using either a blowpipe (free-blown) until 1860 or with a mold until 1900. In this process, the mouth or lip of the bottle was formed last and applied to the bottle after completion (applied lip). An applied lip can be identified by observing the mold seam, which runs from the base up to the neck and near the end of the lip. On a machine-made bottle, the lip is formed first and the mold seam runs over the lip. Therefore, the closer to the top of the bottle the seam extends, the more recent the bottle.
On the earliest bottles manufactured before 1860, the mold seams will end low on the neck or at the shoulder. On bottles made between 1860 and 1880, the mold seam stops right below the mouth and makes it easy to detect that the lip was separately formed. Around 1880, the closed mold began to be used. With the closed mold, the neck and lip were mechanically shaped. Then the bottle was severed from the blowpipe and the ridge on the lip evened off by hand sanding or filing. The closed mold seam usually ends within one-quarter inch from the top of the bottle. After 1900, the seam extends all the way to the top.
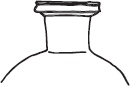
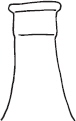
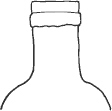
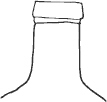
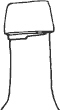
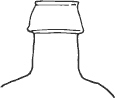
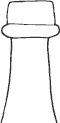
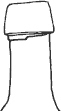
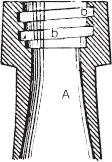
IDENTIFYING BOTTLE AGE BY MOLD SEAMS
FIGURE 1
Before 1860
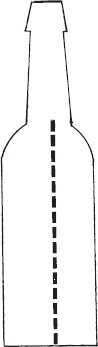
Before 1860: Seams extend to just over the shoulders.
1860-1880
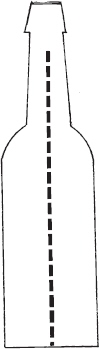
1860-1880: Seams go most of the way up the neck of the bottle.
1880-1890
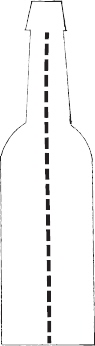
1880-1890: Seams continue through the top but not through or over the lip.
1900-Present
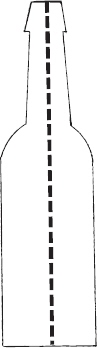
1900-present: Seams extend the full length of the bottle and over the lip.
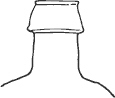
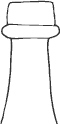
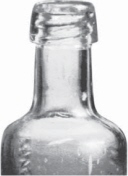
 LIPS AND TOPS (FIGURES 2A, 2B, 3 AND 4)
Since the lip, or top, was an integral part the bottle-making process, it is important to understand that process. One of the best ways to identify bottles manufactured prior to 1840 is by the presence of a “sheared lip.” This type of lip was formed by cutting or snipping the glass free of the blowpipe with a pair of shears, a process that leaves the lip with a stovepipe look. Since hot glass can be stretched, some of these stovepipes have a very distinctive appearance.
Around 1840, bottle manufacturers began to apply a glass ring around the sheared lip, forming a “laid-on-ring” lip. Between 1840 and 1880, numerous variations of lips or tops were produced using a variety of tools. After 1880, manufacturers started to pool their processing information, resulting in a more evenly finished and uniform top. As a general rule, the more uneven and crude the lip or top, the older the bottle.
NECK-FINISHING TOOLS
FIGURE 2A
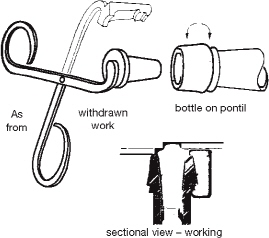
A. The line drawings were developed from a description that appeared in the seventh edition (1842) of the Encyclopedia Britannica, vol. X, p. 579: “The finisher then warms the bottle at the furnace, and taking out a small quantity of metal on what is termed a ring iron, he turns it once round the mouth forming the ring seen at the mouth of bottles. He then employs the shears to give shape to the neck. One of the blades of the shears has a piece of brass in the center, tapered like a common cork, which forms the inside of the mouth, to the other blade is attached a piece of brass, used to form the ring.” This did not appear in the sixth edition (1823), though it is probable the method of forming collars was practiced in some glasshouses at that time.
FIGURE 2B
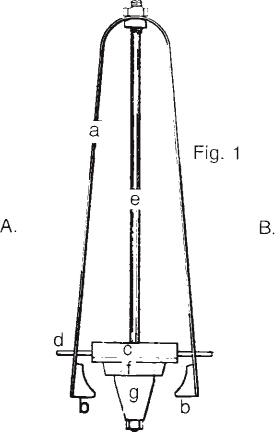
B. The exact period in which neck finishing tools evolved having metal springs with two jaws instead of one, to form collars, is undetermined. It doubtless was some time before Amosa Stone of Philadelphia patented his “improved tool,” which was of simpler construction, as were many later ones. Like Stone’s, the interior of the jaws [was] made in such shape as to give the outside of the nozzle of the bottle or neck of the vessel formed the desired shape as it [was] rotated between the jaws in a plastic state” U.S. Patent Office. From specifications for (A. Stone) patent No. 15,738, September 23, 1856.
 TOOLED BOTTLE LIPS / TOPS IDENTIFICATION
FIGURE 3
1Tooled, rounded, rolledover collar
2Tooled, flanged, with flat top and squared edges
3Tooled, rounded above 3/4-inch flat band
4Tooled, flat ring below thickened plain lip
5Tooled, narrow beveled fillet below thickened plain lip

6Tooled, broad sloping collar above beveled ring
7Tooled, plain broad sloping collar
8Tooled, broad sloping collar with beveled edges at top and bottom
9Tooled, broad flat collar sloping to heavy rounded ring
10Tooled, broad flat vertical collar with uneven lower edge
11Tooled, double rounded collar, upper deeper than lower; neck slightly pinched at base of collar
12Tooled, broad round collar with lower level
BOTTLE LIPS / OTHER TOPS IDENTIFICATION
FIGURE 4
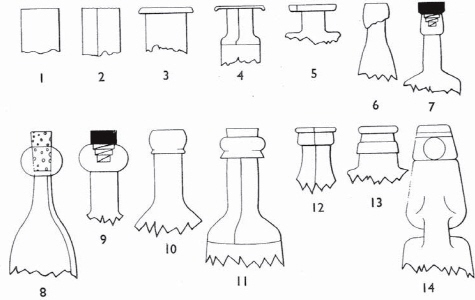
1. Free-blown
2. Sheared
3. Rolled
4. Flared
5. Laid-on ring
6. Applied top
7. Internal threads
8. Blob-top (cork use)
9. Blob-top (internal thread)
10. Improved applied lip on a two-piece mold bottle
11. Improved applied lip on a three-piece mold bottle
12. 20th Century lip
13. Collar below lip
14. Hiram Codd lip
 CLOSURES / STOPPERS
As mentioned in the “Bottles: History and Origin” chapter, the Romans used small stones rolled in tar as stoppers. The following centuries saw little advance in the methods of closure. During most of the 15th and 16th centuries, the closure consisted of a sized cloth tied down with heavy thread or string. Beneath the cover was a stopper made of wax or bombase (cotton wadding). Cotton wool was also dipped in wax to be used as a stopper, along with coverings of parchment, paper, or leather. Corks and glass stoppers were still used in great numbers, with the cork sometimes being tied or wired down for effervescent liquids. When the closed mold came into existence, however, the shape of the lip was more accurately controlled, which made it possible to invent and manufacture many different capping devices.
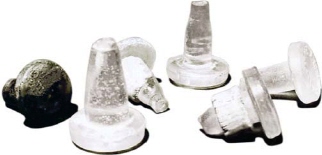

Glass stoppers, 1850-1900.

Example of glass stopper with cork as insulator for poison bottles, 1890-1910.
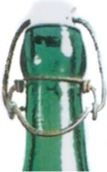
S.A. Whitney, who owned Whitney Glass Works in Glasborough, N.J, introduced an early closure device when he received Patent No. 31,046 on January 1, 1861, for an internal screw stopper (Figure 5). A unique closure was developed on July 23, 1872, when a British inventor, Hiram Codd, invented a bottle made with a groove inside the neck and was granted Patent No. 129,652 (Figure 6). A glass marble was inserted and then a ring of cork or rubber was fitted into the groove to confi ne the marble within the neck. The gas released by an effervescing liquid forced the marble to the top of the neck, sealing the bottle. A second patent, No. 138,230, issued April 29, 1873, contained the interior lug, which was a ball-holding element (Figure 7). It is interesting to note that many young boys broke the bottle to get the marble.
More interesting is that the Codd stopper closure isn’t dead. The Sangaria Corporation, a Japanese company that distributes carbonated soft drinks in the United States, has re-issued and duplicated this same stopper design with the glass marble. In fact, a warning note on the back of the bottle reads, “Do not try to remove the marble from the bottle to avoid injury.”
S.A. WHITNEY BOTTLE STOPPER
FIGURE 5
No. 31046
Patented Jan. 1, 1861

From Samuel A. Whitney’s specification for his “Bottle Stopper,” Patent No. 31,046, Jan. 1, 1861. The drawing on the left shows grooves in the neck of the bottle. In the drawing on the right, in which “h” is a cork washer, the stopper is in place. “The stopper is formed by pressing or casting the moltenglass in molds of the desired shapeAlthoughapplicable to a variety of bottles and jars, it is especially well adapted to and has been more especiallly designed for use in connection with mineral-water bottles, and such as contain effervescing wines, malt liquors, &c., the corks in this class of bottles, if not lost, being generally so mutilated as to be unfit for second use when the bottles are refi lled.” (U.S. Patent Offi ce.)
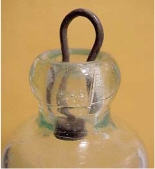
The Hutchinson stopper was awarded Patent No. 213,992 on April 8, 1879, and was a popular closure until the early 1900s (Figure 8). The stopper incorporated a heavy wire loop to control a rubber gasket that remained inside the neck of the bottle. After filling the bottle, the gasket was pulled up against the shoulders and was kept in place by the carbonation. Since it was simple to use, the Hutchinson stopper was easily adaptable to a number of other bottle types.
The lightning stopper (Figure 9), used from 1880 to the early 1900s, was the best closure for beer bottles before the invention of the crown cap. The lightning stopper featured a porcelain or rubber plug anchored to the outside of the bottle by means of a permanently attached wire. The wire formed a bar that controlled the opening and closing of the bottle. Since the lightning stopper cost more than the Hutchinson stopper, it wasn’t used for soft drinks.
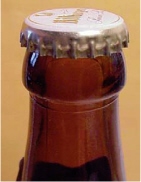
In 1892, William Painter invented the crown cap, which revolutionized the soft drink and beer bottling industry (Figure 10). By 1915 all major bottlers had switched to the crown-type cap. It was reported that Painter’s “crown cork” system had taken him three years of constant work to perfect and cost $100,000, a considerable amount of money in 1892. It wasn’t until 1960, with the introduction of the screw cap for beer and soda pop bottles, that the crown-type cap began to disappear.
Finally, in 1902, threads were manufactured on the outside of the lip to enable a threaded cap to be screwed onto the mouth of the bottle. This was not a new idea. Early glassblowers produced bottles with inside and outside screw caps long before bottle- making machines came along. Early methods of production were so complex, however, that screw-topped bottles produced before the 1800s were considered specialty bottles. They were expensive to replace and today are considered rare and quite collectible. In fact, the conventional screw-top bottle did not become common until after 1924 when the glass industry standardized the threads.
FIGURE 6
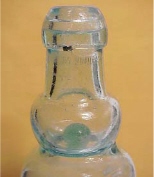
Hiram Codd interior ball stopper, Patent #129,652, July 23, 1872.
FIGURE 7
Hiram Codd interior ball stopper, Patent #138,230, April 29, 1873.
FIGURE 8
Charles G. Hutchinson stopper, Patent #213,992, April 8, (year uncertain).
FIGURE 9
Lightning stopper, used from 1880 to early 1900s.
FIGURE 10
William Painter crown cap, Patent #468,226, Feb. 2, 1890.
FIGURE 11
Dumfries Ale (English) depicting inside threads.
FIGURE 12
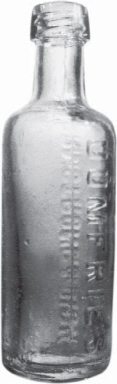
Dumfries Ale (English), full bottle depicting inside threads.
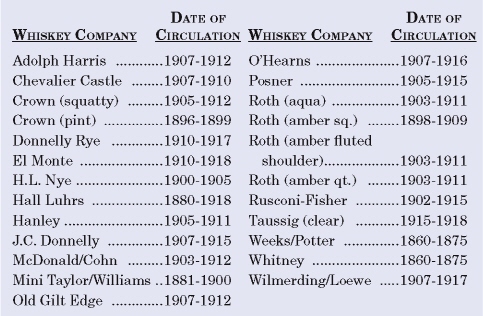
In 1875 some glass manufacturers introduced an inside screw-neck whiskey bottle that used a rubber stopper (Figures 11 and 12). This invention wasn’t very popular because the alcohol interacted with the rubber, discoloring the rubber and making the whiskey bitter. The following table lists some of the brands of embossed whiskeys that featured the inside threaded neck and the approximate dates of circulation:
GLASS COLOR
The next most common method for determining the age of a bottle is by examining the color of the glass. The basic ingredients for glass production (sand, soda, and lime) have remained the same for 3,000 years. These ingredients, when mixed together, are collectively called the batch. When the batch is heated to a molten state, it is referred to as the metal. In its soft or plastic stage, the metal can be molded into objects, which when cooled, become the solid material we know as glass.
Producing colored and perfectly clear glass were both major challenges for glass manufactures for centuries. In the 13th and 14th centuries, the Venetians produced clear glass by using crushed quartz in place of sand. In 1668, the English tried to improve on this process by using ground flint to produce clear glass, and by 1675 an Englishman named George perfected lead glass. Today, this lead glass is referred to as “flint glass.” Before 1840, intentionally colored or colorless glass was reserved for fancy figured flasks and vessels.
In naturally colored glass, the color was considered unimportant until 1880, when food preservation packers began to demand clear glass for food products. Since most glass produced previously was green, glass manufacturers began using manganese to bleach out the green tinge produced by the iron content to satisfy the increased demand for clear glass. Only then did clear bottles become common.
Iron slag was used up to 1860 and produced a dark olive green or olive amber glass that has become known as “black glass” and was used for wine and beverage bottles that needed protection from light. Natural glass colors are brown, amber, olive green, and aqua.
The true colors of blue, green, and purple were produced by the metallic oxides added to the glass batch. Cobalt was added for blue glass; sulfur for yellow and green; manganese and nickel for purple; nickel for brown; copper or gold for red; and tin or zinc for milk-colored glass (for apothecary vials, druggist bottles, and pocket bottles). The Hocking Glass Company discovered a process for making a brilliant red-colored glass described as copper-ruby. The color was achieved by adding copper oxide to a glass batch as it was cooling and then immediately reheating the batch before use. Since these bright colors were expensive to produce, they are very rare and sought after by most collectors.

Many bottle collectors consider purple glass the most appealing and, therefore, it is prized above other glass. As discussed earlier, the iron contained in sand caused glass to take on a color between green and blue. Glass manufacturers used manganese, which counteracted the aqua to produce clear glass. Glass with manganese content was most common in bottle production between 1880 and 1914. When exposed to the ultraviolet rays of the sun, the manganese in the glass oxidizes, or combines with oxygen, and turns the glass purple. The longer the glass is exposed to the ultraviolet rays from the sun, the deeper the purple color. Purple glass is also known as “desert glass” or “sun-colored” glass because the color is activated as a result of exposure to UV rays in intense sunlight.
Because Germany was the main source of manganese, the supply ceased with the outbreak of World War I. By 1916 the glassmaking industry began to use selenium as a neutralizing agent. Glass that was produced between 1914 and 1930 is glass that is most likely to change to an amber or straw color.
The following chart shows how color is achieved by adding various oxides to the batch:

| COLOR | OXIDES ADDED TO THE BATCH |
| Aqua | Iron oxide in sand |
| Black | Iron oxide, manganese, cobalt, iron |
| Clear | Selenium |
| Yellow | Nickel |
| Red | Gold, copper, or selenium |
| Blue | Cobalt oxide |
| Blue-Green | Iron in silicate-based glass |
| Amber | Manganese oxide, sulfur, carbon oxide |
| Dark Brown | Sulphide of copper and sulphide of sodium |
| Amethyst (Purple) | Sulphide of nickel |
| Rose Tinted | Selenium added directly into the batch |
| Orange Red | Selenium mixed first with cadmium sulphide |
| Dark Reddish-Brown | Sodium sulphide |
| Reddish Yellow | Sulphide of sodium and molybdenite |
| Yellow Green | Uranium oxide |
| Green | Iron oxide |
| Milk Glass | Tin or zinc oxide |
| Olive Green | Iron oxide and black oxide of manganese |
| Purple | Manganese |
| Orange | Oxide of iron and manganese |
IMPERFECTIONS

Imperfections and blemishes also provide clues to how old a bottle is and often add to the charm and value of an individual piece. Blemishes usually show up as bubbles or “seeds” in the glass. In the process of making glass, air bubbles form and rise to the surface where they pop. As the “fining out” (elimination process) became more advanced around 1920), these bubbles or seeds were eliminated.
Another peculiarity of the antique bottle is the uneven thickness of the glass. Often one side of the base has a one-inch thick side that slants off to paper thinness on the opposite edge. This imperfection was eliminated with the introduction of the Owens bottle-making machine in 1903.
In addition, the various marks of stress and strain, sunken sides, twisted necks, and whittle marks (usually at the neck where the wood mold made impressions in the glass) also give clues that a bottle was produced before 1900.
LABELING AND EMBOSSING
While embossing and labeling were common practices in the rest of the world for a number of centuries, American bottle manufacturers did not adopt the inscription process until 1869. These inscriptions included information about the contents, manufacturer, distributor, and slogans or other messages advertising the product. Raised lettering on various bottles was produced with a plate mold, sometimes called a “slug plate” fitted inside the casting mold. This plate created a sunken area that makes them a special value to collectors. Irregularities such as a misspelled name add to the value of a bottle, as will any name embossed with hand etching or other method of crude grinding. These bottles are very old and valuable.
Inscription and embossing customs came to an end with the production of machine-made bottles in 1903 and with the introduction of paper labels. In 1933, with the repeal of prohibition, the distilling of whiskey and other spirits was resumed under strict government regulations. One of the major regulations was that the following statement was required to be embossed on all bottles containing alcohol: “Federal Law Forbids Sale or Re-Use of this Bottle.” This regulation was in effect until 1964 and is an excellent method of dating spirit bottles from 1933 to 1964.