In the previous chapters in this minibook, I explain how to incorporate both JavaScript and jQuery into your HTML5 code to help create a dynamic web application. The trick to using JavaScript and jQuery, though, is knowing when to use them. How are you supposed to know when your site visitor is hovering the mouse pointer over a product in your catalog to pop up more information? Fortunately, your web page is talking to you, telling you what your website visitors are doing at all times. All you need to do is listen to your web page and direct your JavaScript or jQuery code accordingly. That’s exactly what this chapter shows you how to do.
Understanding Events
The world is full of events. There are birthday events, holiday events, school events, all types of events competing for your time. Your world is loaded with events, and it’s your job to determine which events to participate in (your birthday) and which ones to ignore (Talk Like a Pirate Day?).
The same is true with your web application. There are lots of events that your site visitor generates as she interacts with your web page. Each time your site visitor moves the mouse, that’s an event. Each time she types text into a form field, that’s an event. And of course, each time she clicks the mouse on a link or button, those are events, too. The key to successful dynamic web applications is to detect the events you need and ignore the ones you don’t need.
Event-driven programming
Most of the JavaScript code earlier in this minibook uses procedural programming. In procedural programming, the browser follows your JavaScript code line by line, processing each statement as it appears in the program.
There’s another way to write programs, called event-driven programming. With event-driven programming, your program centers around events that occur in the web page. You must define a list of events to monitor, and if one of those events occurs, the browser runs the JavaScript function you’ve defined for the event.
With event-driven programming, you need to know what events to watch for. This section details the events that are generated by the browser on the different activities that occur while your site visitor views your web page.
Watching the mouse
No, I’m not talking about Mickey. I’m talking about paying attention to what your site visitor is doing with the mouse device on his or her workstation. Believe it or not, your browser tracks every single move and action your mouse takes. You can tap into that wealth of information with your JavaScript or jQuery programs.
As you can imagine, there are many different events that the mouse generates as you move it around. Table 4-1 shows a list of the different mouse event names generated by the browser as defined in HTML5 and JavaScript. Later on, I show you the jQuery version of the event names.
The mouse pointer has entered a specific area in the window.
onmouseleave
The mouse pointer has left a specific area in the window.
onmousemove
The mouse pointer is moving.
onmouseover
The mouse pointer is hovering over an object.
onmouseout
The mouse pointer has left a specific area in the window.
onmouseup
The primary mouse button has been released.
As you can tell from the list in Table 4-1, you can watch exactly what your site visitors are doing while viewing your web page. (Scary!) Although this information can be useful, it can also result in information overload. The key to successful mouse watching is to only watch for the important events, such as when the site visitor clicks the primary mouse button on an object in the web page or when the mouse is hovering over an object.
It's not a good idea to write code that watches the onmousemove event, because that event triggers for every pixel the mouse pointer moves to on the screen, generating thousands of events at a time!
Listening for keystrokes
The keyboard talks to the browser, too. You can watch for key events in your JavaScript or jQuery programs just as you watch the mouse. Unlike the long list of mouse events, there are only three keyboard events for you to work with:
onkeydown: A key is being pressed down.
onkeypress: A key has been pressed and released.
onkeyup: A key has been released.
Notice the subtle difference between the three events. The onkeydown event only triggers while the site visitor is pressing the key. Both the onkeypress and onkeyup events trigger when the site visitor releases the key. Granted, for most typing situations, the difference is very small, but for some applications (for example, games), it can be useful to know how long a key is being pressed, which you can only get from the onkeydown event.
The term keystroke may be misleading. There are some keys on the standard keyboard that don't generate a keystroke themselves, such as the Shift, Alt, and Ctrl keys on a Windows keyboard. These keys are modifiers for other keys that generate the keystrokes.
Paying attention to the page itself
Even the web page itself has events that your JavaScript and jQuery programs can listen for. Before HTML5, there were only a handful of page events that you could tap into. The newer HTML5 standard has defined a lot more page events to work with. Table 4-2 lists the more common HTML events that you may run into.
Triggers after the site visitor prints the web page
onbeforeprint
Triggers before the site visitor prints the web page
onbeforeunload
Triggers just before the web page is removed from the browser window
onerror
Triggers when there is an error in loading a required file for the web page
onhaschange
Triggers when the server address of the URL has changed
onload
Triggers when the body of the web page loads
onmessage
Triggers when a message is sent to the browser window
onoffline
Triggers when the site visitor sets the browser to view the web page offline
ononline
Triggers when the site visitor sets the browser to view the web page online
onpagehide
Triggers when the site visitor navigates away from the web page
onpageshow
Triggers when the web page appears in the browser window
onpopstate
Triggers when the browser's history changes
onresize
Triggers when your site visitor resizes the browser window
onstorage
Triggers when a web storage area is updated
onscroll
Triggers when the site visitor moves the scrollbar in the browser window
onunload
Triggers when the web page is removed from the browser window
The web page events allow you to track when your web page first appears in the site visitor's browser and when it leaves (and even just before it leaves). This gives you the opportunity to load things right up front when the page appears, or perform some operation as the page is about to disappear from the browser window.
Focusing on JavaScript and Events
JavaScript and HTML5 team up to provide a way for your program to listen for events and perform some type of action when they occur. The HTML5 element code registers a JavaScript function for the browser to run when a specific element event occurs.
Different HTML5 elements generate different events based on how they interact with the site visitor on the web page. The following sections walk you through how to set up a JavaScript event monitor for different HTML5 elements.
Saying hello and goodbye
The page events allow you to monitor when the web page loads and unloads from the site visitor’s browser. You use these in the <body> tag of the web page to specify any onload or onunload event functions you need to run:
<body onload="welcome()">
In this example, the browser runs the welcome() JavaScript function when the web page first loads into the browser window, as shown in Figure 4-1.
FIGURE 4-1: Running a function when the web page loads in the Chrome browser.
There's some controversy as to just what the term loads means for the onload event. Some browsers trigger the onload event as the first thing before processing any of the HTML5 elements into the Document Object Model (DOM), while others wait until all the HTML5 elements have been processed before triggering the event. Because of this, it's not recommended to try to access any of the web page elements from a function triggered by the onload event — there’s no guarantee that they’ll be there yet.
You can test the onload event out in your own browsers by following these steps:
Open your favorite text editor, program editor, or integrated development environment (IDE) package.
Type the following code into the editor window:
<!DOCTYPE html>
<html>
<head>
<title>Testing the Page Events</title>
<script>
function welcome() {
alert("Welcome to my website!");
}
</script>
</head>
<body onload="welcome()">
<h1>This is the main web page</h1>
<p>This is some content on the web page</p>
</body>
</html>
Save the file asloadtest.htmlin theDocumentRootfolder of your web server.
For XAMPP on Windows, that's c:\xampp\htdocs; for XAMPP on macOS, that’s /Applications/XAMPP/htdocs.
Open the XAMPP Control Panel, and start the Apache web server.
Open your browser and enter the following URL:
http://localhost:8080/loadtest.html
You may need to change the TCP port to match your web server.
You should see the welcome alert message, but you may or may not see the HTML code behind it on the web page.
Try different browsers to see if they behave any differently.
Figure 4-1 show the results from running the test using the Chrome browser. The alert() message appears from the onload event, but no content appears in the web page yet. Figure 4-2 shows running the same test using the Microsoft Edge browser.
FIGURE 4-2: Running the onload test using the Microsoft Edge browser.
The Edge browser displays the elements on the web page and then triggers the onload event to run the alert() function!
Using the onunload and onbeforeunload events can be even more problematic. Most browsers won't allow you to use the alert() function after the browser window has already closed, so don’t try to use that in the onunload event. Usually you can still access the DOM tree objects during the unload process, but even that's not guaranteed. It’s common practice to only use the onunload and onbeforeunload events to trigger functions that ensure any application data is safely stored before the application closes out the web page.
Listening for mouse events
To trigger a JavaScript function for mouse events, you need to define the events as attributes in the HTML5 elements. This section shows you how to do that for a few different mouse events.
Clicking the button
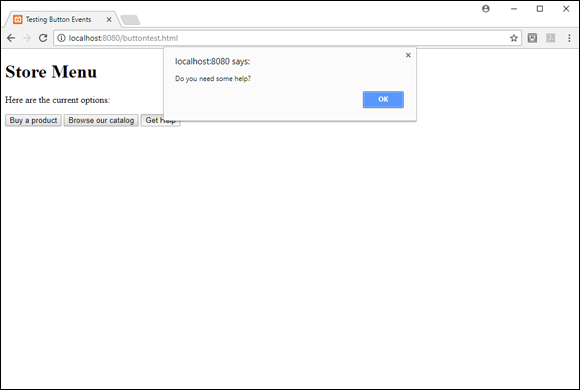
When your website visitor clicks the primary mouse button anywhere on your web page, that triggers an onclick event. To capture that event for individual elements, you must use add the onclick attribute to the element opening tag and specify the JavaScript function you want the browser to run when the event triggers. For example:
<button onclick="myfunction()">
If you have more than one button on your web page, you can pass a parameter to the JavaScript function identifying which button was selected:
<button onclick="func('buy')">Buy</button>
<button onclick="func('browse')">Browse</button>
<button onclick="func('help')">Help</button>
Notice that to pass a string value inside the attribute value you must use single quotes around the string value if you use double quotes around the HTML attribute. If you use double quotes, the browser will confuse them with the double quotes used to delimit the attribute value.
Follow these steps to test out listening for button clicks:
Open your favorite editor.
Type the following code:
<!DOCTYPE html>
<html>
<head>
<title>Testing Button Events</title>
<script>
function clickme(name) {
if (name == "help") {
alert("Do you need some help?");
} else if (name == "buy") {
alert("What would you like to buy?");
} else if (name == "browse") {
alert("You can browse our catalog");
}
}
</script>
</head>
<body>
<h1>Store Menu</h1>
<p>Here are the current options:</p>
<button onclick="clickme('buy')">Buy a product</button>
Save the file asbuttontest.htmlin theDocumentRootfolder of your web server.
Ensure that the Apache web server is still running.
Open your browser and enter the following URL:
http://localhost:8080/buttontest.html
Click each of the buttons that appears on the web page.
Close the browser window when you're done testing.
As you click each button, a different alert dialog box should appear, as shown in Figure 4-3.
FIGURE 4-3: The Help alert dialog box appearing from the buttontest.html application.
If you prefer, you can also use a unique ID attribute for each button to help identify it in the event function code.
Hovering the pointer
It may seem odd, but the onmouseover and onmouseout events allow you to alter the appearance of many types of elements as your website visitors hover their mouse pointers over them. You're not limited to using these events on only buttons; you can work with the mouse events from inside any standard block element, such as paragraph and heading elements within your web page. Follow these steps to try that out:
<p id="test" onmouseover="changeit('in')" onmouseout="changeit('out')">This is some content that will change color!</p>
</body>
</html>
Save the file ashovertest.htmlin theDocumentRootfolder of your web server.
Ensure that the Apache web server is running.
Open your browser and enter the following URL:
http://localhost:8080/hovertest.html
Move your mouse pointer around through the text in the paragraph and observe what happens.
The background color of the p element text should change when your mouse pointer hovers over it.
Close your browser window when you're done testing.
The onmouseover event triggers the changeit() JavaScript function, passing the text in, while the onmouseout event triggers the same changeit() JavaScript function, but passes the text out. The JavaScript code detects the value passed to the changeit() function and sets the background-color style property of the p element accordingly.
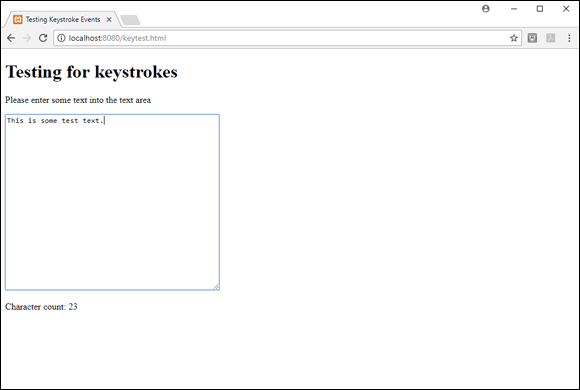
Listening for keystrokes
Elements that accept data entry, such as text boxes and text areas, can trigger the keystroke events as your site visitors type. This allows you to monitor just what data your site visitors enter into the form fields as they type.
You'll often find yourself in situations where you need to count characters entered into a text box or text area in a form. You can use the onkeyup event to trigger a counter that counts the keystrokes.
Follow these steps to create a small program to demonstrate this feature using JavaScript and the onkeyup event:
Open your favorite editor.
Type the following code:
<!DOCTYPE html>
<html>
<head>
<title>Testing Keystroke Events</title>
<script>
function gotkey() {
var count =document.getElementById("text").value.length;
Save the file askeytest.htmlin theDocumentRootfolder of your web server.
Ensure that the Apache web server is running.
Open your browser and enter the following URL:
http://localhost:8080/keytest.html
Start typing some text in the text area that appears on the page.
You should see the character count appear under the text area and be able to keep track of the characters that appear.
Close the browser to exit the program.
The gotkey() function uses the length property of the value attribute of the element. By stringing them all together into the same statement, you can easily return the number of characters that are currently in the text area:
var count = document.getElementById("text").value.length;
The p element after the text area starts out empty, but for each triggering of the gotkey() function, it changes the innerHTML property to the string that was stored in the output variable. Figure 4-4 shows what the result will look like as you type text into the text area.
FIGURE 4-4: Counting keystrokes in the keytest.html program.
Now you can provide an interface that tells your site visitors how many characters they've typed into a text box or text area! You can take this feature one step further by disabling the text area if they’ve entered too many characters:
function gotkey() {
var count = document.getElementById("text").value.length;
JavaScript provides one more way to assign events to elements. You use the .addEventListener() function to dynamically assign events to monitor the elements on your web page. That looks like this:
The first parameter of the .addEventListener() function defines the event to monitor (note the missing on as part of the event name). The second parameter specifies the function to call when the event is triggered. (Also note the missing parentheses in the function name.)
Just as you can dynamically add an event listener to an element, you can remove it using the .removeEventListener() function.
You can assign two or more functions to the same event trigger for an element. The JavaScript interpreter will trigger each function when the event occurs.
Looking at jQuery and Events
The jQuery library uses a slightly different approach to handling events. Instead of relying on the HTML5 event attributes in elements, it monitors the events in the browser and allows you to tap into them directly. This helps simplify things, because you don't need to split the event code between the HTML5 code and the jQuery code. Everything you need is in the jQuery code.
jQuery event functions
The jQuery library provides functions for handling all the HTML5 events that you’ve seen. The benefit of using the jQuery event model is that you don’t need to specify the event attribute in the HTML5 code — the jQuery function does all the work for you!
For example, to monitor for the onclick event for a button, you just simply use the following:
$("button").click(function() {
code
});
This creates an anonymous function to run whenever the site visitor clicks the button. The actual HTML5 button element would look like this:
<button>Click here</button>
And that’s all you need! The benefit of this method is that you do all the event coding in the JavaScript code — there’s nothing in the HTML5 code.
For the most part, the jQuery event functions mirror the HTML5 event attributes, but leave off the on part in the event name. There are, however, a couple of extra handy event functions available. Table 4-3 shows a list of the jQuery events that you're most likely to use.
Triggers when the primary mouse button clicks on the element
dblclick()
Triggers when the primary mouse button is double-clicked on the event
focus()
Triggers when the element gains the window focus
focusin()
Triggers when the element or a child element gains the window focus
focusout()
Triggers when the element or a child element loses the window focus
hover()
Defines two functions — one for when the mouse pointer is over the element and another one for when it leaves
keydown()
Triggers when a key is held down
keypress()
Triggers when a key is pressed and released
keyup()
Triggers when a key is released
mousedown()
Triggers when the primary mouse button is held down
mouseenter()
Triggers when the mouse pointer enters the element area
mouseleave()
Triggers when the mouse pointer leaves the element area
mousemove()
Triggers when the mouse pointer moves
mouseout()
Triggers when the mouse pointer leaves the element area
mouseover()
Triggers when the mouse pointer is over the element area
mouseup()
Triggers when the primary mouse button is released
ready()
Triggers when the DOM tree is fully populated
resize()
Triggers when the browser window has been resized
scroll()
Triggers when the site visitor uses the scrollbar
select()
Triggers when an item is selected
submit()
Triggers when a submit button has been clicked
An extremely handy addition is the hover() function. It allows you to define two separate functions at the same time — one for when the mouse is hovering over the element and another for when it's not. Follow these steps to test this feature out.
Open your favorite editor.
Type the following code into the editor window:
<!DOCTYPE html>
<html>
<head>
<title>Testing Mouse Events</title>
<style>
.yellow {
background-color: yellow;
width: 400px;
}
.red {
background-color: red;
width: 400px;
}
</style>
<script src="jquery-3.2.1.min.js"></script>
<script>
jQuery(document).ready( function() {
$("p").hover( function() {
$(this).addClass("red"); },
function() {
$(this).removeClass("red"); });
});
</script>
</head>
<body>
<h1>This is a test of the mouse events</h1>
<p class="yellow">This is some content that will change color!</p>
<p>This is some content that will change color, too!</p>
</body>
</html>
Save the file asjhovertest.htmlin theDocumentRootfolder for your web server.
Ensure that the Apache web server is running.
Open your browser and enter the following URL:
http://localhost:8080/jhovertest.html
Move the mouse pointer around to hover over the p element sections and watch what happens.
Each p element should get the red background only when you hover over it; the other p element should stay the same.
Close out the browser to end the test.
In the code for this example, everything happens in the jQuery code:
jQuery(document).ready( function() {
$("p").hover( function() {
$(this).addClass("red"); },
function() {
$(this).removeClass("red"); });
});
You should recognize the first line, which tells jQuery to wait until the browser loads the document before running the function code. The function code selects all p elements and then assigns the hover() event function to them. In this example, I created two p elements to show another neat feature in jQuery.
When you hover over each p element, only that p element changes background color! The key to that is the $(this) object in jQuery. The $(this) object represents the currently selected object. Using that, whichever p element triggered the event is the one that the addClass() function applies to, while the other p element is ignored. That saves us a whole lot of code from having to uniquely identify each p element on the web page! Figure 4-5 shows the result of the program in action.
FIGURE 4-5: The jhover.html code test only changes one p element at a time.
This example shows just how easy it is to code events with jQuery. One of the primary goals of jQuery is to make coding for handling events easier, and I'd say they met their goals!
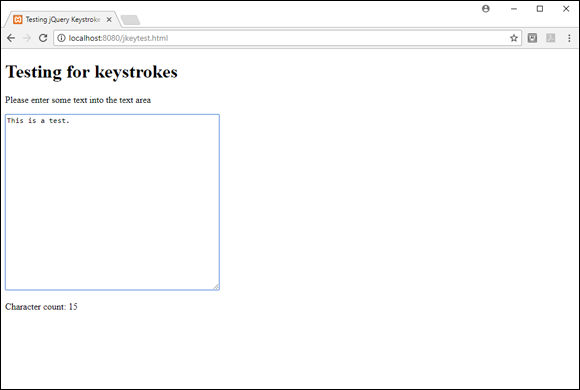
The jQuery event handler
The jQuery library also provides a way for you to code event handlers. With jQuery, the event handler function is called on(). Here’s the format for the on() function:
The selector part you should be familiar with now. It determines which element(s) the event handler is attached to. The event parameter defines the jQuery event to attach to the element(s). The filter parameter is a little different. It defines a child selector to the main selector you specify. For example, if you only want to capture click events on buttons within an article element section, you'd use the following:
$("article").on("click", "button", function() {
To test this feature out, follow these steps to convert the keytest.html JavaScript code you worked on earlier to use jQuery instead:
Open your favorite editor.
Type the following code into the editor window:
<!DOCTYPE html>
<html>
<head>
<title>Testing jQuery Keystroke Events</title>
<script src="jquery-3.2.1.min.js"></script>
<script>
jQuery(document).ready( function() {
$("textarea").on("keyup", function() {
var count = $(this).val().length;
var output = "Character count: " + count;
$("#status").text(output);
});
});
</script>
</head>
<body>
<h1>Testing for keystrokes</h1>
<p>Please enter some text into the text area</p>
<textarea cols="50" rows="20"></textarea><br>
<p id="status"></p>
</body>
</html>
Save the file asjkeytest.htmlin theDocumentRootfolder of your web server.
Ensure that the web server is running.
Open your browser and enter the following URL:
http://localhost:8080/jkeytest.html
Start typing text in the text area.
You should see the count message appear in the status area, showing the accurate count of how many characters are in the text area.
Close the browser window when you're finished.
Stop the web server.
One thing you have to say about jQuery code: It’s a lot cleaner looking than the JavaScript version! Notice that now you don’t need to define an event attribute in the <textarea> tag. jQuery takes care of that for you.
The jQuery code itself is fairly clean and uncomplicated:
jQuery(document).ready( function() {
$("textarea").on("keyup", function() {
var count = $(this).val().length;
var output = "Character count: " + count;
$("#status").text(output);
});
});
It starts out as usual, waiting for the document DOM to load and then assigns the event handler to the text area element on the web page. The event handler looks for the keyup event; when it's detected, the handler function retrieves the length of the text in the text area (again, using the $(this) selector) and then outputs it to the status p element area. Figure 4-6 shows how this looks.
FIGURE 4-6: The output of the jkeytest.html program in action.
The results are the same as the JavaScript version, but with a lot less coding!
To define an event handler that only triggers once and goes away, use the one() function instead of the on() function. To remove an event handler that you've defined for a selector, use the off() function.
 Exploring web page events
 It's not a good idea to write code that watches the
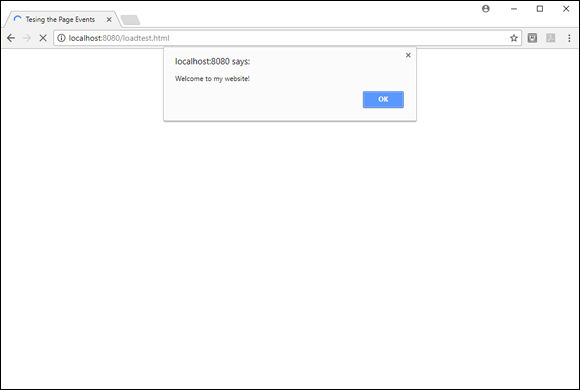

 Notice that to pass a string value inside the attribute value you must use single quotes around the string value if you use double quotes around the HTML attribute. If you use double quotes, the browser will confuse them with the double quotes used to delimit the attribute value.