Chapter 2

PHP Flow Control

IN THIS CHAPTER

check Adding conditional tests

check Looping through code

check Building functions

check Working with event-driven programming

In the preceding chapter, I cover the basics of creating and running PHP programs. I show you how to use variables to hold data, but you don’t really do much with them to test the data and perform operations. In this chapter, I walk through how to use the PHP conditional tests to control how your program behaves, as well as show how to loop through code to perform multiple iterations. In case you have code that you find yourself using frequently, I show how you can convert them into functions to share among your programs. Finally, I cover how to use PHP code in your event-driven web applications to add to your dynamic web applications.

Using Logic Control

Only having variables and echo statements in your PHP program would be pretty boring. You need to give your programs some intelligence so that they can make decisions based on what's happening in the application and display different sets of content based on those decisions.

Every programming language has methods for controlling the order the program handles statements, called the program flow, and PHP is no different. This section walks through the basics of controlling program flow in your PHP programs.

The if statement

The if statement controls which statements PHP should run in the program based on conditions. You use if statements in your everyday life (for example, if it's raining, then you’ll bring an umbrella). You apply the same logic to your PHP programs.

The basic format for the if statement is:

if (condition)

PHP statement to run

PHP evaluates the condition defined inside the parentheses to determine whether it should run the specified PHP statement that appears immediately after the if statement. The condition uses a special PHP expression called the comparison operator, which it uses to compare two values. If the comparison evaluates to a Boolean TRUE value, PHP runs the statement listed after the if statement. If the comparison evaluates to a Boolean FALSE value, PHP skips the statement.

This may sound confusing, but it's not all that hard when you get used to the format. Here’s an example of a simple if statement:

if ($age > 21)

echo "Sorry, you are too old to play";

The condition inside the parentheses checks if the value stored in the variable named $age is greater than 21. If it is, the condition evaluates to a TRUE value and PHP runs the echo statement. If it isn't, the condition evaluates to a FALSE value and PHP skips the echo statement and moves on.

There are quite a few comparison operators that you have available to use in PHP. Table 2-1 shows the comparison operators available.

TABLE 2-1 PHP Comparison Operators

Operator

Description

==

Equal to the same value

===

Equal to the same value, and they're the same data type

!=

Not equal to the same value

<>

Not equal to the same value

!==

Not equal to the same value, or they aren't the same data type

<

Less than

<=

Less than or equal to

>

Greater than

>=

Greater than or equal to

warning Notice that the comparison operator used to check if two values are equal is the double equal sign, not a single equal sign. Forgetting that small detail causes all sorts of annoying errors in your PHP code because the equal sign performs an assignment operation, which always returns a TRUE value (been there, done that).

The triple equal sign not only compares the value of the variables, but also checks to make sure the variables contain the same data types. For example, a Boolean data type of TRUE will match against an integer data type of 1 using the double equal, but not the triple equal.

If you need to control more than just a single statement using the if condition, group the statements using braces:

if (condition) {

statement1

statement2

statement3

}

You can have as many PHP statements contained within the group block as necessary — they'll all be controlled by the single condition in the if statement line. Here’s an example:

if ($price > 50) {

$tax = $price * .07;

$shipping = 10;

$total = $price + $tax + $shipping;

}

In this example, the entire group of statements will only be run by PHP if the $price variable value is greater than 50.

The else statement

The if statement has a cousin, called the else statement. The else statement allows you to provide an alternative group of statements to run if the condition in the if statement evaluates to a FALSE value:

if (condition) {

PHP statements to run if TRUE

} else {

PHP statements to run if FALSE

}

This gives you total control over what PHP statements are run in any condition!

The elseif statement

You can string if and else statements together, but that uses a new statement in place of the else statement, called the elseif statement (yes, that's else and if as one word). An elseif statement looks like this:

if (condition1){

PHP statements to run if condition1 is TRUE

} elseif (condition2) {

PHP statements to run if condition2 is TRUE

}

You can string as many elseif statements into the code block as necessary to check for alternative conditions. Each elseif statement requires its own condition check.

Follow these steps to try out using if, else, and elseif statements:

  1. Open your favorite text editor, program editor, or integrated development environment (IDE) package.
  2. Type the following code into the editor:

    <!DOCTYPE html>

    <html>

    <head>

    <title>Testing PHP Program Control</title>

    </head>

    <body>

    <h1>Random number test</h1>

    <?php

    $number = rand(1, 100);

    if ($number > 50) {

    echo "<h2>The value $number is big!</h2>\n";

    } elseif ($number > 25) {

    echo "<h2>The value $number is medium</h2>\n";

    } else {

    echo "<h2>The value $number is small</h2>\n";

    }

    ?>

    </body>

    </html>

  3. Save the file as phpconditiontest.php in the DocumentRoot folder for your web server.

    For XAMPP on Windows, use c:\xampp\htdocs; for XAMPP on macOS, use /Applications/XAMPP/htdocs.

  4. Open the XAMPP Control Panel and start the Apache web server.
  5. Open your browser and enter the following URL:

    http://localhost:8080/phpconditiontest.php

    You may need to change the TCP port used in the URL to match your web server.

  6. Click the Refresh button on your browser to reload the web page.

    That should run the PHP program again, selecting a new random number.

  7. Close the browser when you're done.

The program uses the PHP rand() function to select a random number from 1 to 100. The value is compared in two separate condition checks in the if and elseif statements. If both fail, the code falls through to the final else statement. PHP runs the appropriate echo statement based on which condition succeeds. Figure 2-1 shows an example of the output you should see in your web page.

image

FIGURE 2-1: The output from the phpconditiontest.php program.

Each time you click your browser's Refresh button, the browser makes a new request to the server to reload the web page. That triggers the server to reload the web page in the PHP server, which in turn reruns the program.

The switch statement

Writing long if, elseif, and else statements to check for a long list of conditions can get tedious. To help out with that, PHP provides the switch statement. The switch statement allows you to perform one check, and then provide multiple values to compare the check against:

switch (condition) {

case value1:

statement1;

break;

case value2:

statement2;

break;

default:

statement3;

}

The switch statement evaluates the condition you specify against the different values presented in each case statement. If one of the values matches the result of the condition, PHP jumps to that section of the code to run the statements contained in that section.

It's important to note, though, that the case statements are labels and not code blocks. After PHP runs the statements in the case section it jumped to, it continues to run the statements in all the case sections after it! To prevent that from happening, use the break statement at the end of the case code section. That causes PHP to break out of the switch statement and skip any remaining case sections.

Also, you can place a default statement section at the end of the switch statement code block. If none of the case values matches the condition value, PHP jumps to the default section.

Looping

Sometimes you'll find yourself needing to repeat the same operation multiple times, such as when you’re displaying all the values in an array variable or database table. You could just write out all the PHP statements yourself, but that could get cumbersome:

$family = array("Rich", "Barbara", "Katie", "Jessica");

echo "One member of my family is $family[0]<br>\n";

echo "One member of my family is $family[1]<br>\n";

echo "One member of my family is $family[2]<br>\n";

echo "One member of my family is $family[3]<br>\n";

This code would certainly display all the elements contained within the array, but what if there were 100 elements in the array? That would require a lot of coding!

Notice that most of the code in the echo statements is the same — the only thing that differs is the index used in the array to reference the specific data element in the array. All that you need to do is iterate through the index numbers and use the same code. Well, that’s exactly what you can do using the PHP looping functions.

PHP provides a family of looping functions available for you to use in your code. The following sections walk through the different ways to loop through code in PHP.

The while family

The while statement allows you to create a simple loop of code based on a condition that you specify in the statement:

while (condition) {

statements

}

In each iteration of the loop, PHP evaluates the condition you specify. If the condition evaluates to a TRUE value, PHP runs the statements contained in the while code block. As soon as the condition evaluates to a FALSE value, PHP breaks out of the loop and continues on with the next statement after the loop.

The while statement is tricky in that something inside the loop code must alter the value checked in the condition; otherwise, it will never end (called an endless loop). Usually, there's some type of variable that you must change inside the loop and then check in the condition.

Follow these steps to test using the while statement to create a loop:

  1. Open your editor and type the following code:

    <!DOCTYPE html>

    <html>

    <head>

    <title>PHP While Test</title>

    </head>

    <body>

    <h1>Presenting the Beatles</h1>

    <?php

    $group = array("John", "Paul", "George", "Ringo");

    $count = 0;

    while ($count < 4) {

    echo "One member of the Beatles is

    $group[$count]<br>\n";

    $count++;

    }

    ?>

    </body>

    </html>

  2. Save the file as phpwhiletest.php in the DocumentRoot folder for your web server.
  3. Ensure that the web server is running and then open your browser and enter the following URL:

    http://localhost:8080/phwhiletest.php

  4. Close the browser when you're done.

When you run the program, you should see the output as shown in Figure 2-2.

image

FIGURE 2-2: The output of the phpwhiletest.php program.

Remember that array data indexes always start at 0, so you need to start the $count variable at 0 before entering the loop. In the while loop condition, you need to check to make sure the $count variable value hasn't gotten past the last index in the array. With four data elements in the array, the last index value is 3. So, as long as the $count variable value is less than 4, the program can continue iterating through the code in the loop. The code uses the $count variable as the $group array index to reference each individual data element in the echo statement. Finally, there's an incrementor statement to add 1 to the $count variable at the end of each loop iteration.

Similar to the while statement is the do…while statement. The do…while statement changes the order of when the condition check is performed:

do {

statements

} while (condition)

With the do…while loop, PHP doesn't check the condition until after it runs the code inside the loop block. This ensures that the code will be run at least one time, even if the condition evaluates to a FALSE value.

The for statement

The while loop statement is a great way to iterate through a bunch of data, but it can be a bit cumbersome to use. With the while statement, you need to make sure you set a PHP variable that changes value inside the loop code, and make sure you code the condition to stop when that variable reaches a specific value. Sometimes with large blocks of code, that can get complicated to track.

PHP provides an all-on-one type of looping statement called the for statement. The for statement can keep track of loop iterations for you.

Here's the basic format of the for statement:

for(statement1; condition; statement2) {

PHP statements

}

The first parameter, statement1, is a PHP statement that the PHP server runs before the loop starts. Normally, this statement sets the initial value of the counter used in the loop.

The middle parameter, condition, is the standard PHP condition check that's evaluated after each loop iteration. The last parameter, statement2, is a PHP statement that’s run at the end of each loop iteration. This is normally set to change the value of the counter used in the loop.

Here’s the same code used to demonstrate the while loop, but using the for statement:

<?php

$group = array("John", "Paul", "George", "Ringo");

for ($count = 0; $count < 4; $count++ ) {

echo "One member of the Beatles is

$group[$count]<br>\n";

}

?>

Because the for loop does everything for you, you don't need to worry about incrementing the counter value inside the code block. At the end of each iteration, PHP runs the incrementor specified in the for statement for you.

The foreach statement

One problem that you may often run into with PHP is having to iterate through all the data elements contained within an associative array variable.

remember An associative array uses text keys, not numbers, to track data values. There’s no way you can increment through the keys in an associative array variable using the for statement.

Fortunately, the PHP developers have come to your rescue with the foreach statement. The foreach statement loops through each of the keys created in an associative array and allows you to retrieve both the key and its associated value.

Here's the format of the foreach statement:

foreach (array as $key => $value) {

PHP statements

}

In each iteration, the foreach statement assigns the associative key to the $key variable, and its associated value to the $value variable. You can then use those variables in your PHP code inside the code block.

Follow these steps to try out the foreach statement with an associative array variable:

  1. Open your editor and type the following code:

    <!DOCTYPE html>

    <html>

    <head>

    <title>PHP foreach Test</title>

    </head>

    <body>

    <h1>My favorites</h1>

    <?php

    $favs = array("fruit"=>"banana","veggie"=>"carrot","meat"

    =>"roast beef");

    foreach($favs as $food => $type) {

    echo "$food - $type<br>\n";

    }

    ?>

    </body>

    </html>

  2. Save the file as foreachtest.php in the DocumentRoot folder of the web server.
  3. Ensure that the web server is running, and then open your browser and enter the following URL:

    http://localhost:8080/foreachtest.php

  4. Close the browser when you're done.

When you run the program, you should get the results shown in Figure 2-3.

image

FIGURE 2-3: The output from the foreachtest.php program.

The foreach statement iterates through each key contained in the $favs associative array variable, assigning the key to the $food variable and its value to the $type variable. The code then uses the echo statement to display the values on the web page.

Building Your Own Functions

While you're coding in PHP, you’ll often find yourself using the built-in functions available (such as the rand() function you used earlier in the example programs). Functions are nothing more than PHP code someone else wrote to accomplish a useful feature that you can use in any program. Instead of having to copy all the code into your application, you just use the function name.

PHP allows you to create your own functions to use in your programs and share with others. After you define a function, you can use it throughout your program. This saves typing if you use a common routine or block of code in lots of places in your application. All you need to do is write the code once in the function definition and then call the function everywhere else you need it.

The basic format for a function definition looks like this:

function name(parameters) {

function code

return value;

}

The name must uniquely identify the function. It can't be one of the existing PHP function names, and it can’t start with a number (although numbers can appear anywhere else in the function name).

The parameters identify one or more variables that the calling program can pass to the function (or you can have a function that requires o parameters). If there is more than one variable in the parameter list, you must separate them with commas. You can then use the variables anywhere within the function code, but they only apply to inside the function code block. You can’t access the passed parameter variables anywhere else in the program code.

Any variables you define inside the function code apply only to the function code. You can’t use function variables in the PHP code outside the function definition.

The return statement allows you to pass a single value back to the calling program. It's the last statement in the function definition code, and it returns control of the program back to the main code section in your program.

Try out the following steps to experiment with creating a function and using it in your PHP program:

  1. Open your editor and type the following code:

    <!DOCTYPE html>

    <html>

    <head>

    <title>PHP Function Test</title>

    </head>

    <body>

    <?php

    function factorial($value1) {

    $factorial = 1;

    $count = 1;

    while($count <= $value1) {

    $factorial *= $count;

    $count++;

    }

    return $factorial;

    }

    ?>

    <h1>Calculating factorials</h1>

    <?php

    echo "The factorial of 10 is " . factorial(10) . "<br>\n";

    echo "The factorial of 5 is " . factorial(5) . "<br>\n";

    ?>

    </body>

    </html>

  2. Save the file as factest.php in the DocumentRoot folder for your web server.
  3. Open your browser and enter the following URL:

    http://localhost:8080/factest.php

  4. Close your browser when you're done.

When you run the factest.php program, the output should look like what’s shown in Figure 2-4.

image

FIGURE 2-4: The output from the factest.php program.

All the code required to calculate the function is contained within the factorial() function definition code block. When PHP uses the factorial() function, it passes a single value that the function assigns to the $value1 variable. When the calculation is complete, the function code returns the results back to the main program.

The main program uses the factorial() function twice in the code, both embedded in echo statements:

echo "The factorial of 10 is " . factorial(10) . "<br>\n";

echo "The factorial of 5 is " . factorial(5) . "<br>\n";

You can embed variables inside the string values in echo statements, but you can't embed functions. To insert the output from the function into the echo statement output, the code uses the string concatenation operator (the period) to “glue” the output from the strings and the factorial() functions into a single string to display.

tip If you have lots of functions that you use in many of your programs, you can define them in a separate file. Then to use the functions in your programs just use the include() function to include the function file, and you can then use the functions inside your programs without having to retype them!

Working with Event-Driven PHP

Because PHP is a server-side programming language, you can't associate it directly with events that occur within the browser. However, that said, you can link your PHP web pages to specific events in the web page so that the browser can request a specific web page based on an event.

There are basically two methods for doing that:

The following sections describe how to use each of these event-driven methods to launch your PHP web pages.

Working with links

In HTML5, you create hypertext links on the web page using the anchor element:

<a href="mypage.html">Click here</a>

The text Click Here appears on the web page, and when the site visitor clicks that link, the browser requests the mypage.html file from the web server.

You can use this method for passing small amounts of data to the PHP web pages in your web application. As part of the URL, you can embed variable/value pairs after the URL location that get passed to the web server:

<a href="mystore.php?content=store">Click to shop</a>

The browser sends the data combination of content and store to the web server as part of the GET request for the new web page. If you need to send more data, separate them with the ampersand sign:

href="mystore.php?content=buy&prodid=10"

This link sends two variable/value pairs to the web server using the GET method:

content=buy

prodid=10

To retrieve the data values passed using the GET method in your PHP code, use the special array variable $_GET[]. The PHP server populates the $_GET[] array variable with all the variable/value pairs passed in the GET method from the client browser. You can then access those array variables in your PHP program code.

Follow this example to test out using the GET method to pass data from a link click event to a PHP program:

  1. Open your editor and enter the following code:

    <!DOCTYPE html>

    <html>

    <head>

    <title>Testing Link Events in PHP</title>

    </head>

    <body>

    <h1>Please select one of the following links:</h1>

    <a href="linktest2.php?content=buy">Buy products</a><br>

    <a href="linktest2.php?content=browse">Browse for products</a><br>

    <a href="linktest2.php?content=help">I need assistance</a><br>

    </body>

    </html>

  2. Save the file as linktest.html in the DocumentRoot folder for your web server.
  3. Open a new window in your editor and enter the following code:

    <!DOCTYPE html>

    <html>

    <head>

    <title>Testing Link Events in PHP</title>

    </head>

    <body>

    <h1>Thanks for visiting us!<h1>

    <?php

    $content = $_GET['content'];

    echo "<h2>You are in the $content section</h2>\n";

    ?>

    </body>

    </html>

  4. Save the file as linktest2.php in the DocumentRoot folder for your web server.
  5. Ensure that the web server is running, and then open your browser and enter the following URL:

    http://localhost:8080/linktest.html

  6. Click one of the links on the web page, and observe what appears in the resulting web page.
  7. Close the browser when you're done.

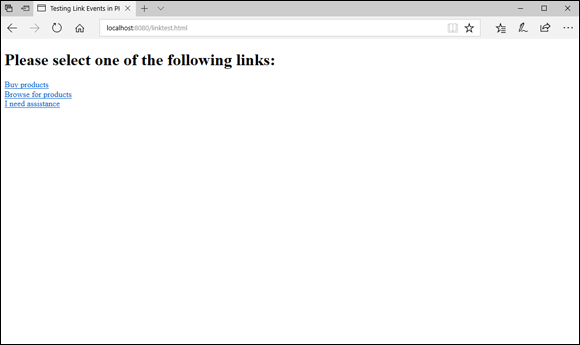
When you open the linktest.html web page, you’ll see a series of links that simulate a navigation menu bar in a web page. Each link consists of a hyptertext link that points to the same web page (linktest2.php) but sets a different value for the content variable passed in the GET method. When you open the page, you should see the results, as shown in Figure 2-5.

image

FIGURE 2-5: The output from the linktest.html file.

When you click a link on the web page, the browser sends a GET request to the web server for the specified web page file, and passes the content variable setting assigned in the anchor element tag.

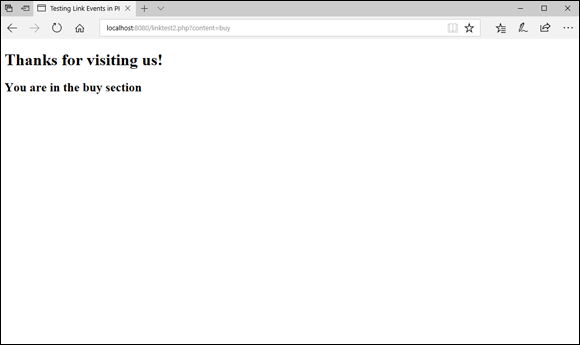
When the Apache web server receives the GET request from the client browser, it retrieves the linktest2.php file, and because it uses the .php file extension, it passes it to the PHP server to process the embedded PHP code. The PHP server detects the GET variable/value pair passed and assigns it to the $_GET[] array variable. The code in the linktest2.php code retrieves that value from the $_GET[] array variable and assigns it to another variable:

$content = $_GET['content'];

The code then uses that variable in the echo statement to display on the web page. The result is shown in Figure 2-6.

image

FIGURE 2-6: The result of clicking the Buy a Product link on the linktest.html web page.

warning Notice the URL that appears in the address bar in the link2test.php web page. It contains the content variable, along with the value that was set by the anchor element href attribute. Because the values set using the GET method appear in the URL, they aren't a secure method of sending data. You should limit using the GET method to passing data about web pages and not personal information.

Processing form data

Book 2, Chapter 3, discusses how to build data entry forms using HTML5 code. To refresh your memory, the core of the HTML5 form is the <form> tag. This tag defines the beginning and end of the data fields that make up the form. The <form> tag uses three main attributes:

  • name: Specifies a unique name for the form
  • method: Specifies the HTTP method used to pass data
  • action: Specifies the web page to pass the form data to

Within the form element, you include HTML elements for text boxes, text areas, radio buttons, check boxes, and other HTML5 form data fields. Each element uses a unique name to identify it in the form data that the browser sends to the action web page.

Because PHP runs on the server, it has no way of knowing when the site visitor is done filling out the form data fields in the browser window. With PHP, it's imperative to have a Submit button in the form to indicate to the browser when to send the form data to the web page specified in the action attribute, using the method specified in the method attribute.

A simple HTML5 form to use with PHP would look like this:

<form name="myform" action="mypage.php" method="POST">

<label>First name</label>

<input type="text" name="fname" size="40"><br>

<label>Last name</label>

<input type="text" name="lname" size="40"><br>

<input type="submit">

</form>

After the site visitor fills in the form data, she needs to click the Submit button to send the data to the mypage.php file specified in the form action attribute. The browser sends the form data embedded behind the scenes in the HTTP communication with the web server.

In the receiving web server, it passes the data received by the POST method to the PHP server, which uses the special $_POST[] array variable to retrieve the form data. You can then access that data in your PHP code using the $_POST[] array variable, along with the form field names:

$firstname = $_POST['fname'];

$lastname = $_POST['lname'];

The same method works for retrieving data from a <textarea> form field.

To retrieve the value from a select element, the name attribute of the select element defines the field name, and the option element value attribute for the option selected in the field is the value passed in the POST data. Consider the following form field:

<select name="age">

<option value="young">18-35</option>

<option value="middleage'>36-55</option>

<option value="old">56+</option>

</select>

When the site visitor selects the option labeled 18-35 in the drop-down list, the form sends the value young in the POST data. The PHP code can then access the $_POST['age'] array variable to retrieve the selected value.

To retrieve the value from a radio button element, the name attribute for all the buttons in the same group is the same. The value attribute defines what data is sent to the server as part of the POST data:

<input type="radio" name="age" value="young">18-35

<input type="radio" name="age" value="middleage">36-55

<input type="radio" name="age" value="old">56+

The PHP code checks the $_POST['age'] variable for the data value passed by the selected radio button.

Working with check box data fields can be a little tricky. The check box doesn't pass any data — it just indicates whether the box is checked. If the box is checked, it sends the value specified by the value attribute assigned to the data field specified name attribute:

<input type="checkbox" name="age" value="old">

If the site visitor checks the box in the form, the form sends the data field age with a value of old, and your PHP code can retrieve the selection using the $_POST['age'] array variable.

The problem comes in if the site visitor doesn't select the check box. If the check box is not selected, the form doesn’t send any data for the form field. In that case, if you try using the $_POST['age'] array variable, you get an error from PHP that it doesn’t exist.

To determine if a check box form field has been selected, you use the isset() PHP function. The isset() function returns a TRUE value if the PHP variable exists and has a value assigned to it or a FALSE value if not. You can then write something like this:

if (isset($_POST['age'])) {

$age = $_POST['age'];

} else

$age = "not selected";

}

Now you're able to determine whether the site visitor selected the check box.

Working with forms and PHP can be a bit tricky, but the more you practice, the better you’ll get at it. Try out this example to get a feel for how to work with forms and PHP:

  1. Open your editor and type the following code:

    <!DOCTYPE html>

    <html>

    <head>

    <title>PHP Form Test</title>

    <style>

    input, textarea {

    margin: 5px;

    }

    </style>

    </head>

    <body>

    <h1>Please fill in the form</h1>

    <form action="formtest.php" method="post">

    <fieldset>

    <legend>My test form</legend>

    <label>First name</label>

    <input type="text" name="fname" size="40"><br>

    <label>Last name</label>

    <input type="text" name="lname" size="40"><br>

    <fieldset>

    <legend>Select your favorite sport</legend>

    <input type="radio" name="sport" value="baseball">Baseball<br>

    <input type="radio" name="sport" value="football">Football<br>

    <input type="radio" name="sport" value="hockey">Hockey<br>

    <input type="radio" name="sport" value="soccer">Soccer<br>

    </fieldset>

    <label>Please type your essay</label>

    <textarea name="essay" cols="50" rows="10"></textarea><br>

    <input type="submit" value="Submit your form">

    </fieldset>

    </body>

    </html>

  2. Save the file as formtest.html in the DocumentRoot folder for your web server.
  3. Open a new window in your editor and type the following code:

    <!DOCTYPE html>

    <html>

    <head>

    <title>PHP Form Test</title>

    </head>

    <body>

    <h1>Form results:</h1>

    <?php

    $fname = $_POST['fname'];

    $lname = $_POST['lname'];

    if (isset($_POST['sport'])) {

    $sport = $_POST['sport'];

    } else {

    $sport = "not specified";

    }

    $essay = $_POST['essay'];

    echo "<h2>First name: $fname</h2>\n";

    echo "<h2>Last name: $lname</h2>\n";

    echo "<h2>Favorite sport: $sport</h2>\n";

    echo "<h2>Essay response:</h2>\n";

    echo "<p>$essay</p>\n";

    ?>

    </body>

    </html>

  4. Save the file as formtest.php in the DocumentRoot folder for your web server.
  5. Ensure the web server is running and then open your browser and enter the following URL:

    http://localhost:8080/formtest.html

  6. Fill in the from data fields, selecting a radio button but leaving the check boxes all unchecked.
  7. Click the Submit button when you're done filling in the form.
  8. Close the browser and shut down the web server.

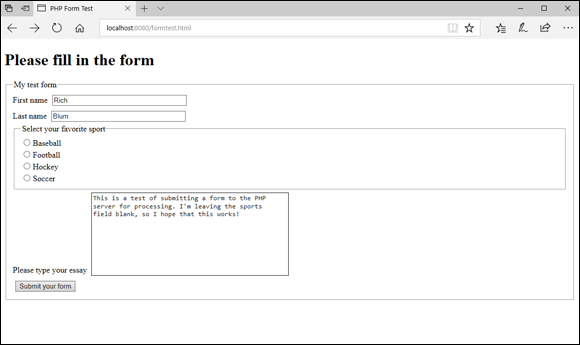
The formtest.html file displays a standard HTML5 form on the web page, as shown in Figure 2-7.

image

FIGURE 2-7: The web form produced by the formtest.html file.

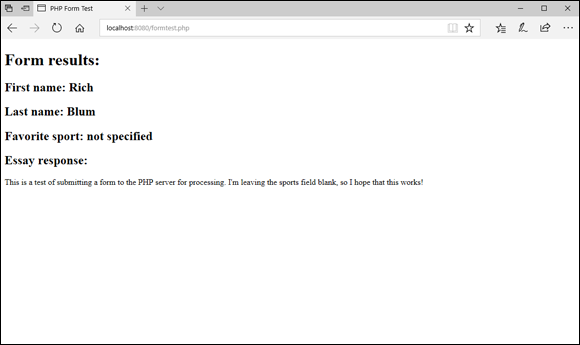
Enter your data in the form, but don't make a selection for your favorite sport. When you click the Submit button, the browser sends the form data as part of a POST method to the web server, which passes the form data to the formtest.php file as specified in the form action attribute.

The formtest.php code retrieves the form data and detects that none of the radio buttons was selected. By using the isset() function. It displays the data passed from the form, as shown in Figure 2-8.

image

FIGURE 2-8: The form results as shown from the formtest.php file.

Now you’re ready to process any HTML5 form using your PHP server-side programming skills!