Chapter 4

Using the Database

IN THIS CHAPTER

check Adding new data to your tables

check Updating existing data in your tables

check Finding data quickly

check Working with backups and restores

The preceding chapter covers how to create databases and tables for your dynamic web application. That’s all well and good, but databases and tables don’t really do anything until you start placing data in them.

This chapter explores the different methods you have available for adding, changing, and removing data in your application tables. After that, it walks through possibly the most important feature of any database: how to quickly retrieve the data that your application needs. The chapter closes by discussing the important jobs of backing up and restoring database data.

Working with Data

The ability to easily manage application data is the whole reason dynamic web applications use databases. So it stands to reason that the SQL language has quite a few options for working with data. There are four basic functions that we need to do with the data in our application:

This section walks through how to accomplish the first three items in this list using the three different MySQL interfaces I cover earlier in this minibook — the MySQL command-line interface (CLI), the graphical MySQL Workbench tool, and the web-based phpMyAdmin tool. Querying data is a complex topic, so I save that for its own section. Let’s get started and look at managing the data in your tables.

The MySQL command-line interface

The MySQL CLI uses standard SQL statements to interact with the MySQL server. There are just three basic SQL statements that you need to know to manage data in your database tables:

  • INSERT: To add new data records to a table
  • UPDATE: To modify existing data records in a table
  • DELETE: To remove existing data records from a table

The following sections describe these three statements and show how to use them in your application.

Adding new data

You use the INSERT SQL statement to add one or more new data records to a table in the database. A data record consists of a single instance of data values for each data field.

tip In some MySQL documentation, you'll often see the terms column used to refer to a single data field and tuple used to refer to an entire data record. I’ll use the more generic terms data field and data record in this book.

Here’s the basic format of the INSERT statement:

INSERT INTO table [(fieldlist)] VALUES (valuelist)

The fieldlist parameter is optional. By default, the INSERT statement tries to load comma-separated values from the valuelist into each data field in the table, in the order the data fields appear in the table definition. Chapter 3 of this minibook explains how can you use the SHOW CREATE TABLE statement to list the data fields in the table. Another method is to use the DESCRIBE SQL statement:

MariaDB [dbtest1]> DESCRIBE employees;

+----------------+-------------+------+-----+---------+-------+

| Field | Type | Null | Key | Default | Extra |

+----------------+-------------+------+-----+---------+-------+

| employeeid | int(11) | NO | PRI | NULL | |

| lastname | varchar(50) | NO | | NULL | |

| firstname | varchar(50) | YES | | NULL | |

| departmentcode | char(5) | YES | | NULL | |

| startdate | date | YES | | NULL | |

| salary | float | YES | | NULL | |

| birthdate | date | YES | | NULL | |

+----------------+-------------+------+-----+---------+-------+

7 rows in set (0.01 sec)

MariaDB [dbtest1]>

It doesn't show the exact SQL statement used to create the table, but it produces a quick summary of the data fields contained in the table. That’s all you need to see what order the data fields appear in the table for the INSERT statement.

Follow these steps to enter a data record into the employees table that you created back in Chapter 3 of this minibook. (If you skipped that part, or haven't read it yet, just jump back there and run the CREATE statements to do that. I’ll wait.)

  1. Ensure that the MySQL server is started, and then open the MySQL CLI program.
  2. Log in as the root user account.
  3. Specify the dbtest1 database from Chapter 3 as the default database by entering the USE statement:

    MariaDB [(none)]> USE dbtest1;

    Database changed

    MariaDB [dbtest1]>

  4. Add a new data record by entering the INSERT statement:

    MariaDB [dbtest1]> INSERT INTO employees VALUES

    -> (123, 'Blum', 'Rich', 5, '2020-01-01', 10000, '2000-05-01');

    Query OK, 1 row affected (0.12 sec)

    MariaDB [dbtest1]>

    tip In the INSERT statement, text and date values must be enclosed in quotes to delineate the start and end of the text value. Numeric values don't need to use quotes. Notice that I split the INSERT statement into two parts here. That’s not necessary, but it can come in handy when you don’t want too long of a line for the INSERT statement.

    The INSERT statement returns a status message indicating how many data record rows were successfully added to the table. (If you need to, you can specify more than one group of data values in the valuelist, surrounding each with the parentheses.)

  5. Check to ensure the data was added correctly by using the SELECT statement:

    MariaDB [dbtest1]> SELECT * FROM employees;

    +------------+----------+-----------+-------+------------+--------+------------+

    | employeeid | lastname | firstname | dcode | startdate | salary | birthdate |

    +------------+----------+-----------+-------+------------+--------+------------+

    | 123 | Blum | Rich | 5 | 2020-01-01 | 10000 | 2000-05-01 |

    +------------+----------+-----------+-------+------------+--------+------------+

    1 row in set (0.00 sec)

    MariaDB [dbtest1]>

    The SELECT statement shows the data fields in the table (I truncated the departmentcode data field name in this output so it would fit the width of the book page), and then shows the data records contained in the table.

If you don't want to assign values to all the data fields in the data record, you must include the fieldlist parameter. This specifies the data fields (and the order) that the data values will be placed in:

MariaDB [dbtest1]> INSERT INTO employees (employeeid, lastname, firstname)

-> VALUES (124, 'Blum', 'Barbara');

Query OK, 1 row affected (0.10 sec)

MariaDB [dbtest1]>

warning Be careful when skipping data fields when adding a new data record. If a data field that uses the NOT NULL data constraint isn't assigned a data value, the server may reject the INSERT statement. I say “may” because it depends on the configuration of the MySQL server. To maintain backward compatibility with older versions of MySQL, by default MySQL won’t enforce some data constraints, such as the NOT NULL constraint by default. To enforce it, you must change the sql_mode setting, either in the MySQL server configuration, or by setting it in the MySQL connection session. The sql_mode setting value of STRICT_ALL_TABLES tells MySQL to enforce all data constraints on all tables. When you do that, you'll get an error message if you don’t supply a value for any data field that uses the NOT NULL constraint:

MariaDB [dbtest1]> set sql_mode=STRICT_ALL_TABLES;

Query OK, 0 rows affected (0.00 sec)

MariaDB [dbtest1]> INSERT INTO employees (employeeid, firstname) VALUES

-> (126, 'Katie');

ERROR 1364 (HY000): Field 'lastname' doesn't have a default value

MariaDB [dbtest1]>

Modifying existing data

If you need to change data that you’ve already entered into the table, don’t worry — all is not lost. You can modify any existing data records in the table, as long as the privileges assigned to your MySQL user account contains the UPDATE privilege.

You use the UPDATE SQL statement for updating one or more data records contained in the table. The UPDATE statement is another of those SQL statements that, though simple in concept, can easily get complex. Here's the basic format for the UPDATE statement:

UPDATE table SET datafield = value [WHERE condition]

The basic format of this statement specifies a datafield in the table to change the data value of that data field to the value specified. The WHERE clause specifies the condition that a data record must meet to have the change applied to it. However, notice that it's optional, which can cause lots of problems.

Here’s the way the scenario often plays out: Suppose you need to go back into the Employees table to change the NULL startdate value for Barbara that wasn’t supplied when the data record was created. If you just use the basic format for the UPDATE statement, you'll get a surprise:

MariaDB [dbtest1]> UPDATE employees SET startdate = '2020-01-02';

Query OK, 2 rows affected (0.10 sec)

Rows matched: 2 Changed: 2 Warnings: 0

MariaDB [dbtest1]>

Your first clue that something bad happened would be the output returned from the MySQL server. The Rows matched and the Changed fields indicate that two data records were updated — but you just wanted to change one data record. Running a SELECT statement will verify your mistake:

MariaDB [dbtest1]> select * From employees;

+------------+----------+-----------+-------+------------+--------+-----------+

| employeeid | lastname | firstname | dcode | startdate | salary | birthdate |

+------------+----------+-----------+-------+------------+--------+-----------+

| 123 | Blum | Rich | 5 | 2020-01-02 | 10000 | 2000-05-01|

| 124 | Blum | Barbara | NULL | 2020-01-02 | NULL | NULL |

+------------+----------+-----------+-------+------------+--------+-----------+

2 rows in set (0.00 sec)

MariaDB [dbtest1]>

The basic UPDATE statement changed the startdate data field value for all of the data records in the table! This is an all-too-common mistake made by even the most experienced database administrators and programmers when in a hurry. By default, MySQL applies the update to all the table data records.

To solve that problem, you just need to add the WHERE clause to specify exactly which data record(s) you intend the change to apply to:

UPDATE employees SET startdate = '2020-01-01' WHERE employeeid = 123;

tip It's a good practice to get in the habit of always including a WHERE clause in your UPDATE statements, even if you really do want the update to apply to all the data records. That way, you know the update will always be applied to the correct data records and avoid costly mistakes.

Deleting existing data

The DELETE statement allows you to remove data from a table but keep the actual table intact (unlike the DROP statement, which removes the table and the data). Here's the format for the DELETE statement:

DELETE FROM table [WHERE condition]

This statement works similar to the UPDATE statement. Any data records matching the condition listed in the WHERE clause are deleted. And just like the UPDATE statement, if you leave off the WHERE clause, the DELETE function applies to all the data in the table. Make sure you really mean that before using it!

Here are a couple of examples of using the DELETE statement:

MariaDB [dbtest1]> DELETE FROM employees WHERE employeeid = 124;

Query OK, 1 row affected (0.08 sec)

MariaDB [dbtest1]> DELETE FROM employees WHERE employeeid = 124;

Query OK, 0 rows affected (0.00 sec)

MariaDB [dbtest1]>

In the second example, I tried to delete a data record that I had already deleted. Notice that when the DELETE statement fails to find any data records to delete, it does not produce an error message; instead, it just indicates in the return status that the number of data records deleted was zero.

The MySQL Workbench tool

Thanks to its graphical interface, working with table data using MySQL Workbench is a breeze. You don't need to memorize any SQL statements — just fill out a form and apply it to the database. Much like ordering a pizza!

Follow these steps to experiment with the data management features in Workbench:

  1. Ensure that the MySQL database server is running, and then open the MySQL Workbench tool.
  2. Double-click the dbtest2 database link in the Navigator pane, under the Schemas section.
  3. Double-click the Tables link under the dbtest2 link.
  4. Hover the mouse pointer over the Employees table entry.

    Three icons appear:

    • An i icon, which displays information about the table
    • A wrench icon, which allows you to modify the table structure
    • A spreadsheet table icon, which allows you to manage data in the table
  5. Click the spreadsheet table icon next to the Employees table entry.

    The Result Grid pane appears under the Query1 pane, as shown in Figure 4-1.

    The Result Grid pane shows the existing table data (if any) in a grid layout. Each row in the grid is a data record in the table.

    tip Depending on the size of the Workbench window, the Result Grid area may be truncated on the right-hand side. If that happens, grab the margin line at the right-hand edge of the Result Grid area and drag it to the right to expand the pane.

  6. To enter a new data record, either double-click in the empty grid row at the bottom of the table or, if your grid is very long, click the Insert Row icon at the top of the grid to jump to the empty grid row.
  7. To modify an existing single data value in a data record, single-click the value in the grid and replace the existing value with the new value.
  8. To remove an existing data record, highlight the grid row by clicking the empty cell at the left-hand side of the row, and then click the Delete selected rows icon at the top of the Result Grid pane.
  9. To apply the changes to the table, click the Apply button at the bottom of the pane.

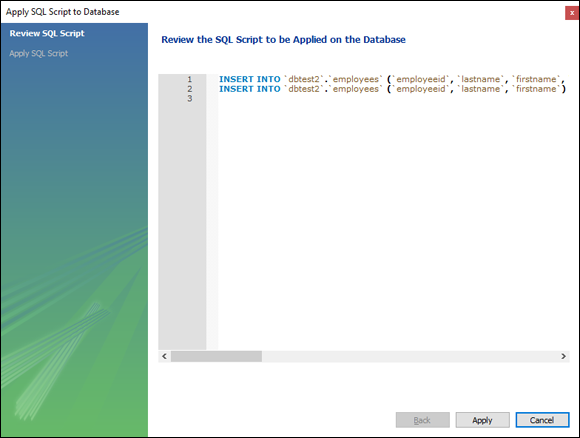
    The Apply SQL Wizard appears, as shown in Figure 4-2.

    The wizard shows the SQL statements generated to add, modify, or delete the data records based on the changes you made in the data grid.

  10. Click the Apply button to apply the SQL statements to the table.
  11. Click the Finish button to close the wizard.
image

FIGURE 4-1: The Workbench Result Grid for displaying table data.

image

FIGURE 4-2: The Apply SQL Wizard in Workbench.

warning The Result Grid can be a bit misleading. Just making the changes in the grid display doesn’t commit them to the table. You have to click the Apply button to run the wizard to commit the changes, or else they’ll be gone when you close out the grid!

If you feel a bit restricted by the small area of the result grid, click the Form Editor button on the right-hand side of the pane. That displays a single data record in the table using a form format, as shown in Figure 4-3.

image

FIGURE 4-3: Using the Form Editor in Workbench to manage data records.

The Form Editor does the same thing as the Result Grid but provides a single data record interface, giving you more room for viewing long data fields. Again, if you make any changes in the Form Editor, make sure to click the Apply button at the bottom to commit the changes.

Making changes to data in a table doesn’t get any easier than that!

The phpMyAdmin tool

The phpMyAdmin web-based tool also provides a graphical interface for working with your table data, but it’s a little more complicated than Workbench. Instead of using a single interface for all data management, phpMyAdmin breaks them up into a couple of different interfaces.

Follow these steps to insert new data using phpMyAdmin:

  1. Ensure that the MySQL server is running, and then open your browser and go to the phpMyAdmin URL for your system.

    For XAMPP it’s http://localhost:8080/phpmyadmin/. Note that the TCP port may be different for your server environment.

  2. Click the dbtest3 database link on the left-hand side of the main phpMyAdmin web page.

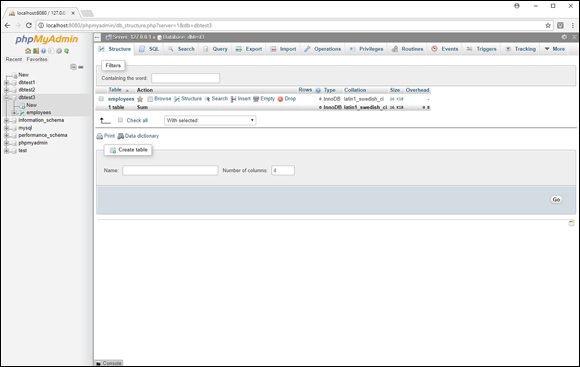
    This produces the Database web page, as shown in Figure 4-4.

  3. To add a new data record, click the Insert link in the Actions section.

    This produces a form to insert one or two new data records, as shown in Figure 4-5.

  4. Enter data values in the appropriate data fields, and then click the Go button to add the data record.

    When you click the Go button, phpMyAdmin generates the INSERT statement and submits the data record to the table. It then takes you back to the Database web page, showing the status for the completed statement.

image

FIGURE 4-4: The phpMyAdmin Database web page.

image

FIGURE 4-5: The INSERT form in phpMyAdmin.

Managing existing data in a table uses a different interface in phpMyAdmin. Follow these steps to manage the existing data records in the table:

  1. Open your browser and enter the following phpMyAdmin URL:

    http://localhost:8080/phpmyadmin/

  2. Click the dbtest3 database link on the left-hand side of the main phpMyAdmin web page.
  3. Click the Browse icon in the employee table actions section of the Database web page.

    This produces a list of all the data records contained in the table, as shown in Figure 4-6.

  4. Click the Edit icon for the data record you need to modify or the Delete icon for the data record you need to delete.

    To delete multiple data records, select the check boxes for those data records, and then click the Delete icon at the bottom of the data record list.

  5. Click the Go button to confirm editing or deleting the selected data record.
image

FIGURE 4-6: The phpMyAdmin window for browsing data records.

Thanks to the graphical interface in phpMyAdmin, entering and managing data is still a simple process. However, finding specific data records in an application can be somewhat tricky, even when using a graphical interface. The next section tackles that topic.

Searching for Data

Quite possibly the most important function you'll perform in your dynamic web applications is to query existing data in the database. Many web developers spend a great deal of time concentrating on the design layout of the web pages, but the real heart of the application is the behind-the-scenes SQL used to query data to produce the website content. If this code is inefficient, it can cause huge performance problems, and possibly even make the web application virtually useless to customers — no matter how fancy the web pages look.

As a good database application developer, it’s essential that you understand how to write good SQL query statements. The SQL statement used for queries is SELECT. Because of its importance, a lot of work has been done on the format of the SELECT statement, to make it as versatile as possible. Unfortunately, with versatility comes complexity.

Because of the versatility of the SELECT statement, the statement format has become somewhat unwieldy and intimidating for the beginner. To try and keep things simple, in this section I walk through the different features of the SELECT statement one piece at a time. The next few sections demonstrate how to use these features of the SELECT statement.

The basic SELECT format

The basic format for the SELECT statement seems simple enough:

SELECT fieldlist FROM table

The fieldlist parameter specifies the data fields that should appear in the output from the table you specify. The fieldlist can be a comma-separated list of specific data fields in the table, or the wildcard character (the asterisk) to specify all data fields, as shown in the SELECT example I use earlier in this chapter:

SELECT * FROM employees;

This statement returns all the data field values for all the data records contained in the Employees table. If that's all you need for your application, you don’t need to know anything more about the SELECT statement (lucky you)!

However, more than likely, you’ll need to customize just what data fields (and data records) need to appear in the output. That’s where things start getting complicated. The following sections show some more features that you may need to use in your SELECT statements.

Sorting output data

The output from a SELECT statement is called a result set. The result set contains only the data fields specified in the SELECT statement. The result set is only temporary and, by default, is not stored in any tables in the database.

By default, the data records displayed in the result set are not displayed in any particular order. As records are added or removed from the table, MySQL may place new data records anywhere within the table order. Even if you enter data in a particular order using INSERT statements, there is still no guarantee that the records will display in the same order in the result set.

If you need to specify the order in which the data records appear in your output, you must add the ORDER BY clause to the SELECT statement:

> SELECT employeeid, lastname, firstname FROM employees ORDER BY firstname;

+------------+----------+-----------+

| employeeid | lastname | firstname |

+------------+----------+-----------+

| 124 | Blum | Barbara |

| 126 | Blum | Jessica |

| 125 | Blum | Katie |

| 123 | Blum | Rich |

+------------+----------+-----------+

4 rows in set (0.00 sec)

>

In this example, only the data fields specified in the SELECT statement are displayed, ordered by the firstname data field. The default order used by the ORDER BY clause is ascending order, based on the data type and collation you select when creating the table. You can change the order to descending by adding the DESC keyword at the end of the ORDER BY clause:

ORDER BY firstname DESC;

This gives you complete control over how the data records appear in the result set output.

Filtering output data

By default, the SELECT statement places all the data records in the table in the result set output. The power of the database query comes from displaying only a subset of the data that meets a specific condition.

You add the WHERE clause to the SELECT statement to determine which data records to display in the result set output. Now we're getting to the heart of the SELECT statement!

For example, you can check for all the employees who work in the department identified by departmentcode 5 by using the following query:

MariaDB [dbtest1]> SELECT * FROM employees WHERE departmentcode = 5;

+----+-------+-------+----------------+------------+--------+------------+

| id | lname | fname | departmentcode | startdate | salary | birthdate |

+----+-------+-------+----------------+------------+--------+------------+

| 123| Blum | Rich | 5 | 2020-01-02 | 10000 | 2000-05-01 |

| 125| Blum | Katie | 5 | 2020-02-25 | 14000 | 2004-01-01 |

+----+-------+-------+----------------+------------+--------+------------+

2 rows in set (0.00 sec)

MariaDB [dbtest1]>

The result set only contains the data records from the table that match the WHERE clause condition you specified. In this example, the data field was an integer type, but if the data field you use is a text or date value, you must place quotes around the value to delineate the start and end of the value:

SELECT * FROM employees WHERE startdate < "2020-03-01";

warning In the WHERE clause condition, the collation you define for the data field is important. MySQL evaluates the specified condition based on the collation defined. If you use a case-insensitive collation, MySQL can't tell the difference between the values Rich and rich. Be very careful in selecting the collation you use for tables, because that plays an important role in just how your application can handle the data contained in the tables.

More advanced queries

Now that you've seen the basics (and the power) of the SELECT statement, let’s dive into some more complex topics. The following sections help add to your SELECT querying skills by showing you how to do some pretty complex searches in your database!

Querying from multiple tables

In a relational database, data is split into several tables in an attempt to keep data duplication to a minimum. In Chapter 3 of this minibook, I show you how to apply the second normal form rule of database design to create separate Customers and Orders tables so that the customer information didn't need to be duplicated for every order data record. Although this helps reduce data redundancy, it produces a small problem for your application queries.

When your application needs to generate a report for an order, it most likely will need the customer’s address information to place on the report. That means now your program needs to retrieve the order information from the Orders table, and the customer information from the Customers table.

You can do that with two separate queries:

  1. Query the Orders table with the orderid value to retrieve the customerid.
  2. Query the Customers table with the customerid to retrieve the customer address information for that order.

However, the two separate queries do take some extra processing time, both in your PHP application code and in the MySQL server. A more efficient way of retrieving that information is to submit a single SELECT statement that retrieves the data from both tables.

To query data from multiple tables in a single SELECT statement, you must specify both tables in the FROM clause. Also, because you're referencing data fields from both tables in the data field list, you must indicate which table each data field comes from. That looks like this:

MariaDB [dbtest1]> SELECT orders.orderid, customers.name, customers.address

-> FROM orders, customers

-> WHERE orderid = 1000 AND orders.customerid = customers.customerid;

+---------+------------+-------------------------+

| orderid | name | address |

+---------+------------+-------------------------+

| 1000 | Acme Paper | 134 Main St.; Miami, FL |

+---------+------------+-------------------------+

1 row in set (0.00 sec)

MariaDB [dbtest1]>

As you can see from this example, it doesn’t take long for a seemingly simple SELECT statement to get complex! Let’s walk through just what this statement does.

The first line in the query defines the data fields you want to see in the result set output. Because you’re using data fields from two tables, you must precede each data field name with the table it comes from.

In the second line, you have to define which tables the data fields come from in the FROM clause. You can list the tables in any order here.

Finally, in the WHERE clause, you have to define the condition that filters out the records you want to display. In this example, there are two conditions that must be met:

  • You need the Orders table data record that meets the specific orderid value you're looking for.
  • You need the Customers table data record that matches the customerid value for that specific order.

You use the logical AND operator to combine the two conditions. The result set contains the data record values that meets both of those conditions.

Using joins

In the previous example, you had to write a lot of code in the WHERE clause to match the appropriate data record from the Customers table to the Orders table data record information. In a relational database, this is a common thing to do. To help programmers, the SQL designers came up with an alternative way to perform this function.

A database join matches related data records in relational database tables without your having to perform all the associated checks in your code. Here's the format for using the join in a SELECT statement:

SELECT fieldlist FROM table1 jointtype JOIN table2 ON condition

The fieldlist parameter lists the data fields from the tables to display in the output as usual. The table1 and table2 parameters define the two tables to perform the join on. The jointype parameter determines the type of join for MySQL to perform. There are three types of joins available in MySQL:

  • INNER JOIN: Only displays data records found in both tables.
  • LEFT JOIN: Displays all records in table1 and the matching data records in table2.
  • RIGHT JOIN: Displays all records in table2 and the matching data records in table1.

The LEFT and RIGHT join types are also commonly referred to as outer joins. The order in which you specify the tables and the join type that you use are very important to the join operation.

Finally, the ON condition clause defines the data field relation to use for the join operation.

It's common practice to use the same data field name for data fields in separate tables that contain the same information (such as the customerid data field in the Customers and Orders tables). You can add the NATURAL keyword before the join type to tell MySQL to join using the common data field name. Here's an example of querying the customer information for all the orders using a NATURAL INNER JOIN:

MariaDB [dbtest1]> SELECT orders.orderid, customers.name, customers.address

-> FROM orders NATURAL INNER JOIN customers;

+---------+---------------+------------------------------+

| orderid | name | address |

+---------+---------------+------------------------------+

| 1000 | Acme Paper | 134 Main St.; Miami, FL |

| 1001 | Acme Paper | 134 Main St.; Miami, FL |

| 1002 | Acme Machines | 264 Oak St.; Los Angeles, CA |

+---------+---------------+------------------------------+

3 rows in set (0.00 sec)

MariaDB [dbtest1]>

Now that’s a lot less typing to mess with! The result set shows all the data records in the Orders table that have matching customerid data records in the Customers table.

Another way of doing this is to add the USING clause to a JOIN statement:

MariaDB [dbtest1]> SELECT orders.orderid, customers.name, customers.address

-> FROM orders LEFT JOIN customers USING (customerid);

+---------+---------------+------------------------------+

| orderid | name | address |

+---------+---------------+------------------------------+

| 1000 | Acme Paper | 134 Main St.; Miami, FL |

| 1001 | Acme Paper | 134 Main St.; Miami, FL |

| 1002 | Acme Machines | 264 Oak St.; Los Angeles, CA |

+---------+---------------+------------------------------+

3 rows in set (0.00 sec)

MariaDB [dbtest1]>

The USING keyword works with the LEFT and RIGHT joins to specify the data field for the join operation.

warning Using joins the wrong way can cause severe performance issues on your MySQL server, especially when working with large amounts of data (joining all the data records in tables with millions of data records can take quite a long time). I strongly suggest testing out your SELECT statements first before coding them into your web application. That will help give you a feel for any performance issues that may occur. In some situations, it's better to submit multiple smaller SELECT statements than to submit a single complex SELECT statement.

Using aliases

Having to specify the table and data field names in SELECT statements can get somewhat cumbersome. To help out, you can use the table alias feature, which defines a name that represents the full table name within the SELECT statement. Here's the format for using aliases:

SELECT fieldlist FROM table AS alias

When you define an alias for a table, you can use the alias anywhere within the SELECT statement to reference the full table name. This is especially handy in the long WHERE clauses when you're working with multiple tables:

MariaDB [dbtest1]> SELECT t1.orderid, t2.name, t2.address

-> FROM orders as t1, customers as t2

-> WHERE t1.orderid = 1000 AND t1.customerid = t2.customerid;

+---------+------------+-------------------------+

| orderid | name | address |

+---------+------------+-------------------------+

| 1000 | Acme Paper | 134 Main St.; Miami, FL |

+---------+------------+-------------------------+

1 row in set (0.00 sec)

MariaDB [dbtest1]>

The t1 alias represents the Orders table, and the t2 alias represents the Customers table. Notice that you can use the aliases anywhere in the SELECT statement, even in the data field list!

Playing It Safe with Data

You've worked hard managing the data contained in the database (or at least your application has!). It would be a tragedy if something happened that corrupted the database so that you couldn’t access that data. You never know when a catastrophic event will occur in the computer world, so it’s always a good idea to have a duplicate copy of your data handy at all times.

The MySQL server provides a few different methods for backing up and restoring database data. This section walks through how to back up and restore database data in the MySQL server environments.

Performing data backups

When backing up a MySQL database server, you have a few different options available:

  • Copy the physical files the MySQL server uses to store data and database information.
  • Use MySQL utilities to extract database and table structure information.
  • Use MySQL utilities to extract table data.
  • Use MySQL utilities to extract both the table structure and data.

If you choose to copy the physical file structure of the MySQL server, you’ll need to be careful. MySQL uses file locking to protect data as the server is running, so you may not be able to copy all the files required for the server operation at any given time.

Before you try to manually copy the MySQL server files, it’s best to stop the MySQL server process from running to ensure all the data files are available and that you can safely copy them. This is called a cold backup.

In a cold backup, because you’ve stopped the MySQL server, web applications can’t access the application data, so your website users won’t be able to properly interact with your application. If your application has certain downtimes where website visitors won’t use it (such as outside of business hours), this is fine, but for most web applications, your website visitors need access 24 hours a day, seven days a week! In those situations a cold backup just won’t work.

The alternative is to perform a hot backup, which copies database information while the MySQL server is running and the web applications are still in use. Because the server is still running, the backup process can’t lock the data tables, so the MySQL server can still process SQL statements, altering the data contained in the databases.

Because of this, the hot backup methods can’t copy any of the files associated with the server operations. Instead, all they can do is take snapshots of the data contained within the database at specific moments in time. This type of backup is called a data export.

In a data export hot backup, the backup program exports the table structure and any data contained in the table into a text file that you can then copy to a safe location. The text file formats can differ, from placing data in a comma-separated spreadsheet format, to generating SQL statements that you can feed into the MySQL server to re-create the tables.

Each of the MySQL interfaces that you’ve been working with support data export hot backups. The following sections describe how to use these options within each of the interfaces.

From the command-line interface

The mysqldump command-line utility allows you to quickly and easily export a table structure and data from the command line. The mysqldump program is usually included with the other binary programs in MySQL, and you should find it in the same folder as the other MySQL command-line utility files (for XAMPP, that's the c:\xampp\mysql\bin folder in Windows, or /Applications/XAMPP/mysql/bin in macOS).

Here's the format for the mysqldump utility:

mysqldump [options] database [tablelist]

There are lots of options available for you to customize just how to perform the export. Here are some of the more common ones you may run into:

  • --add-drop-database: Add a DROP DATABASE statement in the output to replace any existing databases with the same name.
  • --add-drop-table: Add a DROP TABLE statement in the output to replace any existing tables with the same name.
  • --all-databases: Backup all the tables from all the databases on the server.
  • --databases: List multiple databases to export.
  • --lock-tables: Lock the tables during the export.
  • --password: Specify the user password, or if empty, prompt for a password.
  • --tab: Produce a tab-separated output for the data instead of SQL statements.
  • --user: Specify the user account to log into the MySQL server for the export.

Follow these steps to back up the dbtest1 database tables using the mysqldump utility:

  1. Open a command line in Windows or a Terminal session in Linux or macOS.
  2. Change to the MySQL folder that contains the MySQL utilities for your installation environment.

    For XAMPP on Windows, that's:

    cd \xampp\mysql\bin

  3. Run the mysqldump utility to export the table data from the dbtest1 database.

    By default, the mysqldump utility will output the database contents to the screen. To save it to a file, you must redirect the output to a file. Enter this command:

    C:\xampp\mysql\bin>mysqldump --user=root --password dbtest1 > dbtest1.sql

    Enter password:

    C:\xampp\mysql\bin>

  4. View the generated dbtest1.sql file using your favorite text editor.

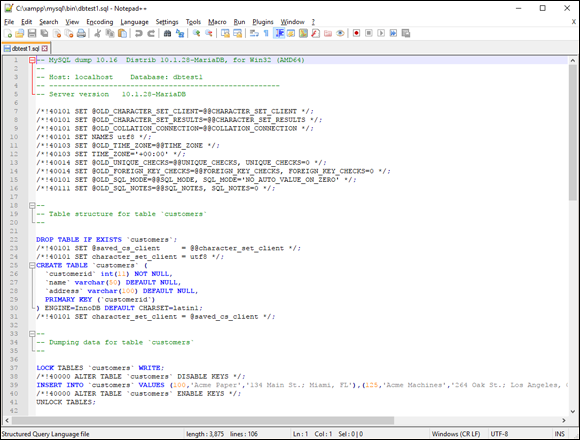
    Figure 4-7 shows the results from my database.

image

FIGURE 4-7: The output from the mysqldump utility.

As you peruse through the dbtest1.sql file that the mysqldump utility generated, you'll probably recognize the SQL statements that it uses. For each table in the database, it generates a CREATE TABLE statement to rebuild the table structure; then it generates an INSERT statement to add each data record from the original table.

Using Workbench

The MySQL Workbench graphical program provides a nice form for you to use to pick out the mysqldump options for the export. Follow these steps to generate an export file using Workbench:

  1. Ensure that the MySQL server is running, and then start the Workbench tool.
  2. Click the Data Export link from the Management section in the Navigator window pane.

    Figure 4-8 shows what the Data Export interface looks like.

  3. Single-click the dbtest2 database entry in the left-hand window of the Tables to Export section of the main window.

    The tables contained in the dbtest2 database appear in the right-hand side window.

  4. Select the check box for the dbtest2 database in the left-hand window.

    This automatically selects the check boxes for the tables it contains.

  5. Under the right-hand side window, ensure that the drop-down box has the Dump Structure and Data option selected.
  6. In the Export Options section, select the Export to Self-Contained File radio button and specify the location and name of the .sql file that will contain the export.

    The default will create a file in your Documents folder under the dump folder.

    Alternatively, you can opt to save the export as a project, which generates multiple files for each table. This allows you some more flexibility when restoring the data, but it's more difficult to manage the exported files.

  7. Click the Advanced Options button at the top of the window.

    A complete list of options for customizing the export appears, as shown in Figure 4-9.

  8. Click the Return button to return to the main Data Export interface window.
  9. Click the Start Export button at the bottom of the window.

    A dialog box appears, prompting you for the root user account password.

  10. For XAMPP, leave it empty and click the OK button.

    The Export Progress window appears, showing the progress of the export.

  11. Use your favorite text editor to view the .sql file that was generated by the export.
image

FIGURE 4-8: The Workbench Data Export window.

image

FIGURE 4-9: The Workbench Data Export advanced options window.

Using a graphical interface certainly makes the data export process much simpler!

Using phpMyAdmin

The phpMyAdmin tool has an excellent graphical interface for handling data exports. After you open the phpMyAdmin tool, click the Export button at the top of the main web page. This produces the interface shown in Figure 4-10.

image

FIGURE 4-10: The phpMyAdmin export web page.

The main export page allows you to choose from two options:

  • A quick export, which exports all the tables from all the databases using the mysqldump default options.
  • A custom export, which allows you to pick and choose the databases and options for the export.

One nice feature about the phpMyAdmin export interface is that it allows you to select the format of the export file from a long list of options, shown in Table 4-1.

TABLE 4-1 The phpMyAdmin Export Formats

Format

Description

CodeGen

The NHibernate file format

CSV

The comma-separated values format

CSV for Microsoft Excel

The CSV format with customizations for Microsoft Excel

Microsoft Word 2000

The Microsoft 2000 Word document

JSON

The JavaScript Object Notation format

LaTeX

The Lamport TeX format commonly used for academic publications

MediaWiki Table

The Wikipedia table format

OpenDocument Spreadsheet

The open spreadsheet standard format

OpenDocument Text

The open document standard format

PDF

The Adobe Portable Document Format

PHP array

PHP code to create an array of the data

SQL

SQL statements to rebuild the table

Texy!

XHTML formatted data

YAML

A data serialization format that is human-readable

That’s a lot of different ways to export your database data!

If you select the Custom export method, you can select the databases to export, the output method (and file type if you save it to a file), the format of the output, and any MySQL directives (such as to add the DROP DATABASE or DROP TABLE statements). This gives you maximum flexibility when creating your database backups!

Restoring your data

Backups are only good if you have the ability to use them to restore the database. Testing out the restore capabilities of your system before you have a catastrophic event is always a good idea.

Each of the MySQL interface methods provides a different way of restoring data from the backup files. This section walks through each of these methods.

From the command-line interface

To restore a database using the SQL dump file generated by the mysqldump utility, just pass the file into the input of the mysql command-line tool using the command line redirect symbol (<). That looks like this:

mysql --user=root --password dbtest1 < dbtest1.sql

The MySQL server will process the SQL statements contained in the dbtest1.sql file and apply them against the database you specify on the command line. This is a great way to move a database to a new database, either on the same server or on a remote server!

If you opt to save only the table data using either the tab or comma-separated formats, you can read the data into a table by using the LOAD DATA INFILE SQL statement:

LOAD DATA INFILE filename INTO TABLE table

The data fields in the file must match the order in which they appear in the table.

From Workbench

The MySQL Workbench tool provides a graphical interface for loading the backup file. After you open Workbench, click the Data Import/Restore link in the Management section of the Navigator window pane. Figure 4-11 shows what that window looks like.

image

FIGURE 4-11: The Workbench Data Import/Restore window.

In the Import Options section, select either the project folder or the export file that you created with the Export feature. Select the database to use for the import in the Default Target Schema drop-down box.

If you opted to save the backup as a project, you can customize the restore by selecting exactly which objects to restore. If you opted to save the backup as a single file as in the example, you must restore all the objects in the export file.

After you’ve selected the export file and options, click the Start Import button at the bottom of the window to begin the import process. That makes restoring table data almost simple!

From phpMyAdmin

Importing data from an export backup using phpMyAdmin is also a fairly simple process. After you open the phpMyAdmin web tool, click the Import button at the top of the web page. This produces the Import Web page, as shown in Figure 4-12.

image

FIGURE 4-12: The phpMyAdmin Import web page.

From here, you can browse to find the export file that you generated, along with selecting some options for the import, such as the file format. After you’ve made your selections, click the Go button at the bottom of the web page to start the import.