In the previous chapter, I show you how to insert, delete, and manage data in a MySQL database. Now that you have your content all ready for your application, there’s just one more piece to add in the assembly line to complete your dynamic web applications. This chapter explores how you can interact with the MySQL database server from your PHP programs to retrieve the stored data, add new data records, and remove existing data records. This chapter first explores how PHP interacts with databases in general. Then it focuses on the most popular method used for accessing MySQL databases from web applications: the mysqli library.
Database Support in PHP
The PHP programming language doesn't have any functions for accessing databases directly built into the language. However, there are plenty of PHP extension libraries available to help out. The PHP extensions provide additional functionality to the main PHP language by incorporating add-on libraries (see Book 4, Chapter 1).
PHP has a long history of providing library support for accessing different types of databases, making it a popular programming language to use with lots of different database servers. Table 5-1 lists the database server libraries currently available to use with your PHP code.
An open-source relational database with object extensions
DB++
A non-SQL-based relational database created by Concept asa
dBase
An old proprietary database file format used mostly for microcomputers
FireBird/InterBase
A relational database based on the ISO SQL-2003 standard
IBM DB2
A proprietary IBM relational database format
Informix
An old relational database format acquired by IBM in 2001
Ingres
An open-source relational database designed for large applications
MaxDB
An ANSI SQL-92-compliant relational database used by the SAP software
Mongo
An open-source document-oriented database
mSQL
A lightweight SQL-based database created by Hughes Technologies
MySQL
The open-source MySQL database server
OCI8
The Oracle database server
PostgreSQL
An open-source database based on the original Ingres database
SQLite
An embeddable database system for small environments
SQLite3
An update to the SQLite database system
SQLSRV
The Microsoft SQL database server
tokyo_tyrant
An open-source distributed database system
In addition to the specific database extensions available in PHP, there are also three abstract database interfaces available:
DBA: A library for accessing Berkeley DB–style database files
ODBC: A library for interfacing with the Open Database Connectivity (ODBC) standard, originally developed by Microsoft and popular on Windows platforms
PDO: The PHP Data Objects (PDO) library, which uses a lightweight interface to access different types of databases, based on an installed driver
The benefit of using an abstract database interface in your PHP code is that you can easily change the underlying database your application uses without having to change any of your PHP code. If you use a specific database extension, such as for MySQL, and you need to run your application using a different database server, you need to recode all your database interactions. However, with the abstract database extension you can keep your code and just change the underlying database driver. If you’re developing applications for use in multiple environments, this is definitely the way to go.
Because the MySQL database server is the focus of this book, this chapter shows you how to code PHP to interact with a MySQL database using the MySQL-specific database interface. If you decide to use another database server for your applications, you’ll be able to apply the same techniques you learn here to the other PHP database libraries.
Using the mysqli Library
The original MySQL database extension library created for PHP was called php_mysql. It had some limitations, but it was widely popular in developing dynamic web applications across the Internet that used the MySQL database.
As time went on, developers worked on improving the limitations of the php_mysql library. Eventually, enough changes accumulated to warrant a new library package release. That release was named the php_mysqli library (the added i stands for “improved”). Starting in PHP version 7, the original php_mysql library has been removed, so it’s not recommended that any new application development use it. This section walks through how to use the php_mysqli library to interface your PHP programs to a MySQL database server.
One of the added features of the php_mysqli library is that it supports both procedural language and object-oriented language coding styles. That means you can use the library both as functions in procedural programs and as an object in object-oriented PHP programs.
For the procedural program environment, you just run separate functions for each action. Most of the functions require that you pass the database connection handle along as a parameter. For the object-oriented program environment, you must instantiate a new mysqli object, and then run methods using that object. For each action, you need to interact with the MySQL database. In the following sections, I show you how to use both coding methods.
Connecting to the database
The first thing you need to do from your PHP code is to establish a connection to the MySQL database server. The connection creates a database session, from which you can submit queries and retrieve result sets.
In the procedural coding method, you establish the connection using the mysqli_connect() function:
That's a lot of information to pass for the connection! Fortunately, for most situations, you don’t need to include the port or socket values, because those are standard. As you can probably tell from the parameter names, you must specify the host name or IP address of the MySQL server, a userid to log into the server, along with its associated password. The database parameter allows you to specify a default database for the session. A typical connection statement would look like this:
If the connection is successful, the $con variable contains what's called the connection handle. You must use it to reference the connection session in some of the other php_mysqli library functions.
If you need to change the default database used in the connection, use the mysqli_select_db() function:
mysqli_select_db(handle, database)
As you can tell from the function format, for the first parameter you need the connection handle from the original database connection:
mysqli_select_db($con, "dbtest2");
In object-oriented coding, instead of using the mysqli_connect() function, you must instantiate a new instance of the myslqi object:
$db = new mysqli("localhost", "user1", "myL0ngP@ssword", "dbtest1");
The parameters available are the same as for the mysqli_connect() function. However, this time the $db variable contains an instance of the myslqi object instead of a connection handle.
To select a new default database for the session, you run the select_db() method from the $db object you created:
$db->select_db("dbtest2");
Notice that the names of the procedural functions and object-oriented methods are similar. That holds true for the rest of the functions and methods you'll use in the php_mysqli library, so it’s relatively easy to move back and forth between the two coding methods.
In both the procedural and object-oriented coding methods, you must enter the user ID and password to connect to the database. Unfortunately, you must do that in plain text. This is a bit of a security risk. If anyone has access to your source code, they could gain access to the database. First, make sure the user ID configured on the MySQL server is locked down to a specific host location (don’t use a wildcard character for the location). The next step is to move the connection statement to an out-of-the-way place, such as in a separate include file; then use the PHP include() function to add it to your programs. That at least limits the visibility of the user ID and password information to a single file. If your server environment permits, you may even be able to hide the include file outside of the DocumentRoot folder of your web server.
Closing the connection
When you open a connection to the MySQL server, the connection remains open for the duration of that program. When the PHP server reaches the end of your PHP code for that web page, it automatically closes the connection.
The MySQL server has a limited number of client connections that it supports (defined by the MySQL configuration file). If you're coding in a high-volume environment that has lots of customers accessing your web application at the same time, it may be crucial that your application releases the MySQL server connection as soon as possible.
If you’re working in that type of environment, you can manually close the MySQL server connection as soon as you’re done using it to help free up more connections as soon as possible. You do that by using the mysqli_close() function. Just specify the connection handle as the sole parameter:
mysqli_close($con);
If you’re working with object-oriented programming code, just use the close() method on the mysqli instance:
$db->close();
Again, for most normal situations you don't need to worry about closing the MySQL server connection, it’s just nice to know you have that option available if you need it!
Submitting queries
After you establish a connection to the MySQL server, you can start submitting SQL statements. You can submit any type of statement, just as if you were working from the MySQL command-line interface.
The procedural function you use to submit a query to the MySQL server is the mysqli_query() function. Here’s the format:
$conresult = mysqli_query(handle, query);
The handle parameter is the connection handle created when you connected to the MySQL server. The query parameter is the text SQL statement. Unless you're submitting a very short SQL statement, it has become common practice to store the SQL statement in a variable so as not to make the mysqli_query() statement overly complicated:
$query = "SELECT * FROM employees";
$dbresult = mysqli_query($con, $query);
The mysqli_query() function returns what's called a resource handle. You must store that in a variable to be able to access the data in the result set returned by the query.
In the object-oriented coding world, you use the query() method of the mysqli connection instance to submit SQL statements:
$query = "SELECT * FROM employees";
$result = $db->query($query);
The query() method returns a result set object, which you must store in a variable to be able to access the data contained in the result set.
The SQL statement that you send to the MySQL doesn't need a semicolon at the end. The semicolon is used by the MySQL command-line interface to indicate the end of the statement. The mysqli_query() function already knows the end of the SQL statement because it will only accept one query per text string. That also helps block SQL-injection types of attacks against your system.
Retrieving data
If you submit a SQL statement that will return data (such as a SELECT statement), the result set handle returned will point to the data. You can then retrieve the data using other mysqli library functions. There are actually quite a few different ways to retrieve that data using different functions or methods. Table 5-2 lists the different functions and methods available.
TABLE 5-2 The mysqli Data Retrieval Functions and Methods
Function
Method
Description
mysqli_fetch_all
fetch_all()
Retrieves all the data records in the result set as an array
mysqli_fetch_array
fetch_array()
Retrieves the current data record in the result set as an array
mysqli_fetch_assoc
fetch_assoc()
Retrieves the current data record in the result set as an associative array
mysqli_fetch_field_direct()
fetch_field_direct()
Retrieves the metadata for a specific field in a result set
mysqli_fetch_field()
fetch_field()
Retrieves the metadata for a single field in a result set
mysqli_fetch_fields()
fetch_fields()
Returns the metadata for all the fields in a result set as an array
mysqli_fetch_object()
fetch_object()
Retrieves the current data record of a result set as an object
mysqli_fetch_row()
fetch_row()
Retrieves the current data record of a result set as a numeric array
mysqli_field_seek()
field_seek()
Sets the result set pointer to a specific field in the current data record
mysqli_free()
free()
Releases the memory associated with the result set handle
The mysqli _fetch family of statements retrieves the data records from the result set and places them in an array variable. The type of array variable used depends on the function you use:
The mysqli_fetch_array() function creates an associative array, a numeric array, or both, based on the second parameter (MYSQLI_ASSOC, MYSQLI_NUM, or MYSQLI_BOTH).
The mysqli_fetch_assoc() function creates an associative array, using the data field names as the array keys.
The mysqli_fetch_row() function creates a numeric array, using numeric indexes for each data field (starting at 0, and using the data field order specified in the table or SELECT statement data field).
The fetch statements are also somewhat unique in that they allow you to walk your way through the result set one data record at a time. Each time you call the fetch statement, it returns the data from the current data record in the result set; then it moves a pointer to the next data record in the result set for the next call. When it reaches the end of the result set data, it returns a NULL value, making it ideal to use the fetch statements in a while() loop:
$query = "SELECT * FROM employees";
$conresult = mysqli_query($con, $query);
while($row = mysqli_fetch_assoc($conresult)) {
echo "<p>Employee last name: $row['lastname']<br>\n";
echo "Employee first name: $row['firstname']<br>\n";
echo "Start date: $row['startdate']<br>\n";
echo "Salary: $row['salary']</p>\n;
}
Or if you're using the object-oriented programming style:
$query = "SELECT * FROM employees";
$dbresult = $db->query($query);
while( $row = $dbresult->fetch_assoc()) {
echo "<p>Employee last name: $row['lastname']<br>\n";
echo "Employee first name: $row['firstname']<br>\n";
echo "Start date: $row['startdate']<br>\n";
echo "Salary: $row['salary']</p>\n;
}
The mysqli_fetch_assoc() function returns the data record as an associative array value, which you then store in an array variable. The while loop continues until there are no more data records in the result set; then it drops out so the program can continue.
Being prepared
You can submit any type of SQL statements using the mysqli_query() function, but it's not recommended to use that for submitting INSERT statements. All too often, beginning PHP coders retrieve data from an HTML form, place the data directly in an INSERT statement string, then submit the string to the MySQL server, like this:
This method works, but it's a dangerous way of inserting data into your database! There’s no guarantee that the person using the HTML form will enter the correct data into all the data fields (either by accident or on purpose). There’s also no guarantee the data submitted in the form won’t contain malicious characters meant to cause issues with the database.
The safer way of submitting data in an INSERT statement is to use a prepared statement, which defines a template of the query you want to execute on the MySQL server, and then sends the data separate from the template. The MySQL server stores the prepared statement, and then matches the submitted data against the template. This helps filter out malicious data. Plus, it can help speed up executing multiple INSERT statements on the server. You just submit one template statement. Then you can apply multiple data statements against the same template.
With a prepared statement, you create the query string as normal, but instead of including data values, you use a question mark as a placeholder for each value, like this:
Then you use the myqli_prepare() function to submit it:
$constmt = mysqli_prepare($con, $query);
If you're using the object-oriented coding style, it looks like this:
$dbstmt = $db->prepare($query);
Now the MySQL server has the prepared statement, but it doesn’t have any data to plug into it. To do that you use the mysqli_stmt_bind_param() function:
The first parameter is the result from the prepared statement you submitted. The second parameter is somewhat odd. It defines the data type of each of the data values as a single character in a string value:
b: A blob data type value
i: An integer data type value
d: A double data type value
s: A string data type value
In this example, I define the first data value as an integer, the next four as string values, and the final data value as an integer.
After defining the data types, you just list the values for the data fields, in the order they appear in the prepared statement.
If you're following along in the object-oriented code style, here’s how to bind the parameters:
After you bind the data values to the prepared statement, there’s still one more step — you must execute the prepared statement:
mysql_bind_execute($constmt);
Or if you’re using the object-oriented coding style, it looks like this:
$dbstmt->execute();
This is what links the data to the template in the MySQL server and processes the statement.
Using prepared statements for INSERT statements is crucial, but you can also use them for submitting SELECT statements if you don't trust the data that you’re using in the WHERE clause.
This can be the result of allowing your website visitors to enter text to search for in the database. For example, instead of writing this code:
$empid = $_POST['employeeid'];
$query = "SELECT * FROM employees WHERE employeeid = $empid";
$result = $db->query($query);
$row = $db->fetch_assoc($result);
You can use a prepared statement and write it this way:
$empid = $_POST['employeeid'];
$query = "SELECT * FROM employees WHERE empid = ?";
When you submit the SELECT statement using a prepared statement, you must bind the PHP variables for the result set data fields using the bind_result() method (or mysqli_stmt_bind_result() for procedural style coding). Then you can retrieve the data records in the result set using the fetch() method (or mysqli_stmt_fetch() for procedural style coding).
Checking for errors
Whenever you submit any type of action to the MySQL server, it's always a good idea to ensure that it completed properly before continuing on with your program. There are a couple of different ways to do that.
One method is to test the connection handle or result handle for a NULL value. If the connection or query fails, the handle will be set to NULL:
$db = new mysqli("localhost", "user1", "MyL0ngP@ssword", "dbtest1");
if (!$db) {
echo "Sorry, there was a problem connecting";
exit;
}
This allows you to halt the program immediately without trying to submit any further statements. The downside is that if the connection fails, the connection statement will generate an ugly PHP error message. If you'd like to suppress the error message, you can precede the code with an ampersand (@), like this:
@ $db = new mysqli("localhost", "user1", "MyL0ngP@ssword", "dbtest1");
The leading ampersand tells PHP to suppress any error output that may be generated from the statement.
The other way of stopping things when the connection fails is to use the PHP die() function:
@ $con = mysqli_connect("localhost", "user1", "MyL0ngP@ssword", "dbtest1") or
die("Sorry, something went wrong with the connection");
The logical OR statement will only trigger if the connection statement fails, running the die() function, which displays the string in the web page output.
Sometimes when you submit queries that fail, it helps to be able to see the exact error message the query generated. You can do that using the mysqli_error() function:
$conresult = mysqli_query($con, $query)
if (!$conresult) {
echo mysqli_error($con);
}
Or for object-oriented programming:
$dbresult = $db->query($query);
if (!$dbresult) {
echo $db->error();
}
The mysqli_error() function returns the detailed error message generated by the MySQL server when a submitted SQL statement fails. Often that helps shed some additional light on just what went wrong, and can be invaluable when troubleshooting your SQL code!
The mysqli_error() function is useful for troubleshooting code, but it's also useful for attackers to gain inside information on your database structure. After you’re done developing the application code, it’s best to remove any mysqli_error() functions you have in the code to prevent an attacker from exploiting them.
Miscellaneous functions
Submitting queries to the MySQL server and retrieving the data records from the result set consists of the bulk of your database requirements, but there are a few more handy functions available in the php_mysqli library that can be useful in your application coding. Table 5-3 lists some of the more common ones that you may want to use.
Turn on or off the autocommit feature in MySQL, which allows you to submit multi-statement transactions
change_user
Changes the user account for the session
character_set_name
Returns the character set used for the connection
commit
Commits a transaction
more_results
Checks if there are more query results from a multi-query submission
multi_query
Allows you to submit more than one query at a time
next_result
Prepares the next data record result from a multi-query
real_escape_string
Escapes special characters in a string to make them safe to use in an SQL query
rollback
Rolls back the current transaction
set_charset
Sets the default character set used for the session
As you can probably guess, the procedural style names for these methods are the same, just with the mysqli_ prefix.
The real_escape_string() method is useful for cleaning up text input to use in an INSERT statement. It places a backslash in front of any character that will cause trouble when sent to the MySQL server. This is especially useful with data that may include single or double quotes.
Though not a method, the num_rows property is handy when you just need the number of data records returned in a result set. Because it's a property and not a method, you don’t include the parenthesis after it:
$query = "SELECT * FROM employees";
$dbresult = $db->query($query);
if ($dbresult->num_rows > 0) {
echo "There were $dbresult->num_rows data records in the table";
} else {
echo "Sorry, there weren't any data records returned";
}
The procedural style is a little different in that it uses the num_rows as a function:
if (mysqli_num_rows($conresult) > 0)
The mysqli_num_rows() function returns the same information, but you just use it as a function instead of a property.
Putting It All Together
Now that you've seen the basics of using the php_mysqli library to interact with the MySQL server, let’s walk through a short web application that does that. First, you need a database with some data. Follow these steps to create that:
Ensure that both the Apache and MySQL servers are running.
If you’re using XAMPP, start the Control Panel and click the Start buttons for both Apache and MySQL.
Open the MySQL command-line interface.
For Windows, open a Command Prompt session and enter these commands:
cd \xampp\mysql\bin
mysql --user=root --password
For the macOS environment, open a Terminal session and enter these commands:
cd /Applications/XAMPP/mysql/bin
./mysql --user=root --password
Press the Enter key at the MySQL password prompt.
Enter the following statement to create theapptest1database:
MariaDB [(none)]> CREATE DATABASE apptest1;
Query OK, 1 row affected (0.00 sec)
Enter the following statement to create theappuser1user account:
MariaDB [(none)]> CREATE USER appuser1@localhost IDENTIFIED BY "MyL0ngP@ssword";
Query OK, 0 rows affected (0.07 sec)
Enter the following statement to grant privileges to theapptest1database for theappuser1user account:
MariaDB [(none)]> GRANT SELECT,INSERT,UPDATE,DELETE ON apptest1.*
-> TO appuser1@localhost;
Query OK, 0 rows affected (0.00 sec)
Enter theUSEstatement to change the default database to theapptest1database:
MariaDB [(none)]> USE apptest1;
Database changed
Enter the following statement to create the Bowlers table:
MariaDB [apptest1]> CREATE TABLE bowlers
-> (bowlerid int primary key,
-> name varchar(100),
-> address varchar(200),
-> phone varchar(20));
Query OK, 0 rows affected (0.28 sec)
Enter the following statement to create the Games table:
MariaDB [apptest1]> CREATE TABLE games
-> (gameid int auto_increment primary key,
-> bowlerid int,
-> score int);
Query OK, 0 rows affected (0.22 sec)
Now you can start entering some data into your tables.
Here's some sample data for the Bowlers table:
MariaDB [apptest1]> INSERT INTO bowlers VALUES
-> (100, 'Rich', '123 Main St.', '555-1234');
Query OK, 1 row affected (0.08 sec)
MariaDB [apptest1]> INSERT INTO bowlers VALUES
-> (101, 'Barbara', '123 Main St.', '555-5678');
Query OK, 1 row affected (0.10 sec)
MariaDB [apptest1]> INSERT INTO bowlers VALUES
-> (102, 'Katie Jane', '567 Oak St.', '555-0123');
Query OK, 1 row affected (0.10 sec)
MariaDB [apptest1]> INSERT INTO bowlers VALUES
-> (103, 'Jessica', '901 Elm St.', '555-3256');
Query OK, 1 row affected (0.09 sec)
Add some data for the Games table for the bowlers:
MariaDB [apptest1]> INSERT INTO games (bowlerid, score) VALUES (100, 110);
Query OK, 1 row affected (0.10 sec)
MariaDB [apptest1]> INSERT INTO games (bowlerid, score) VALUES (100, 115);
Query OK, 1 row affected (0.08 sec)
MariaDB [apptest1]> INSERT INTO games (bowlerid, score) VALUES (100, 105);
Query OK, 1 row affected (0.05 sec)
MariaDB [apptest1]> INSERT INTO games (bowlerid, score) VALUES (101, 110);
Query OK, 1 row affected (0.11 sec)
MariaDB [apptest1]> INSERT INTO games (bowlerid, score) VALUES (101, 112);
Query OK, 1 row affected (0.06 sec)
MariaDB [apptest1]> INSERT INTO games (bowlerid, score) VALUES (101, 130);
Query OK, 1 row affected (0.10 sec)
MariaDB [apptest1]> INSERT INTO games (bowlerid, score) VALUES (102, 115);
Query OK, 1 row affected (0.11 sec)
MariaDB [apptest1]> INSERT INTO games (bowlerid, score) VALUES (102, 125);
Query OK, 1 row affected (0.09 sec)
MariaDB [apptest1]> INSERT INTO games (bowlerid, score) VALUES (102, 140);
Query OK, 1 row affected (0.08 sec)
MariaDB [apptest1]> INSERT INTO games (bowlerid, score) VALUES (103, 135);
Query OK, 1 row affected (0.08 sec)
MariaDB [apptest1]> INSERT INTO games (bowlerid, score) VALUES (103, 138);
Query OK, 1 row affected (0.09 sec)
MariaDB [apptest1]> INSERT INTO games (bowlerid, score) VALUES (103, 130);
Query OK, 1 row affected (0.08 sec)
Exit the MySQL command-line interface by entering the exit statement:
MariaDB [apptest1]> exit;
C:\xampp\mysql\bin>
Close the Command Prompt or Terminal session.
Now that you have some sample data, you can code an application to use the data! Follow these steps to create a simple application that reads the Bowlers table and then calculates the average score for each bowler on your team:
Open your favorite text editor, program editor, or integrated development environment (IDE) package.
Save the file asphpapptest.phpin theDocumentRootfolder for your web server.
If you're using XAMPP on Windows, that’s c:\xampp\htdocs. For XAMPP on macOS, that’s /Applications/XAMPP/htdocs.
Ensure that the Apache and MySQL servers are still running.
Open your browser and enter the following URL:
http://localhost:8080/phpapptest.php
You may need to modify the TCP port in the URL to match your web server.
Observe the output in the web page.
Open the MySQL command-line interface again and add some new data records.
Create a new bowler, along with some new games scores.
Refresh the browser window and observe the output.
Stop the Apache and MySQL servers, close out the XAPP Control Panel, and close your browser when you're done.
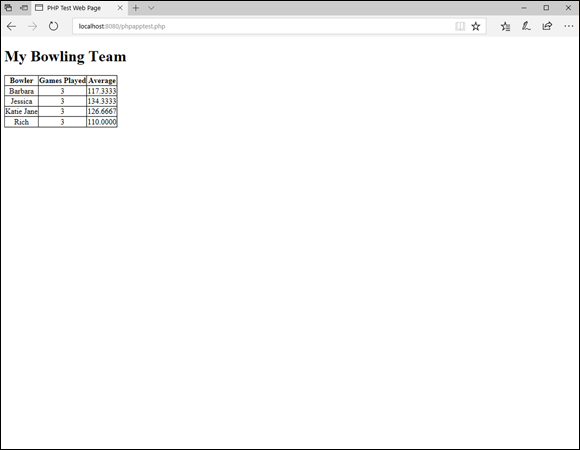
Figure 5-1 shows the results that you should have seen in your browser window.
FIGURE 5-1: The output from the phpapptest.php program.
The PHP code first submitted a SELECT statement to retrieve the bowlerid and name data field values for each bowler in the Bowlers table:
$query = "SELECT bowlerid, name FROM bowlers ORDER BY name";
Then the code iterates through that result set using the fetch_assoc() method:
while($row = $result->fetch_assoc()) {
For each iteration in the Bowlers table, the code submits another SELECT statement, using the MySQL COUNT() and AVG() built-in functions to determine the number of data records for the bowler, and the average of the score data field values:
$query2 = "SELECT COUNT(score) AS games, AVG(score) AS average FROM games" . " WHERE bowlerid = $bowlerid";
Remember that the dot at the end of the statement is the string concatenation operator, so you can split this long SQL statement into two lines to make it easier to read.
Because this SELECT statement returns only one data record for each bowler, you don't need to iterate through the result set, because there’s just one data record in the result set. The code uses the fetch_assoc() function to retrieve the data field values (notice that it uses the alias names assigned to the data fields in the SELECT statement) and uses the echo statement to output the table row HTML code with the embedded data. Fancy!
 Examining the PHP database libraries
 Notice that the names of the procedural functions and object-oriented methods are similar. That holds true for the rest of the functions and methods you'll use in the php_mysqli library, so it’s relatively easy to move back and forth between the two coding methods.
 In both the procedural and object-oriented coding methods, you must enter the user ID and password to connect to the database. Unfortunately, you must do that in plain text. This is a bit of a security risk. If anyone has access to your source code, they could gain access to the database. First, make sure the user ID configured on the MySQL server is locked down to a specific host location (don’t use a wildcard character for the location). The next step is to move the connection statement to an out-of-the-way place, such as in a separate include file; then use the PHP