Chapter 2
Implementing an Object-Oriented Application
IN THIS CHAPTER
 Handling web events
Creating code to work with objects
Test-driving your application
If you’ve just finished reading through Chapter 1 of this minibook, take a moment and take a deep breath! You did a lot of work preparing the database, PHP objects, and the HTML and CSS templates required for the AuctionHelper application. This chapter walks through how to create the rest of the PHP code required to complete the application. First, it walks through the overall layout of the AuctionHelper application links and buttons, and discusses how to handle the browser events triggered by them. Those are how your application users interact with the website. Then it goes through all the PHP code required to work with the bidder and item objects that you’ve already created. Finally, the chapter finishes off by discussing how to test out an application to ensure things are working correctly.
Working with Events
Web-based applications use what’s called event-driven programming. In event-driven programming, the flow of the program is based on events that the program user generates from the user interface. The program displays the user interface, and then waits and listens for an event to occur. As the program user clicks each link or button on the web page, the application runs different sets of include files to generate the content that it displays in the main web page sections.
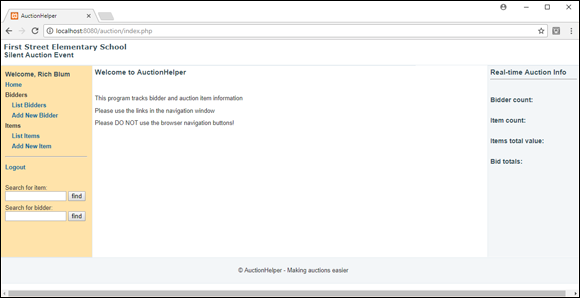
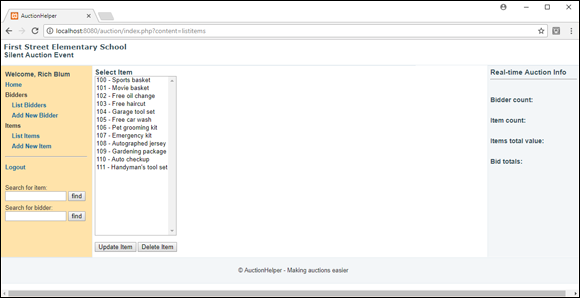
Figure 2-1 refreshes your memory on just what the main AuctionHelper web page looks like when the user logs into the application.
From the main page, the links and buttons in the navigation area (the section on the left side of the web page) control the application events. There are four links available:
- List bidders
- Add new bidder
- List items
- Add new item
And below those are two search text boxes:
- Search for items
- Search for a specific bidder
Each event, whether a link or a button, creates a new request from the user’s browser to the web server, which then passes the index.php file to the PHP server for processing, along with the content HTML variable and value. The following sections discuss how to create the PHP code to handle those events.
Bidder Object Events
This section walks through the PHP code you need to create to respond to the bidder-oriented events in the navigation menu. This allows you to add, change, and delete bidders, as well as display information about what items a specific bidder has won in the silent auction.
Listing bidders
When your application user clicks the List Bidders link in the navigation menu (see Figure 2-1), the link URL passes the user's browser to the index.php main file and sets the content HTML variable to a value of listbidders in the link URL:
<a href="index.php?content=listbidders">
The code in the index.php file tells the PHP server to retrieve the listbidders.inc.php include file for the main content section. You need to create the listbidders.inc.php code file to display a list of the current bidders in the Bidders table.
Follow these steps to create the listbidders.inc.php file:
- Open your favorite text editor, program editor, or integrated development environment (IDE) package.
- Enter the following code:
<?php
echo "<script language=\"javascript\">\n";
echo "function listbox_dblclick() {\n";
echo "document.bidders.displaybidder.click() }\n";
echo "</script>\n";
echo "<script language=\"javascript\">\n";
echo "function button_click(target) {\n";
echo "if(target==0) bidders.action=\"index.php?content=displaybidder\"\n";
echo "if(target==1) bidders.action=\"index.php?content=removebidder\"\n";
echo "if(target==2) bidders.action=\"index.php?content=updatebidder\"\n";
echo "}\n";
echo "</script>\n";
echo "<h2>Select Bidder</h2>\n";
echo "<form name=\"bidders\" method=\"post\">\n";
echo "<select ondblclick=\"listbox_dblclick()\" name=\"bidderid\" size=\"20\">\n";
$bidders = Bidder::getBidders();
foreach($bidders as $bidder) {
$bidderid = $bidder->bidderid;
$name = $bidderid . " - " . $bidder->lastname . ", " . $bidder->firstname;
echo "<option value=\"$bidderid\">$name</option>\n";
}
echo "</select><br><br>\n";
echo "<input type=\"submit\" onClick=\"button_click(0)\" " .
"name=\"displaybidder\" value=\"View Bidder\">\n";
echo "<input type=\"submit\" onClick=\"button_click(1)\" " .
"name=\"deletebidder\" value=\"Delete Bidder\">\n";
echo "<input type=\"submit\" onClick=\"button_click(2)\" " .
"name=\"updatebidder\" value=\"Update Bidder\">\n";
echo "</form>\n";
?>
- Save the file in the
auction folder you created in the DocumentRoot folder of your web server as listbidders.inc.php.
The listbidders.inc.php code generates the web page shown in Figure 2-2.
 In Figure 2-2, you'll notice that I placed some bidders into the Bidders table ahead of time so that I could test out the program. It’s always a good idea to have some test data on hand so you can see your application working as you build it. You can remove the test data when your application goes live.
The listbidders web page displays a list box of all the bidders in the Bidders table and then three buttons:
- View Bidder: Displays information on the bidder selected in the list box.
- Delete Bidder: Removes the bidder selected in the list box from the Bidders table.
- Update Bidder: Displays a form to update the information in the bidders table for the bidder selected in the list box.
Users trigger events on the web page in two ways: by clicking one of the three buttons, or by double-clicking a bidder in the list box.
In the listbidder.inc.php code, the first section of the code defines two JavaScript functions for handling the web page events:
listbox_dblclick(): Triggers when the application user double-clicks a bidder in the list box. It simulates pressing the View Bidder button, which requests the index.php page with the content HTML variable set to displaybidders.button_click(): Triggers when any of the three buttons is clicked. It dynamically changes the action attribute in the <form> element to redirect the browser to one of three include files, based on which button the user clicks.
Next, the PHP code creates the <select> list box of bidders by calling the getBidders() static method from the Bidder class. It uses each Bidder object returned by the getBidders() method to create each entry in the list box.
Finally, the code creates three buttons to view, delete, or update a bidder data record. These buttons use the button_click() JavaScript function that was defined. The three buttons redirect three actions to take on a specific bidder entry:
- The View Bidder button redirects to the
displaybidder.inc.php include file.
- The Delete Bidder button redirects to the
removebidder.inc.php include file.
- Update Bidder button redirects to the
updatebidder.inc.php include file.
Now you have three more include files to code! These are described in the following sections.
Viewing a bidder
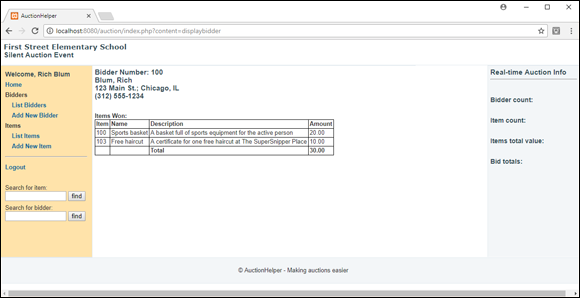
When your application user clicks the View Bidder button or double-clicks a bidder from the list box, the code retrieves the displaybidder.inc.php include file code, passing the bidderid value for the bidder the user selects from the list box. The displaybidder.inc.php code displays the bidder data record from the Bidders table and lists any items in the Items table that the bidder has won (where the item winbidder value matches the bidderid value).
Follow these steps to create the displaybidder.inc.php file:
- Open your editor and enter this code:
<?php
if (!isset($_REQUEST['bidderid']) OR (!is_numeric($_REQUEST['bidderid'])))
{
echo "<h2>You did not select a valid bidderid to view.</h2>\n";
echo "<a href=\"index.php?content=listbidders\">List bidders</a>\n";
} else
{
$bidderid = $_REQUEST['bidderid'];
$bidder = Bidder::findBidder($bidderid);
if ($bidder) {
echo $bidder;
echo "<br><br>\n";
// List items won
$items = Item::getItemsbyBidder($bidderid);
if ($items) {
echo "<b>Items Won:</b><br>\n";
echo "<table>\n";
echo "<tr><td><b>Item</b></td><td><b>Name</b></td>" .
"<td><b>Description</b></td><td><b>Amount</b></td></tr>\n";
$itemtotal = 0;
foreach($items as $item) {
printf("<tr><td>%s</td>", $item->itemid);
printf("<td>%s</td>",$item->name);
printf("<td>%s</td>", $item->description);
printf("<td>%.2f</td></tr>\n", $item->winprice);
$itemtotal = $itemtotal + $item->winprice;
}
echo "<tr><td/><td/><td><b>Total</b></td>";
printf("<td><b>%.2f</b></td></tr>\n", $itemtotal);
echo "</table>\n";
} else {
echo "<h2>There are no items won at this time</h2>\n";
}
} else {
echo "<h2>Sorry, bidder $bidderid not found</h2>\n";
}
}
?>
- Save the file in the
auction folder as displaybidder.inc.php.
The displaybidder.inc.php code generates the web page shown in Figure 2-3.
The displaybidder.inc.php code uses the bidderid value in the findBidder() static method to retrieve the information for the specific bidder. It then uses the bidderid in the getItemsbyBidder() static method from the Items class to retrieve all the items associated with the bidder's bidderid value.
The getItemsbyBidder() method returns the list of matching items as an array of Item objects, so the code uses the foreach statement to iterate through each item and display its properties. That provides all the bidder information in one handy web page, making it a breeze for volunteers to check out bidders at the end of the silent auction!
Deleting a bidder
When the application user clicks the Delete Bidder button from the bidders list, that triggers the removebidder.inc.php include file. Follow these steps to build that file:
- Open your editor and enter this code:
<?php
if (isset($_SESSION['login'])) {
$bidderid = $_POST['bidderid'];
$bidder = Bidder::findBidder($bidderid);
$result = $bidder->removeBidder();
if ($result)
echo"<h2>Bidder $bidderid removed</h2>\n";
else
echo "<h2>Sorry, problem removing bidder $bidderid</h2>\n";
} else {
echo "<H2>Please login first</h2>\n";
}
?>
- Save the file in the
auction folder as removebidder.inc.php.
That wasn't too difficult! The removebidder.inc.php code first checks to make sure the user is really logged in and then retrieves the bidderid value that the listbidder.inc.php code passed using the POST method. It finds the associated Bidder object using the findBidder() method, and then runs the removeBidder() method for that object.
Updating a bidder
When the application user clicks the Update Bidder button from the bidders list, that triggers the updatebidder.inc.php file. Follow these steps to build that file:
- Open your editor and enter this code:
<?php
$bidderid = $_POST['bidderid'];
$bidder = Bidder::findBidder($bidderid);
if ($bidder) {
echo "<h2>Update Bidder $bidderid</h2><br>\n";
echo "<form name=\"bidder\" action=\"index.php\" method=\"post\">\n";
echo "<table>\n";
echo "<tr><td>BidderID</td><td>$bidder->bidderid</td></tr>\n";
echo "<tr><td>Last Name</td><td><input type=\"text\" name=\"lastname\" " .
"value=\"$bidder->lastname\"></td></tr>\n";
echo "<tr><td>First Name</td><td><input type=\"text\" " .
"name=\"firstname\" value=\"$bidder->firstname\"></td></tr>\n";
echo "<tr><td>Address</td><td><input type=\"text\" " .
"name=\"address\" value=\"$bidder->address\"></td></tr>\n";
echo "<tr><td>Phone</td><td><input type=\"text\" " .
"name=\"phone\" value=\"$bidder->phone\"></td></tr>\n";
echo "</CDATAtable><br><br>\n";
echo "<input type=\"submit\" name=\"answer\" value=\"Update Bidder\">\n";
echo "<input type=\"submit\" name=\"answer\" value=\"Cancel\">\n";
echo "<input type=\"hidden\" name=\"bidderid\" value=\"$bidderid\">\n";
echo "<input type=\"hidden\" name=\"content\" value=\"changebidder\">\n";
echo "</form>\n";
} else {
echo "<h2>Sorry, bidder $bidderid not found</h2>\n";
}
?>
<script language="javascript">
document.bidder.lastname.focus();
document.bidder.lastname.select();
</script>
- Save the file in the
auction folder as updatebidder.inc.php.
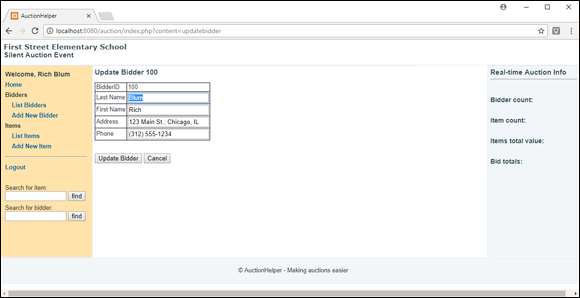
The updatebidder.inc.php include file generates the web page shown in Figure 2-4.
The updatebidder.inc.php code retrieves the bidder based on the bidderid value and creates a form using the Bidder object properties as the default values for the form text fields. The application user can modify any of the text field values and then click the Update Bidder button to save the changes.
The form calls the changebidder.inc.php file to submit the form data to the MySQL database. Follow these steps to create that file:
- Open your editor and enter this code:
<?php
if (isset($_SESSION['login'])) {
$bidderid = $_POST['bidderid'];
$answer = $_POST['answer'];
if ($answer == "Update Bidder") {
$bidder = Bidder::findBidder($bidderid);
$bidder->bidderid = $_POST['bidderid'];
$bidder->lastname = $_POST['lastname'];
$bidder->firstname = $_POST['firstname'];
$bidder->address = $_POST['address'];
$bidder->phone = $_POST['phone'];
$result = $bidder->updateBidder();
if ($result) {
echo "<h2>Bidder $bidderid updated</h2>\n";
} else {
echo "<h2>Problem updating bidder $bidderid</h2>\n";
}
} else {
echo "<h2>Update Canceled for bidder $bidderid</h2>\n";
}
} else {
echo "<h2>Please login first</h2>\n";
}
?>
- Save the file in the
auction folder as changebidder.inc.php.
The changebidder.inc.php code first checks to make sure the login session cookie exists to ensure the user has properly logged into the application. It then retrieves the $_POST['answer'] value. This determines which button in the form the user selected (either to proceed with the update or cancel the update). If the user clicked the Update button, the code retrieves the bidderid value and uses the findBidder() static method to retrieve the data record from the Bidders table. It then retrieves the rest of the form data using the $_POST[] array variable and updates the Bidder object properties with the new data. Finally, the code uses the updateBidder() method to commit the new values to the database.
Adding a new bidder
When the application user clicks the navigation link to add a new bidder, that triggers the newbidder.inc.php include file. Follow these steps to build that file:
- Open your editor and enter this code:
<h2>Enter new bidder information</h2>
<form name="newbidder" action="index.php" method="post">
<CDATAtable cellpadding="1" border="0">
<tr><td>Bidder ID:</td><td><input type="text" name="bidderid" size="4">
</td></tr>
<tr><td>Last name:</td><td><input type="text" name="lastname" size="20">
</td></tr>
<tr><td>First name(s):</td><td><input type="text" name="firstname" size="50">
</td></tr>
<tr><td>Address:</td><td><input type="text" name="address" size="75">
</td></tr>
<tr><td>Phone:</td><td><input type="text" name="phone" size="12">
</td></tr>
</CDATAtable><br>
<input type="submit" value="Submit new Bidder">
<input type="hidden" name="content" value="addbidder">
</form>
<script language="javascript">
document.newbidder.bidderid.focus();
document.newbidder.bidderid.select();
</script>
- Save the file in the
auction folder as newbidder.inc.php.
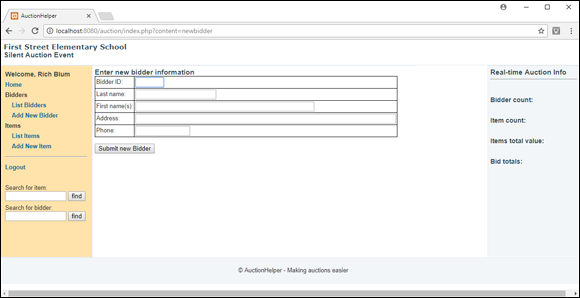
The newbidder.inc.php include file generates the web page shown in Figure 2-5.
The newbidder.inc.php code simply creates a form to enter the information for a new bidder.
The JavaScript code at the end of the newbidder.inc.php file forces the browser to place the cursor in the bidder data field by default. That's a small feature that goes a long way in making your web forms more user-friendly!
When the application user clicks the Submit New Bidder button, it triggers the addbidder.inc.php include file. Follow these steps to create that file:
- Open your editor and enter this code:
<?php
if (isset($_SESSION['login'])) {
$bidderid = $_POST['bidderid'];
if ((trim($bidderid) == '') OR (!is_numeric($bidderid)))
{
echo "<h2>Sorry, you must enter a valid bidder ID number</h2>\n";
} else
{
$lastname = $_POST['lastname'];
$firstname = $_POST['firstname'];
$address = $_POST['address'];
$phone = $_POST['phone'];
$bidder = new Bidder($bidderid,$lastname,$firstname,$address,$phone);
$result = $bidder->saveBidder();
if ($result)
echo "<h2>New Bidder #$bidderid successfully added</h2>\n";
else
echo "<h2>Sorry, there was a problem adding that bidder</h2>\n";
}
} else {
echo "<h2>Please log in first</h2>\n";
}
?>
- Save the file in the
auction folder as addbidder.inc.php.
The addbidder.inc.php code first checks to make sure the user is properly logged in. Then it retrieves the bidderid and makes sure the value isn't empty and that it’s a valid number. It then retrieves the rest of the form data posted by the newbidder.inc.php form and uses it to create a new Bidder object. Finally, it uses the saveBidder() method from the Bidder object to store the new bidder information as a data record in the Bidders table.
Searching for a bidder
The List Bidders feature allows you to access all the bidders, but if your silent auction event is a success, you may have hundreds of bidders to have to look through to find a single bidder! To solve that problem, it helps to have a search text box to find a specific bidder based in the bidderid assigned to the bidder. That's built into the navigation menu nav.inc.php file with this code:
<form action="index.php" method="post">
<label>Search for bidder:</label><br>
<input type="text" name="bidderid" size="14" >
<input type="submit" value="find" >
<input type="hidden" name="content" value="displaybidder">
</form>
When your application user enters a bidderid value into the Bidder search text box and clicks the find button, the navigation action triggers the displaybidder.inc.php include file passing the bidderid value. Because it uses the same displaybidder.inc.php code you've already created for the list bidders feature, you’ve already done the coding to complete the bidder search feature!
Item Object Events
This section walks through the PHP code you need to respond to the item-oriented events in the navigation menu. These events allow you to add, change, delete, and view items tracked for the silent auction.
Listing items
When your application user clicks the List Items link in the navigation window, it triggers the listitems.inc.php include file based on the link URL:
<a href="index.php?content=listitems">
Just as when you were working with bidders, the listitems.inc.php include file code creates a list box with the current Items table data records, along with three buttons to trigger events to view, delete, and update a specific item. Follow these steps to create the listitems.inc.php file:
- Open your editor and enter this code:
<?php
echo "<script language=\"javascript\">\n";
echo "function listbox_dblclick() {\n";
echo "document.items.updateitem.click() }\n";
echo "</script>\n";
echo "<script language=\"javascript\">\n";
echo "function button_click(target) {\n";
echo "if(target==0) " .
"document.items.action=\"index.php?content=removeitem\"\n";
echo "if(target==1) " .
" document.items.action=\"index.php?content=updateitem\"\n";
echo "}\n";
echo "</script>\n";
echo "<h2>Select Item</h2>\n";
echo "<form name=\"items\" method=\"post\">\n";
echo "<select ondblclick=\"listbox_dblclick()\" " .
"name=\"itemid\" size=\"20\">\n";
$items= Item::getItems();
foreach($items as $item) {
$itemid = $item->itemid;
$name = $item->name;
$option = $itemid . " - " . $name;
echo "<option value=\"$itemid\">$option</option>\n";
}
echo "</select><br><br>\n";
echo "<input type=\"submit\" onClick=\"button_click(0)\" " .
"name=\"deleteitem\" value=\"Delete Item\">\n";
echo "<input type=\"submit\" onClick=\"button_click(1)\" " .
"name=\"updateitem\" value=\"Update Item\">\n";
echo "</form>\n";
?>
- Save the file in the
auction folder as listitems.inc.php.
The listitems.inc.php code generates the web page shown in Figure 2-6.
You should recognize the similarities with the listbidders.inc.php code. The listitems.inc.php code creates the two JavaScript functions for handling the web page events, displays the items table data records in a list box, and then displays two buttons:
- Delete Item: Removes an item data record from the Items table.
- Update Item: Updates an existing item data record in the Items table.
The form works similar to the listbidders.inc.php code. However, you don't need an event to display an item, because that’s not a requirement for the application (see Chapter 1 of this minibook for the application requirements).
If the user double-clicks an item in the list or clicks the Update Item button, that triggers the updateitem.inc.php code. If the user clicks the Delete Item button, that triggers the removeitem.inc.php code. These files are described in the next sections.
Deleting an item
The removeitem.inc.php code works the same way as the removebidder.inc.php code does. It retrieves the item ID of the item the user selects in the list box and then uses it to delete the associated data record in the Items table. Follow these steps to create the removeitem.inc.php code:
- Open your editor and enter the following code:
<?php
if (isset($_SESSION['login'])) {
$itemid = $_POST['itemid'];
$item = Item::findItem($itemid);
$result = $item->removeItem();
if ($result)
echo"<h2>Item $itemid removed</h2>\n";
else
echo "<h2>Sorry, problem removing item $itemid</h2>\n";
} else {
echo "<h2>Please login first</h2>\n";
}
?>
- Save the file in the
auction folder as removeitem.inc.php.
The removeitem.inc.php include file code checks to make sure the user is properly logged in. Then it retrieves the itemid value passed to it. It uses that itemid value in the findItem() static method to retrieve the Item object and then the removeItem() method to remove the item data record from the Items table.
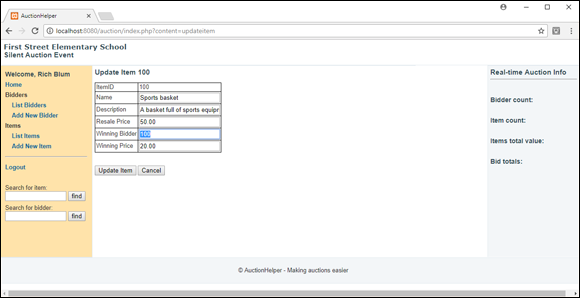
Updating an item
When the application user either double-clicks an item entry in the list box or selects an entry from the list box and clicks the Update Item button, those events trigger the updateitem.inc.php include file. Follow these steps to create that file:
- Open your editor and enter the following code:
<?php
if (!isset($_POST['itemid']) OR (!is_numeric($_POST['itemid']))) {
echo "<h2>You did not select a valid itemid value</h2>\n";
echo "<a href=\"index.php?content=listitems\">List items</a>\n";
} else {
$itemid = $_POST['itemid'];
$item = Item::findItem($itemid);
if ($item) {
echo "<h2>Update Item $item->itemid</h2><br>\n";
echo "<form name=\"items\" action=\"index.php\" method=\"post\">\n";
echo "<CDATAtable>\n";
echo "<tr><td>ItemID</td><td>$item->itemid</td></tr>\n";
echo "<tr><td>Name</td><td><input type=\"text\" name=\"name\" ".
"value=\"$item->name\"></td></tr>\n";
echo "<tr><td>Description</td><td><input type=\"text\" " .
"name=\"description\" value=\"$item->description\"></td></tr>\n";
echo "<tr><td>Resale Price</td><td><input type=\"text\" " .
"name=\"resaleprice\" value=\"$item->resaleprice\"></td></tr>\n";
echo "<tr><td>Winning Bidder</td><td><input type=\"text\" " .
"name=\"winbidder\" value=\"$item->winbidder\"></td></tr>\n";
echo "<tr><td>Winning Price</td><td><input type=\"text\" " .
"name=\"winprice\" value=\"$item->winprice\"></td></tr>\n";
echo "</CDATAtable><br><br>\n";
echo "<input type=\"submit\" name=\"answer\" " .
"value=\"Update Item\">\n";
echo "<input type=\"submit\" name=\"answer\" value=\"Cancel\">\n";
echo "<input type=\"hidden\" name=\"itemid\" value=\"$itemid\">\n";
echo "<input type=\"hidden\" name=\"content\" value=\"changeitem\">\n";
echo "</form>\n";
} else {
echo "<h2>Sorry, item $itemid not found</h2>\n";
echo "<a href=\"index.php?content=listitems\">List items</a>\n";
}
}
?>
<script language="javascript">
document.items.winbidder.focus();
document.items.winbidder.select();
</script>
- Save the file in the
auction folder as updateitem.inc.php.
The updateitem.inc.php include file generates the web page shown in Figure 2-7.
The updateitem.inc.php code retrieves the itemid value passed to it and then uses the findItem() static method to retrieve the item's data record from the Items table. It uses the item properties to populate the form, which then allows the user to change any of the item property values.
The last part of the code file adds a JavaScript section to the web page to set the default cursor location for the form. Note, however, that it doesn’t set the cursor at the itemid data field. Instead, it sets the cursor at the winbidder data field:
<script language="javascript">
document.items.winbidder.focus();
document.items.winbidder.select();
</script>
As the silent auction event ends, the volunteers will need to rush to enter the winning bidder information for each item. This helps out a bit by ensuring the updateitem form opens with the cursor in the winning bidder form field so all the volunteers need to do is enter the winning bidder number and the winning bid value!
When the application user clicks the Submit button, the form passes the updated data to the changeitem.inc.php include file. Follow these steps to create that file:
- Open your editor and enter the following code:
<?php
if (isset($_SESSION['login'])) {
$itemid = $_POST['itemid'];
$answer = $_POST['answer'];
if ($answer == "Update Item") {
$item = Item::findItem($itemid);
$item->itemid = $_POST['itemid'];
$item->name = $_POST['name'];
$item->description = $_POST['description'];
$item->resaleprice = $_POST['resaleprice'];
$item->winbidder = $_POST['winbidder'];
$item->winprice = $_POST['winprice'];
$result = $item->updateItem();
if ($result) {
echo "<h2>Item $itemid updated</h2>\n";
} else {
echo "<h2>Problem updating item $itemid</h2>\n";
}
} else {
echo "<h2>Update Canceled for item $itemid</h2>\n";
}
} else {
echo "<h2>Please login first</h2>\n";
}
?>
- Save the file in the
auction folder as changeitem.inc.php.
The changeitem.inc.php code first checks to make sure the user is properly logged in. Then it retrieves the $_POST['answer'] value to determine if the user canceled the update or not. If the user clicked the Update button, the code retrieves the itemid, uses the findItem() static method to retrieve the item's data as an Item object, changes the item’s properties using the retrieved form data, and uses the updateItem() method to update the existing data record in the Items table.
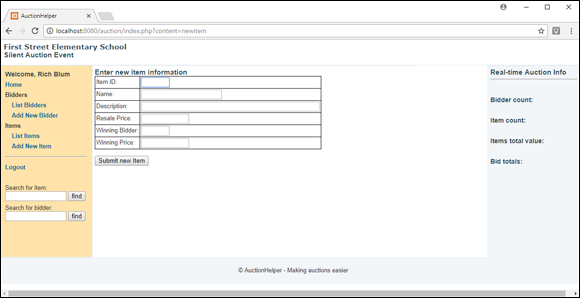
Adding a new item
Are you starting to get the hang of things now? The application is just a series of events, and you just need to create the PHP include files tied to the individual events to perform the task associated with the event. That's the core of dynamic web applications!
When the application user clicks the link to add a new item from the navigation menu (see Figure 2-1), the link points to the main index.php file, setting the content HTML variable to newitem:
<a href="index.php?content=newitem">
That means you now need to code the newitem.inc.php include file. Follow these steps to do that:
- Open your editor and enter the following code:
<h2>Enter new item information</h2>
<form name="newitem" action="index.php" method="post">
<CDATAtable cellpadding="1" border="0">
<tr><td>Item ID:</td><td><input type="text" name="itemid" size="4">
</td></tr>
<tr><td>Name:</td><td><input type="text" name="name" size="20">
</td></tr>
<tr><td>Description:</td><td><input type="text" name="description" size="50">
</td></tr>
<tr><td>Resale Price:</td><td><input type="text" name="resaleprice" size="10">
</td></tr>
<tr><td>Winning Bidder:</td><td><input type="text" name="winbidder" size="4">
</td></tr>
<tr><td>Winning Price:</td><td><input type="text" name="winprice" size="10">
</td></tr>
</table><br>
<input type="submit" value="Submit new Item">
<input type="hidden" name="content" value="additem">
</form>
<script language="javascript">
document.newitem.itemid.focus();
document.newitem.itemid.select();
</script>
- Save the file in the
auction folder as newitem.inc.php.
The newitem.inc.php code generates the web page shown in Figure 2-8.
The newitem.inc.php code generates the form that users use to add a new item. When the user clicks the Submit button, that triggers the additem.inc.php file. Follow these steps to create that file:
- Open your editor and enter the following code:
<?php
if (isset($_SESSION['login'])) {
$itemid = $_POST['itemid'];
if ((trim($itemid) == '') OR (!is_numeric($itemid)))
{
echo "<h2>Sorry, you must enter a valid item ID number</h2>\n";
} else
{
$name = $_POST['name'];
$description = $_POST['description'];
$resaleprice = $_POST['resaleprice'];
$winbidder = $_POST['winbidder'];
$winprice = $_POST['winprice'];
$item = new Item($itemid, $name, $description, $resaleprice,
$winbidder, $winprice);
$result = $item->saveItem();
if ($result)
echo "<h2>New Item #$itemid successfully added</h2>\n";
else
echo "<h2>Sorry, there was a problem adding that item</h2>\n";
}
} else {
echo "<h2>Please login first</h2>\n";
}
?>
- Save the file in the
auction folder as additem.inc.php.
The additem.inc.php code first checks to make sure the user is properly logged in. Then it retrieves the itemid and makes sure the value isn't empty and that it’s a valid number. It then retrieves the rest of the form data posted by the newitem.inc.php form and uses it to create a new Item object. Finally, it uses the saveItem() method from the Item object to store the new item information as a data record in the Bidders table.
Searching for an item
Just as with bidders, a successful silent auction event could potentially contain hundreds of separate items for auction! When it comes time to assigning the winning bidder and price to an auction item, you won't want the auction volunteers to have to hunt through the list box of items looking for the one item to update. This is where the search box comes in handy.
The navigation section includes the HTML code to create a simple search text box for items:
<form action="index.php" method="post">
<label>Search for item:</label><br>
<input type="text" name="itemid" size="14" >
<input type="submit" value="find" >
<input type="hidden" name="content" value="updateitem">
</form>
The form retrieves the itemid value from the text box and sets the content HTML variable to updateitem to pass to the index.php file. This combination passes the itemid value to the updateitem.inc.php file, which you've already created.
Logging Out of a Web Application
So far, the application has controlled access to major features (such as adding and updating bidders and items) by checking for the existence of the login session cookie. As long as the volunteer keeps the browser window open, when he or she logs in the session will remain active, and the application will allow the user full control of the data.
The session will end when the browser is closed, but sometimes customers prefer to see an actual Logout feature to ensure that they’ve properly logged out from the application and that no one can come by later and gain unauthorized access to the application. It’s always a good idea to include a logout feature in your dynamic web applications.
In the AuctionHelper program, the Logout link is included as part of the navigation menu:
<tr><td><a href="index.php?content=logout">
<strong>Logout</strong></a></td></tr>
This link sets the content HTML variable to the value logout, which triggers the index.php file to include the logout.inc.php include file. This is the last file you'll need to create to complete the application! Follow these steps to do that:
- Open your editor to a new window and enter the following code:
<?php
if (isset($_SESSION['login']))
{
unset($_SESSION['login']);
}
header("Location: index.php");
?>
- Save the file in the
auction folder as logout.inc.php.
- You can finally close out your editor — you're done coding for this project!
The logout.inc.php include file first checks to make sure the login session cookie exists, and if it does, it uses the unset() function to remove it. This doesn't stop the session, but it removes the session cookie the application uses to detect if the user is logged in.
The header() function may take some explanation:
header("Location: index.php");
The header() PHP function sends an HTTP header message to the browser. The Location message instructs the browser to redirect to the specified URL. In this case, the code redirects the browser back to the index.php file, which causes the browser to repaint the main web page. This time, though, since the login session cookie is gone, the main web page will display the login form.
 The PHP server must send any HTTP messages generated by the
 header() function before any HTML code. Because this application uses the header() function in an include file, that won't be the case. What allows you to do this is the output_buffer setting in the PHP server. If you enable that setting in the php.ini configuration file, the PHP server buffers all output from the program. Then it sends all the output in one stream. The output buffer is smart and will rearrange any HTTP messages to the front of the buffer, sending them first.
Testing Web Applications
Congratulations! If you've been following along with the code in these last two chapters, you’ve just completed a full-featured dynamic web application to track silent auction data. However, the development work doesn’t stop after you’ve designed the website and created the code. You must ensure that things work correctly before handing the application over to your customer.
That process involves testing. There are generally four levels of testing that you can perform with dynamic web applications. From lowest to highest, they are as follows:
- Unit testing: Perform tests on individual sections of code to ensure that there are no syntax or logic errors.
- Integration testing: Perform tests on passing data between different sections of code to ensure that there is no data mismatch.
- System testing: Perform tests on the entire website to ensure that all the functionality works correctly and nothing is missing.
- Acceptance testing: Your customer tests the website to ensure that it works as he or she specified and that he or she understands the user interface.
In PHP applications, you often perform the unit testing as part of each include file that you create to respond to events. Ensure that when you click a link in the web page, the proper include file triggers and that it performs its job correctly.
When you perform unit testing, watch for PHP warnings as well as errors. Warnings may not adversely affect the outcome of the application, but it’s poor programming practice to misuse PHP code, even if it doesn’t cause a fatal error.
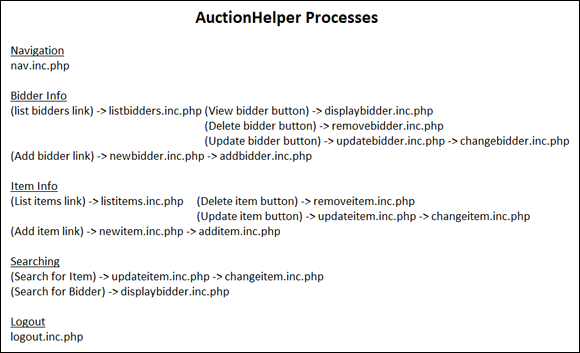
Integration testing with include files can get somewhat tricky. It’s easy to get lost in a sea of include files, even in a small application like AuctionHelper. It often helps to draw a process map, showing which include files are triggered by events and which include files rely on other include files. Figure 2-9 shows a simple process diagram for the include files used in the AuctionHelper application.
In situations where a function relies on two separate include files (such as passing new bidder information from the newbidder.inc.php include file to the addbidder.inc.php include file), integration testing must ensure that all the data values are passed correctly.
System testing requires that you (or better yet, someone else) walk through the entire application from start to finish. Every link and button event must function correctly, producing proper content on the web pages. The system testing often refers back to the original feature requirements that were defined by the customer, ensuring that each of the requirements is met by the applications.
Finally, you’re ready to turn your creation over to the customer for acceptance testing. It often helps to have a checklist handy for each of the requirement features, to ensure that the customer doesn’t forget to test all the features of the application. If you’re also required to create a user guide for the application, this is also a good place to test that out as well!
With all that, there’s still one final feature that you haven’t implemented from the original requirements. If you remember from Chapter 1 of this minibook, one of the original requirements was to provide real-time statistics for the auction totals. You created an area to display the data, but you didn’t actually create the data. That requires some JavaScript tricks that you haven’t seen yet, so I saved that for another chapter.