The previous two chapters in this minibook walk through the AuctionHelper application, a dynamic web application used to support a silent auction. There is one requirement for that project that I haven’t covered yet — the ability to update web pages with real-time data. To do that requires a little more than just PHP or even just JavaScript. It requires using a new technology that combines both languages! This chapter discusses just what that technology is and how to produce dynamic content on a web page without having to reload the web page, a great feature to include in your web applications!
Getting to Know AJAX
One of the newest technologies to hit dynamic web programming is Asynchronous JavaScript and XML (called AJAX). This name doesn’t refer to either the household cleaner or the figure in Greek mythology. It also doesn’t refer to a new type of programming language.
Instead, AJAX refers to a method of combining several existing web languages and standards to produce dynamic content on a web page. AJAX utilizes the following technologies:
JavaScript: To communicate with a web server “behind the scenes” in an existing web page in the browser
A server-side programming language: To retrieve the dynamic content from the application database
Extensible Markup Language (XML): To safely transfer the dynamic content back to the browser
HTML and CSS: To place the dynamic content on the web page and assign styles and positioning to it
Document Object Model (DOM): To reference locations on a web page to place the dynamic content
Trying to picture just how all these piece fit together can be a bit confusing. Figure 3-1 shows a rough diagram of how this all works.
The first step in AJAX is for JavaScript code embedded within the web page to establish an HTTP connection with a web server to retrieve a specific web page. The web page can be a static HTML file, but more often it utilizes a server-side programming language, such as PHP, to retrieve data from an application database to return to the JavaScript client program.
In AJAX, data retrieved from the server is usually formatted using the XML standard to send back to the browser, although that’s not a requirement. Data can be sent using any formatting standard, or even just in plain text. Recently the JavaScript Object Notation (JSON) format has become increasingly popular to use as a method to format data in AJAX implementations.
When the JavaScript code in the browser receives the new data, it uses HTML and CSS to place and style the new content, usually using DOM manipulation to place the data in the existing web page that’s displayed in the browser. All this happens behind the scenes of an existing web page while the website visitor is viewing it!
The key to AJAX is the creation of a special JavaScript object that can communicate with web servers. The next section discusses just what that is.
Communicating Using JavaScript
Allowing JavaScript code to run in a web page and communicate directly with a web server has revolutionized dynamic web applications. This feature actually isn’t all that new. Microsoft introduced the feature with the XMLHTTP ActiveX object way back in Internet Explorer version 5.
The XMLHTTP object allowed you to specify a URL to connect to a web server using HTTP and retrieve the web page content that the server returned. Although it's simplistic, this started a revolution that has changed the face of dynamic web applications!
The downside was that Microsoft controlled the standard, and other browsers were reluctant to incorporate it. Soon, though, a JavaScript standard was created to support this feature, called the XMLHttpRequest object. The XMLHttpRequest object does what its awkward names says: It sends an HTTP request to a web server and retrieves the response and creates an XML object. The XMLHttpRequest object quickly became popular and is supported by all the major browsers in use today.
This section walks through the methods and properties available in the XMLHttpRequest object and how to use them to communicate with a web server from your own web pages.
Considering XMLHttpRequest class methods
The XMLHttpRequest object contains several class methods to help you control the interaction between the JavaScript program and the web server. Table 3-1 lists the methods available.
Cancels an existing request that is waiting for a response
getAllResponseHeaders()
Retrieves the HTTP header information returned by the web server
getResponseHeader()
Retrieves information from a specific HTTP header
open(method,url,async,user,pass)
Opens a connection to the specified web server
send(string)
Sends a request to the web server
setRequestHeader()
Adds HTML variable/value pairs for the request
There aren't a lot of class methods for the XMLHttpRequest, making it not only powerful, but fairly easy to use! After instantiating a new XMLHttpRequest object, use the open() method to define the connection to the web server and the send() method to send the request to the server:
var con = new XMLHTTPRequest();
con.open("GET", "myprog.php", true);
con.send();
The first parameter of the open() method defines the HTTP request type to use — either the GET method or the POST method. The second parameter defines the URL to send the request to. The third parameter determines if the connection is asynchronous (true) or synchronous (false).
With a synchronous connection, JavaScript will wait at the send() method until it receives a response from the web server. While JavaScript is waiting, the browser won't process any other code or events in the web page. This will make the web page appear frozen, because the user won’t be able to click any links or buttons.
With the asynchronous connection type, JavaScript sends the request and then continues on with the rest of the program. When it receives a response from the web server, it triggers a callback function that you define to handle the response (discussed in the next section). This allows the program code to continue operating while it’s waiting for the server response, which is a much cleaner experience for the web page viewer.
While currently still supported, the synchronous connection type is in the process of being deprecated in the XMLHttpRequest JavaScript standard. It’s good practice to just use the asynchronous connection type for your applications, because that doesn’t have an adverse effect on the web page user interface.
If you define the HTTP request to use the POST method of sending data, you must place the HTML variable/value data pairs as a parameter in the send() method:
con.open("POST", "myprog.php", true);
con.send("id=100&name=rich");
If you prefer to use the GET request method, you can include the HTML variable/value data pairs in the URL:
Some browsers have a limitation on how long the connection URL can be, so for large amounts of data it's better to use the POST method.
After you send the request, you’ll need to retrieve the response from the web server. That requires using a few of the XMLHttpRequest object class properties, discussed next.
Due to the potential for abuse, most browsers restrict the URL that the XMLHttpRequest object can connect to. You can only connect to a URL in the same domain as the original web page that loads the object.
Focusing on XMLHttpRequest class properties
The XMLHttpRequest object contains several class properties that you'll need to know about to handle the HTTP response from the web server. These are shown in Table 3-2.
Defines a callback function that the browser triggers when the HTTP connection changes state
readyState
Contains the connection status of the HTTP connection
responseText
Contains the response sent by the web server in text format
responseXML
Contains the response sent by the web server in XML format
status
Contains the numeric HTTP response code from the web server
statusText
Contains the text HTTP response string from the web server
After you use the send() method to send a connection request to a web server, the HTTP connection process works through five connection states, as tracked by the readyState property:
State 0: The connection has not been initialized.
State 1: The connection to the server has been established.
State 2: The server received the HTTP request message.
State 3: The server is processing the HTTP request.
State 4: The server sent the response.
As the HTTP connection works through these five connection states, the value contained in the readyState property changes. This causes the function you define in the onreadystatechange property to trigger for each state change. When the readyState property contains a value of 4, the final result from the request is available for processing.
When the readyState property value is 4, you know the communication is complete, but you don't know how it turned out. To determine that, you check the HTTP response returned by the web server using the status property. If the status property contains the 200 numeric HTTP result code, that indicates the connection was successful, and any data returned by the web server is available in the responseText and responseXML properties. If the status property contains some other HTTP result code (such as 403 or 404), that indicates there was an error communicating with the web server.
Because these values are standard, it has become somewhat common practice to start out the onreadystatechange callback function code checking for them:
con.onreadystatechange = function() {
if (this.readyState == 4 && this.status == 200) {
var result = this.responseText;
}
};
The function only retrieves the data when the connection is complete and has returned valid data. This method of defining the callback function inline is referred to as creating an anonymous callback function, because you don't define a name for the function. It only exists inside the onreadystatechange property, so you can’t reference it anywhere else in your JavaScript code.
Although using an anonymous function is a popular way of defining the callback function, you can define the function as a standard named JavaScript function and then reference that function name in the onreadystatechange property.
Trying out AJAX
Now that you've seen a little about how AJAX works, let’s walk through an example of using it. For this example, you write some code that dynamically changes the values in a drop-down box based on a selection in another drop-down box on the web page. Follow these steps to get started:
Open your favorite text editor, program editor, or integrated development environment (IDE) package.
As you make a selection in the Make drop-down box, the options available in the Model drop-down box dynamically change. After creating the web page layout, the ajaxcars1.html code uses JavaScript to listen for events from the Make drop-down box. When a change is made to a selection, that triggers the getmodels() JavaScript function.
The getmodels() function uses DOM to retrieve the selection made in the select element:
var make = select.options[select.selectedIndex].value;
Then it passes the selection to the ajaxcars.php program using an XMLHttpRequest object:
var request = new XMLHttpRequest();
var URL = "ajaxcars.php?make=" + make;
request.open("GET", URL);
The ajaxcars.php code returns a simple text string of models, separated by commas, based on the make value it receives. Back at the ajaxcars1.html file, the onreadystatechange callback function retrieves the returned value, converts it into an array, retrieves the options DOM object handle for the Models drop-down box, and then uses the innerHTML DOM property for the model drop-down box to reset and change the options available in the drop-down box. Before your eyes, the drop-down box options change to match the car make you select. Now that's dynamic programming!
Using the jQuery AJAX Library
Unfortunately, using the XMLHttpRequest object is somewhat clunky in JavaScript. There are a lot of parts that you need to have in place and use in the correct order for things to work correctly. The popular jQuery JavaScript library (discussed in Book 3, Chapter 3) comes to our rescue by providing some functions to help simplify using AJAX.
The jQuery $.ajax() function
The $.ajax() function in jQuery allows you to build all the parts for an XMLHttpRequest object at one time in one place. Instead of having to break things down into several different methods and properties, you just fill out a series of key/value pairs to submit in your request and process the response:
$.ajax({
type: 'POST',
url: 'myprog.php',
data: { id: "100", name: "Rich" },
dataType: "XML",
success: function (response) {
var XMLresult = response;
},
error: function(response) {
console.log('Error: ' + response);
}
});
The key/value pairs defined in the function control just how the request works. Table 3-3 shows the different elements available in the $.ajax() function settings.
Defines the MIME data types the request will accept
async
Specifies if the connection is synchronous
beforeSend
Defines a callback method to trigger before the connection request is sent
cache
Prevents the browser from caching the request
complete
Defines the callback method to trigger when the connection is complete
contents
Defines a regular expression to determine how to parse the response
contentType
Defines the Content-type for the data sent to the server
context
Defines the DOM context for all callbacks
converters
Defines content type converters for the response data
crossDomain
Forces a connection to an outside domain
data
Sends data to the server in a POST request
dataFilter
Defines a function to process raw data in the response
dataType
Defines the data type expected in the response
error
Defines a callback function to trigger if the connection fails
global
Triggers global Ajax event handlers
headers
Defines additional HTML header values
ifModified
Returns data only if the response has changed since the last request
isLocal
Allows the current connection if it uses a local resource (such as a local file)
jsonp
Defines a callback function if the connection returns data in JSON format
jsonpCallback
Defines the callback function for a JSON request
method
Defines the HTTP method used for the request (GET or POST)
mimeType
Defines the MIME type used for the response
password
Defines the password if required to access the URL
processData
Bypasses processing the response data
scriptCharset
Sets the charset attribute on the <script> element if the response is a script
statusCode
Returns the HTTP status code for the response
success
Defines a callback function to trigger if the connection succeeds
timeout
Sets the time to wait for a response from the server
traditional
Uses the traditional AJAX parameter serialization method
type
Defines the HTTP request method
url
Defines the URL connection string for the request
username
Defines the username if required to access the URL
xhr
Defines a callback function to create a custom XMLHttpRequest object
xhrFields
Defines the field name/value pairs for the XHR object
Although the $.ajax() function has lots of features that allow you to customize it, most often you'll just need to use a few of them to create a standard connection request and retrieve the response data.
Follow these steps to convert the ajaxcars1.html file to use the $.ajax() function:
Open theajaxcars1.htmlfile you previously created in your editor.
Modify the code to replace theXMLHttpRequestobject with the$.ajax()function.
Save the file asajaxcars2.htmlin theDocumentRootfolder for your web server.
Open your browser and enter the following URL:
http://localhost:8080/ajaxcars2.html
Make a selection from the Make drop-down box, and observe the options available in the Model drop-down box.
The web page generated by the ajaxcars2.html file should work exactly the same as the web page generated by the ajaxcars1.html file. As you make a selection in the Make drop-down box, the options available in the Models drop-down box dynamically change.
Note that to run the ajaxcars2.html file, you need to specify the jQuery library file in a script element. If you haven't downloaded that previously while working in Book 3, Chapter 3, you can download the current jQuery library file from http://jquery.com.
The jQuery $.get() function
The $.ajax() function helps clean up your code a little bit, but there's still a lot of information you need to enter into the settings for the connection to work. As you create different AJAX applications, you’ll notice that many of the settings that you use remain the same from program to program. To help make things easier, the jQuery library contains the $.get() function.
The $.get() function assumes the common setting values used in the $.ajax() function, so that you only need to specify a couple of things:
$.get('myprog.php').done(function(response) {
var result = response;
}).fail(function(response) {
console.log('Error: ' + response);
});
Now that's really making things simple! Follow these steps to modify the ajaxcars2.html file to use the $.get() jQuery function:
Open theajaxcars2.htmlfile in your editor.
Modify the code to replace the$.ajax()function with the$.get()function.
Save the file asajaxcars3.htmlin theDocumentRootfolder for your web server.
Open your browser and enter the following URL:
http://localhost:8080/ajaxcars3.html
Make a selection in the Make drop-down box and observe the options available in the Model drop-down box.
With the $.get() function, you can focus on the code that handles the response without having to worry about all the settings!
Transferring Data in AJAX
The ajaxcars.php server program used in the previous examples sent the response data back to the client browser as a comma-separated string value. That's fine for small amounts of data, but if your application needs to move large amounts of data that can quickly get confusing.
To help organize the data sent back to the browser, the AJAX standard suggests using the XML markup standard. There are many different data formatting standards you could use, for web developers using XML is a popular choice because it’s similar to HTML, so using it isn’t too much of a new learning curve. The following sections discuss the XML standard and how to use it in both your PHP and JavaScript code.
Looking at the XML standard
Similar to HTML, a standard XML document uses element tags to identify each data element in the document. The first element in an XML document identifies the XML standard used. Then that’s followed by the actual data elements:
<?xml version="1.0" encoding="UTF-8"?>
<car>Dodge</car>
Unlike HTML, there are no standard tags used in XML — you can define any tag you want to represent the data in your application! Just as in HTML, you can create levels of data in XML:
<?xml version="1.0" encoding="UTF-8"?>
<car>
<make>Dodge</make>
<model>Challenger</model>
</car>
Because there are no predefined element names in XML, you can create element names and levels as needed for your application. All the same rules for element names that you’re already familiar with in HTML apply to XML:
Element names can contain letters, numbers, hyphens, underscores, and periods.
Element names are case-sensitive.
Element names must start with a letter or underscore.
Element names cannot contain spaces.
Elements must have a matching close tag.
Just like HTML, XML elements also support attributes:
<?xml version="1.0" encoding="UTF-8"?>
<car make="Dodge">
<model>Challenger</model>
</car>
The same rules for element names apply to attribute names. You can also define multiple attributes in a single element. Just separate each attribute/value pair with a space. Also, it’s important to remember that you must enclose the attribute value in quotes.
One of the benefits of using XML is that finding data in an XML document is a breeze. The XML standard uses the same Document Object Model (DOM) as HTML. You use the XML DOM to reference an individual element or attribute contained anywhere within the XML document.
The following sections explain how to use XML to handle data in PHP and JavaScript.
Using XML in PHP
You can manually build all the XML elements to create an XML document as a string value in PHP, but there’s an easier way to do that! PHP includes the DOMDocument object, which allows you to build an XML document as an object. Often, it’s easier to manipulate an object than a string value in the PHP code.
To create a new DOMDocument object, just instantiate the class:
$doc = new DOMDocument("1.0");
The parameter specifies the XML version number PHP uses to create the document. When you create the object, you use the DOMDocument methods to add elements, attributes, and their values. There are quite a few DOMDocument methods available. Table 3-4 shows the methods that you'll most often use to create an XML document.
Adds a new child node to an existing node in the document
createAttribute
Creates a new attribute for an existing element
createElement
Creates a new element node in the document
createTextNode
Creates a text value for an existing element in the document
saveXML
Outputs the DOM document in XML format
As you can see from Table 3-4, it doesn't take all that much code to create an XML document in PHP! Follow these steps to try building an XML document using PHP:
Save the file asxmltest.phpin theDocumentRootfolder for your web server.
Open your browser and then enter the following URL in the browser address bar:
http://localhost:8080/xmltest.php
View the XML code displayed in the browser window.
The Content-type HTTP header tells the browser that the document is an XML document and not an HTML document. That causes the browser to parse the text as an XML document and display the contents.
Setting the Content-type HTTP header is also important when creating an XML document that you pass to the JavaScript XMLHttpRequest object. When JavaScript detects the XML document Content-type, it places the data in the responseXML property instead of the responseText property.
Different browsers display XML files in different formats. Figure 3-3 shows what the output looks like in the Microsoft Edge browser, which does a nice job of formatting the XML document.
FIGURE 3-3: Viewing the XML source code using the Microsoft Edge browser.
The PHP code creates a new DOMDocument object, using the carlot element as the root of the XML tree:
$carlot = $doc->createElement("carlot");
$carlot = $doc->appendChild($carlot);
It then adds two car elements to the document. The first car element contains an attribute named make, with a value of "Dodge":
$car1 = $doc->createElement("car");
$car1 = $carlot->appendChild($car1);
$make1 = $doc->createAttribute("make");
$make1->value = "Dodge";
$car1->appendChild($make1);
It also contains two child elements, both named model, with different text values:
Notice that you can add the text value associated with the node in the createElement method. If you prefer, you can use the createTextNode method to create the text value separately after you create the element.
In XML DOM, the text contained within an element is considered a separate node. This is a significant difference from HTML DOM, where the text is part of the element. This can get confusing when you're trying to traverse an XML DOM tree.
Next the PHP code creates another car element with the make attribute set to "Ford". This car element only has one child element, using the model name. The code then appends the model element as a child node of the second car element.
The saveXML() method completes the process by converting the DOMDocument object into an XML document that you can send to the requesting browser using the echo statement.
Using XML in JavaScript
To read the XML data sent by the PHP server in your JavaScript code, you use the DOMParser object. The DOMParser object creates a DOM tree from the XML document data and provides methods and properties for you to traverse the tree, accessing the elements and attributes it contains.
The XMLHttpRequest object uses the responseXML property to hold the data sent by the server as an XML DOMParser object, so creating the object has already been done for you:
var xmldoc = con.responseXML;
There aren't a lot of methods and properties that you need to know to get the XML data. You retrieve the XML elements using the getElementsByTagName() method:
var cars = xmldoc.getElementsByTagName("car");
This returns an array of all the car elements. You then just iterate through them to examine each element individually:
for(i = 0; i < cars.length; i++) {
make = cars[i].getAttribute("make");
The getAttribute() method retrieves the value associated with the specified attribute name.
As you retrieve each individual car element, you then access each model child element from the car element using the getElementsByTagName() method:
var models = cars[i].getElementsByTagName("model");
for (j = 0; j < models.length; j++) {
var model = models[j].childNodes[0].nodeValue;
For each individual model element, you need to read the text that it contains. However, with XML, that's a little tricky. Because the XML DOM treats the element text as a separate element node, you need to reference it as a separate node. This is where the childNodes property comes in handy. It contains an array of all the child nodes for an element. Because there’s only one text node associated with the element, you can retrieve its value using childNodes[0] and the nodeValue property as shown earlier.
Follow these steps to write a JavaScript program to read the XML document created by the xmltest.php program:
Save the file asxmltest.htmlin theDocumentRootfolder of your web server.
Open your browser and enter the following URL:
http://localhost:8080/xmltest.html
Click the Get Cars button to retrieve the XML document from thexmltest.phpprogram.
Observe the changes dynamically made to the web page, and then close the browser when you're done.
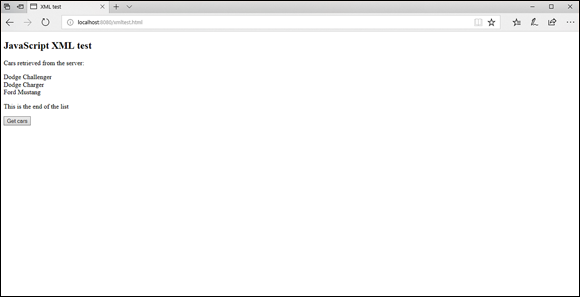
When you run the program and click the Get Cars button, you should see the list of cars defined in the XML document created by the xmltest.php program, as shown in Figure 3-4.
FIGURE 3-4: The output of the xmltest.html program.
The JavaScript code uses the XMLHttpRequest object to request the xmltest.php page and then parses the XML document from the responseXML property to retrieve the car makes and models available on the car lot!
Now that you've seen how to use AJAX, the next step is to utilize it in the AuctionHelper program to display the real-time data for the auction. I cover that topic in the next section.
Modifying the AuctionHelper Application
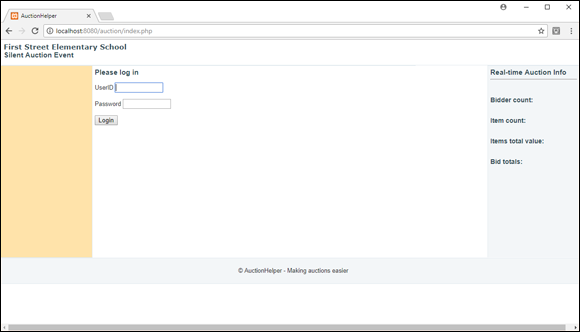
With your newfound skills in AJAX, you can now tackle the last requirement for the AuctionHelper application! If you remember from Chapter 1 of this minibook, the main layout for the AuctionHelper application contains a separate section to display the real-time data, as shown in Figure 3-5.
The aside.inc.php code creates four separate span elements for the content to display:
The total number of bidders
The total number of items
The total resale value of all the items
The total current winning bid values
The first step to implement this feature is to create the PHP file that generates the real-time data and returns it as an XML document. Follow these steps to do that:
Save the file asrealtime.phpin theauctionfolder in theDocumentRootfolder for your web server.
You should recognize the code in the realtime.php file. It creates a DOMDocument object and then populates it with the data you need. However, notice that I used four new static methods to retrieve the data. You could write the PHP code to directly access the auction database here, but it's better programming practice to let the Bidder and Item objects do that work for you. That means you'll need to add some code to each of the PHP files that create those objects. Follow these steps to do that:
Open thebidder.phpfile from theauctionfolder in your editor.
At the very end of the code after thefindBidder()static method definition (but before the closing bracket) add the following code:
static function getTotalBidders() {
$db = new mysqli("localhost", "ah_user", "AuctionHelper", "auction");
$query = "SELECT count(bidderid) FROM bidders";
$result = $db->query($query);
$row = $result->fetch_array();
if ($row) {
return $row[0];
} else {
return NULL;
}
}
Save the file asbidder.phpin theauctionfolder.
Open a new tab or window in your editor and then open theitem.phpfile from theauctionfolder.
At the very end of the code after thefindItem()static method definition (but before the closing bracket), add the following code:
static function getTotalItems() {
$db = new mysqli("localhost", "ah_user", "AuctionHelper", "auction");
$query = "SELECT count(itemid) FROM items";
$result = $db->query($query);
$row = $result->fetch_array();
if ($row) {
return $row[0];
} else {
return NULL;
}
}
static function getTotalPrice() {
$db = new mysqli("localhost", "ah_user", "AuctionHelper", "auction");
$query = "SELECT sum(resaleprice) FROM items";
$result = $db->query($query);
$row = $result->fetch_array();
if ($row) {
return $row[0];
} else {
return NULL;
}
}
static function getTotalBids() {
$db = new mysqli("localhost", "ah_user", "AuctionHelper", "auction");
$query = "SELECT sum(winprice) FROM items";
$result = $db->query($query);
$row = $result->fetch_array();
if ($row) {
return $row[0];
} else {
return NULL;
}
}
Save the file asitem.phpin theauctionfolder.
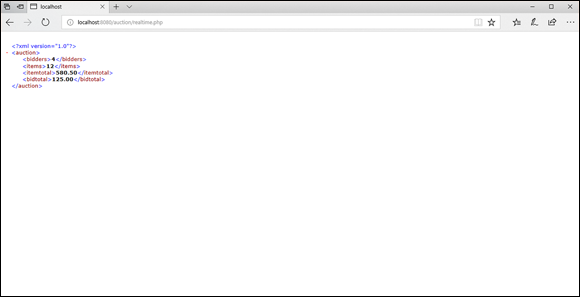
Now you have the static class methods created and the code to generate the XML document with the real-time data you need. If you like, you can test that out by opening your browser and entering the following URL:
http://localhost:8080/auction/realtime.php
You should see the XML document that contains the data you need, as shown in Figure 3-6.
FIGURE 3-6: Displaying the output from the realtime.php file.
The final step is to modify the index.php file to retrieve the data from the realtime.php file at a regular interval and populate the appropriate DOM objects to display the data.
First, you'll need to create the XMLHttpRequest object to retrieve the data and populate the DOM object. Follow these steps to do that:
Open theindex.phpfile from theauctionfolder in your editor.
Modify the code in the<head>section to look like this:
var dombidders = document.getElementById("biddercount");
var domitems = document.getElementById("itemcount");
var domitemtotal = document.getElementById("itemtotal");
var dombidtotal = document.getElementById("bidtotal");
//send the GET request to retrieve the data
var request = new XMLHttpRequest();
request.open("GET", "realtime.php", true);
request.onreadystatechange = function() {
if (request.readyState == 4 && request.status == 200) {
//parse the XML document to get each data element
var xmldoc = request.responseXML;
var xmlbidders = xmldoc.getElementsByTagName("bidders")[0];
var bidders = xmlbidders.childNodes[0].nodeValue;
var xmlitems = xmldoc.getElementsByTagName("items")[0];
var items = xmlitems.childNodes[0].nodeValue;
var xmlitemtotal = xmldoc.getElementsByTagName("itemtotal")[0];
var itemtotal = xmlitemtotal.childNodes[0].nodeValue;
var xmlbidtotal = xmldoc.getElementsByTagName("bidtotal")[0];
var bidtotal = xmlbidtotal.childNodes[0].nodeValue;
dombidders.innerHTML = bidders;
domitems.innerHTML = items;
domitemtotal.innerHTML = itemtotal;
dombidtotal.innerHTML = bidtotal;
}
};
request.send();
}
</script>
</head>
Save the file asindex.phpin theauctionfolder.
The getRealTime() function uses the XMLHttpRequest object to submit the request to the realtime.php program and then parses the content received in the responseXML property. Because each data item is an element with a unique name, the code uses four separate getElementsByTagName() methods to parse out each element; then it uses the childNodes[0] property to retrieve the text value assigned to the element.
However, nothing triggers the getRealTime() function yet. The trick to triggering the function at a regular interval to simulate a real-time update requires the JavaScript setInterval() function:
setInterval(function, time);
The setInterval() function triggers the function you specify every time milliseconds. So to trigger the getRealTime() function every five seconds, you'd write the following:
setInterval(getRealTime, 5000);
Be careful when setting how often to fire a trigger to update real-time data. You may be tempted to have it trigger every second, but that could generate a lot of network traffic! Usually retrieving data every five seconds or so is sufficient for most “real-time” environments.
Now the only question is where to place that code! Follow these steps to do that:
Open theindex.phpfile from theauctionfolder in your editor.
In the<aside>section, modify the code to look like this:
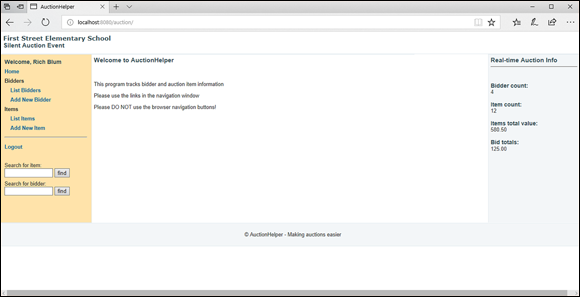
And that should do it! The first getRealTime() function triggers when each page loads to display the data and then the setInterval() function triggers the getRealTime() function every five seconds after that. (Notice that you don't use the parentheses when specifying the function name in the setInterval() function.) The new AuctionHelper page is shown in Figure 3-7.
FIGURE 3-7: The AuctionHelper main page with the real-time data added.
You can test this feature by opening two separate browser windows and logging into the AuctionHelper application. In one window, add a new bidder. Then watch the other window update the auction totals automatically!
Congratulations! You’ve completed the AuctionHelper dynamic web application! That was a lot of code to generate, but you’ve seen all the parts required to create a full-featured dynamic web application.
 Getting acquainted with AJAX
 While currently still supported, the synchronous connection type is in the process of being deprecated in the
  Although using an anonymous function is a popular way of defining the callback function, you can define the function as a standard named JavaScript function and then reference that function name in the