Ampere (or amp): Refers to the rate at which electrical power flows to a light, tool, or appliance.
Armored cable: Two or more wires that are grouped together and protected by a flexible metal covering.
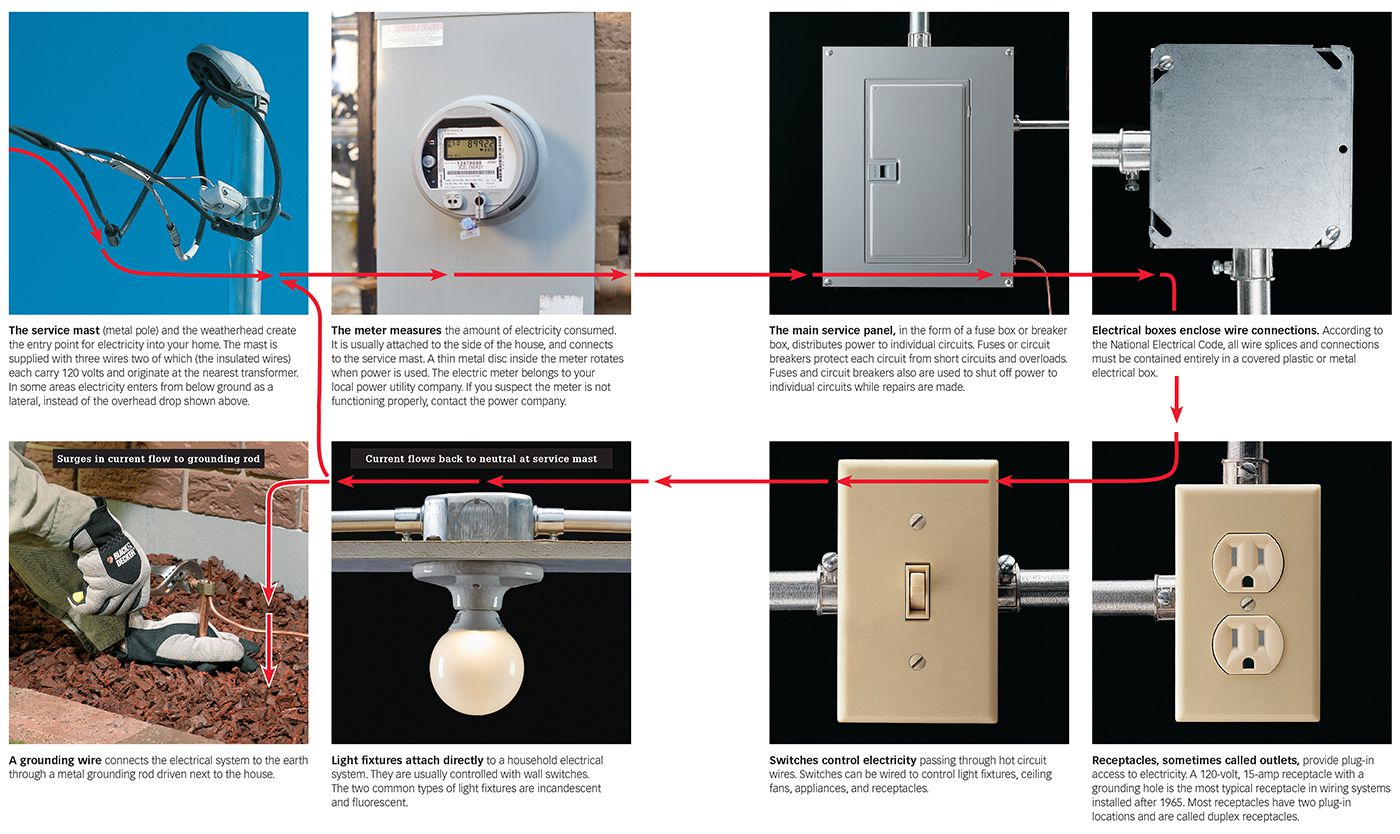
Box: A device used to contain wiring connections.
BX: See armored cable (Bx is the older term).
Cable: Two or more wires that are grouped together and protected by a covering or sheath.
Circuit: A continuous loop of electrical current flowing along wires or cables.
Circuit breaker: A safety device that interrupts an electrical circuit in the event of an overload or short circuit.
Conductor: Any material that allows electrical current to flow through it. Copper wire is an especially good conductor.
Conduit: A metal or plastic pipe used to protect wires.
Continuity: An uninterrupted electrical pathway through a circuit or electrical fixture.
Current: The movement of electrons along a conductor.
Duplex receptacle: A receptacle that provides connections for two plugs.
Feed wire: A conductor that carries 120-volt current uninterrupted from the service panel.
Fuse: A safety device, usually found in older homes, that interrupts electrical circuits during an overload or short circuit.
Greenfield: Materials used in flexible metal conduit. See armored cable.
Grounded wire: See neutral wire.
Grounding wire: A wire used in an electrical circuit to conduct current to the earth in the event of a short circuit. The grounding wire often is a bare copper wire.
Hot wire: Any wire that carries voltage. In an electrical circuit, the hot wire usually is covered with black or red insulation.
Insulator: Any material, such as plastic or rubber, that resists the flow of electrical current. Insulating materials protect wires and cables.
Junction box: See box.
Meter: A device used to measure the amount of electrical power being used.
Neutral wire: A wire that returns current at zero voltage to the source of electrical power. Usually covered with white or light gray insulation. Also called the grounded wire.
Nonmetallic sheathed cable: NM cable consists of two or more insulated conductors and, in most cases, a bare ground wire housed in a durable PVC casing.
Outlet: See receptacle.
Overload: A demand for more current than the circuit wires or electrical device was designed to carry. Usually causes a fuse to blow or a circuit breaker to trip.
Pigtail: A short wire used to connect two or more circuit wires to a single screw terminal.
Polarized receptacle: A receptacle designed to keep hot current flowing along black or red wires, and neutral current flowing along white or gray wires.
Power: The result of hot current flowing for a period of time. Use of power makes heat, motion, or light.
Receptacle: A device that provides plug-in access to electrical power.
Romex: A brand name of plastic-sheathed electrical cable that is commonly used for indoor wiring. Commonly known as NM cable.
Screw terminal: A place where a wire connects to a receptacle, switch, or fixture.
Service panel: A metal box usually near the site where electrical power enters the house. In the service panel, electrical current is split into individual circuits. The service panel has circuit breakers or fuses to protect each circuit.
Short circuit: An accidental and improper contact between two current-carrying wires, or between a current-carrying wire and a grounding conductor.
Switch: A device that controls electrical current passing through hot circuit wires. Used to turn lights and appliances on and off.
UL: An abbreviation for Underwriters Laboratories, an organization that tests electrical devices and manufactured products for safety.
Voltage (or volts): A measurement of electricity in terms of pressure.
Wattage (or watt): A measurement of electrical power in terms of total energy consumed. Watts can be calculated by multiplying the voltage times the amps.
Wire connector: A device used to connect two or more wires together. Also called a wire nut.
Best Practices for Home Wiring 
BY MATERIAL
Service Panel
• Maintain a minimum 30" wide by 36" deep of clearance in front of the service panel.
• Ground all 120-volt and 240-volt circuits.
• Match the amperage rating of the circuit when replacing fuses.
• Use handle-tie breakers for 240-volt loads (line to line).
• Close all unused service panel openings.
• Label each fuse and breaker clearly on the panel.
Electrical Boxes
• Use boxes that are large enough to accommodate the number of wires entering the box.
• Locate all receptacle boxes 12 to 18" above the finished floor (standard).
• Locate all switch boxes 48" above the finished floor (standard). For special circumstances, inspectors will allow switch and location measurements to be altered, such as a switch at 36" above the floor in a child’s bedroom or receptacles at 24" above the floor to make them more accessible for someone using a wheelchair.
• Install all boxes so they remain accessible.
• Leave no gaps greater than 1/8" between wallboard and front of electrical boxes.
• Place receptacle boxes flush with combustible surfaces.
• Leave a minimum of 6" of usable cable or wire extending past the front of the electrical box.
Wires & Cables
• Use wires that are large enough for the amperage rating of the circuit (see Wire Size Chart, page 571).
• Drill holes at least 2" back from the exposed edge of joists to run cables through. Do not attach cables to the bottom edge of joists.
• Do not run cables diagonally between framing members.
• Run cable between receptacles 20" above the floor.
• Use nail plates to protect cable that is run through holes drilled or cut into studs less than 1 1/4" from front edge of stud.
• Do not crimp cables sharply.
• Contain spliced wires or connections entirely in a plastic or metal electrical box.
• Use wire connectors to join wires.
• Use staples to fasten cables within 8" of an electrical box and every 48" along its run.
• Leave a minimum 1/4" (maximum 1") of sheathing where cables enter an electrical box.
• Clamp cables and wires to electrical boxes with approved NM clamp. No clamp is necessary for one-gang plastic boxes if cables are stapled within 8".
• Label all cables and wires at each electrical box to show which circuits they serve for the rough-in inspection.
• Connect only a single wire to a single screw terminal. Use pigtails to join more than one wire to a screw terminal.
Switches
• Use a switch-controlled receptacle in rooms without a built-in light fixture operated by a wall switch.
• Use three-way switches at the top and bottom on stairways with six steps or more.
• Use switches with grounding screw with plastic electrical boxes.
• Locate all wall switches within easy reach of the room entrance.
Receptacles
• Match the amp rating of a receptacle with the size of the circuit.
• Install receptacles on all walls 24" wide or greater.
• Install receptacles so a 6-ft. cord can be plugged in from any point along a wall or every 12 ft. along a wall.
• Include receptacles in any hallway that is 10 ft. long or more.
• Use three-prong, grounded receptacles for all 15- or 20-amp, 120-volt branch circuits.
• Include a switch-controlled receptacle in rooms without a built-in light fixture operated by a wall switch.
• Install GFCI-protected receptacles in bathrooms, kitchens, garages, crawl spaces, unfinished basements, and outdoor receptacle locations.
• Install an isolated-ground circuit to protect sensitive equipment, like a computer, against tiny power fluctuations. Computers should also be protected by a standard surge protector.
Light Fixtures
• Use mounting straps that are anchored to the electrical boxes to mount ceiling fixtures.
• Keep non-IC-rated recessed light fixtures 3" from insulation and 1/2" from combustibles.
• Include at least one switch-operated lighting fixture in every room.
• Ground all receptacles by connecting receptacle grounding screws to the circuit grounding wires.
• Use switches with grounding screws whenever possible. Always ground switches installed in plastic electrical boxes and all switches in kitchens, bathrooms, and basements.
BY ROOM
Kitchens/Dining Rooms
• Install a dedicated 40- or 50-amp, 120/240-volt circuit for a range (or two circuits for separate oven and countertop units).
• Install two 20-amp small appliance circuits.
• Install dedicated 15-amp, 120-volt circuits for dishwashers and food disposals (required by many local codes).
• Use GFCI receptacles for all accessible countertop receptacles; receptacles behind fixed appliances do not need to be GFCIs.
• Position receptacles for appliances that will be installed within cabinets, such as microwaves or food disposals, according to the manufacturer’s instructions.
• Include receptacles on all counters wider than 12".
• Space receptacles a maximum of 48" apart above countertops and closer together in areas where many appliances will be used.
• Locate receptacles 4" above the top of the backsplash. If backsplash is more than the standard 4" or the bottom of cabinet is less than 18" from countertop, center the box in space between countertop and bottom of wall cabinet.
• Mount one receptacle within 12" of the countertop on islands and peninsulas that are 12 × 24" or greater.
• Do not put lights on small appliance circuits.
• Install additional lighting in work areas at a sink or range for convenience and safety.
Bathrooms
• Install a separate 20-amp circuit.
• Ground switches in bathrooms.
• Use GFCI-protected receptacles.
• Install at least one ceiling-mounted light fixture.
• Place blower heaters in bathrooms well away from the sink and tub.
Utility/Laundry Rooms
• Install a separate 20-amp circuit for a washing machine.
• Install a minimum feed 30-amp #10 THHN wire for the dryer powered by a separate 120/240-volt major appliance circuit.
• Install metal conduit for cable runs in unfinished rooms.
• Use GFCI-protected receptacles.
Living, Entertainment, Bedrooms
• Install a minimum of two 15-amp circuits in living rooms.
• Install a minimum of one 15- or 20-amp basic lighting/receptacle circuit for each 600 sq. ft. of living space.
• Install a dedicated circuit for each permanent appliance, like an air conditioner, computer, or group of electric baseboard heaters.
• Do not use standard electrical boxes to support ceiling fans.
• Include receptacles on walls 24" wide or more.
• Space receptacles on basic lighting/receptacle circuits a maximum of 12 ft. apart. For convenience you can space them as close as 6 ft.
• Position permanent light fixtures in the center of the room’s ceiling.
• Install permanently wired smoke alarms in room additions that include sleeping areas and hallways.
Outdoors
• Check for underground utilities before digging.
• Use UF cable for outdoor wiring needs.
• Run cable in schedule 80 PVC plastic, as required by local code.
• Most local codes now require in-use rated weatherproof box covers.
• Bury cables housed in conduit at least 18" deep; cable not in conduit must be buried at least 24" deep.
• Use weatherproof electrical boxes with watertight covers.
• Use GFCI-protected receptacles.
• Install receptacles a minimum of 12" above ground level.
• Anchor freestanding receptacles not attached to a structure by embedding the schedule 80 PVC plastic conduit in a concrete footing, so that it is at least 12" but no more than 18" above ground level.
• Plan on installing a 20-amp, 120-volt circuit if the circuit contains more than one light fixture rated for 300 watts, or more than four receptacles.
Stairs/Hallways
• Use three-way switches at the top and bottom on stairways with six steps or more.
• Include receptacles in any hallway that is 10 ft. long or more.
• Position stairway lights so each step is illuminated.