Tools & Materials 
Drill/driver
Wire stripper
Cable ripper
Wallboard saw
Baseboard heater or heaters
Thermostat (in-heater or in-wall)
12/2 NM cable
Electrical tape
Basic wiring supplies
Flathead screws
Combination tool
Protective equipment
Baseboard heaters are a popular way to provide additional heating for an existing room or primary heat to a converted basement.
Heaters are generally wired on a dedicated 240-volt circuit controlled by a thermostat. Several heaters can be wired in parallel and controlled by a single thermostat.
Baseboard heaters are generally surface mounted without boxes, so in a remodeling situation, you only need to run cables. Be sure to mark cable locations on the floor before installing drywall. Retrofit installations are also not difficult. You can remove existing baseboard and run new cable in the space behind.
Tools & Materials
Drill/driver
Wire stripper
Cable ripper
Wallboard saw
Baseboard heater or heaters
Thermostat (in-heater or in-wall)
12/2 NM cable
Electrical tape
Basic wiring supplies
Flathead screws
Combination tool
Protective equipment
How Much Heater Do You Need? 
If you don’t mind doing a little math, determining how many lineal feet of baseboard heater a room requires is not hard.
1. Measure the area of the room in sq ft. (length × width): ——
2. Divide the area by 10 to get the baseline minimum wattage: ——
3. Add 5% for each newer window or 10% for each older window: ——
4. Add 10% for each exterior wall in the room: ——
5. Add 10% for each exterior door: ——
6. Add 10% if the space below is not insulated: ——
7. Add 20% if the space above is not well insulated: ——
8. Add 10% if ceiling is more than 8 ft. high: ——
9. Total of the baseline wattage plus all additions: ——
10. Divide this number by 250 (the wattage produced per ft. of standard baseboard heater): ——
11. Round up to a whole number. This is the minimum number of feet of heater you need. ——
Note: It is much better to have more feet of heater than is required than fewer. Having more footage of heater does not consume more energy; it does allow the heaters to work more efficiently.
Planning Tips for Baseboard Heaters
• 240-volt heaters are much more energy efficient than 120-volt heaters.
• Baseboard heaters require a dedicated circuit. A 20-amp, 240-volt circuit of 12-gauge copper wire will power up to 16 ft. of heater.
• Do not install a heater beneath a wall receptacle. Cords hanging down from the receptacle are a fire hazard.
• Do not mount heaters directly on the floor. You should maintain at least 1" of clear space between the baseboard heater and the floor covering.
• Installing heaters directly beneath windows is a good practice.
• Locate wall thermostats on interior walls only, and do not install directly above a heat source.
 HOW TO INSTALL A 240-VOLT BASEBOARD HEATER
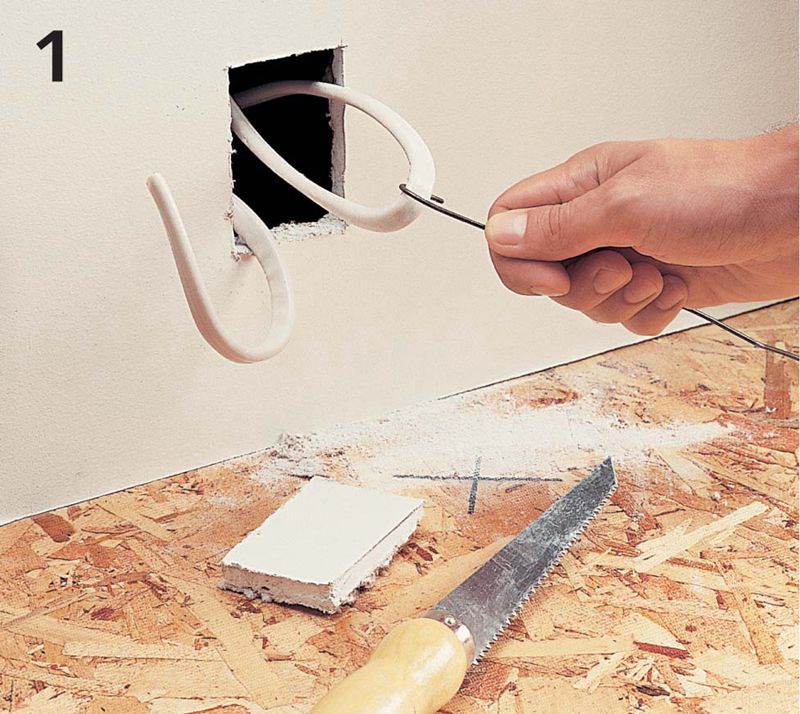
Cut a small hole in the drywall 3 to 4" above the floor at heater locations. Pull 12/2 NM cables through the first hole: one from the thermostat, the other to the next heater. Pull all the cables for subsequent heaters. Middle-of-run heaters will have two cables, while end-of-run heaters have only one cable.
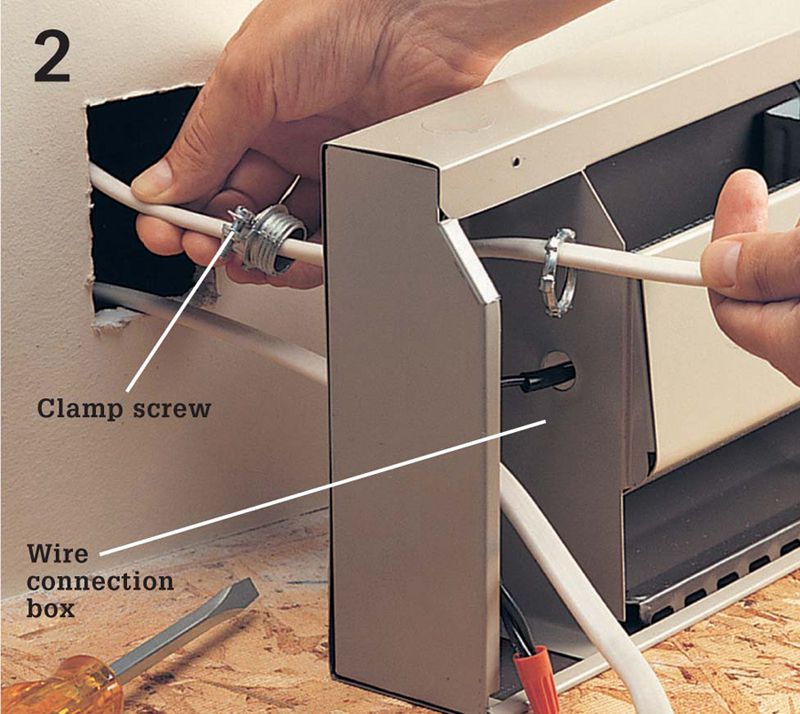
Remove the cover on the wire connection box. Open a knockout for each cable that will enter the box, then feed the cables through the cable clamps and into the wire connection box. Attach the clamps to the wire connection box and tighten the clamp screws until the cables are gripped firmly.

Anchor heater against wall about 1" off the floor by driving flathead screws through back of housing and into studs. Strip away cable sheathing so at least 1/2" of sheathing extends into the heater. Strip 3/4" of insulation from each wire using a combination tool.
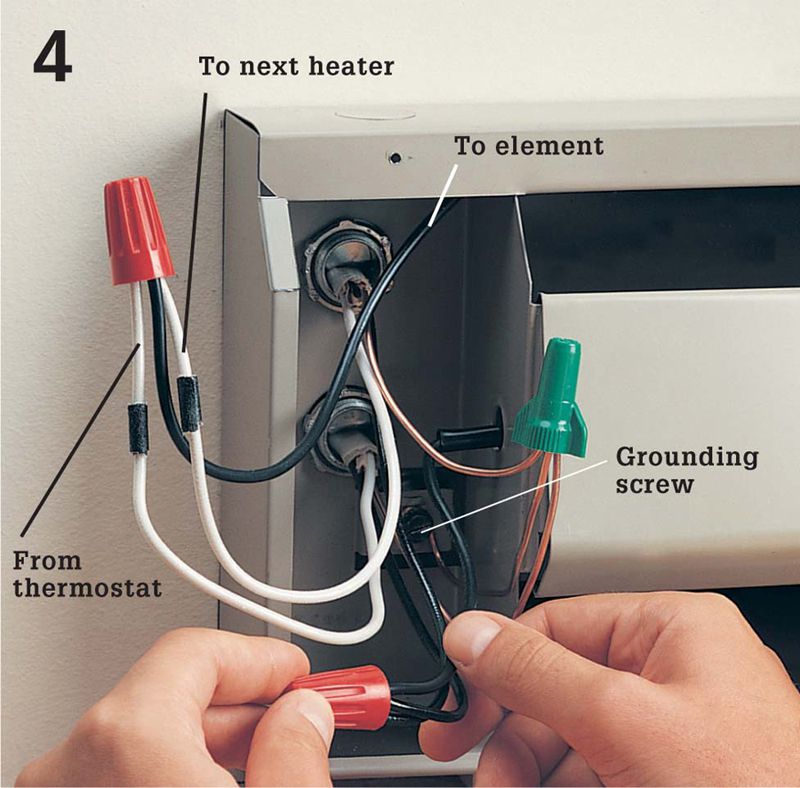
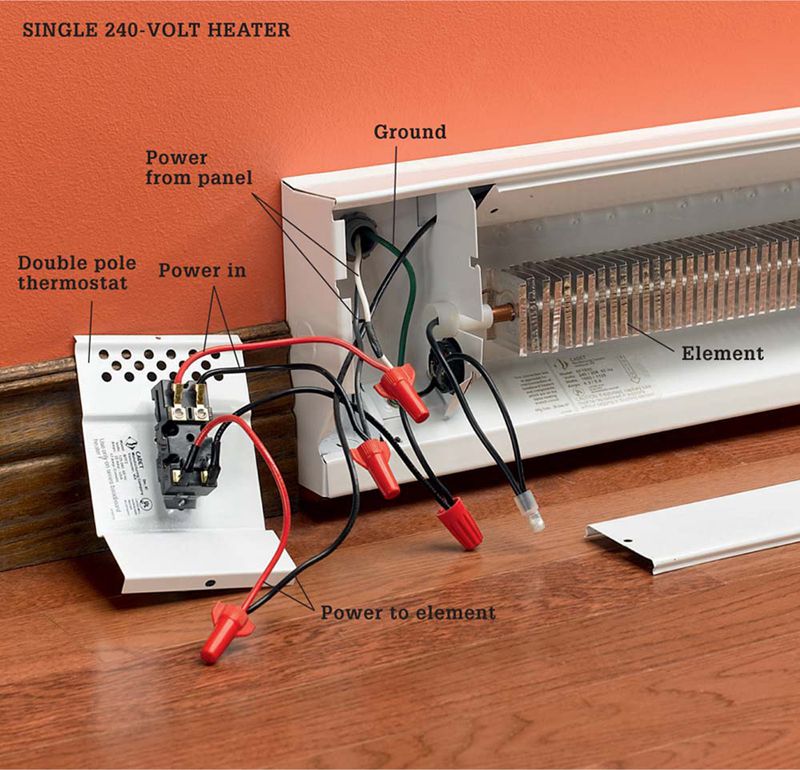
Make connections to the heating element if the power wires are coming from a thermostat or another heater controlled by a thermostat. Connect the white circuit wires to one of the wire leads on the heater. Tag white wires with black tape to indicate they are hot. Connect the black circuit wires to the other wire lead. Connect a grounding pigtail to the green grounding screw in the box, then join all grounding wires with a wire connector. Reattach cover.
One heater with end-cap thermostat. Run both power leads (black plus tagged neutral) into the connection box at either end of the heater. If installing a single-pole thermostat, connect one power lead to one thermostat wire and connect the other thermostat wire to one of the heater leads. Connect the other hot LINE wire to the other heater lead. If you are installing a double-pole thermostat, make connections with both legs of the power supply.
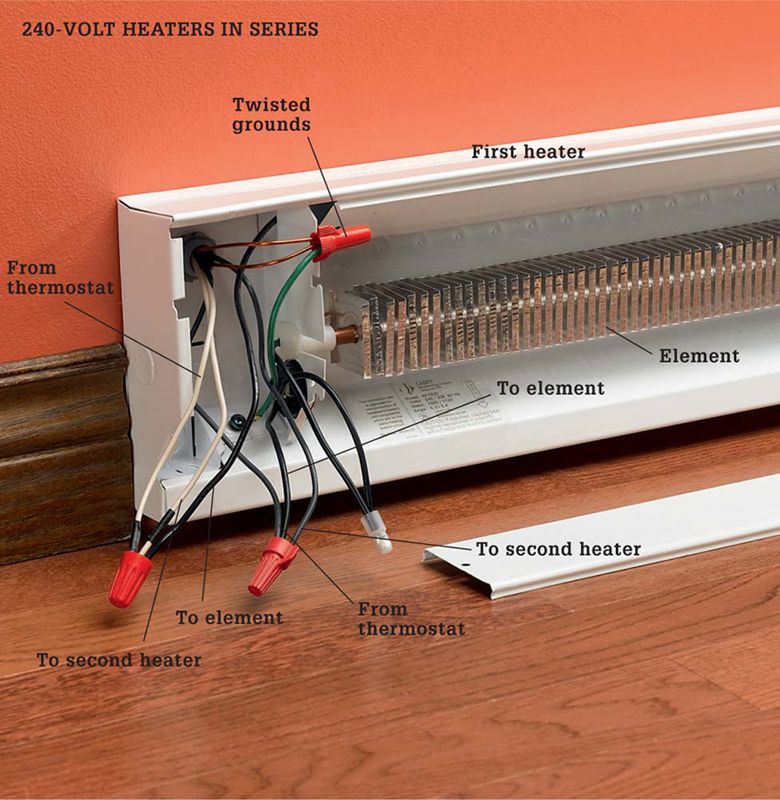
Multiple heaters. At the first heater, join both hot wires from the thermostat to the wires leading to the second heater in line. Be sure to tag all white neutrals hot. Twist copper ground wires together and pigtail them to the grounding screw in the baseboard heater junction box. This parallel wiring configuration ensures that power flow will not be interrupted to the downstream heaters if an upstream heater fails.