
MULLED APPLE CIDER WITH ORANGES AND ROSEMARY
Rosemary might sound like an unusual addition to a pot of spiced cider, but in the right amount, it adds a woody note that makes this hot, comforting drink uniquely delicious. You’ll heat the cider on the Instant Pot’s Sauté setting, then leave it on the Keep Warm setting, where it will stay warm for everyone to enjoy.
Zest (in strips) and juice of 1 navel orange
Two 6-inch rosemary sprigs
1 cinnamon stick, broken into large pieces
1 bay leaf
8 cups unfiltered apple cider
PREP 0 MINUTES
COOK 15 MINUTES
PR N/A
STEEP 30 MINUTES
SERVES 8
-
Put the orange zest, rosemary, cinnamon, and bay leaf into a wire-mesh steamer basket and place the steamer basket into the Instant Pot. Pour in the orange juice and cider.
-
Cover the pot with a tempered glass lid. Select the Sauté setting and heat the cider for about 15 minutes, until barely at a simmer (around 190°F). Press the Cancel button to turn off the pot, then select the Keep Warm setting. Leave the steamer basket in the cider and steep for 30 minutes, then remove the steamer basket and discard the solids.
-
Stir the cider and ladle into mugs. Serve warm.
Note: For traditional mulled cider, replace the orange, rosemary, cinnamon, and bay leaf with a packet of mulling spices.
Nutrition Information
Per serving: 120 calories, 0 grams fat, 30 grams carbohydrates, 0 grams fiber, 0 grams protein
No alcohol is added to this comforting winter sipper. It’s made up of just tart cranberry juice, apple juice, spices, and a drizzle of honey. You can find 100 percent cranberry juice in some grocery stores and in natural foods stores. Check the label to make sure you are buying no-sugar-added juice.
2 cinnamon sticks
2 teaspoons whole allspice berries
1 teaspoon whole cloves
1 whole star anise
4 cups unfiltered apple cider
2 cups 100 percent cranberry juice (no sugar added)
2 tablespoons honey or agave nectar
PREP 0 MINUTES
COOK 10 MINUTES
PR N/A
STEEP 20 MINUTES TO 1 HOUR
SERVES 6
-
Put the cinnamon, allspice, cloves, and star anise into a wire-mesh steamer basket and place the steamer basket into the Instant Pot. Pour in the apple juice and cranberry juice. Add the honey.
-
Cover the pot with a tempered glass lid. Select the Sauté setting and set the cooking time for 11 minutes.
-
When the cooking program ends, select the Keep Warm setting. Leave the spices in the liquid and steep for at least 20 minutes or up to 1 hour, depending on how strongly you want the drink to be spiced. Remove the steamer basket and discard the spices.
-
Stir the cocktail and ladle it into mugs. Serve warm.
Nutrition Information
Per serving: 138 calories, 0 grams fat, 36 carbohydrates, 1 gram fiber, 0 grams protein
VIRGIN TODDY TONIC

Here is a welcome nonalcoholic, spice-infused winter warmer for snowy days and chilly nights. Sweetened with honey or agave nectar, it is made with black tea but is easily switched to a caffeine-free sipper by swapping in rooibos tea or decaffeinated black tea.
3 cinnamon sticks, broken into large pieces
1 teaspoon whole cloves
6 cups water
4 black tea bags
Zest (in strips) and juice of 1 lemon
¼ cup honey or agave nectar, plus more as needed
PREP 0 MINUTES
COOK 15 MINUTES
PR N/A
STEEP 4 MINUTES
SERVES 6
-
Place the cinnamon and cloves into the Instant Pot and select the Sauté setting. Let the spices heat and toast, stirring occasionally, for about 4 minutes, until the pot displays its “hot” message and the spices are aromatic. Wearing heat-resistant mitts, lift out the inner pot and pour the spices into a wire-mesh steamer basket. Make sure no bits of spices are left in the pot.
-
Return the inner pot to the housing and place the steamer basket into the pot. Pour the water over the spices and cover the pot with a tempered glass lid. (The pot should still be on its Sauté setting.)
-
When the water has come to a simmer (after about 10 minutes), uncover the pot and add the tea bags to the steamer basket, nudging them with a wooden spoon or spatula to submerge them in the water. Press the Cancel button to turn off the pot, then cover the pot with the glass lid once more. Let the tea steep for 4 minutes.
-
Uncover the pot and, wearing heat-resistant mitts, remove the steamer basket. Add the lemon juice and honey to the pot and stir until fully dissolved. Taste for sweetness, adding more honey if needed.
-
You can serve the toddies right away, or keep them warm, covered, on the Keep Warm setting. To serve, ladle into mugs and garnish each mug with a twist of lemon zest.
Notes: You can also sweeten each mug individually if you like, with your sweetener of choice. I like 2 teaspoons honey or agave nectar per mug. For a sugar-free drink, use 8 drops liquid stevia per mug.
For a spicy variation, add a 2-inch piece fresh ginger, peeled and thinly sliced, to the pot along with the spices. Garnish each mug with a tiny pinch of cayenne pepper.
Nutrition Information
Per serving: 45 calories, 0 grams fat, 12 grams carbohydrates, 0 grams fiber, 0 grams protein
FROZEN YOGURT FUDGE ICE POPS
Make a batch of Greek yogurt in the Instant Pot, then freeze up a batch of sweet treats. These ice pops will satisfy your dark chocolate ice cream craving without a ton of calories or any unpronounceable ingredients. Cocoa powder and semisweet chocolate chips provide a double dose of chocolate flavor, toning down the tanginess of the yogurt.
1¼ cups plain 2 percent Greek yogurt, homemade (this page) or store-bought
¼ cup 2 percent milk
¼ cup agave nectar or coconut nectar
¼ cup natural cocoa powder
½ teaspoon pure vanilla extract
⅛ teaspoon fine sea salt
2 ounces semisweet chocolate chips or baking wafers, melted and cooled
PREP 10 MINUTES
COOK N/A
PR N/A
FREEZE 4 HOURS
MAKES 6 ICE POPS
-
In a blender, combine the yogurt, milk, agave nectar, cocoa powder, vanilla, and sea salt. Blend on medium speed for about 30 seconds, until well mixed. Scrape down the sides, add the melted chocolate, and blend for 30 more seconds at high speed, until smooth.
-
Let the mixture settle in the blender for a couple of minutes, tap it against the counter a dozen times to remove the air bubbles, let sit for another 2 minutes, and tap once more.
-
Pour the mixture into ice-pop molds (about 4 ounces each), insert an ice-pop stick in each mold, and freeze for at least 4 hours, until frozen solid.
-
To unmold, dip each mold into warm water for about 5 seconds, then wiggle the ice pop out by the stick. Serve right away or transfer the ice pops to ziplock freezer bags and store in the freezer for up to 6 months.
Notes: Replace the cocoa powder with peanut powder (PB2 or Pbfit brand, see this page) to make ice pops flavored with chocolate and peanut butter.
For a peppermint variation, substitute ½ teaspoon peppermint extract for the vanilla.
Nutrition Information
Per ice pop: 134 calories, 5 grams fat, 21 grams carbohydrates, 2 grams fiber, 6 grams protein
COCONUT BULGUR PUDDING
This is a vegan spin on trigo con leche, a traditional Dominican breakfast dish that also makes a satisfying dessert. Quick-cooking, whole-grain bulgur wheat cooks in just 15 minutes under pressure and is then combined with almond milk, coconut cream, spices, and a touch of citrus zest. Coconut nectar is a natural sweetener, and it gives the pudding a rich flavor and toffee hue. I like this pudding served either warm or chilled.
1 cup coarse bulgur wheat
2 cups water
2 cups unsweetened almond milk
One 5⅓-ounce can coconut cream
¾ teaspoon ground cinnamon, plus more for serving
¼ teaspoon ground nutmeg
2 whole cloves
⅓ cup coconut nectar
¼ cup raisins
2 teaspoons finely grated orange zest
Chopped walnuts, for serving (optional)
PREP 0 MINUTES
COOK 30 MINUTES
PR 10 MINUTES NPR
COOL 1 HOUR
CHILL 3 HOURS TO OVERNIGHT
SERVES 8
-
Combine the bulgur and water in the Instant Pot and swirl the pot a bit, making sure all of the grains are in an even layer and submerged in the water.
-
Secure the lid and set the Pressure Release to Sealing. Select the Pressure Cook or Manual setting and set the cooking time for 15 minutes at high pressure. (The pot will take about 5 minutes to come up to pressure before the cooking program begins.)
-
When the cooking program ends, let the pressure release naturally for 10 minutes, then move the Pressure Release to Venting to release any remaining steam. Open the pot and add the almond milk, coconut cream, cinnamon, nutmeg, cloves, coconut nectar, and raisins. Whisk to combine.
-
Press the Cancel button to reset the cooking program, then select the Sauté setting. Bring the pudding to a simmer (this will take about 3 minutes), then cook, whisking continuously, for about 7 minutes, until it has thickened and begins to sputter as it boils (it will continue to thicken when chilled). Press the Cancel button to turn off the pot. Stir in 1 teaspoon of the orange zest.
-
Wearing heat-resistant mitts, lift out the inner pot. Remove and discard the whole cloves. Ladle the pudding into a glass or ceramic serving dish, individual bowls, or ¾-cup ramekins. Cover and let cool for 1 hour on the counter, then refrigerate the pudding for at least 3 hours or up to overnight.
-
Just before serving, top the pudding with a sprinkling of walnuts (if using), a light dusting of cinnamon, and the remaining 1 teaspoon orange zest.
Nutrition Information
Per serving: 162 calories, 5 grams fat, 27 grams carbohydrates, 3 grams fiber, 3 grams protein
WINE-POACHED PEARS
Use a robust red wine for poaching your pears, such as a Merlot, Malbec, or Syrah. This will result in some seriously beautiful pears: a deep burgundy exterior that reveals a lovely pale interior when the fruit is cut. Enjoy the sweet, tender pears with a drizzle of some of the wine syrup and a dollop of Greek yogurt. For a nondairy option, serve with a scoop of coconut or soy ice cream.
One 750 ml bottle robust red wine
¾ cup water
½ cup honey or agave nectar
Two 3-inch cinnamon sticks
2 pounds slightly underripe Bartlett or D’Anjou pears (4 pears)
Plain 2 percent Greek yogurt, homemade (this page) or store-bought, for serving
PREP 0 MINUTES
COOK 45 MINUTES
PR QPR
CHILL 4 HOURS TO 2 DAYS
SERVES 4
-
Combine the wine, water, honey, and cinnamon sticks in the Instant Pot. Select the Sauté setting and bring the liquid to a simmer.
-
While the liquid is coming to a simmer, peel the pears, quarter them lengthwise, and cut away the core. When the poaching liquid is simmering (it will take about 10 minutes to come to a simmer), add the pears.
-
Secure the lid and set the Pressure Release to Sealing. Press the Cancel button to reset the cooking program, then select the Pressure Cook or Manual setting and set the cooking time for 1 minute at high pressure. (The pot will take about 5 minutes to come up to pressure before the cooking program begins.)
-
When the cooking program ends, perform a quick release by moving the Pressure Release to Venting. Open the pot and, using a slotted spoon, transfer the pears and cinnamon sticks to a medium bowl.
-
Press the Cancel button to reset the cooking program once again, then select the Sauté setting. Leave the pot uncovered and allow the liquid to reduce for the full 30 minutes of the Sauté program. The liquid should reduce by about half, leaving you with about 1½ cups syrupy liquid. Pour the reduced liquid over the pears, then cover and refrigerate them for at least 4 hours or up to 2 days.
-
Serve the chilled pears in bowls. Top each serving with 2 tablespoons of the wine syrup and a dollop of yogurt.
Note: You can use the leftover syrup as a yogurt topping, or mix it with club soda for a fizzy, relatively low-alcohol spritzer.
Nutrition Information
Per serving (4 pear quarters plus 2 tablespoons wine syrup): 230 calories, 0 grams fat, 47 grams carbohydrates, 6 grams fiber, 2 grams protein
PINK APPLESAUCE
Have your dessert and eat your vegetables, too. This applesauce has a secret ingredient: a full pound of beets are cooked with the apples and then mixed right in. Cinnamon and raisins add spice and sweetness, and the beets turn the dish a beautiful, vibrant pink. (You can use golden beets if you prefer. They are a lot less messy to peel, and the applesauce will have a more traditional appearance.) Mash the apples and beets with a potato masher for a rustic texture or use an immersion blender for a smooth puree.
3 pounds apples (such as Fuji, Gala, or Granny Smith), peeled, quartered, and cored
1 pound red beets, peeled and cut into ¼-inch-thick wedges
½ cup water
⅓ cup raisins
½ teaspoon ground cinnamon
PREP 0 MINUTES
COOK 30 MINUTES
PR 20 MINUTES NPR
MAKES 6 CUPS
-
Combine the apples, beets, water, raisins, and cinnamon in the Instant Pot.
-
Secure the lid and set the Pressure Release to Sealing. Select the Steam setting and set the cooking time for 7 minutes at high pressure. (The pot will take about 20 minutes to come up to pressure before the cooking program begins.)
-
When the cooking program ends, let the pressure release naturally (this will take about 20 minutes). Open the pot and, wearing heat-resistant mitts, lift out the inner pot. For chunky applesauce, use a potato masher to break up the apples and beets. For a smooth puree, use an immersion blender to blend until smooth.
-
Serve right away, or let cool, transfer to an airtight container, and refrigerate for up to 1 week. Applesauce also freezes well, so you don’t have to worry about using up the whole batch at once. Freeze 2-cup portions flat in 1-quart ziplock plastic freezer bags for up to 6 months. The bags stack nice and even and take up hardly any space in the freezer.
Notes: If you like, omit the raisins and add a handful of chopped dried apples instead. The dried fruit absorbs the extra water needed for pressure cooking in the Instant Pot, so you don’t end up with a watery applesauce if you opt for dried apples over raisins.
Make sure to peel the beets thoroughly to avoid any fibrous skin getting into the sauce. If you prefer not to peel the beets before cooking them, you can steam them whole according to the chart on this page and then puree them with the cooked apples.
Nutrition Information
Per ½ cup: 59 calories, 0 grams fat, 18 grams carbohydrates, 2 grams fiber, 1 gram protein
DRIED FRUIT COMPOTE

My mother learned how to make compote from her mom, and now I love it, too. This Instant Pot version is done in an hour, rather than the overnight fridge soak my family traditionally used. Dried fruits are immersed in water with cinnamon, and the water becomes sweet and spiced as the fruit rehydrates.
8 ounces dried peach halves, quartered
8 ounces dried Turkish apricots
½ cup dried cranberries
¼ cup dark raisins
¼ cup golden raisins
2 cinnamon sticks
3 cups water
4 cups plain 2 percent Greek yogurt, homemade (this page) or store-bought, for serving
PREP 0 MINUTES
COOK 10 MINUTES
PR 1 HOUR NPR
SERVES 12
-
Combine the peaches, apricots, cranberries, raisins, and cinnamon sticks in the Instant Pot and pour the water over them.
-
Secure the lid and set the Pressure Release to Sealing. Select the Pressure Cook or Manual setting and set the cooking time for 0 (zero) minutes at low pressure. (The pot will take about 10 minutes to come up to pressure before the cooking program begins.)
-
When the cooking program ends, let the pressure release naturally and leave the pot covered on the Keep Warm setting for 1 hour.
-
Open the pot and remove and discard the cinnamon sticks. The compote can be served warm or chilled. Spoon the yogurt into bowls and top with the compote.
Note: My mom recommends adding peeled and sliced apples or oranges to the cooked compote and enjoying it chilled.
Nutrition Information
Per serving: 136 calories, 0 grams fat, 34 grams carbohydrates, 3 grams fiber, 2 grams protein
CINNAMON RAISIN BREAD PUDDING
When you steam this bread pudding in the Instant Pot, it stays perfectly moist, unlike some baked bread puddings. Instead of using cinnamon raisin bread, which is usually made with white flour, you’ll create the flavor by tossing whole-wheat bread with cinnamon, raisins, milk, eggs, and a touch of sweetener. A drizzle of cream cheese glaze is a decadent and dessert-worthy finishing touch.
4 large eggs
1 cup 2 percent milk
3 tablespoons agave nectar or honey
1 teaspoon ground cinnamon
¼ teaspoon fine sea salt
6 cups cubed whole-wheat French bread, in 1-inch cubes
⅓ cup raisins
Glaze
¼ cup cream cheese, at room temperature
½ cup confectioners’ sugar
½ teaspoon pure vanilla extract
PREP 5 MINUTES
REST 10 MINUTES TO 24 HOURS
COOK 45 MINUTES
PR 10 MINUTES NPR
SERVES 6
-
Grease a 7-cup round heatproof glass dish with butter or nonstick cooking spray.
-
In a blender, combine the eggs, milk, agave nectar, cinnamon, and salt. Blend on low speed for about 30 seconds, until well mixed, stopping to scrape down the sides as needed.
-
Put the cubed bread and raisins into a large bowl. Pour in the egg mixture and stir to combine, pressing the bread down to make sure all of the pieces are moistened. Transfer the mixture to the prepared dish, making sure the raisins are distributed evenly throughout. Cover the container tightly with aluminum foil. Let rest at room temperature for 10 minutes or refrigerate for up to 24 hours.
-
When you’re ready to cook the bread pudding, pour 1 cup water into the Instant Pot. Place the covered dish on a long-handled silicone steam rack, then, holding the handles of the steam rack, lower it into the pot. (If you don’t have the long-handled rack, use the wire metal steam rack and a homemade sling as described on this page.)
-
Secure the lid and set the Pressure Release to Sealing. Select the Pressure Cook or Manual setting and set the cooking time for 30 minutes at high pressure. (The pot will take about 10 minutes to come up to pressure from room temperature, or 15 from the fridge.)
-
While the bread pudding is cooking, make the glaze: In a small bowl, whisk together the cream cheese, confectioners’ sugar, and vanilla.
-
When the cooking program ends, let the pressure release naturally for 10 minutes, then move the Pressure Release to Venting to release any remaining steam. Open the pot and, wearing heat-resistant mitts, grasp the handles of the steam rack and lift the dish out of the pot. Uncover the pudding, taking care not to get burned by the steam or to drip condensation onto the surface. Spoon the cream cheese glaze evenly over the pudding.
-
Using a large serving spoon, scoop the pudding onto plates. Serve warm.
Note: You can also make this pudding with whole-wheat English muffins.
Nutrition Information
Per serving: 287 calories, 7 grams fat, 45 grams carbohydrates, 1 gram fiber, 9 grams protein
GLAZED HONEY-LEMON CAKE
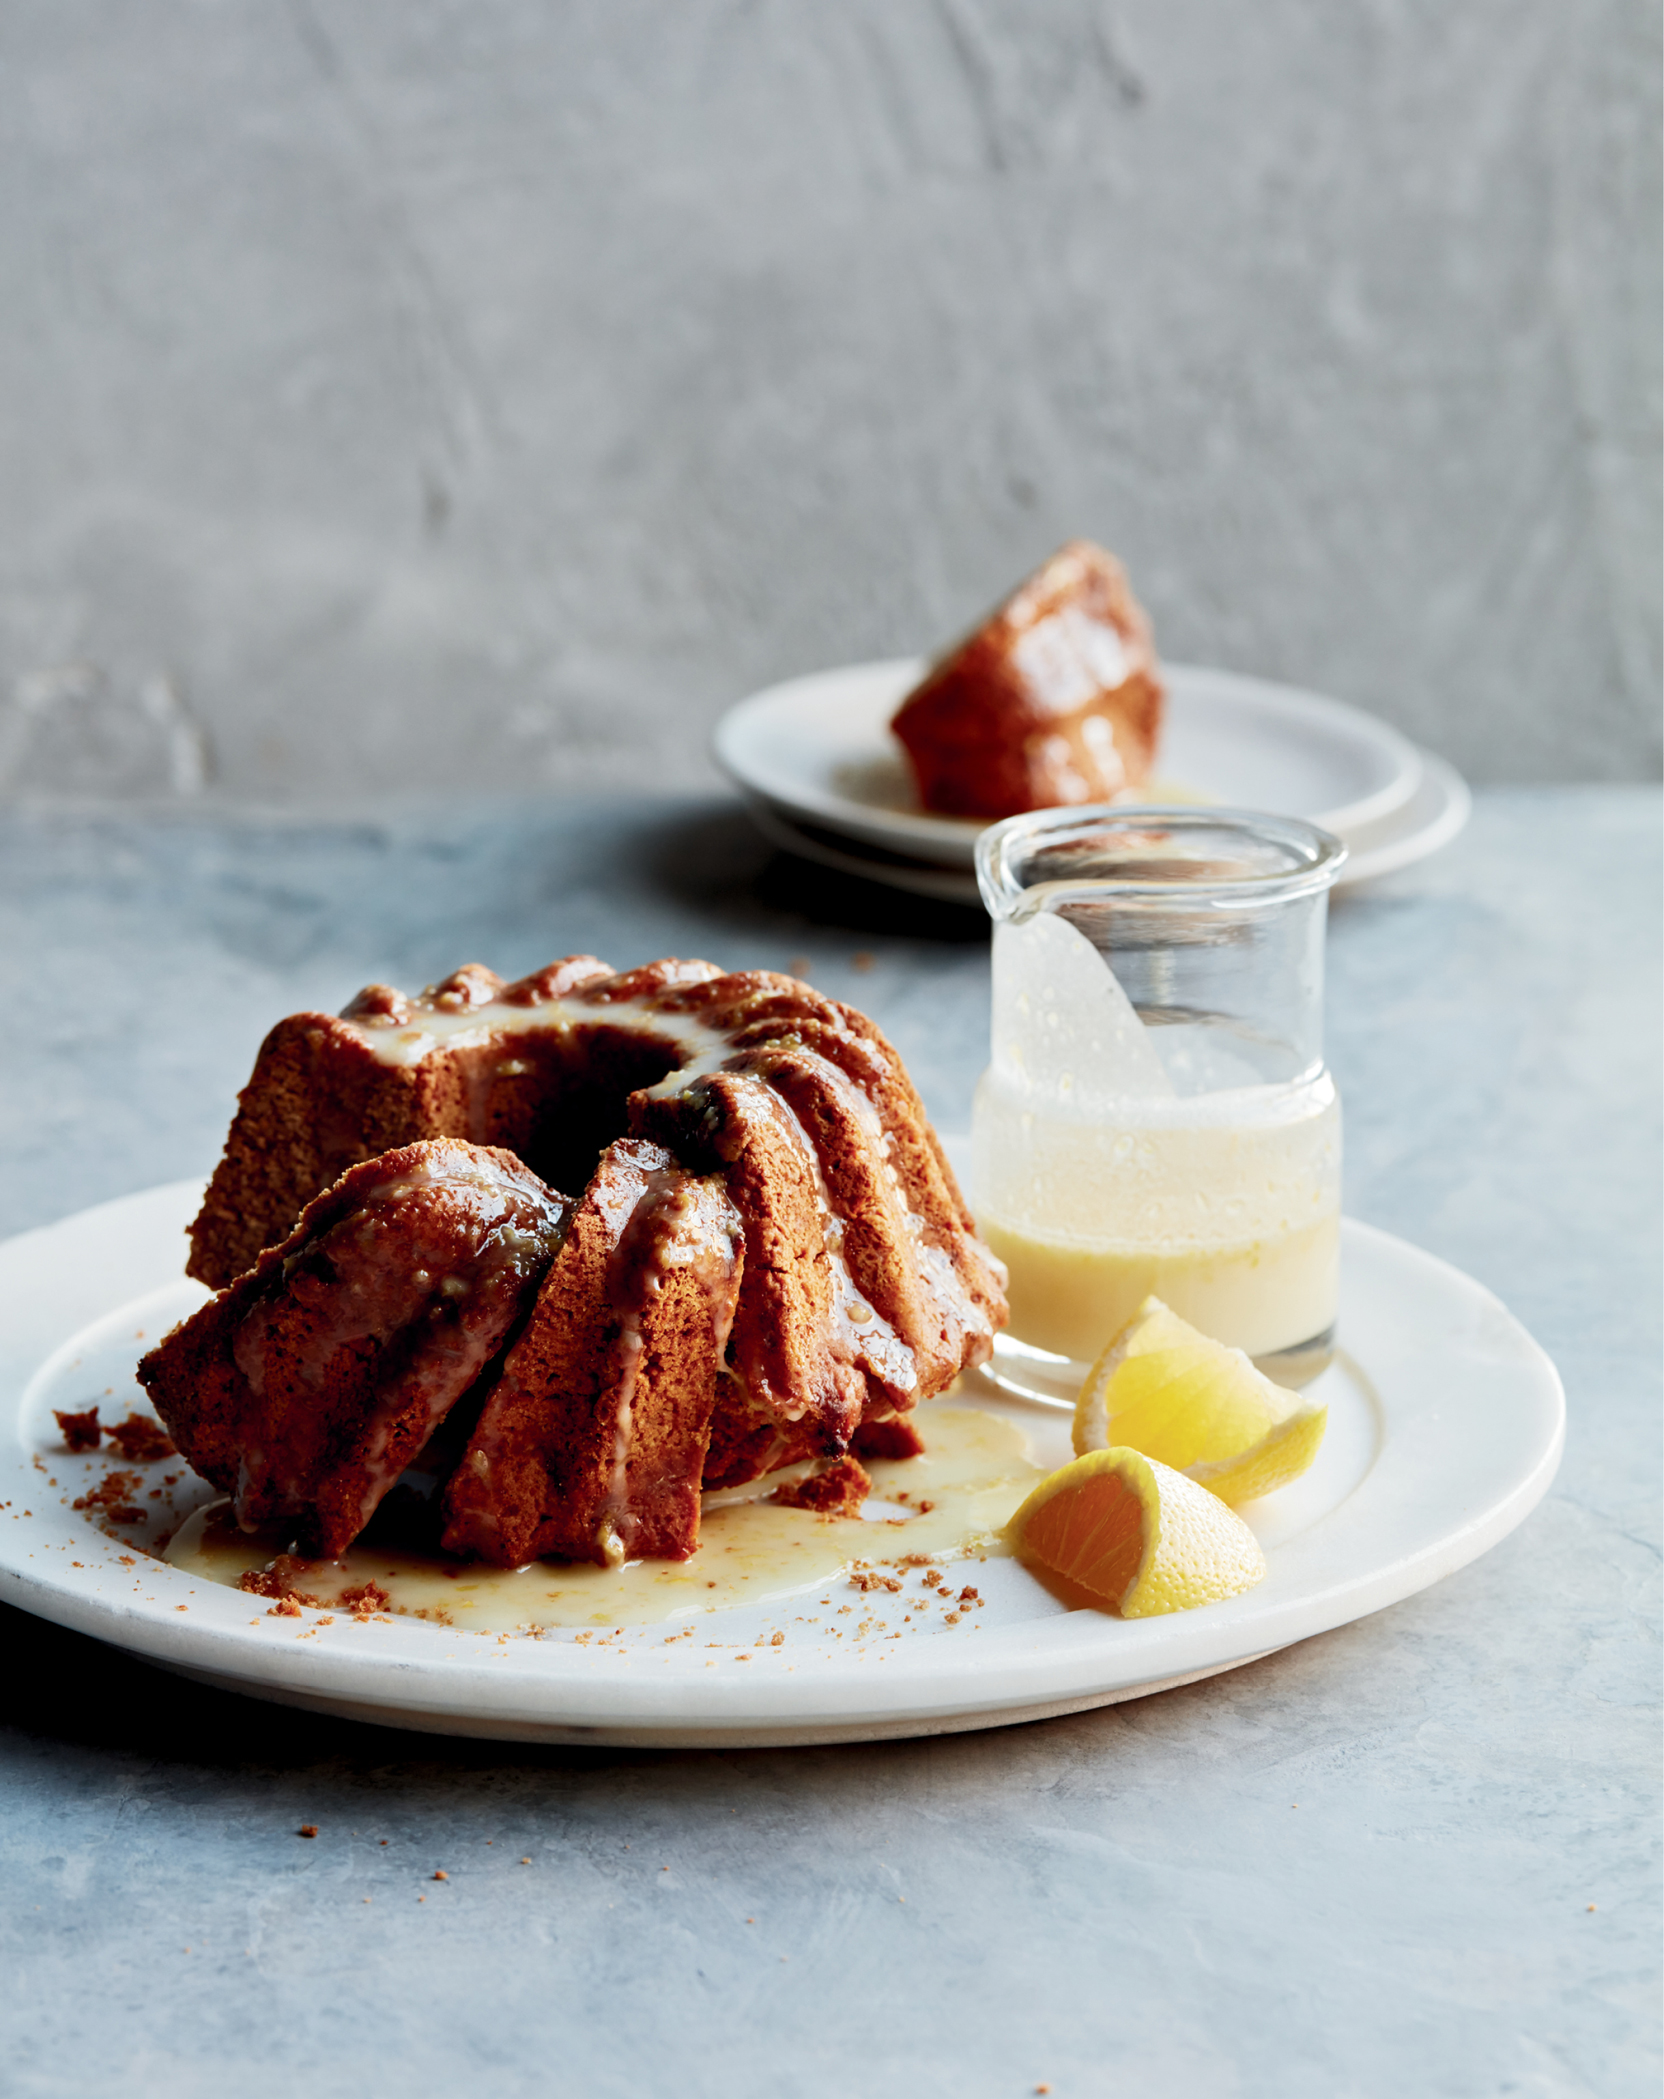
Serve this moist, honey-sweetened cake at teatime or for dessert. Whole-wheat pastry flour performs much more like white flour than traditional whole-wheat flour, making it the better choice for delicately crumbed cakes like this one (or to make the cake gluten-free, substitute a gluten-free flour blend). Bob’s Red Mill and Giusto’s are my go-to brands for whole-wheat pastry flour.
Cake
2 cups whole-wheat pastry flour or gluten-free flour blend
1½ teaspoons baking powder
½ teaspoon baking soda
¼ teaspoon fine sea salt
2 large eggs
6 tablespoons unsalted butter, melted and cooled
⅓ cup honey
1½ teaspoons finely grated lemon zest
¼ cup fresh lemon juice
Lemon Glaze
⅓ cup confectioners’ sugar
½ teaspoon finely grated lemon zest
1½ teaspoons fresh lemon juice
PREP 10 MINUTES
COOK 50 MINUTES
PR 10 MINUTES NPR
COOL 10 MINUTES
SERVES 8
-
To make the cake: Pour 1 cup water into the Instant Pot. Grease a 7-inch round Bundt pan with butter or nonstick cooking spray and dust with flour, shaking and rotating the pan to coat it evenly. Tap out the excess.
-
In a medium bowl, whisk together the flour, baking powder, baking soda, and salt. Make a well in the center of the dry ingredients. Add the eggs to the well and whisk to break up the yolks a bit. Add the butter, honey, and lemon zest and juice and whisk just until the dry ingredients are fully incorporated. The batter will be quite thick.
-
Spoon the batter into the prepared pan and spread it in an even layer. Tap the pan firmly against the countertop a few times to remove any air bubbles in the batter. Cover the pan tightly with aluminum foil. Place the pan on a long-handled silicone steam rack, then, holding the handles of the steam rack, lower the pan into the pot. (If you don’t have the long-handled rack, use the wire metal steam rack and a homemade sling as described on this page.)
-
Secure the lid and set the Pressure Release to Sealing. Select the Cake, Pressure Cook, or Manual setting and set the cooking time for 45 minutes at high pressure. (The pot will take about 5 minutes to come up to pressure before the cooking program begins.)
-
While the cake is cooking, make the glaze: In a small bowl, stir together the confectionersʼ sugar and lemon zest and juice until smooth.
-
When the cooking program ends, let the pressure release naturally for 10 minutes, then move the Pressure Release to Venting to release any remaining steam. Open the pot and, wearing heat-resistant mitts, grab the handles of the steam rack, lift the pan out of the pot, and set the pan on a cooling rack. Uncover the pan, taking care not to get burned by the steam or to drip condensation onto the surface. Let the cake cool in the pan for 5 minutes, then invert the pan onto the cooling rack and carefully lift off the pan. Let the cake cool for 5 more minutes.
-
Set the rack with the cake over a large plate to catch any drips. Stir the glaze once more, then spoon the glaze evenly all over the cake.
-
Serve the cake warm or let cool to room temperature, then transfer to a serving plate. Cut into wedges and serve.
Note: The cake will keep, covered with plastic wrap or in a tightly lidded container, on the counter for up to 3 days. If serving on day two or three, pop a slice in the microwave for 5 to 10 seconds to revive it.
Nutrition Information
Per serving: 260 calories, 10 grams fat, 40 grams carbohydrates, 4 grams fiber, 5 grams protein
GLUTEN-FREE CHOCOLATE CAKE
You would never guess this cake is gluten-free. It is rich, chocolaty, moist, and delicious warm or at room temperature. It’ll keep, tightly covered, on the countertop for a few days, and a next-day slice is best when revived for about 10 seconds in the microwave.
1¼ cups gluten-free flour blend
⅓ cup natural cocoa powder
¾ teaspoon baking powder
½ teaspoon baking soda
¼ teaspoon fine sea salt
3 large eggs
⅓ cup agave nectar or honey
½ cup plain 2 percent yogurt, homemade (this page) or store-bought
1 teaspoon pure vanilla extract
4 tablespoons unsalted butter, melted and cooled
½ cup semisweet chocolate chips
PREP 10 MINUTES
COOK 50 MINUTES
PR 10 MINUTES NPR
COOL 25 MINUTES
SERVES 8
-
Pour 1 cup of water into the Instant Pot. Grease a 7-inch round Bundt pan with butter or nonstick cooking spray.
-
In a large bowl, whisk together the flour, cocoa powder, baking powder, baking soda, and salt. Make a well in the center of the dry ingredients.
-
In a medium bowl, whisk together the eggs, agave nectar, yogurt, and vanilla until well blended, then whisk in the butter. Pour the wet mixture into the well in the dry ingredients. Stir the wet mixture into the dry mixture just until the dry ingredients are fully incorporated. Fold in the chocolate chips.
-
Pour the batter into the prepared pan. Tap the pan firmly against the countertop a few times to remove any air bubbles in the batter. Cover the pan tightly with aluminum foil. Place the pan on a long-handled silicone steam rack, then, holding the handles of the steam rack, lower the pan into pot.
-
Secure the lid and set the Pressure Release to Sealing. Select the Cake, Pressure Cook, or Manual setting and set the cooking time for 40 minutes at high pressure. (The pot will take about 10 minutes to come up to pressure before the cooking program begins.)
-
When the cooking program ends, let the pressure release naturally for 10 minutes, then move the Pressure Release to Venting to release any remaining steam. Open the pot and, wearing heat-resistant mitts, grasp the handles of the steam rack, lift the pan out of the pot, and transfer the pan to a cooling rack. Uncover the cake, taking care not to get burned by the steam or to drip condensation onto the surface. Let the cake cool in the pan for 5 minutes, then invert the pan onto the cooling rack and carefully lift off the pan. Let the cake cool for at least 20 minutes before serving.
-
Transfer the cake to a serving plate and cut into wedges. Serve warm or at room temperature.
Nutrition Information
Per serving: 275 calories, 14 grams fat, 35 grams carbohydrates, 2 grams fiber, 6 grams protein
GREEK YOGURT CHEESECAKE

This cheesecake has all of the rich, creamy goodness of a traditional cheesecake but with a little less fat, a little more protein, and no cane sugar in the filling. The Greek yogurt adds a light tanginess that nicely offsets the sweetness of the just-thick-enough graham cracker crust. At about 250 calories a slice, this cheesecake is an indulgence you can easily fit into a healthy eating lifestyle. The fresh berries on the side add both color and plenty of vitamin C.
Crust
6 graham cracker sheets, broken roughly into crackers
1½ tablespoons unsalted butter, melted
Filling
One 8-ounce package cream cheese, at room temperature
¾ cup plain 2 percent Greek yogurt, homemade (this page) or store-bought, at room temperature
⅓ cup agave nectar or honey
1 teaspoon pure vanilla extract
3 large eggs, at room temperature
1 cup fresh raspberries or sliced strawberries, for serving
PREP 10 MINUTES
COOK 40 MINUTES
PR 20 MINUTES NPR
COOL 2 HOURS
CHILL 12 TO 24 HOURS
SERVES 8
-
Line the base of a 7-inch springform or cheesecake pan with parchment paper. Grease the sides of the pan and the parchment with butter.
-
To make the crust: In a food processor, process the graham crackers to fine crumbs. Add the butter and process using 1-second pulses until the mixture resembles damp sand.
-
Transfer the crumb mixture to the prepared pan and press it firmly into an even layer on the bottom and about ½ inch up the sides of the pan. Use a paper towel to wipe any crumbs out of the food processor.
-
To make the filling: In the food processor, combine the cream cheese, yogurt, agave nectar, and vanilla and process using 1-second pulses just until smooth. Add the eggs one at a time, using two 1-second pulses to mix in each egg. It’s fine if some streaks of egg yolk remain.
-
Pour the filling into the crust. Gently tap the pan on the counter a few times to remove some of the air bubbles in the filling. Cover the pan tightly with aluminum foil.
-
Pour 1 cup water into the Instant Pot. Place the pan on a long-handled silicone steam rack, then, holding the handles of the steam rack, lower it into the pot. (If you don’t have the long-handled rack, use the wire metal steam rack and a homemade sling as described on this page.)
-
Secure the lid and set the Pressure Release to Sealing. Select the Cake, Pressure Cook, or Manual setting and set the cooking time for 34 minutes at high pressure. (The pot will take about 5 minutes to come up to pressure before the cooking program begins.)
-
When the cooking program ends, let the pressure release naturally for 20 minutes, then move the Pressure Release to Venting. Open the pot and, wearing heat-resistant mitts, grasp the handles of the steam rack and lift the pan out of the pot. Uncover the cheesecake, taking care not to get burned from the steam or to drip condensation onto the surface. Use a paper towel to dab off any excess moisture that may have settled on top of the cheesecake. The cake will be a bit puffed up and uneven at first, but it will settle and even out as it cools.
-
Leave the cheesecake to cool on the counter for 2 hours, then cover and refrigerate. Let chill for at least 12 hours or up to 24 hours before serving.
-
To unmold the cheesecake, unclasp the collar of the pan and lift it off, then use the parchment border to tug the cheesecake off the base of the pan and onto a plate. Cut the cake into wedges and serve with the berries on the side.
Nutrition Information
Per serving (cheesecake only): 254 calories, 15 grams fat, 21 grams carbohydrates, 0 grams fiber, 7 grams protein
FLOURLESS CHOCOLATE TORTE

There are just five ingredients in this dense, decadent, naturally gluten-free dark chocolate torte. It’s easy and quick to make, too, with everything whisked together in one bowl, then transferred to a springform pan and cooked under pressure for just a half hour. The texture falls somewhere between brownies and fudge, so a small wedge is enough to satisfy your sweet tooth. Serve it at a dinner party and nobody will guess that (a) it took so little effort and (b) you made it in an Instant Pot.
10 ounces semisweet chocolate chips or baking wafers
6 tablespoons unsalted butter, at room temperature, cubed
4 large eggs, at room temperature
3 tablespoons honey or agave nectar
¼ teaspoon fine sea salt
Raspberries or sliced strawberries, for serving
Whipped cream, for serving
PREP 15 MINUTES
COOK 35 MINUTES
PR 15 MINUTES NPR
COOL 2 HOURS
CHILL 10 TO 24 HOURS
SERVES 10
-
Pour 1 cup water into the Instant Pot. Line a 7-inch springform pan with an 8-inch parchment round, clamping the collar in place so that a little of the parchment is sticking evenly out the sides of the pan. Grease the sides of the pan with butter.
-
Put the chocolate chips into a medium microwave-safe bowl. Heat the chocolate chips in a microwave in 30-second intervals, stirring after each interval, just until melted. While the chocolate is still warm, add the butter and whisk vigorously for about 1½ minutes, until the butter melts and is evenly combined with the chocolate. Add the eggs one at a time, whisking after each addition until thoroughly combined. Whisk in the honey and salt for about 1 minute, until the batter is completely smooth and glossy.
-
Pour the batter into the prepared pan. Tap the pan against the counter a few times to remove any air bubbles in the batter. Cover the pan tightly with aluminum foil. Place the pan on a long-handled silicone steam rack, then, holding the handles of the steam rack, lower the pan into the pot. (If you don’t have the long-handled rack, use the wire metal steam rack and a homemade sling as described on this page.)
-
Secure the lid and set the Pressure Release to Sealing. Select the Cake, Pressure Cook, or Manual setting and set the cooking time for 30 minutes at high pressure. (The pot will take about 5 minutes to come up to pressure before the cooking program begins.)
-
When the cooking program ends, let the pressure release naturally for 15 minutes, then move the Pressure Release to Venting to release any remaining steam. Open the pot and, wearing heat-resistant mitts, grasp the handles of the steam rack, lift the pan out of the pot, and set the pan on a cooling rack. Uncover the cake, taking care not to get burned by the steam or to drip condensation onto the surface. Let the cake cool on the counter for 2 hours, re-cover with a dry sheet of aluminum foil, and then transfer to the refrigerator and chill for at least 10 hours or up to 24 hours.
-
To unmold the torte, run a knife around the edge to release it from the pan sides, then unclasp the collar and lift it off. Use the parchment border to tug the torte off the base of the pan and onto a serving plate.
-
Cut the torte into wedges and serve with the berries and whipped cream.
Nutrition Information
Per serving (torte only): 240 calories, 17 grams fat, 24 grams carbohydrates, 4 grams fiber, 5 grams protein
