Chocolate decorations
Chocolate curls
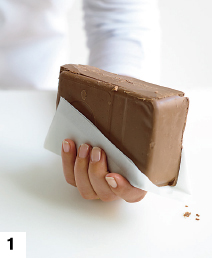
1 Wrap a strip of non-stick baking paper around a block of chocolate as a barrier between your hands and the chocolate to help prevent it melting while you hold it.
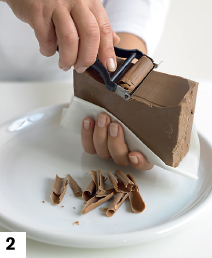
2 Use a vegetable peeler to shave curls from the chocolate (the wider the blade, the larger the curls will be). Catch them on a plate or non-stick baking paper and refrigerate until required. Alternatively, do this directly over the dessert just before serving.
TIP Milk chocolate has a higher content of fat solids and is less brittle than dark chocolate, so it is better suited to making curls. Dark chocolate tends to flake when making curls, but it is perfect for making chocolate scrolls and shards (see below).
Chocolate scrolls and shards

1 Pour melted chocolate onto a flat, hard surface, such as a baking tray or marble benchtop, then use a palette knife to quickly spread it as evenly as possible until it is about the thickness of thick cardboard. If the chocolate is too thick, it won’t roll. Leave the chocolate until almost set.

2 Holding a large sharp knife with both hands, blade facing away from you and on a 45 degree angle, gently and slowly push it along the chocolate to form thin scrolls. You can also use a metal pastry scraper. If the chocolate is warm and hasn’t set enough, it will simply stick to the knife or scraper.
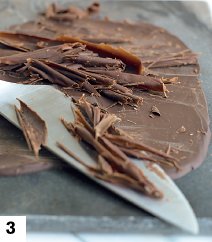
3 As the chocolate cools and hardens, shards will form instead of scrolls. If the chocolate hardens too much before you are finished, dip the knife in hot water and then dry it thoroughly before using.