
Is there something missing on your patio or in the garden? Do you need somewhere to sit and contemplate the world or just enjoy your morning coffee with the newspaper? A bench always adds a classic feature to any garden and this sturdy design looks great in a simple wood finish or painted in a colour of your choice. If you make this bench in the wood finish for use outdoors, you must apply at least three coats of an exterior varnish. The first version of this bench was a birthday present for my brother-in-law that he has used in his garden ever since. I made another one for our home which we put next to the children’s trampoline in the garden and later on next to the porch at our front door. It has been a feature in family photos and my favourite part of the day is when I arrive home and see Juliet sitting on the bench waiting for me.
This exceptionally sturdy bench will last many years if it is finished well. It is aesthetically very bold and features strong, clean lines. The four main parts are the seat, the back and the two arm support and leg assemblies. The seat consists of a frame mounted with slats at equal spacing for comfort while sitting. The back is slanted and consists of three supports on which are also mounted equally spaced slats. The armrests are wide enough to hold a mug of coffee and the seat is positioned at an ergonomically suitable height. Altering the dimensions with thinner wood will reduce the bulkiness of the design, but may require additional supports in the frame for the back and seat. For the second bench my assembly process was slightly different as I added the middle back support at the end of the construction process rather than making the back completely before mounting it to the seat frame.
WHAT I WOULD DO DIFFERENTLY NEXT TIME
When attaching the seat slats to the seat frame, I had to use a long screwdriver to get past the armrest support to tighten the wood screws. Doing this by hand proved to be extremely laborious and even painful because it needed to be tight in order to achieve a rigid assembly. It would have been far easier to remove the armrest support so that I could access the screw heads with an insert bit placed in a power drill to achieve the desired strength of the joint between the ends of the seat slats and the seat frame sides.

After a tiring game of football in the garden, cousins Kleran, Juliet and James relax on their favourite bench.
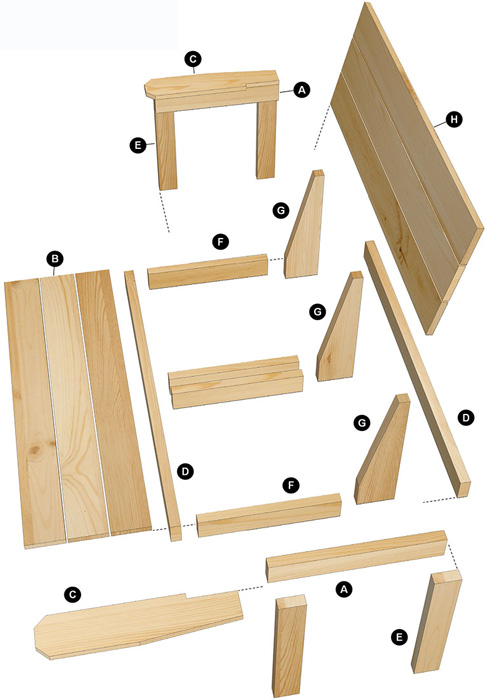
| PART | QUANTITY | THICKNESS | WIDTH | LENGTH | |
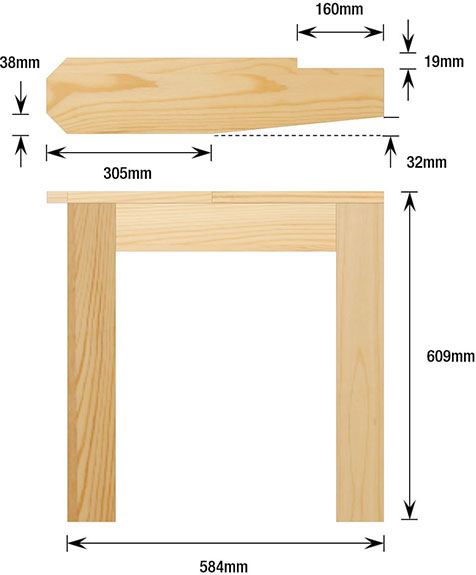
| A | Armrest supports | 2 | 38mm | 89mm | 584mm |
| B | Seat slats | 3 | 22mm | 140mm | 1321mm |
| C | Armrests | 2 | 22mm | 140mm | 622mm |
| D | Seat frame long sides | 2 | 38mm | 89mm | 1321mm |
| E | Legs | 4 | 38mm | 89mm | 587mm |
| F | Seat frame short sides/stretchers | 4 | 38mm | 89mm | 508mm |
| G | Back supports | 3 | 38mm | 140mm | 543mm |
| H | Back slats | 3 | 22mm | 140mm | 1245mm |
Project information
| Overall dimensions | 1487mm long x 622mm wide x 839mm high |
| Number of parts | 23 |
| Special equipment | Circular saw, Jigsaw |
| Techniques | Marking template (see page 22) |
| Difficulty | Medium |
| Duration | 16 hours |
Family fun factor

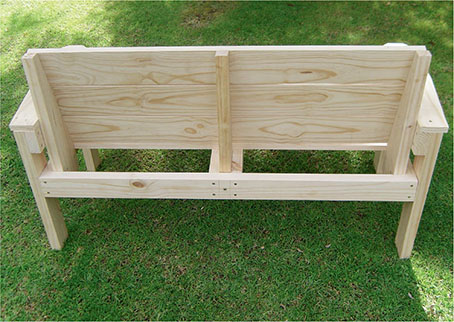
Front view

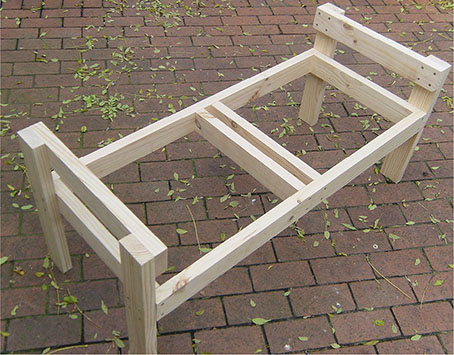
Armrest and leg assembly
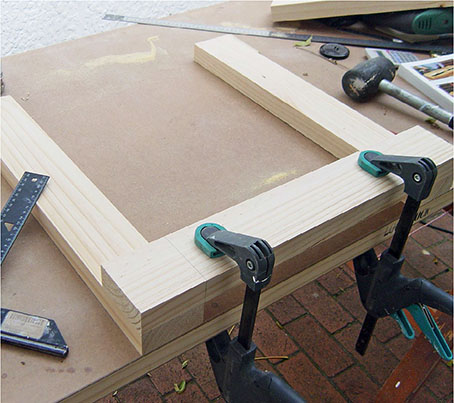
1 Lay out the components of the seat frame according to the design; short sides/stretchers (F x 4), and long sides (D x 2). Use long quick grip clamps or sash clamps to clamp the seat assembly in place, as shown in the photograph. Check for right angles with a try square and make sure that all edges are flush and there are no protruding corners.
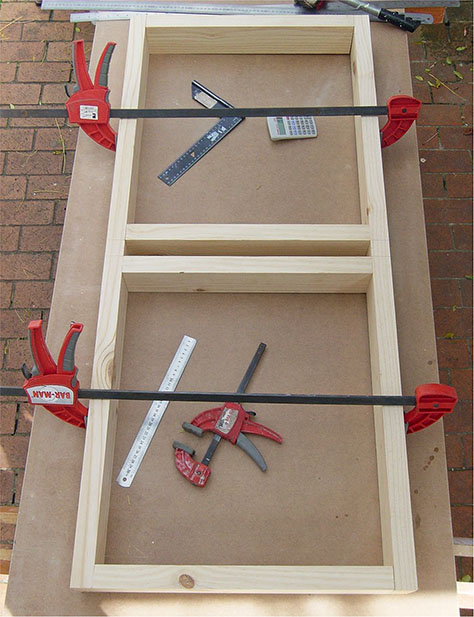
TIP: Later in the assembly we will be inserting the middle back support (G) between the stretchers (F x 2) in the middle of the seat frame. I found it useful to place the back support between the stretchers while clamping up the seat frame. This will ensure the back support can be inserted later.
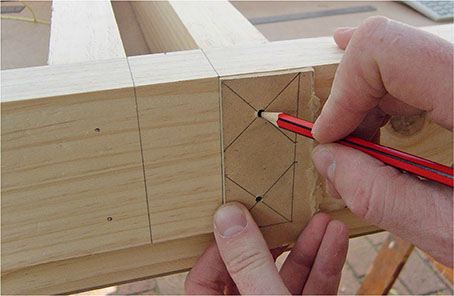
2 Make a marking template for the cut screw positions and mark off two screw holes for each butt joint, as shown in the photograph.
TIP: The marking template is simply an offcut of thin board that has been marked with the end dimensions of the short sides and stretchers (F x 4). Structurally, the best position for fastening the screws is found by intersecting 45-degree lines from the corners of the marking template. Re-using this template at each butt joint rather than remeasuring the positions each time makes the marking process much quicker.
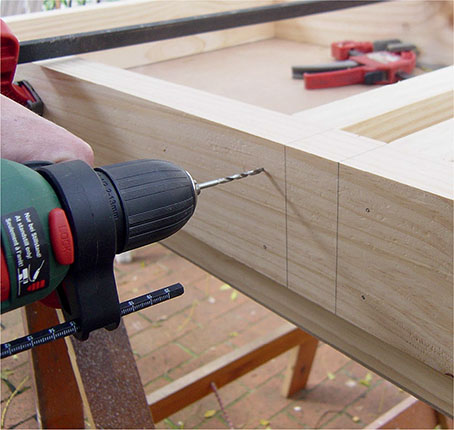
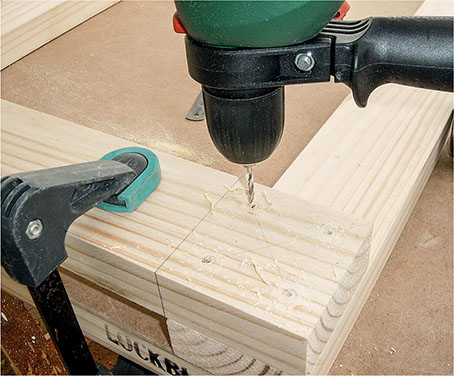
3 Use a power drill to drill pilot holes, then use an insert bit to fasten the joints with cut screws.
4 Lay out the components of one armrest support (A) and legs (E x 2) assembly. I used the edge of the work surface as a straight edge against which to measure a right angle between the armrest support and the legs. Clamp the assembly in place using quick grip clamps.
5 Mark screw holes, drill pilot holes and fasten with cut screws, as shown in the photograph. Repeat for the second armrest and leg assembly.
TIP: I used a socket wrench to tighten the cut screws the last few threads until the screwhead is flush with the wood surface, which locks the screw tightly in place and makes for a sturdier construction.
COMPLETE THE FINAL ASSEMBLY
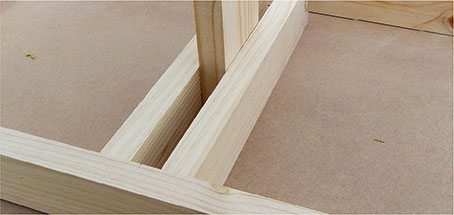
6 Lay the seat frame on its side and clamp the leg assemblies in place on both sides using long quick grip clamps, a rubber mallet to tap the parts into place and a try square to check for right angles. Make sure this is done according to the design dimensions, ensuring the underside of the seat frame is at the right distance from the end of the legs as this will ensure that the top of the seat will be at the ergonomically designed height.
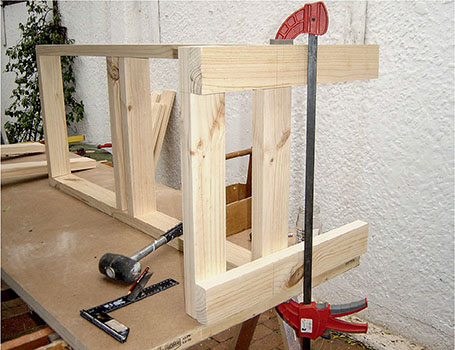
7 Drill pilot holes and fasten the full assembly with cut screws as before. This step requires a fixed workbench as you need to apply pressure higher up above the surface on which you have clamped the assembly.
TIP: When clamping, make sure the connecting surfaces of the seat frame and legs are tight against each other. This will ensure maximum strength in your final construction.

8 The seat frame, legs and armrest supports are now fully assembled. I found it practical to place this assembly on the ground for the following steps. Check again that the height of the seat frame is correct and use a try square to verify all right angles. Make any adjustments now to correct mistakes as it will be far easier than when the seat slats (B x 3) and back slats (H x 3) are in place.
9 Mark and cut the back supports (G x 3) according to the design dimensions. It is best to use a circular saw and mount the cutting piece on the edge of the workbench with a guide held in place with a quick grip clamp, as shown.
TIP: To position the cutting guide correctly, clamp it loosely to the work piece and position the blade of the circular saw at the beginning of the cut. Tap the cutting guide with a rubber mallet until the blade is in the right place, then clamp on that side. Repeat at the end of the cut and clamp fully before cutting. Also ensure you check the clearance between the cutting line and the work surface underneath the work piece so that you do not cut into your work surface with the circular saw!

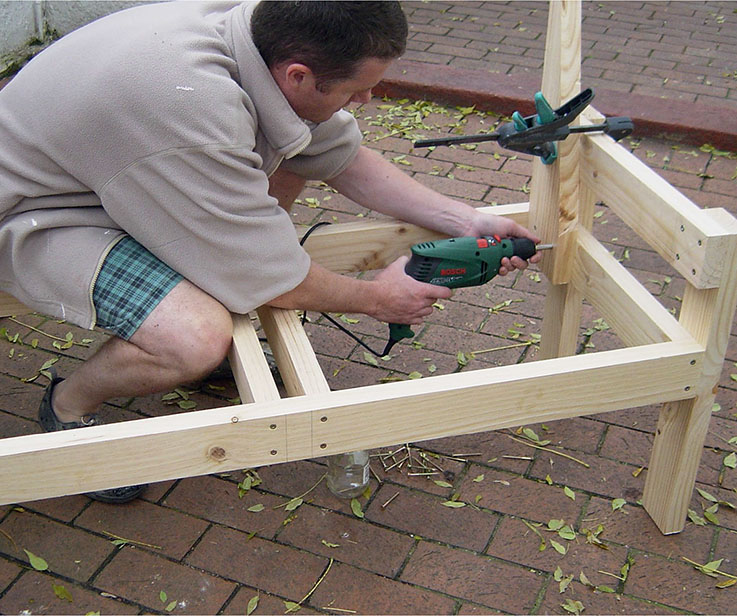
10Use quick grip clamps to clamp and fasten the right and left back supports (G x 2) to the seat and armrest support assembly, using pilot holes and cut screws as before.
TIP: You may wish to turn the assembly onto either end to ensure sufficient pressure as you drive in the wood screws. I simply sat on the assembly to hold it in place!
INSTALL THE ARMRESTS AND SLATS
11 Clamp and fasten the back slats (H x 3) to the back supports, working from top to bottom.
TIP: Use 6mm thick spacers to ensure a consistent gap between each slat on both sides, but do not clamp too tightly or you won’t be able to remove the spacers afterwards.

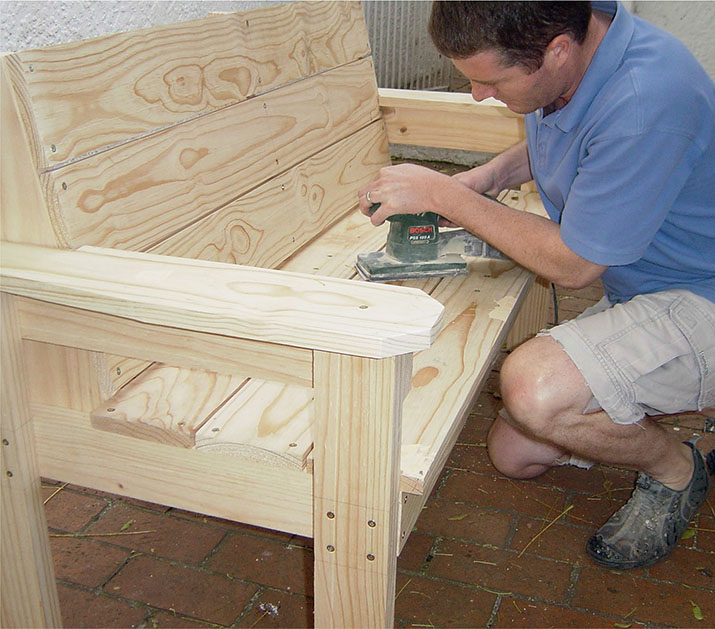
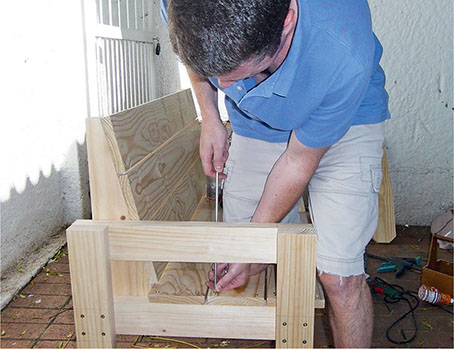
12 Mark the screw positions for the ends of the seat slats (B x 3) and clamp them all in position, making use of spacers again. You will need a long screwdriver to work past the armrest supports to fasten them in place. Instead of driving the screws all the way in by hand, you can also use an extension drill driver insert bit.
13 Mark out and cut the armrests (C x 2), using either a circular saw and guide or a jigsaw, as I did in this case. If you use a jigsaw you will find the cutting piece will slip away from you unless you block it using a quick grip clamp, as shown on the left of the work piece in the photograph.
TIP: Once both armrests are cut, place them together and file down any irregularities until the two shapes are exact replicas.

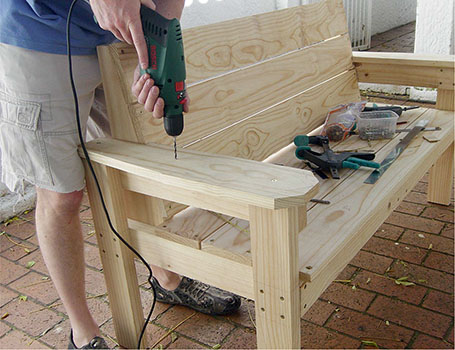
14 Clamp and fasten the armrests (C x 2) to the armrest supports (A x 2). Remember that unless you are painting the bench, the screw heads on the armrests (C x 2), back slats (H x 3) and seat slats (B x 3) will be more visible than elsewhere on the bench. You must therefore be completely certain that they are properly spaced, aligned and flush with the wood surface.
INSTALL THE MIDDLE BACK SUPPORT AND FINISH
15 Insert the middle back support (G) between the stretchers (F x 2) in the seat frame. Line it up against the back slats (H x 3) and fasten them to it in the same way as with the right and left back supports (G x 2).
16 Use a bolt-headed screw to secure the middle back support to the rear of the seat frame, as shown in the photograph. This will ensure sufficient strength in the final step of assembling the bench because you can achieve greater torque when tightening it with a spanner than when using an insert bit or screwdriver.

17Use a random orbital sander to sand off any burrs and to round off the edges of the armrests (C x 2) and the front edge of the front seat slat (B x 1). Do not round the edges too much as you may lose the aesthetically tight lines of the design, which is square and straight. Depending on your intended use, finish with outdoor paint or wood preservative. Apply an extra two coats of wood preservative if the bench is to be placed in constant sunlight.