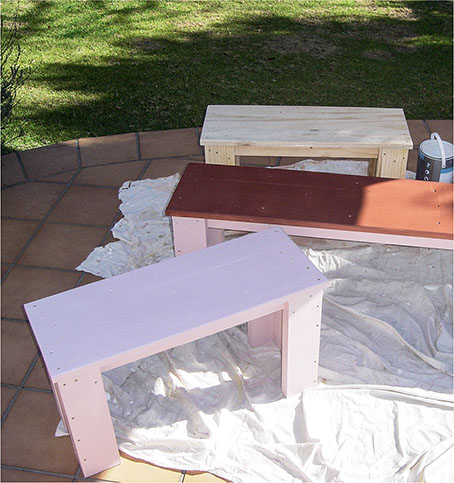
When my place of work installed a gym at the office, I made some additional benches in two different lengths for the changing rooms and workout areas. This style of indoor bench can be laid out in different seating configurations, such as classroom, campfire style and even end-to-end along the sides of a large room. Unlike more traditional benches with a back, they can be used from both sides or even at either end, which allows for more people to use them at the same time. For the gym at work, they are used by people needing to sit down while they change or stretch before a workout. Gym bags, clothes and other equipment may also be placed on or underneath them for temporary storage. In a family home these benches would be well suited to a table in a traditional farm-style kitchen.
Two different lengths were made – 830mm and 1800mm – each with a standard width of 93mm and a height of 324mm. The design is very solid and functional, using slightly thicker wood than for a more decorative garden bench. These benches are designed to take a significant amount of wear and tear, which usually takes place in gyms from excessive moving around. I put a chamfer around the edges to avoid a sharp corner underneath people's legs when they are sitting down, especially as they may be in shorts or loose gym wear. The longer version of the bench features an extra brace centred on the underside of the seat support assembly. The rest of the design is exactly the same for the two benches; only the length of the seat slats and seat supports vary according to the different overall length. Wood screws are used throughout, and there are six main components: four legs, the seat support and the seat.

This bench is hard wearing and very sturdy, with the long version being particularly useful in classrooms and school halls. Only the seat panels and supports have to be changed if you want to make a different length.
Family fun factor

WHAT I WOULD DO DIFFERENTLY NEXT TIME
In the original design I kept the joints between the seat slats flat and sanded them down to create a smooth surface. Adding a chamfer to the adjoining faces is a better idea, which improves form and function. Aesthetically this creates the slatted bench style and emphasises the use of multiple boards to create the seat, rather than one single piece of wood. This does add additional time to your project and as I was working toward the gym opening deadline, I had to cut the building tasks right down to the absolute minimum. Putting two of the short design benches together end to end can substitute for one long bench if you don't have one. If you need to do this regularly, you could also add hooks on the sides of the legs to hold them together.
SHORT BENCH
| PART | QUANTITY | THICKNESS | WIDTH | LENGTH | |
| A | Seat slats | 3 | 23mm | 108mm | 830mm |
| B | Legs part 1 | 4 | 35mm | 115mm | 430mm |
| C | Legs part 2 | 4 | 35mm | 70mm | 430mm |
| D | Seat supports, long | 2 | 23mm | 70mm | 730mm |
| E | Outer braces | 2 | 23mm | 178mm | 105mm |
LONG BENCH
| PART | QUANTITY | THICKNESS | WIDTH | LENGTH | |
| A | Seat slats | 3 | 23mm | 108mm | 1800mm |
| B | Legs part 1 | 4 | 35mm | 115mm | 430mm |
| C | Legs part 2 | 4 | 35mm | 70mm | 430mm |
| D | Seat supports, long | 2 | 23mm | 70mm | 1700mm |
| E | Seat supports, short | 2 | 23mm | 105mm | 178mm |
| F | Centre brace | 1 | 23mm | 178mm | 105mm |
Project information
| Overall dimensions | 830mm long x 324mm wide x 453mm high (short bench) 1800mm long x 324mm wide x 453mm high (long bench) |
| Number of parts | 15 (short bench) and 16 (long bench)(includes the centre brace F) |
| Special equipment | None |
| Techniques | Chamfer (see page 21) |
| Difficulty | Easy |
| Duration | 4 hours each |
Side view

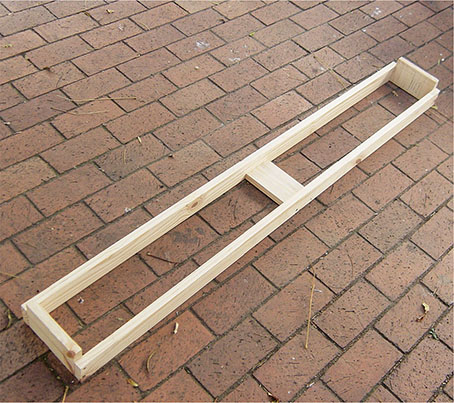
MAKE THE SEAT SUPPORT ASSEMBLY
1 Position the centre brace (F) between the long seat supports (D x 2) by marking a centre line on all pieces with a carpenter’s pencil. Line up the brace (F) with the inside centre of the seat supports (D x 2), as shown in the photograph.

2 Position and clamp the seat support assembly, which consists of the parts aligned above with the outer braces (E x 2), as shown in the photograph.
TIP: Position and clamp the quick grip clamps firmly but not too tightly so that you can then tap the braces into position with a rubber mallet as required and then tighten up.

3 Fasten the centre brace (F) in position between the seat supports (D x 2) using a power drill and two cut screws on either side. There is no need for a countersink but ensure that you drill pilot holes for each cut screw, otherwise the wood will split.

4 Fasten the outer braces (E x 2) with the same technique used for the centre brace (F). The entire seat support assembly is now complete and ready for the attachment of the four leg assemblies.
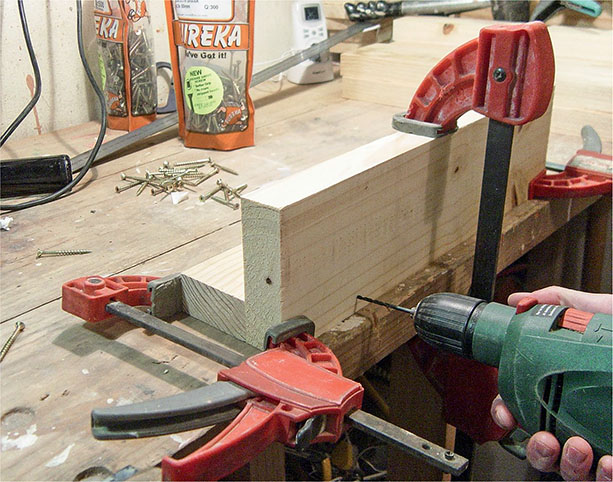
MAKE AND ATTACH THE LEG ASSEMBLIES
5Each leg assembly consists of two parts (B and C) that need to be fastened with a simple butt joint. Clamp these to your work surface with quick grip clamps, as shown in the photograph. Use a power drill to make pilot holes at equal spacing and fasten the parts together with cut screws.
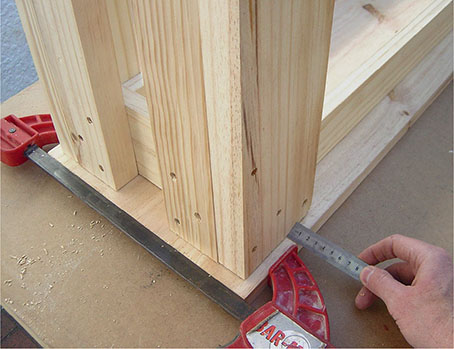
6 Repeat step 5 for the remaining three leg assemblies and check overall dimensions and right angles with a try square. As thick wood is being used, and if the edges of the wood are straight, the right angles will be quite accurate. These are now ready for fastening onto the seat support assembly at all four corners.

7 Fasten the leg assemblies onto the corners of the seat support assembly, as shown in the photograph. Use cut screws and a power drill with pilot holes, as before. The wider of the two components in the leg assembly must align with the length of the bench so that the joint in the leg assembly is not visible from the front.

MAKE THE SEAT AND FINAL ASSEMBLY
8 Rest the three seat slats (A x 3) on a level work surface and clamp in position with quick grip clamps, as shown in the photograph.
TIP: There is no need to glue these together as they will independently be fastened to the seat support.

9 Turn the completed seat support assembly upside down and place on top of the clamped seat slats (A x 3). Use a small steel ruler and adjust the position of the seat support assembly so that there is equal spacing all the way round the underside edge of the seat.
10 Once the spacing is correct, clamp the seat support assembly to the seat slats (A x 3) with quick grip clamps on either end, as shown in the photograph.
TIP: Do not clamp down to the work surface as later on you will turn the total bench assembly right side up and fasten the seat down.

11 Drill a pilot hole through the centre brace (F), as shown in the photograph, and then fasten it to the bottom of the middle seat slat with a cut screw.
TIP: Ensure that the length of the cut screw is less than the combined thickness of the brace and the seat slat, otherwise you will need to grind down the tip of the screw with a Dremel (see page 41).

12 Turn the assembled bench right side up and place it onto the ground for easier positioning while fastening. Drill pilot holes with a power drill at adequate intervals all round the edges and fasten down the seat slats to the rest of the bench, using cut screws.
13 Sand the top of the bench with a random orbital sander to ensure a smooth finish. Also apply the random orbital sander to the edges of the seat to achieve a 45-degree chamfer all the way round.

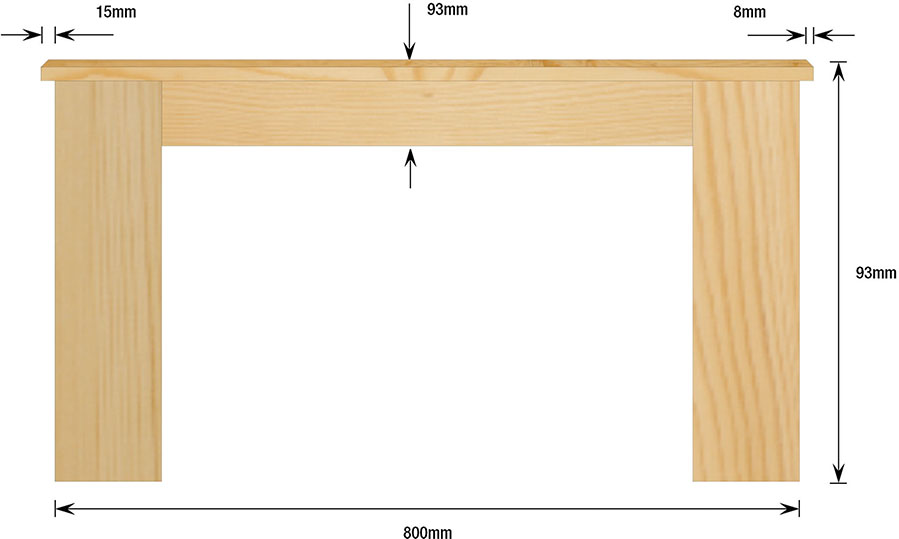
Front view of short bench
14 Prime the wood with one coat of wood primer and, once dried, finish with a paint colour of your choice.
15To build the shorter version of the bench, use the relevant cutting list and omit steps 1 and 11.

Top view of short bench

For clarity, the illustration is shown without the seat