
Begin with the following materials to get started knitting cables on circle looms.
Materials
• Knifty Knitter™ circle- and long-loom series from Provo Craft*
• Knitting tool included with loom
• Cable needle
• Crochet hook (for casting on)
• 2 size 5 (3.75mm) double-pointed knitting needles (for holding stitches)
• Yarn needle
• Split-ring stitch markers
• Scissors
• Measuring tape/gauge checker
• Blocking wires (optional)
*Samples were knit on Provo Craft Knifty Knitter series looms; however, patterns can be knit on other knitting looms. Be sure to check for gauge and peg count when substituting knitting looms.
Pattern Note
All of the patterns are worked in a clockwise direction around the knitting loom (where the first row starts from right to left).
Basic Techniques
Chain Cast On
To cast on, move your loom from left to right. Working yarn should end up on the right side to begin the first row (in order to have the first row start from right to left).
Make a slip knot and place it on the peg. Take the working yarn towards the inside of the loom.
Step 1: Insert crochet hook through the slip knot. Hook working yarn, forming a chain.
Step 2: Place chain on next empty peg to the right.
Step 3: Insert crochet hook through chain just made. Hook working yarn forming a chain.
Step 4: Place chain on next empty peg to the right (Photo A).
Step 5: Repeat Steps 3 and 4 until desired number of stitches have been cast on. Each peg will have 1 loop.
Knit Stitch (k)
The knit stitch is a smooth V-shaped stitch; it is identical to the knit stitch created with knitting needles.
Step 1: Place working yarn in front of the peg and above the loop on the peg.
Step 2: Insert knitting tool from bottom up and catch the working yarn with the tool, thus forming a loop.
Step 3: Hold the newly formed loop (from Step 2) with the knitting tool (Photo B).
Step 4: Pull up on the loop on the tool to take the loop that was originally on the peg, off the peg.
Step 5: Place the loop you are holding (from Step 3) on the peg. Pull on the working yarn to tighten the stitch.
Twisted Knit Stitch (also known as single stitch)
In needle knitting, this stitch is known as the twisted knit stitch or a stitch knit through the back loop.
Step 1: Take the working yarn (yarn coming from the ball of yarn) to the inside of the knitting loom.
Step 2: Moving in a clockwise direction around the knitting loom, encircle the peg counter clockwise with the yarn to form e-wrap (Photo C).
Step 3: Continue to e-wrap all the pegs. Each peg should have 2 loops on it.
Step 4: Using your knitting tool, lift the bottommost loop off the peg, let it fall towards the inside of the knitting loom.

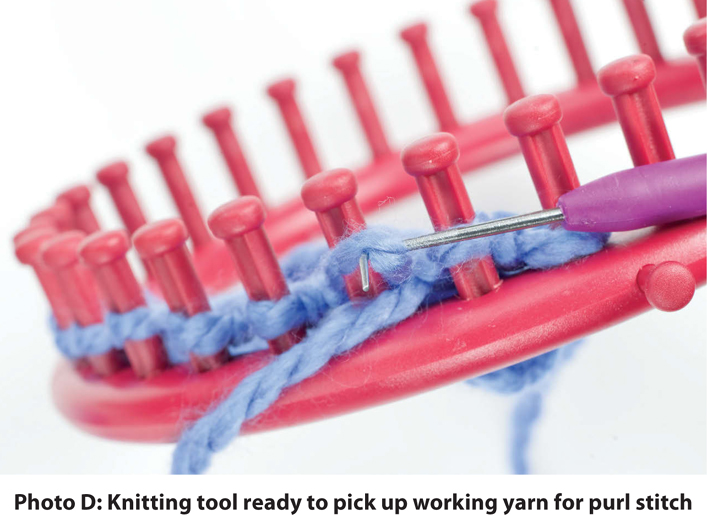
Purl Stitch (p)
The purl stitch is the opposite of the knit stitch. Instead of a smooth V, you will see bumpy fabric.
Step 1: Place working yarn in front of peg and below the loop on the peg.
Step 2: Insert knitting tool from the top down and hook the working yarn with the tool (Photo D).
Step 3: Pull the loop caught with the tool, up through the stitch.
Step 4: Continue to pull up on loop to remove the original loop from the peg.
Step 5: Place the loop you are holding (from Step 3) on the peg. Gently tug on the working yarn to tighten the stitch.
Stockinette Stitch
The stockinette stitch is created by knitting every row.
Garter Stitch
The garter stitch is formed by 2 rows.
Row 1: Knit.
Row 2: Purl.
The combination of these 2 rows creates 1 garter-stitch row and 1 garter-stitch ridge.
To attach a new skein of yarn at beginning of the next row, join the 2 ends of yarn with a slip knot. Knit the first 3 stitches of the row with both yarns together. Drop the old strand and continue knitting with the new strand.
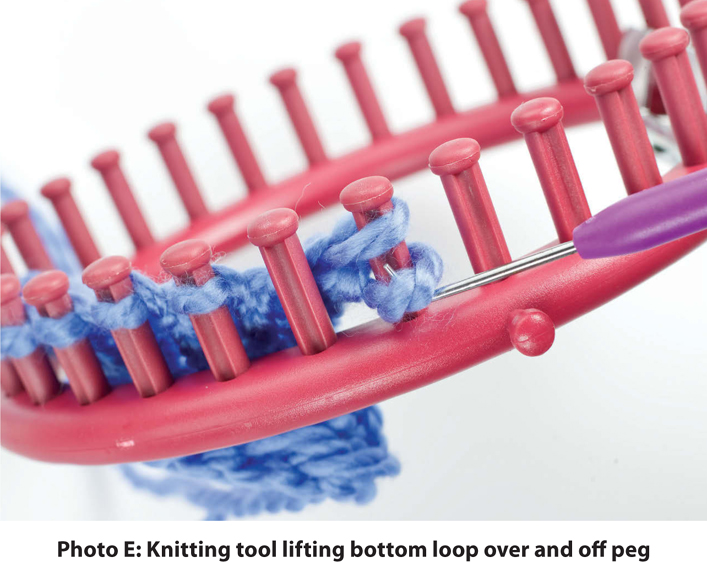
Basic Bind Off (also called flat removal method)
Step 1: Knit the item until you have only 1 loop on each peg. The working yarn is coming from the last peg. Knit the first 2 loops. Move the loop from the 2nd peg over to the first peg. Lift the bottom loop over the top loop and off the peg to bind off first stitch (Photo E). Move the loop from the first peg over to the vacated 2nd peg.
Step 2: Knit the next loop. Move this loop over to the previous peg. Lift bottom loop over and off the peg (2nd stitch bound off).
Step 3: Repeat Step 2 until all stitches have been bound off.
Step 4: When you reach the last peg, cut the working yarn leaving a 5-inch tail. Knit the loop. Remove the stitch from the peg. Pull the yarn tail end through the loop.
Shaping Techniques
Decreases
There are 2 decrease techniques used in this book, the terms used are the same as used in needle knitting.
These decreases take place on 2 pegs. Peg 1 is on the right and Peg 2 is on the left.
K2tog (knit 2 together—slants to the right)
Step 1: Take the loop from Peg 1 and place it on Peg 2.
Step 2: Knit all the pegs as you normally would. When you reach the peg with 2 loops, treat the 2 loops as 1 and knit them together.
Ssk (slip, slip, knit—slants to the left)
Step 1: Take the loop off Peg 1 and hold it. Take loop off Peg 2 and hold it. Place the loop from Peg 1 on Peg 2. Place the loop that was on Peg 2 back on Peg 2. Peg 1 is empty, Peg 2 has 2 loops.
Step 2: Knit all the pegs as you normally would. When you reach the peg with 2 loops, treat the 2 loops as 1 and knit them together.
Increases
M1 (Make 1)
Step 1: Create an empty peg where you need to increase a stitch by moving the loops to the outer pegs.
Step 2: With knitting tool, reach for the ladder that runs from 1 peg to the next, pick it up, twist it and place it on the empty peg.
Step 3: Knit on the knitting loom as usual, when you reach this peg, treat it just as any other peg and work it as per directions in pattern.
The yo increase is used in conjunction with the k2tog and the ssk decrease techniques.
Step 1: To create a yo, take the yarn towards the inside of the knitting loom.
Step 2: Go around the peg in a counterclockwise direction (e-wrap the peg).
Wrap & Turn Short Rows
When working a sock, the heel is created in 2 parts—a decreasing part and an increasing part.
The decreasing section requires the knowledge of a technique known as Wrap and Turn (W&T). The increasing section requires the knitter to knit over the wrap and the loop together.
Decreasing section
Short row: The term “short row” means that a row is not knit to the end; instead, knit to a certain point and stop. Then turn and knit back in the opposite direction. To avoid creating a hole, use W&T.
To work W&T short row
Step 1: Knit to the designated turning point. Take the next loop off the peg.
Step 2: Take the working yarn towards the inside of the knitting loom and wrap around the peg, bring the yarn towards the front of the loom.
Step 3: Place loop back on the peg. The peg now has 1 wrap and the knit stitch.
Step 4: Pick up working yarn and knit back in the other direction.
Be sure to leave the peg with the wrap untouched.
Increasing section
In the increasing section, the wrap and the loop are treated as 1 and knit together.
Cable Techniques
Cables over 2 stitches
LT (Left Twist)
Step 1: Skip Peg 1, knit Peg 2 (Photo F).
Step 2: Place loop from Peg 2 on cable needle.
Step 3: Move loop from Peg 1 to Peg 2.
Step 4: Place loop from cable needle on Peg 1.
Step 5: Knit loop on Peg 2.

RT (Right Twist)
Step 1: Place loop from Peg 1 on cable needle and hold to the center of the knitting loom (Photo G).
Step 2: Knit loop on Peg 2 and move to Peg 1.
Step 3: Place loop from cable needle on Peg 2.
Step 4: Knit loop on Peg 2.

RC (Right Cross)
Step 1: Place loop from Peg 1 on cable needle and hold to center of knitting loom.
Step 2: Move loops from Peg 2 and Peg 3 to Peg 1 and Peg 2 (Photo H).
Step 3: Place loop from cable needle on Peg 3.
Step 4: Knit all three Pegs.

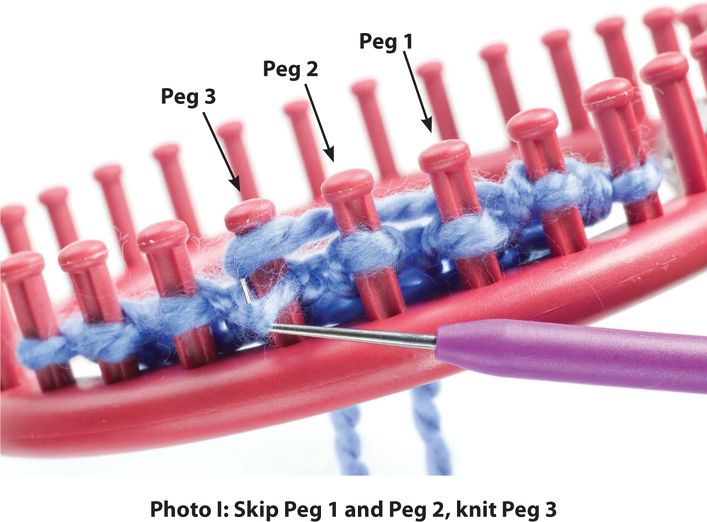
LC (Left Cross)
Step 1: Skip Peg 1 and Peg 2. Knit Peg 3 (Photo I).
Step 2: Place loop from Peg 3 on cable needle.
Step 3: Knit Peg 1 and Peg 2. Move loop from Peg 2 to Peg 3 and loop from Peg 1 to Peg 2.
Step 4: Place loop from cable needle on Peg 1.
Note: The following 3-stitch cables are worked in the same manner as the Right Cross and Left Cross except the crossing stitch is purled rather than knitted.
RPC (Right Purl Cross)
Step 1: Place loop from Peg 1 on cable needle and hold to center of the knitting loom.
Step 2: Knit Peg 2 and Peg 3. Move loop from Peg 2 to Peg 1 and loop from Peg 3 to Peg 2.
Step 3: Take loop from cable needle and place it on Peg 3.
Step 4: Purl loop on Peg 3.
LPC (Left Purl Cross)
Step 1: Skip Peg 1 and Peg 2. Purl Peg 3.
Step 2: Place loop from Peg 3 on cable needle.
Step 3: Knit skipped pegs. Move loop from Peg 2 to Peg 3 and loop from Peg 1 to Peg 2.
Step 4: Place loop from cable needle on Peg 1.
Cables over 4 stitches
4-st LC (4-stitch Left Cross—work over 4 stitches, on Pegs 1–4)
Step 1: Skip Peg 1 and Peg 2 (Photo J).
Step 2: Knit stitches on Peg 3 and Peg 4, place these loops on cable needle and hold to the center of knitting loom.
Step 3: Knit skipped loops on Peg 1 and Peg 2. Place loop from Peg 1 on Peg 3 and loop from Peg 2 on Peg 4.
Step 4: Place loops from the cable needle and on Peg 1 and Peg 2.
Step 5: Gently pull loop on Peg 3 and then the loop on Peg 4 to tighten the stitches.
4-st RC (4-stitch Right Cross—work over 4 stitches, on Pegs 1–4)
Step 1: Place loops from Peg 1 and Peg 2 on cable needle (Photo K).
Step 2: Knit Peg 3. Place it on Peg 1.
Step 3: Knit Peg 4. Place it on Peg 2.
Step 4: Take Loop 1 from cable needle and place it on Peg 3. Knit it.
Step 5: Take Loop 2 from cable needle and place it on Peg 4. Knit it.

Cables over 6 stitches
Note: Work in same manner as 4-stitch cables, except cross 3 stitches instead of 2.
6-st LC (6-stitch Left Cross—work over 6 stitches, on Pegs 1–6)
Step 1: Skip Peg 1, Peg 2 and Peg 3.
Step 2: Knit loops on Peg 4, Peg 5 and Peg 6, place these 3 stitches on cable needle and hold to center of knitting loom.
Step 3: Knit skipped loops. Place loop from Peg 1 on Peg 4, loop from Peg 2 on Peg 5 and loop from Peg 3 on Peg 6.
Step 4: Place loops from the cable needle on Peg 1, Peg 2 and Peg 3.
Step 5: Gently pull loop on Peg 4, loop on Peg 5, then Peg 6 to tighten the stitches.
6-st RC (6-stitch Right Cross—work over 6 stitches, on Pegs 1–6)
Step 1: Place loops from Peg 1, Peg 2 and Peg 3 on cable needle.
Step 2: Knit Peg 4 and place it on Peg 1.
Step 3: Knit Peg 5 and place it on Peg 2.
Step 4: Knit Peg 6 and place it on Peg 3.
Step 5: Take Loop 1 from cable needle and place it on Peg 4. Knit it.
Step 6: Take Loop 2 from cable needle and place it on Peg 5. Knit it.
Step 7: Take Loop 3 from cable needle and place it on Peg 6. Knit it.
Mattress Stitch
Lay the pieces side by side, with right sides facing up.
Start the seam at the bottom edge. First join the cast-on rows, inserting the yarn needle between the first and 2nd stitch in from the edge, underneath 1 of the “bars” of yarn that run between the stitches. Then, working with the other piece, do the same.
Pull gently on the yarn to close the stitches.
Grafting/Kitchener Stitch
Place stitches onto knitting needles as indicated in pattern, making sure that the stitches are set up on the needles correctly.
Insert the yarn needle into the first stitch on the needle closest from right to left, pull needle through, leaving stitch on the needle. Insert the needle into the first stitch on the back needle from the left, leave the stitch on the needle. Pull the yarn through.
Needles are set for grafting, following the next 4 steps:
Step 1: Insert the tapestry needle into the first stitch on the front needle from the left. Slip stitch off the needle.
Step 2: Insert the needle into the next stitch on the front needle from the right. Leave stitch on the needle. Gently pull on the working yarn to tighten stitch. Do not pull too much.
Step 3: Insert the needle into the first stitch on the back needle as if to right, and slip it off the needle.
Step 4: Insert the needle into the next stitch on the back needle as if to left. Leave this stitch on the needle. Snug up the yarn by pulling gently on the working yarn.
Repeat Steps 1–4. At the end, the needles will have 2 stitches remaining. Repeat Step 1 and then repeat Step 3.

Weave in the ends to the wrong side of piece.
I-cord
I-cords are used in this book as drawstrings.
3-stitch I-cord
Step 1: Cast on 3 stitches.
Step 2: Knit to end of row.
Step 3: Take working yarn to the back of the pegs and run the yarn behind the pegs to the front of Peg 1 (Photo L).
Step 4: Knit to the end of row.
Repeat Steps 3 and 4 until I-cord reaches desired length.
Bind off.
Pull on the I-cord to set the stitches.
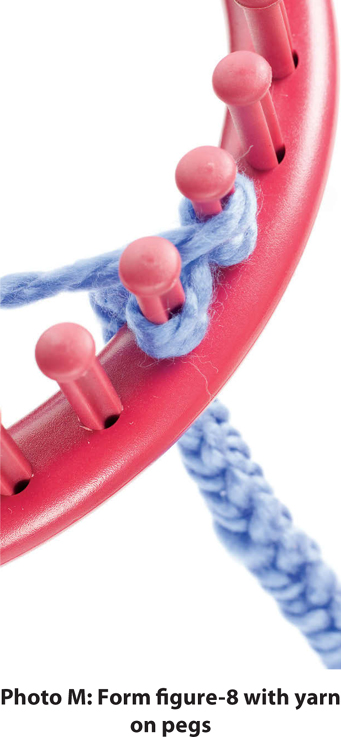
2-stitch I-cord
Step 1: Cast on 2 stitches.
Step 2: Form a figure 8 with yarn on both pegs (Photo M).
Step 3: Lift the bottommost loop off the peg.
Repeat Steps 2 and 3 until I-cord reaches desired length.
Bind off.
Pompom
Cut 2 doughnut-shape pieces out of cardboard, about 1 inch bigger than the desired size of pompom.
Cut a small square out 1 of the sides to create a small opening.
Sandwich a piece of yarn in between the 2 cardboards, tie a temporary knot.
Grab working yarn and wrap it around the 2 pieces of cardboard. Start at the left and move towards the right.
When the cardboard is completely full, find the temporary knot and hold on to it. With scissors slip in between the 2 pieces of cardboards and begin cutting around the circle. When you are finished cutting, tighten the knot securely.
Trim pompom to desired size.
Set the washer to the smallest setting, regular cycle and hot water. Add 1 tablespoon of Eucalan Woolwash or shampoo.
Designer Note: Eucalan Woolwash saves rinsing the item by hand and makes the wet wool smell better.
Place the item to be felted in a zippered pillowcase; put it in the washer. Add 2 pairs of jeans to aid in agitation. It is not recommended to use towels, as these may leave fuzz in felted items. Start the washer.
Check the felted items frequently. Stop the machine completely before placing your hand inside. If additional felting is required, reset the washer and continue the felting process. Check the progress closely and shape item as the felting process continues by pulling at the corners. Item is felted when it feels firm, and the stitches are indistinguishable. Keep felting the bag until you are completely satisfied. It may take a few cycles. Do not let the machine go into the rinse-and-spin cycle, as this will create creases that are very difficult to remove.
When the item reaches the desired look, remove it from the zippered pillowcase, place it between towels and squeeze out as much water as possible. Shape again by stretching damp item over a suitable-sized form. If nothing that resembles the shape is available, use plastic bags inside to give it its form. The felted item should fit over the fitted form snuggly. Shape all the corners. Make sure that everything looks the way you want it to look. Feel free to pull at it. Do not let it dry until you are completely satisfied with the way it looks. Once it looks the way you desire, let it dry completely, away from sunlight and from any heating vents. It may take up to 2 full days to dry completely. Keep shaping it during the drying process, if you so desire. ![]()

