Advanced Lessons
After learning how to paint flowers, birds, fishes and shrimps from the Introductory Lessons, we will practice the common combinations of various objects in this chapter.

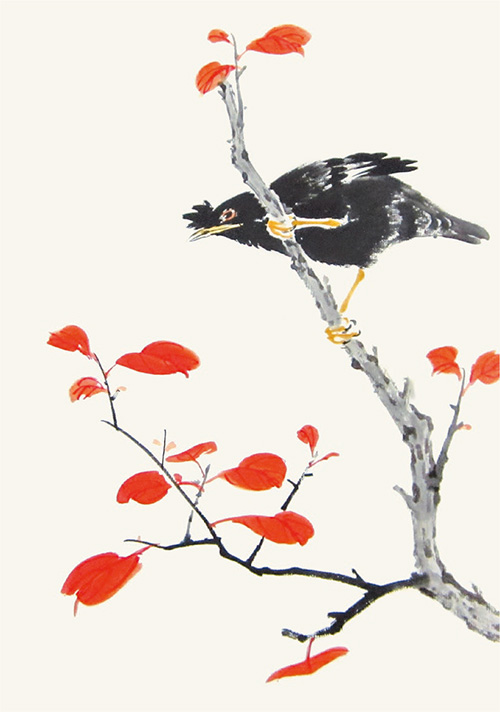
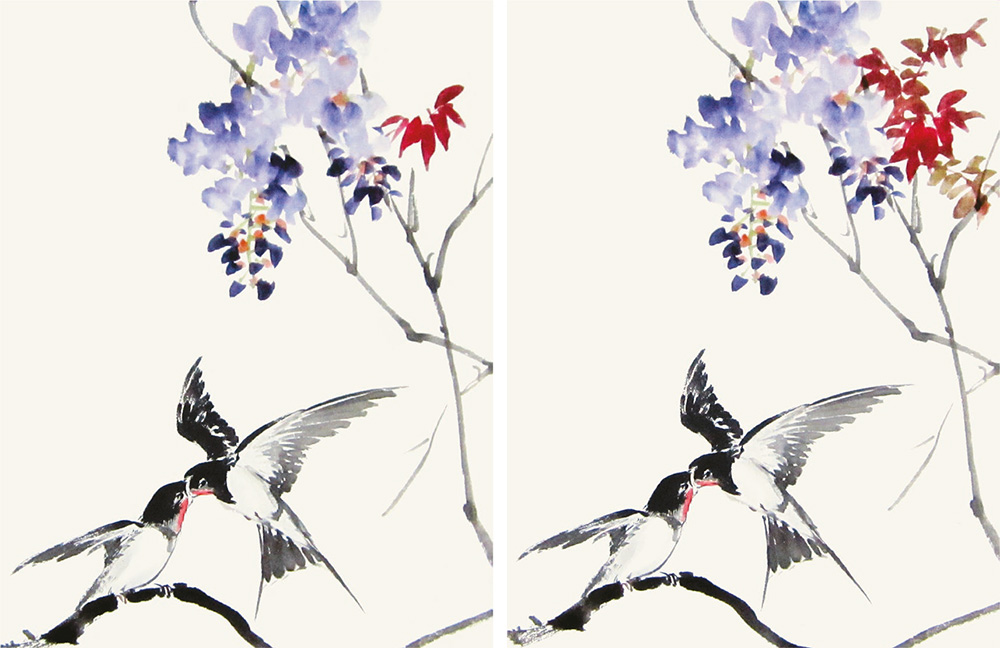
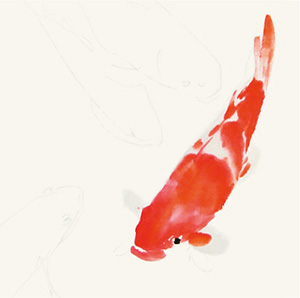
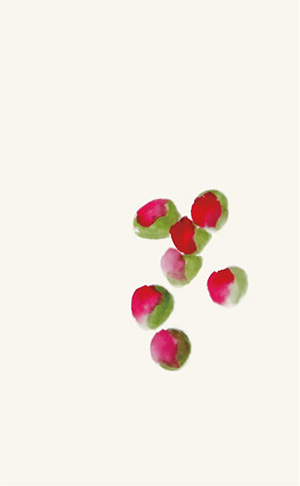
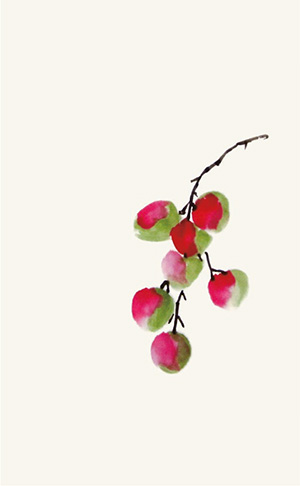
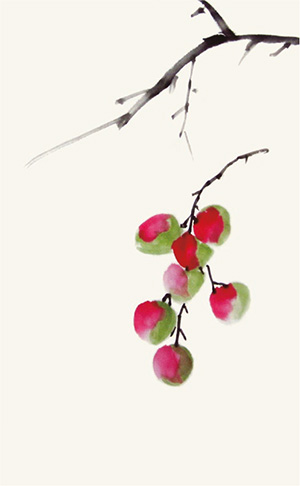
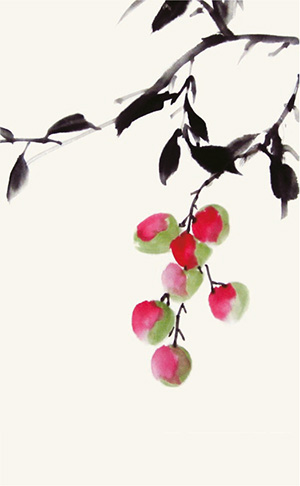
Fig. 32 Munia and the Red Leaves
Height 50 by width 50 centimeters
The white munias stand on the twigs. Their red bills and the red leaves complement each other, forming a simple and yet interesting composition.
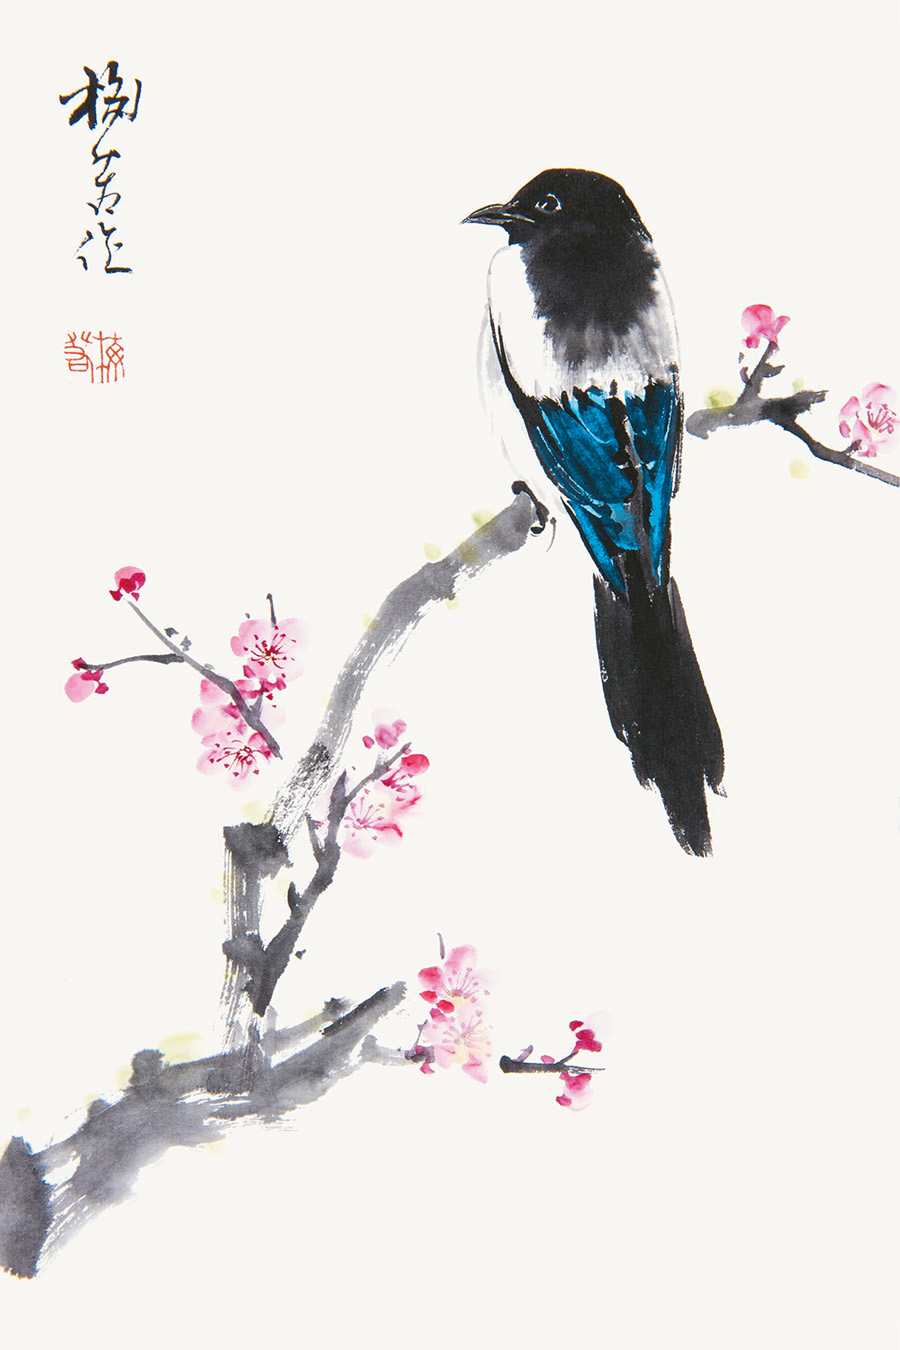
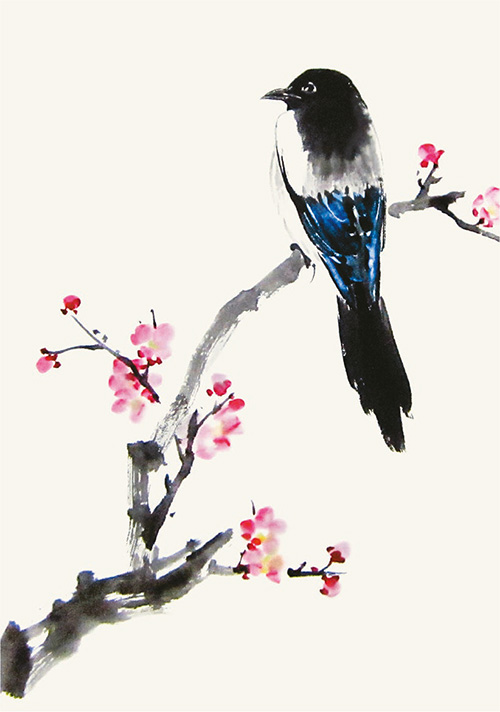
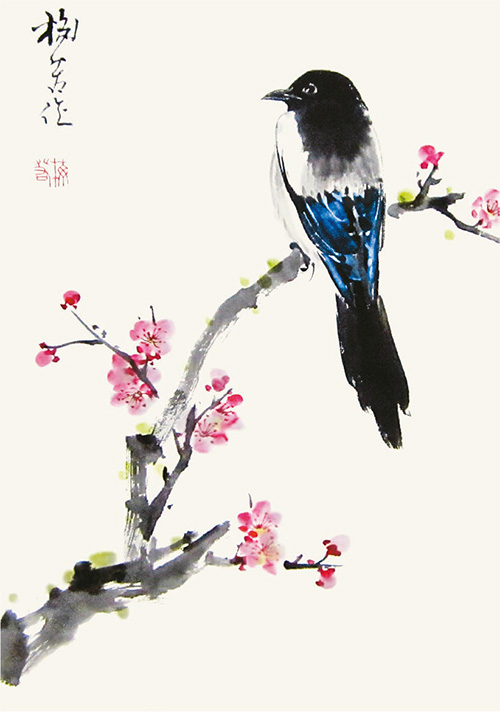
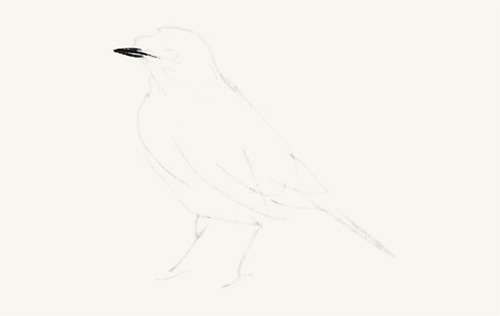
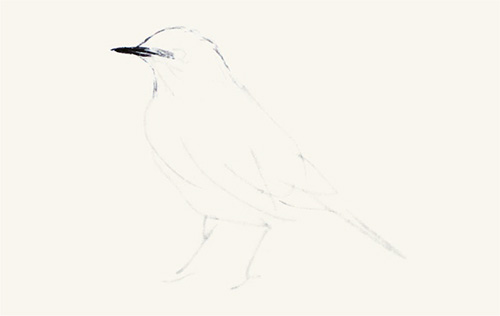
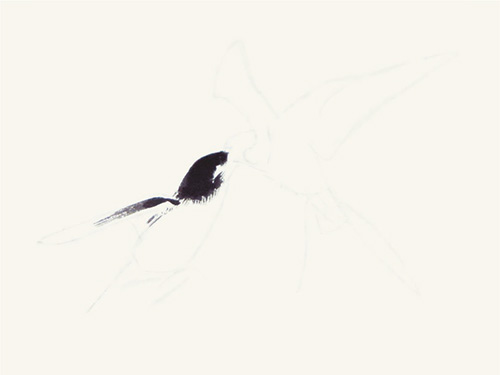
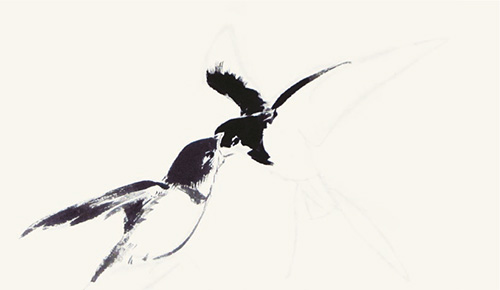
1. Magpie on Plum Blossoms
A magpie resting on a plum tree is a symbol of happiness. Chinese believe a magpie can bring joy and luck; thus, “magpie on plum blossoms” is a popular auspicious theme for Chinese painting.
We have learned how to paint magpie (see page 166) and plum blossom (see page 27) in the Introductory Lessons. When combining them, you need to pay attention to their positions.
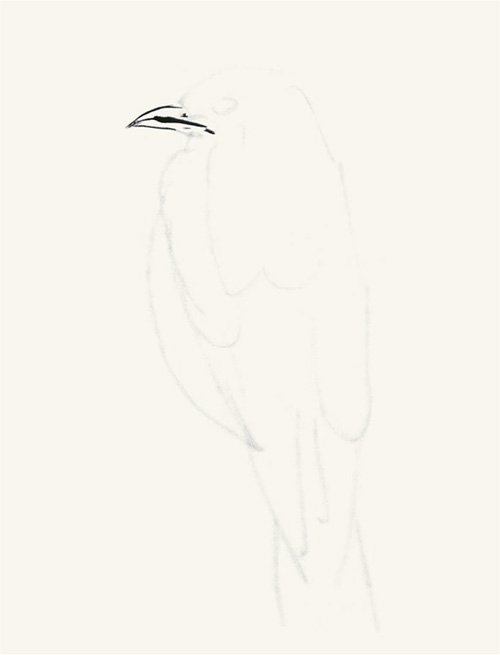
1 Determine the position of the magpie. You can outline the body with a pencil first and then outline the beak with ink.
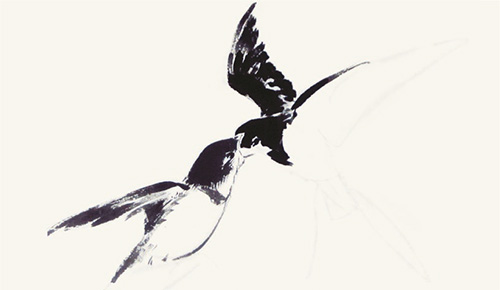
2 Paint the eye with dark ink.
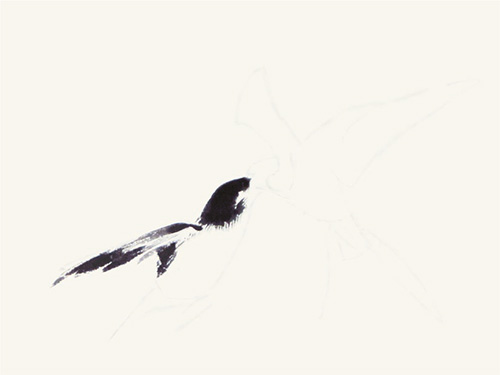
4 Paint the chin with dark ink.
5 Paint the back with dark ink.
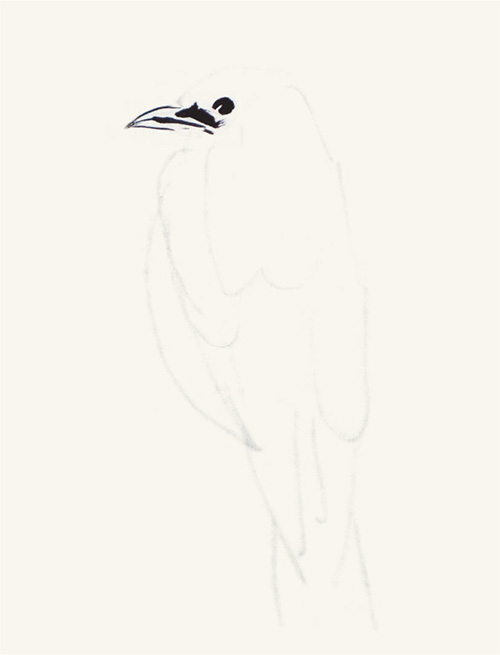
6 Outline the shoulder with light ink and leave it empty of color.
7 Paint the covert feathers with dark ink.

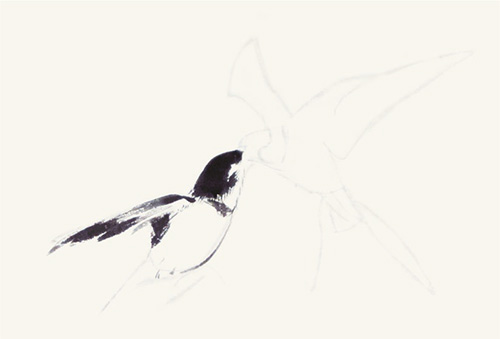
8 Continue to paint the flight feathers with dark ink.
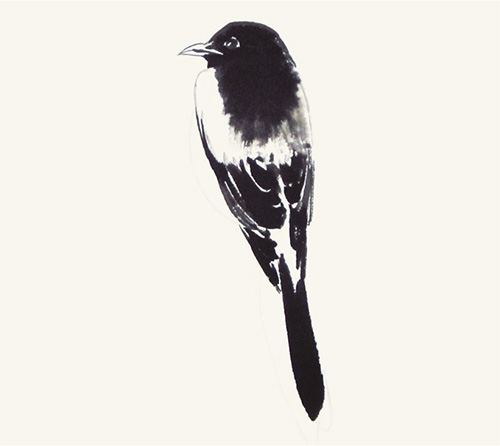
9 Paint the tail with dark ink.

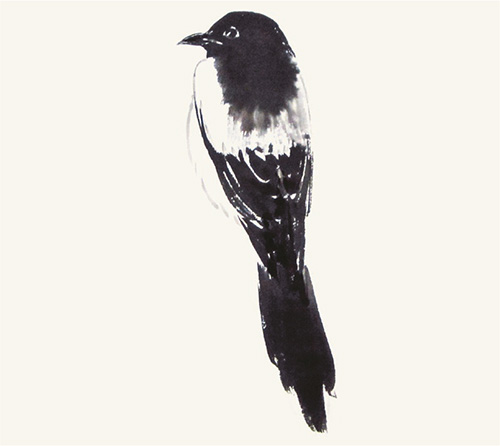
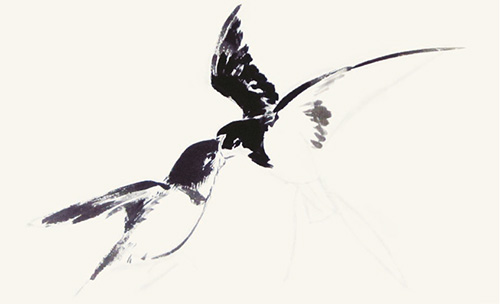
11 Fill the empty space of the wings with ink. Then fill the bill with ink.
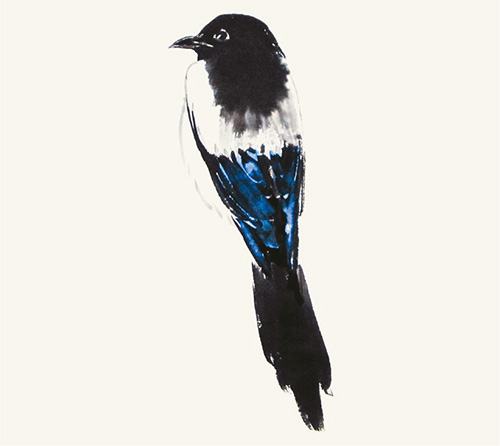
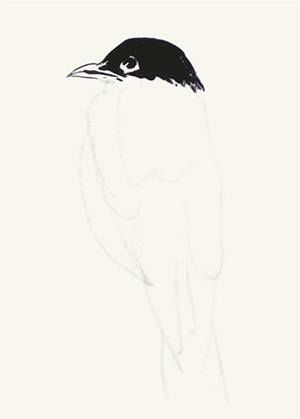
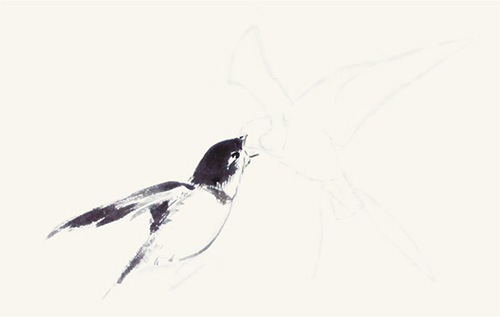
12 Color the wings with azurite.
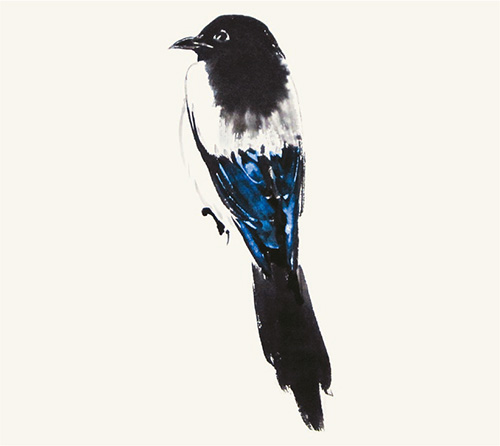
13 Add the foot.
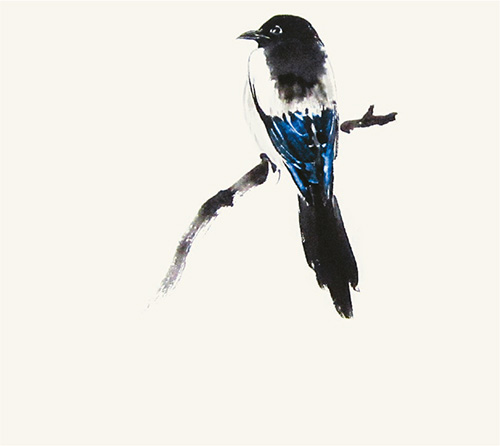
14 Add the plum branch below the foot to illustrate the scene of a magpie resting on a tree.
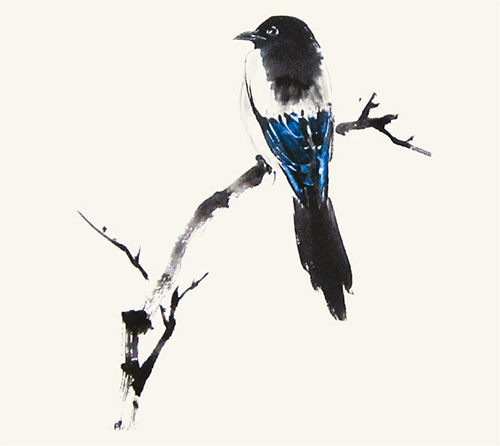
15 Add more branches on the right and the bottom.
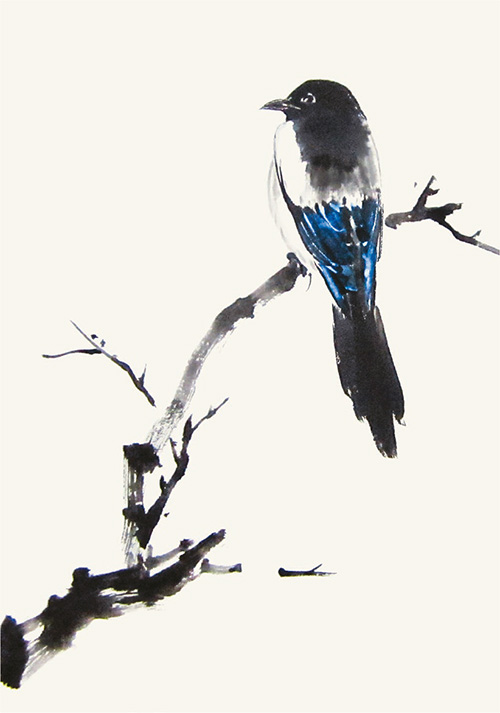
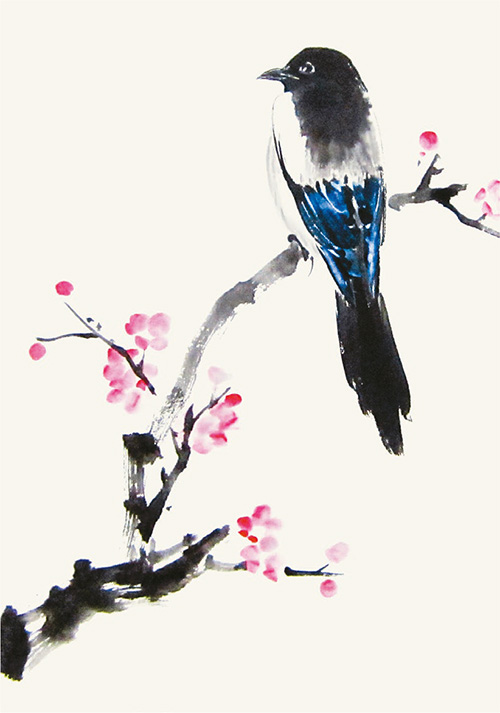
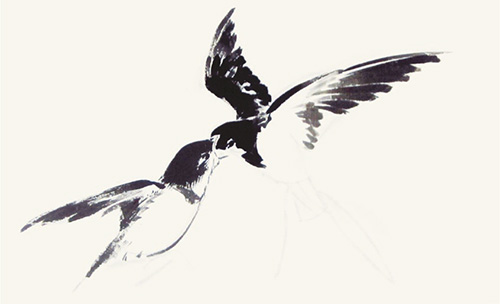
17 Mix titanium white with eosin to paint the plum blossoms.
18 Paint flower centers with dark green and receptacles with rouge.
19 Paint the stamens with rouge or eosin. Add dark-green moss on the branches to complete.
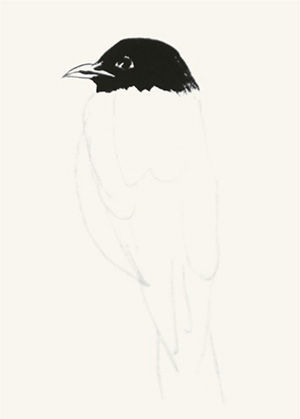
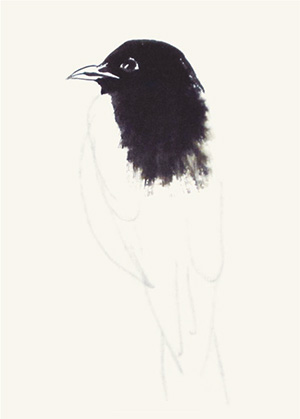
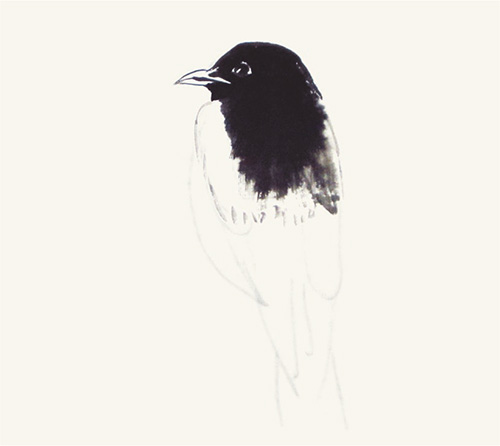
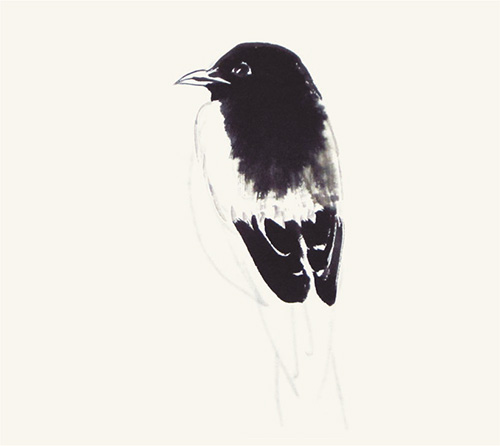
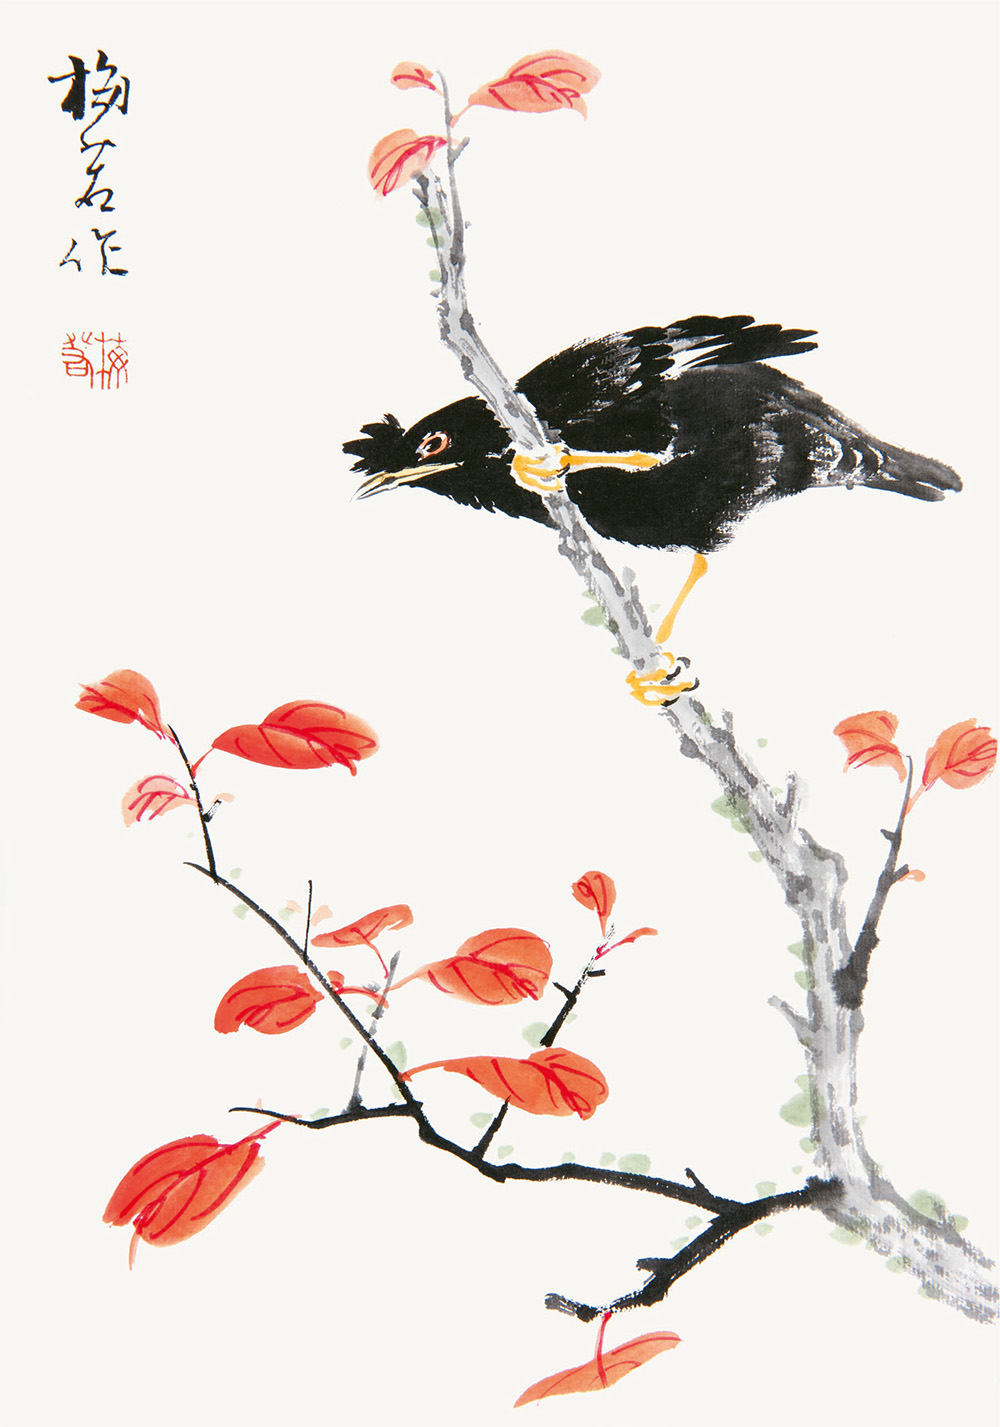
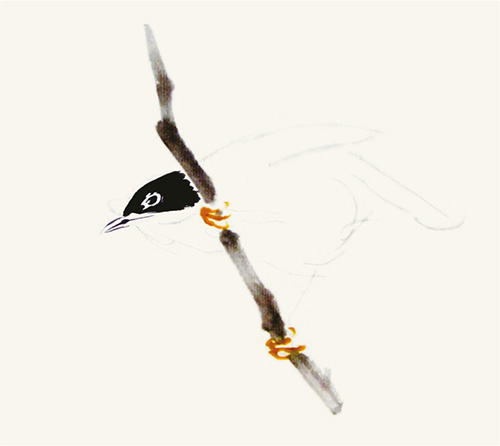
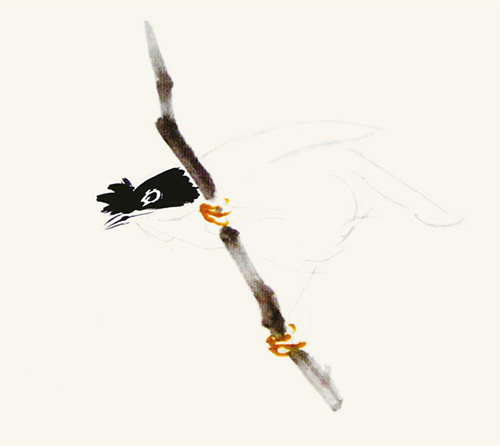
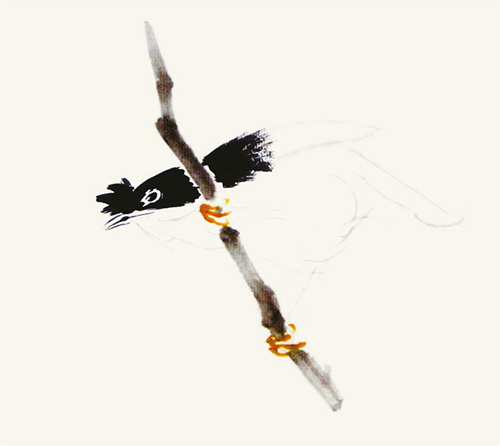
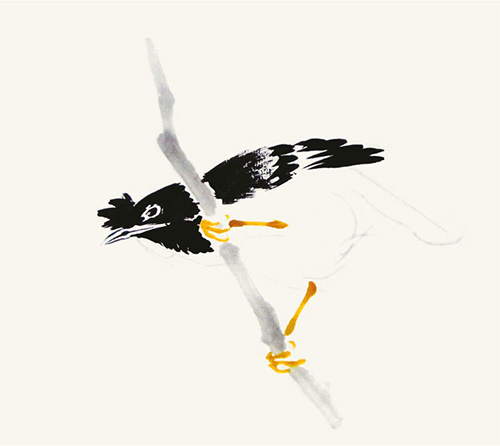
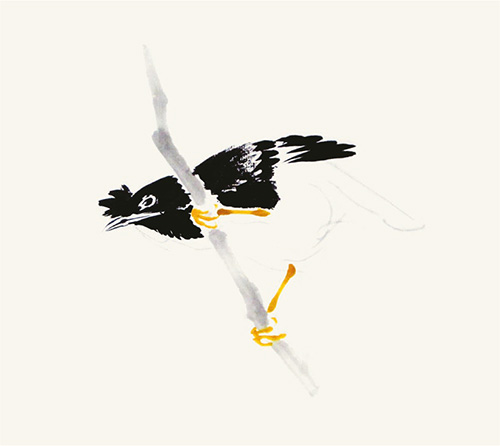
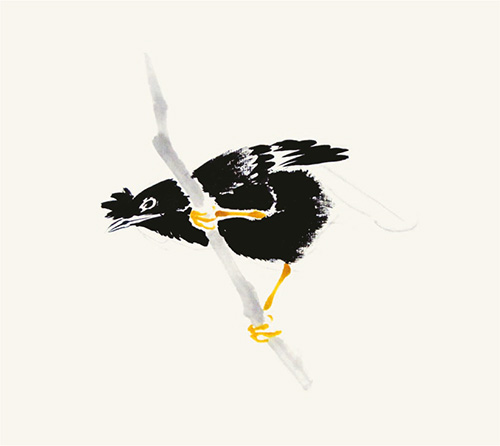
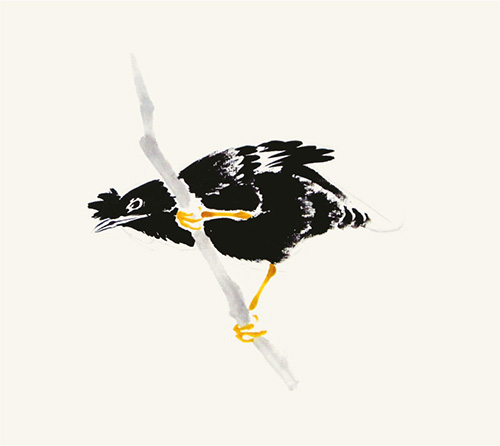
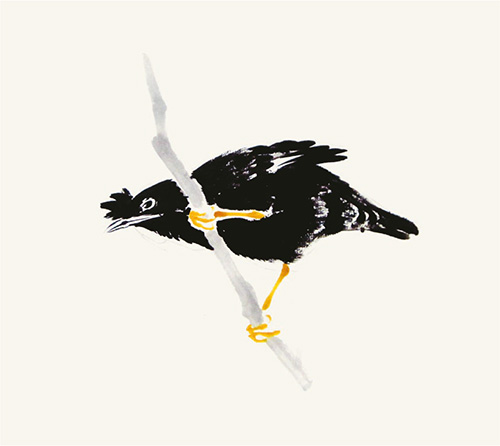
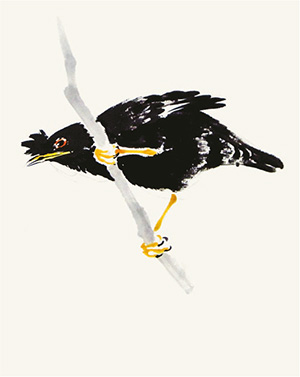
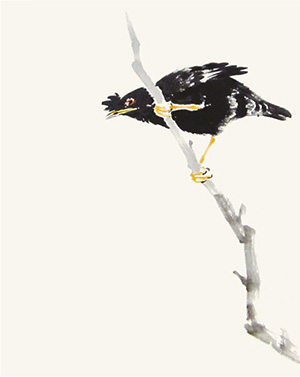
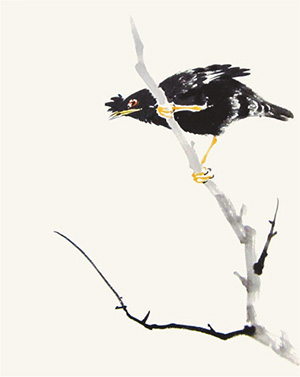
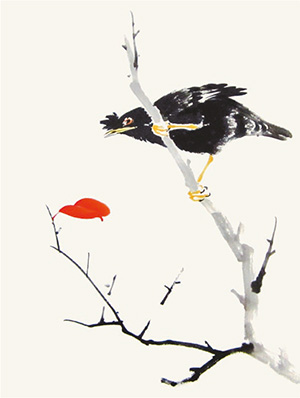
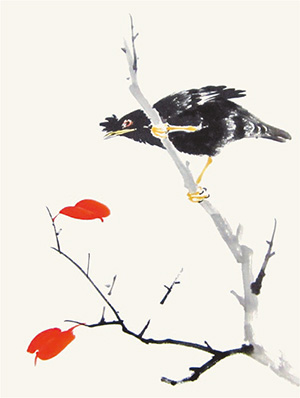
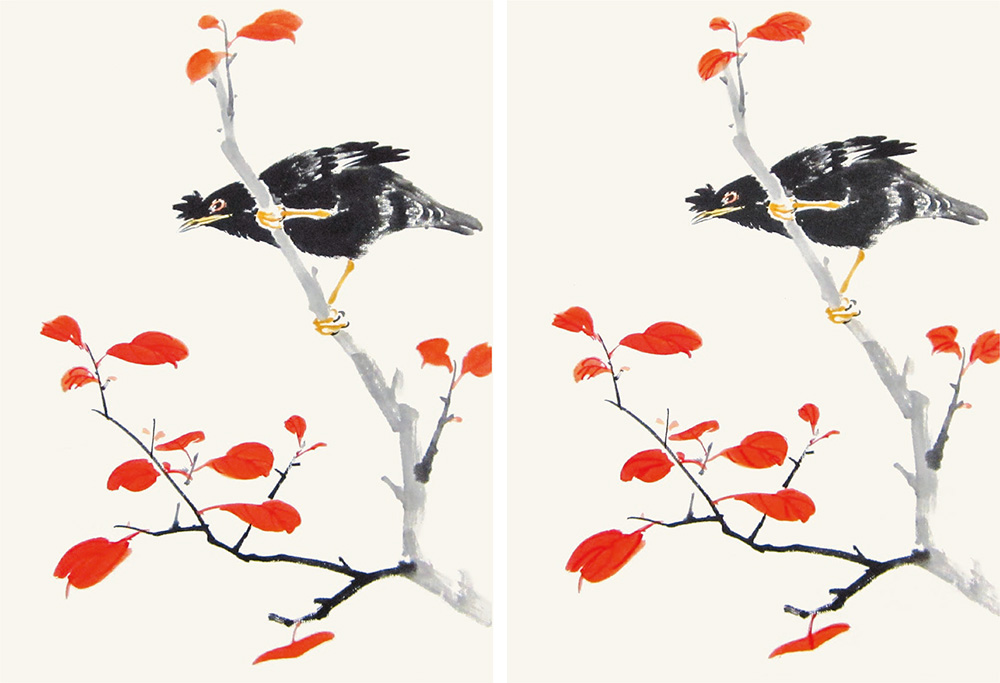
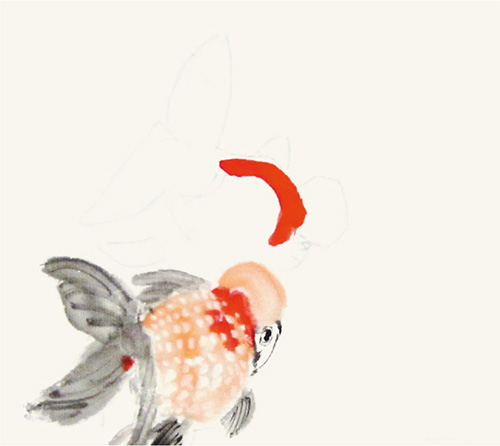
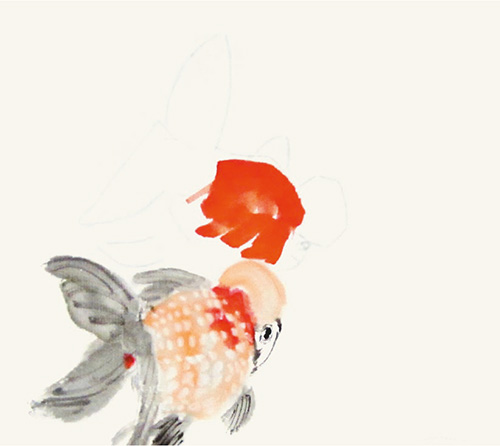
2. Crested Myna with Red Leaves
The crested myna with red leaves is a popular theme in Chinese painting. The red leaves are brightly colored while the black crested myna seems like it will leap from the branch any time, forming a vivid contrast of activity and inertia.
Refer to the painting techniques of crested myna (see page 154), camellia leaf (see page 44) and plum branch (see page 27) in the Introductory Lessons for this painting.
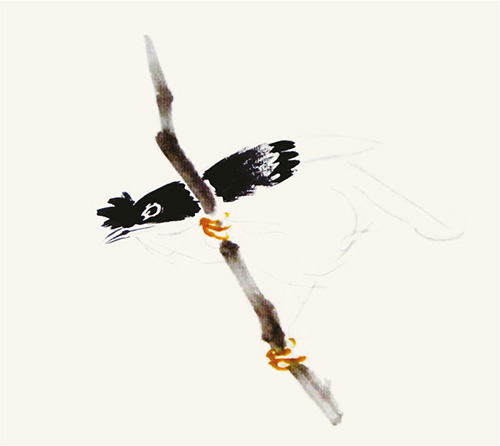
1 Sketch the shape of the bird with a pencil. Mix gamboge and ocher to draw the claws of one foot first.

2 Draw the other foot’s claws.
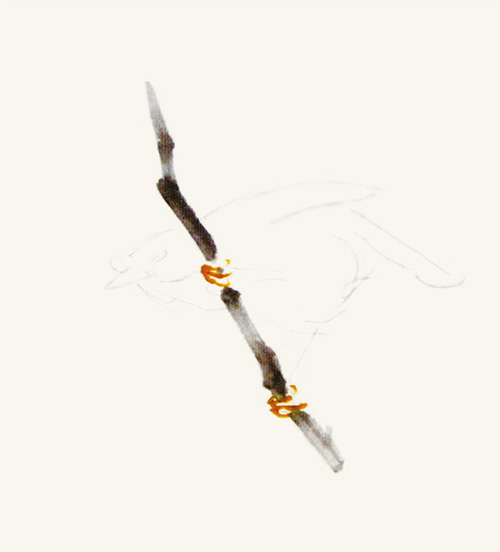
3 Paint the branch and pay attention to the variation of color shades.

4 Outline the bill with light ink using three strokes.
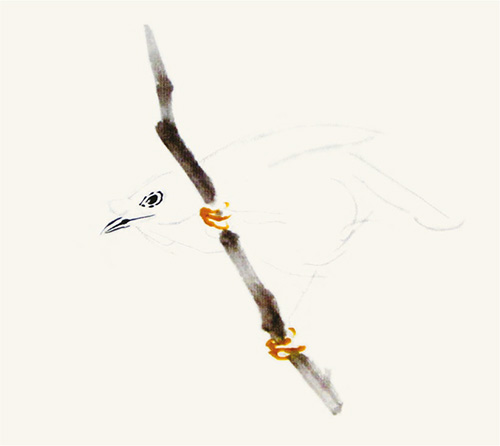
6 Paint the head with dark ink.
7 Paint the crest on the head with dark ink.
8 Paint the back using the simao stroke.
9 Dip the brush into dark ink and paint the covert feathers.
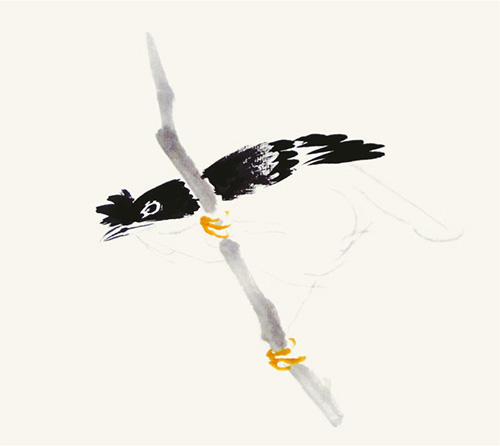
10 Paint the flight feathers with dark ink.
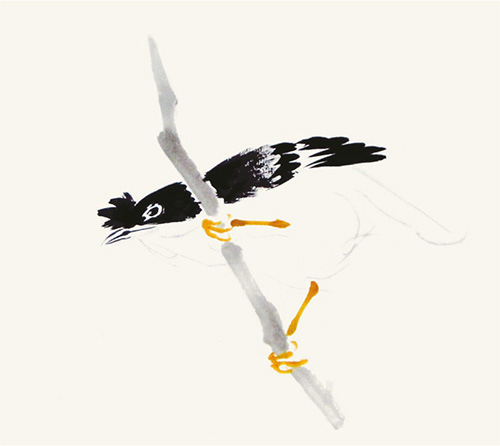
12 Paint the cheek and throat with dark ink.
13 Paint the upper part of the body with dark ink.
14 Paint from the breast and belly to the tail using the simao stroke.
15 Paint the uppertail coverts using the simao stroke.
16 Paint the tail with dark ink.
17 Paint the eye with vermilion or eosin. Color the bill with gamboge and the empty space with titanium white.
18 Extend the branch to the lower right.
19 Paint the small branches, which are darker.

20 Paint the twigs in the pattern of the Chinese character 女, and leave spaces for the red leaves.
21Mix vermilion and eosin to paint the red leaf using two strokes, one up and one down.
22 Add another leaf at the lower left.
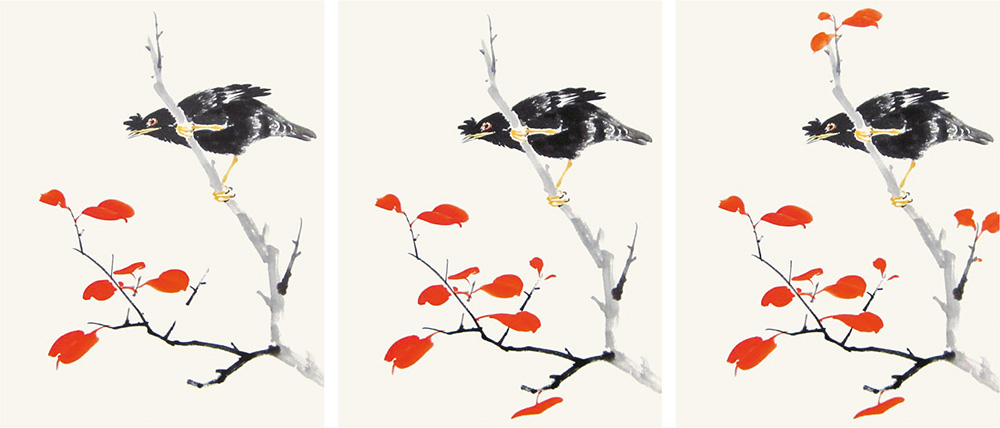
23 Continue to add more red leaves in different sizes and orientations.
25 Partially outline the branch with light ink to emphasize the rough surface texture.
26 Add dark-green moss on the branches to complete.
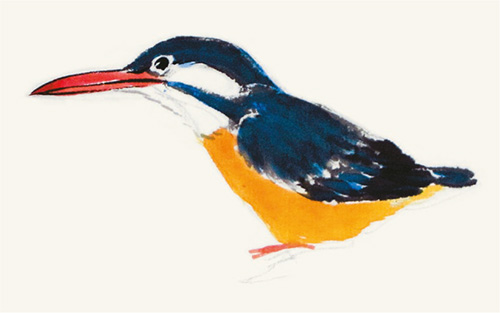
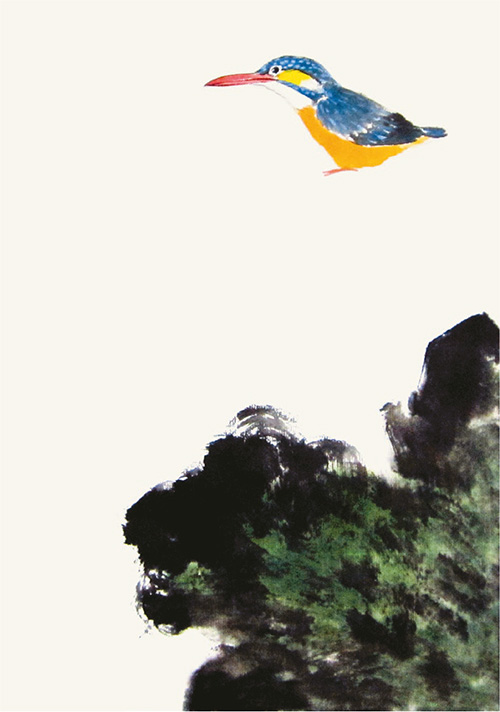
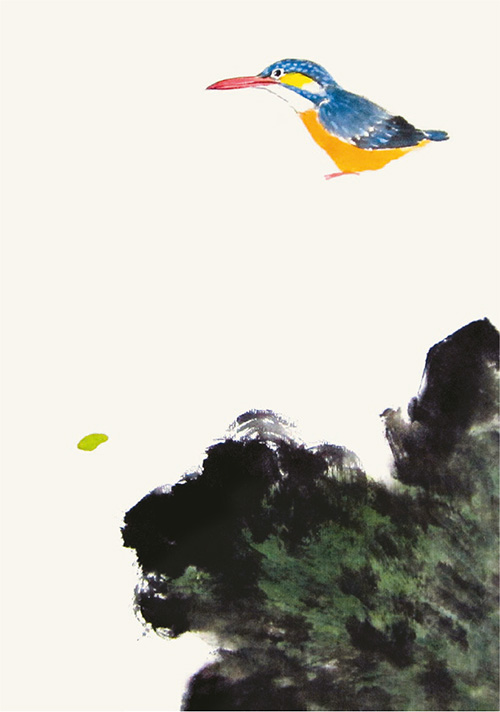
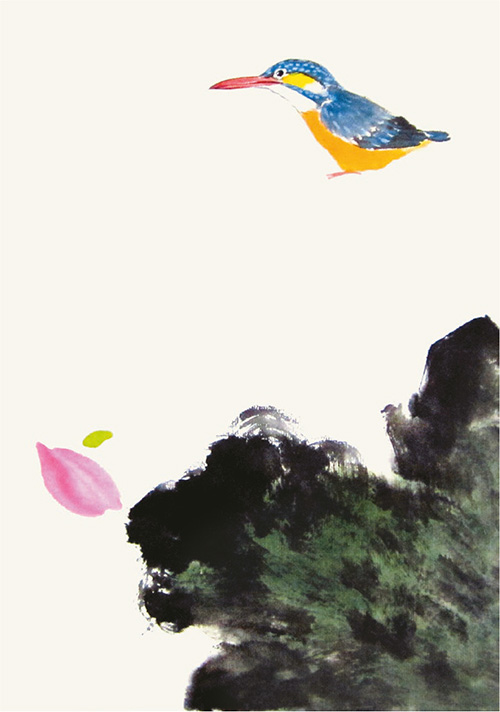
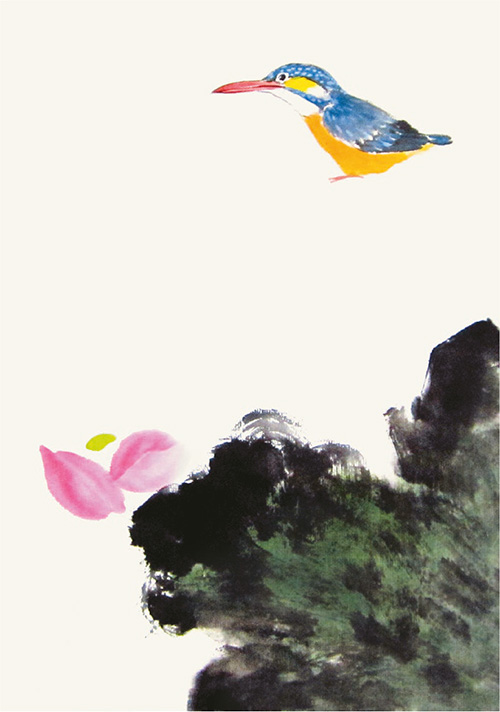
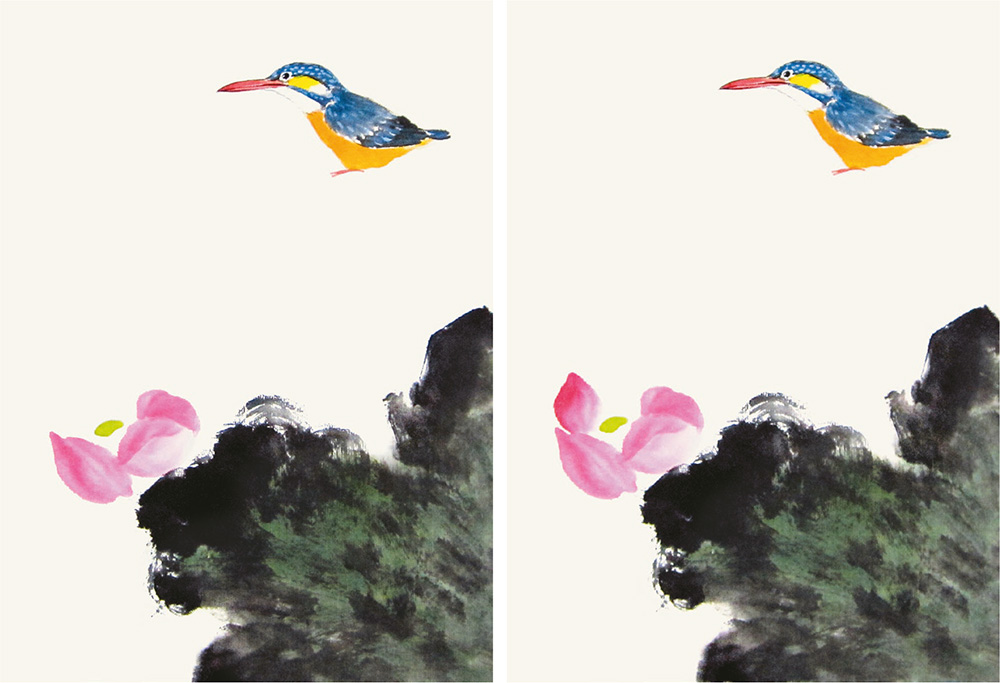
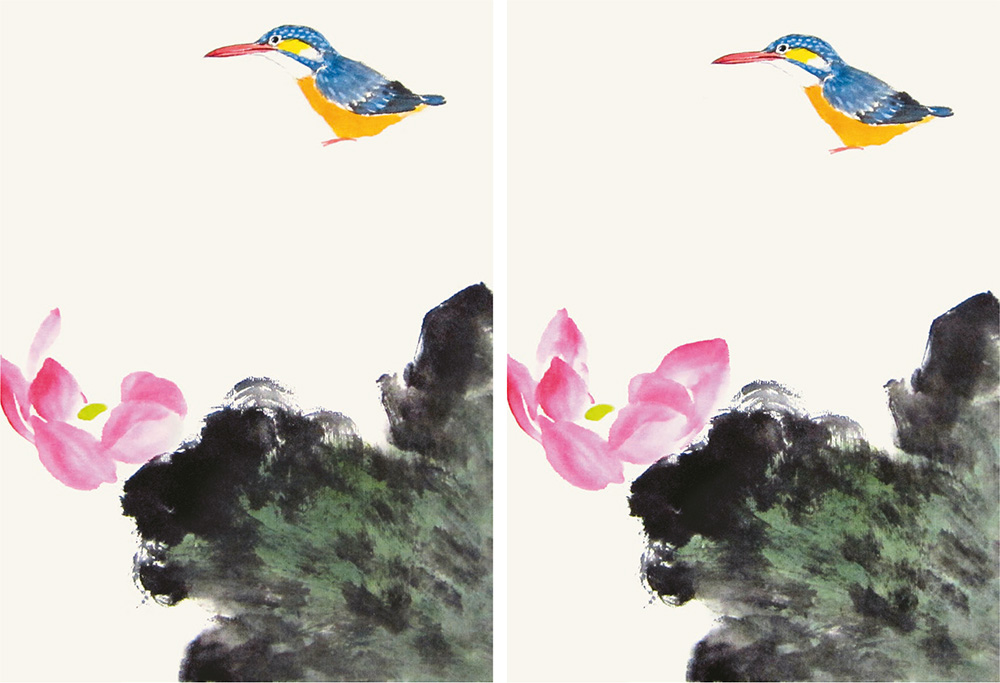
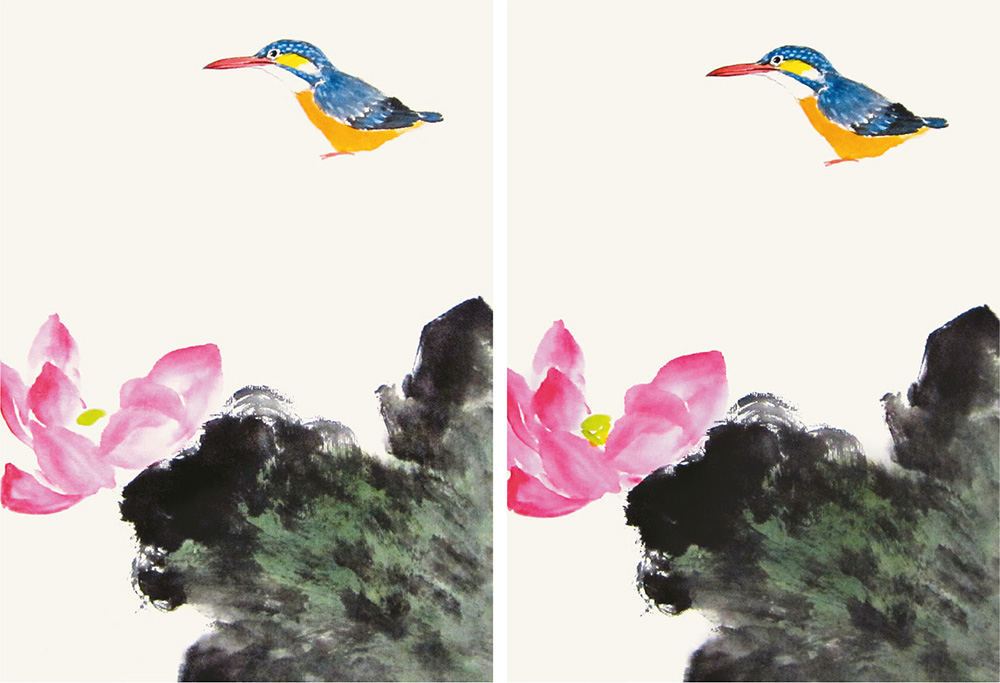
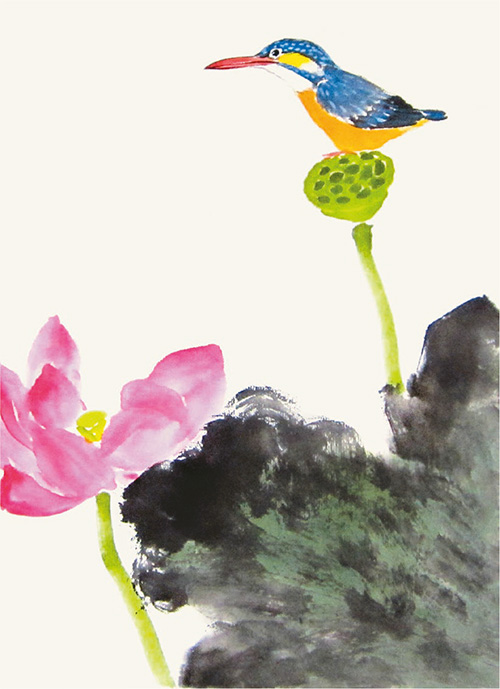
The kingfisher and the lotus are both popular themes in Chinese painting. The brightly colored kingfisher is playing among the blooming lotus, erect seedpod and fluttering water plants, forming a vivid natural scene.
The painting techniques of lotus and kingfisher can be found in the Introductory Lessons (see pages 56 and 158). In this lesson, we will also introduce painting techniques for the lotus leaf and seedpod.

How to Paint Lotus Leaf
To paint a big lotus leaf, start from the edge and paint toward the center to shape the leaf with charred ink. It is like sweeping the floor to gather the dust. This is a highly xieyi-style painting technique.
1 Let’s paint the kingfisher first. Draw the bill with three strokes. Paint the eye with dark ink and leave the highlight.
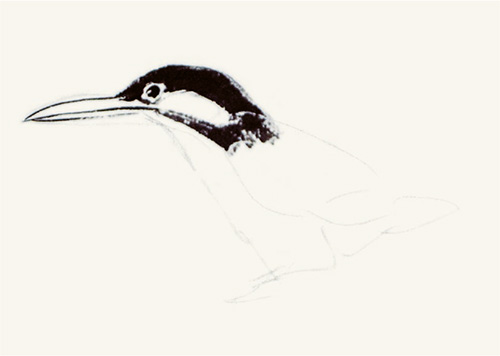
2 Paint the head and cheek. Be sure to leave the empty space in the middle.

3 Use the simao stroke to paint the back with light ink.
4 Paint the covert feathers with dark ink.

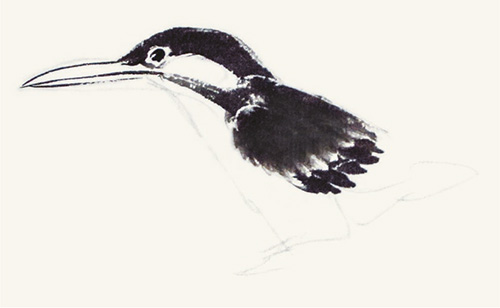
6 Outline the cheek and throat with light ink.

7 Mix gamboge and vermilion to paint the breast and belly from the top downward.

8 Mix vermilion and eosin to paint the bill and feet.
9 Cover the black feathers with azurite after the ink on the feathers is dry.
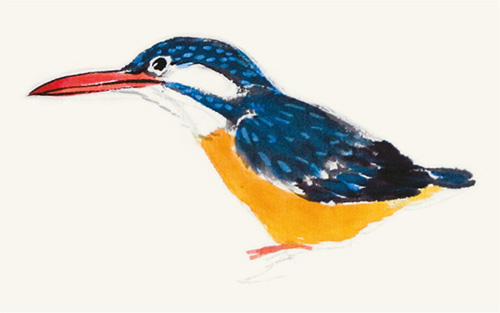
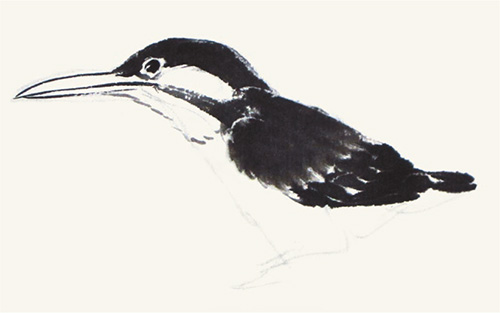
10 Mix azurite and titanium white to dot the head, back and wing. Pay attention to the orientations of the dots.
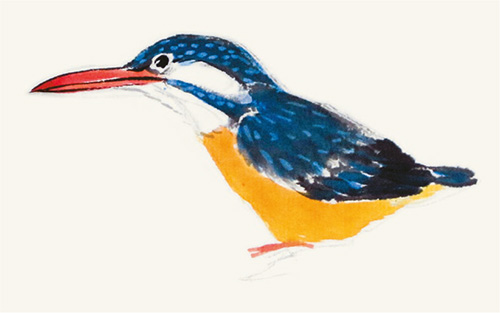
11 Paint the empty spaces with titanium white.
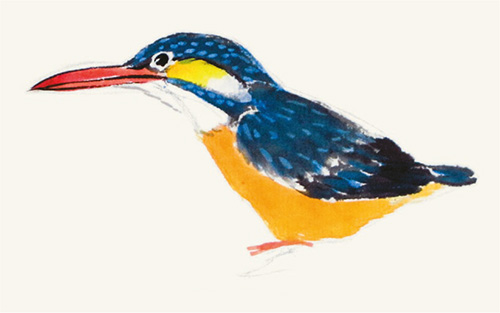
12 Paint half of the white space next to the eye with gamboge.

14 Add dark green when the ink of the leaf is still wet.
15 Then paint the lotus flower. Paint the seedpod using dark green (with more gamboge) first.
17 Paint another petal and pay attention to the gradient color.
18 Paint the first layer of petals.
20 Complete the lotus.
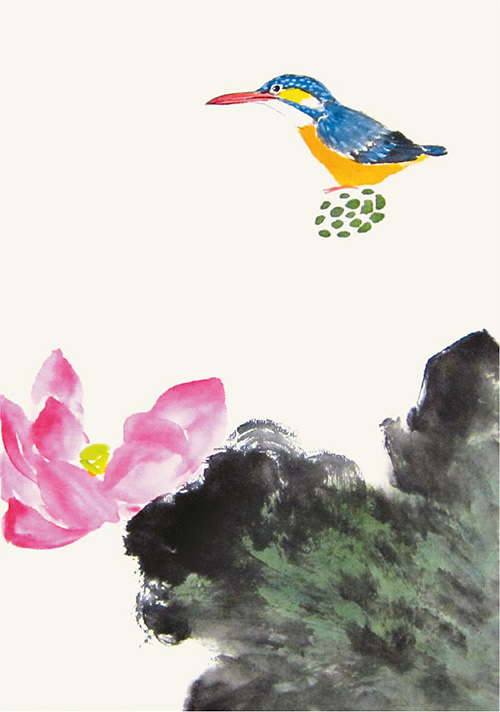
21 Paint the dark-green seedpod below the feet of the kingfisher, starting with the lotus seeds by dotting.
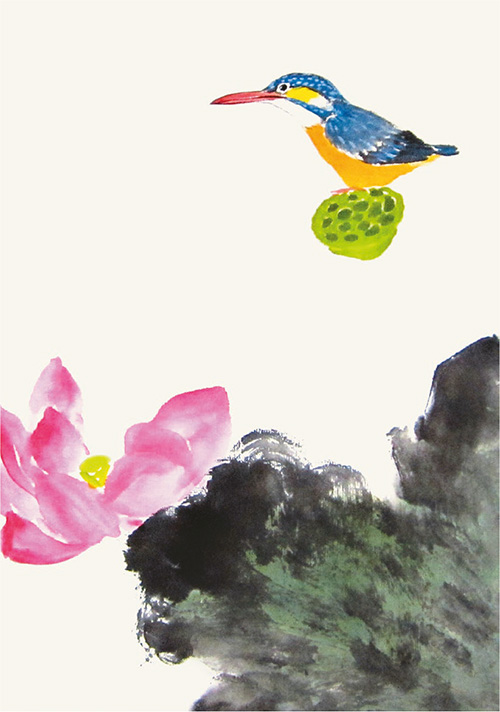
22 Complete the seedpod with dark green (with more indigo).
23 Paint the dark-green stems of the seedpod and lotus.

24 Paint the ocher remnants of the stamens around the seedpod. Add ocher dots on the stems as thorns. Paint one more leaf at the lower left with dark green.
26 Outline the leaf veins on the lower-right leaf while it is still wet.
27 Mix gamboge, vermilion and rouge to paint the stamens. Add dots on the seedpod using ink as the protruding seeds.
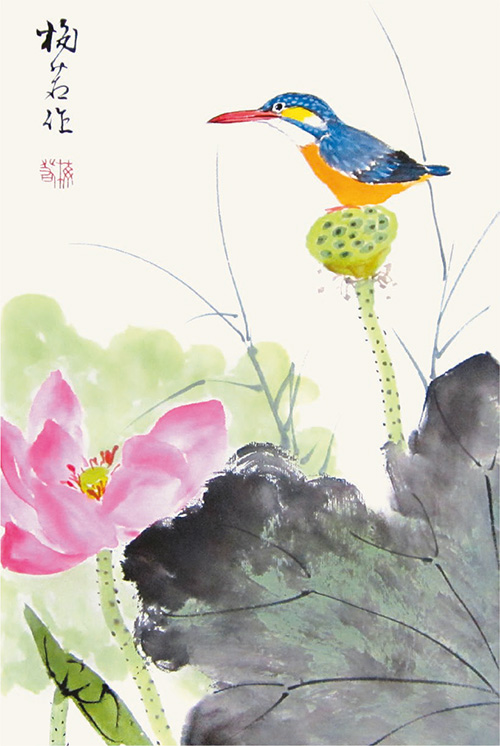
28 Paint the water plants next to the seedpod using ink or indigo to complete the picture.
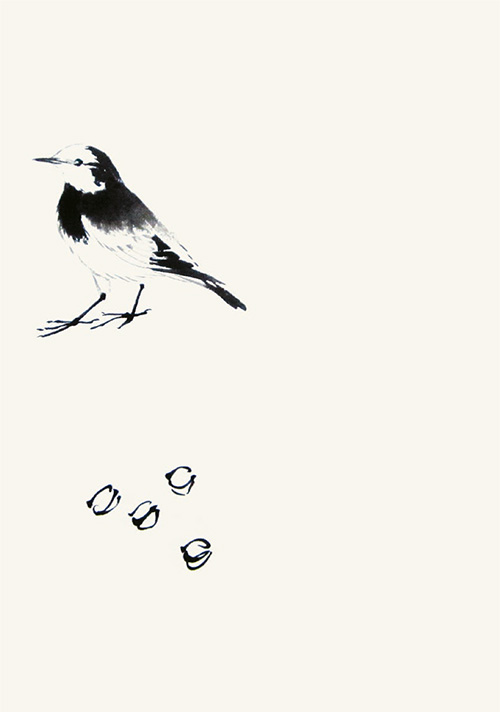
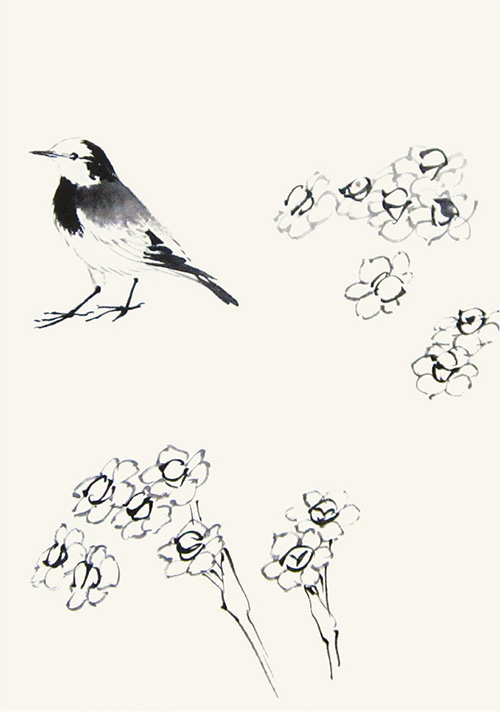
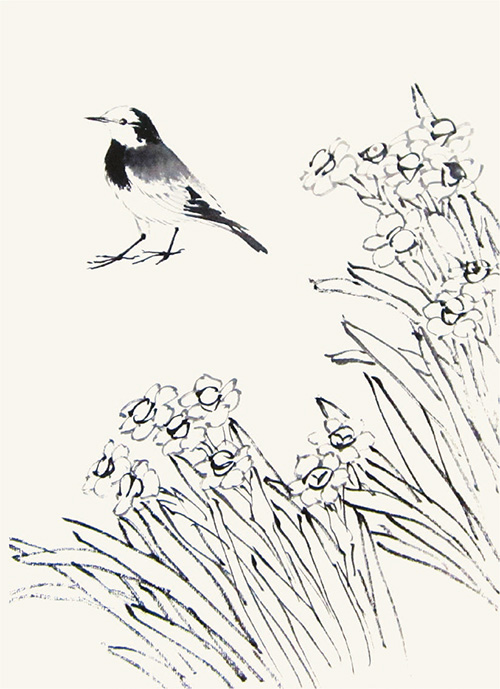
Narcissi are usually planted in a pot. In this lesson, the narcissi appear in a natural setting with a wagtail to create a more interesting scene. The flowers bloom among the straight green leaves, and the golden coronas on top are like lights illuminating the picture. In the middle of the painting, the nimble black-and-white wagtail stands on the rock, ready to fly away at any moment.
You can refer to the Introductory Lessons on page 162 and page 63 for the painting techniques of wagtail and Chinese narcissi. This lesson also includes painting techniques for rocks.
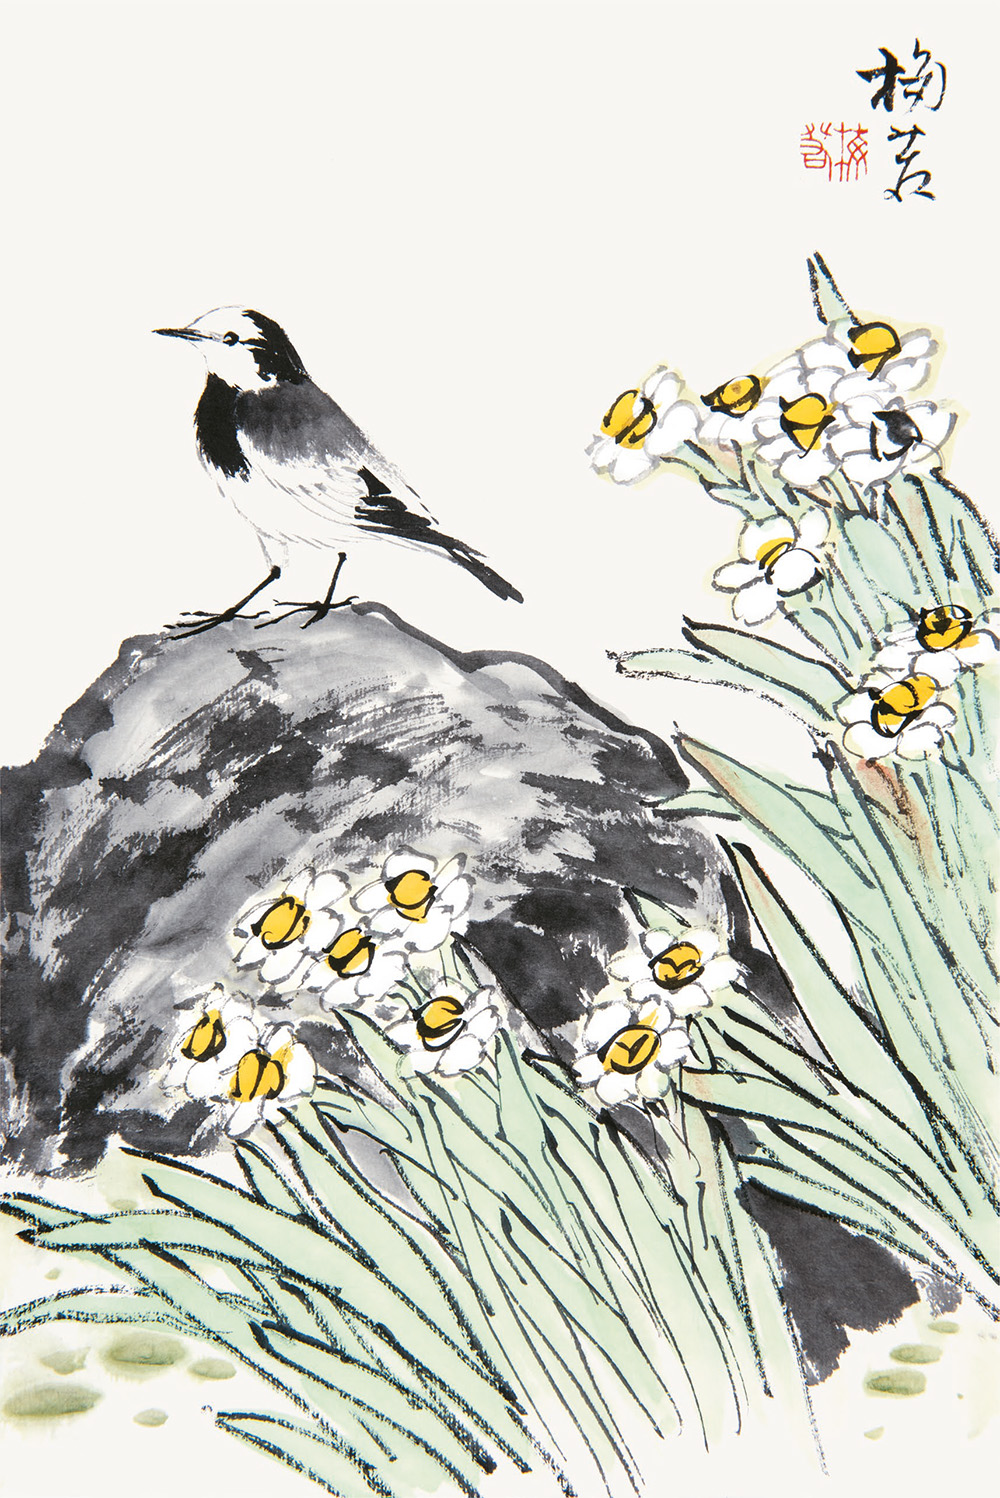
1 Let’s draw the wagtail first. Use three strokes to draw the long, thin bill.
2 Outline the head and throat with light ink.
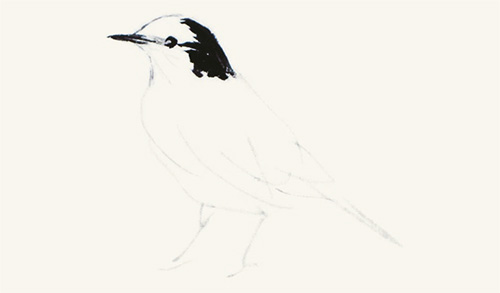
3 Paint the eye with dark ink, being sure to leave the highlight. Paint the head with dark ink and leave the empty space on top.
4 Use the simao stroke to paint the back.
5 Outline the covert feathers with light ink as the ink on the brush gets lighter.
6 Paint the flight feathers with dark ink.
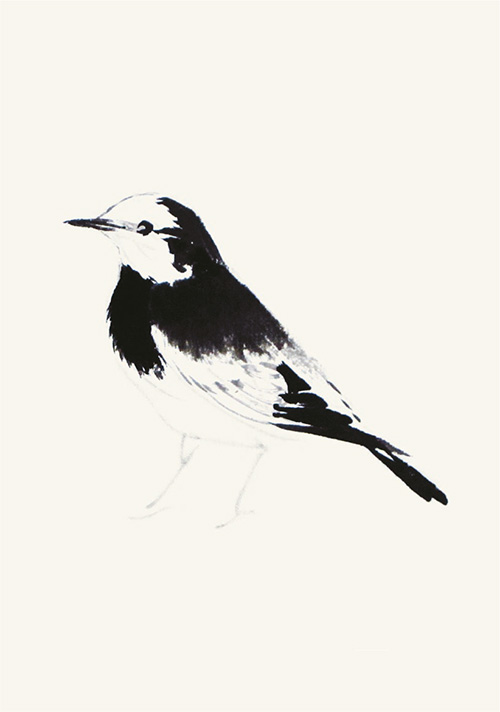
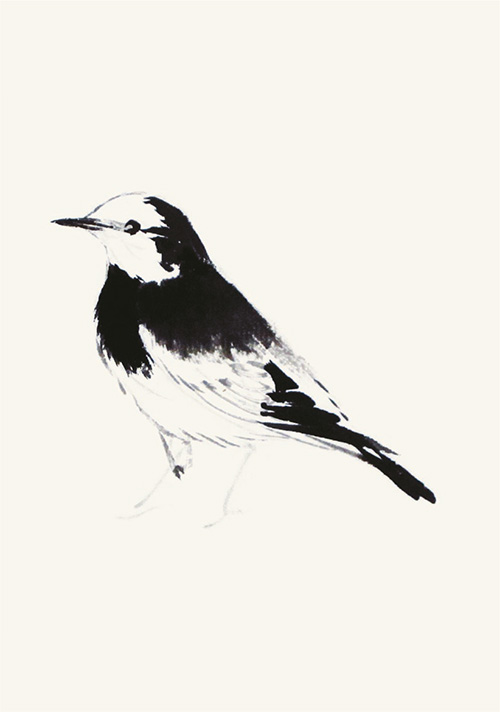
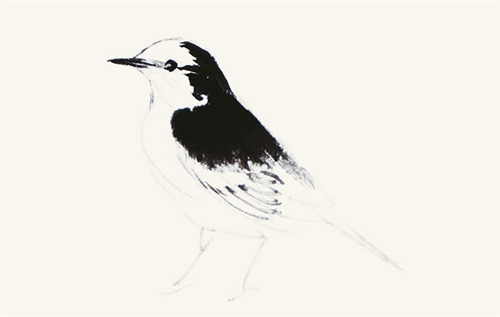
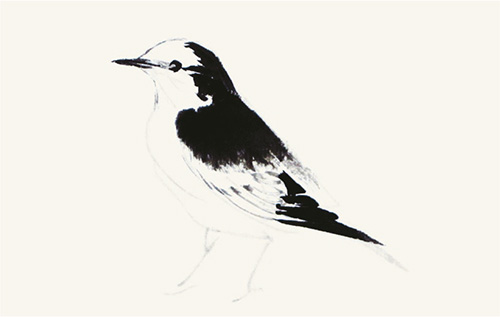
8 Outline the belly, the undertail coverts, and the leg with light ink.
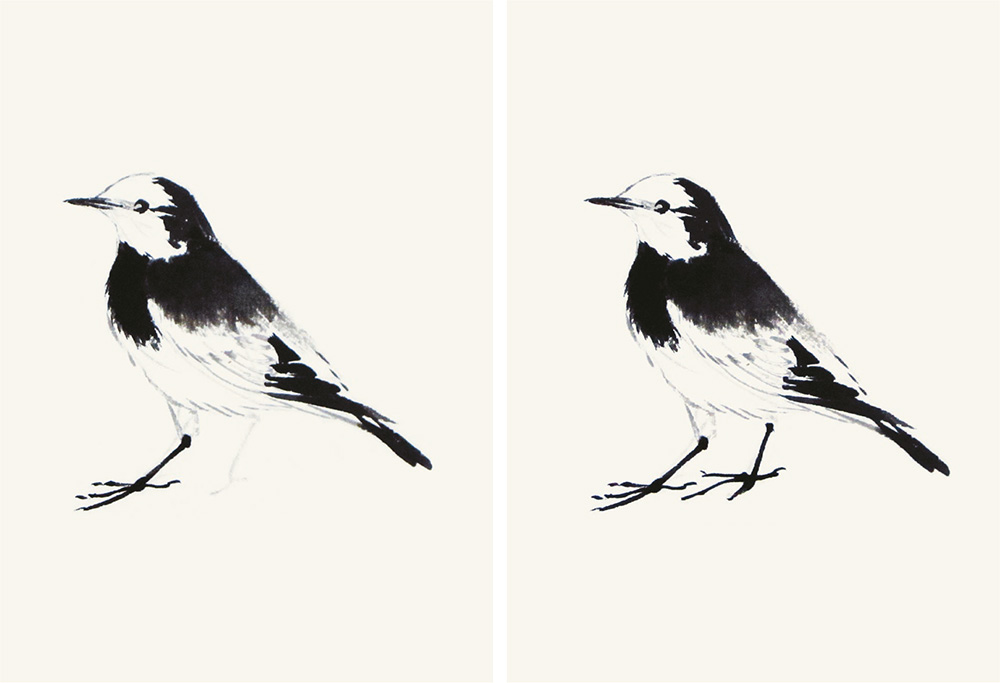
9 Paint the feet with dark ink. Gently color the body with light ink to make it more three-dimensional. Color the empty space with titanium white and the bill with ink.

11 Draw twelve more coronas at the lower left and upper right. Be sure to have variations in size and orientation.
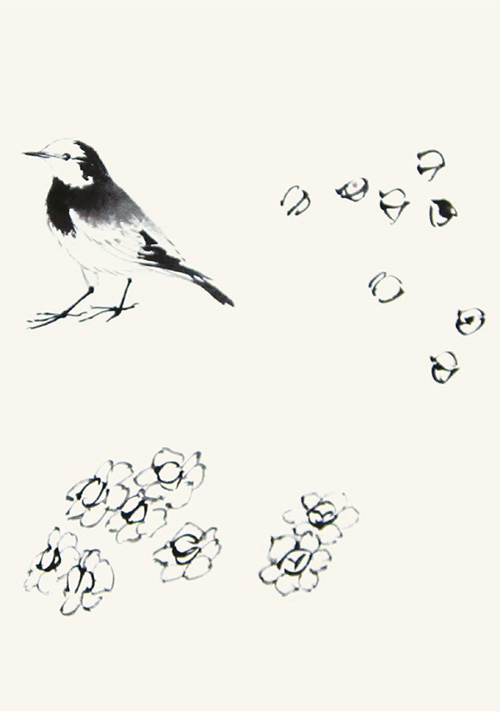
12 Use the nail-head rat-tail stroke to outline the six petals around each corona on the lower left with light ink.
13 Outline the petals around the coronas on the right side of the wagtail. Then paint the stems with light ink.
14 Use the nail-head rat-tail stroke to paint the long and upright leaves. Make sure they are facing one direction as if fluttering in the breeze.
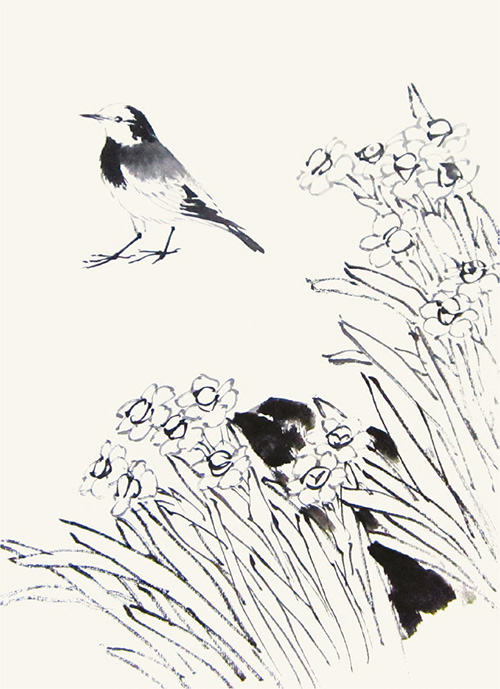
15 Paint the rocks among the narcissi.

16Paint the rock below the feet of the wagtail with ink so the wagtail is standing on the rock. Touch up the rock to create the texture and shadows.
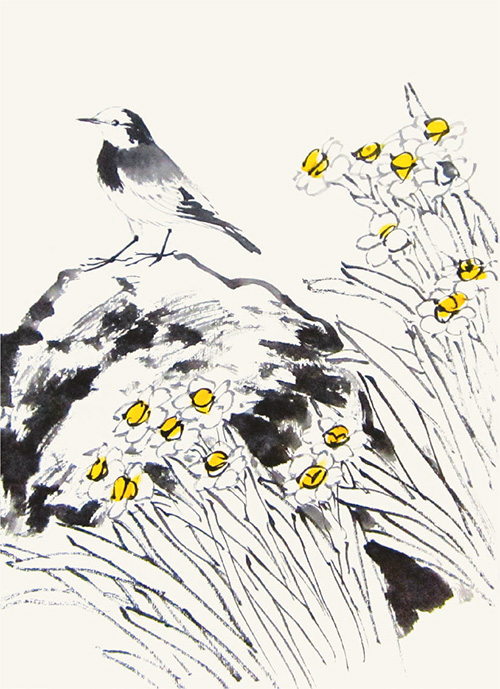
17 Mix gamboge and vermilion to color the coronas.
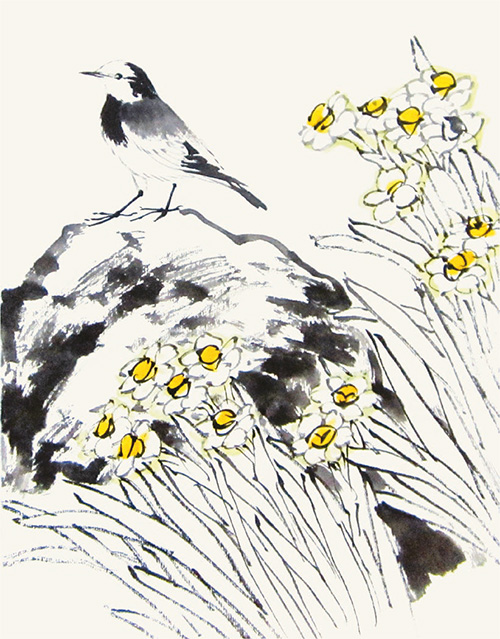
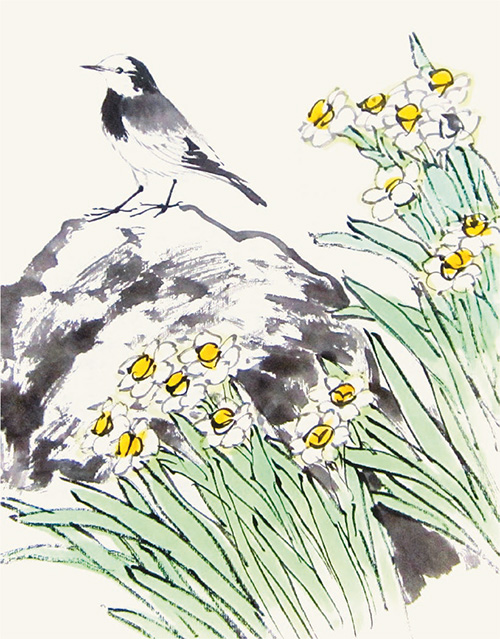
19 Fill the leaves with malachite.

20 Fill the rocks with light ink when it is dry. The rock is complete.
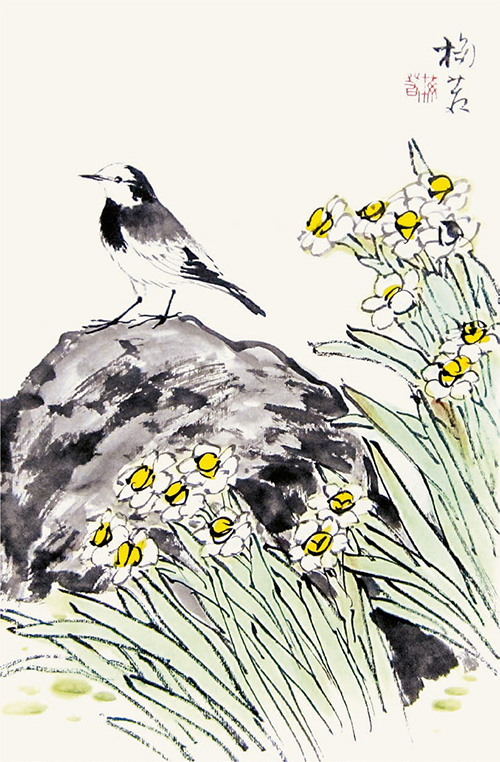
21 Add dark-green moss on the leaf tips and around the bottom of the rocks to represent the water surface and complete the work.
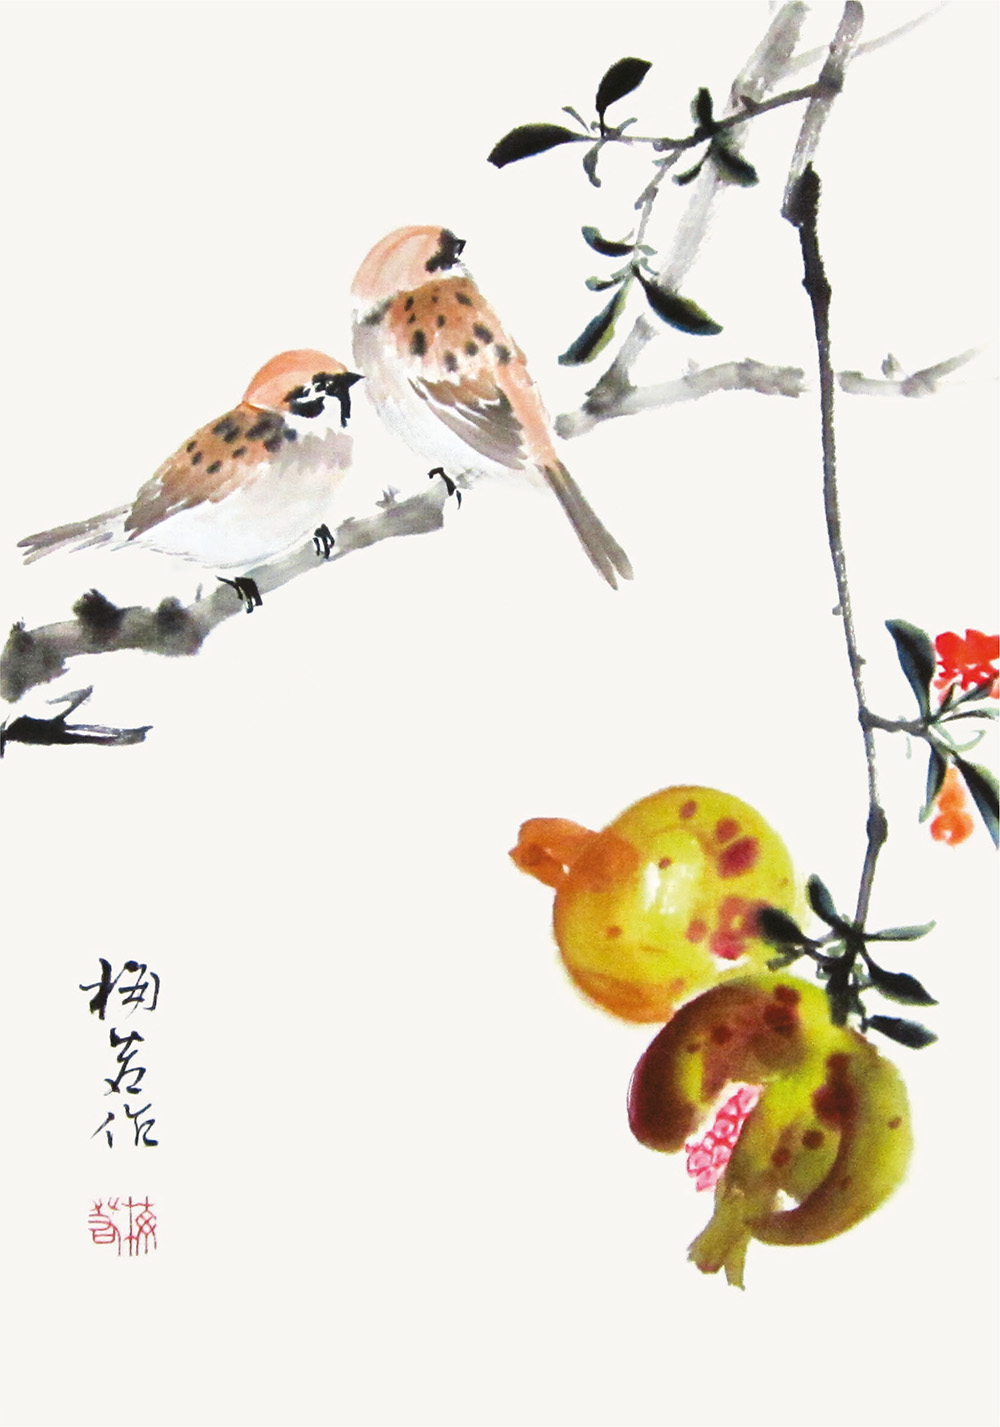
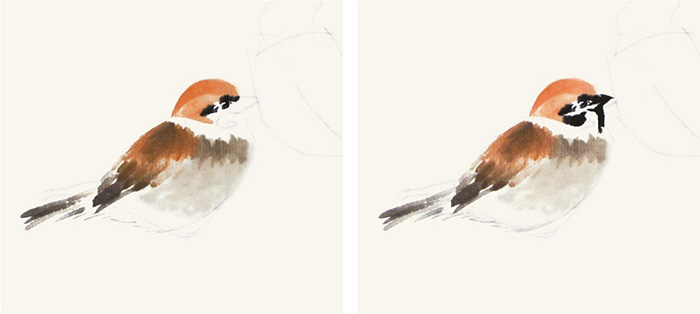
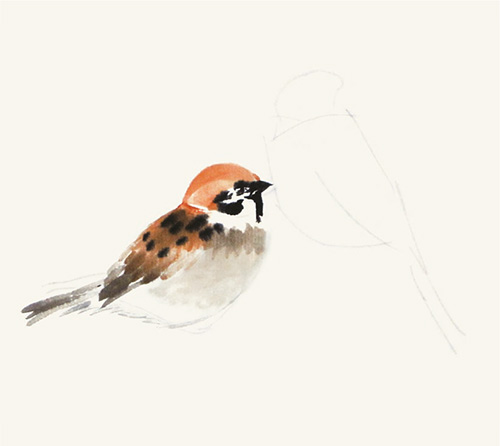
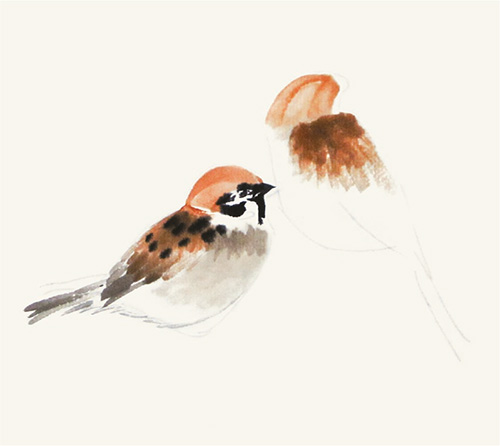
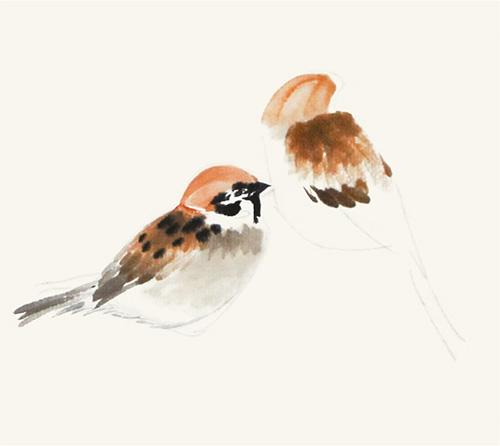
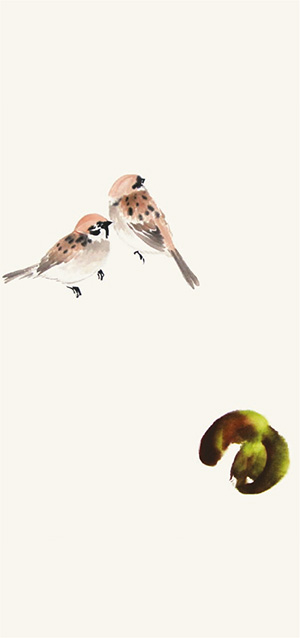
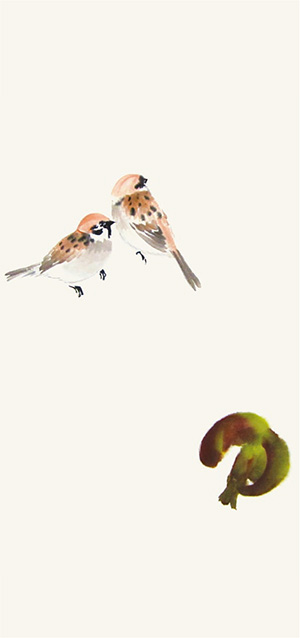
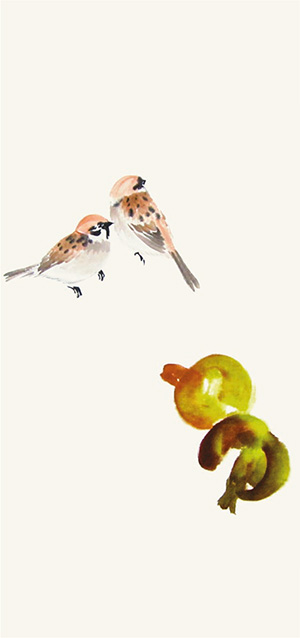
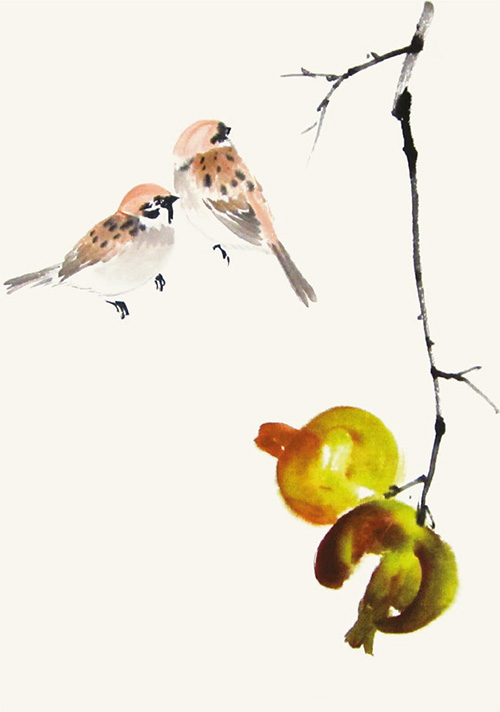
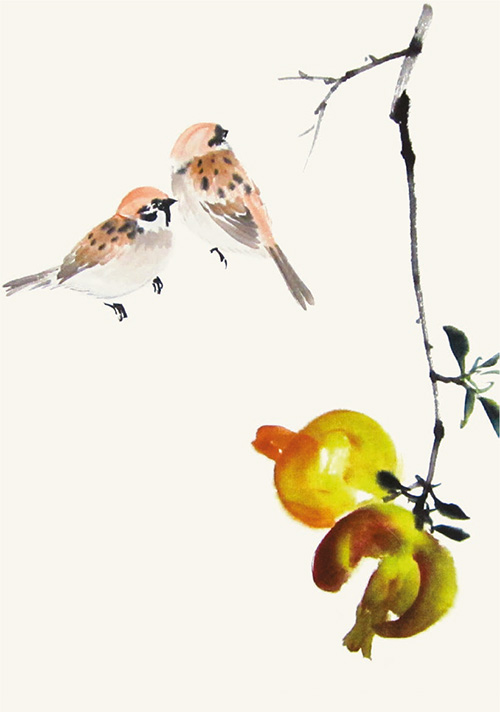
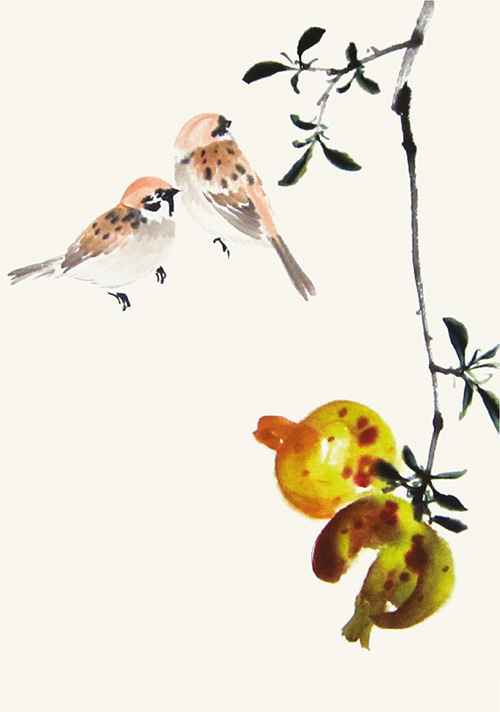
5. Sparrows on the Pomegranate Tree
In this lesson, there are two sparrows standing on the pomegranate tree. One is facing the front while the other is looking backward; one is active while the other is calm. On the other side of the painting, there are two heavy pomegranates. One of them splits off to spread fragrance everywhere, and you can almost smell it through the picture. This painting is full of the scent of fall.
You can refer to the Introductory Lessons of painting sparrow and pomegranate on pages 146 and 74.
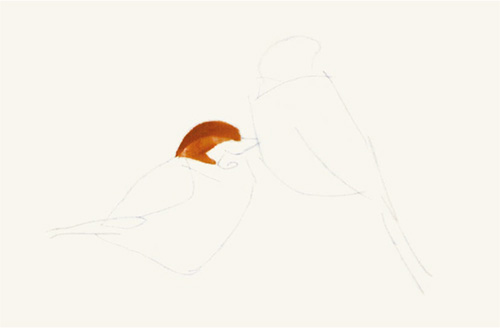
1 Let’s paint the two sparrows first. Paint the ocher head.

2 Mix ocher and ink to paint the back using the simao stroke.
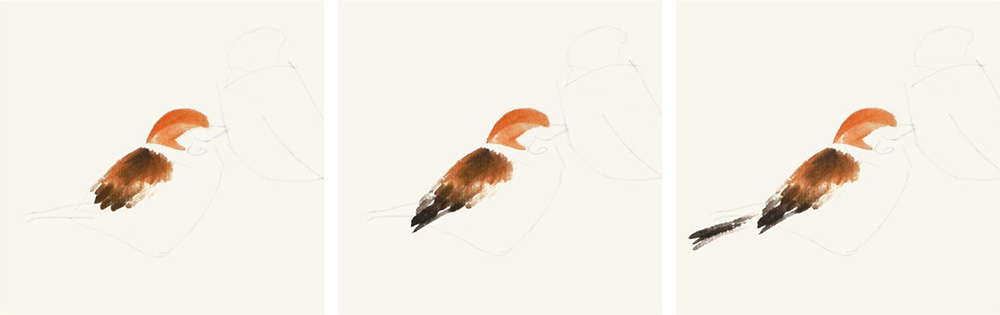
3 Paint the covert feathers, flight feathers and tail with ink.
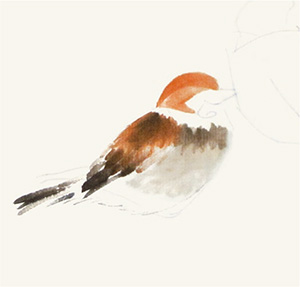
4 Paint the breast and belly and outline the edge of the belly with light ocher.
5 Paint the bill, eye, throat and the stripes on the cheek with dark ink.
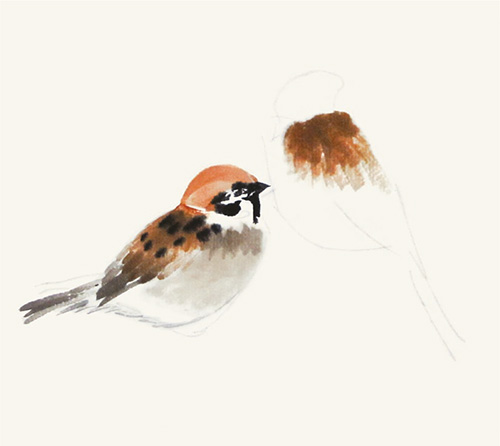
7 Repeat the steps to paint the other sparrow. Mix ocher and ink to paint the back using the simao stroke.
8 Mix ocher with light ink to paint the head using three strokes. Note the different posture of this sparrow.
9 Paint the ocher covert feathers.

10 Paint the ocher flight feathers and tail.
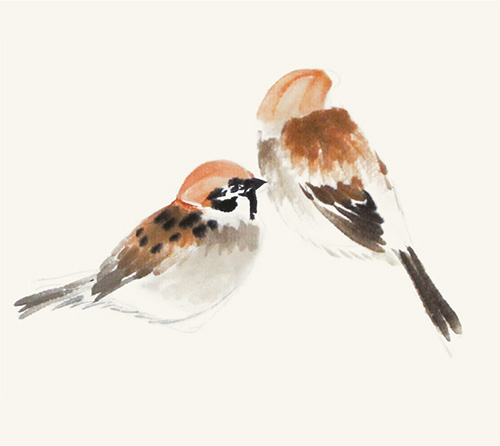
11 Paint the breast and outline the belly when the ocher and ink gets lighter.

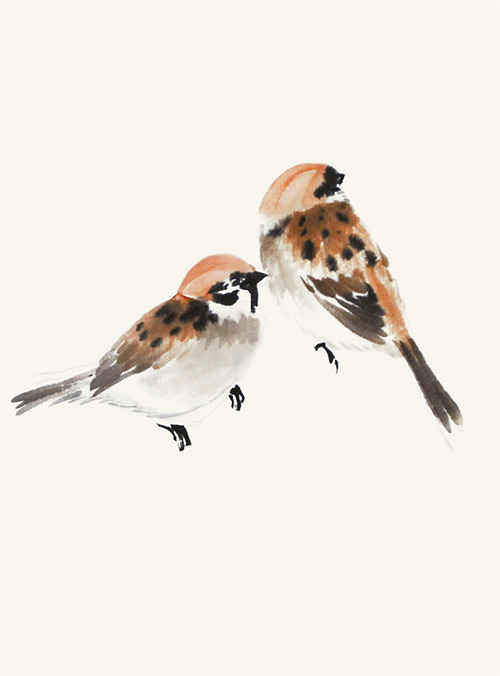
13 Paint the claws with dark ink.
14 Dip the brush tip into dark green and then the brush into rouge to paint the pomegranate at the lower right. Make one stroke on each side and then one in the middle.
15 Dip the brush into dark green and brush tip into rouge to paint a calyx.
16 Paint one more pomegranate as the ink gets lighter.
18 Dip the brush into dark green and brush tip into ink to paint the leaves.

19 Continue to add more leaves. Use dark ink to outline the leaf veins, one vein per leaf.
20 Use ink or rouge to add spots on the pomegranate in different sizes and shades.

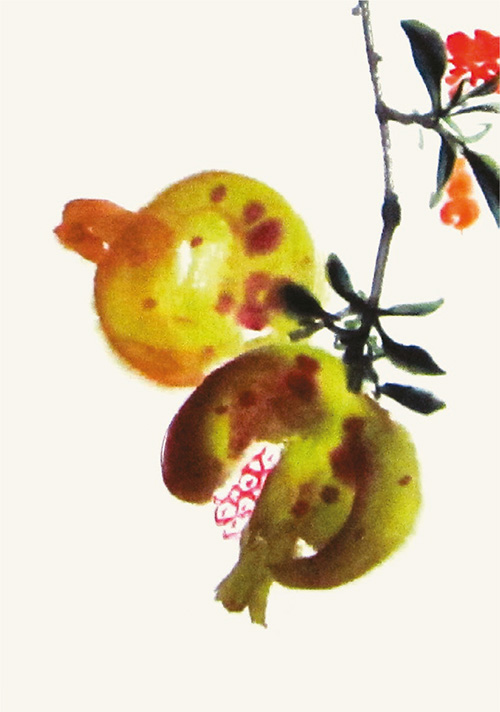
22 Refer to the pomegranate seed painting techniques in the Introductory Lessons. Outline the eosin seeds where the pomegranate splits.
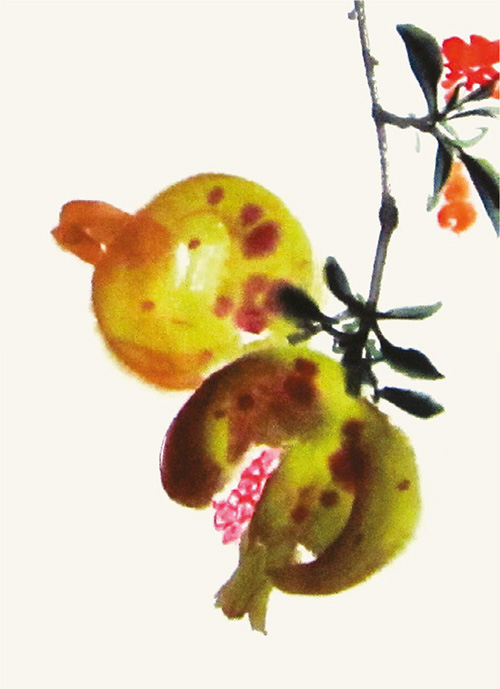
23 Use eosin to color the seeds.

24 Add the branch for the sparrows to stand on. Paint the main branch from left to right with light ink. Create a fork on the right to complete the work.
6. Five Sons Passing the Imperial Examinations
“The Five Sons Passing the Imperial Examination” is a Chinese proverb. In ancient time, the five sons of a man named Dou Yujun all had outstanding academic performances. They all passed the imperial examinations. Motifs were created after them as the symbol of a bright future and wealth. One of the motifs is five chickens in one picture.
This lesson incorporates morning glories and chicks, the painting techniques of which can be found on pages (53 and 151) in the Introductory Lessons.

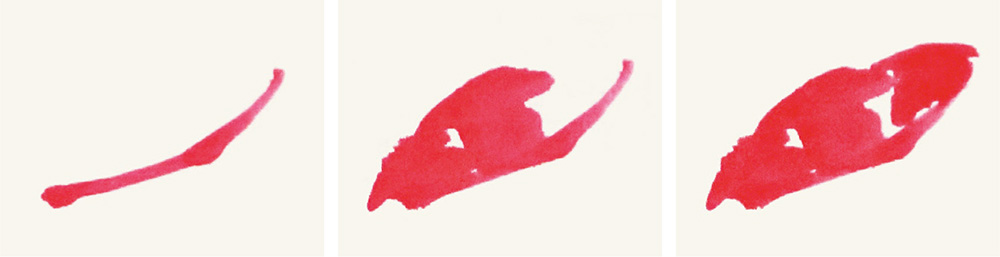
1 Let’s paint morning glories first. Use one stroke to draw the edge of the petal with eosin or rouge. Then use three strokes to finish the petal on the other side.
2 Paint two more morning glories.
3 Paint a few buds.
4 Complete the three morning glories.
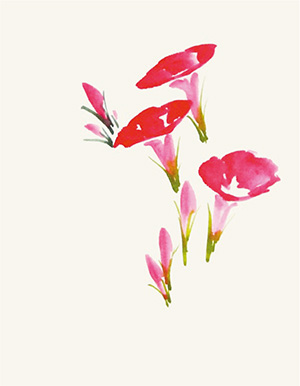
5 Paint the dark-green receptacles.
6 Paint the dark-green leaves.
8 Outline the veins with ink.
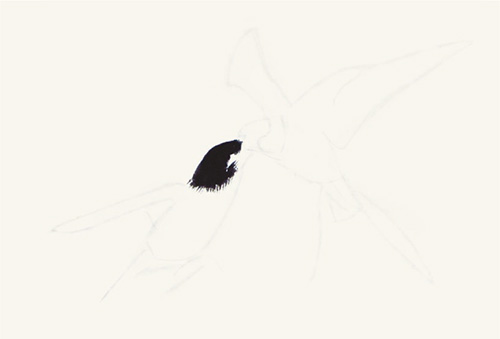
9 Let’s paint a white chick with its back to us. Outline the body, head and feet using light ink.
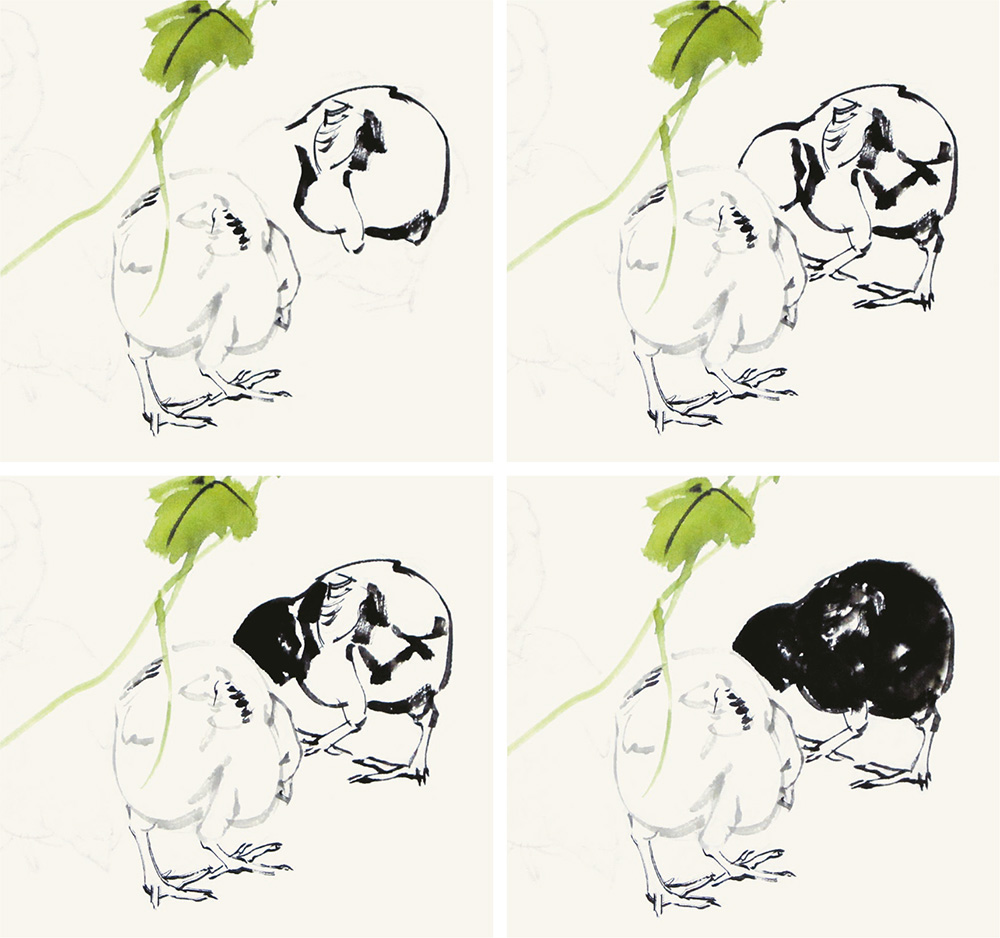
10 Next paint a black chick. Outline the body, head and feet with dark ink. Then color the head and the body.
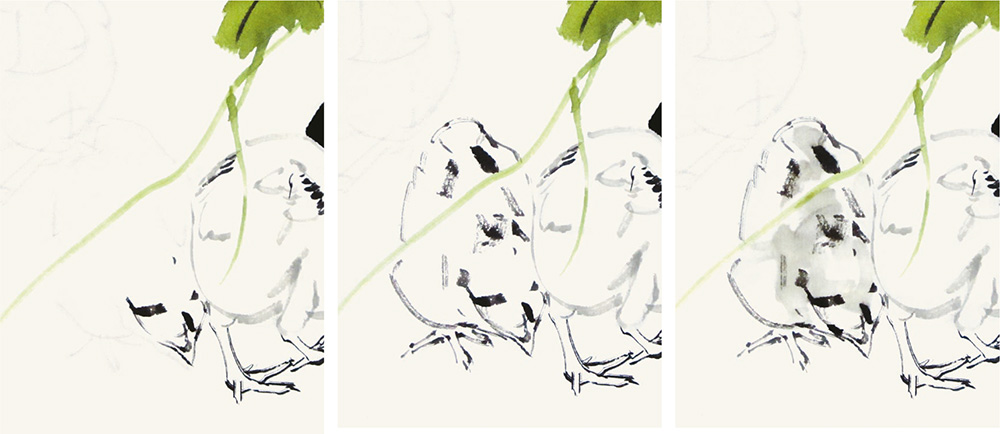
11 Next is a spotty chick. Outline the head, body and feet with light ink. Then color the body with light ink. Be sure to color only a section to highlight the patterns.
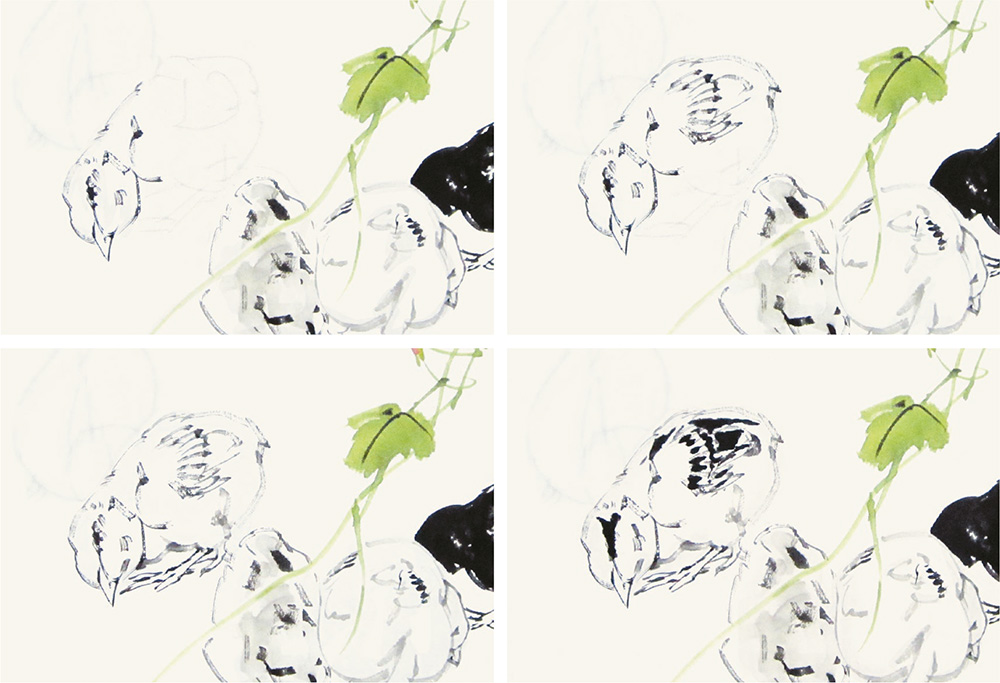
12 Next is the fourth chick. Paint the head, body and feet. Add dots on the wings with dark ink. Every stroke is to be entirely pressed down on the paper, focusing the pressure on the brush belly.
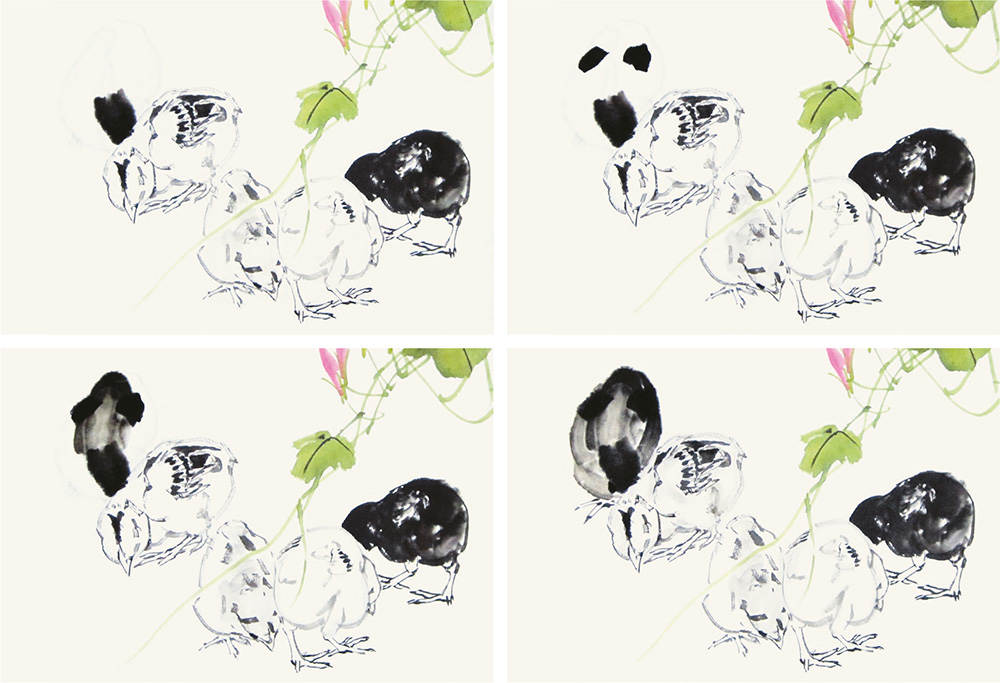
13 Refer to step 12 to paint the fifth chick. Draw the head and tail. Paint the body when the ink gets lighter. Then outline the feet.
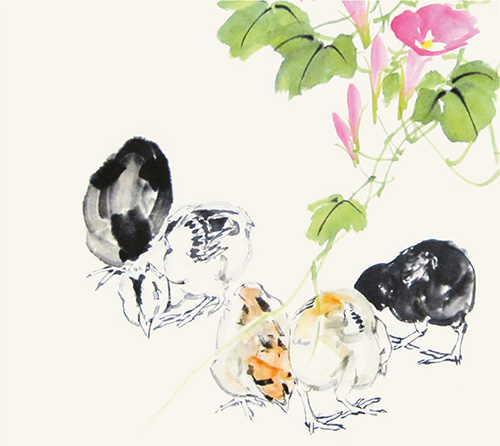

15 Color the bills and feet of all chicks with gamboge.
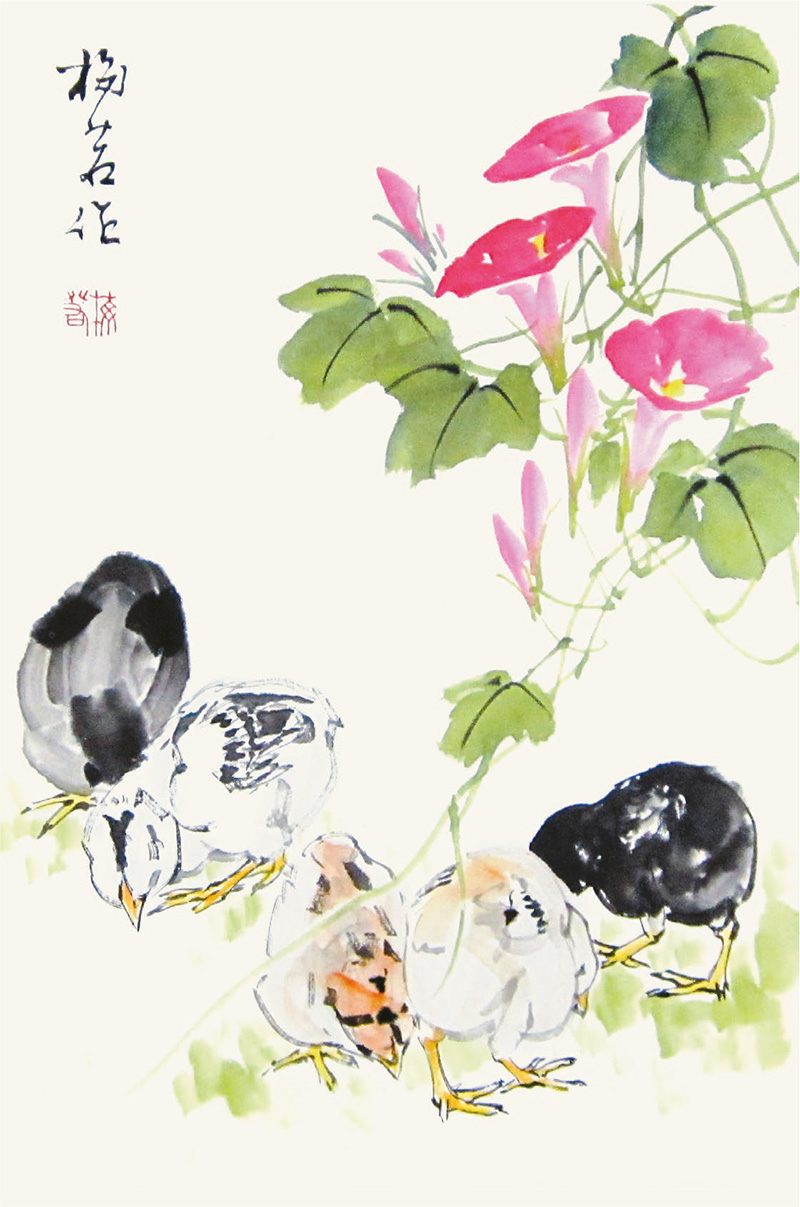
16 Paint the green grass to complete.
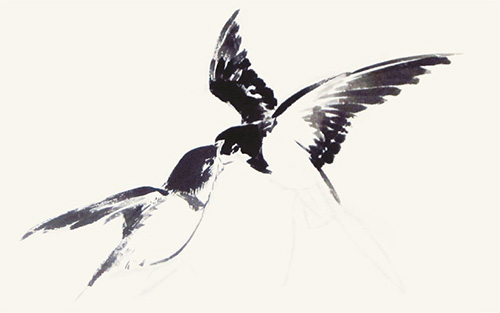
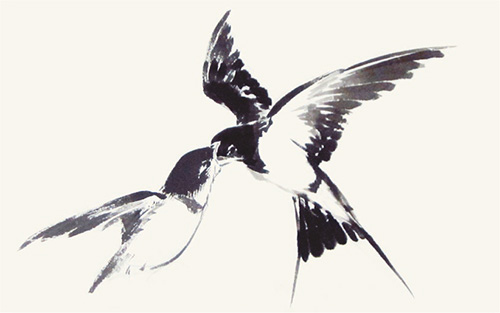
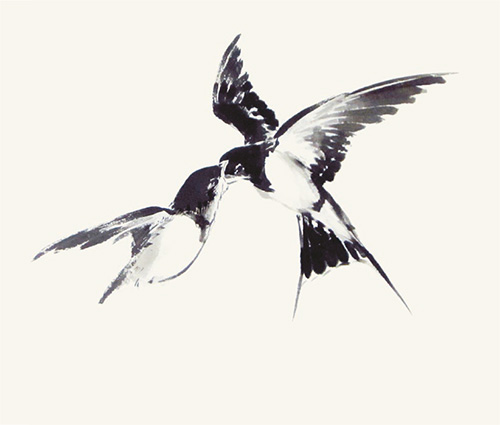
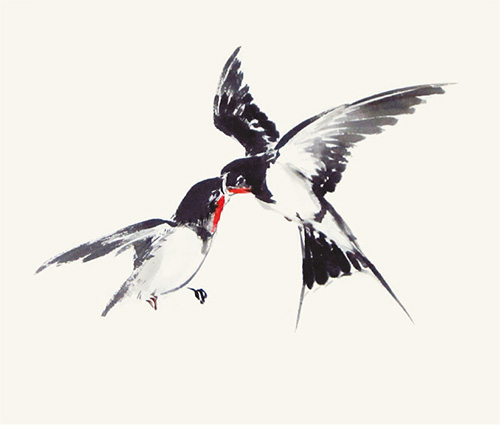
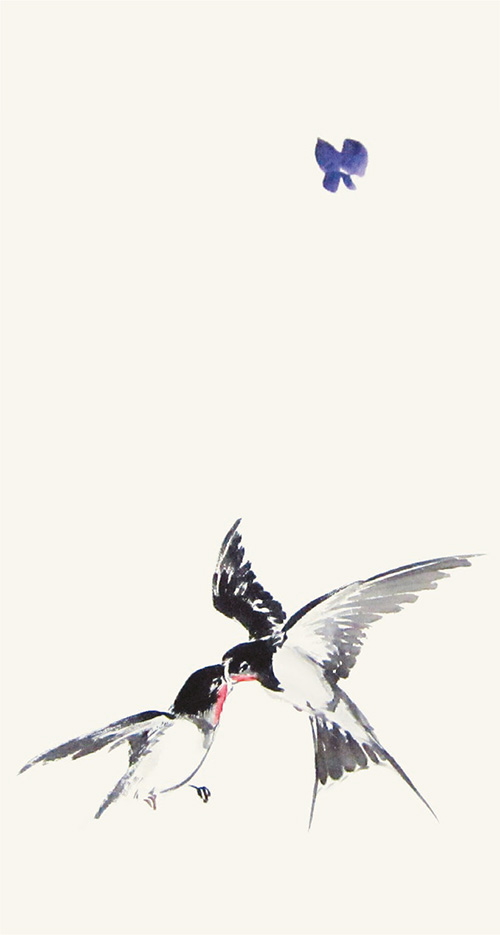
In this painting, the wisterias are hanging down to create a colorful backdrop. In front is the baby swallow standing on a branch. The mother swallow has just returned and cannot wait any longer to feed her baby with what she has in her bill. Her wings are still in the air, which creates a lovely and dynamic picture.
You can refer to the Introductory Lessons for the painting techniques of wisteria and swallow on pages 50 and 170.
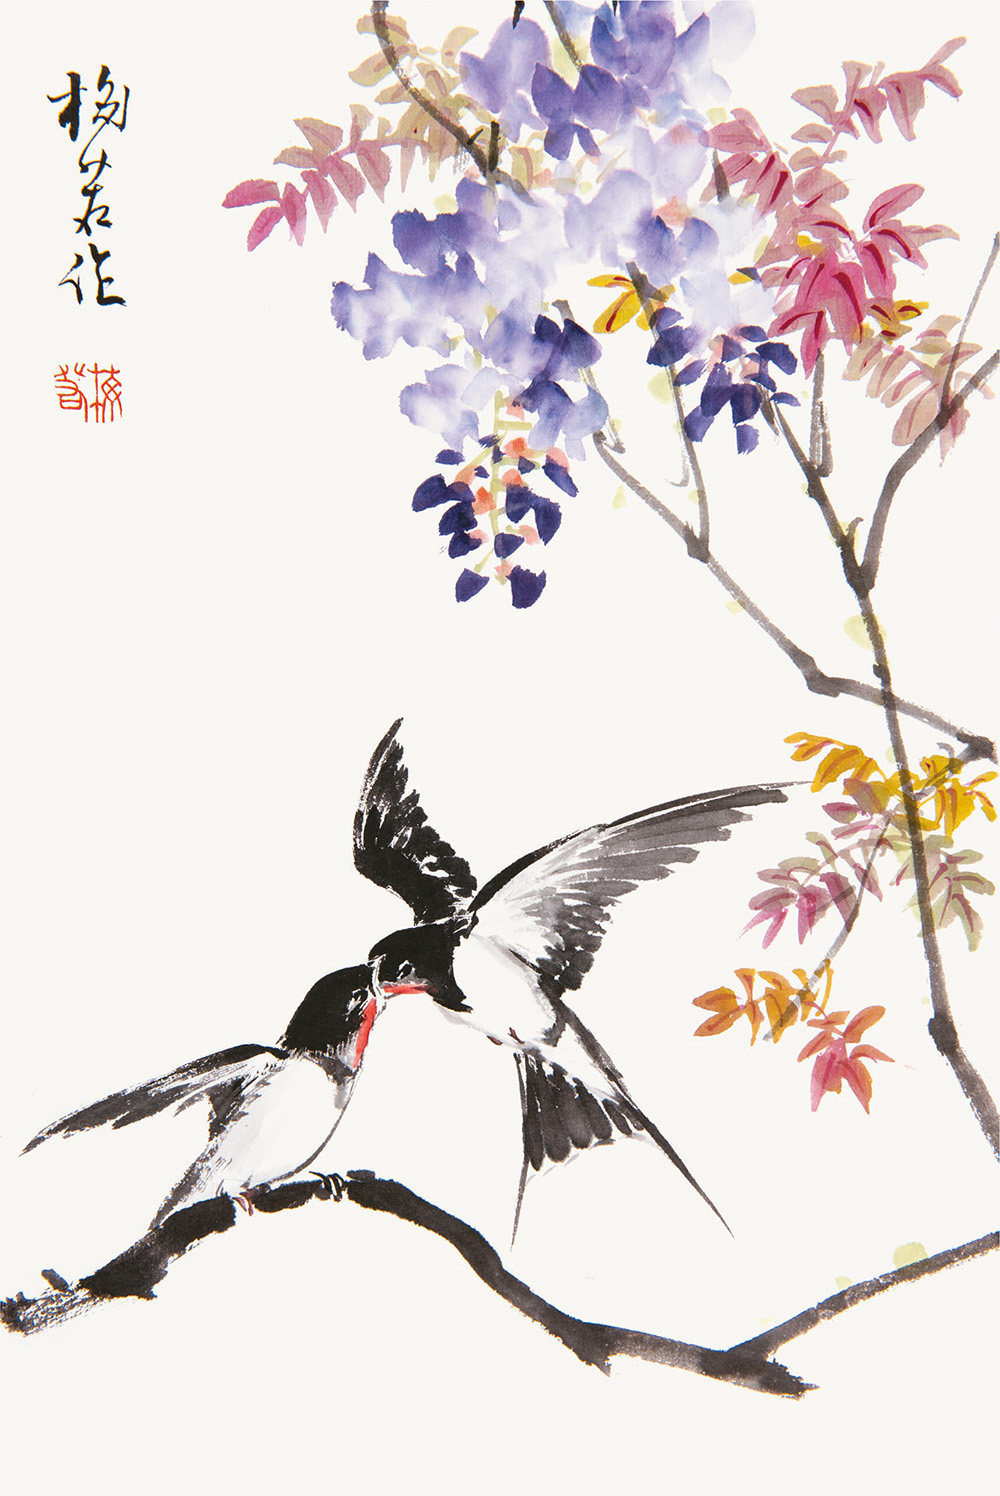
1 Let’s paint the baby swallow first. Use the simao stroke to paint the head.
2 Paint the wings with dark ink.
3 Outline the throat and belly with light ink.
4 Paint the tail with light ink. Outline the opening bill that shows its desire to be fed.

5 Next paint the mother swallow. Paint the eye and head first. No need to draw the entire beak since the mother is feeding the baby and her bill is in her baby’s bill.
6 Use the simao stroke to paint the covert feathers on the upper wing with dark ink. Then paint the edge of the opposite wing with dark ink.
7 Paint the flight feathers with dark ink.
8 Paint the feathers of the opposite wing with light ink.
9 Outline the back with light ink.

10 Outline the belly with light ink.

11 Then paint the tail with light ink. First, paint the scissors-shaped tail.
12 Then paint the undertail coverts.
14 Mix vermilion and eosin to color the necks. Paint the bills and feet with indigo.
15 Next, paint the wisteria. Paint a wisteria on the top of the picture first.
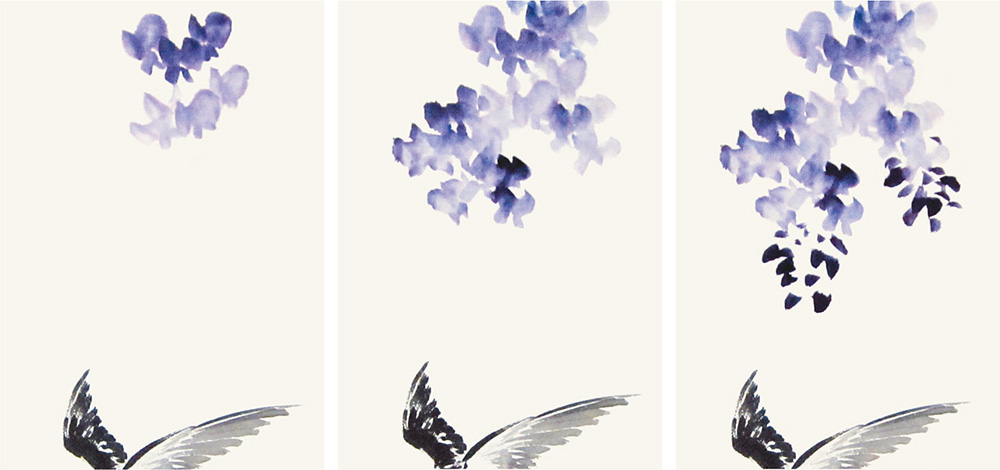
16 Add more flowers to form clusters.

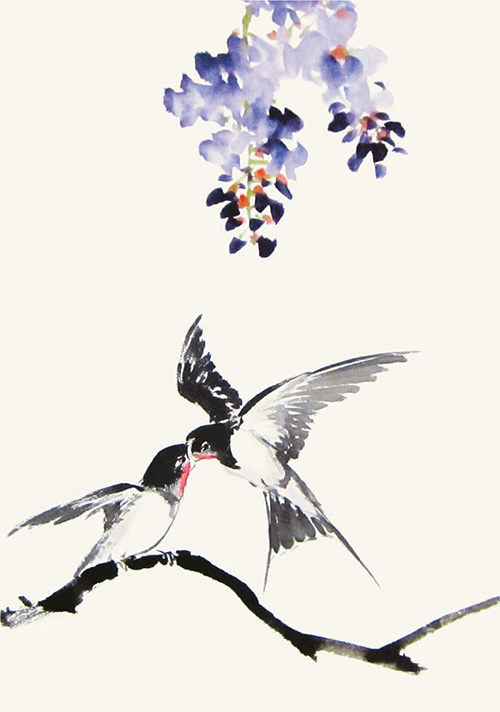
18 Use ink to paint the vine for the baby swallow to stand on.
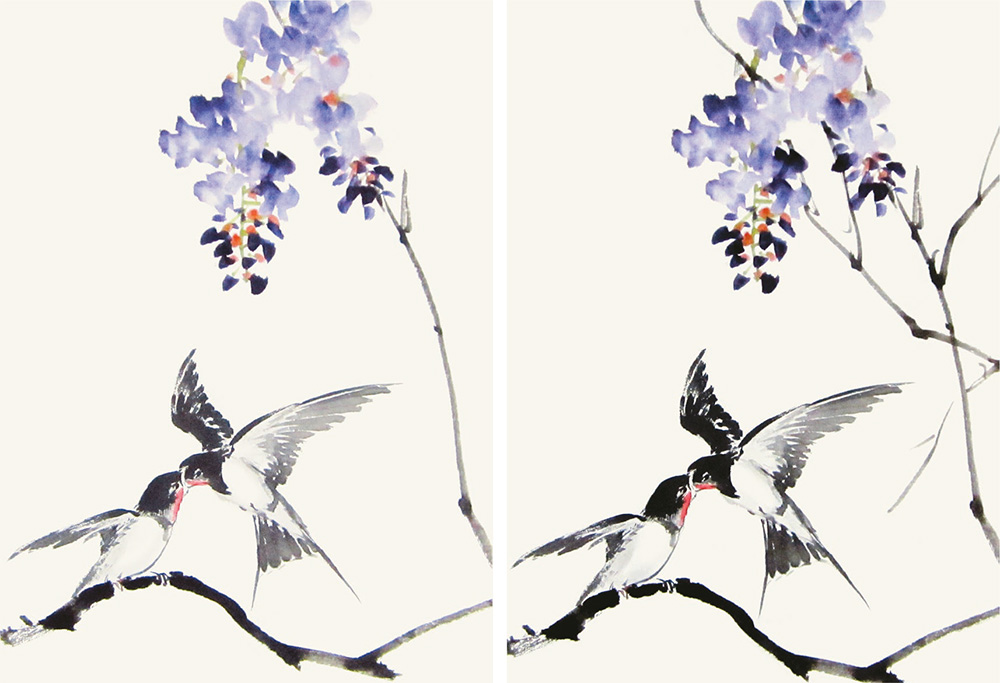
19 Add the vines to attach the wisterias. Be sure to present the dynamic state of the veins.
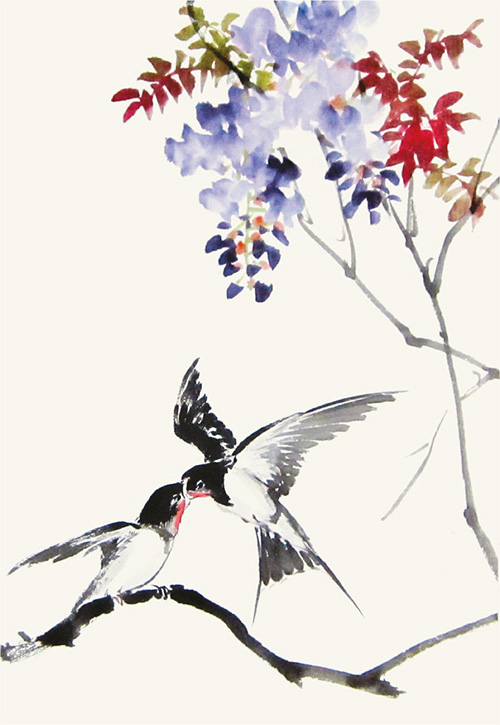
21 Add one more cluster of leaves on the left side of the wisterias.
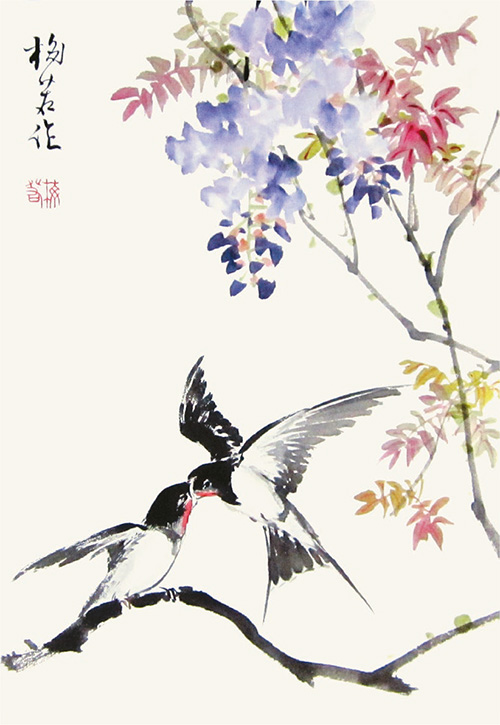
22 Add one more cluster of leaves at the lower right when the color on the brush gets lighter to complete the composition. Outline the rouge leaf veins to complete the work.
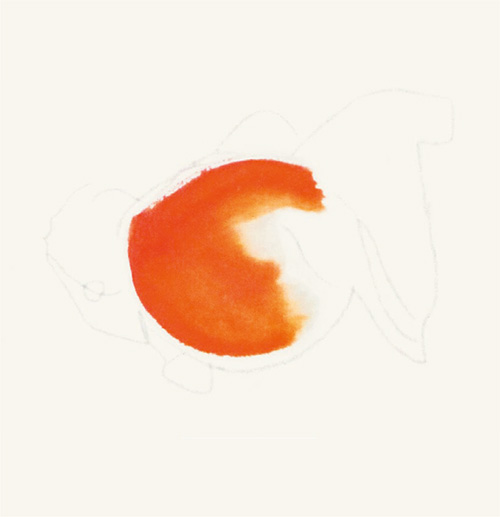
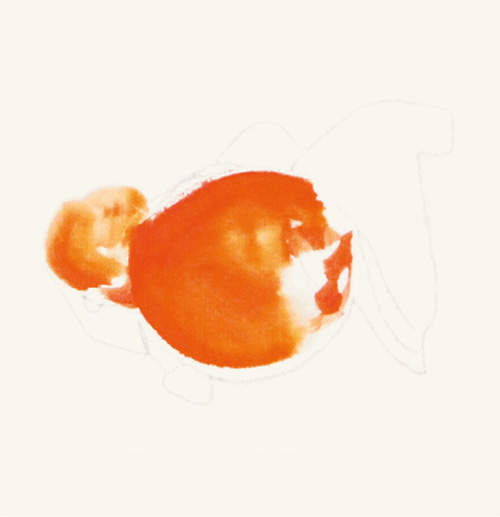
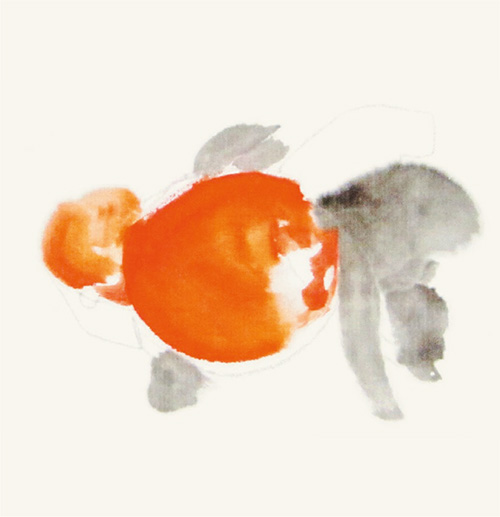
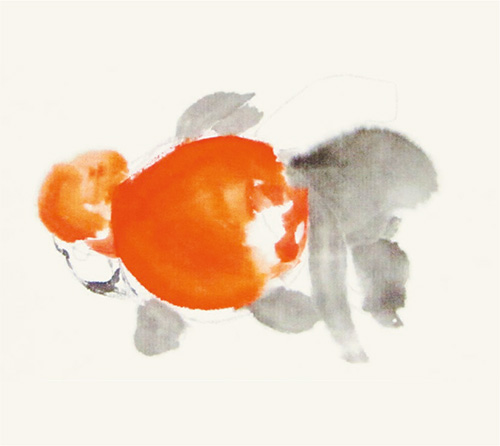
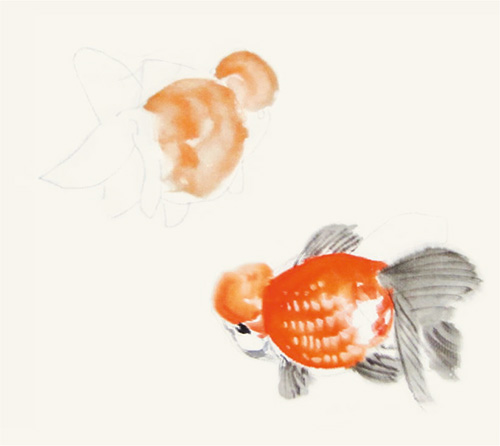
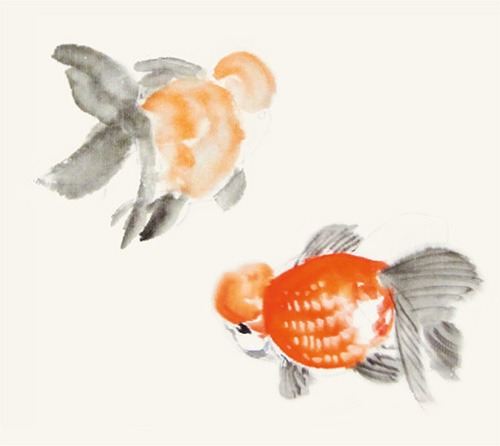
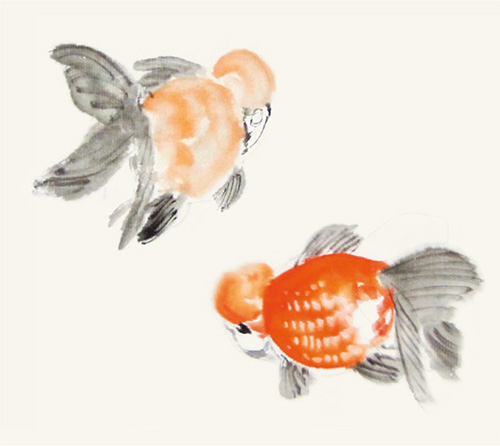
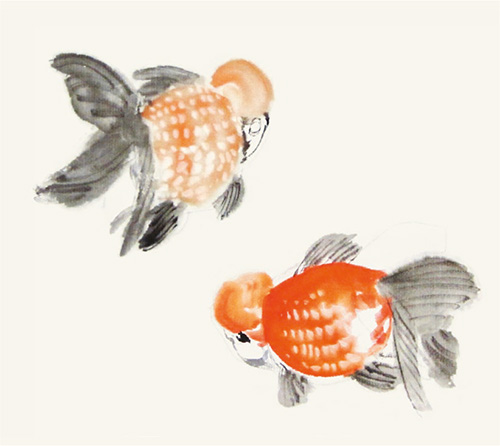
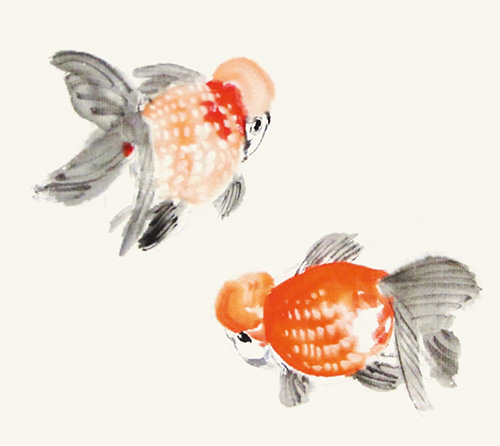
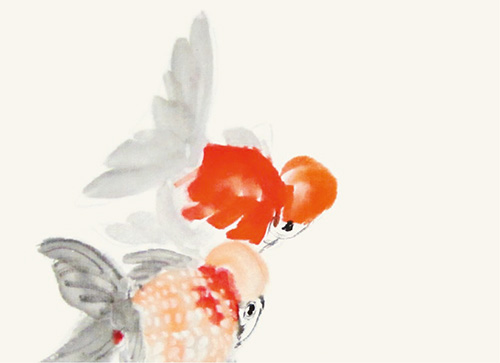
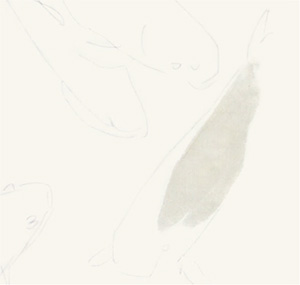
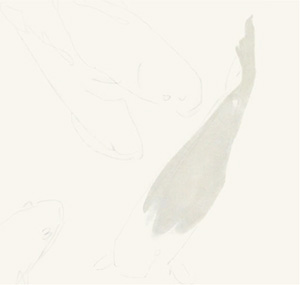
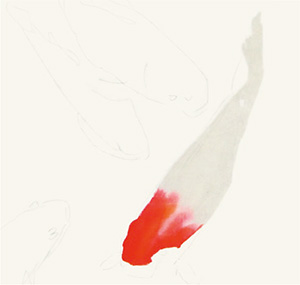
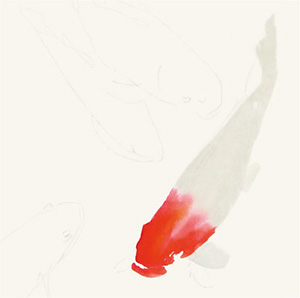
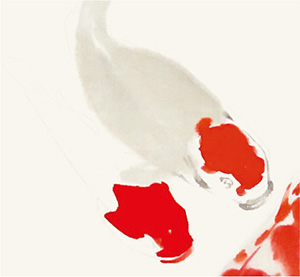
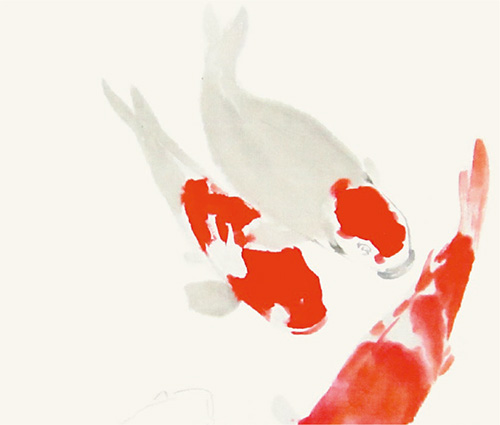
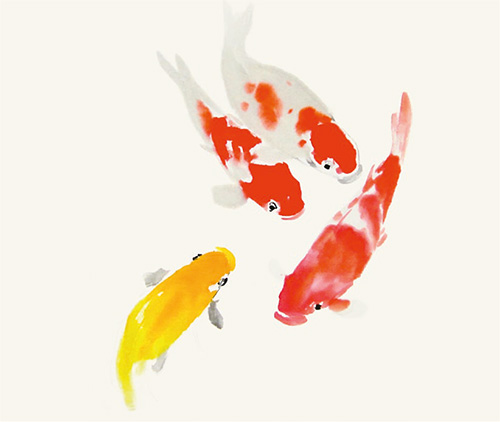
8. Goldfishes Playing in the Water
The pearlscale is a stunning goldfish. Due to accumulated calcium, the scales are hard and domed, looking like pearl inlay, and the pearls look plump and neat. In this painting, leaving the appropriate white space on the painting and portraying the swaying pearlscale tails and fluttering water plants create a scene of pearlscales playing in the water though no water is literally painted. Sometimes, silence is more eloquent than words.
Refer to the painting techniques of goldfish (see page 118) in the Introductory Lessons to paint the pearlscale.
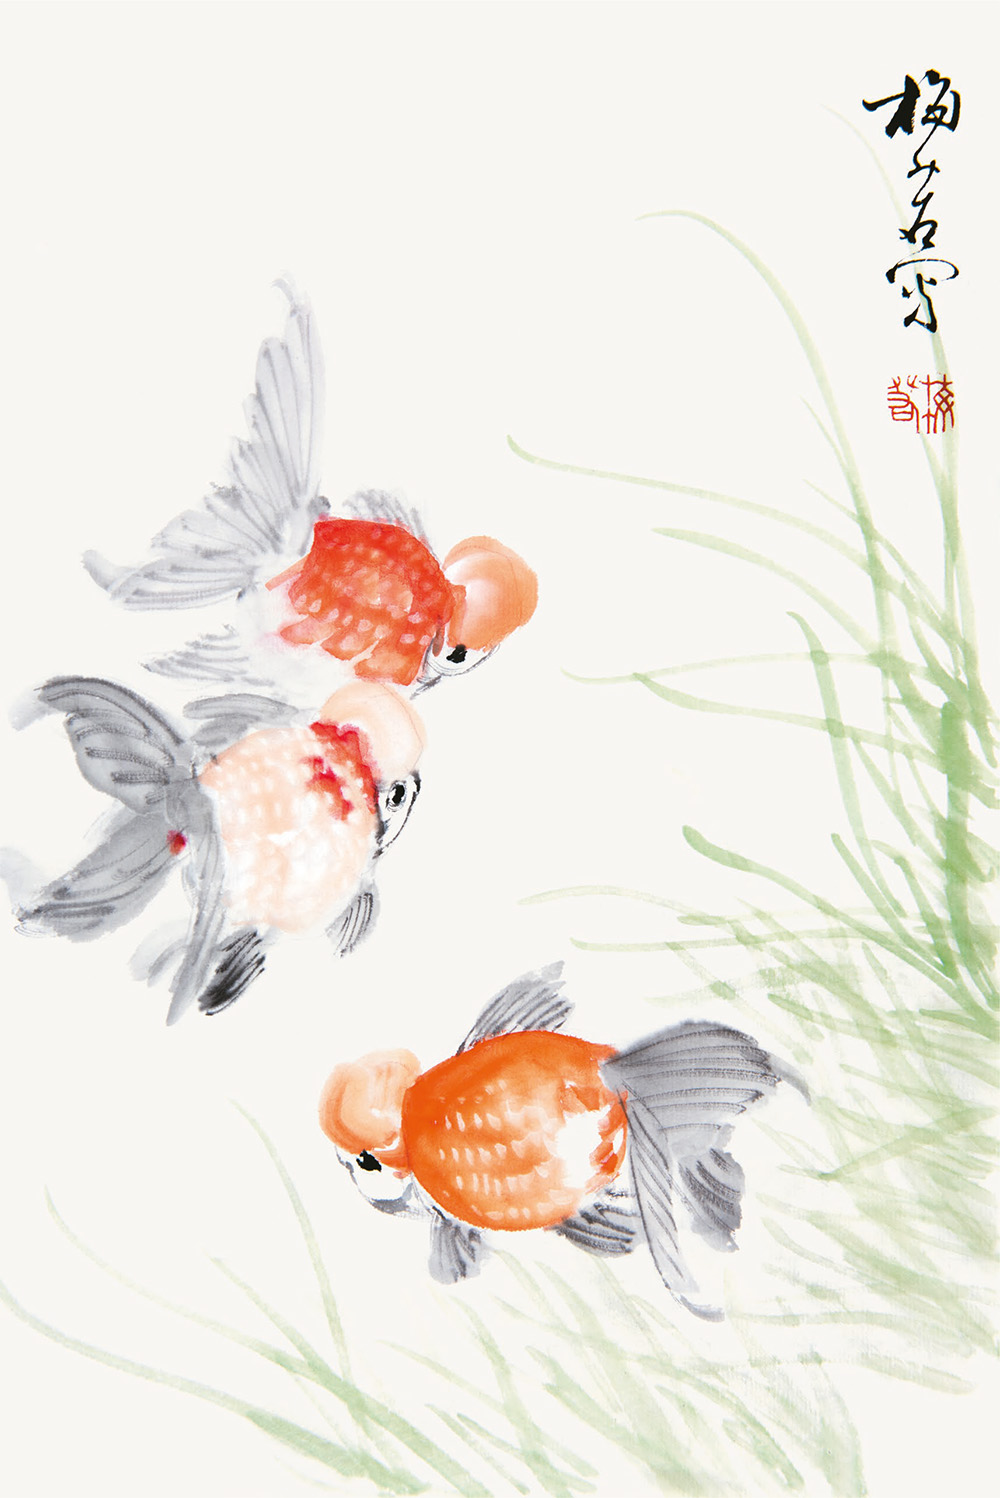
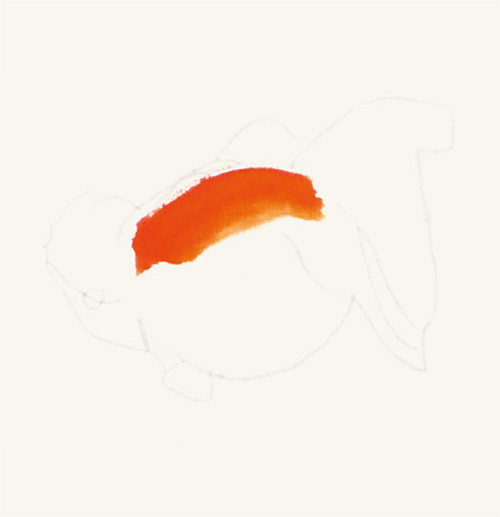
1 Paint the vermilion back with one stroke.
2 Paint the belly with one stroke.
3 Dip the brush into water to paint the head.
4 Paint the tail, dorsal and pectoral fins with light ink.
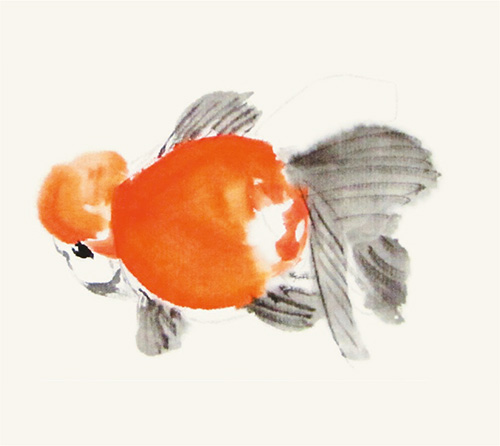
6 Paint the spines on the fins with light ink. Dot the eye with dark ink and be sure to leave highlight.
7 Use titanium white to dot the scales.
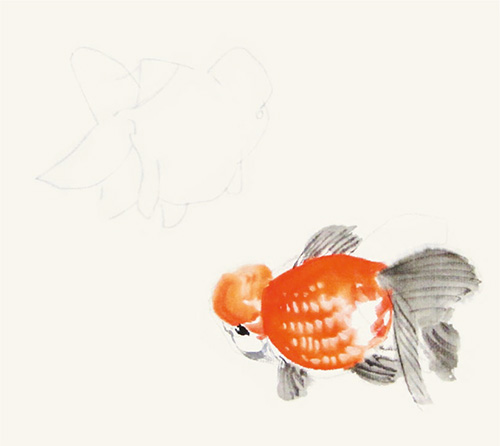
8 Then paint the other fish on the top left. First, paint the light-vermilion back.
9 Paint the body and add the head. Pay attention to the orientation of the fish head.
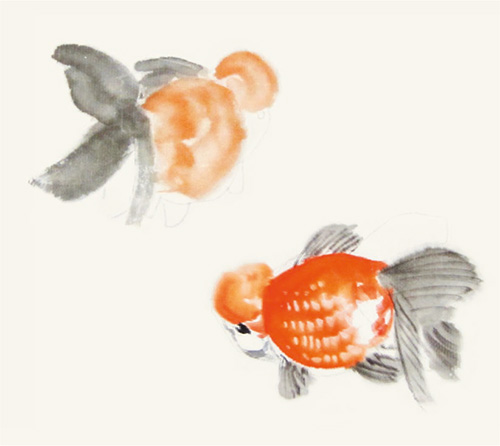
10 Paint the tail and dorsal fin with light ink. Pay attention to the movement.
12 Use light ink to paint the spines on the fins, outline the bottom part of the head, and circle around the eye.
13 Use titanium white to dot the scales.
14 Dot the pupil with dark ink. Add the vermilion pattern on the body.
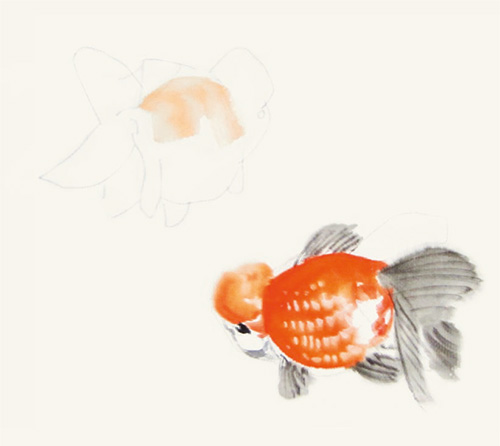
15 Then paint the third fish. Paint the vermilion back with one stroke.
16 Add a few more strokes to complete the body.

18 Outline the head with light ink and dot the eye with dark ink.

19 Paint the spines on the fins with light ink. Use titanium white to dot the scales.

20 The three fishes look different in color and posture.
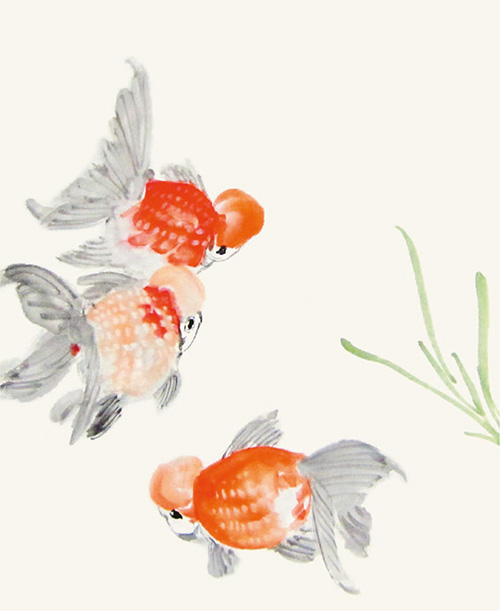
21 Paint the curved water plants on the right using dark green.
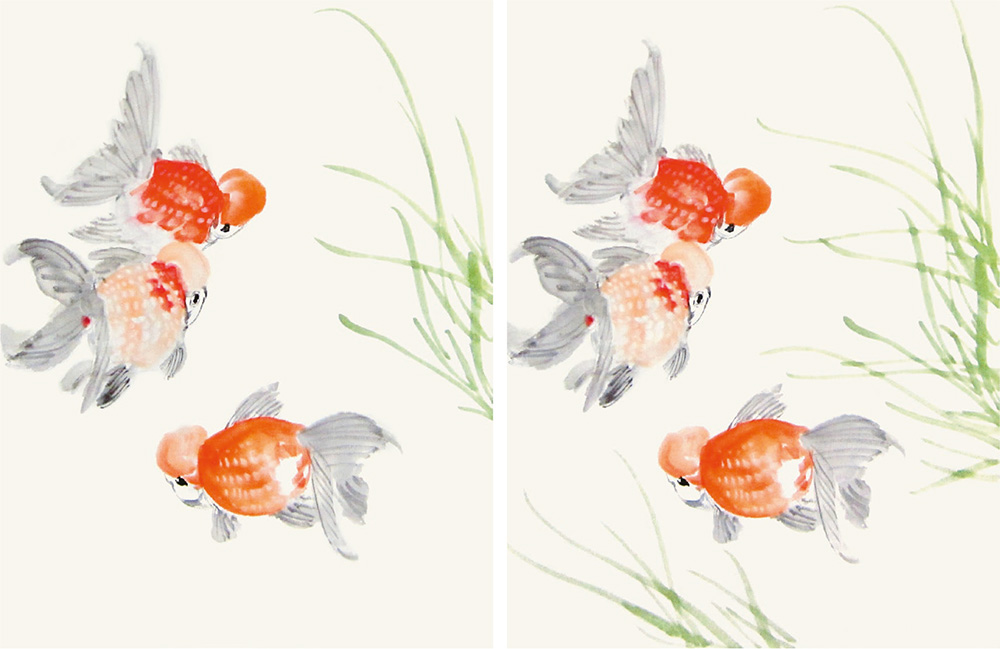
22 Add more water plants on the right and at the bottom and make them look as if they’re fluttering in the water. Note the different lengths and the overlapping positions of the water plants.
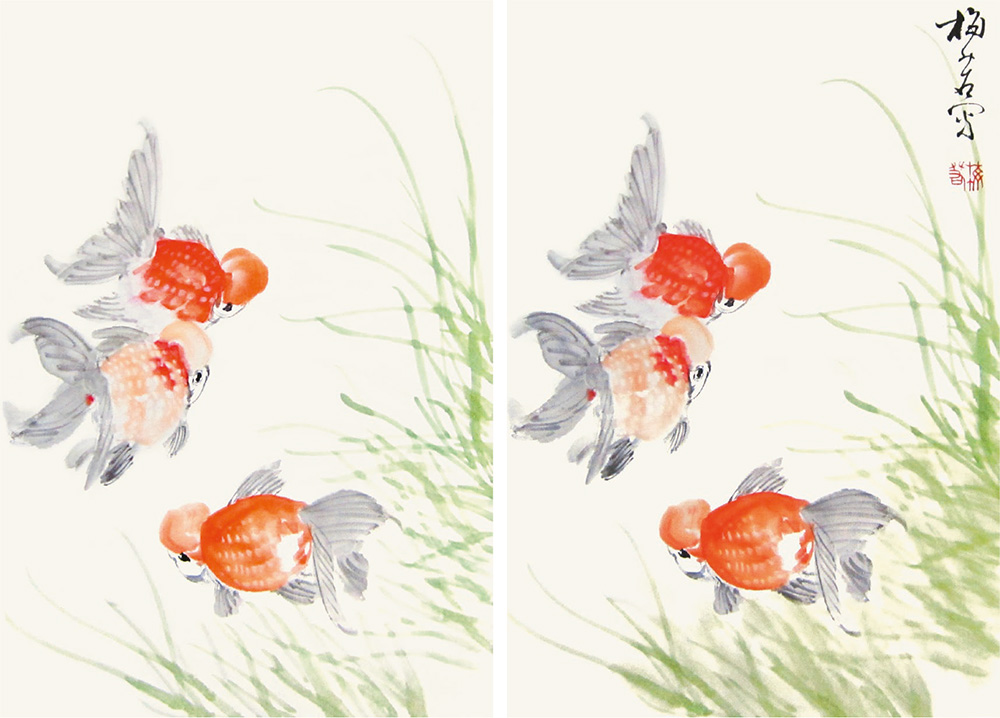
23 Add more water plants at the bottom and touch up the water plants with dark green, portraying the flowing effect of water to complete the work.
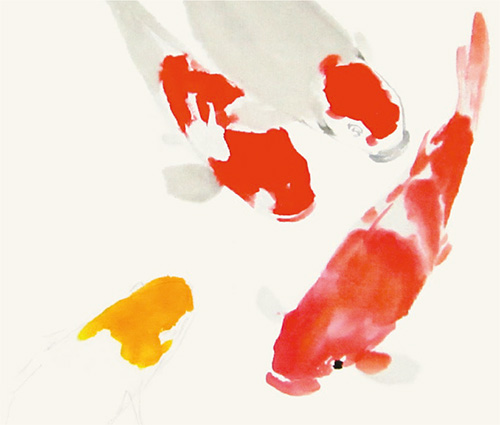
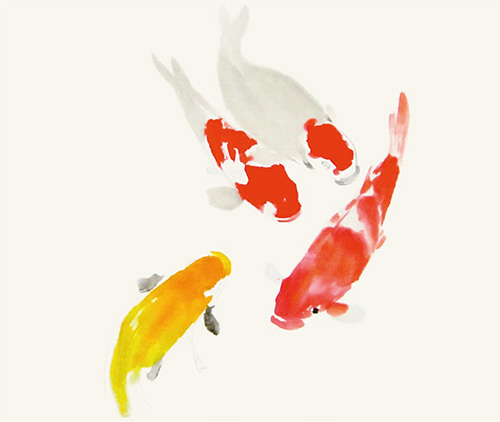
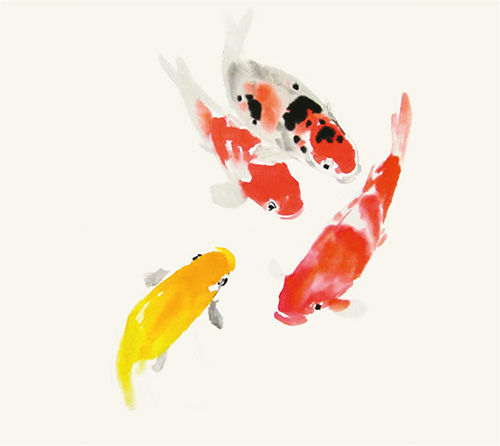
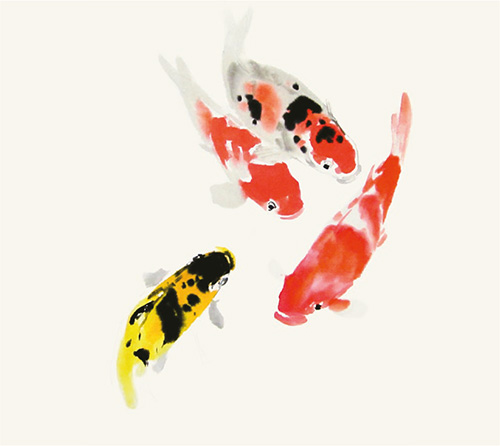
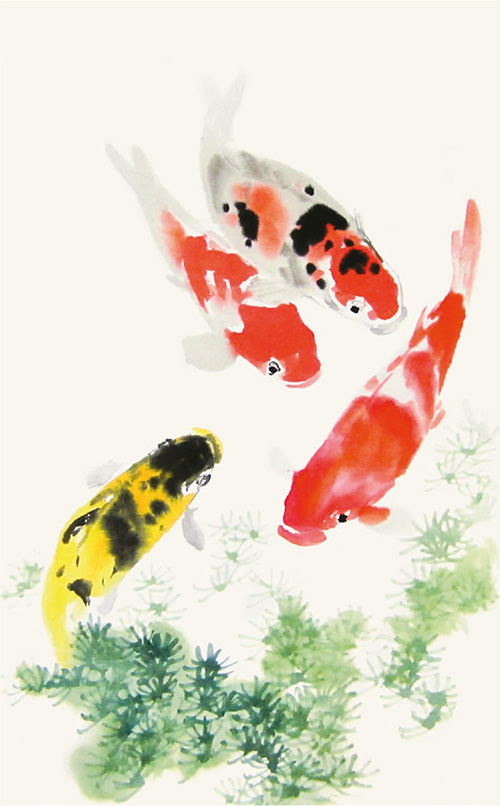
In this painting, a refreshing scene is composed of four colorful carps playing in the water next to green aquatic plants. Carp is an auspicious symbol. Having four carps together means surplus year after year.
Refer to the painting techniques for carp in the Introductory Lessons (see page 128) and the picture composition of Goldfishes Playing in the Water in the preceding lesson.

1 Let’s start with the first carp. Paint the light-ocher body.
2 Paint the light-ocher tail.
3 Mix vermilion and eosin to color the head.
4 Paint the mouth with one stroke and leave a gap between the mouth and the head.
5 Color the body but leave some empty spaces. Dot the eye with dark ink.
6 Next is the second carp on the top left. Mix vermilion and eosin to paint the head.
7 Paint the light-ocher body and tail.
8 Outline the mouth, head and eye using light ocher.
9 Next is the third carp, parallel to the second one. Mix vermilion and eosin to paint the head, and paint the mouth in one stroke.
11 Next is the fourth carp. Mix gamboge and vermilion to paint the head.
12 Then paint the body. Paint the pelvic and pectoral fins with light ink.
13Dot the eyes for the carps. The two carps on the top from the side view have only one eye showing. The yellow one at the bottom left is from the top view, which displays both eyes.
14 Use ink to add spots in various sizes on the uppermost red carp.
15 Use ink to add spots on the yellow carp. They can be in patches or spots.
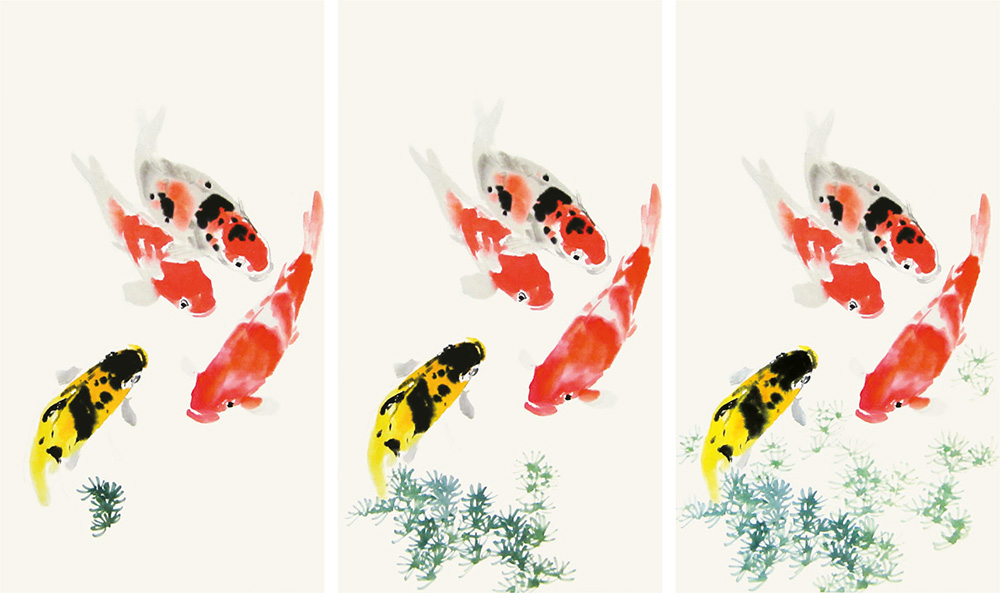
16 Add the green water plants at the bottom using radial strokes in various densities. The farther away the water plants are, the lighter the color is.
17 Touch up the water plants with dark green.
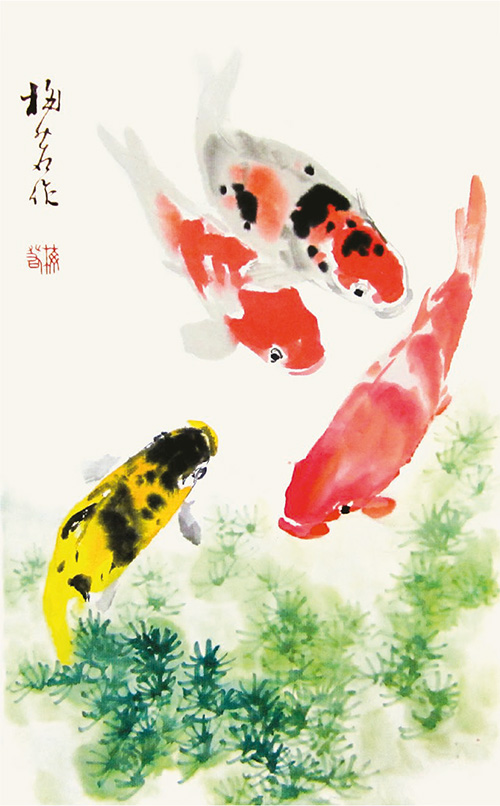
18 When the color gets lighter, touch up the water plants again to give the effect of water. The work is complete.
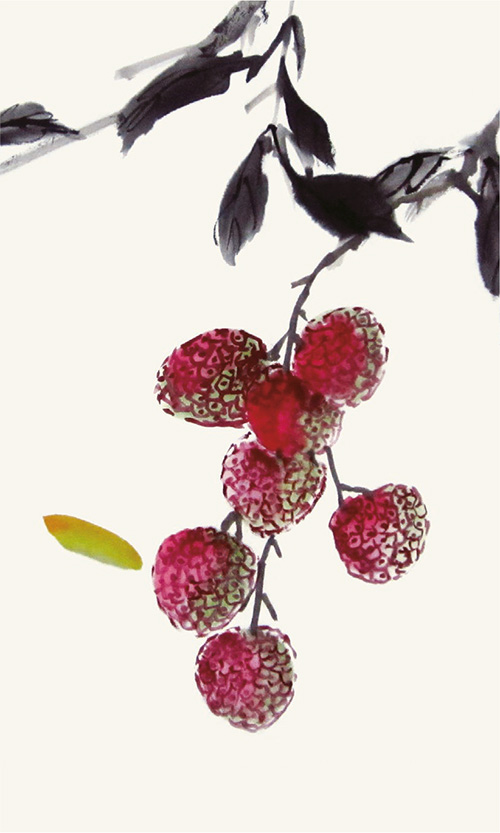
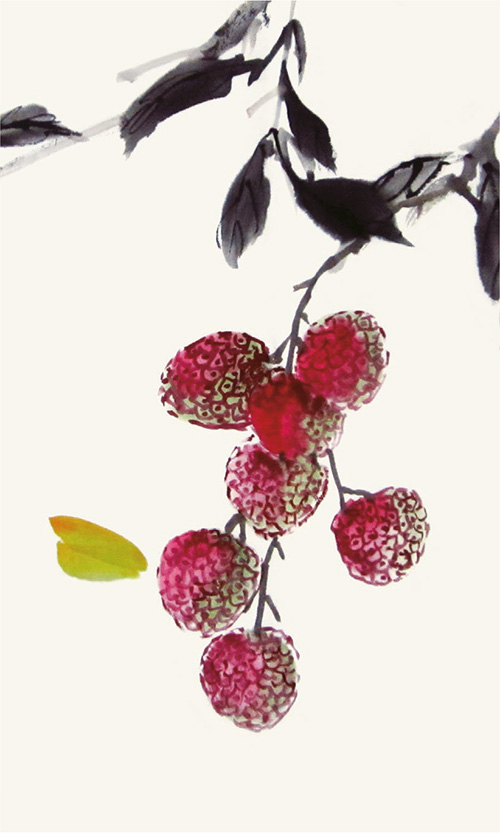
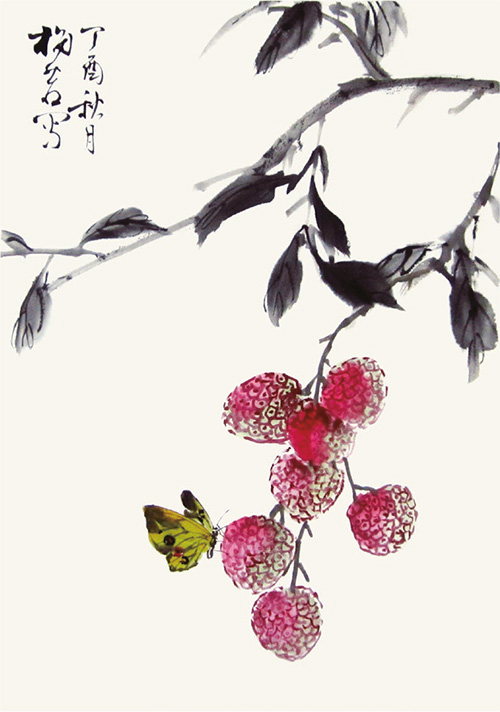
This art is a typical caochong (grass insect) painting. The bunch of lychees attracts a little yellow butterfly. It is landing on the lychee, providing a sense of slight vibration from the wings although the picture is still. The small portion of lychees is enough to present the whole tree that is full of appealing fruits.
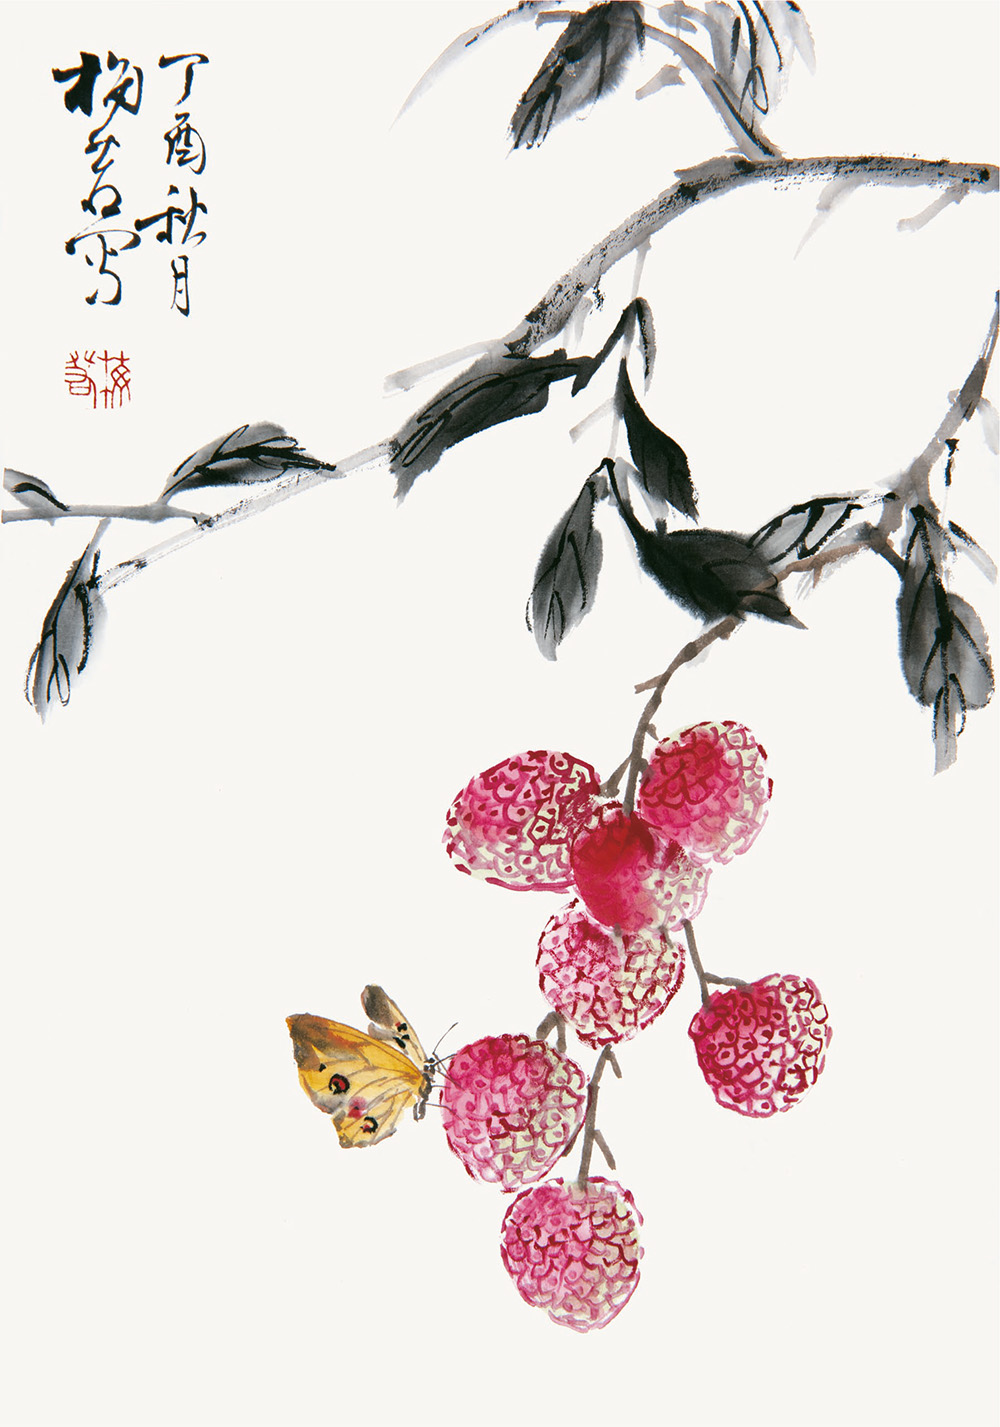
1 Use eosin to dot out halves of the lychees. Pay attention that the lychees here are composed of upper half and lower half, which means to create the sense of “bunch.”
2 Paint the lower halves of the lychees with dark green to make them complete.
3 Mix ocher with ink to draw the twigs to connect the lychees.
4 Draw the branches on top right with ink.
5 Paint the leaves with ink. Use two centered-tip strokes for the broad leaves and one stroke for the narrow ones. Be sure to paint a stroke in one breath to form the natural shades of ink.
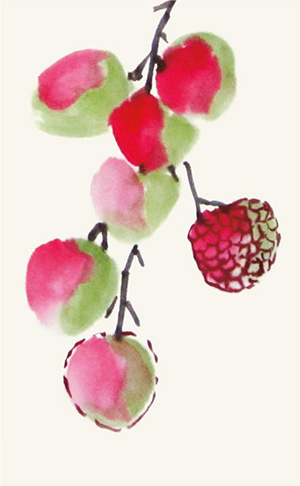
6 Draw a dotted line around the lychee with thick rouge, referring to the bottom lychee. Then draw some irregular hexagons to present the texture, referring to the right lychee.
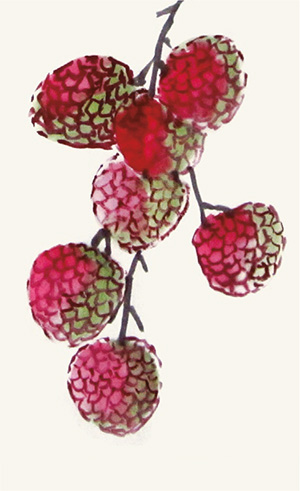
7 Repeat the previous methods to complete the rest of the lychees. This is different from the lychee painting technique in the Introductory Lessons.
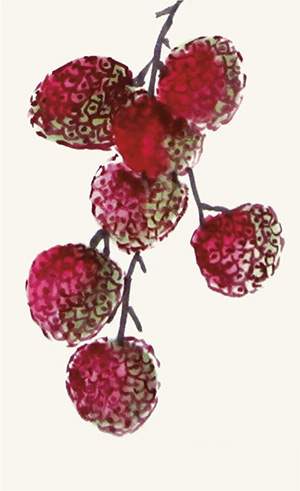
8 Add a dark rouge dot in each irregular hexagon. Then use dark rouge to create dark shades on the surface of the lychees to present the overlapping effect.
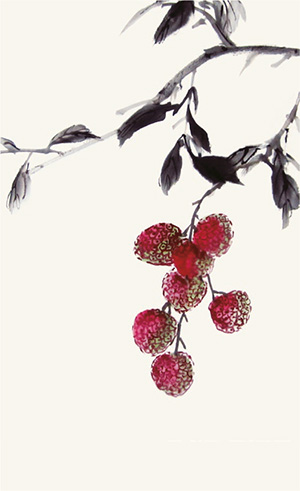
9 Outline the leaf veins with dark ink.
10 Dip the brush tip into gamboge and vermilion to paint the butterfly wing.
11 Add another stroke to form the pair.
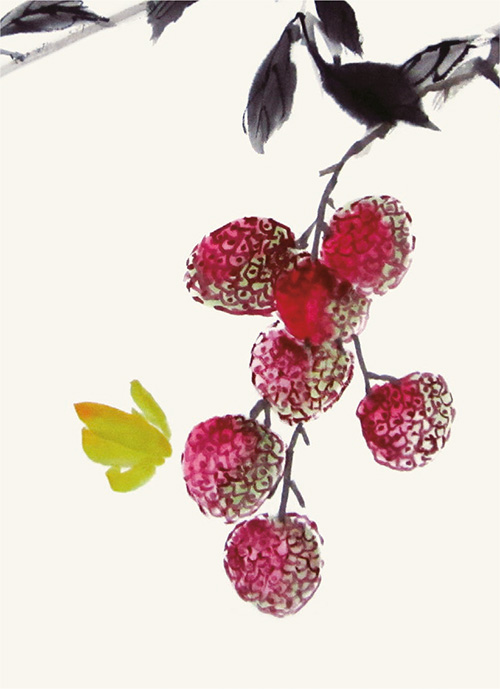
12 Add a stroke on top and at the bottom respectively to create the opposite wing and the hind wing. This is the side view of the butterfly.
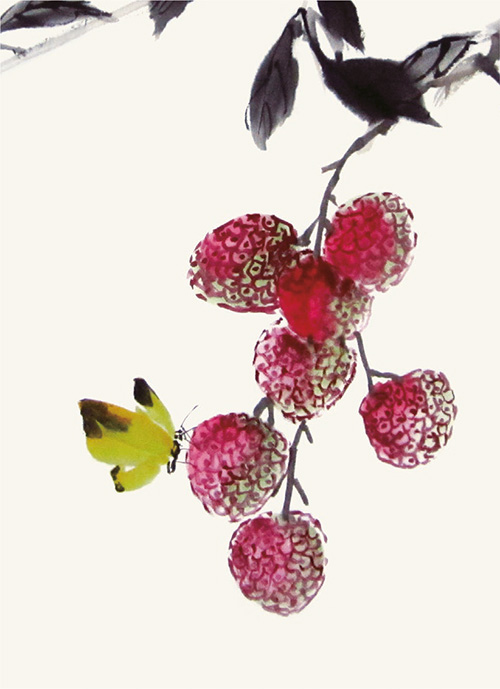
13 Mix ocher with dark ink to paint the body and the pair of antennas. Add the remaining ink to the wing tips.
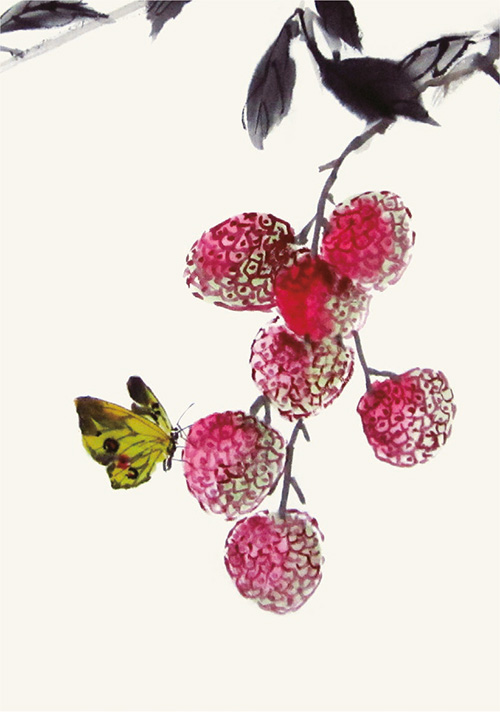
14 Draw the veins on the wings with ink. Add rouge dots for the patterns.
15 The butterfly and the lychees are complete.
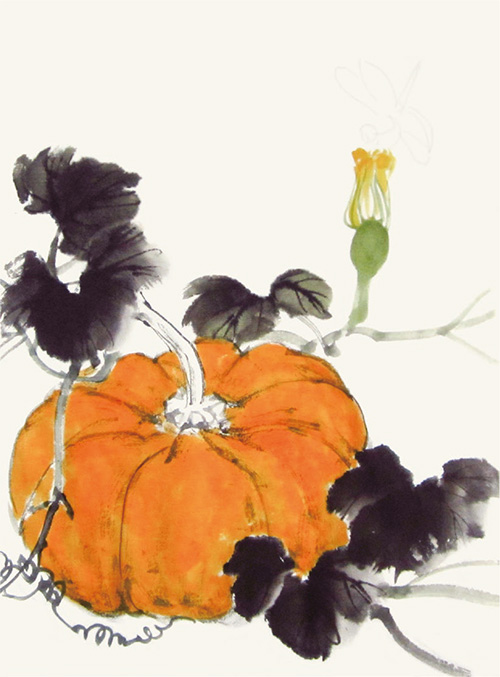
This painting connects a dragonfly with a pumpkin. The dragonfly is standing on the flower of a plump pumpkin as if it is sniffing its fragrance before fluttering away. The gigantic golden ripe pumpkin epitomizes a harvest scene.
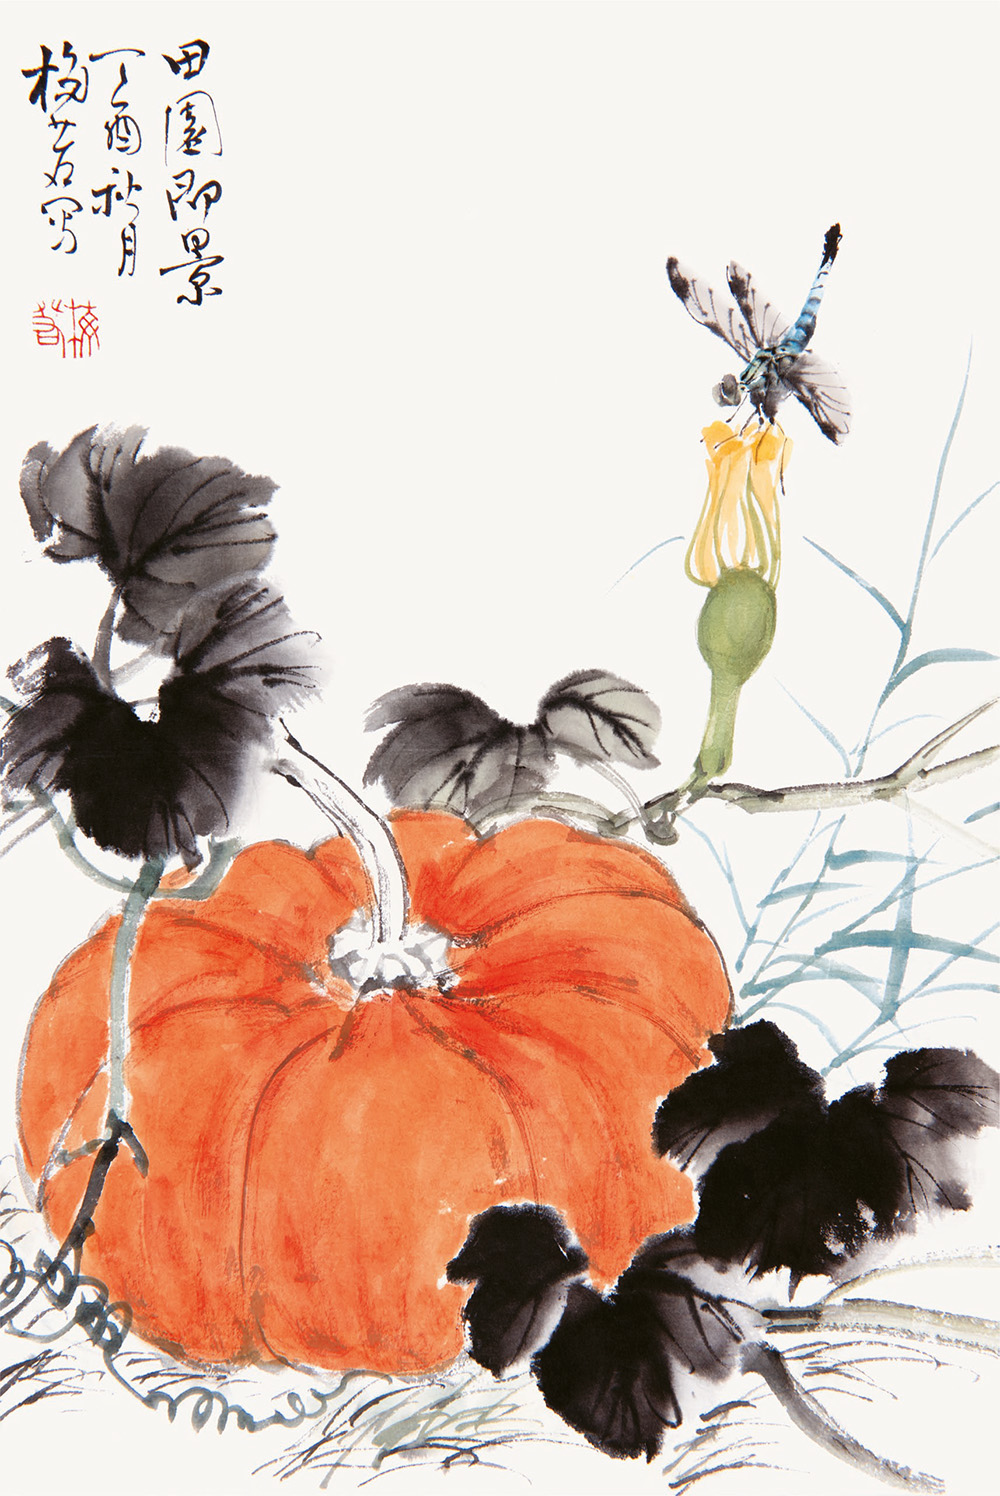
1 Dip the brush tip in dark ink to paint the pumpkin leaves.
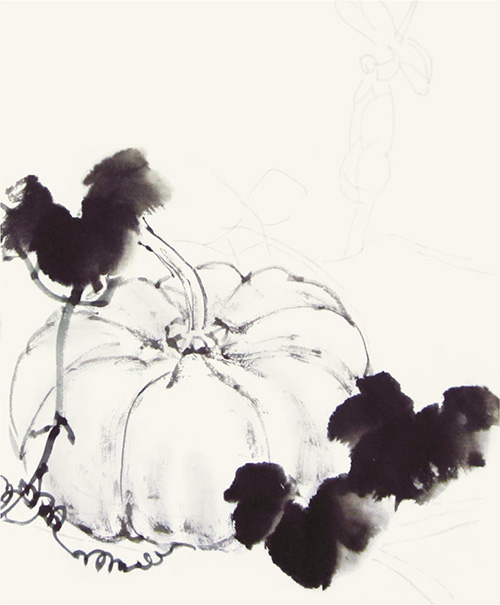
2 Use less dark ink to outline the pumpkin and its vines.
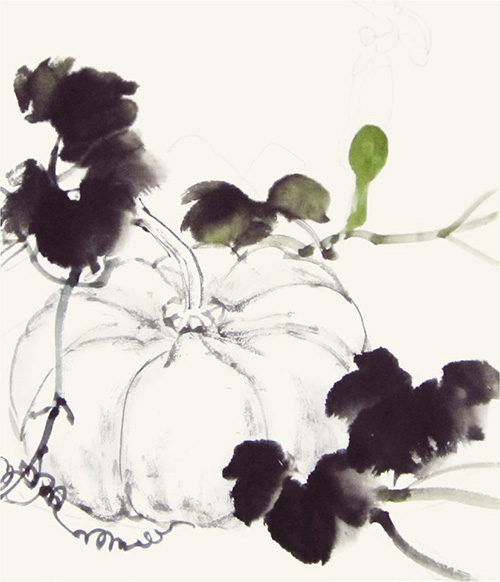
3 Add a leaf on top with ink; then paint the pedicle with dark green.
4 Mix gamboge with a little vermilion to create golden yellow to paint the half-open flower for the butterfly to stand on.
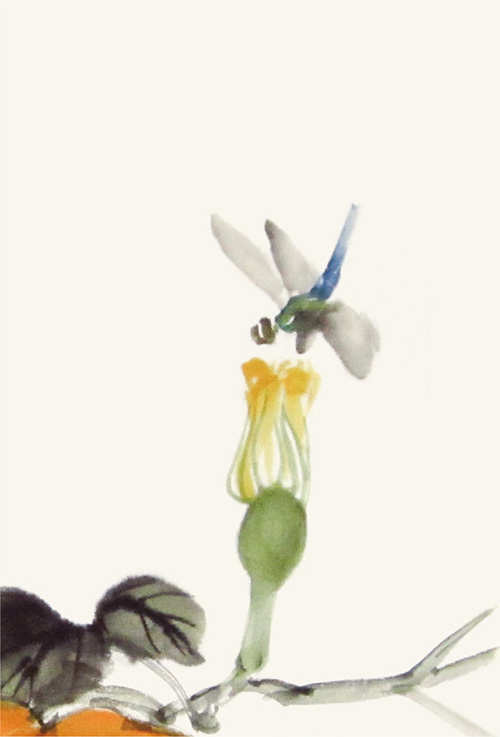
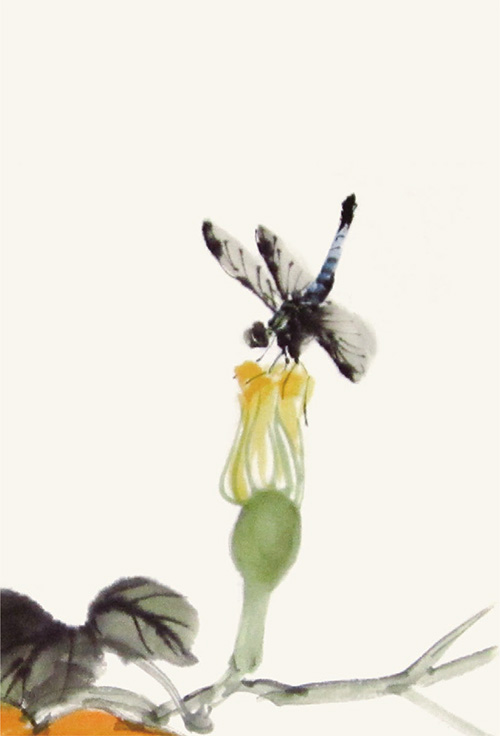
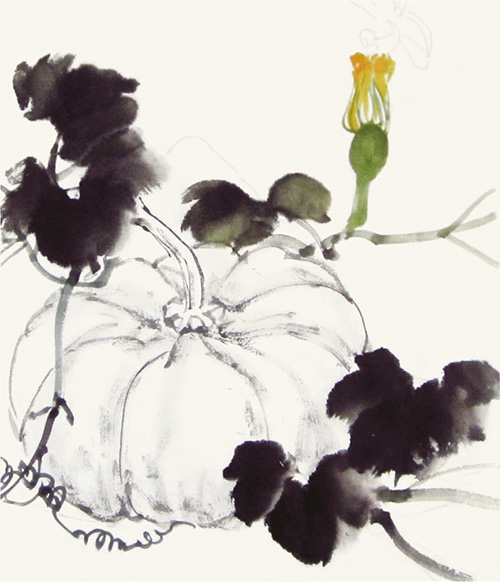
6 Refer to the dragonfly painting technique in the Introductory Lessons (see page 114) to create the dragonfly above the flower. Note the nuance of the posture.

7 Paint some grass below and on the right of the pumpkin with ink or indigo to highlight the effect of the pumpkin sitting on the ground. The painting is complete.