44 GOTH GIRL: Loose-Knit Tight-Fit Holey Jumper
47 MASTER & SERVANT: Camisole with Dropped Stitches and Bra Straps
51 TRANSGRESSION: Superbulky Jumper with Cross Design and Detached Sleeves
55 THE SWINDLE: Boxy Striped Jumper
58 THE YOUNG ONE: Sweater Vest with Nautical Details
63 LOLITA: Vertical-Striped Ribbed Corset with Stitch and Ribbon Lacing Detail
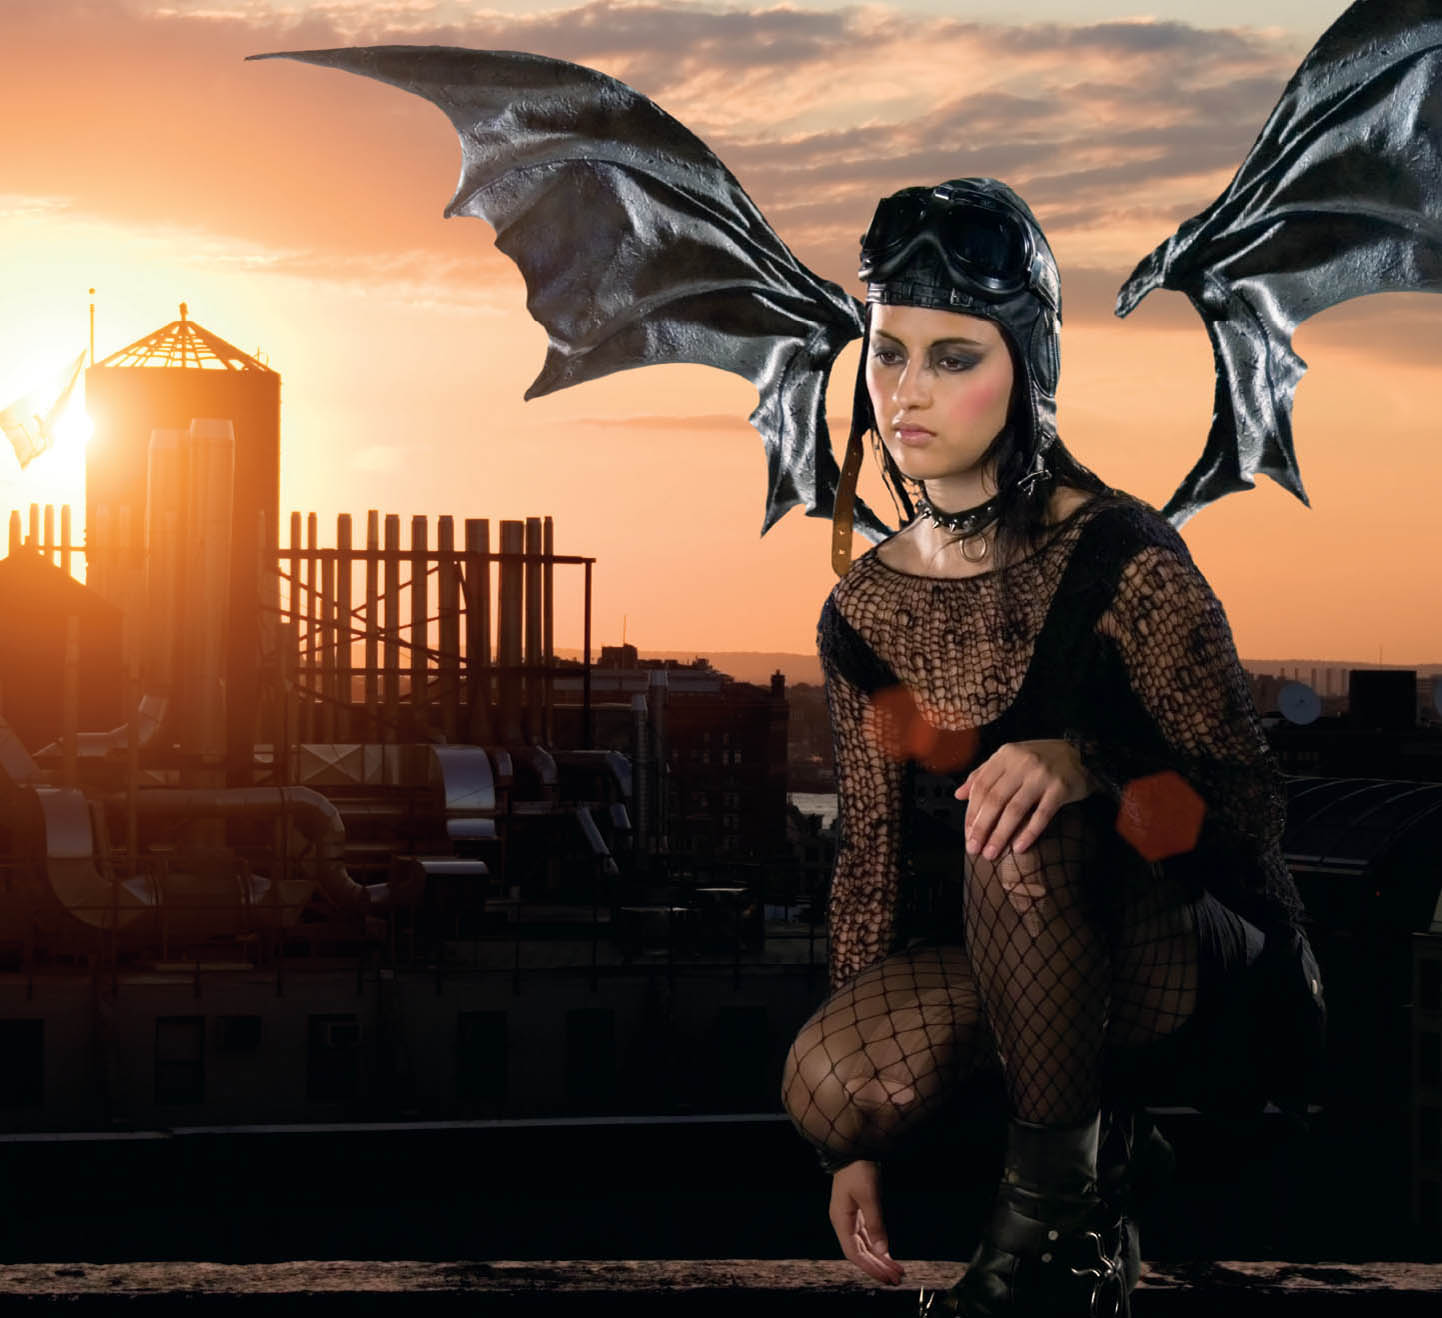

every day is halloween when you wear this cobweb-inspired jumper. wear it over a colorful camisole for a sexy look, or over graphic t-shirts to add texture to your punk-rock ensemble.
MATERIALS
» 16-inch size 17 circular needle, or size required to get correct gauge
» 2 stitch holders
» 1 skein black fingering-weight mohair yarn (Karabella Gossamer, 52% nylon, 30% kid mohair, 18% polyester, Black with Black, #6800)
GAUGE (IN STOCKINETTE STITCH)
» 7 stitches and 9 rows make a 4-inch square
FINISHED MEASUREMENTS (SIZES MEDIUM AND LARGE ARE GIVEN IN PARENTHESES)
» This project appears small when finished, but will stretch and conform to the body like a stocking. Small fits a 32-34 inch bust; medium a 34-36 inch bust; and large a 36-38 inch bust.
SKILLS & METHODS
» Dropped stitch
» Knitting in the round
» Stockinette stitch
» Yarn over
This sweater is knit completely in the round in stockinette stitch so that there are no seams to break up the sheer spiderweb lace look achieved from knitting the fine yarn on such oversize needles. You will essentially be knitting 1 large tube for the body of the sweater and 2 smaller tubes for the sleeves. A dropped stitch and a few yarn overs add to the overall distressed look!
Begin by casting on 50 (58, 66) stitches, and join the beginning and end of the round, being careful not to twist the cast-on row. Work in stockinette stitch, knitting every round, until you reach 18 (20, 22) inches. This is the body of the sweater up to the underarm. At this point, transfer 40 (48, 56) of the stitches onto 2 stitch holders, and keep 10 stitches on your needles to begin 1 sleeve. In addition to the 10 stitches, cast on another 10 (14, 18) stitches. Join the beginning and end of the round, being careful not to twist the new cast-on row, and work these 20 (24, 28) stitches circularly in stockinette stitch. At random points, place 1 or 2 yarn overs that will develop into holes. Bind off when the sleeve measures 24 (25, 26) inches.
Before making the second sleeve, drop a stitch about 2 stitches away from the first sleeve. Let the dropped stitch run all the way down the body of the sweater to create a ladder effect. To make the second sleeve, keep 15 (19, 23) stitches on each side of the first sleeve (including the 1 dropped stitch) on stitch holders, and use the remaining 10 stitches opposite the first sleeve to begin. In addition to these 10 stitches, cast on another 10 (14, 18) stitches, and repeat as for the first sleeve.
At this point, pick up all of the live stitches from your stitch holders and also pick up stitches from your sleeve cast-on row; you should pick up a total of 50 (66, 82) stitches. Knit 2 rounds. After the 2 rounds, place markers around each of the 10 (14, 18) stitches that comprise the outside of the sleeves. On the third round, knit 2 together 5 (7, 9) times along each of the 10 (14, 18) stitches you marked. At the end of this row, you will have 40 (52, 64) stitches total and a somewhat narrower neckline. Knit 2 more rounds and bind off. 
 master &
for an everyday dominatrix look, we created a simple tube top but added ingeniously placed faux runs, dropped stitches, and bra straps. to add to the overall sexiness, use an incredibly soft and luxurious cashmere. it not only looks great but also feels sensuous next to your skin.
MATERIALS
» Size 7 straight needles, or size required to get correct gauge
» Stitch markers
» Darning needle
» 1 set of old bra straps
» 2 skeins black worsted-weight yarn (Rowan Cashsoft Aran, 57% extra-fine merino, 33% microfiber, 10% cashmere, Black, #11)
GAUGE (IN STOCKINETTE STITCH)
» 17 stitches and 24 rows make a 4-inch square
FINISHED MEASUREMENTS (SIZES MEDIUM AND LARGE ARE GIVEN IN PARENTHESES)
» 27 (30, 33) inches by 11 (12, 13) inches
SKILLS & METHODS
» Stockinette stitch
» Yarn over
This sexy little top is constructed from an easy knitted wide rectangle with some smartly placed yarn overs and runs that create curvy body shaping. A simple center back seam joins the rectangle into a tube top, then bra straps are sewn on to make it into a camisole.
The camisole is knit from the top down. Using the single-yarn method, cast on a total of 108 (126, 138) stitches as follows: cast on 54 (63, 69), make a triple yarn over, then cast on 54 (63, 69) more stitches. The 3 loops of the yarn over will begin the V-ladder featured on the front center of the camisole. On the first row, purl 54 (63, 69) stitches, drop the triple yarn over loops, make another triple yarn over, and purl the remaining 54 (63, 69) stitches. Repeat this again for the second row. Knit the third row, and continue to work from now on in stockinette stitch. Continue to make a triple yarn over in the center for the next 3 rows, dropping them to make the ladders and adding new ones each time. After 6 sets, you will continue in stockinette stitch and make 8 rows with double yarn overs. Following the 8 rows of double yarn overs, make 10 rows of single yarn overs. This will have an overall effect of a V-shaped ladder of dropped stitches.
Work in stockinette stitch until the top measures 8½ (9½, 10½) inches from the beginning. Place markers after the 37th (43rd, 47th) stitch and after the 71st (83rd, 91st) stitch. This marks where the next sets of yarn-over ladders will be placed. Continue to work in stockinette while making the following sets of yarn overs and dropping them on the next row. Work 7 rows with single yarn overs at the stitch markers, then 5 rows with double yarn overs. Purl the next row, while maintaining the double yarn overs at the markers. Bind off in purling, and again continue to maintain the double yarn overs. At the same time, you will also drop stitches on purpose just before binding off. You will drop stitch number 3 (3, 3), 29 (34, 37), 79 (92, 101), and 106 (124, 136) and let the ladder of dropped stitches work all the way up to the top of the camisole.
Use mattress stitch to seam up the back of the top. Then sew on the bra straps about 14 (16, 18) stitches to the left and right of the center in the front and the back. This camisole looks best when it is rinsed in a conditioner bath and blocked until completely dry. 
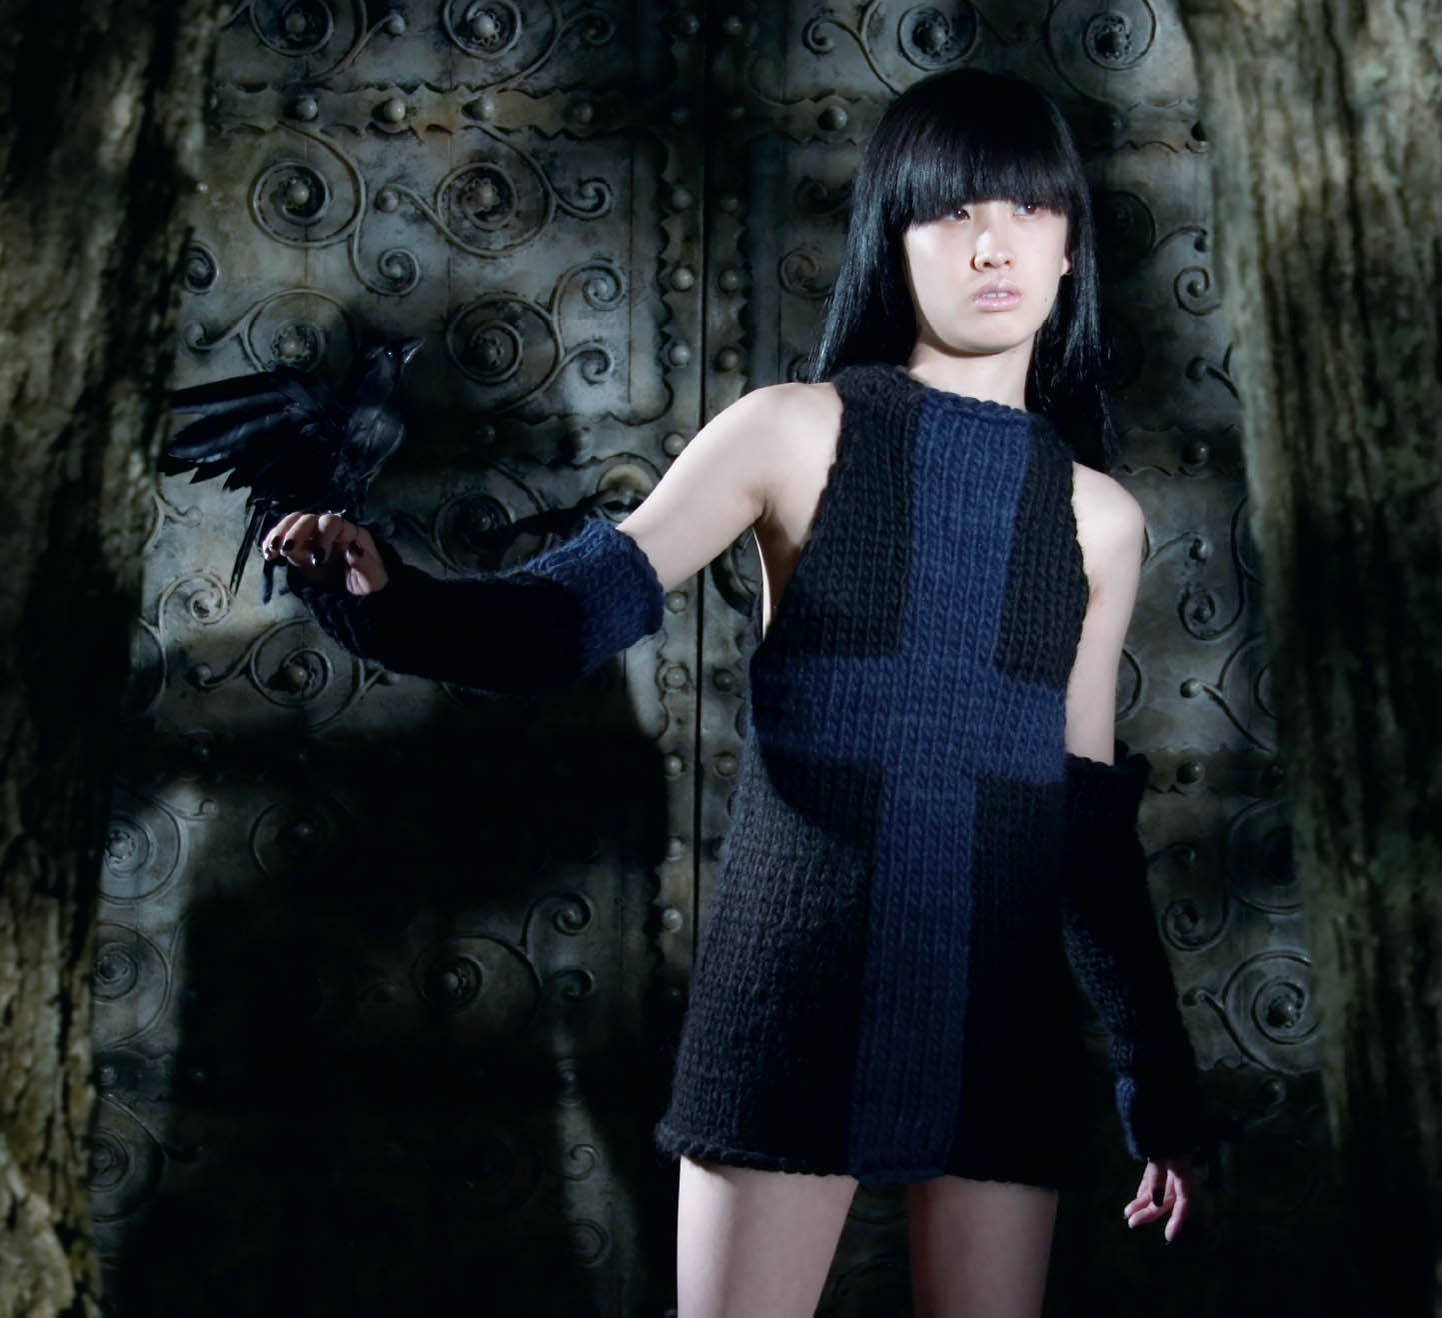

bulky knits don’t have to leave you looking shapeless. a few alterations to a simple classic style can turn the ordinary into extraordinary. the detached and removable sleeves in this halter-neck jumper offer a sexy glimpse of exposed shoulders. the bold cross design on the jumper adds a flattering focal point, and if worn as a minidress, it is sinfully salty!
MATERIALS
» 32-inch size 17 circular needle, or size required to get correct gauge
» Stitch markers
» 3 stitch holders
» Darning needle
» Size 17 straight needles, optional
» 6 skeins black superbulky yarn (Blue Sky Bulky, 50% alpaca, 50% merino wool, Black Bear, #1008)
» 2 skeins blue superbulky yarn (Blue Sky Bulky, 50% alpaca, 50% merino wool, Dark Blue, #1013)
GAUGE (IN STOCKINETTE STITCH)
» 7¼ stitches and 11 rows make a 4-inch square
FINISHED MEASUREMENTS
» See body and sleeve illustrations
SKILLS & METHODS
» Intarsia
» Stockinette stitch
This sweater is worked in stockinette stitch throughout on circular needles but not knit in the round. The detached sleeves are also knit in stockinette stitch throughout. The only seams are in the center of the back of the sweater and up the sleeves.
Using 2 balls of black and 1 ball of blue, take the circular needle and cast on 60 stitches as follows: 27 in black, 6 in blue, and another 27 in black. Work in stockinette stitch, using intarsia to keep the center 6 stitches blue to create the vertical line of the cross until the body of the sweater measures 13½ inches; this should be 36 rows. Place 2 stitch markers around the center 30 stitches (after 15 stitches and 45 stitches) to mark the area where the horizontal blue stripe of the cross will be. Cut the blue yarn, and join again at the first marker when knitting the next row. Work 8 rows using intarsia to keep the stitches between the markers blue.
At this point transfer each set of black stitches (15 each) onto stitch holders or the straight needles, reserve for the back of the sweater, and remove the stitch markers. You will now be creating the front of the sweater, shaping the armholes and continuing the vertical line of the blue cross in intarsia with the 30 stitches on your needles. Reintroducing the 2 balls of black yarn and the center 6 in blue, work in stockinette stitch for the next 14 rows while simultaneously decreasing a stitch at the beginning of every row. Knit together the second and third stitches of each row in order to keep a neat edge. This will result in an overall decrease of 7 stitches on each side; 16 stitches remain on your needle. Work 4 more rows in stockinette, maintaining the top of the blue cross in intarsia without any further decreases. Transfer these 16 stitches onto a stitch holder, and commence work on the back armholes.
Transfer the back stitches from their holders onto your needle. For the back armholes, you will be working across all 30 stitches with only 1 ball of black yarn. Work in stockinette stitch for the next 14 rows while decreasing at the beginning of every row. Remember to knit together the second and third stitches of each row in order to keep a neat edge. This will result in an overall decrease of 7 stitches on each side; 16 stitches remain. Then work 4 more rows in stockinette without any further decreases. At this point transfer the 16 stitches for the front onto the circular needle, so there are 32 stitches in all. Work in stockinette stitch for 6 rows, continuing to use intarsia for the center 6 stitches in blue and using 2 balls of black yarn. Bind off. Remember, during this color changing, bind off to introduce the blue color 1 stitch before the intarsia pattern begins on the bind-off row, so that when you slip the stitch during bind-off, the pattern is maintained. Do this again when introducing the second ball of black.
The sweater is almost finished. You will notice 2 slits along the back. One is a small 2-inch slit at the neck, which you can seam together simply with a darning needle and black yarn. The second slit is in the center back, below the armhole. To seam this together, we used the contrasting blue superbulky alpaca, using about 2 yards to crisscross a seam, much as you do when lacing shoes. This creates a decorative blue braid. We double-knotted the end and left a few inches hanging for a messy look.
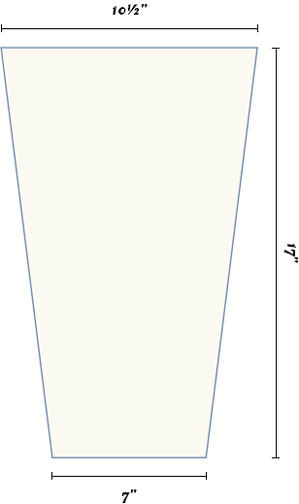
One sleeve will have a blue stripe at the widest point, while the other sleeve will have a blue stripe at the narrowest point. For the first sleeve, cast on 18 stitches in blue, and work 7 rows even. Knit 2 together at the beginning of the seventh row; you will have 17 stitches left. Switch to the black yarn, work stockinette stitch, and knit 2 together at the beginning of rows 13, 19, 25, 31, 37, and 43.
SLEEVE
You will have 11 stitches remaining. Knit 1 row, and then bind off.
For the second sleeve, cast on 18 stitches with the black yarn. Make decreases by knitting 2 together at the end of the row on rows 7, 13, 19, 25, and 31. Continue working even in stockinette stitch in black, switching to blue yarn on the 37th row. Knit 2 together in blue at the end of this row and again on the 43rd row. You will have 11 stitches remaining. Knit 1 more row in blue, and bind off.
Use the same technique as the back of the sweater to seam together the sleeves. Take about 2 yards of the bulky alpaca, and lace the sleeves as you would shoes. Double-knot and leave a tail for decoration.
This superbulky yarn has a very soft and fuzzy texture and blooms beautifully when it is knit. It requires no washing, conditioning, or blocking.
Please note that the sweater is shown photographed on a petite model. If you are interested in making a minidress out of yours, take some extra time. Measure from your underarm to the desired length of the minidress, and make sure to lengthen the sweater accordingly. You can keep all armhole shaping, neck shaping, and detached sleeves the same. Note that this will require more yarn! 


no punk-rock wardrobe is complete without the quintessential oversized striped mohair sweater worn by many famous punk rockers in the late 1970s. for the past 10 years, whenever we found ourselves in a yarn store looking at the mohair collection, we would inevitably say, “we have to make that sweater one of these days!” and now we finally have! we chose an acerbic green-and-black color palette for ours, but feel free to pair your two favorite colors.
MATERIALS
» Size 11 knitting needles, or size required to get correct gauge
» Row counter, optional
» 4 stitch holders
» Darning needle
» 3 skeins black worsted-weight mohair yarn (Joseph Galler Yarns, Flore II, 75% kid mohair, 20% wool, 5% nylon, Black, #015)
» 3 skeins green worsted-weight mohair yarn (Joseph Galler Yarns, Flore II, 75% kid mohair, 20% wool, 5% nylon, Lime, #104)
GAUGE (IN STOCKINETTE STITCH)
» 12 stitches and 16 rows make a 4-inch square on size 11 needles
FINISHED MEASUREMENTS
» See front & back and sleeve illustrations
SKILLS & METHODS
» Stockinette stitch
» 3-needle bind-off
We intentionally designed this sweater to be large and comfy. It is made up of 4 pieces: identical front and back pieces and 2 sleeves.
For the front, cast on 57 stitches in black mohair. Work 64 rows in stockinette stitch, alternating every 16 rows between black mohair and green mohair.
To shape the armholes, switch to the black mohair, and work the next few rows in stockinette stitch according to the following directions. Bind off the first 2 stitches at the beginning of the next 4 rows. Then work decreases at the beginning and end of your row by knitting 2 together on the next 2 knit rows. You should have worked 71 rows and have 45 stitches remaining at this point.
Work through row 90 in stockinette stitch, switching colors every 16 rows as before. Begin the neck hole shaping on row 91 by knitting the first 12 stitches, binding off the center 21 stitches, and knitting the last 12 stitches. Note that the stitches for the left shoulder will remain on the far end of your needle but will not be worked until later. Continue working just the right shoulder as follows:
row 92: Purl.
row 93: Bind off the first 3 stitches at the neck opening, and knit to the end; 9 stitches remain.
row 94: Purl.
row 95: Bind off the first stitch at the neck opening, and knit to the end; 8 stitches remain.
row 96: Purl.
Do not bind off. Transfer the remaining 8 stitches to a stitch holder because you will join the pieces together at the shoulders with a 3-needle bind-off.
For the left side, slip stitches to the other needle. Attach green mohair at the shoulder edge, and work in stockinette stitch as follows:
row 92: Knit.
row 93: Bind off the first 3 stitches at the neck opening, and purl to the end; 9 stitches will remain.
row 94: Knit.
row 95: Bind off the first stitch at the neck opening, and purl to the end; 8 stitches will remain.
row 96: Knit.
Again, do not bind off. Transfer the remaining 8 stitches to a stitch holder for a 3-needle bind-off seam. Repeat to create the back piece.
To attach the front and back pieces at the shoulders, place both pieces together, right sides facing each other, and join each shoulder with a 3-needle bind-off (see instructions in glossary).
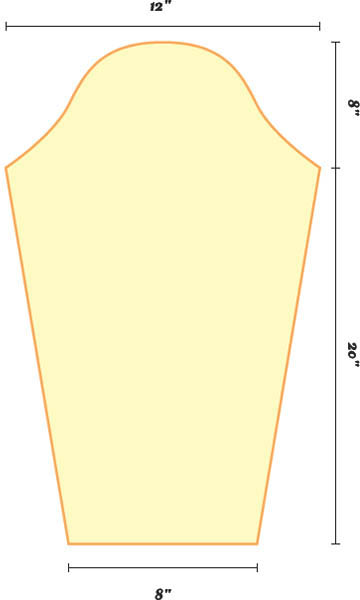
To create the sleeves, cast on 24 stitches in green mohair. Work 80 rows in stockinette stitch, alternating every 16 rows between green mohair and black mohair. Note: you will increase 1 stitch at the beginning and end of rows 13, 26, 39, 52, 65, and 78. You will now have 36 stitches. Switch back to black mohair, and begin shaping the cap of the sleeve by binding off the first 2 stitches of the next 4 rows. Then work decreases at the beginning and end of your row by knitting 2 together on the next 2 knit rows.
SLEEVE
You should have worked 87 rows with 24 stitches remaining at this point. Work rows 88 through 96 in stockinette stitch. Switch to green mohair, and work rows 97 through 109 in stockinette stitch, knitting together the second and third stitches as well as the second- and third-to-last stitches on rows 99, 101, 103, 105, 107, and 109; 12 stitches remain. On row 110, purl together the second and third stitches as well as the second- and third-to-last stitches; 10 stitches remain. On row 111, knit together the second and third stitches, the fourth and fifth stitches, the sixth and seventh stitches, and the eighth and ninth stitches. Bind off the remaining 6 stitches. Repeat to create the second sleeve.
Using a 1-stitch seam allowance, set in sleeves and sew to armhole edges. Finally, sew the side seams and the sleeve seams. 

 the
thein keeping with the schoolboy theme, here is a conventional sweater vest with a nautical twist. nineteen-fifties pinup girls were often dressed thematically, and we chose the sailor motif for our look, customizing with an anchor patch and buttons.
MATERIALS
» Size 8 knitting needles, or size required to get correct gauge
» Row counter, optional
» 4 stitch holders
» 24-inch size 8 circular needle
» Darning needle
» Patch, optional
» 5 buttons, optional
» 5 skeins blue cotton fleece worsted-weight yarn (Brown Sheep Co., Lamb’s Pride, Cotton Fleece, 80% cotton, 20% merino wool, Wolverine Blue, CW585)
GAUGE (IN STOCKINETTE STITCH)
» 16 stitches and 24 rows make a 4-inch square
FINISHED MEASUREMENTS (SIZES MEDIUM AND LARGE GIVEN IN PARENTHESES)
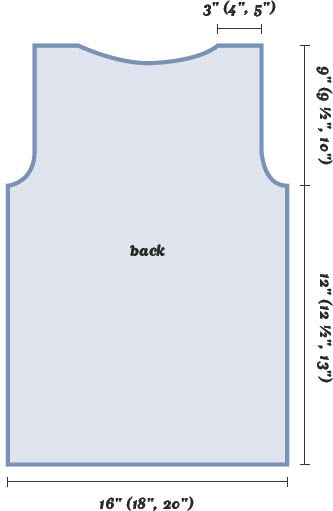
» See front and back illustrations
SKILLS & METHODS
» Ribbing
» Stockinette stitch
» 3-needle bind-off
This vest is made up of 2 pieces: a front piece and a back piece. Ribbing is added to the armholes and V-neck. Finally, we added a personal touch with an iron-on patch and decorative buttons.
This project is worked with 2 strands of yarn held together throughout. For the front piece, cast on 64 (72, 80) stitches. To create the bottom ribbed edge, knit 4 stitches, then purl 4 stitches, alternating to the end of the row. Work in ribbing for 8 rows. Work rows 9 through 72 (76, 78) in stockinette stitch. Your piece should measure approximately 12 (12½, 13) inches long.
At this point you will divide the piece in half, working the V-neck and armhole decreases first for the right side and then for the left side. Keep the first 32 (36, 40) stitches on your left needle, and transfer the last 32 (36, 40) stitches onto a stitch holder. For the left side, shape the left armhole and V-neck as follows:
row 73 (77, 79): Bind off the first 2 stitches, and knit to the end; 30 (34, 38) stitches remain.
row 74 (78, 80): Purl 1, purl together the second and third stitches, and purl to the end; 29 (33, 37) stitches remain.
row 75 (79, 81): Bind off the first 2 stitches, and knit to the end; 27 (31, 35) stitches remain.
row 76 (80, 82): Purl.
row 77 (81, 83): Bind off the first stitch, and knit to the end; 26 (30, 34) stitches remain.
row 78 (82, 84): Purl.
row 79 (83, 85): Bind off the first stitch, and knit to the end; 25 (29, 33) stitches remain.
row 80 (84, 86): Purl 1, purl together the second and third stitches, and purl to the end; 24 (28, 32) stitches remain.
row 81 (85, 87): Bind off the first stitch, and knit to the end; 23 (27, 31) stitches remain. This concludes the right armhole shaping.
To finish the V-neck, work rows 82 (86, 88) through 126 (130, 132) in stockinette stitch, purling together the second and third stitches on rows 86 (90, 92), 90 (94, 96), 94 (98, 100), 98 (102, 104), 102 (106, 108), 106 (110, 112), 110 (114, 116), 114 (118, 120), 118 (122, 124), 122 (126, 128), and 126 (130, 132). For the small size, transfer the remaining 12 stitches onto a stitch holder because you will join the front and back pieces together at the shoulders with a 3-needle bind-off. For the medium size, continue working in stockinette stitch for another 3 rows, then transfer the remaining 16 stitches onto a stitch holder. For the large size, continue working in stockinette stitch for another 6 rows, then transfer the remaining 20 stitches onto a stitch holder.
For the right side, transfer 32 (36, 40) stitches from the stitch holder onto your needle. Attach 2 strands of blue yarn at the armhole edge, and shape the right armhole and V-neck as follows:
row 73 (77, 79) (wrong side): Bind off the first 2 stitches, and purl to the end; 30 (34, 38) stitches remain.
row 74 (78, 80) (right side): Knit 1, knit together the second and third stitches, and knit to the end; 29 (33, 37) stitches remain.
row 75 (79, 81): Bind off the first 2 stitches, and purl to the end; 27 (31, 35) stitches remain.
row 76 (80, 82): Knit.
row 77 (81, 83): Bind off the first stitch, and purl to the end; 26 (30, 34) stitches remain.
row 78 (82, 84): Knit.
BACK
row 79 (83, 85): Bind off the first stitch, and purl to the end; 25 (29, 33) stitches remain.
row 80 (84, 86): Knit 1, knit together the second and third stitches, and knit to the end; 24 (28, 32) stitches remain.
row 81 (85, 87): Bind off the first stitch, and purl to the end; 23 (27, 31) stitches remain. This concludes the left armhole shaping.
To finish the V-neck, work rows 82 (86, 88) through 126 (130, 132) in stockinette stitch, knitting together the second and third stitches on rows 86 (90, 92), 90 (94, 96), 94 (98, 100), 98 (102, 104), 102 (106, 108), 106 (110, 112), 110 (114, 116), 114 (118, 120), 118 (122, 124), 122 (126, 128), and 126 (130, 132). For the small size, transfer the remaining 12 stitches onto a stitch holder because you will join the front and back pieces together at the shoulders with a 3-needle bind-off. For the medium size, continue working in stockinette stitch for another 3 rows, then transfer the remaining 16 stitches onto a stitch holder. For the large size, continue working in stockinette stitch for another 6 rows, then transfer the remaining 20 stitches onto a stitch holder.
For the back piece, follow the instructions for the front up to and including row 72 (76, 78). Next, you will work both the right and left armholes at the same time as follows: At the beginning of the next 4 rows, bind off the first 2 stitches, and knit or purl to the end; 56 (64, 72) stitches remain. At the beginning of the next 6 rows, bind off the first stitch, and knit or purl to the end; 50 (58, 66) stitches remain. Work rows 83 (87, 89) through 120 (124, 126) even in stockinette stitch. On row 121 (125, 127), you will begin shaping the back neck opening. Knit the first 16 (20, 24) stitches, bind off the center 18 stitches, and then knit the remaining 16 (20, 24) stitches. Transfer the first 16 (20, 24) stitches to a stitch holder so you can work the next 5 rows of the left side in stockinette stitch, binding off the first 2 stitches on every knit row. For the small size, transfer the remaining 12 stitches onto a stitch holder because you will join the front and back pieces together at the shoulders with a 3-needle bind-off. For the medium size, continue working in stockinette stitch for another 3 rows, then transfer the remaining 16 stitches onto a stitch holder. For the large size, continue working in stockinette stitch for another 6 rows, then transfer the remaining 20 stitches onto a stitch holder.
For the right side, transfer the 16 (20, 24) stitches back onto your knitting needle, purlwise. Attach 2 strands of blue yarn at the armhole edge, and work the next 5 rows in stockinette, binding off the first 2 stitches on every purl row. Leave these 12 (16, 20) stitches on your needle for the final 3-needle bind-off. For the small size, leave these remaining 12 stitches on a stitch holder because you will join the front and back pieces together at the shoulders with a 3-needle bind-off. For the medium size, continue working in stockinette stitch for another 3 rows, then leave the remaining 16 stitches on your needle for bind-off. For the large size, continue working in stockinette stitch for another 6 rows, then leave the remaining 20 stitches on your needle for bind-off.
To seam the shoulders, place the front and back pieces together, right sides facing each other, and join the top shoulder seams together using the 3-needle bind-off method.
To add ribbing to the V-neck opening, use a circular needle. Pick up 84 (90, 96) stitches around the perimeter of the neck opening, starting 1 stitch to the right of the center of the V-neck. You should pick up 30 (33, 36) stitches along the right side, 24 across the back of the neck, and 30 (33, 36) down the left side. When you are finished picking up, turn and work your first row on the wrong side. Knit 4 stitches, then purl 4 stitches, alternating to the end of the row. Turn and work across on the right side, working purl 4 stitches, then knit 4 stitches, alternating to the end of the row. Repeat these 2 rows for a total of 8 rows. Bind off in the corresponding knit 4, purl 4 pattern. To finish, stitch down the left side edge to the right side. Lay the right side edge over the left side ribbing, and stitch down.
To add ribbing to the right armhole, pick up 60 (66, 72) stitches along the edge of the armhole using the circular needle. Instead of the 8 rows you worked on the bottom and neck edge, you will work 4 rows of knit 4, purl 4, alternating across the row. Bind off in the corresponding knit 4, purl 4 pattern. Repeat on the left armhole. Using a 1-stitch seam allowance stitch, sew the side seams together using the darning needle. Weave all loose ends into the back of the knitting.
To add a personal touch, we ironed on an anchor patch and sewed 5 anchor-themed buttons down the right side seam. Feel free to customize as you like! 
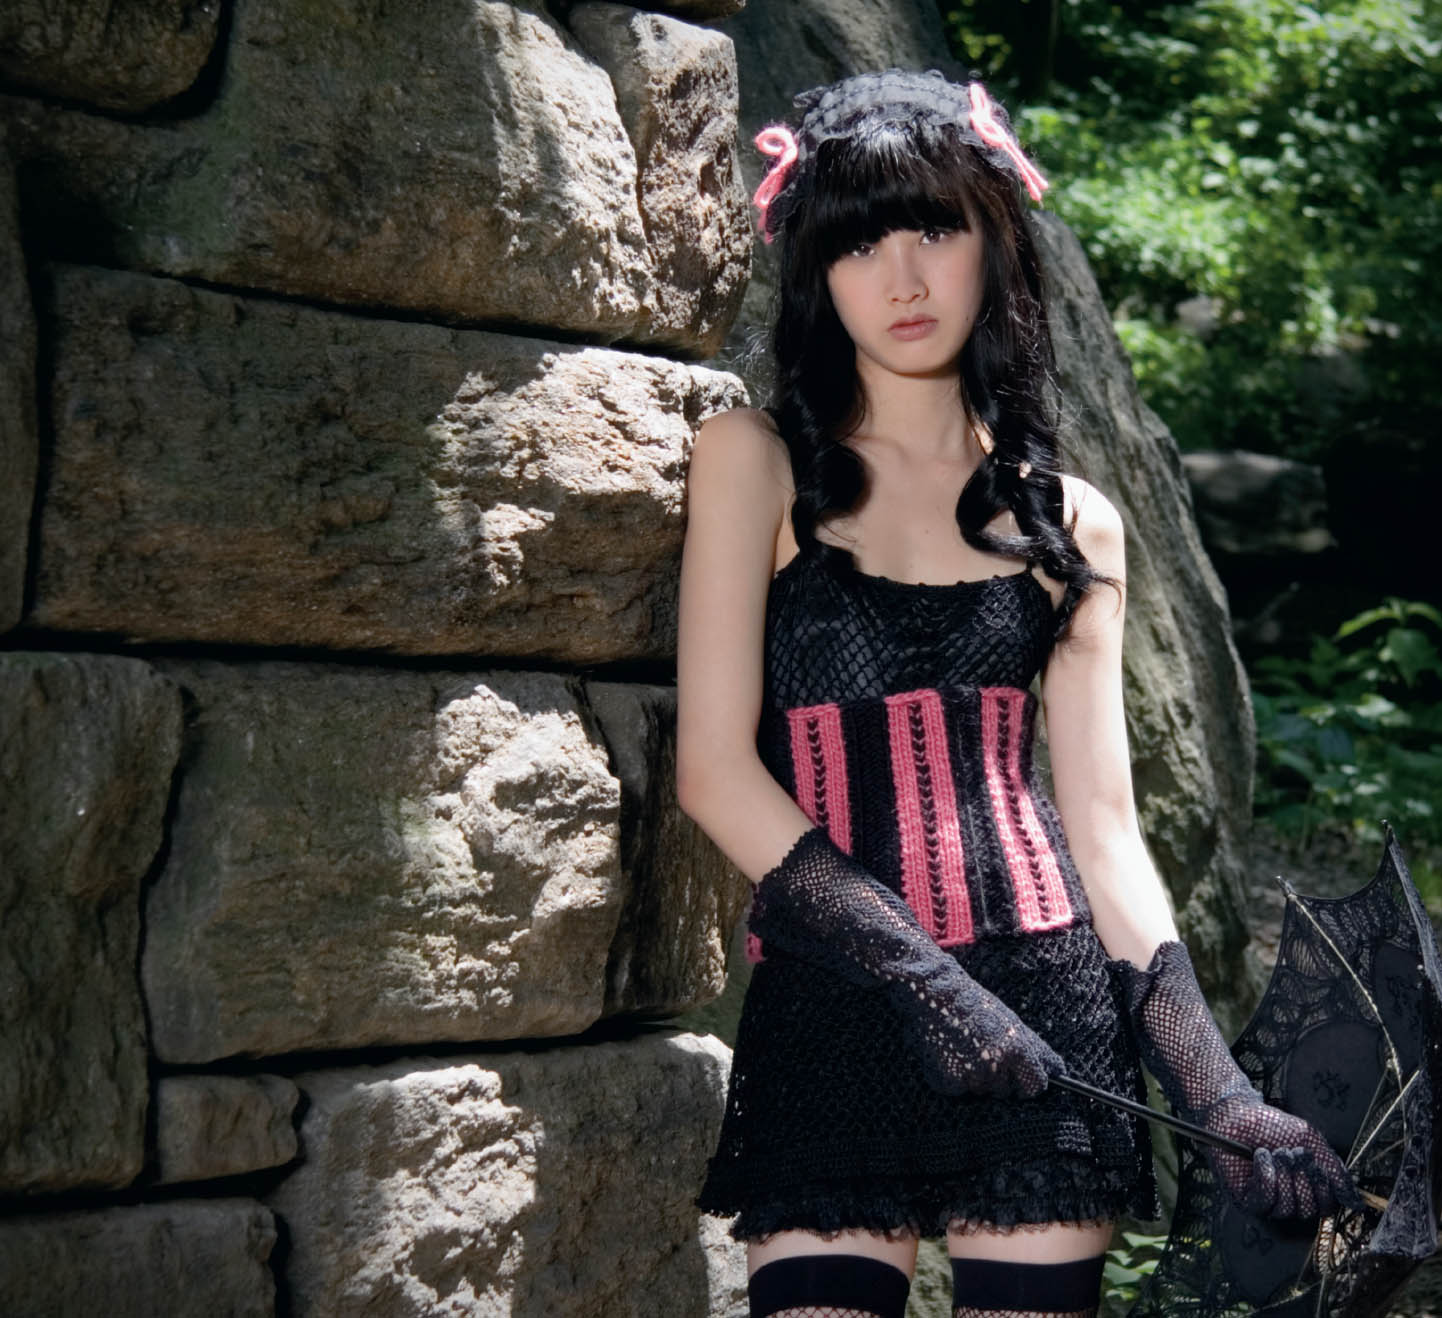

one of the newest subgenres of punk-rock fashion is the “gothic lolita” style popular in japan today. this corset is knit in antique rose and accented in black, with a silk ribbon to emulate the clothing worn by victorian porcelain dolls. even if you are not a follower of the trend, this accessory can be worn over a simple tank top and jeans to spice up your outfit.
MATERIALS
» Size 10½ straight needles, or size required to get correct gauge
» Darning needle
» Size G crochet hook
» 1 skein pink bulky-weight wool yarn (Brown Sheep Co., Lamb’s Pride Bulky, 85% wool, 15% mohair, Lotus Pink, M38)
» 1 skein black bulky-weight wool yarn (Brown Sheep Co., Lamb’s Pride Bulky, 85% wool, 15% mohair, Onyx, M05)
» 3¼ yards of taupe colored silk ribbon, or ribbon of your choice, about 1½ inches wide
GAUGE (IN STOCKINETTE STITCH)
» 15 stitches and 20 rows make a 4-inch square in ribbed pattern
FINISHED MEASUREMENTS (SIZES MEDIUM AND LARGE ARE GIVEN IN PARENTHESES)
» 23 inches by 9 inches for small (when stretched)
» 25 inches by 10 inches for medium (when stretched)
» 27 inches by 11 inches for large (when stretched)
SKILLS & METHODS
» Crochet (single)
» Duplicate stitch
» Intarsia
» Ribbing
» Stockinette stitch
This corset knits pretty quickly, but it’s one of those projects where some preparation is worth the effort. You will be knitting a ribbed pattern while working vertical stripes of pink and black using intarsia. There is no graph to follow, as all the stripes are simply worked in even columns after the cast-on row.
Begin by preparing 7 (8, 9) balls of pink and 6 (7, 8) balls of black. Cast on 59 (68, 77) stitches in the following order: 5 pink and 4 black. Repeat this 6 (7, 8) times. Finally, cast on 5 pink.
Your ribbed pattern will be only within the black columns. It is knit 1, purl 2, knit 1 on the right side in black. The rib pattern on the back of the black columns is purl 1, knit 2, purl 1. All of the pink columns will be worked in stockinette stitch, knitting on the right side and purling on the wrong side. You will interlock the yarns between the pink and black columns using intarsia as you normally would in stockinette stitch. Basically you will be repeating the instructions for row 1 and row 2 as follows:
row 1 (right side): With pink knit 5; with black knit 1, purl 2, knit 1. Repeat this across, ending the row by knitting 5 with pink.
row 2 (wrong side): With pink purl 5; with black purl 1, knit 2, purl 1. Repeat this across, ending the row by purling 5 with pink.
Be sure to interlock the pink and black yarns each time you change colors as you normally would work intarsia in stockinette stitch.
Work this pattern until the corset measures 9 (10, 11) inches—about 46 (50, 54) rows. Bind off. Begin binding off as you usually would, but remember to change to the next color of yarn 1 stitch before the end of the column. That way, when you bind off the first stitch of a new color column, you will have the correct yarn color on the needle. After binding off all stitches, take all the time needed to weave in all loose ends using a darning needle.
To create the decorative details running vertically on the pink columns, use a darning needle and the black yarn to make duplicate stitches on the center of the pink columns. Make a duplicate stitch every other row in the center of every pink column. Using the black yarn and a crochet hook, you will add a black edging to the sides of the corset to lace ribbon through for the closure. Along each of the sides of the pink columns on the edge of the corset, use the crochet hook to single crochet 23 (25, 27) times evenly along each side. On the next row, crochet holes by chaining 3 and working a single crochet into every other single crochet. Lace your ribbon by crisscrossing through these chain-3 holes. 