
The first things that need to be determined by someone wanting to establish a survival retreat are
1. Purpose and
2. Location
Will this be a short-term retreat, i.e., a prepper's haven, a long-term retreat for a last stand in an apocalyptic EOTW (end of the world) scenario, or something in-between? The main difference is the amount of logistical support that will be needed.
Let's start the discussion on location by defining three basic geographic locales.
Urban locations are in the city, within land densely occupied by buildings and other structures used for residences, institutions, and commercial/industrial sites. Urban implies buildings built high and more close together than in suburban areas and usually having more than one form of public transportation, i.e., bus, subway, rail.
Suburban locations are in areas on the outskirts of cities and contain structures that, on the average, are lower and farther apart than in urban areas. The population density is smaller, but the same services are available (school, health care, public works, fire/EMS/law enforcement). Some forms of public transportation are available, which are often in the form of commuter trains or buses.
Rural locations are usually remote from cities and characterized by large amounts of open space and contain a significantly less dense population. Structures are often farther apart, and services (schools, hospitals, etc.) are shared between communities. Public transportation may be absent altogether.
How does this make a difference? Many, if not most, survivalists are inclined to go for rural remote locations as a means of getting away from urban locations where their main fear is that they end up getting trapped with a million other people, searching for food, barter, and revenge. What many fail to see are the equal advantages of staying in urban or suburban areas for the purpose of blending in. As various survivalist writers point out, setting yourself out from the crowd may be a faulty strategy. In the animal kingdom, singling out a straggler from the pack is how predators identify their next meal. There's safety in numbers, especially if a shred of genuine law enforcement and public safety service remains intact. In analyzing retreats that ultimately failed to protect their occupants, one of the most common factors seemed to be that the group did not blend in to their surroundings. The second factor that they failed to take advantage of was the protection of the surrounding population, or more simply, the herd.
A second question to ponder when deciding whether to retreat in your urban or suburban home or to purchase land and develop a remote retreat is, if you're not living in your retreat 24-7, what makes you think somebody else won't find your retreat before you get there? In an EOTW situation, the roads, if not destroyed, will probably be blocked and patrolled by thugs. You won't be driving to your retreat, and it may take days, even weeks, to get there by foot. What if the zombies take over the retreat before you have a chance to flee there? Then the problem is compounded, and you have nowhere to go and only limited supplies on hand. Your new alternative, unfortunately, is to join those very hordes you've been so worried about. Now you are the living dead, and the retreaters and survivalists are hiding from you. In a practical and even a strategic sense, it's more logical to hunker down where you live, where you can blend in, and where there's still a smidgen of societal protection left available. If this isn't your plan, then consider keeping at least a seventy-two-hour kit on hand for each person in your party and a few nearby seventy-two-hour caches. Another decision you will need to make is whether to prepare a contingency retreat and contingency escape plan to get to your retreat if plan A fails. At the very least, some alternative survival locations should be designated in your plan.
So, let's say you've pinpointed which circumstance your retreat is destined to fit in. We'll examine the possibilities.
Traditional survivalist wisdom dictates a retreat in a location with the following:
• Sparse population
• Plenty of water
• Arable soil
• Adequate solar or wind exposure for energy production.
• Good solar exposure for farming
• Defensible terrain
Additional preferences often mentioned in modern rural retreat criteria include the following:
• A distance of more than one tank of gasoline away from large urban centers.
• Locations not located along major lines of refugee traffic or major corridors of travel from urban areas. These would preferably be out of sight of major roads and highways.
• A location with definitive tactical advantages:
 Remote, well off-road, and requiring lengthy hikes to approach.
High ground or terrain easily modified for tactical defense or escape and evasion.
And the ability to dig back into a hillside or into the ground forest canopy cover, as well as many others.
This is an off-road retreat home in a small Arizona town, ninety miles from the nearest urban center. It's located adjacent to several reservoirs, on easily defendable high ground with farmable soil, and has prime solar and wind exposure for energy production.
If this is an eleventh-hour retreat—a place to escape to when all hell breaks loose—planning consideration must be given to interim protection and transportation to the retreat or the whole concept becomes a moot point. An urban or suburban escape vehicle (a BOV or “bug-out vehicle”) should be available, stocked with its own bug-out bag, the mechanical configuration and fuel capacity to get you where you need to go (4WD, motor home, etc.), and with enough supplies to maintain you and your group for at least as long as it takes you to get established in the retreat or find the next cache.
Retreating where you live or work is referred to as “bugging in.” This may involve as much as turning the entire house, yard, or even an apartment into a self-sustainable fortress or as little as preparing to “shelter in place” in a single room. Shelter in place involves taking immediate shelter wherever you are, perhaps for just a few hours or days, and usually in a central interior room that is then sealed off from contaminants as needed. It normally has no additional defensive upgrades in terms of construction. However, a preselected shelter should have walls well secured to the foundation, wall studs strongly secured to the roof rafters, and large appliances secured with cable or metal stripping. An emergency stash (the seventy-two-hour kit) should be stored there, and well-planned shelters will include a means of communicating with the outside world (cell phone and two-way radio).
When you add the self-defense piece of survivalism, that simple single-room shelter becomes a variation of the “safe room” or “panic room.” Safe rooms come in two flavors. The safe room FEMA recommends for protection against natural disasters, and the panic-room-style safe room designed to serve as a secure sanctuary modified to withstand an all-out assault. Safe rooms are new or preexisting, may be built above or below ground, and specifically are built or modified to withstand the devastating forces of nature or a deadly mob assault, depending on which flavor you choose. In simpler times, these were called “storm shelters,” or were simple hidden rooms under the baseboards. In modern times, hidden basement rooms are still a viable option.
Safe rooms that meet FEMA standards for wind disasters are costly whether you buy the prebuilt versions or do it yourself. A well-made safe room is constructed by using wood and steel or reinforced concrete, welded steel, or other superstrong materials. It is usually built in a basement, on a slab-grade foundation, on a garage floor, or in an interior room on the lowest level. The room is anchored securely to resist overturning, and the walls, ceilings, doors, and all connections are built to withstand extremely high winds and prevent penetration by wind-borne debris. If built belowground, your safe room will also need to be flood-proof.
Panic rooms are also available prebuilt or can be do-it-yourself and are essentially a defense system rather than a reinforced waiting room. The most common choices for panic room locations in existing structures are large closets or master bedrooms with a bathroom. A large home with several floors might have a panic room on each floor. If you decide to use a room within an existing structure:
• Choose a windowless interior room.
• Make certain that the door system is solid. Reinforce existing doors or replace them with solid hardwood-core doors, and reinforce the wooden doorjamb or replace it with a steel one. Whether the room is DIY, prefab, or built with the house, panic rooms usually have hidden entryways. Entryway doors are often made of steel and have mortise locks (built into rather than attached to the door) and steel doorjambs. If the door doesn't open inward, install security hinges or pin the hinges.
• Install a keyless dead bolt and consider multiple locks. High-end rooms might have a keypad-controlled electromagnetic lock. Complex lock systems might include a combination of keyed locks, keypads, and scan devices (fingerprint or retina).
• Stock it with at least a seventy-two-hour supply of essentials.
• Fortify or reinforce on all sides, walls, ceilings, and floors. Thick plywood reinforcement adds a small degree of ballistic protection, a significant degree of storm protection, and cannot be kicked through like sheetrock can. Additional measures might include wire or steel mesh and blast-proof Kevlar panels. Lightweight Kevlar and plastics can be used on wimpy upper floors.
• Consider including alarm systems and cameras.
• Windows, if there are any, should be reinforced and lockable, covered with a grill or bars, and adorned with heavy curtains and other view blockers.
• Include a communication system (cell, Internet, and radio) and an armory (weapons, a safe, and ammunition storage).
The panic room is a family protection system that is most likely to be used as a temporary retreat from home invaders where the family can wait, call for help, and stay in communication with the authorities. In a worst-case scenario, this is also a place to hunker down and make your last stand against the marauding zombie hordes that have surrounded you, penetrated your perimeter defenses, and entered your home.
Building a foolproof perimeter defense and an assault-proof panic room is no easy task and is certainly going to be easier in the suburbs than in urban areas, where the population is dense and residential properties are small and tightly packed. Even under those circumstances, though, some simple modifications can be made to the apartment or home that provide an early warning system and can turn a bedroom into a functional panic room. If modifying a small room within an existing structure, a reasonably secure room can be had for a couple of thousand dollars. A professionally designed, high-end room can cost half a million.
One last point on logistics: Having a retreat in an urban or dense suburban area doesn't necessarily exclude you from water sources or from agriculture to augment food supplies. Crops and herbs can be grown in plant boxes, parks, median strips, or even inside at the windowsill or under grow lights. Meat, i.e., rodents, small animals, and chickens, can be raised in cages. Water is everywhere in the city. It may be ugly filth, but unless it contains toxic chemicals, it can be filtered and purified.
A residence or dedicated retreat can only be entirely invulnerable and self-sustainable if defense and sustainability are designed and integrated into the structure as it is being built. Even so, it is very possible to defensively harden and to reach an acceptable degree of sustainability by making some modifications to your existing structure.
Making your home into a retreat does not mean destroying the comfort or the beauty of the structure. Also, it does not mean disrupting the primary use of the structure or the rooms within it. For instance, your bedroom will still be a bedroom, even if you've turned it into a safe room, and it won't have to resemble a ’60s fallout shelter.
A stud finder is handy for impromptu window and door sealing to keep the zombies out. Nailing a plywood sheet to your drywall doesn't work. They'll just push it in. The plywood must be deeply nailed, preferably screwed, into the studs within the wall.
First and foremost, let's remember who this book is written for: the 85 percent of the population that controls only 15 percent of the wealth. Commercial shelters and panic rooms are expensive. We're talking over six digits in most cases to add something on or to incorporate a retreat into a new structure. This is insanely more than the average American family can afford, and once again, protection becomes the exclusive right of the wealthy unless we can offer some reasonable and inexpensive alternatives such as those discussed later in this book.
Buyer should also beware of any purchases and go about buying your retreat as you would when you bought your own home. Building permits will be required in many, if not all, cases. This not only makes you highly visible to authorities, but also places you at their mercy for permission. You must also be aware that from order to installation can take months until it is completed. Nothing happens overnight, especially when building permits are required.
Where to Get More Information
Here is a list of good websites than can be used to educate interested readers regarding the ups and downs, ins and outs of commercial retreats and shelters:
oism.org (see the Egg-energy shelter system)
beehiveshelters.com (prefabs based on hexagonal modules)
americanbombshelter.com (this site is excellent, stocked with lots of information)
Typically, commercial shelters and retreats are made of rebar and concrete or welded and insulated steel, making an air- and watertight structure. Panic and safe rooms are available in steel and fiberglass.
Underground shelters can serve as retreats, disaster shelters, safe rooms, and even data storage areas. Undergrounds are often built from prefabricated steel or fiberglass structures incorporating an arched roof (tanks and cylinders) for increased ceiling strength. Both quality steel and fiberglass provide good corrosion protection. Undergrounds are usually incorporated within the construction of a new home. They're all buried, except at ventilation and access points, which are often hidden by landscaping or due simply to the fact that they lie beneath the ground and are interconnected to another structure (the home). Ventilation is designed to provide a positive-pressure atmosphere which keeps out airborne pathogens and chemical gases. The air supply is typically cleaned through an NBC (nuclear, biological, chemical) filter, and the intake pipes are usually protected by a blast valve that prevents the overpressure wave from an explosion from entering the structure. The ventilation system should move air throughout the shelter in order to exchange carbon dioxide and oxygen. The air then exits the shelter via an outflow pipe that is protected by another blast valve.
A stand-alone shelter should have at least two ways in and out. There should be a main entrance and an emergency door or escape hatch, and should probably have primary and backup water and power supplies. More expensive underground shelter complexes are clusterable, may interconnect multiple modules, and may include a main shelter module, food module, water module, medical module, and utility (and armory) module. Each module can stand alone if other modules need to be cut off and interconnections can be made between neighbors for an underground community. Such shelter systems run somewhere around $300,000 or more per planned inhabitant, or about a million and a half for five people.

Basement shelters commonly have the same components but less blast protection unless structural changes are made. The advantage of doing a basement shelter is that power, water, and sewage utilities are already there, making it far easier to add onto an existing structure. Basement shelters also conveniently allow entry and exit without leaving the home.
Of course, there are DIY plans for a few hundred dollars, but even a shelter built from DIY plans are going to be expensive. A couple of interesting, less expensive concepts are the Hoag shelter system that uses a used fuel tank and the Sea Egg system, which can be seen on some of the websites at the end of the book.
Here's a list of things that are often included in a commercial shelter or retreat structure:
• Storage area for a large food cache (typically a month or year of food)
• NBC-filtered positive pressure ventilation system
• Emergency escape hatches or doors, lockable, with emergency manual opening mechanisms
• Lockable ladder entrance from overhead structures.
• Lockable air valves, water- and air-tight
• Specially formulated paint
• Wooden and/or carpeted floors
• Faraday cage protection against EMP (electromagnetic pulse)
It's important at this point to remember that one of the key concepts in my series of survival books is that they are all written for the average person. Sure, it would be great to have a few hundred thousand dollars to drop on building a dream retreat or modifying the summer home to turn it into a retreat, but that's a pipe dream that belongs to the rich. One of the primary purposes of this book is to show what an average person can do to modify their existing residence to make it a safe and functional retreat.
It's my opinion that the key is passive home security, not booby traps and sophisticated arms caches. This slaps traditional survivalism in the face, but can be borne out by some precedence. The zombie hordes that attack your retreat are probably going to be just like any other criminals. A number of studies have indicated that violent criminals may average eight to ten points lower on IQ tests than noncriminals. In other words, violent criminals may be more likely to be thwarted by complications blocking the approach. They tend to take the easiest path, and direct armed assault without obstacles is a lot easier than intruding into a retreat that's protected by a maze of security applications. In other words, spend more time and money on security and monitoring than on arms. Now that's not to say that you shouldn't arm yourself, actually on the contrary. After a zombie has wearily worked through the security obstacles, the idea of an armed conflict with an obviously intelligent and well-prepared opponent may be the final straw in his decision to call it off and find some other victim.
With that in mind, let's examine some possibilities. Even though this is DIY, to make a serious difference, you're going to have to spend hundreds, if not a few thousand dollars. Do it a little at a time. There's no hurry… for now the scavenging zombie hordes exist only in the minds of Hollywood types and science fiction writers.
There are several external early warning systems that you should keep in mind.
1. Alarms
Most alarm systems are composed of multiple electromagnetic contacts placed on doors and windows that sense when they are opened and motion sensors (usually wall-mounted) that detect movement. Most sensors are PIRs, or passive infrared detectors, that respond to movement. Some systems include glass break sensors that sense the shock wave or sound of shattering glass. Systems can be wired, partially wired, or wireless, the latter being more expensive but easier for DIY.
a. Alarm Services and Professionally Installed Alarm Systems
A basic professionally installed alarm system consists of a CPU (central processing unit, or computer), keypads—usually near the main entrance and in the master bedroom, where the entire system or just-selected zones are armed or disarmed by punching in codes—interior and exterior sirens and strobe lights, and door and window contacts. They will also include motion detectors, such as passive infrared detectors that sense human temperatures but not the lower temperatures of pets. Add-ons can include smoke and heat detectors, glass break detectors, panic buttons, remote operation devices (“remotes”), flood sensors, temperature sensors, carbon monoxide detectors, driveway alarms, and pressure mat alarms. Systems can either be wired or use wireless technology.
Another component of subscription alarm services is the service's own central monitoring station. Like the dish and cable networks, alarm companies make their money from selling you services. That's how they can offer you the gear at such cheap prices, because they'll make it up with your subscription. The advantage of using an alarm service is that you can leave the area and the company essentially house-sits for you. The central monitoring station will notify 911 if anything suspicious occurs, and some of the more expensive services will even respond with their own security team. What, though, can we expect from these subscription service providers during a widespread pandemonium situation when the grid has crashed? The monitoring station is likely to be nonfunctional, and worse, there will be a group of gun-packing, angry, unemployed security guards who know about your alarm system and know precisely where you are.
Technology has progressed to the point that it is now possible to have complete access to your professionally installed alarm system from almost any location via the Internet. This allows fully remote control and real-time monitoring. Don't count on this to work when the shit hits the fan and the grid goes down.
A note of caution: unless your alternative power source is wired into the electrical panel, any security device that runs on house current should have a battery backup and must be capable of being unplugged from the wall and plugged into the power line coming in from the generator or inverter of the backup system.
b. Inexpensive Alarm Alternatives
Simple unmonitored systems can include any of the components that a subscription-monitored service does with the exception of the central monitoring station. These basic systems exist to warn the residents and intimidate intruders.
Installation is simple:
• Window squealers
These are inexpensive electromagnetic contacts. A two-pack at Wal-Mart was $6 at the time that this was written. The detector is mounted on the door or window fixed frame, and the magnet on the door or window itself. Be sure to install the batteries before installation, and be careful with the alignment.
http://www.wikihow.com/Install-a-Door-or-Window-Magnetic-Detector
• Stand-alone motion-detector alarms and glass break detectors
Before installing these, be certain you know the detection range. Place them in a location were intruder movement is likely to be perpendicular to the direction the sensor is pointing rather than directly toward or away from it. Also, place them where they won't be adversely affected by heat, sunlight, or loose floor/wall vibrations. These are commonly placed at the front door, patio door, fire escape, and at other entry points or pathways around ground-floor dwellings.

CCTV (closed-circuit TV) allows video images to be monitored or recorded from locations inside or outside the home. Some systems allow observation from remote locations via the web. CCTV systems can be wired or wireless. As with lighting and alarms, wireless systems are easier to install and don't require drilling holes in the walls. Like lights, solar-powered models are available.
A basic CCTV system consists of cameras, power supply, receiver, antenna (if wireless), monitor, and recording device. Many systems also include a remote control. Alternately, an inexpensive wired camera can be plugged directly into the AV input of the family TV, which then can serve as the receiver/monitor. The salesmen are going to want to sell you a DVR to record the surveillance. This is nice, if you intend to use the device for everyday security. A video recording of burglars, intruders, or vandals is great to have when the cops show up. You can buy a separate DVR or you can purchase a DVR circuit board with cable ports to turn a computer into a surveillance center. When it comes to real bedlam and chaos, though, nobody's going to be interested in your videos, so for a retreat, a DVR is an unnecessary expense. Just patch the cameras directly into your TV or computer.
Cameras have become very inexpensive. A decent indoor/outdoor color camera runs about $45, and includes a night vision mode which activates a bundle of infrared LED lights. More expensive versions might include motion-detecting IR which turns on the camera only when it detects movement.
Systems that hide the camera from view are called “covert systems.” “Overt systems” are openly visible. Overt systems might scare a burglar away, but for a retreat, covert cameras seem like a better idea since marauders are likely to try to destroy any visible cameras.
With a few tools and the ability to focus on the instruction manual, almost anyone can set up a video monitoring system. The camera units are patched in to the safe room, the ops center, or other designated location where the resident(s) can observe intruders from a safe distance. This gives you time to get ready, gather some intelligence about your attackers, and call for reinforcements.
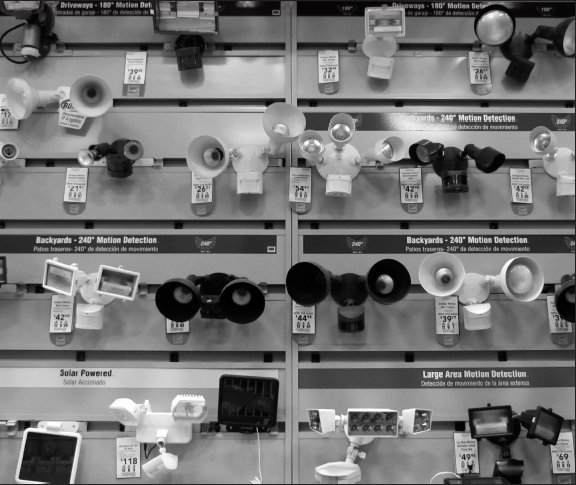
3. Lighting
Obviously, intruders do not like being observed and often like to work under the cover of darkness. For this reason, it makes a lot of sense to install lights that illuminate all access doors, ground-level windows, the garage door, and any pathways that lead to or around the property. Light the front-entry doors and other important spots with two fixtures or a two-fixture lamp in case one fails. Overlap the lighted areas for complete coverage.
You must also consider energy consumption. Buy high-efficiency bulbs that get the brightest light (number of lumens) for the least power consumed (watts). These bulbs are not cheap, but they usually have an extended life. Also, what about your energy source? What sources will you have when the grid goes down? Batteries? Generator? Solar? Consider photocells for automatic on-off if you need all-night lighting. Motion-detector-activated lights save energy and surprise intruders. Make sure that you mount them high enough above the ground that they can't be disabled.
Here are the steps for putting together an effective lighting system:
1. Sketch a simple floor and perimeter map (graph paper helps keep the scale accurate).
2. Identify areas around the structures and perimeter where light is needed.
3. For each area identified, determine the necessary lighting/detection zone.
A simple flat-screen TV can be turned into a multiple-camera video monitor for under $100. Almost any low-voltage video source (a video security camera or even a simple point-and-shoot camera) can be used. This TV has two AV input ports. One port is plugged into a RadioShack AV selector switch that is plugged into two cameras. The TV's second AV input port is attached to the family's DVR or satellite receiver. With this setup, the family can casually toggle between a movie and two views of the intruding zombie hordes. The photo shows two very different cameras. On the right is a GE security camera with IR LEDs for night vision. Left is the family's old point-and-shoot digital camera with the auto shutoff function disabled.
• Doorways and small areas – 110 degrees
• Walkways and driveways – 150 degrees
• Side of house or garage – 180 degrees
• Corners, decks, patios – 240 degrees
• Sharp corners or large backyards – 270 degrees
4. Determine the type of fixture and the mounting height:
• Ground-mounted floods – Avoid them. They're easy to destroy or dismantle.
• High-output floods – These are mounted high for maximum coverage. They use mercury vapor or high-power sodium bulbs with extended life expectancy.
• Adjustable twin-head floods – Double-fixture lights that can be aimed in different directions for maximum coverage and backup.
• Residential lights – These will direct light downward, have shields, or have visors that can help prevent distant detection.
• Area lights – Used to light large open areas.
A final note on lighting: don't aim your lights directly at your own ports of vision (the doorway, windows, etc.). The purpose of the lighting is to expose the intruder, not to blind the residents.
4. Dogs and other “alarm animals.”
Dogs can function as an early alarm system and are, by nature, territorial. A deep, fierce growl or bark is intimidating, and every intruder knows dogs can be aggressively defensive. Large breeds associated with territorialism and aggressive defense include German shepherds, Dobermans, Rottweilers, bullmastiffs, pit bulls, and black Labs. Dark colors are more intimidating than light, although even light-colored or gentler dogs like golden retrievers make excellent alarm animals. Size matters in the case of watchdogs; Chihuahuas and Shih Tzu's don't inspire fear no matter how fiercely they bark.
Check the light display at your local Home Depot, Lowes, or Wal-Mart.
Dogs need basic training skills and need to learn simple commands that will keep them safe and keep them from attacking innocent people. Teaching a dog to be aggressive is dangerous business that will get somebody hurt and could even get the dog euthanized. Most dogs bark naturally at intruders and need no training to function as an alarm, but they do need training to be able to recognize a threat rather than barking at anything and everything, which makes the dog useless as an alarm and annoying as a companion.
The program of training should include socialization to learn what's normal and what's a threat, basic command training, guard training using positive reinforcement (no hitting or chaining up for punishment), barking control (barks at visitors but stops on command), and property boundary recognition. It's also a good idea to give the dog access to the house and yard by installing a dog door that's low (too low for a reach-through) and just large enough for the dog but too small for a human.
Don't have a dog? Put up signs that will make intruders believe there's a dog, or, if you're rural or remote, consider alternative animals. The nice thing about alternative alarm animals is some of them can also help you with your sustainability plans by providing meat and eggs.
As kids who grow up on farms will tell you, geese are notoriously territorial and aggressive defenders of turf. They also have a loud and recognizable squawk. Geese are most effective in flocks with a single male. This eliminates fights between male geese. Geese will attack other animals, so pets and other animals must be segregated or trained to keep their distance.
Geese are less effective than dogs at patrolling boundaries. Some scratch feed thrown into the same location every day will keep them where they will do the most good. Other animals sometimes recommended for guard duty include donkeys and llamas. Visit this website for additional information:
Familyhomesecurity.com/alternative-guard-animals/
In urban and suburban settings, a formidable, threatening set of doors and windows is a real psychological deterrent. Intruders are likely to head down the block looking for easier pickings.
Here's some interesting reading: http://www.statefarm.com/learning/be_safe/home/burglary/learning_besafe_athome_door-locks.asp
There are three primary ways intruders will get into your home (or retreat):
• Through an unlocked door or window
• Impact force (breaking the door or window)
• And prying (spreading the frame so the bolts don't extend into the strike pad) or jimmying
A full 83 percent of break-ins are successful by using one of these three methods, and there are even more ways to get through a locked door. The goal when modifying your door and window systems is to make it as difficult as possible, if not impossible, for an intruder to use door or window access. Perimeter doors, including yard doors and doors into garages or between adjoining living structures (apartments), should be equally protected. Also, remember that an unlocked garage or shed door gives your intruders cover.
Here are some key points:
1. Replace exterior hollow-core doors and the hollow-core door to your safe room (usually a master bedroom or large closet) with windowless metal doors or solid-core wood doors. By their very nature, hollow-core doors are lightweight, very wimpy, and easily destroyed with a shoulder, kick, hammer, or a shotgun. A hardwood core door puts 1.75 to 3 inches of solid wood between you and the invader. Plywood, USB, or MDF wood composites are generally weaker and less plastic than hardwood. Avoid molded or decorative doors that have windows, mail slots, or thin-walled recesses that can be easily breached. Mail slots should be protected with a letter box cage.
Typical simple solid-core doors are 1.75 inches thick and inexpensive (and go for well under $100). Thicker doors may require modification or replacement of the frame and jambs, and are much more expensive. If you're seriously worried about the zombies blasting through your door with a 12-gauge, keep some liquid nails and precut ½-inch plywood on hand to bolster your door.
2. Make certain the door hangs properly and fits the frame well. If not, it will be easier for an intruder to break through or jimmy the door.
3. Exterior doors should swing inward to prevent the intruder from dismantling the hinge pin. Install security-type pinned hinges or hinges with nonremovable pins on all exterior doors that open outward. The hinge can also be “pinned” by removing screws from opposing positions on both top and bottom hinges and driving a nail into the holes so that the head sticks out just enough to stay within the drilled-out hole of the opposite side. When the door is closed, the head of the nail engages the matching hole and holds the door in place even if the hinge pin is removed. See these websites for a closer look: http://www.hardwaresource.com/hinges/DOOR+HINGES/Door+Hardware/Security+Stud+for+Hinges
http://www.stanleyhardware.com/default.asp? LEFT=left_cht_specialty.htmandPAGE=cht_specialty.htmandTYPE=STATICLEFT
4. Reinforce or replace the doorframe or doorjamb. The jamb is the vertical portion of the frame onto which a door is secured. Most types of door fasteners and deadbolts extend into a recess in the doorjamb when engaged, making the strength of the doorjambs vitally important to the overall security of the door. If the jamb is wimpy, basic deadbolts and fasteners can simply be bypassed by kicking down or body-slamming the door. It is possible to buy used doors, but be sure to reinforce the jamb as well. New exterior doors are commonly sold along with the doorframe. Usually the strength of the doorframe is proportional to the cost and strength or weight of the door. If you can afford them, metal security doors and steel jambs are a good option.
One way to reinforce an old doorjamb is to pull away the trim to expose the gap between the framing (usually 2 × 4s) and the doorjamb. Pack this gap with wood (scrap plank is fine) so that the strike plate screws go completely through the wood without a gap, then replace the trim.
Another easy way to reinforce a doorframe is to install a long metal strike plate with long screws that go deep into the surrounding wall studs. These plates are manufactured by several companies and most large hardware stores will stock them.
5. Speaking of the strike plate, it's usually the weakest point of the door system. Use security strike plates on all exterior entrances. The strike plate is mounted directly into or onto the doorframe.
The standard strike plate that comes with the door may only be cosmetic. Install a heavy metal strike plate or a strike box/faceplate combo with extra-long screws that go into the stud. Screws should be staggered so that they don't go into the same wood grain, causing the board to weaken or split.
The combination of warning systems and good doors will go a long way toward giving you the time you need to get inside, close the doors, lock the zombies out, and grab the armament. But what about those locks? And what about the windows?
First, replace wimpy, nonlocking doorknobs with hefty outdoor locking knobs. This should be done on at least each of the exterior doors, including the garage and the door to your safe room. Knob locks are available with keys or as combination locks. Most locking knob sets incorporate a spring bolt lock, which uses a spring to hold the bolt in place and offers only minimal security if the door is on the outside of the jamb due to the ease of moving the bolt with a blade. Next, you should install an ANSI (or BHMA) grade 1 single-cylinder dead bolt that extends out of the door edge and into the frame at least one inch (that distance is called the “throw”). Longer throws severely limit the ability of an intruder to get inside by spreading the doorframe with a crowbar. A single cylinder has one keyhole on its exterior end. The other end is inside the structure and has a simple rotating handle or thumb-turn to lock and unlock the door.
Installation of a dead bolt sounds complicated to most of us, but it's actually a simple process of removing the old lock, reboring the hole, and installing the deadbolt. Reinforcing the strike is only slightly more complicated. The following website is a superbly illustrated, simple-but-detailed step-by-step description of how to reinforce a doorjamb and frame and install a new dead bolt lock:
http://www.familyhandyman.com/DIY-Projects/Home-Safety/Home-Security/how-to-reinforce-doors-entry-door-and-lock-reinforcements
If your door has a window component, it can be shattered and the intruder can reach through and unlock the door. There are several possible solutions. The first is that the glass can be replaced with an unbreakable plexiglass or reinforced with a layer or sandwich of thick plastic laminate. Another option is to install a double-cylinder deadbolt.
A basic double-cylinder dead bolt has keyholes on both sides of the door. This is actually a fire hazard, especially if there are children living in the structure. As a result, most building codes do not allow double-cylinder deadbolts that don't have a thumb-turn. If you install these, make sure you leave a key in a fixed, permanent location in or near the indoor cylinder.
A variation of the double-cylinder dead bolt is the captured-key lock, which has a thumb-turn that can be removed from the inside cylinder, leaving a keyhole. The thumb-turn is actually the key, and it must be left in the lock at all times when anyone is in the structure. The same result can be obtained with a double-sided dead bolt by just leaving the key in place. Either way, these are hazardous. Imagine being caught inside without a key during a fire.
A variation of the standard dead bolt is the vertical deadbolt, which generally rests on top of the door. This is very resistant to jimmying. Other variations include single cylinders with removable thumb-turns, an exit-only function which has no external cylinder, and the mechanical or electrical push-button deadbolt. A rim-latch dead bolt is an alternative setup that locks automatically when the door is shut. It's great for a fast lock when retreating from the zombies, but it can easily lock you out.
A number of features are available for deadbolts. Saw-resistant bolts have internal pins that spin inside the bolt if someone attempts to saw through. Hardened-steel casings (the lock housing) make hammering and sawing even less effective. Beveled casings have rounded edges that make using a pliers or a wrench quite difficult. Hardened-steel anti-drill chips inside the housing destroy intruding drill bits.
Everyone in the group should know where the keys and spares are placed, and should practice the one-two-three, close-spring-bolt-dead bolt sequence so they don't forget one of the locks when they're in a panic.
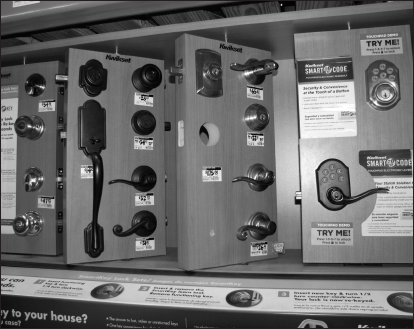
This image is of a lock display at the hardware store. Consider installing a lock pad (right side of photo). Most can be set to automatically lock when the door is closed, saving you precious seconds in a conflict situation. Opening the door takes a brief moment, and there's no key to lose or have fall into the wrong hands.
Keyless locks are also available. A simple changeable code opens the lock. They come with doorknob locks, deadbolts, and knob/dead bolt sets. Fingerprint locks are another, more expensive alternative.
Any additional locks that secure the door to the doorframe or floor (deadbolts, floor bars, foot locks) will add more strength to the door system. If a drop bolt or rim lock is used, it must be mounted on the door with through-bolts. Otherwise, a blow could cause it to separate from the door. A final option is to install a metal crossbar lock. They're ugly as sin, but can make a door nearly impossible to get through.
Wide-angle peepholes are a good way to be able to see the entryway without having to expose oneself. Most peephole viewers have a 180-degree horizontal field of view. They are usually made of metal and mounted at eye level. If there are short people or children in the structure, consider a second peephole at their level.
Some experts recommend installing a steel grid on the doorway because it can be both seen and shot through for defense. Grids or grills must be easy to open from the inside. Anchors that fasten the grill/grid to a doorway or window exterior must not be easily unfastened from the outside (the zombies have screwdrivers and wrenches too). A storm door can be installed where an entry door is adequately recessed in the frame. A typical storm door has a half window and a lower panel and may have a solid core. They are usually made to close automatically.
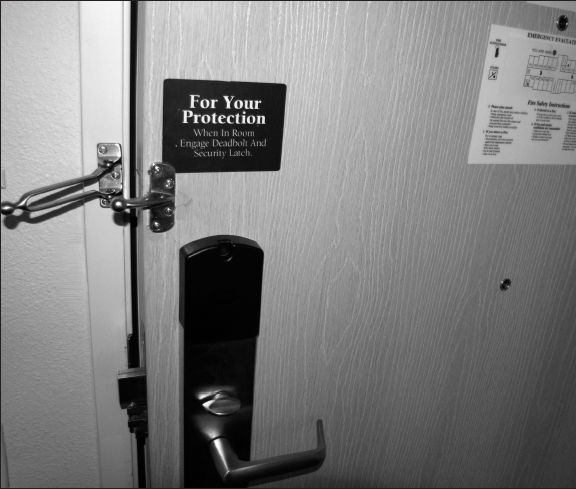
Good security in a budget motel: security deadbolt, flip lock, upper and lower peepholes, and a door wedge for good measure. Note that door limiters, flip locks, security chains, and surface-mounted door bolts are simple to install in the home but are generally weak and easily torn from the doorframe by a hard kick or body slam.
A steel security door over a solid hardwood core entry door is an adequate amount of door security for almost any neighborhood. Both doors must be properly hung to be completely effective, and must be installed with multiple locks and a reinforced jamb.
Other Types of Doors
Intruders love sliding doors, especially when they're in the back of the house and out of sight. They're often forgotten and left unlocked and are easily shattered with a rock, hammer, or bullet. The sliding panel should be mounted on the inside so that it can't be lifted off the track and removed from the outside. If it's not mounted on the inside, there is some security to be had by placing sheet metal screws through the upper track, just snug enough with the window that it can slide open but can't be lifted off the lower track. The door should most certainly have a strong key lock. You can also install a pin lock by drilling a hole completely through the sliding panel so a removable solid metal pin can be inserted to secure the sliding panel to the fixed panel. This type of pin lock can also be used to lock a double-hung sash window. A “Charley Bar” can be used to latch the sliding panel to the frame. Finally, the old dowel-in-the-track trick works nicely to keep the door closed or to allow it to open only as far as needed for ventilation.
French doors, or any paired doors without a center post are not secure. Existing doors can be made more secure by installing heavy-duty vertical bolts and a quality dead bolt on the live door to secure it to the inactive door. Your other choice is to install ornate exterior security storm doors. These should have a heavy-duty two-inch steel frame, a quality deadbolt, and be prehung in a metal jamb.
Install automatic openers or bolt-type locks on both sides (left and right) on the inside. Keep car doors locked, even in a locked garage. When going on vacation or when the marauding hordes attack, turn off the electronic opener system. As with other electronic security systems (lights, alarms, etc.), garage openers should have a backup battery and either a solar charger of its own or a way to plug into the backup power system.
Tilt-up garage doors are relatively solid and easy to secure with locks or pins. Automated retractable sectioned garage doors, on the other hand, may be made with panels held in place by flimsy molding and can easily be crushed or knocked in. Short of buying a stronger door (which is never cheap), there are only limited ways of reinforcing the sectional panels. Weighting the door with deadman anchors is one way to slow intruders down, but ultimately, the overhead door will be a very weak link in your security system. The door between the house and the garage is therefore critical.
Remove, seal, or lock exterior hatches or doors. Install a motion sensor in the attic and a screamer on the door if it can't be removed or sealed.
Don't leave spare keys in the cliché spots, like under the doormat or in the flowerpot; everyone knows where to look. Use an external key lockbox with a combination code that is firmly mounted on a solid structure.
Security windows come with shatterproof glass, are difficult to break through, and also extremely expensive. Full-on bulletproof glass is heavy and thick, requiring changes in the wall assemblies. Security or safety glass is made using one of two methods: tempering or laminating.
Tempered glass is made by treating the glass as it is heated and cooled to increase its tensile strength, making it hard to break. When tempered glass does break, it snaps apart into rounded chunks. This is what the side windows of cars are made of. Laminated glass is made by putting a sheet of polyvinyl butyrol (PVB) in between two pieces of glass. When it does break, the vinyl layer acts like tape and holds the glass in place. Laminated glass is commonly used in car windshields and most security windows. Security windows are ideal, but for the “85 percent” group, a more reasonably priced and nearly as effective alternative is to cover your existing glass with a strong window laminate. If you have it installed, it will cost approximately $10–20 per square foot, which is almost as expensive as just going out and buying a new security window. But if you do the work yourself, it can be accomplished for as little as $2 per square foot; using glazing mastic to securely attach the glass to the frame will maximize the effect of the laminate. Storm windows (double pane) are more inconvenient to break through than single pane, and laminating both panes can make the window virtually bomb- and intruder-proof. Of course, die-hard security freaks are going to tell you it can't possibly be anywhere near as effective as real security glass. Skeptics should visit this YouTube site:
http://www.youtube.com/watch?v=j-i1MsVXFaA
Common window types include the following:
• Casement windows are made up of one or more sections or casements that open like a door. Hinges are located on one side (“side-hung”) or along the top (“top-hung”).
• Sash, double-hung windows have two vertically sliding “sashes.”
• Awning windows have hinges along the top edge.
• Sliders are horizontal sliding windows with two casements or sashes.
Check out the window types on the following site:
http:/www.kcpowerclean.comwindows-types.jpg
Window opening mechanisms include hinges (usually butt hinges or friction hinges), tracks for sliding (double-hungs slide up or down, sliders slide horizontally), and tilts (casement windows that pivot). These are secured by various types of fasteners that hold or lock window sections together and stays that hold the window to the frame. Check them out, and if there's a weak point, replace them or supplement them with a backup of some kind.
Older windows need special scrutiny. Make sure the putty and glazing pins that actually keep the glass from falling out are intact; if not, simply redo them. Caulked and sealed wooden glazing beads are always a good idea.
Window security can range from locking fasteners and pins, to stay bolts and screw bolts, to multipoint mortise locks. Solid window locks that require a key and that secure component frames together are a good idea as well. The lock should be attached to the frame, not to the glass, and should be operated from the inside for safety precautions. In addition to being locked, windows should always be alarmed. Electromagnetic locks (“screamers”) are inexpensive and effective. Install a rail clamp, dowel, or wood-block stop (screwed in if used in a vertical track) to allow the window to be opened a desired width for ventilation. Also, a motion-detector device could improve security if installed near each of the windows.
If you decide to go all out and “iron” your windows with grids, grills, or bars, remember that they must be fire escapable from the inside and not easily detached from their exterior side. With the exception of covering air conditioner holes, cages, grills, and bars are not generally recommended for residences. Motorized roll-down security shutters can be operated from the inside, but usually require professional customizing and installation, which can be very pricey.
This photo is of laminate window reinforcement. Peel the backing off to expose the dry glue and apply to the window. Different thicknesses or multiple layers can be applied according to the threat (ballistic, explosive, high wind). The 0.009-inch and 0.011-inch thicknesses are the most commonly applied to residences and small businesses. The 0.003, 0.005, 0.006, 0.007, 0.014, and 0.020 are also available.
Skylights
Upper-floor windows and skylights should be equipped with locks, alarmed, and reinforced with safety laminate.
Heavy curtains keep intruders from being able to see into the structure or room. They'll keep them from getting a clear shot of you with a weapon. You'll know where they are, but they won't be able to see you. Even if they do manage to get through the window, there's no telling what terrors you have waiting for them beyond those curtains.
In a simple seventy-two-hour-style disaster incident or a panic room scenario, a telephone is going to be the most important piece of communications equipment you will have. Telephone service will not be down for long, and the days where an intruder can cut your lines is behind us now that we're all using cell phones and as other alternatives are now available (like Internet telephone services such as Skype). If your retreat or room is too remote or armored for reliable cell service, get a buried phone (POTS) line, an intercom system, or an alarm button directly connected to 911 dispatchers or to a commercial security provider.
A bit of coaching is warranted here: In a typical home-invasion crime, traditional wisdom says that once you make contact with 911, you stay on the line as the event goes down. This allows you to be reassured by the dispatcher and to continuously relay updates to the responding authorities. Soundproofing the room or structure keeps intruders from hearing your conversations on the radio or phone, but it also limits your ability to hear early intruder warnings. However, if you're planning for a long-term, shit-hits-the-fan disaster situation resulting in widespread pandemonium, the cell and dish network towers are just as likely to be down as any other part of civilization's infrastructure; and don't forget, there is such a device as a cell phone jammer. In the end, a good old-fashioned radio may still be your best bet.
There's a lot to know about communications. The first book in this series, What to Do When the Shit Hits the Fan, covers this topic in greater detail.
What follows is a ten-point summary of the fundamentals.
1. Prior to and during a major disaster, most of the population will get their information and news from broadcast or cable TV, radio, or the Internet. These sources are easily corruptible and in a pandemonium-styled event could quickly become quite unreliable. The Emergency Alert System (EAS) broadcasts information and instructions via TV and radio stations. Also, the National Oceanic and Atmospheric Administration (NOAA) Weather Service Radio System will be a source of all-hazard information. Many FRS, GMRS, and ham radios come with preset NOAA frequencies and may also come with an encoder that automatically alerts the user when information is being broadcast.
2. Residents in remote or rural areas or who are located in other countries may have to rely on local resources for updated information. Look at the local (county or state) emergency plan and see how authorities plan to communicate emergency information to the public.
3. Keep a battery-, crank-, or solar-powered AM/FM/shortwave radio in your home and workplace emergency kits. Make sure you have extra sets of batteries as well.
4. Family and business associates might be dispersed. Make sure you have clear plans ahead of time for how you'll be able to contact each other during an emergency.
5. The traditional phone system, referred to as POTS (plain old telephone system), is powered through underground cables or the wires hanging from telephone poles. They will work during emergencies, as long as the lines aren't cut and stations are still functioning.
6. Cell phones rely on radio waves between the phone and the cellular tower. The radio channels can be oveloaded, and service can be affected by power outages at local servers or by destruction of relay and cell towers. Turn off your cell phone when it's not in use to conserve the battery.
7. Satellite phones transmit through low-orbiting satellites. They don't work well indoors without an external antenna dish. Also, they are heavy and expensive, and the system is not disaster-proof.
8. Wireless radio systems:
a. Each country has its own electronic communications agency. In the United States, it's the Federal Communications Commission (FCC), and it assigns radio frequencies according to function.
b. Radio signals, like all electromagnetic radiation, usually travel in a straight line. However, at low frequencies (LF, under three MHz), signals may partially follow the earth's curvature, thus allowing AM radio signals in low-noise environments to be heard well after the transmitting antenna has dropped below the horizon. Also, frequencies between 3 and 30 MHz (called high frequencies, or HF) can be reflected by the ionosphere, thus giving radio transmissions in this range a potentially global reach. But at higher frequencies (VHF and UHF), neither of these effects applies and any obstruction in between the transmitting and receiving antennas will block the signal. This applies to commercial FM broadcast radio, broadcast TV, cell phones, Wi-Fi, FMRS, GMRS, and MURS radio. The ability to visually sight a transmitting antenna roughly corresponds with your ability to receive a signal from it. This propagation characteristic is called “line of sight.”
In practice, this varies, depending on the exact frequency and strength of the transmitted signal. Low-powered transmitters (FRS, GMRS, MURS, and local Wi-Fi) can be blocked by trees, buildings, hills, or even heavy rain and snow. Even the presence of objects not in the direct line of sight can also interfere with the signal. Reflected radiation from the ground can hurt the signal as well, though this effect can be reduced by raising the antenna farther above the ground. The resulting improvement in signal is referred to as height gain.
c. Getting licensed. FRS, MURS, and CB all run on low power and are extremely limited by line of sight. Their advantage is that they don't require a license and they are exceptionally inexpensive. FRS and GMRSs have the added advantage of multiple channels with multiple privacy codes. GMRS are slightly more powerful and do require a license, but don't require an examination. In all countries, amateur radio (“ham”) licensing requires an examination to prove that the user has the knowledge of basic radio electronics and of the communication rules and regulations. In return, hams get more frequencies (larger “bands”) and can use a much wider variety of communications technologies at substantially higher power—up to 1,500 watts (compared to half a watt for FRS).
What's the real advantage of basing your communications planning on radios? Well, when the shit hits the fan, radios will still function when nothing else will, and nobody can turn it off except the user who's listening.
d. Setting up. Those CB, GMRS, and FRS walkie-talkies you see at the truck stop and hardware store don't require much of a setup. Take them out of the package, put in some batteries, and start communicating.
Mobile stations and base stations do take some preparation. Always have your mobile radio installed in your BOV by a professional. If you want to be able to use your mobile as a base station, get some detailed advice or have it done by a pro.
When installing a radio in your home or building, follow these steps for a comfortable and safe station:

1. Dedicate a desk or specific area for the radio, hopefully at the command post.
2. You'll need access to the outside for the antenna and ground wires. Ground it as instructed in the installation manual.
3. Give the radio proper clearance from the walls for ventilation.
4. Use earphones to minimize noise and to keep intruders from hearing your conversations.
5. Cover the radio when not in use to protect it from dust.
e. Making contact. Here are standard guidelines for using two-way radios:
1. Monitor the frequency (a.k.a. channel) before transmitting.
2. Plan your message before transmitting.
3. Press the PTT (push-to-talk) button and briefly pause.
4. Hold the microphone two to three inches from your mouth.
5. Identify first the person being called.
6. Acknowledge transmissions directed to you.
7. Use plain English. Ten-codes and CB jargon confuse everyone.
8. Profanity is still illegal.
9. Reduce background noise as much as possible.
9. Data systems. Data is information, which includes text, numbers, and pictures. Devices used to transmit data include desktop and portable computers, fax machines, and “smartphones” (the combination of a PDA and a cell phone). Fax machines use phone, Internet, or radio services to send printed or illustrated data. E-mail is message (text) data that's transmitted over wireless and landline systems.
Retreaters and preppers planning on using notebook computers and smartphones as their primary communication and navigation devices should remember that computer-accessed technology will not be available if power sources are knocked out or if the servers are damaged. E-mail, texting, and all those smartphone apps are lower-tier devices, subject to failure of other tiers: power supply, landline or wireless systems, servers, etc.
10. Primary and backup communication systems. Some thought should be given to continuity of communication. Right now, your primary means of communicating are your phones (POTS and cell) and your computer (Internet). These systems will very likely be overloaded, destroyed, or otherwise unavailable during a major disaster, leaving you with no way to communicate with the outside world. Therefore, radio is your answer.
The following considerations are mentioned here because they may or may not, depending on how complex your retreat is, lead to additions or modifications of existing structures, or may require some close attention when designing new structures. The two earlier books in the series, What to Do When the Shit Hits the Fan and Living Off the Grid, are recommended volumes of reference for a simplified look at alternatives for power and light, heating and cooling, and so on. The Urban Homestead, by Coyne and Knutzen, is also an excellent source of information and ideas.
Most large or complex retreats will be powered by generators (which makes fuel an enormous bartering tool). The “gen” will probably be wired directly into the house or compound's current circuit board. It may be a backup for, or an integral part of, a multisource self-sufficient power system that could include solar and wind power generation and a huge battery bank. There are a lot of considerations to keep in mind. If you're planning on using a generator, pay close attention to the hazard of carbon monoxide poisoning. Generators will require self-containment or exterior placement. In the long term, wind and solar power may be the best solution; but if solar and wind are the major components of your system, be aware that a single bullet or a chunk of flying debris can pulverize your big panels or your wind turbine. You must always make sure that you take the proper precautions to protect them. For instance, amorphous and some other solar cells will still function with acceptable efficiency when overlaid by shatterproof plexiglass. Cables are better protected when they're buried. All in all, make sure you always protect the system.
Whatever technologies are chosen, they absolutely must be hardy and simple to maintain. Imagine a complex, commercially installed system breaking down after some widespread catastrophic event. Chances are there won't be any electricians available to fix it right away. Will you be able to do it yourself?
Also, you must maximize the efficiency of your system by learning to conserve energy and by using passive heating and cooling concepts that use the energy of the sun and wind to heat and cool without first changing it to electricity.
• There are two types of solar energy systems. The first collects the heat produced by the sun's energy, warms air or water within it, and then circulates it to heat a home or provide hot water. The second uses panels of solar cells to absorb the sun's rays and convert them to electricity, which is then used to run lights and appliances.
Fold-up, flexible solar cells that will not shatter and continue to work, even if pierced by a bullet.
• Solar arrays are a cluster of panels, which are groups of photovoltaic cells that convert sunlight to electricity. The bigger the array of panels, the more power (watts) it produces.
• Panels face the sun (southward in the Northern Hemisphere), unobstructed and tilted at the proper angle to get the most light energy.
• Some panels can be integrated into the structure as roofing or siding. Other recent technologies have produced soft folding panels that can be rolled up and carried wherever they are needed.
• Solar panels produce DC electricity (like the electricity in your car). Some tiny appliances can recharge or run directly off the panel, but most systems send the DC into a battery bank for storage. It's possible to run DC appliances directly off the batteries, but it's simpler and cheaper in the long run to plug an inverter into the battery bank. The inverter changes DC to AC (the type of current in your house), allowing the use of normal AC appliances.
• The question now is “what's involved in producing AC power?”
PV panels gather the sun's rays and convert them to electrical energy.
The electricity is sent to a battery bank via a charge controller (a device that prevents overcharging and voltage leaks in the batteries).
In the battery bank, the electricity is stored in “deep cycle” batteries, like marine batteries, as opposed to “shallow cycle” batteries, like those used in cars.
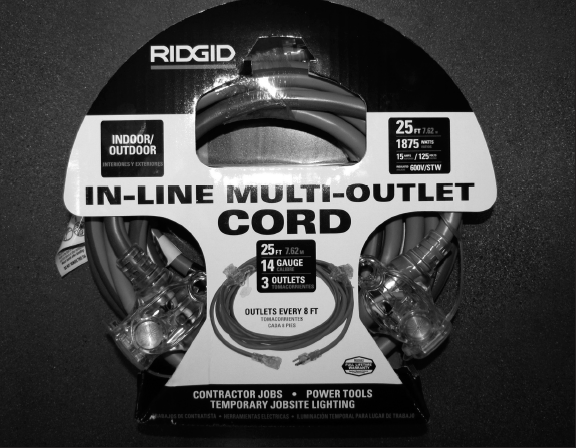
A properly rated multioutlet extension cord with outlets every 8 feet makes bringing the electricity indoors from your power system relatively easy.
When it's time to use the stored electricity, an inverter changes the DC to AC. Power cords can be plugged directly into the inverter, or the inverter can feed a power panel that distributes the AC through the home.
Other parts of the system will probably include the following:
• Fuses and safety disconnects that prevent electrocution, short circuits, and fires. In very small systems, the safeties built into the inverter, appliances, and extension cords may be adequate. Larger systems will need more protection.
• Properly rated multiplug extension cords, preferably with circuit breaker mechanisms to protect from overloading and shorts.
• Any system, large or small, plugging directly into the existing house electrical panel should always be approved or contracted by a licensed electrician.
This is the Coleman 3-panel 55-watt solar power kit. Two kits will give the buyer 6 panels and enough spare parts (including controller, inverter, cables, and panels) to keep the system going for a couple of years. Four panels can easily be rigged to produce a portable 72-watt system. Four high-capacity deep-cycle marine batteries can be added to the system for about $300, and another $100 buys an inverter powerful enough to run a small refrigerator, air conditioner, or small heater. Bring the power into the home with a properly rated circuit breaker extension cord ($50).

• A grid-tied system has enormous advantages but can be painfully expensive. For survivalists, the question remains, “why tie into the grid?” After all, if there is no infrastructure in the survivalist future, tying into the grid would be futile.
• Harvesting power from the wind is very difficult unless you have the space and location to mount the turbine at least thirty-five feet above the nearest building. Wind power, therefore, is most pertinent to suburban and rural retreats.
• A microturbine can produce several hundred watts.
• The combination of a small turbine and a solar array ensures the continuity of production and storage of electricity without having to start the generator. On a good day, power is produced by the sun. On a bad day, it's produced by the wind.
On the other end of the scale are the simple power sources for short incidents. Battery operated LED lights or hand-cranked lights (some with mini solar cells, radios, and phone chargers) are now available in most hardware stores. There are even passive solar devices that can cook food, heat water for a shower, warm a room, and dry clothes.
Air circulation will be a consideration in panic and safe rooms, many of which are made to be airtight and temperature-controlled. Passive ventilation measures might include static ventilation holes covered with a grill or active ventilation may be provided on a small scale using solar-powered fans (attic fans). Ventilation systems may include separate air filtration systems, which will protect against biohazard materials, dummy vents to throw off intruders, and individual PPE (personal protective equipment) such as gas masks. Expensive retreats or panic rooms might have a filtered fresh-air system or even a sealed rebreather system with its own oxygen supply. Readers should note as they research air systems that “air” is not the same thing as “oxygen.” Generally when we talk about an air system we're referring to a supply of “room air” which normally contains 21 percent oxygen. When we refer to an oxygen source, we're talking about oxygen tanks or an oxygen generator that supplies high-concentration oxygen for mixture with old room air.
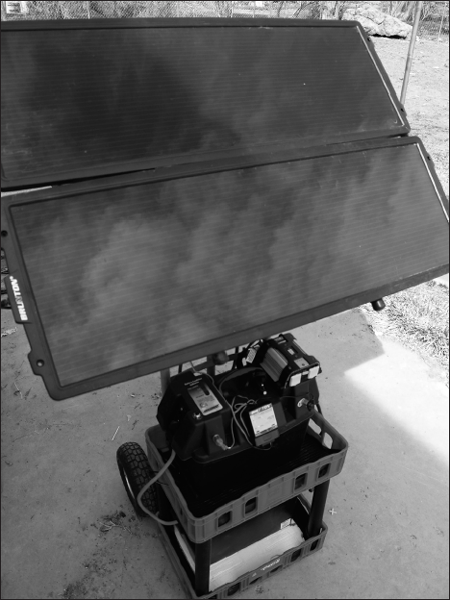
This image is of a 30-watt solar power system with a 400-watt inverter and 2-battery bank on wheels. It costs approximately $400, depending on where you purchase the components, and will run a computer and an electric blanket or low-watt fan for hours.
Plumbing is the next consideration. Hopefully, the plumbing will continue to run during an emergency, but when the tap water becomes contaminated or ceases to flow, the prudent prepper or retreater will have a contingency supply of water stored on site, as well as some form of backup sanitation system (portable toilets, etc.). High-end retreats and most rural retreats will have their own independent plumbing and septic tank systems.
In summary, here's the bare essential list of to-do's to prepare your grounds to function as a retreat:
1. Exterior Doors
a. All exterior doors and the garage door are solid hardwood or metal clad.
b. All entrance doors have both a keyed knob lock and a dead bolt.
c. The doorjambs and frames are reinforced.
d. The entrance door has a wide-angle peephole.
e. Glass within thirty-six inches of the door is reinforced with security laminate or completely sealed.
f. Security hinges or pinned hinges are used if the door opens out.
g. Spare keys are not kept under a doormat or planter.
2. Windows and Glass Doors
a. All are reinforced with security laminate.
b. Safety locks are used that allow up to six inches of ventilation while still being locked.
c. All are alarmed with electromagnetic contacts (“screamers”).
d. Sliding glass doors have a keyed lock.
e. A pin or bar is used to prevent sliding doors from being forced open.
3. Outside
a. Shrubs and bushes are trimmed so they cannot be used for cover or are removed completely to expand the visible perimeter.
b. Each outside entrance is illuminated.
c. Motion detection lighting is installed at all entrances and pathways.
d. Gates, garage doors, and shed doors are always kept locked.
e. A contingency power source is available to run security and other essential appliances.
4. A dog aids in intruder detection, and a weapon provides active defense when it's necessary.
5. Food and water for a predetermined length of sustainment is stored and/or cached, supplemented by farming that is already in progress and materials that are on hand for water harvesting.


