By definition, retreats are supposed to be largely self-sufficient. So, like it or not, a real retreater is going to have to be a farmer as well. Unfortunately, farming is not something that can be learned on the spot. You can't have seeds hanging around in storage for years and then suddenly expect them to grow for you if you've never done any farming before. There are a lot of good websites with helpful suggestions. Start with this one and see what else you can find:
http://containergardening.about.com/od/floweringcontainergarden/u/DIYProjects.htm? p=1
There are many good books on the subject. One of the best is Coyne and Knutzen's The Urban Homestead. Much of what follows are influenced by that manual, and the author highly recommends it as part of the urban or suburban retreater's library. Most readers, after all, are urban and suburban dwellers with limited soil sources and very limited farming experience. Aside from teaching you how to grow your own food and raise your own animals for meat and dairy, Coyne and Knutzen's book contains information on urban foraging, and over seventy pages are dedicated to methods of preserving the harvest. Another thirty pages describe in-depth water harvesting techniques.
Below are some basic concepts of farming for foodsupplementation. Although these apply specifically to limited-soil scenarios, the same basics apply to farming on a larger scale.
1. Basic principles:
a. Grow only what you can use. It will save you money and farming space.
b. Develop a clean soil resource.
c. Use more water, but do it less frequently.
d. Do not expect any miracles. (Remember, Rome wasn't built in a day.)
e. Keep constant notes as you never know when they'll come in handy.
2. If you have no access to ground soil, grow food in containers on patios, roofs, balconies, or indoors where they will get enough sunlight. You can also look into hydroponics and vertical farming. Maximize the growing space in all directions (string or wire trellises, etc.). Food crops need six hours of sun, direct or reflected, each day. If only inside space is available, place containers next to windows and supplement with artificial light.
3. Give priority to fruit-bearing plants (beans, peas, tomatoes, melons, cucumbers, squash, etc.).
4. Build soil in these ways:
a. Compost all yard and kitchen waste and use as soil. Composting occurs when organic waste is broken down by microbial processes. When the process occurs on the forest floor, it's called mulching and the product is mulch. When the process is carried out by humans using pits or bins, it's called composting and the product is called compost. The resulting material can be used as fertilizer.
Efficient composting requires careful sorting and mixing of proper ingredients. Compost needs a good supply of nitrogen-rich vegetable waste (called greens), which includes scraps from the kitchen, grass and weed clippings, fresh leaves, and even coffee grounds. It needs a nearly equal supply of carbon-rich materials (called browns), which include straw, bark, wood chips, sawdust, dry leaves, and shredded newspaper. Don't add any bones, meat, fish, oils, dog waste, or dairy products.
Compost radiates heat if the nitrogen–carbon ratio is good. The warmth indicates that the aerobic bacteria, worms, and fungi are all doing their job. When the process is nearly complete and it's ready to be used as fertilizer, the compost will be cool.
Keep an eye on air and moisture levels. The micro-organisms need air to work their magic, so be sure to mix it up and include some wood chips or straw to prevent vegetable products from clumping together and to keep the ventilation process going. The mixture should be damp but not wet enough to drip from the bottom.
The end result is a light, soil-like material called humus—a highly nutritious topsoil that can be spread over vegetable gardens, lawns, fields, and around trees.
b. Use mulch (leaves, etc.) to protect and build soil. Mulch holds in moisture, slows weeds down, and stabilizes soil temperature. Fall leaves, wood shavings or small chips, straw, pine needles, corn husks, and lawn clippings can all be used as mulch. Lay down a healthy cover around plants, about five inches deep. The mulch will break down and thin and can be replenished annually with fall leaves.
c. Be creative in finding or building places to grow your crops, preferably where they can get good sun exposure.
Tub Science at work. On the left is a composter made from a thirty-three-gallon garbage can. There are many quarter inch holes drilled into the can on the sides and on the bottom. The larger holes are screened and provide additional assurance that the mixture is getting enough air. To mix the contents, the container can be tipped and rolled every couple of days or weeks. Don't wait for the end of the world to start composting. These bins take three to four months for a family of two to fill and another six months or so to become humus, so a second or third bin will be needed. In urban areas “browns” may be scarce until the fall leaves are distributed by the wind. In your storage, you'll want to start keeping old newspapers and save your sawdust.
On the right is a thirty-four-gallon wheeled garbage can fitted with a cheap hose valve fixture to allow the hose to be turned on & off. When full, this contraption will run fifty feet of downslope soaker hose or a simple ring sprinkler at a drizzle for a couple of hours. Fill the can by using rain gutters or collector tubs. Otherwise, keep the lid on to prevent mosquito breeding. Filtered or treated gray water can also be used to help fill the can.
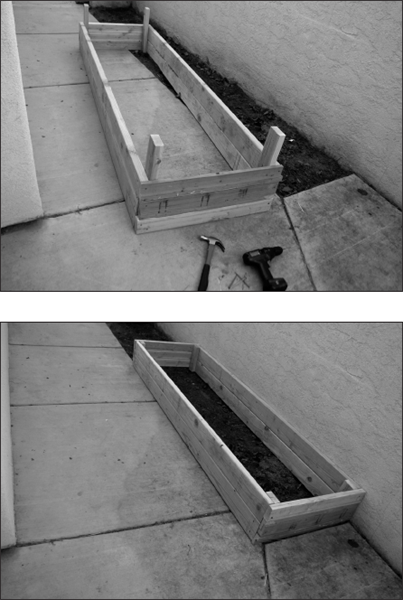
A raised bed built from old boards for an urban garden.
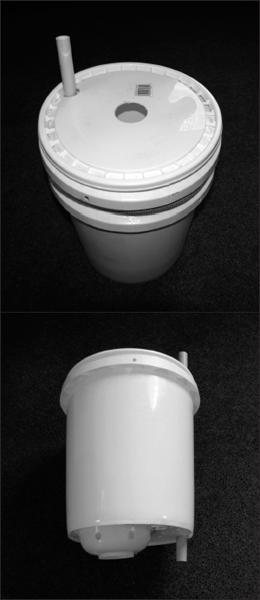
A self-watering five-gallon bucket planter is big enough for herbs or a medium-sized plant. This is made from two stacked five-gallon buckets. The inner bucket is modified as shown in the photo 5-3. A similar contraption made from large plastic storage tubs will hold a couple of tomato or half a dozen mature lettuce plants.
i. If you have some exposed soil, build it up with a raised bed, simple rock, or lumber walls a foot or two high to hold the soil.
ii. Containers can include commercial planting pots, stacked tires, kiddie pools, buckets, etc.
d. Avoid tilling the soil.
e. Rotate crops to prevent nutrient depletion and disease.
f. Don't use pesticides or herbicides.
5. Watering
Coyne and Knutzen recommend watering deeply and less frequently. Use drip systems or soaker hose. Keep the soil spongy, not dripping wet, and let plants dry out slightly between watering.
6. Watch for infestations and diseases. Clip diseased foliage off and pick or wash off aphids or other damaging bugs.
7. Not all bugs and animal visitors are bad. Ladybugs, birds, spiders, and bees are good for a garden.
8. Consider concentrating on edible perennials (plants that come back year after year without replanting), such as fruit and nut trees. Dwarf varieties can be grown in large pots or buckets and will deliver plenty of fruit.
9. The key is to get started early. The garden needs to be already planted or at least ready to be planted if you expect to produce food when you need it. Just use our process and store the food you produce and keep the garden going. You can buy seedlings at any nursery in season and transplant them wherever you want, or you can store them and start your own seeds.
Some seeds start growing when planted per package directions directly in the ground. Others require special handling. Generally, here are the rules of thumb for starting seeds indoors:
1. Start a month before planting season.
2. Store seeds properly in a cool and dark location. (A refrigerator works well.)
3. Wide, flat containers prevent overcrowding. Plastic pots with good drainage are always the best to start with. Get some plant trays from the nursery, or drill some drainage holes in those old yogurt containers. Then all you have to do is add some potting soil.
4. Place seeds as directed on the soil and tamp the seeds with the bottom of a glass or bottle to ensure they make direct contact with the soil. Sprinkle some sphagnum moss or chicken grit to help keep the surface dry (helps prevent plant infections).
5. You can prevent plant infections by providing ventilation (consider a small fan on the lowest setting) and good drainage.
6. Make sure that you never overwater. Maintain the moisture level by covering the pots with plastic wrap. Check for dryness daily, and if more moisture is needed, spritz the surface soil with a spray bottle or place the pot in another container of water just deep enough to allow water to wick into the pot. Remove the plastic wrap when the seeds germinate.
7. Keeping the plant at a normal room temperature (65–75°F) encourages germination.
8. Expose (indoors) to sunlight or artificial light twelve to sixteen hours each day. Rotate the pot a quarter turn daily in relation to the available light source.
9. A weak fertilizer solution can be used once to encourage growth when the true leaves have appeared. The earliest leaves will probably be rounded food storage cells. True leaves resemble their adult versions.
10. Acclimate seedlings to direct sunlight temperature changes by exposing them outside for increasing periods over several days to prepare them for transplantation.
Some seeds require even more preparation, and there will usually be instructions to that effect on the seed package.
Many urban gardening manuals recommend growing only foods that are normally scarce or expensive. But the goal of a retreat, in contrast to convenience or savings, is sustainability. You're not only going to want the small scarce or expensive stuff like berries and herbs, instead you'll want to be able to produce the inexpensive staples like potatoes, onions, corn, squash, peppers, lettuce, carrots, tomatoes, beets, garlic, etc.
The following websites are excellent sources of information on how to grow and stores these types of foods:
http://www.gardeners.com/Storing-Potatoes-Onions-Garlic-Squash/5021,default,pg.html
http://www.gardenguides.com/114522-make-own-seed-potatoes.html
http://www.garden.org/foodguide/browse/veggie/tomatoes_getting_started/372
http://www.ehow.com/how_2100121_grow-corn-container.html
http://containergardening.about.com/od/vegetablesand herbs/u/VegetableContainerGardeningUP.htm
It's possible, of course, to surround a large, remote retreat with cattle and other animals for meat, eggs, and milk. But when the zombie hordes attack and the residents are forced to withdraw to the confines of their defensive perimeter, they will suddenly be forced to make do with not much more farming and ranching space than a typical urban or suburban retreat. This brief description of supplemental sources of meat and eggs applies to remote retreats as much as it does to urban ones.
When you take on this task, you will have to learn some important skills:
• How to slaughter, skin, and butcher your own meat.
• How to prevent attacks by common wild predators, like coyotes, foxes, skinks, raccoons, and even domestic pets by using fencing and other strategies.
• How to store meat and eggs so that they last and don't rot.
• What animals need for food, water, shelter, tolerance to weather, and temperature extremes.
• How to supplement your food with animal products, and to supplement their food with your scraps and fields.
• The basics of animal health and first aid.
There are many choices of animals to raise on small-scale farms, including the following:
1. Chickens
Chickens are a favored source of meat, eggs, and fertilizer. They are easy to care for and only need to be kept in a pen or small yard. Chickens, turkeys, ducks, and geese can forage for weeds and bugs (insects, snails, worms) in a field or pasture or even your container garden when it's not in season, which is important to sustaining a successful farm. Their waste can be tossed in the composter to speed up decomposition. They can fly over fences and are considered tasty by predators, so it's best to clip their wings to avoid that; and they must, of course, be well-watered and properly fed. Chickens are allowed in most rural and suburban areas, even if they're just kept as pets. In most suburban and urban areas, there's likely to be a ban on roosters due to the fact that they can make a lot of noise Turkeys tend to roam a bit, but chickens tend to stay close to home, and if they do roam, will return home for the evening.
Chicken FAQs:
• Where do I get chickens?
Get them as chicks from the local feed store. Make sure you know the sex so that you get all hens and no roosters.
No, hens will lay unfertilized eggs without a rooster present. If you want to breed chickens, you'll need a rooster.
• What breed and size are good for eggs?
Leghorns, Rhode Island Reds, and Plymouth Rocks are good layers. Bantams are small but still lay a decent-size egg.
• What's the life expectancy of a laying hen?
Three to eight years. Most hens can start laying at twenty weeks old and stop laying eggs at about the age of three.
• How many hens will I need?
In a rural area, you can keep as many as you can handle. For an urban setting, three to five will keep a family of two in eggs every day (about a dozen per week).
• Is raising them for meat practical?
Raising chickens or ducks for meat is quite time consuming and very costly. Wait until a hen stops laying then cook it up.
• What do I do with the starter chicks?
Keep them warm, hydrated, and fed. A cardboard box heated with a 60-watt lamp bulb makes an adequate “brooder.”
• What is a henhouse?
This is a box with roosting bars and a few nesting boxes. It's where they sleep and lay eggs. The house and the fenced “run” that surrounds it are what we call a coop.
For your chicks, most feed stores sell a special type of chick feed that works well. Adults like scratch (cracked grains), greens, vegetable scraps, and fruit. They need grit, either from the dirt or store-bought. They also use a lot of calcium, so you can boil egg shells and feed it to them to supply the vitamins they need.
• Some good chicken websites?
http://www.backyardchickens.com/raising-chickens-basics.php (excellent site!)
http://en.wikibooks.org/wiki/Category:Raising_Chickens
http://www.mybackyardchickenfarm.com/chickencoop.html
http://www.lionsgrip.com/babychix.html http://www.ces.ncsu.edu/depts/poulsci/tech_manuals/small_flock_resources.html
2. Ducks
Ducks are a little noisier than chickens but are a good source of meat and eggs and they eat plenty of garden bugs.
Duck FAQs:
• Where do I get ducks?
You can get them at the same feed store as you would get chicks.
• Do I need a drake (male)?
No, unless you plan to raise ducks.
• What breeds are good layers?
Most often recommended is the Khaki Campbell. Indian Runners are better layers but have other issues that put them in second place.
• How many do I need?
At least two, as ducks get lonely.
• How do I handle the chicks?
The same way you would with chickens, by using a brooder box.
• Do I need a duck coop (house + run)?
Yes, but no brooding bars are needed.
• What do ducks eat?
Plants (including weeds and garden plants), bugs, and duck feed.
• Will they need a swimming pond?
Ducks use deep water to drink and clean themselves. A kiddie pool will do, but change the water daily. (Best idea is to use it in the garden.)
A great duck site:
http://duckhobby.com/duckbreeds.html
3. Geese
These birds are noisy and aggressive but are an excellent source of meat and eggs and feathers/down. Ducks and geese like the water, which gives you another reason to raise fish. A great goose site:
http://www.motherearthnews.com/sustainable-farming/keeping-geese-ze0z10zhir.aspx
4. Turkeys
Turkeys are most often raised for meat, and a single bird can provide fifty pounds of it. Turkeys are not prolific egg layers, and most spoiled Americans who try turkey eggs are not particularly fond of them. Here are a couple of good websites:
http://www.ces.ncsu.edu/depts/poulsci/tech_manuals/small_flock_resources.html
http://www.frugal-living-freedom.com/raising-turkeys.html
5. Quail, Pheasant, Pigeon
Quail are comparatively small but are reliable and frequent layers. The chicks mature in about six weeks or so, creating lots of eggs and meat in a short amount of time. Pigeons are also easy to raise and reproduce quickly, though, as with guinea pigs, most Americans have a difficult time with the idea of eating one. Both quail and pigeons fly, so they're often clipped or kept in barns or coops. Breeding pheasants is much like breeding chickens.
These are good game bird sites:
http://www.ehow.co.uk/how_6247306_raise-game-birds-meat.html
http://www.ehow.com/how_5682938_raise-wild-game-birds.html
6. Rabbits
Rabbits require little room and provide meat, fur, and fertilizer. They're very quiet and can be kept in small pens. You can also let them roam around in the grass, but they'll require herding home at the end of the day. Rabbits will eat anything green, and their waste is excellent in a composter or, after it has dried as a fertilizer. A male and a couple of females can act as breeders and multiply “like rabbits.” A single doe can produce as much as 1,000 times her own weight in meat per year. The common meat breeds are New Zealand's and Californians, but Angora rabbits are a good choice, since they can provide meat and fertilizer and their long hair can be combed out when they molt and spun into yarn.
Some great rabbit sites:
http://www.thefarm.org/charities/i4at/lib2/rabbits.htm
http://www.essortment.com/raising-meat-rabbits-41673.html
7. Guinea Pigs
Female guinea pigs can have five litters a year of one to six babies, and the females of the litter can have their own pups just a month after birth. Again, two females and a male will keep you in meat. They are very cheap to feed and the meat is high in protein and low in fat and cholesterol. Raising guinea pigs is much like raising rabbits, just a bit noisier. A great guinea pig site:
8. Fish
Fish can be nearly self-sufficient with adequate water surface area and depth. Depending on the species, they do well in warm, cold, deep, shallow, or moving water. They can eat bugs, other fish, some plants, and some are straight bottom feeders.
Some sites:
http://www.ehow.com/how_4501761_create-backyard-fish-farm.html - This site suggests a 12'-diameter kiddie pool and shows just how complicated backyard fish farming can get.
http://www.ehow.com/how_4474959_raise-catfish-barrel.html - This is a great site with a relatively easy method of raising fish in a 55-gallon barrel. Clean harvested water can be used. The project requires an aquarium filter which could be run on its own 5-watt solar cell and battery (<$80). The water must be changed daily, but is nutrient rich and can be used to water the garden.
9. Goats
Goats are the only animal on this list that provides both meat and milk. One assumes it would fairly easy to raise goats, but when your goats have babies, you'll run out of space and ground forage in a hurry. You'll need about fifteen square feet of barn space per adult. A three-sided shelter is enough, but it will need to be secured with a stout woven-wire fence at least four feet high. A large chain link commercial kennel is an excellent alternative. Any goat can provide meat, but not all are excellent milk producers. Nubian goats seem to be the most often recommended dairy goats. Goats will eat almost anything vegetable, including weeds, leaves, grass, and scraps or discards from the kitchen and garden. Dairy goats should be fed a daily chunk of alfalfa hay if it's available.
A few goat sites:
If you've got lots of space, visit this one…
http://www.ehow.com/how_6382091_raise-goats-milk-meat.html
If you live in the city, try this one:
http://www.ehow.com/how_6382091_raise-goats-milk-meat.html
10. Bees
These are silent and clean creatures that can be safely kept on a rooftop, balcony, or unenclosed patio. One hive can easily supply more honey than a small family can use.
Bee Basics:
• A simple bee kit with hive, frames, smoker, personal protective gear, gadgets and tools, and instructions can be had for as little as $160.
• A three-pound package of 10,000 bees with a queen will probably cost at least $100 plus delivery. The other option is to bring home wild bees.
• The queen bee lives about two or three years. Worker bees work themselves to death in four to six weeks during the late spring and summer but live much longer in winter.
• It will take months for the bees to do their work, so like everything else we've discussed in this book, you've got to get started before TSHTF.
• Bees attack to protect the honey and young. They are far more sedated when they're swarming because they are away from the hive.
• Before you go through all the expense, check with neighbors and local codes, as not everyone likes the idea of bees next door. Tell neighbors you'll slip them some honey when it's ready and explain to them that you will place the hive where the bee flight paths do not intersect with human traffic.
http://www.chelseagreen.com/content/urban-apiculture-or-bees-in-the-city-draft/http://outdoorplace.org/beekeeping/city-bees.htm
Check out these sites to learn how to harvest honey:
http://gomestic.com/gardening/harvesting-honey-from-bee-hives/http://www.ehow.com/how_1649_harvest-honey.html
The following website is a great source of information on animal farming:
http://www.frugal-living-freedom.com
If you've got property for a rural retreat, it may be possible to drill a well or find and prepare a spring. Refer to Living off the Grid for additional information and references to well and spring resources.
If a well or spring is not available, the answer to water sustainability is conservation and the art of catchment systems, or water harvesting. A water catchment system works where wells can't be dug, groundwater is contaminated, springs can't be found, or rain is scarce. These types of systems have been used for thousands of years in countries with poor groundwater resources. Even in the desert, a short rain can deliver enough water to keep the household going until the next storm.
The easiest form of storm harvesting is a simple rain barrel fed by the downspout of the rain gutters or edges of a building. Yes, the water will certainly be dirty, but metal or clay tile roofs seem to be cleaner than shingled roofs. For a little extra, there are many commercial rain barrels available with perks like roof-cleaner diverters and prebarrel filters.
Water from a barrel is not pressurized, except by gravity, but that gives it just enough pressure to water a garden using a hose from the barrel drain. Elevating the barrel, using cinder blocks, increases the pressure, but it won't support a plumbing system of any kind without a pump. Storm-harvesting systems intended to provide water for drinking, cooking, and bathing will need pumping, filtration, and disinfection systems.
The harvesting system may also drain into larger above-ground tanks, underground cisterns, or into dammed reservoirs. Some commercial versions also have roof-cleaning diverters.
Aside from roofs, melt- and rainwater can be captured from gullies and washes, but the obvious problem is sediment (mud) buildup and the control of raging floodwaters. Large systems like this can become hazards to anything downstream.
Some old-school methods are a little more labor-intensive but happen to work quite well. Excavate the available land area so impermeable surfaces (cement, pavement, etc.) are minimized and the ground is morphed in a way that it catches the rain and funnels it in the direction you want it to go as irrigation or catch-water. Terracing is a simple method of keeping rain- and melt-water from running away. Directing the water into a mulch basin is another effective variation. Mulch basins are pits or trenches planted with high crops (large plants or trees) and covered with mulch. A mulch basin is also a good place to send gray waterif the basin has been planted with alkaline-tolerant plants. Try this website for ideas: http://web1.msue.msu.edu/monroe/soilweb2/alkaline-tolerant.htm)
A cistern is a tank made of concrete, steel, fiberglass, or plastic and can sit either above- or belowground. If the cistern or water tank is aboveground and higher than the building's internal plumbing, the weight of the water in the cistern may provide adequate pressure. Otherwise, a pump is needed to send water from the catchment to the house. Again, filtering and disinfection will be needed before using the water for drinking, cooking, or bathing. A rain barrel or any other aboveground storage device requires steps to keep it from freezing.
Domestic wastewater is made up of gray waterand blackwater. Gray watercomes from the laundry, bathroom sink, shower or tub, kitchen, and various appliances. Basically, it's any wastewater that's not contaminated with feces. Blackwater comes from the toilet and is usually referred to as sewage. Blackwater is highly infectious, but it's not the same for greywater. While blackwater must be purified and treated before it can be reused, greywater, which also carries germs and pollutants, can be reused to water gardens. As a rule of thumb, don't use gray wateron crops that anyone might eat raw, and don't let it sit around in barrels or ponds as it will soon turn foul.
Since most of your gray wateris going to come from the shower, sink, and washing machine, it's a good idea to try to control the pollutants by using grey-water-friendly detergents. The information on the bottle or box should specifically say whether it's greywater friendly or not. Common detergents have chemical additives that make them incompatible with gray watersystems.
Gray water systems range from simple and inexpensive to highly complex and very expensive. All gray water systems rely on two principles: the first being that healthy topsoil can purify or filter greywater, and the second is that humans cannot use gray water for watering crops, drinking, cooking, or bathing before it is purified.
The simplest method of reusing gray water is to just drain it or dump it in buckets directly onto garden soil. Use a bucket to collect any water that has to run to heat up. After a bath or during a shower, remember to siphon water to the bucket or to an outside location. It takes little effort to disconnect the pipes under the sink, so drainage will go into a large bucket or to add a pipe or hose that will carry it directly outside where it's needed. Sophisticated systems treat gray water prior to disposal by using in-line filters or settling tanks and sand filters in order to remove pollutants and germs before distributing it through a drip system.
Keep in mind that gray water tinged with detergents is going to be alkalized. Make sure you do not direct that kind of water to plants that you know are not alkali-resistant. There are several lists of alkali-resistant plants on the Internet. Use your search engine to pull them up. A better idea is to use detergent-contaminated gray water for other purposes, like flushing toilets.
A gray water system is based on site, climate, budget, quantity, need of soil permeability, how much work you're willing to do, and local health and building codes. Once you go beyond the basic methods mentioned above, you'll need a working knowledge of basic plumbing and the tools to accomplish it. The Internet is rifled with DIY information and tutorials. Again, we'll recommend the book The Urban Homestead for a great introduction to inexpensive alternatives.
For most people, greywater is easiest to handle within a septic system. Separate black- and greywater systems are easy to install during new construction, but to modify an existing dwelling to handle separate systems is difficult and very expensive.
Let's pause briefly for a return to reality. In a true “shit hits the fan” scenario, you're not going to have the luxury of a public water utility, and you'll be wishing that you had a spring or a well. You're going to be using water you've stored and whatever water you have been able to harvest. Conservation will be king as there will be no room for wasting any water—clean or grey.
While rural retreats in worst-case scenarios are still going to have functional septic systems, urban and suburban retreaters are likely to be on public sewer systems, which will eventually fail and back up. Retreat builders would be wise to invest in composting toilets. Commercial systems come in all shapes and sizes, from septic systemlike basement chambers to individual toilets that must be emptied into other containers. A DIY version is a simple five-gallon bucket, with or without a toilet seat modified to fit it. Cover each “extraction” with a carbonaceous material (sawdust) or even sand to reduce the odor. If you've got a big supply of buckets, just fill the bucket, seal it with the lid, and store where it won't become an aesthetic or health risk. If you've just got one or two buckets, then line them with a couple of strong garbage bags. When the bucket is nearly full, pull the bags out and seal them. Double bagging is important, but of course, if the situation is prolonged, the bags and the buckets will run out. Even then, there are solutions. Some advice: