I have described where to look for fossils, and what to do when you find them, but the most important step of all is to always record exactly where you found the fossil and what rock unit and level it came from. If you are just collecting lots of shells from well-known localities where hundreds of specimens are already known (and many more remain to be found), this step isn’t crucial. Still, it’s good practice never to leave the field with specimens without noting the locality information (fig. 9.1A–B). If you don’t do it while you are there, you are unlikely to accurately reconstruct your exact location after the fact.
Figure 9.1 ▲
(A) A paleontologist taking notes on an outcrop while the crew collects fossils. (B) A close-up of a field notebook showing the details of the fossil locality, sometimes with a Polaroid photo attached. (Photographs by the author)
Location information can be found in a number of ways. Lots of mobile devices have GPS systems built into them, so you can find your exact latitude and longitude if you know how to use the right app. In remote badlands, however, you may not have a cell signal, so it’s wise to carry a portable GPS device that can pick up satellites anywhere. However, if you find yourself in a dense forest or in a narrow canyon, even satellite reception may be difficult. It is a good idea to have an “old school” backup system: a topographic map of the region. This map will help you navigate around, but it is especially useful in locating and recording the exact spot where the fossil was found.
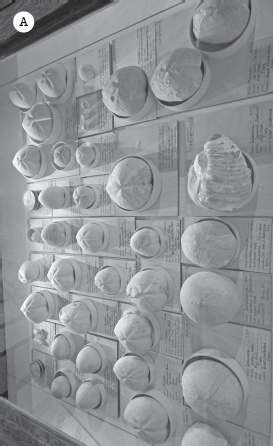
In addition, for the specimen to have any scientific value, you need to provide as much detail about the geologic location of the fossil as possible, including the exact formation name the level within the formation where it was found. For a rigorous scientific study, all the fossils must have their exact level recorded from a particular top or bottom of the formation or a marker bed within the formation (figure 9.2A–B).
Figure 9.2 ▲
Every specimen must have its precise geographic information and stratigraphic level recorded when it was collected in the field, or its scientific usefulness is limited. (A) A museum display of Cretaceous sea urchins from the Dover Chalk, each with precise locality information on the labels. (B) Two paleontologists doing research on fossil camels in the American Museum of Natural History in New York. Each specimen in the tray has a catalog number and all the geographic and stratigraphic information displayed on the specimen or on the label in the tray. (Photographs by the author)
This may seem like a big hassle, but it is a crucial step that is needed for a fossil to have real value to science. Far too often I’ve run across fossils in museums that had only very vague locality information. They may make pretty mantelpiece displays, but they are of no use if you want to do any kind of study that depends on precise locality information. Many paleontologists have been shown a very important and age-diagnostic fossil to identify, but when asked the collector can’t remember where it came from—the value of the fossil is greatly diminished as a result. The fossil could have unlocked clues or solved important geologic problems, but without the location information, the paleontologist can do little except identify it.
Dr. Robert J. Emry, a mammalian paleontologist now retired from the Department of Paleobiology at the Smithsonian Institution, told me a revealing story when I was his field assistant in 1978. In the 1950s and 1960s, he was working in the field crew of the legendary Dr. Morris Skinner of the Frick Laboratory of the American Museum of Natural History in New York. When he was a teenager and first began collecting, Bob found a fossil skull and rushed over to Morris with his find. Morris asked him if he knew precisely at what level he had found it. When Bob didn’t recall, Morris just tossed it away because its scientific value was so worthless that it wasn’t even good enough to take home.
The most important reason for recording the exact level in the formation is to help date the formations from which fossils come. In the 1790s, British canal engineer William Smith noticed that every formation has its own distinct assemblage of fossils. This is known as the principle of faunal succession (also called “fossil succession”). He discovered that he could tell each formation apart from the others by its fossil content. Soon he impressed the rich gentlemen collectors by telling them what formation they had gotten their fossils from. Building on this discovery, Smith embarked on an ambitious project to map all the rock formations of Great Britain (fig. 9.3). Simon Winchester called it “the map that changed the world” because a geologic map is the fundamental tool for understanding Earth’s history. It is also a tool for finding oil, gas, coal, and other resources.
Figure 9.3 ▲
William Smith’s 1815 map of Great Britain, the “map that changed the world.” At the scale it was mapped, it is still accurate and usable even today. (Courtesy of Wikimedia Commons)
Smith was just a humble engineer, and not a rich gentleman, and he ended up going bankrupt doing this enormous project, even as other geologists stole credit for his discoveries. He was even put in debtors’ prison for a while, but nevertheless he published his masterpiece in 1815, the first real geologic map ever produced. Fortunately, late in his life other geologists began to acknowledge his contributions to the discovery of Earth’s history and geology. In 1831, shortly before he died, Smith was hailed as the “Father of British Geology.”
So how do we use faunal succession to tell time? The method of dating rocks using fossils is called biostratigraphy, the study of the layered sequence of rocks and their fossils. First, the geologist or paleontologist makes careful note of the exact level in the sequence of strata from which every fossil comes. When these specimens are plotted on a stratigraphic column (fig. 9.4), they show a distinct sequence of different fossils marking different ranges in time (and in the strata). This is called a range zone. The paleontologist then does the same careful recording and plotting of biostratigraphic data and range zones on other stratigraphic columns. When the columns are compared, the sequences can be matched, or correlated, between the two different areas.
Figure 9.4 ▲
Stratigraphic columns showing correlation between four local range zones to form a composite biostratigraphy of the entire time interval. (Illustration by Mary Persis Williams)
For example, in figure 9.4, the sequence of oysters, belemnites, and snails allows a straightforward match between area A and area B. In area C, however, the belemnites and the oysters are found at the top of the column, so that part of column C is correlated with the bottom of columns A and B. This establishes that the range zone with the sea star fossils must be older than the zone with the oysters, and it gives us a longer composite sequence. Finally, area D has a different fossil sequence. The belemnites and snails allow us to match the bottom of column D with the top of columns A and B. The presence of the fish fossils in column D suggests that there may be a range zone missing between the snails and the belemnites in columns A and B. Finally, the ammonite zone appears above the snail zone, giving an even longer composite sequence. Thus the overall sequence of fossils and time goes from the oldest (sea star fossils) zone to the oyster zone, then to the belemnite zone, the fish fossil zone, the snail zone, and finally the ammonite zone.
When I did my dissertation project on the mammal fossils of the White River Badlands of the Dakotas, Nebraska, Colorado, and Wyoming, most of the fossils I found in older museum collections were useless for the detailed type of study I had planned. Luckily, Morris Skinner and his collectors had made enormous collections of Badlands fossils in all these areas. Unlike any previous group of collectors, they had recorded the exact stratigraphic position of every fossil to the nearest foot above or below a marker bed. This allowed me to precisely date the fossils and to do a detailed study of their change through time—which would not have been possible if the information had not been recorded in the field.
Knowing exactly where you found the fossil and recording it before you leave raises another issue: the land and collecting rights. If you are collecting in roadcuts or at beach cliffs, these public access lands usually have no restrictions. But if you go into a quarry or onto any kind of private land, you have to obtain permission to collect from the landowners, and they may have restrictions on what you can take home as well. If you are collecting on any kind of federal lands (national parks, national forests, national grasslands, or anything managed by the Bureau of Land Management), or any kind of state lands (state parks, state forests, state monuments, etc.), you need a formal permit before collecting. The procedures for getting those permits vary from place to place, but you should not start walking across publicly managed lands and grabbing fossils without first getting the proper permits.
This is a common problem. Careless amateurs and professional poachers often take fossils from publicly held lands—of which you as a taxpayer are the part owner—and sell them for a profit or keep them as a treasure without obtaining the legal rights to do so. Sadly, too often important scientific specimens have vanished into rich people’s living rooms because poachers and careless amateurs break the law—and the agencies who manage the land don’t have the people or money or other resources to patrol these lands and catch the poachers. Once such specimens vanish into private hands (often without recording any of the proper locality information or level within the formation), they are lost to science, and their most important data are lost forever as well.