Mobile Bay: Damn the Torpedoes

Mobile, Alabama, lies at the southernmost point in the state, at the northwestern tip of a 36-mile-long and 18-mile-wide bay that allows the state its only sea access. With a population of just over 29,000 when the war started, it was one of the largest cities in the state and second only to New Orleans as a port for international trade. Although never a city noted for strong secessionist feelings, no doubt due to the strong ties with Northern traders, Mobile was proposed by local boosters as the first capital of the Confederacy. Some radical secessionists felt that the Confederacy was bound to eventually include Mexico and some or all of the Caribbean islands, so it would be in a favorable central location.
After Lincoln’s election in 1860, secession fever swept the state, and Governor Andrew B. Moore soon moved to provide for military defense. On January 3, 1861, several days before a state convention met to formally declare Alabama free from the Union, he ordered local companies of the 1st Alabama State Troops to seize and man forts and arsenals around Mobile Bay. The next day, two companies moved to take Forts Morgan and Gaines, while several other companies went 30 miles north to seize the Mount Vernon Arsenal. Seven days later, on January 11, 1861, Alabama formally declared secession.

Mobile not only had a valuable and large deepwater port to help supply the newly formed Confederacy, it also had a series of fortifications to protect it, thanks to the U.S. Army Corps of Engineers. At the east side of the entrance to the bay stood massive Fort Morgan, supported by Fort Gaines and Fort Grant across the ship channel on Dauphin Island. Mobile itself was protected by a series of small forts and artillery batteries on both shores of the northern end of the bay, as well as a series of trench lines surrounding the city on the west (landward) side.
Within days of Alabama’s secession, a massive project was under way to clean up and improve the still-unfinished forts. With volunteer citizens and slaves provided by local planters, all available guns were mounted, living quarters for the garrisons built up outside the walls, wells cleaned out, and sloping glacis constructed. In March, when the Confederate government took over responsibility for area defense from the state, Colonel (later Lieutenant General) William Joseph Hardee was named commander of Fort Morgan.
Hardee, the author of the then-standard text on infantry tactics, was only in command at Mobile for three months, but he managed a near whirlwind of action. The untrained militia and local guard infantrymen were properly trained, artillerymen were trained and readied to repel the inevitable naval attack, and Hardee’s own command was soon expanded to the entire Mobile Bay area. In addition, he was placed in command of the “Mobile Navy,” the revenue cutter Lewis Cass, soon augmented by a grossly inadequate ironclad, the CSS Baltic. Later, after Hardee had departed, this “navy” was expanded to include two ironclad rams, the CSS Tennessee and CSS Nashville; two ironclad “floating batteries” (gunboats similar to the rams), the CSS Huntsville and CSS Tuscaloosa; and three side-wheeler gunboats, the CSS Morgan, CSS Gaines, and CSS Selma—all at the time of the major last battles under the command of Admiral Franklin Buchanan. The CSS Tennessee, Buchanan’s flagship, was typical of the large, powerful Confederate-designed ironclads—209 feet long with a 48-foot beam, covered with 4 to 6 inches of armor plating and mounting two 7-inch and four 6.4-inch Brooke rifled guns.
The centerpiece of Mobile’s defense against naval attack was a massive, five-sided masonry post at the very tip of Mobile Point, Fort Morgan, supplemented by two other smaller forts across the ship channel on Dauphin Island. The three-story-high brick fort still under construction when hostilities broke out in 1861 had replaced earlier defense posts dating back to a French outpost in 1699 at the site. However, it was only after the Spanish concession of Florida to the fledgling United States in 1813 that any attempts were mounted for strong, permanent fortifications on the two narrow barrier islands guarding Mobile Bay.
Fort Gaines on Dauphin Island, named for General Edmund Pendleton Gaines (best known for commanding Fort Erie with great skill during the War of 1812), and Fort Morgan on Mobile Point (named for General Daniel Morgan, Revolutionary War) are of the Third System of Fortification planning period of the 1830s and 1840s. A continuous series of strong masonry forts was planned to guard ports, towns, and strategic locations along the entire eastern seaboard and Gulf Coast. First proposed in 1821, Fort Gaines was still unfinished when the war began, described as a “shell of masonry” by one visitor. Although mounting few guns and for all practical purposes nearly unmanned early in the war, it still posed an impressive defensive obstacle, with a five-sided outer wall 22½ feet tall and 4½ feet thick. Unlike so many other Gulf Coast fortifications, Fort Gaines possessed gun emplacements well situated to defend against attacks from either land or water. By 1864 the garrison under Colonel Charles D. Anderson consisted of about 800 infantry and artillerymen, about half poorly trained local militia, and 26 heavy guns. Some of the garrison were of the Pelham Cadets, boys as young as 14 who ended up fighting about as well as any other irregular unit there.
[The Civil War] was a fearful lesson, and should teach us the necessity of avoiding wars in the future.
—Lieutenant General Ulysses S. Grant, Union Army, from his memoirs
Fort Morgan was a star-shaped pentagon of similar construction begun in 1819 and completed in 1834, although with a particular design feature that proved seriously hazardous during the battle. A three-story-tall, 10-sided barracks building in the center of the fort known as the “citadel” stuck up well above the surrounding parapet, lending both a perfect aiming point for Union gunners and providing a shrapnel hazard if hit during battle. To help protect the fort’s gunners, wooden traverses across the side and rear of the casements as well as sand-work glacis all around the exterior masonry walls were planned, although little work was completed before the Union attacks commenced. At the time of the last battle for control of the bay, Brigadier General Richard L. Page commanded a garrison of 400 regular army and artillery troops, and the fort mounted 45 guns of various sizes and calibers.
A third major defensive point centered around Fort Powell, a smaller earthwork redoubt named for the former commander of Fort Morgan, Colonel William Llewellyn Powell, who had died on duty in September of 1863. Guarding (and formally named for) the westernmost approach to Mobile Bay, Grant’s Pass, the post only mounted eight heavy guns and contained at its peak only 140 troops under Lieutenant Colonel James M. Williams, but it was able to stand up against repeated Union attacks with little damage.
Perhaps the most famous, and certainly one of the most effective, defense arrangements was the stringing of a series of “torpedoes” across the bay from Fort Morgan to Fort Gaines. The floating mines were built to explode when touched by a ship or gunboat and had enough power to shatter an armored ironclad’s hull. By the third year of the war, every water approach to Mobile Bay had at least one line of torpedoes across most of the passage, and the main ship channel was guarded by no less than 180 in three rows that covered the entire channel up to within 700 feet of Fort Morgan.
Following the Union Navy’s largely successful tight blockade of eastern Confederate-held ports, the Union Army campaigns in the Carolinas and Florida, and the utter failure of the weak Confederate Navy to do much more than snipe at the Union blockade, only the ports of Wilmington, North Carolina, and Mobile, Alabama, were left open to receive the critical supplies brought in by blockade-runners by the third year of the war. Wilmington was able to supply, barely, General Robert E. Lee’s Army of Northern Virginia, with a trickle of supplies sent westward to Lieutenant General Braxton Bragg’s Army of Tennessee. Mobile was the only remaining open port by 1864 still able to bring the majority of supplies in to the Western and Trans-Mississippi Theater armies.
Even more important than Mobile’s port to the supply and reinforcement of the Army of Tennessee was the city’s railroad network. After the loss of the rail center at Corinth, Mississippi, following the Shiloh-Corinth Campaign in the summer of 1862, Mobile became the only rail link between Confederate forces in the Eastern and Western Theaters. Its importance was underscored in early July 1862, when Major General John Porter McCown’s division moved through the city from Tupelo, Mississippi, en route to Chattanooga, Tennessee, to reinforce the garrison there. By later July, the rest of General Bragg’s 25,000-strong Army of Mississippi followed McCown’s route, abandoning northern Mississippi in order to try to save Chattanooga.
Despite the extreme value Mobile posed to the Confederacy as both a rail center and port, neither side made any serious early moves to take or protect it. The series of Confederate Western Theater commanders in the first years of the war consistently looked to Forts Morgan and Gaines to provide the majority of protection for the city, supplemented by small infantry and artillery redoubts and emplacements in and around the city to guard against the “unlikely” event of a land-based attack. Major General Benjamin Franklin Butler and Flag Officer (later Rear Admiral) David Glasgow Farragut determined to concentrate their Northern forces initially on New Orleans and the Mississippi River, leaving Mobile (and Pensacola) for a later attack.
A few months after Confederate troops had abandoned Fort Massachusetts on nearby Ship Island, Butler and Farragut moved to seize the strategically positioned island. On December 3, 1861, 1,900 Union soldiers stepped ashore to take back possession of the post 12 miles off the shore of Gulfport, Mississippi, providing the Union Army and Navy an ideal base from which to threaten the entire Gulf coastal region of eastern Florida, Alabama, Mississippi, and Louisiana. However, Mobile remained securely in Confederate hands for nearly three more years, with Farragut busy along the Mississippi River and the land forces concentrating on Vicksburg and the Mississippi interior. Prior to the 1864 battle, the only serious attack was a weak attempt by Commander David D. Porter to force a passage into Mobile Bay in the summer of 1862, easily repulsed by the rebels without any immediate Union follow-up.
Due primarily to its isolated location, well south of any other major city or supply depot, any military action at Mobile was probably going to be either purely naval or an amphibious landing heavily supported by naval gunfire. This was confirmed by the first action, in December 1861, when the part-ironclad (armor only protected the boilers, leaving the gun deck open and exposed to enemy fire) CSS Florida sailed out from Fort Morgan’s pier to engage the blockade steamer USS Huntsville near Sand Point. Typical for early-war encounters, naval or otherwise, both sides withdrew after firing a relatively few ill-aimed shots that did little or no damage, and subsequently both sides claimed victory.
In April 1862 the Mobile Bay naval commander, Captain Randolph, ordered the newly readied wooden gunboats CSS Morgan and CSS Gaines to sail out and try to break through the Union blockade “fleet,” which consisted of only two ships at the time. Even with this weak enemy force to attack, the two Confederate gunboats only fired a total of about a dozen shots before retreating at high speed back to the safety of their harbor. In the next two years, five other such small naval actions against the blockade fleet or the Confederate forts were mounted; all had the same negative results.
The most serious attack during this period, although actually only a feint to draw attention away from a Union Army attack toward Meridian, Mississippi, had Farragut sailing four gunboats and six “mortar schooners” (wooden small ships mounting heavy mortars that could stand off from the main action a bit and lob shells inside a fort’s walls) into Grant’s Pass. Over the course of five days of bombardment in February 1864, his ships fired about 2,000 shots and shells into the earthwork fort, killing one man and wounding five, including post commander James Williams. In exchange, the fort stood nearly intact with the little damage done being repaired in one day, and one of Farragut’s own mortar schooners was hit by Confederate gunners and nearly sunk. Although the channel had been seeded with torpedoes, and Union gunboats struck several, none exploded as expected. An after-action inspection revealed that marine worms had infested the wooden casks and rendered the triggers inoperative.
The Battle of Mobile Bay
With most of the Gulf Coast and Mississippi River now under Union control, Farragut’s next objective was to shut down the port of Mobile once and for all. Using his assembled naval force, his primary objective was to neutralize the three main Confederate forts and completely cut off the blockade-runners from a safe port. A separate army force under Major General Gordon Granger would land on Dauphin Island with about 1,500 men and attack the two forts there. To oppose the assault, Commander Page (3rd Brigade, District of the Gulf) could muster about 1,040 men in the three forts and their surrounding batteries.
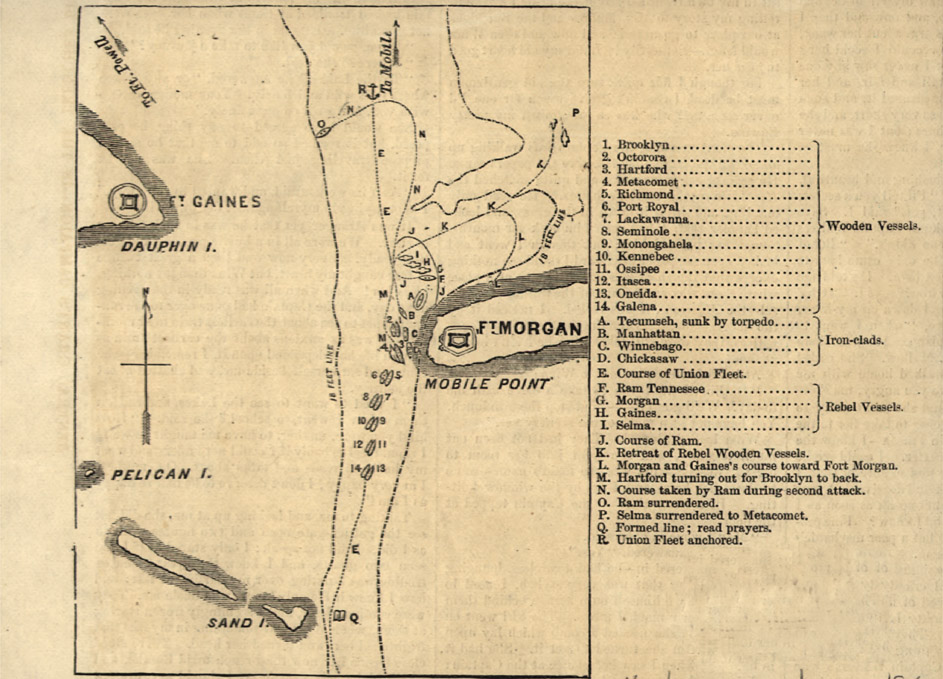
At dawn on August 5, 1864, Farragut began his attack. Fourteen wooden, lightly armored gunboats and four ironclad monitors sailed toward the main ship channel in a tight formation, the gunboats lashed together in pairs with the better-protected monitors alongside starboard (eastward) to protect them from Fort Morgan’s artillery fire. Well aware of the torpedoes strung across the channel, Farragut deliberately ran his small fleet close to Fort Morgan, attempting to sail through the narrow space between the fort and the first line of torpedoes, although at a terrible risk from near point-blank Confederate fire. At about 7 a.m. Farragut ordered his point vessel, the USS Tecumseh, to open fire, which was followed in short order by a concentrated fire from Page’s guns. For the next 45 minutes both sides kept up a blistering fire, but amazingly, although they were literally only a few yards apart, very little damage was done to either side.
One of Farragut’s major objectives was the sinking or disabling of the CSS Tennessee. As his fleet sailed past Fort Morgan, the USS Tecumseh swung slightly west to engage the Confederate ironclad awaiting her near the middle of the ship channel but almost immediately struck a torpedo, shattering her hull and sending her quickly to the bottom. Only 21 of her 114-man crew managed to escape. The wooden gunboat USS Brooklyn, next in line to the USS Tecumseh, slowed and started turning away from the lethal minefield back toward Fort Morgan. Confederate gunners cheered, then quickly loaded their guns with grapeshot and canister, preparing to rake the enemy decks as soon as they moved within range.
Farragut, lashed by his crew into the rigging of his flagship, USS Hartford (to keep him from being killed from falling to the deck if wounded while in his high observation post), allegedly screamed out to his helmsman, “Damn the torpedoes! Drayton! Ahead, full speed! Hard astarboard; ring four bells! Eight bells! Sixteen bells!” (there is much debate over whether he really said this famous quote) and thus ordered his own ship to take the lead. Moving at near maximum speed, the small Union fleet pushed through the torpedo belts without setting off any more, although several officers reported hearing fuses firing as their ships hit the floating mines.
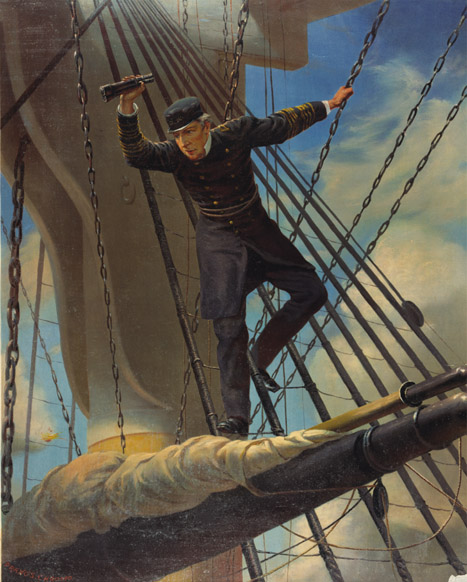
Lashed to the shrouds—Farragut passing the forts at Mobile, in his flagship, Hartford
For the South, Buchanan’s own fleet opened fire as soon as their guns were unmasked to the onrushing Union gunboats. While their shots raked the Union ships for several minutes before they were able to return fire, the Confederates definitely got the worst of the exchange. Within a few minutes the CSS Gaines was sinking from multiple shots below the waterline, the CSS Selma was run down by the USS Metacomet and forced to surrender, and the CSS Morgan soon broke contact and fled east to the safety of her namesake. Only the CSS Tennessee remained by 8 a.m. to threaten Farragut’s assault, and the Union fleet now safely past the forts quickly turned on the powerful but slow and ungainly ironclad.
The CSS Tennessee moved in for her own attack, but Farragut’s ships surrounded her and began maneuvering for ram attacks. At 9:25 a.m. the USS Monongahela, the USS Lackawanna, and Farragut’s own ship rammed the Confederate ship in turn, inflicting little damage but disrupting the gun crew’s ability to fire. Buchanan suffered a broken leg when an 11-inch solid shot struck the after port cover he was standing next to. In the meantime, the three surviving Union ironclad monitors had moved up alongside the CSS Tennessee and had begun hammering fire on her armored decks. At 10 a.m., with his steering gear shot away and his gun crews no longer able to return fire, Captain James D. Johnston surrendered his ship.
The short naval action resulted in 12 Confederates killed, 20 wounded, and 280 captured. Farragut reported a loss of 145 killed, 170 wounded, and 4 captured.
At the same time Farragut was racing through the main ship channel, Lieutenant Commander George H. Perkins aboard the USS Chickasaw, along with three other gunboats, moved up Mississippi Sound toward Grant’s Pass and opened fire on Fort Powell. Williams’s gunners returned fire, but once again, neither side suffered in the short exchange. The USS Chickasaw withdrew, along with the other gunboats, but returned alone just before noon and again late in the afternoon. This time her gunners were more effective, raking the fort’s exposed parapets with a hot fire and penetrating the bomb-proof. Convinced that a renewed bombardment the next day would result in his magazine being penetrated and exploded, Williams ordered his men to evacuate to nearby Fort Gaines during the night, setting fire to and destroying his post as he left.
Granger landed his troops on Dauphin Island late in the afternoon of August 3, and Page immediately requested reinforcements from the Mobile garrison. About 200 local militia and Confederate marines managed to slip past the Union fleet lying close by and get into the fort before Granger’s attack commenced. By midnight on August 4, the Union landing force had closed in enough to set up their artillery batteries and opened fire on Fort Gaines’s water battery as Farragut’s fleet sailed through the channel. Anderson ordered his own guns to open up on the Union battery, but with no apparent success.
Just after noon on August 6, the USS Chickasaw moved within range and began pounding the fort’s masonry walls. Little damage was suffered, but several patients in the post hospital were killed by flying debris. Before the infantry or even other Union gunboats could get involved in the fight, Anderson decided he had had enough. Showing a sad lack of leadership, Anderson first signaled Page over in Fort Morgan for instructions, consulted with two of Page’s staff officers, and was then presented with a petition signed by most of his own officers imploring him to surrender rather than fight on. With Page frantically signaling him to hold his post, Anderson raised a white flag and requested terms from Granger and Farragut. Into Union captivity went 864 officers and men, as well as 26 artillery pieces, a large amount of ammunition, and a year’s supply of food.
The early surrender of both forts caused a storm of protest in both Mobile and the Confederate high command. Area commander Page said publicly that the surrenders were a “deed of dishonor and disgrace to its commander and garrison,” and both Williams and Anderson were crucified in the Mobile press. Williams was quickly removed from command, although some responsibilities were gradually restored later. In all fairness, these officers faced a near impossible defensive position, bombarded from the sea, threatened by infantry by land, and cut off from any hope of continued resupply or reinforcement. When the CSS Tennessee surrendered, the last best chance for a naval victory was surrendered with her.
With the western approaches to Mobile Bay now secured, Granger and Farragut turned their attention on Fort Morgan. Granger’s heavily reinforced command, now numbering some 5,500 infantry and artillerymen, landed just east of the isolated Confederate fort uncontested on August 9. Page pulled his infantry inside the fort, obviously outmatched in an open land battle, and prepared for a long siege. Just before noon the Union fleet moved in and began shelling the fort; a few hours later a note was delivered demanding the unconditional surrender of the last Confederate outpost. Page adamantly refused, and Granger ordered his troops to close in on the fort.
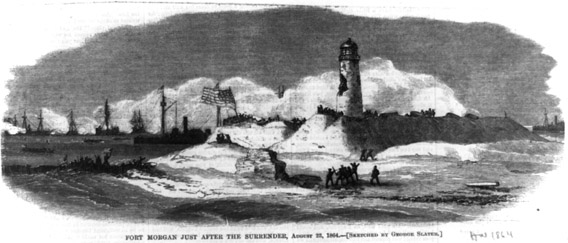
Fort Morgan just after the surrender, August 23, 1864
Rather than a headlong assault, Granger decided to slowly move his troops forward, building heavy artillery emplacements and siege entrenchments as they went. Farragut’s sailors had repaired the CSS Tennessee’s steering gear and, along with the three surviving ironclad monitors, began a heavy bombardment of the fort on August 13. Two days later the now close-in Union infantry and their heavy siege artillery joined in on the bombardment and sniping. For some unknown reason, Page refused his gunners permission to return fire, except for occasional, short barrages toward the Union infantry encampment.
Granger continued to bring in more heavy artillery, and by the morning of August 21 he was able to report 25 heavy artillery pieces and 16 siege mortars mounted and ready for action. That afternoon his gunners, joined by every Union monitor and gunboat, opened up a massive, pounding barrage on Fort Morgan. Page reported later that the barrage soon “disabled all the heavy guns save two … partially breached the wall in several places, and cut up the fort to such an extent as to make the whole work a mere mass of debris.” Although the heavy barrage lifted somewhat during the night, it resumed in full force at dawn the next day. Page was forced to admit that his command could not hold out much longer. He ordered what ammunition remained destroyed and his guns spiked, and he sent a message offering unconditional surrender to Granger. The formal surrender was signed on the afternoon of August 23.
Despite the rather heavy fighting that took place at Fort Morgan, Page reported only very light casualties: 3 killed and 16 wounded, with more than 600 marching into captivity.
While Page had fought off both Farragut and Granger for a few weeks, Major General Danny Herndon Maury, District of the Gulf commander headquartered in Mobile, hastily prepared the city for the coming invasion. He urgently requested reinforcements from Bragg and conscripted every available male in the city. Even with his officers rounding up anyone who could tote a rifle, by August 9 Maury still only had about 4,000 troops in entrenchments and batteries all around the city, a pitifully small force to resist the attack that all were sure was coming in days, if not hours.
However, neither Farragut nor Granger was in any particular hurry to attack Mobile. A waterborne reconnaissance on August 15 revealed to the Union admiral that the harbor defenses were far too strong for him to bring up his fleet within gun range and that an attack on the city would have to be primarily a land-based one. The Union commanders returned to Fort Morgan and sent word to Washington that they would need a serious number of reinforcements to overcome the Confederate defenses and take Mobile.
It is well that war is so terrible, lest we grow too fond of it.
—General Robert E. Lee to Lieutenant General James Longstreet, both of the Confederate Army, December 13, 1862
Maury sent word that he, too, badly needed large numbers of reinforcements, but he knew that his prospects for getting them were slim. He spent the next few months fortifying the city as well as possible, centering the defenses around a series of fixed and floating batteries, rebuilt or reinforced entrenchments and redoubts, and even building up and improving an old Spanish fort on the eastern shore of the bay, known, appropriately, as Spanish Fort. Outside of ordering out a handful of naval and land-based raids and skirmishes on the Mobile defenses, both Farragut and Granger seemed perfectly content to wait in Fort Morgan until reinforcements or other orders arrived.
Late in 1864, the commander in chief of all Union armies, Lieutenant General Ulysses S. Grant, was not at all convinced that Mobile was worth the intense manpower needed to take it, but he wanted Granger to move his force north and take Selma and Montgomery. These two cities brought under Union control would help a planned cavalry raid through Alabama and Georgia by Major General James Harrison Wilson, even then on his way south through Tennessee. Granger was promised more troops and ordered to bypass Mobile if a short campaign was insufficient to take it.
After many delays, Granger’s reinforcements finally arrived in mid-March 1865, and shortly after that the Union columns moved out. Major General Edward Richard Sprigg Canby moved north with about 32,000 troops from the base at Fort Morgan on March 25. A second column led by Major General Frederick Steele marched out of Fort Barrancas at Pensacola, Florida, on March 20 with about 13,000 troops. At this time on the Confederate side, Maury could muster a total of about 9,000 soldiers, militia, conscripts, and sailors to man the 209 artillery pieces and miles of trenches and redoubts around the city and upper bay.
As soon as he was notified of the Union columns’ route of approach, Maury moved all his infantry to the eastern shore, into Spanish Fort and nearby Fort Blakely. Brigadier General Randall Lee Gibson took over command of Spanish Fort, with a garrison consisting of his own Louisiana Brigade, with about 500 men, another 950 infantrymen from the Alabama reserves, and about 360 artillerymen to man the 6 heavy guns, 14 field guns, and 12 Coehorn mortars. Brigadier General St. John Richardson Liddell at Fort Blakely was in a slightly better position, with a peak force of about 2,700 troops manning a 3,000-yard-long line of entrenchments and redoubts.
Canby came on fast, approaching Spanish Fort early on the morning of March 27. To give his engineers a little more time to improve their emplacements, Gibson ordered Lieutenant Colonel Robert H. Lindsay to take about 500 men and hit the Union column before they could deploy for battle. Lindsay assaulted through the Union vanguard, but he withdrew when the column’s forward regiments began deploying in line of battle. His delaying tactic worked, however, forcing Canby to delay several hours, getting his forces reorganized and moving again. By nightfall Canby’s men were starting to establish siege lines only 1,000 yards from the fort, with some forward skirmishers less than 300 yards from Gibson’s line.
Most siege operations during the war tended to be all-artillery affairs, with infantry on both sides primarily just trying to dig in deep enough not to be hit. However, from the morning of March 28 on through the end of the siege, Union sharpshooters kept up a steady and accurate fire inside the fort’s walls, small infantry attacks were launched by both sides on the other’s trench lines, and Canby’s men steadily extended their line of entrenchments until they were nearly to the walls of the Confederate fort itself. The artillery kept up a steady barrage through it all, with one massive two-hour barrage on April 4 coming from no less than 40 heavy siege guns and about 12 siege mortars.
The worst bombardment of all came on April 8 at sundown, when 53 Union heavy siege guns, joined by 37 field guns and mortars and Union gunboats just offshore, started a concentrated fire directly on the fort. Ironically, Gibson had planned his own barrage for that same date and time, but his gunners were only able to crank off a few rounds before the Union barrage drove them to their shelters. During the heavy barrage, troops from Colonel James L. Geddes’s 3rd Brigade leading Brigadier General Eugene Asa Carr’s 3rd Division (of Major General Andrew Jackson Smith’s XVI Corps) assaulted the left of the Confederate line. Overrunning the first line of entrenchments, they were nearly to the fort itself when a rebel counterattack led by Lieutenant Alfred G. Clark with about 100 men stopped the assault before it could overrun the parapet walls.
The Confederate Flag
The first Confederate flag, or Stars and Bars, incorporated two horizontal red stripes separated by a white stripe. It included seven white stars in a blue field. This flag was adopted in March 1861 and raised over the Confederate capitol, then in Montgomery, Alabama, by the granddaughter of former U.S. president John Tyler. But this flag caused confusion at the Battle of First Bull Run in Virginia because it looked very much like the Union’s Stars and Stripes. Following the battle, General Pierre Gustave Toutant Beauregard designed a battle flag for the Confederate Army of Northern Virginia. This flag, erroneously referred to today as the Confederate Stars and Bars, was a red square with a blue St. Andrew’s cross and 13 superimposed white stars (representing the 11 seceded states, plus the “enemy-held” states of Kentucky and Maryland).
A variation of this flag was used by armies in the Western Theater, being the same basic design but rectangular rather than square. This same flag was used by the Confederate Navy and called the “Naval Jack.” This is what many still call the Confederate flag, and most historians refer to as the “Southern Cross.” In May 1863 the Confederacy adopted a new national flag to replace the first Stars and Bars. It was white with the more-familiar battle flag in the upper left corner.
This flag is sometimes referred to as the “Stonewall Flag,” as one of its first uses was to drape Lieutenant General Thomas Jonathan “Stonewall” Jackson’s casket after he was mortally wounded following the Battle of Chancellorsville. Also known as the “Stainless Banner,” this flag showed mostly white unless flying in a stiff breeze and was frequently mistaken for a flag of truce or surrender, so a new design in 1865 added a red bar on the flag’s white edge. This last flag design came about too late in the war to see much actual service. Today, however, the Army of Northern Virginia’s battle flag (or the western variation) is the one most people identify as the “Confederate flag.”
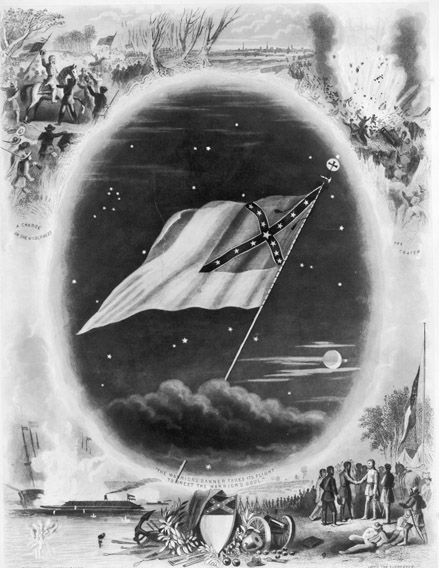
Confederate flag surrounded by battle scenes
Clark was killed in the counterattack, but his small command managed to stop the Union assault. Aware that he was not going to be able to hold against a renewed attack, Gibson ordered his gunners to spike their guns and gradually withdrew his command out of the fortification walls. During the night the remnants of his force worked their way across the marshes to Fort Blakely, then were transferred by steamboat across the bay into Mobile. While he was able to take most of his 395 wounded out with him, he left behind 93 dead and about 750 missing or captured.
While Canby advanced on and laid siege to Spanish Fort, Steele moved north in a feint on Montgomery, then west to attack Fort Blakely. Early on April 1 his vanguard, Lieutenant Colonel Andrew B. Spurling’s 2nd Cavalry Brigade, encountered Captain J. B. Hart’s 46th Mississippi Infantry Regiment, deployed about 5 miles east of Fort Blakely as skirmishers. Spurling’s cavalry immediately charged, driving the small Confederate command nearly the whole way to the fort, and captured 74 of the 100 men as well as the regimental colors. Their charge was only halted by concentrated fire from another regiment posted outside the fort, fewer than 100 Missourians from Colonel James McCown’s (Cockrell’s) brigade.
Throughout April 1 and 2 Steele’s advancing command came into line and launched into a running fight with Liddell’s advance guard, gradually pushing them to within a half-mile of the fort, where both sides dug in for another protracted siege. The next week was spent beefing up the lines and launching isolated attacks, none of which gained any territory from the other. When Spanish Fort fell on the night of April 8, Canby moved his infantry north and ordered Steele to join in a general attack the next day. At 5:30 p.m. on April 9, four Union divisions jumped out of their trench line, leading a mass assault of more than 16,000 infantrymen on the small Confederate fort. Within a few minutes they completely overran Fort Blakely, capturing 3,423 Confederate soldiers in the process.
The siege at Fort Blakely broke the back of the entire Confederate command at Mobile. Casualty reports are apparently missing, but fewer than 200 Confederate soldiers escaped into the bay and the relative safety of the remnants of the Mobile fleet. All three generals present were captured, while Canby and Steele’s command lost a combined total of 113 killed and 516 wounded.
The last two batteries remaining under Confederate command, Battery Huger and Battery Tracy, remained, blocking any Union advance toward Mobile until nightfall on April 11. Their ammunition exhausted, Maury’s last artillerymen spiked their guns and then escaped by steamboat back to Mobile, where they joined the retreat north toward Montgomery. These were the last shots fired in the last battle of the Western Theater; final commander of the Department of East Louisiana, Mississippi, and Alabama, Lieutenant General Richard “Dick” Taylor, met with Canby at Citronelle, Alabama, on May 2 to discuss surrender terms. The last 4,500 Confederate soldiers under his command formally surrendered on May 4, 1865 (some sources state May 8), nearly a month after Lee had surrendered in Virginia and more than a week after Johnston had surrendered in North Carolina. Only General Edmund Kirby Smith held out longer, surrendering his Trans-Mississippi Department on May 26, ending all formal military action in the war.
Mobile is at the extreme southwestern corner of Alabama, just a few miles from the Mississippi state border. I-10 connects Mobile with Biloxi and New Orleans to the west and Pensacola and Tallahassee to the east. I-65 runs northeast out of the city to Montgomery. Battle areas of the Mobile campaigns (naval- and land-based) are nearly all outside the city proper; Spanish Fort and Fort Blakely are across Mobile Bay just off I-10 East, and Forts Morgan and Gaines are south of the city on the Gulf of Mexico coastline.
The two existing coastal forts offer an interesting journey in turn. We suggest you follow AL 193 south out of the city (intersection with I-10 West at exit 17) about 20 miles to Dauphin Island. Turn left at the stop sign (end of AL 193) onto Bienville Road and travel about a mile to Fort Gaines. After your visit there, backtrack about one-quarter mile to the car ferry landing, near the fishing boat ramps. A privately run car ferry runs about every 90 minutes across the bay to Pleasure Island and Fort Morgan State Park (251-861-3000). The ferry has a range of prices from $5 to $35, depending on your mode of transportation, and some discounts are offered for round-trip passages. Both forts are (barely) within walking distance of the ferry landing, providing the weather cooperates and you are in reasonable shape.
Traveling east out of Fort Morgan State Park, the small town of Gulf Shores is 22 miles away on AL 180. Turn left onto Baldwin CR 59 in the main business district, which intersects I-10 about 25 miles north at exit 44. Fort Blakely and Spanish Fort are about 8 miles west and Mobile is 15 miles west on the interstate from this intersection, allowing an interesting, if lengthy, roundabout tour of the battle areas.
Originally located roughly near where AL 193 crosses Grant’s Pass before it enters Dauphin Island, Fort Powell no longer exists, but the tour brochure at Fort Gaines points out its location, barely visible from one bastion.
Admiral Raphael Semmes Statue
Government St. at Water St.
Mobile, AL
The admiral was the famed commander of the CSS Alabama, the most successful Confederate commerce raider, which sank 57 Union ships before being shot to pieces and sunk by the USS Kearsarge off the coast of France.
Fort Conde Welcome Center
150 S. Royal St.
Mobile, AL
(251) 208-7304
While all of the Civil War actions took place outside the city of Mobile proper, there are still some worthwhile sights there for the dedicated buff. For a complete listing of this historic city’s sights and attractions, most of which lean toward the antebellum, contact the welcome center, which can also supply maps (absolutely necessary here).
Fort Gaines Historic Site
51 Bienville Blvd.
Dauphin Island, AL
(251) 861-6992
www.dauphinisland.org/fort.htm
This well-preserved and lovingly cared-for fort was used as a coastal defense outpost during the Spanish-American War and both world wars, and later as a Coast Guard base, modified to suit each new role. Now owned and operated by the Dauphin Island Park and Beach Board, it is very well preserved and managed and an absolute delight to visit. An excellent brochure outlines the self-guided tour, and one of the “disappearing” gun mount magazines has been converted into an unusual but well-presented museum of uniforms, weapons, maps, photos, and documents spanning the 140-year history of the fort.
The old guardhouse next to the main sally port (entrance) contains a rather extensive collection of souvenirs as well as a nice collection of books, and some of the former garrison would no doubt be amused to note that their former commandant’s office on the other side of the sally port now houses the restrooms. The tour brochure notes the location of Fort Powell, which no longer exists.
The fort is located near the end of Bienville Road, about 2 miles east of the intersection with AL 193 and about a quarter-mile east of the car ferry port.
Fort Morgan State Historical Site
51 AL 180 West
Gulf Shore, AL
(251) 540-5257
The basic shape and masonry walls of Fort Morgan still exist more or less intact, but the post was heavily modified for service in the Spanish-American War and both world wars. Now operated by the Alabama Historical Commission, the site includes several postwar buildings used as part of a radically expanded post at the turn of the 20th century, several artillery pieces from various periods of the post’s history, and a self-guided tour of the partially restored fort.
As a general rule, we have found that the lower the level of ownership and management of a historic site (i.e., federal is high, local historical commission is low), the more informed, helpful, and friendly the staff is, and accordingly the more pleasant the visit is. Unfortunately, Fort Morgan is not a good example of this rule. On past visits, we have encountered incorrectly labeled or attributed signs and markers, a very confusing arrangement for paying entrance fees, poorly maintained and dangerous stairwells, and a distinct shortage of basic amenities. Reluctantly, we must recommend that perhaps the best visit of the fort and battle area can be taken in while just offshore aboard the Mobile Bay Ferry.
Group rates are available. You are supposed to pay your entrance fee about a half-mile east of the site at the same gate where you pay your fee for the Mobile Bay Ferry (which is only collected on the Fort Morgan side for trips either way), although there are no signs to indicate this, and you must inform the fee collector of your intentions. There is a single set of restrooms on-site next to the main parking lot and a single soft drink machine in a tiny, unmarked brick building next to the fort’s sally port (under the flagpoles). A small museum with maps, photos, and artifacts shares space with a large gift shop near the main entrance. The fort is open daily.
Historic Blakeley State Park/Spanish Fort
34745 AL 225
Spanish Fort, AL
(251) 626-0798
This 3,800-acre park is the site of the last major battle of the war, in April 1865. Although none of the earthworks or entrenchments still exists, there are several paths through the woods that run through the battle area, and two observation platforms overlooking the Tensaw River, where Battery Huger and Battery Tracy were located. A battle reenactment is held here the first weekend in Apr each year. Nearby Spanish Fort is now a heavily built-up suburb of Mobile; no trace of the old fort remains. The park is open daily.
The Museum of the City of Mobile
111 S. Royal St.
Mobile, AL
(251) 208-7569
This museum houses a truly massive collection of artifacts detailing the long history of Mobile. A nice Civil War–era exhibit contains a small but well-presented weapons display.
USS Alabama Battleship Memorial Park
2703 Battleship Parkway (Highway 90/98)
Mobile, AL
(251) 433-2703
No, this isn’t Semmes’s famed warship, which lies in the murky depths 3 miles off the coast of Cherbourg, France. This is the equally famous WWII battleship, now nicely preserved as a floating museum. The decks, massive main-gun turrets, mess rooms, berthing compartments, bridge, and officers’ quarters are open for tours. Also in the encompassing 100-acre park is the USS Drum, a WWII fleet submarine also open for tours, as well as a rather eclectic selection of combat aircraft, including a B-52D, B-25 Mitchell, P-51D Mustang, F4U Corsair, and even an A-12 (the interceptor version of the super-secret SR-71 Blackbird).
This attraction has absolutely nothing to do with the Civil War history of Mobile, but it is nearly irresistible to the historical traveler and an absolute must for any military buff. Park hours vary by season. The park is across the Mobile River from the downtown area; take I-10 east to exit 27 and follow the signs.
There are very few lodgings available near either fort, and those on the two islands tend to be the very high-priced resort variety with lengthy minimum stays required. We recommend you look for more reasonably priced establishments a few miles north in the metro Mobile area, particularly near the I-10 intersections, and we have noted a few of the better choices.
| Gulf Breeze Motel | $–$$ |
1512 Cadillac Ave.
Dauphin Island, AL
(251) 861-7344
(800) 286-0296
http://gulfinfo.com/gulfbreezemotel/index.html
While most facilities on the Gulf Coast area of Mobile are expensive resorts, this small motel is a significant exception. The two-story, blue-and-white facility houses 31 fairly good-size units, each of which contains a refrigerator as well as the usual amenities. Less than 2 miles from Fort Gaines (turn right instead of left at the water tower, where AL 193 ends on the island), Gulf Breeze is just up the street from the beaches and an 18-hole golf course; a boat launch and slips are on the grounds. A bit unusual is the 48-hour cancellation notice needed for reservations (so your credit card is not charged for a night’s stay), and the check-in time is quite early, at 1 p.m. The island is very pleasant, so if you wish to stay for a week, one night of your stay is free. Rates vary with the season and accommodations.
| The Gulf Shores Plantation | $$–$$$$ |
805 Plantation Rd.
Gulf Shores, AL
(251) 540-5000
(800) 211-5053
If you want to go whole hog in an upscale resort, this is the place to do it. Located very conveniently between Fort Morgan and Gulf Shores along a rather long and mostly deserted island road, this full-service resort has 325 rooms arranged as two- to five-bedroom condos and is rated three-diamond by AAA. All the rooms feature kitchens. There are six swimming pools on the property, as well as a golf course, lighted tennis courts, a sauna and Jacuzzis, and a game room for the kiddies. No pets are allowed. Most restaurants on this stretch of Gulf Shores are few and far between, but there is a Pizza Hut on the property as well as a beachside cafe. Isolation has its advantages, as the beach is practically a private one.
As for the lodgings, we recommend looking for dining establishments off the two islands, as the ones nearest the two forts tend to be overpriced and not really superior to those closer to the city, with one significant exception.
| Lighthouse Bakery | $ |
919 Chaumont Ave.
Dauphin Island, AL
(251) 861-BAKE (2253)
This small bakery and sandwich shop is fairly well hidden away on a side street across from the Ship and Shore Store and facing the Baptist church. It appears sparkling new and caters to both the resort and fishing crowds. The best time to visit is at breakfast, when the pleasant staff has fresh, large cinnamon rolls, danishes, and muffins ready (well before most historians of our acquaintance have their eyes cranked open!), as well as a variety of ever-changing daily specials.
Cajun roast beef, smoked turkey, and turkey pastrami sandwiches are available for dinner or early suppers, as well as a variety of other meat, cheese, and salad sandwiches. This is a “for-real” bakery, and fresh breads and rolls are available daily. Try to visit on a Thursday, when the to-die-for pepperjack cheese rolls are offered. The popularity this bakery has already engendered is reflected in the notice that you must call ahead to reserve one of the French bread loaves, available on Saturday.
Another highlight is the freshly ground and properly prepared coffees—a hearty espresso or “real” cappuccino is highly recommended.