Chapter 4
RELOADING THE REVOLVER
If you’re going to use a revolver as a defensive tool you need to acknowledge that you may be more likely to need a rapid reload than you would if using an autoloader. Though I’ve not unearthed any cases of revolver shooters being injured or killed because their gun had insufficient capacity, it’s not outside the realm of plausibility that five or six rounds could prove inadequate - particularly in this day of multiple-assailant attacks. This lack of capacity is one if the revolver’s few weaknesses, but luckily it’s one that can be addressed through proper technique.
MINIMIZING RELIANCE ON FINE MOTOR SKILLS
The revolver is a difficult arm to reload under the best of conditions. A number of things need to be done in sequence to achieve an efficient reload, and all of them require a certain amount of dexterity and tactile sensation - the very things that are diminished during the body’s reaction to a lethal threat.
It’s in our interest, then, to adopt a reload technique that minimizes that reliance on fine dexterity.
Note that I said minimizes, not eliminates. We can’t get around the fact that we have to interface with the mechanism. Some trainers use that as an excuse to promote techniques that are extremely dexterity-intensive, maintaining that because you have to manipulate the cylinder release you might as well resign yourself to doing everything in ways that demand fine muscle control.
The fact is that we need to use the cylinder release; there’s just no other way to get the cylinder open and cleared for the reload. There are other parts of the reload sequence, however, where we do have the choice of techniques that are somewhat less reliant on fine motor skills.
The ultimate in efficiency would be to make the entire process of reloading as failure-proof as possible. Of course that’s not possible, simply because revolvers just aren’t designed that way. However, saying that because we must use fine motor skills in one case means that we should use them in another is a cop-out; we should always strive to make all techniques, including the reload, as resistant to failure as possible. That means reducing to the greatest degree the reliance on fine motor skills wherever possible.

A case caught under the extractor is usually caused by poor reload technique, and wastes any time that may have been saved by trying to go faster.
Lack of dexterity isn’t the only issue that interferes with the reload, however. An improper reloading technique can actually jam the revolver, in some cases so severely that the only way to clear it is the use of a tool and some time. These are exactly the things that are in short supply during an attack, so it behooves you to learn a technique that reduces as much as possible the chances of that happening.
The reload procedure I recommend does both of those things: reduces the reliance on fine motor skills and reduces the chances of a reloading-related failure to the greatest degree. It also works well with the body’s natural reactions and capabilities, making it ideal for the chaos which accompanies a criminal attack. We’ll cover that more in depth in Section Two.
There are many different ways to reload the revolver, and some very respected trainers have reasons for advocating their pet methods, but I believe what follows is the most efficient method for dealing with the sudden realization that you have no more bullets in your wheelgun. I also believe that I can help you understand why it’s the most efficient.
(I’ll also refer you to the chapter on efficiency in Section Two for a full discussion of the underlying concept - and why it’s not the same as speed.)

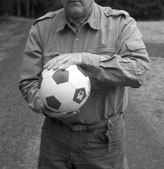
How would you switch your hands on a soccer ball? Just rotate your forearms! This is the basis for the Universal Revolver Reload.
THE UNIVERSAL REVOLVER RELOAD
This has come to be called the “universal revolver reload” (URR), because it works under the greatest range of conditions and works identically whether it’s used with a Colt, Smith & Wesson, Taurus or Ruger revolver.
The basis of the URR is a common, large-muscle-group motor movement, one you’ve no doubt done many times in your life. Pretend you’re holding a basketball in your hands, left hand on the bottom and right hand on the top. How do you reverse the position of your hands without removing them from the ball?
Simple - you just rotate your wrists and let the ball rotate in your hands. It’s a simple, gross motor movement primarily involving the large muscles of the forearm. This simple, intuitive action is the basis of the Universal Revolver Reload.
The URR uses the weak (left) hand to simply hold the cylinder, while the more dexterous strong hand performs the tasks that require fine motor control.
Which hand to do what?
There are those who suggest that it’s more efficient to keep the revolver in the shooting hand while reloading, largely because it’s ever so slightly faster. Faster it may (or may not) be, but it certainly ignores anatomy (and the very real effects of the body’s natural reactions in a lethal encounter; more about that later).
If you’re like most people you have a strong hand and a weak hand, and your weak hand is probably significantly less able to do precise work than your strong hand. (Even those whose hands are very close in ability find that when they need a high level of precision or dexterity, they use one hand in preference to the other.) We also know that fine motor control degrades under stress, and asking your weak hand to do a fine task under trying conditions is probably not the best way to get it done efficiently.
Relegating the most capable hand to merely cradling the empty gun while performing the most delicate parts of the operation with the hand least suited to doing them is probably not a recipe for success.
I believe a good defensive reload technique must use the strongest, most experienced hand to do the hardest task: getting fresh rounds into their chambers. Relegating the most capable hand to merely cradling the empty gun while performing the most delicate parts of the operation with the hand least suited to doing them is probably not a recipe for success.
This is why the universal revolver reload has the weak hand do the simple tasks while the strong hand does the complex ones.
As you recognize the need to reload, take your finger off the trigger and lay it on the frame of the revolver, above the trigger. Your eyes should remain on the threat; you should practice reloading the revolver without needing to watch the process.
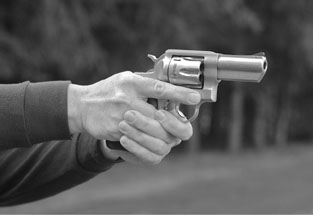
When it’s time to reload, take your finger off the trigger and lay it on the frame of the revolver, above the trigger.
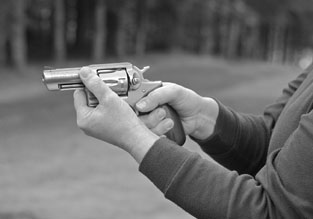
Move your support hand forward so your thumb is on the frame in front of the cylinder and your two middle fingers are touching the cylinder on the opposite side.
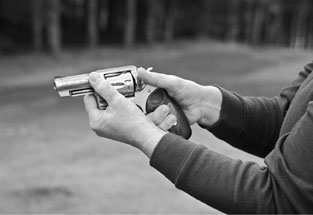
Extend your shooting hand thumb straight forward toward the muzzle, and allow the gun to rotate to the right.
As you bring the gun back toward your body for better strength and control, move your left (support) hand forward so that your thumb is on the frame in front of the cylinder, and your two middle fingers are touching the cylinder on the opposite side.
At the same time simply extend your shooting hand thumb straight forward toward the muzzle. Regardless of whether you have a Colt, Ruger or Smith & Wesson, simply point your thumb forward. Just as you did with the imaginary basketball, you’re going to use your wrists and forearms to rotate the gun to the right. Allow the gun to rotate in your grasp.
As the muzzle rotates toward a vertical position, the cylinder release and your thumb will make contact, and as the gun continues to rotate it will push the release into your relatively stationary thumb. This will result in the latch being depressed without a lot of effort on your part. Whether you have a Colt, Smith & Wesson or Ruger doesn’t matter - just let the gun rotate the release button into your thumb. A Smith & Wesson will release very early in the rotation, a Ruger a little later, and a Colt very late. No matter when that happens, let the gun do the work for you.
As the cylinder unlatches, the fingers of your left hand will naturally apply pressure against the movement of the gun to open the cylinder. Remember: it’s the movement of the gun against your fingers that does the work. As the muzzle comes to the vertical position, just let the gun rotate around the middle fingers of your left hand thus pushing the cylinder fully open. Grasp the cylinder between your thumb and fingers to immobilize it, and remove your right hand from the grip.
Immobilizing the cylinder this way makes it very difficult to bend the crane (the arm on which the cylinder rotates) when ejecting the cases or inserting a push-to-release speedloader. It also keeps the cylinder from rotating when using the twist-to-release style of speedloader.
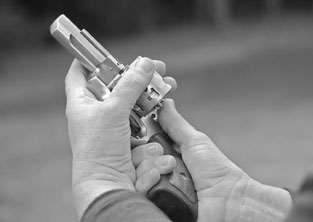
The movement of the gun against your fingers does the work. As the muzzle comes to the vertical position, let the gun rotate around the middle fingers of your left hand, pushing the cylinder fully open.
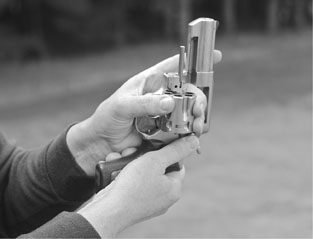
Grasp the cylinder with the fingers and thumb of the support hand, and remove your right hand from the grip.
Up to this point you’ve used primarily large muscle groups and gross motor movements, which are very resistant to degradation during the body’s natural response to a threat. Those natural reactions are the very reason this reloading method exists.
Flatten your right hand and swiftly strike the ejector rod one time with your palm. This accelerates the brass and tends to throw it clear of the cylinder, even with short ejector rods. Velocity is more important than force, and it’s important that you only strike the ejector rod one time. If there are any cases which fail to clear the cylinder, multiple ejections will not clear them but will significantly raise the risk of a case-under-extractor jam. The combination of the cylinder pointing at the ground, the quick extractor strike, and striking only once virtually eliminates the risk of such a jam. (If for some reason there are cases that don’t clear, you can pick them out later without danger of a jam.)
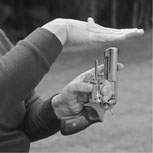
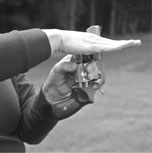
Strike the ejector rod one time with your palm. Velocity is more important than force, and it’s important that you only strike the ejector rod one time only.
This action makes use of proprioception, which is the body’s natural ability to locate its limbs in free space. Proprioception is why we can walk without watching our feet; it’s why we can touch our noses with our fingers when our eyes are closed; it’s why we can tie an apron behind our back. It’s as reliable a sense as we have. To eject the casings, all you have to do is bring your hands together; since the ejector rod is in the middle of the hand that’s holding the cylinder, when your hands come together the rod will be depressed; you can’t help but do it! If you were holding the gun any other way you’d need to figure out a method of locating the ejector rod so you could operate it. This way, all you have to do is bring your hands together and the job is done.
Rotate the muzzle toward the ground, bringing the gun down to the mid-abdominal level. Your elbow should be tight into your side; if you were to move suddenly, the gun should stay immobile relative to your abdomen.
As the muzzle comes down, your right hand simultaneously retrieves your ammunition - speedloader, SpeedStrip or loose rounds. Insert the rounds into the cylinder; proprioception again works in your favor, allowing you to get the fresh ammunition to the cylinder without needing to look. Again, all you need to do is bring your hands together and the ammunition will contact the cylinder; this would not be the case if you that cylinder wasn’t being held in your palm.
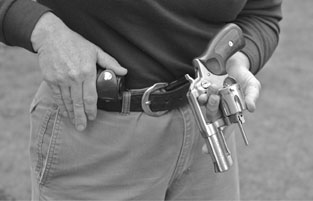
Rotate the muzzle toward the ground, keeping your support-arm elbow tight to your side, simultaneously retrieving your ammunition with your right hand.
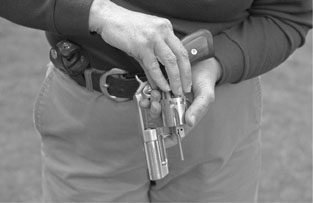
Insert the rounds into the cylinder.
To close the cylinder, simply roll your hands toward each other as if you were closing a book. The revolver is now recharged; all you need to do is bring your support hand back and re-establish a good shooting grip.
Remember to let the gun do the work by letting it rotate in your hands. You don’t have to think about searching for the release catch or forcibly pushing the cylinder open or stick your fingers into the frame window - the natural movement of the gun in your hands will do that for you.
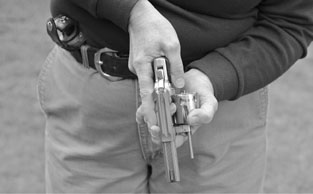
Once the rounds are in the cylinder, reestablish your firing grasp.
SPEEDLOADER TECHNIQUE
The most efficient way to recharge your revolver is to use a speedloader. The speedloader inserts all rounds into the cylinder simultaneously and greatly reduces the fiddling necessary to get bullet noses started into their chambers.
The speedloader really comes into its own when paired with the Universal Revolver Reload. With one hand holding the cylinder and the other handling the speedloader you can take advantage of proprioception; all you need to do is to bring your hands together and the speedloader will be right on top of the cylinder where it needs to be. Reloading in the dark or while keeping your eyes on your threat is more efficiently accomplished with the speedloader than with any other method.
Like anything else, there is a technique to using the speedloader. Poor speedloader technique can slow the reload significantly. Here’s what I’ve found to be the best way to use one.
When you retrieve your speedloader, it’s important to grasp it by the body, and ideally so that your fingers align with and extend just past the bullet noses. This slightly enhances the effect of proprioception and makes it easier to handle the speedloader. If you don’t get it exactly right, don’t worry; the technique won’t fail if your fingers aren’t in exactly the right place. The most important thing is to grasp the speedloader by the body, not by the knob!
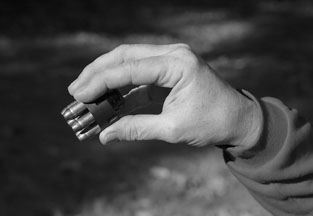
When retrieving the speedloader, the most important thing is to grasp it by the body, not by the knob.

As you bring the hand with the speedloader toward the one that is holding the cylinder, the speedloader will naturally end up over the chambers.

As the bullet noses come into contact with the cylinder, simply jiggle the speedloader by twisting it very slightly and very quickly clockwise and counter-clockwise.
As you bring the hand with the speedloader toward the one that is holding the cylinder, proprioception ensures that the speedloader will naturally end up over the chambers. Just bring your hands together.
(Some trainers advise, and I used to teach, that the tips of your fingers can make contact with the edge of the cylinder to help align the rounds with the chambers. I’ve found that’s not necessarily true, particularly if your initial grasp of the speedloader doesn’t leave your fingertips in front of the bullet noses. Instead, I now teach to simply bring your hands together - the speedloader will be in just the right position automatically.)

Once rounds have dropped into the chambers, release them from the speedloader.
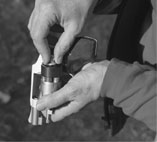
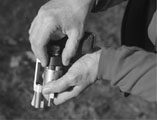
With an HKS or similar speedloader, twist the knob to release the rounds.
Sometimes you’ll get lucky and the bullet noses happen to line up with the chambers; other times they’ll line up on the metal between the chambers. The solution is simple: as the bullet noses come into contact with the cylinder, simply jiggle the speedloader by twisting it very slightly and very quickly clockwise and counter-clockwise. The bullets will drop into the chambers without further work on your part. (This is a fine motor skill, which validates my insistence on using your most dexterous hand to do the job.)
After the rounds have dropped into the chambers, release them by whatever method your speedloader brand requires. If you’re using a Safariland or SL Variant, simply push the body of the speedloader toward the cylinder and the rounds will release.
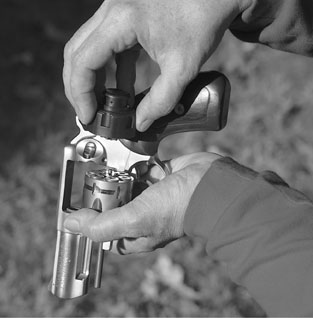
Pull the speedloader straight back to make sure all of the rounds have cleared . . .
If your speedloader is an HKS or similar design, insert the rounds into the cylinder, then grab the knob and twist it to release the rounds.
As the rounds drop from the speedloader, pull it straight back out to make sure all of the rounds have cleared, then drop it over the side of the gun. This eliminates another failure point of the reload procedure: rounds binding in the loader.
It’s not uncommon to have the speedloader tilt just a bit and cause a round or two to bind inside the loader. When this happens the round(s) don’t clear the loader, and if you attempt to close the cylinder you’ll trap that round(s) and the speedloader against the frame of the gun. You’ll then need to open the cylinder, grab the speedloader, shake the round(s) loose and finally finish the reload. Yes, it’s time consuming and aggravating, which is why I strive to avoid it by lifting the loader and allowing the rounds to drop free, then tossing the speedloader away.
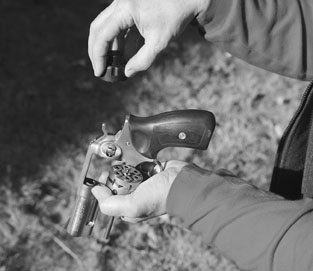

… then drop it over the side of the gun.
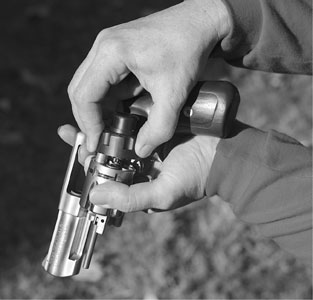
Tilting the speedloader just a bit can cause a round or two to bind inside the loader.
SPEEDLOADER RECOMMENDATIONS
The two most common and widely available speedloaders on the market are the Safariland, which use a push-to-release mechanism, and the HKS, which releases by turning a knob. (There are other examples of each style, such as the push-type SL Variant and the turn-type Five Star, but Safariland and HKS are by far the most readily available. They’re the least expensive in their respective categories as well.)
In general I much prefer the Safariland, simply because they’re more intuitive in use. You’re already grasping the speedloader by its body and pushing the rounds into the cylinder; releasing the rounds from the Safariland is a simple continuation of that movement. The HKS style, on the other hand, requires you to release your grasp of the body, find the knob and grab it, then twist it in the proper direction to allow the rounds to drop into the cylinder. I don’t consider that as intuitive as simply continuing pushing the way you’re already pushing.
I’ve also found that the Safariland speedloaders, when properly loaded, are more secure. They’re less likely to accidentally release in a pocket or when dropped.
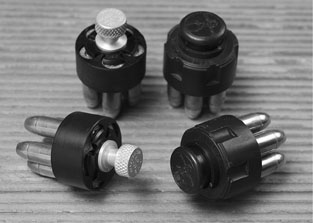
Author feels Safariland speedloader on left is more intuitive in use and more secure than HKS on right.
LOADING THE SAFARILANDS
Properly loaded, I’ve never had a Safariland Comp I or Comp II speedloader accidentally release - even when purposely dropped and kicked into a concrete wall, a demonstration which I’ve done many times. Some shooters, however, have reported exactly the opposite. The difference between my experience and everyone else’s? How the things are loaded.
If you follow Safariland’s loading instructions, accidental release is far more likely.
I’ve learned the hard way that if you follow Safariland’s loading instructions accidental release is far more likely. Safariland says to put the rounds into the speedloader, then invert the assembly onto something like a table so that the bullet noses are resting on a hard surface. The speedloader’s knob is then pushed in and turned to lock in the rounds. This is where the problem occurs.
Normal manufacturing tolerances for ammunition allow for a certain variance in bullet length and in the overall length of loaded rounds. It’s possible to get a round in which the bullet is slightly shorter than normal, and/or where the round itself has an overall length that’s on the short side of acceptable. It’s also possible to get the opposite - a round that is slightly long but still ‘in spec.’
When those two rounds are inserted into the same speedloader and then that speedloader is inverted onto a flat surface, the longer rounds hold the speedloader body a little high. The shorter rounds aren’t pushed up far enough to completely engage the locking cam around their rims and aren’t positively retained. When that speedloader is jostled just right, the rounds that aren’t held solidly will drop loose. (Sometimes that results in the complete emptying of the loader.)
Instead of doing that, I recommend that you hold the loader so that it’s pointing up and insert the rounds with the bullets pointing skyward. As you push in and turn the locking knob, jiggle the whole thing slightly. This allows the rounds to make positive contact with the body of the loader and allows them to work securely under the extractor. If any one round doesn’t lock securely you can feel it instantly; releasing the lock and relocking fixes the problem.
This technique ensures that the heads of the cartridges are positively seated in the speedloader base, giving the locking mechanism proper access to the rims. In nearly two decades of loading Safariland speedloaders in this manner, I’ve yet to experience an accidental release, even when intentionally trying to get it to happen.
SPEEDSTRIP TECHNIQUE
The SpeedStrip, Tuffstrip and other similar products are rubber strips that hold rounds by their rims. (SpeedStrip, like Kleenex, is a brand name that’s come to be used to refer to any such devices. It’s actually a registered trademark of Bianchi International.) They hold the rounds in a row, which makes them very flat and convenient to carry.
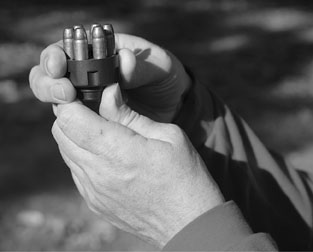
To prevent accidental release of the rounds, hold the loader so that it’s pointing up and insert the rounds with the bullets pointing skyward.
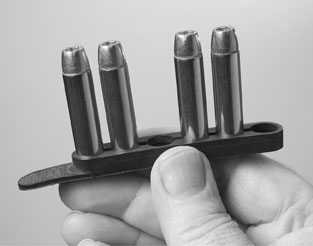
Carry only four rounds in the strip, leaving a blank space in the middle to use as a handling tab.


No matter how you wind up grabbing the strip, you’ll have a way to hang onto it.
Since they are only usable to insert two rounds at a time, however, they’re much slower and more dependent on fine motor skills than are speedloaders. To help compensate for their shortcomings, I have a specific way of configuring and using them.
First, I recommend that you carry only four rounds in your strips. Start at the tab end and load two rounds, leave one blank space, and load two more rounds leaving a leftover space at the other end. This provides a handling tab at each end and one in the middle.
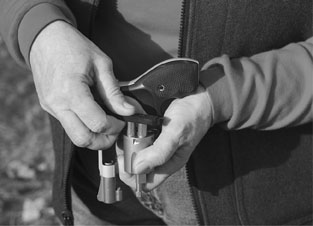


Push the rounds in, then simply ‘peel’ the strip off the case heads, allowing them to drop into the cylinder.

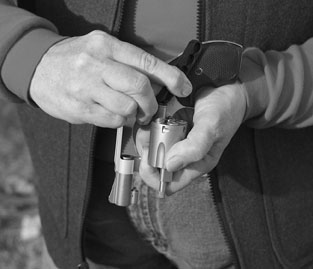
Do the same with the other two rounds.
No matter how you wind up grabbing the strip, you’ll have a way to hang onto it and sufficient space to get your fingers in to manipulate the rounds as they go into the cylinder. This makes a big difference when peeling the strip off of the rounds in the chambers.
Retrieve the strip (I prefer a back pocket or the watch pocket of a pair of jeans) and insert two rounds into adjacent chambers. Again, proprioception is your friend: simply bring the ammo toward the palm of the hand holding the cylinder, wiggle slightly to get the bullet noses started into the chambers, and push the rounds in. Then simply ‘peel’ the strip off the case heads, allowing them to drop the rest of the way into the cylinder.
If time permits, do the same with the other two rounds. I don’t shift the strip in my hand; I simply use the heel of my palm to push them into the chambers and then peel off the strip.
Now drop the strip and close the cylinder. Back in business!
LEFT HAND RELOADING
Most of my left handed students have found the following to be workable. Like the right handed URR, it uses the same principles of proprioception, gross motor movements wherever possible, and using the most experienced and dexterous hand to do the important task of getting the rounds into the cylinder.
Bring the right hand forward so that the cylinder can be pinched between the thumb, fore and middle fingers.
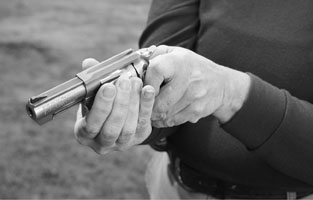
Pinch the cylinder between the thumb and fore and middle fingers.

Operate the cylinder release with the forefinger of the left hand.
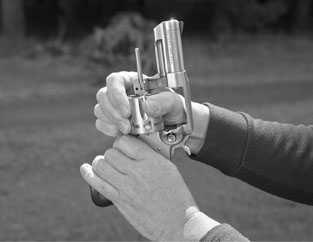
The cylinder is held firmly with the thumb and fingers of the right hand.
Using the forefinger of the left hand, operate the cylinder release. (I’ve found it helpful to use the side of my forefinger to do so, supported where necessary by the left thumb on the opposite side of the frame.) This is much easier with Ruger revolvers than either Colt or Smith & Wesson.
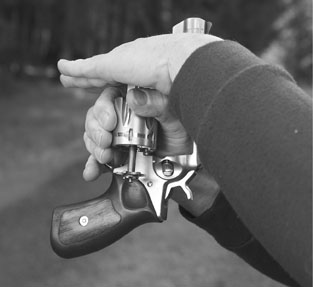
Strike the ejector rod only once.

Insert the spare ammunition.
As the cylinder unlatches, rotate the frame around the right thumb so that the cylinder window ends up at the base of the thumb. The cylinder should be held firmly immobilized between the thumb and fingers of the right hand.
Strike the ejector rod swiftly with the left palm, once only.
Rotate the muzzle toward the ground, retrieve the spare ammunition with the left hand and insert into the cylinder.

Pull the right thumb out of the frame and close the cylinder.

Return to two-handed grip.
Re-establish a firing grip; pull the right thumb out of the frame, and close the cylinder with the fingers.
Go back to a two-handed grip.
Like the right-handed universal revolver reload, this method is designed to avoid the critical stall points in the reload process and make the reload more efficient in critical situations.
PRACTICING THE RELOAD
There are a couple of key points when practicing the revolver reload. First, resist the urge to speed the reload up by taking shortcuts. I teach a completely different reloading technique to competition shooters, where the possibility of a reloading failure doesn’t offset a small speed advantage. (More precisely, the speed advantage offsets the small chance of a failed reload process.) In a defensive situation, however, the tenths of a second saved are not worth a botched reload.
I lost an important match one day because I was using a competition reloading technique, one that was optimized for speed above reliability. I’d done it thousands of times, but on this one occasion I was within striking distance of a very good shooter and going into a stage where I knew a particular shooting ability would give me an insurmountable lead. When my super-fast reload left me with a case under the extractor, I ended up a full sixty points behind the guy! That event caused me to understand that if it had happened in the middle of a defensive shooting I might not survive. Resist the urge to take shortcuts that reduce the reliability of the process.
Second, practice in context. We’ll talk more about this concept in Section Two, but right now it’s sufficient to suggest that you practice the reload in live fire as much as possible. I used to practice my reloads dry - at home using realistically weighted dummy rounds - in order to prepare for competition. I’ll bet I did ten thousand repetitions to become as fast as I could.
The problem was that I didn’t link that athletic skill with the recognition of the need to reload, and when I shot in a match it would take me a few fractions of a second to go from the realization that I was out of ammunition to the actual act of the reload. The stimulus of the suddenly empty gun was missing in my dry runs. When I switched from dry reloads to incorporating as many reloads as possible in live fire, I was finally able to make the necessary link between the stimulus and the response. You’ll read a lot more about this concept later; the important thing is to practice reloads in live fire as much as possible.
ONE-HAND RELOADING
Reloading the revolver with one hand is an advanced skill, in the sense that it’s not one that has widespread application. The only reason you’d ever want to reload the revolver with one hand is because your other hand is inoperable for some reason.
It’s possible that during your response to an attack that you could sustain an injury to your hand that renders it unable to function well enough to participate in the reload process. It’s a slim possibility that you’d be injured and you need to reload your revolver, to be sure, but it’s plausible that it could happen.
A more likely scenario is one where you’ve injured your hand or had a recent surgical procedure that has left it unusable for a period of time. Many surgeries, such as the common procedure to correct carpal tunnel syndrome, can and do take one hand out of service for a period of time. This is, I believe, the most rational reason to at least be familiar with these techniques.
Because reloading with one hand isn’t what one could call a core skill, I wouldn’t recommend spending a lot of time on practice. Running through the procedure once or twice every so often, though, will help you maintain at least a passing acquaintance with the process.
Right hand only
You’ve fired your last shot and recognized that you need to reload your revolver. Finger off the trigger!
Bring your thumb up to the hammer spur as you would if you were cocking the gun to single action. (If you’re using a hammerless gun, put it on the back of the frame where a hammer spur would be.) Bring the gun back to your body and rest the butt of the gun somewhere between the top of your belt and the bottom of your sternum. This is the key to doing an efficient one-hand reload: anchoring the gun to your body. Having the butt contact your body, actually resting there, gives you a solid point around which you can maneuver your hand. This is critical - if the butt of the gun is hanging in free space, it’s a lot harder to do the manipulation necessary to complete the reload. WIth the butt anchored, your hand can move anywhere on the gun, wherever it may need to be, without fumbling.
Move your hand up on top of the gun, so that the web of your thumb and forefinger is on the top strap, your thumb is touching the cylinder release, and your fingers are touching the cylinder on the opposite side. You may find that it’s necessary to rotate the gun, using the butt as a pivot point, to make this easier to manage.
Operate the cylinder release with your thumb while simultaneously pushing the cylinder open with your fingers. As the cylinder opens, push your fingers into and through the frame opening.
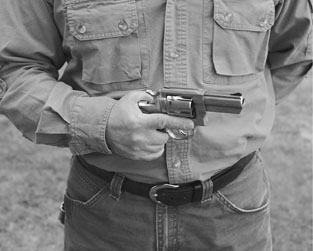
First step: Finger off the trigger!

This is the key to doing an efficient one-hand reload: anchoring the gun to your body.
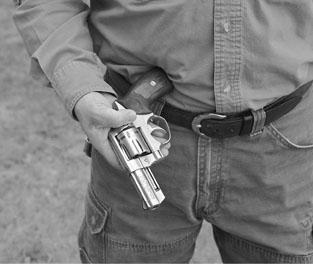
Move your hand up on top of the gun.
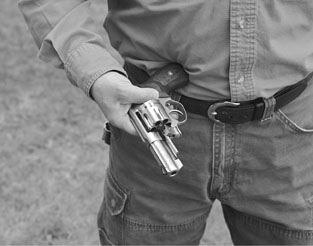
Operate the cylinder release with your thumb while simultaneously pushing the cylinder open with your fingers.

As the cylinder opens, push your fingers into and through the frame opening.

Position your thumb on the ejector rod, then push the ejector rod - swiftly and fully - one time only.
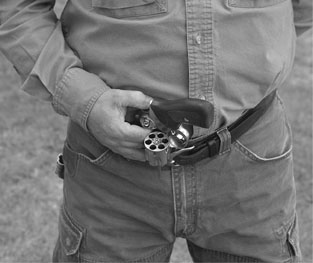
Rotate the gun and insert the muzzle into your waistband.
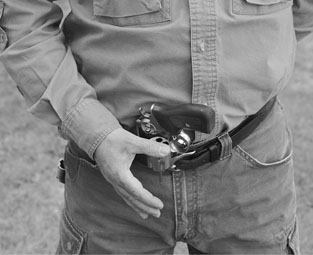
Check for any un-ejected cases.

Insert your spare ammunition.
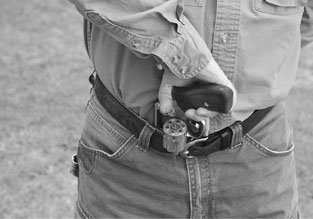
Twist your hand around to get an approximate firing grip.
The gun should now be held by the top strap with your fingers wedging the cylinder in the open position. Position your thumb on the ejector rod, and lift the gun free of contact with your body.
Push the ejector rod swiftly and fully, one time only. With a two-hand reload the chances of a case-under-ejector jam increase greatly with each successive ejection, and it’s worse with one hand because the ejector isn’t being operated at the same velocity. Resist the urge to pump the ejector rod; a healthy shake of the gun as you depress the ejector will help accelerate the casings free of the cylinder.
Rotate the gun so that the muzzle is pointing down and insert the barrel into your waistband. I find it helpful to put my thumb on the barrel, pointing in a parallel direction, to help guide the gun. The cylinder needs to be on the outside of the waistband.
Let go of the gun and sweep your hand over the top of the cylinder, feeling for any un-ejected cases. If you find any, pluck them out and drop them.
Get your spare ammunition, in whatever form you’re using, and insert the rounds into the cylinder.
Twist your hand around so that you can get an approximate firing grip on the gun, and pull it free of the waistband.
Twist the gun clockwise into a natural position, bring the cylinder into contact with your waistband, and rotate the gun counter-clockwise to close and latch the cylinder. (Do not flip the cylinder closed - I don’t care how many times you’ve seen it on TV.) You’re reloaded and ready to go.

Rotate the gun to close and latch the cylinder.
Left hand only
After your last shot, bring your finger off the trigger and pull the gun back to contact with your body.
Rotate the gun to the left as you bring your hand higher on the backstrap of the grip. Your thumb should be pointing in the general direction of the muzzle and contacting the cylinder.
The side of your forefinger should be contacting the cylinder release. As it operates the release latch, the thumb pushes the cylinder open.
Once the cylinder is open work your hand forward so that you’re holding the gun by the topstrap, with your thumb under the barrel and contacting the ejector rod.
Push the ejector rod swiftly and fully, one time only. Remember that the chances of a case-under-ejector jam increase greatly with each successive ejection, so resist the urge to pump the ejector rod. A healthy shake of the gun as you do this will help accelerate the casings free of the cylinder.
Invert the gun and push the muzzle down and into your waistband. The cylinder should be on the outside of the waistband.

Pul the gun back to contact with your body.

Rotate the gun. Thumb should be contacting the cylinder.
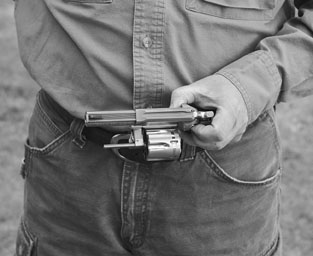
Operate the cylinder release with the forefinger, and push the cylinder open with the thumb.
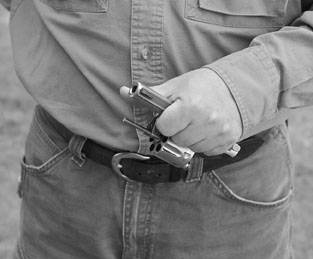
Work your hand forward.
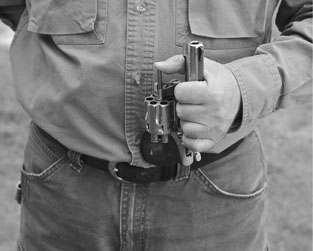
A healthy shake of the gun as you push the ejector rod will help accelerate the casings free of the cylinder.

Invert the gun and insert the muzzle into your waistband.

Check for any cases that failed to eject, then insert your spare ammnition.
Sweep your fingers over the top of the cylinder and feel for cases that failed to eject. Pull out any that you find, retrieve your spare ammunition and insert the rounds into the cylinder.
Get a firing grip on the gun, pulling it out of the waistband.

Re-establish firing grip and pull gun from waistband.
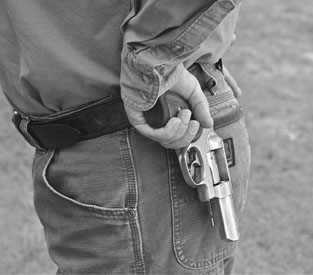
Rotate the gun clockwise, bringing it to your backside.
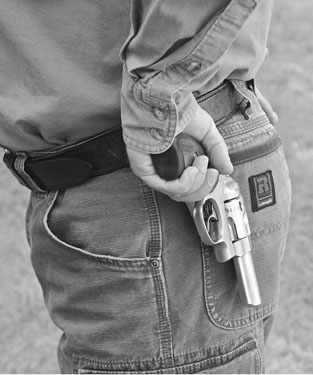
Close and latch the cylinder.
Twist the gun clockwise so that the cylinder is on the inside, and bring it to the backside.
Rotate the gun to close and latch the cylinder. Again, don’t flip the cylinder closed!
IMPORTANT POINTS
Having the gun butt in contact with the body makes it easy to ‘walk’ the hand over the gun to perform the necessary functions. Without doing that, the gun has to be juggled in the hand, making it more likely that the gun will be dropped. By bringing the butt into contact with the body you stabilize it, making it possible to reach any part of the gun easily. Use that solid contact point to your advantage.
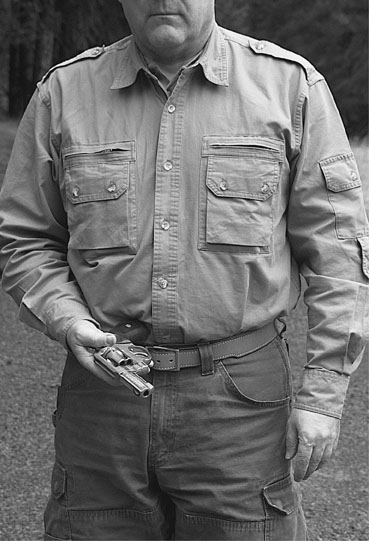
Author’s gun position for right-hand-only reload.
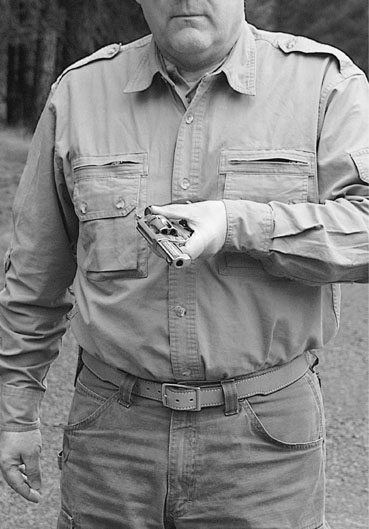
Author’s gun placement for left-hand-only reload.
When doing a right-hand reload I tend to place the butt on top of my belt. This seems to give me a good anchor without having to push the gun into my belly, and puts it at a natural and easy to manage height and angle.
When doing the left-hand reload, though, I tend to bring it closer to my sternum. The butt seems to nestle in that little hollow at the base of the sternum, which (for me) better suits the different angles that the left hand needs to execute. As you’ll learn in later chapters, I’m usually a big proponent of consistency in technique, but in this case I think the deviation is justified by better control and more efficient movement.
Using this method you’ll find that even the Dan Wesson revolver, with its cylinder release on the crane in front of the cylinder, is not a problem to reload. I’ve found that Rugers are the easiest to manage one-handed, largely because operating the cylinder release is an easily performed pinch that is helped by the support by the fingers on either side of the frame. The difference is quite small, however, and may be due more to hand size than anything.
Keep your mind on the task at hand when doing any one-handed manipulation. It’s very easy to let a finger stray into the trigger guard when closing the cylinder, which is a condition you want to avoid. Pay attention to where your fingers are at all times and once the cylinder is closed pay careful attention to what your muzzle is covering as you come back onto target.