Chapter 15
DRAWING THE REVOLVER
Most people think of the drawstroke in terms of getting the gun into action as quickly as physically possible. There are trainers who have said that the first person to get his gun out of the holster is the winner; many people spend inordinate amounts of time working to perfect the draw, to shave tenths of a second in order to beat a shot timer.
To a large extent this focus on sheer speed of the draw is an artifact of an overly competition-based approach to defensive shooting. The draw is something which can be timed, is too often timed, and thus commands more attention than may be appropriate.
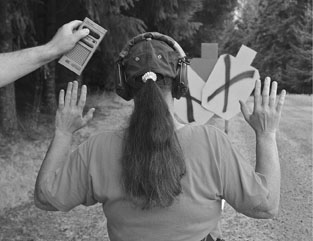
Just because something can be measured doesn’t mean it’s important to measure!
As I said in an earlier chapter, very often in videos of actual attacks it’s not drawing the gun which appears to waste the most amount of time - it’s the decision-making which leads up to the initiation of the draw.
None of the foregoing should be construed to mean that you should bring the gun out of the holster leisurely; quite the opposite. It’s only that the draw needs to be kept in perspective given all of the other things that factor into your response.
REMEMBER CONSISTENCY?
The draw stroke should be consistent with all of your other gun-handling skills. Remember when I said that consistency is a big part of efficiency? The drawstroke is a good example.
The physical part of the draw begins with getting a solid, firm grasp on the revolver. If you have covering garments, sweep them out of the way to allow your hand to grab the grip of the gun without getting anything caught.
There many techniques suggested to move clothing out of the way, but I’m not going to ask you to over-think it. Simply figure out how to get your hand to the gun without grabbing any clothing along the way, and do that. Use your other hand, if necessary, to help you get the garments out of the way. Think not in terms of what to do with the clothing, but simply how to get your hand to the gun. I’ve found that students figure this out much faster without me introducing convoluted, choreographed maneuvers.

Figure out how to get your hand to the gun without grabbing any clothing along the way, and do that.

Once you have that grasp, lift the gun straight out of the holster. Bring it as far out of the holster as is comfortable
Once you have a solid grasp on the gun, defeat any retention mechanisms that your holster might have. I’m personally not a big fan of retention holsters for a concealed revolver, but if you are that’s fine; just be sure to practice smoothly unlatching or unsnapping or un-whatevering the thing as part of your draw.
Once you have that grasp, lift the gun straight out of the holster, parallel to your body so that you are not pointing it at any part of yourself. Bring it as far out of the holster as is comfortable; you don’t need to do tendon damage to your elbow, just bring it as far out of the holster as you are able to comfortably.
At this point orient the gun (point the muzzle) directly toward the target. You’ll notice that you’re now in a position that’s very close, if not identical, to the high compressed ready position described earlier.
Here’s where consistency comes in. If you’ve been practicing your grasp and extension, you’re already accustomed to presenting the gun from this position. Your draw stroke is now automatically integrated with that part of your practice, and you’ll see in the chapter on dealing with multiple threats how this integration proves useful.
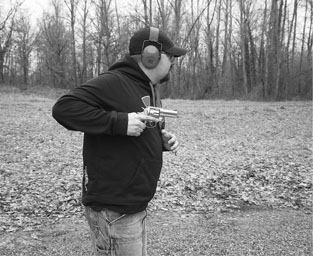
Orient the gun directly toward the target; you’re now in a position that’s very close, if not identical, to the high compressed ready position.
Once your revolver is oriented on target, simply extend it into and parallel with your line of sight. You’re now ready to shoot, or to take the additional time and effort to use your sights.
Practice this in discrete steps first, then make it one continuous movement. Slowly at first, concentrating on where the gun is going; you’ll find that you speed up naturally as you get used to the movements. Don’t try to go faster until you can do it without error, without fumbling, and without pointing your muzzle at your own body.
This consistency in presentation keeps you from making a draw that messes with your ability to get the gun oriented on target. If you come out of the holster and make a bee-line to the target, you’re back to the problems we talked about earlier; the gun is coming up into your field of view at the same time you’re reaching extension, which forces you to track the gun visually and stop its upward movement, then correct the inevitable over-shot to bring the gun back into alignment with the target.
If instead you practice the drawstroke as a logical development of the extension, you’ll come out of the holster into the high compressed ready, then extend on the target - all in one fluid movement that automatically puts the revolver in a line that is parallel with your line of sight. The gun is already aligned on target, and all you have to do is reach extension; it’s already there and waiting for the trigger stroke.
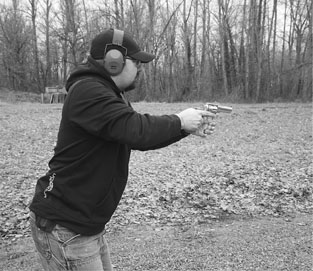
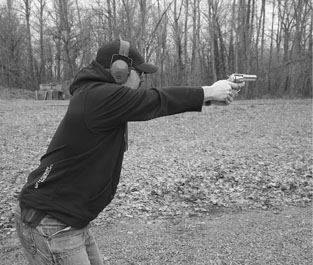
Once your revolver is oriented on target, simply extend it into and parallel with your line of sight.
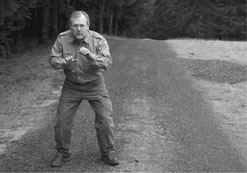
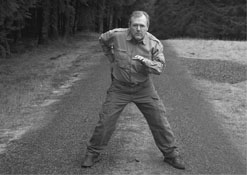

As you initiate your draw, simply take a large step, moving at least one body-width to one side. If you can move more than one body-width in one step, so much the better.
The key is to draw the gun through the high compressed ready and extend on the target.
FREE TIME TO DISTRACT YOUR ATTACKER
The drawstroke takes time. Not a lot of it, of course, but it’s time that you could be multi-tasking in a way that would keep you safer.
If your attacker is facing you, and you move very rapidly to one side or the other, he’ll need to shift his gaze to track you. Human tracking of rapid movement is very complex, but revolves around the brain trying to keep the target centered on the fovea22. If the movement is rapid and of sufficient angular distance, the brain has to first catch up then stop itself from over-correction23. This all takes time, and if the target stops suddenly it causes disruption in the brain’s ability to predict where the target actually is going to be.
It’s not a lot of time or a lot of disruption, mind you, but it does happen and you can take advantage of the phenomenon to help affect your attacker’s ability to present a lethal threat to you. As you initiate your draw, simply take a large step at right angles (perpendicular) to your target and move at least one body-width to one side. Make the movement very rapidly, and if you can move more than one body-width in one step, so much the better.
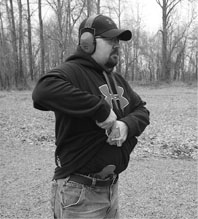
Bringing the gun up out of the holster from an appendix position. Note barrel is parallel to the body for safety and shooter is careful not to bring the muzzle higher than the hand that is pulling the covering garment away. (Holster courtesy of Crossbreed Holsters.)
Your attacker’s brain has to react to your sudden, unanticipated movement, figure out where you’re going, direct his eyes to catch up to you, and then react all over again when you stop suddenly. That’s activity during which he can’t as easily be hurting you.
Again, it’s not a lot of time - but in your case it’s free! You’re already using that bit of time to draw your revolver, and if you move at the same time you draw this slight distraction ends up costing you nothing.
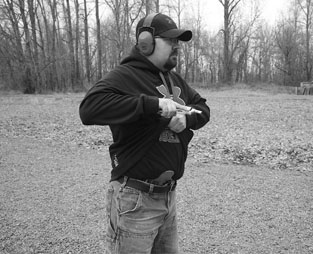
Once the gun is out of the appendix carry, orient the muzzle to the threat. Note that the gun is on its side, but the muzzle is on target.
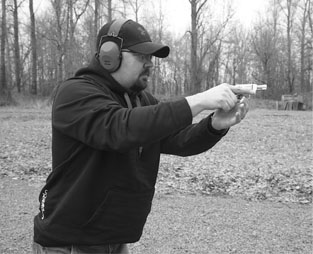
As the arm extends, wrist rotates to bring revolver into upright shooting position.
Do not be mistaken: this movement on your part is not going to magically keep him from shooting or stabbing you, but it’s going to make doing so a little harder. Looked at in financial terms, you’ve made a tidy profit without spending a cent.
When you practice drawing your revolver, move rapidly off the line of attack as soon as you initiate your draw stroke. Make sure that the movement is very sudden, that it’s at right angles relative to the target, and that it’s at least one full body-width - more if possible.
Some trainers call this “getting off the X,” but in this book I’ll refer to it as “lateral movement.” You should integrate lateral movement with your drawstroke every time you’re on the range practicing or training. Remember the old adage - free is a very good price.
SPECIAL CASES
When dealing with drawstrokes where the gun is other than on the hip, it’s useful to go back and pay attention to the basic concepts: draw with the boreline parallel to your body so that you’re not pointing the revolver at yourself, then orient the muzzle directly toward the threat.
Appendix carry
Appendix carry is a good example. Appendix carry, where the gun is inside your waistband between your navel and hip, is getting very popular. It’s quite fast to access and is very concealable (if one’s wardrobe allows it).
As the revolver comes out of the holster, keep it pointed straight down and parallel to your abdomen. This requires you to bend your wrist rather severely. Now rotate the gun directly toward the target: if you’re a right-hander, this means rotating your wrist and forearm counter-clockwise. The revolver will now be on its side with the muzzle pointing at the target; simply extend as you bring the gun into and parallel with your line of sight. As you do so, your wrist and forearm will now rotate clockwise back into a normal shooting position.
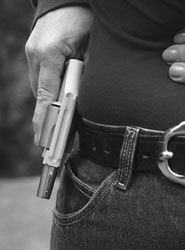
When drawing from a pocket, pay attention to the angle of your muzzle and your leg when the gun comes out; make sure barrel is parallel to leg and not pointing at your foot.
The same general procedure is the same if you choose to carry in a cross-draw manner. Cross-draw is really nothing more than appendix carry on the weak side, and the same concepts apply.
Pocket carry
Drawing from a pocket isn’t all that different from drawing from a belt holster. As you reach into your pocket make your rapid lateral movement. This will usually result in your leg being at an angle to your body, and the tendency is to draw the gun out and orient it vertically as you clear the pocket. If you do so, the muzzle will be pointed toward your leg! Remember: keep the gun parallel to your body. This means keeping the gun at the same angle as your leg until you get it oriented on the target.
I find that moving toward the side on which your gun is pocketed tends to result in a less severe angle and an easier draw as a result, but you need to practice moving to either side. Get used to thinking about keeping the gun parallel until it has become a habit.
PRACTICE THE DRAW FROM REALISTIC POSTURE
At the moment you decide to draw, your body’s natural reactions are all but certain to have been activated. You’ve had a flinch response where your hands have started moving toward your head, you’ve oriented (physically/visually/mentally/emotionally) toward your target, and your center of gravity has dropped to put you into something resembling a shallow crouch. These are the circumstances under which your drawstroke is likely to happen.
If that’s the case, how much sense does it make to practice drawing your gun while standing straight up? Unless you’ve got some warning about the impending attack (in which case why are you still there?), you’re quite unlikely to be standing perfectly erect while you drawing your gun. Instead you should be training under the conditions you are likely to be when attacked: hands somewhere between your waist and your head, knees bent, body weight forward, squared off to the threat.
This is part of realistic training. Training and practicing your techniques under circumstances in which you’re unlikely to find yourself only makes your actual response less sure, less efficient. Realistic training in this case means drawing your gun in as close an approximation of your actual position as possible. Bottom line: if you’re standing upright when you draw your revolver, you’re not training realistically!

Practicing a realistic draw means doing so from a lowered center of gravity, as you would when actually attacked.
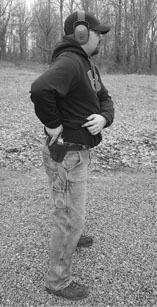
This upright stance, common to competition shooting, is not the position in which you’re likely to find yourself when surprised by an attacker. Why practice this way?
HOLSTER CHOICE AS A FUNCTION OF YOUR NATURAL REACTIONS
Whether from natural reactions or trained responses, you should assume an aggressive, forward-leaning posture even before starting to draw your gun. As I’ve mentioned, if you’re serious about training realistically you’ll adopt that posture during all of your practice exercises.
If your holster choice is one of the belt-carry types, positioned anywhere other than your appendix, that natural position is going to affect how you draw the revolver, and some holsters don’t work well under those conditions.
This is because a gun carried on a belt tends to stay in the same place relative to the hips, regardless of the position of the upper body. The shoulders, which carry the arms, move somewhat independently relative to the hips.
The canted holster works with the body’s natural reactions.
The instinctive threat reaction posture we’ve been studying, with the lowered center of gravity and the upper body lean, moves the butt of the revolver backward relative to the arms. Because the shoulders are forward relative to the holster, you’ll have to actually pull backwards to get the gun out of the holster. That’s not the direction in which your arm is used to operating, or where it has the most strength. There’s also an emotional factor, brought about by the fear response: we tend to want to move the tool toward the threat, not away from it.
If you pick a straight-drop holster, that is one without a forward tilt, it will be less efficient and less intuitive to draw smoothly from this threat response posture. You can certainly make it work on a nice, threat-free range, but what about when your life is really on the line?
In contrast, the forward canted holster - often referred to as the “FBI cant” - will release relatively easily from that forward-leaning position. It doesn’t work as well when you’re standing straight up, which makes it a design that’s not in favor with competition shooters. Under the conditions in which it is likely to be needed, however, it is more intuitive and therefore more efficient.
The canted holster puts the exit path of the gun into line with the position that the body is likely to find itself during an attack. It works better with both the body’s natural reactions and your trained responses than the straight holster does.
BEYOND THE HOLSTER
Remember that I said your body’s natural reactions affect how and what you train? They also affect what you train with. Any piece of hardware you choose to carry, whether it’s a gun or a holster, needs to work well with what your body is going to do naturally.
The revolver fits that criterion very well, because it needs no manipulation other than the trigger in order to shoot. It is an efficient design in terms of being able to react to a sudden threat. The forward canted belt holster is in the same category.
Can you use a straight-drop holster for defensive encounters? People have certainly done so over the decades, but you now know that your hardware choice affects your efficiency. The more efficient your response, the less time that you’ll be exposed to danger and the less chance you’ll have of being injured - or worse - during the attack.
Don’t allow yourself to be goaded into your holster selection based on what anyone else uses. If you understand your body’s natural reactions, and understand the resulting lowered/leaning stance, you’ll be able to make the proper choice.