Chapter 17
AFTER SHOOTING — ASSESS!
You may have heard this before - it’s common enough to be almost trite - but you live in a 360-degree world. If you’re unlucky enough to need to shoot a criminal attacker, you’re going to need to learn to deal with all the other things in your environment that may have an impact on the incident: bystanders, law enforcement, witnesses, other injured people, more threats, and so on.
STEP ONE: BREAK THE THREAT FIXATION AND CLEAR THE FIELD OF VIEW
I’ve been speaking of the body’s natural threat fixation, which is a combination of the physical reactions and the emotional (fear) reactions to a lethal attack. The body wants to locks its vision and its attention on the threat in order to be able to react to it, to protect itself.
Once you’ve shot and that threat has ceased - probably in the form of falling down - it’s time to break that natural fixation and prepare to assess your environment. The first step is to get the gun out of your line of vision, which keeps it from blocking your field of view and removes it from your immediate attention.
Simply bring the gun back to the high compressed ready position you’ve been practicing. This brings it to a position you’re accustomed to, one from which you can extend and engage if necessary (again, consistency!). Make sure that you practice bringing your finger out of the triggerguard and placing it on the frame of the revolver as you come back to the ready.
This also clears your field of view so that you can actually look at your environment. Some trainers suggest that you simply swing the gun from side to side, or slightly lower it and do the same thing. The trouble with those ideas is that the combination of the gun and your arms blocks anywhere from a third to more than half of your visual span.
When your gun is held at arms length, even if slightly lowered, you can’t see the ground in front of you; you probably can’t see your threat on the ground, where he may still be a threat; you won’t see bystanders or witnesses cowering low; and you might not see the police officer crouched behind the water fountain ordering you to drop your gun (and you’re pointing the thing at him too!).
Bringing the gun back to the high compressed ready eliminates those problems. You now have a clear field of view, top to bottom and side to side, and you can examine your environment in detail without needing to point the gun everywhere you look.

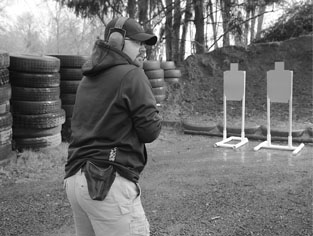
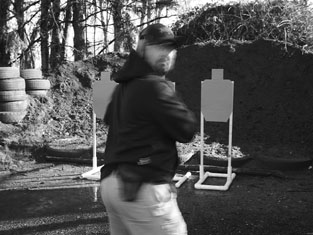
After shooting, bring your gun back into that high, compressed ready position - clearing your field of view and helping to break the threat fixation.

The commonly-taught lowered ready doesn’t completely clear your field of view and is not consistent with any other technique you’ve learned.
STEP TWO: START SEARCHING
When you assess, you’re doing a visual search of your environment. This means that you actually need to look at things and people in order to determine if they are in some way connected to your attack. An assessment is a search, and you can’t do an effective search if your brain isn’t engaged.
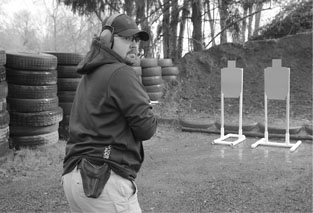
You’re going to need to turn your head in order to survey your environment. Keep the muzzle of your revolver under control; I suggest that you keep it roughly pointed in the one direction you know it might be needed again: at your threat.
As you turn your head, make quick mental notes about what you’re seeing, and mostly what you need to see are people. You may decide to look for something to hide behind while you reload your gun, or simply to get out of the proximity of your threat. Doing the assessment thoroughly will help you find that cover, but you need to actually see things. A quick look around will only produce blurs.
This is why I say that the assessment is a search. A search means that you look for things, and you actually see and think about what you’re looking at.
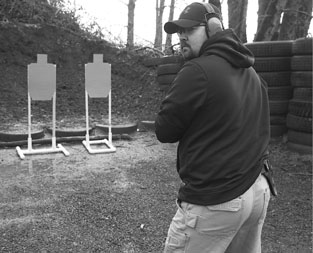
Don’t forget to turn to your other side and check what’s over there, too!
STEP THREE: LOOK BEHIND YOU
Remember what I said about the 360 degree world? Now would be a good time to integrate that into your assessment.
You’re going to need to turn your head in order to survey your environment. Keep the muzzle of your revolver under control.
A search means that you look for things, and you actually see and think about what you’re looking at.
You’re going to need to look at the environment all around you, because you don’t know where anything is going to be relative to your incident. Something very important, like Mr. Police Officer or another Mr. Bad Guy, could be directly behind you. You need to turn your head all the way around, from one side then the other, in order to truly see what’s behind you.
Don’t forget to turn to your other side.
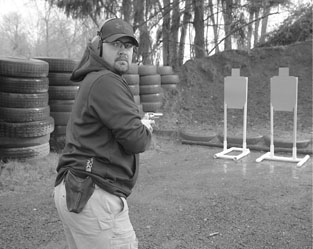
Something very important, like Mr. Police Officer or another Mr. Bad Guy, could be directly behind you.
The assessment is a search - and you can’t search if you’re moving too fast to actually see anything!
Many trainers and schools teach a watered-down form of assessment, one where you simply wag your head from side to side; not only does it make the world go by too quickly for you to actually see anything, it also doesn’t allow you to look at the whole picture. It’s not realistic in any manner; don’t do it! Look all around, and take the time to actually look at things.
SAFELY, OF COURSE
How do you keep your gun from pointing at things it shouldn’t be pointed at while you’re doing this? First, keep it roughly on the threat you’ve just engaged. Depending on your level of torso flexibility you may be able to do so by simply turning your head and shoulders all the way around to look behind you. If you don’t have that flexibility (as I get older I find mine diminishing), it’s okay to move your feet slightly to allow the shoulders to pivot as necessary.
PRACTICING THE ASSESSMENT
It can be a bit un-motivational to practice this on a range, where you don’t have a lot of people (if any) or anything interesting to look at. Give yourself a challenge: look to see if anyone else has come in behind you; look to see if doors have opened or closed; look at the lights in the room next to the range; check to see if any cars have come or gone; or perhaps if birds have landed on the gravel. On any range there are things to look at, if you push yourself to do so.
If you’re using a public shooting area out in the forest, say on Forest Service or BLM land as is common in the West, this may be both an exercise and a safety strategy. Many assaults have happened in such areas, and my own state has seen a couple of murders over the years by thugs who followed a hapless shooter into the woods with the intention of stealing his guns. In those areas the assessment is actually useful during practice, making it a two-for-one investment: you get needed practice and you keep yourself safe at the same time!
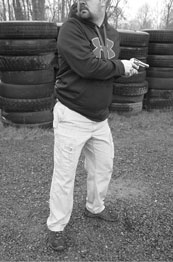
If necessary, move your feet to allow a full 360-degree movement. Keep your muzzle under control; don’t let it follow your eyes!
HOW LONG SHOULD IT TAKE?
One of the questions that comes in nearly every class I teach is, “How much time should it take me to do an assessment?”
The answer is, “I don’t know.”
The speed of the assessment, how rapidly and thoroughly you examine your environment, depends on the environment itself. If you’re in the middle of a largely deserted parking lot with most people some distance away, your assessment is going to move a lot more rapidly than if you were in the middle of the mall with lots of people and furnishings around. If you have more to look at, it’s going to take you longer to do the assessment. If you have fewer things to look at, it will take less time.
Assessment is a procedure, not an action; it has a purpose. If we tried to attach an arbitrary time for its completion it would no longer have a purpose other than to make the time. The assessment is a search, but a search with a defined purpose. Practice it thoroughly, and don’t give into the temptation to make it a quick head wag or succumb to the notion that it must be completed on some sort of arbitrary schedule.
In a later chapter, we’ll talk about using the other half of the assessment process to deal with additional threats in your environment.